
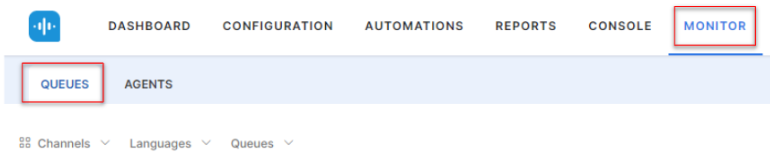
To access the Monitor section, you must be an Administrator or Supervisor; or have the Monitor Console – permission set to Yes. See Role Management for more.
The Monitor tab lets you monitor live conversations between agents and customers and displays four views: Queues, Agents, Interactions, and Service Levels.
- The Queues section displays the conversation summary between agents and customers per queue. You only have access to the queues you are assigned to; and to the agents assigned to the same queues as you.
- The Agents section lets you view agent performance metrics and monitor agent-specific live conversations. Listed agents belong to the same queues you are also assigned to.
- The Interactions section displays all interactions currently live in SmartAssist and assigned to agents on the CONSOLE.
- The Service Level section displays all service levels configured for voice and chat channels.
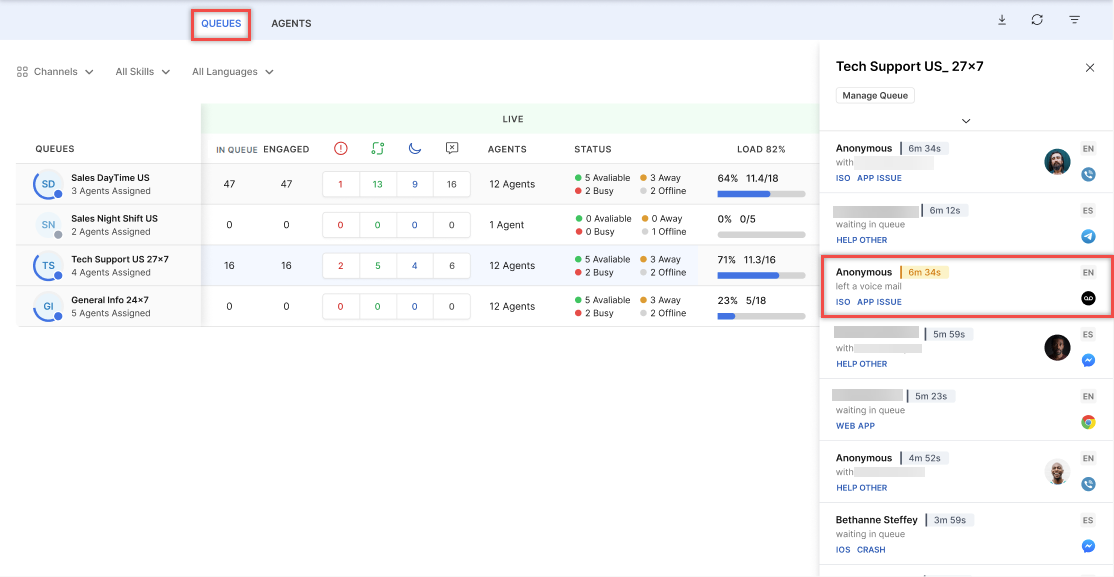
Queues
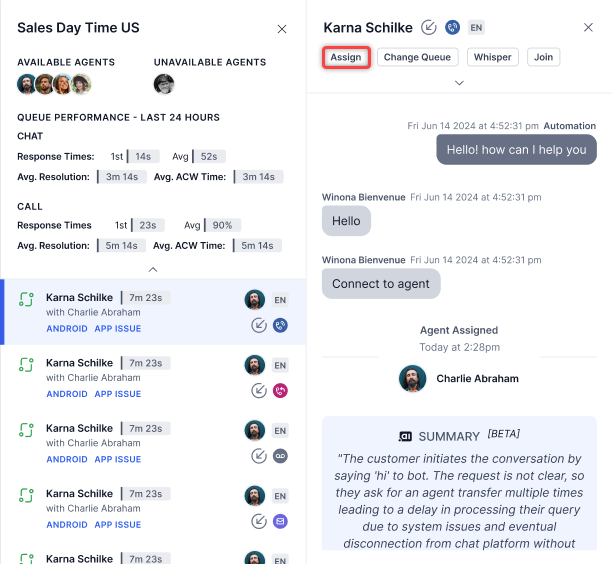
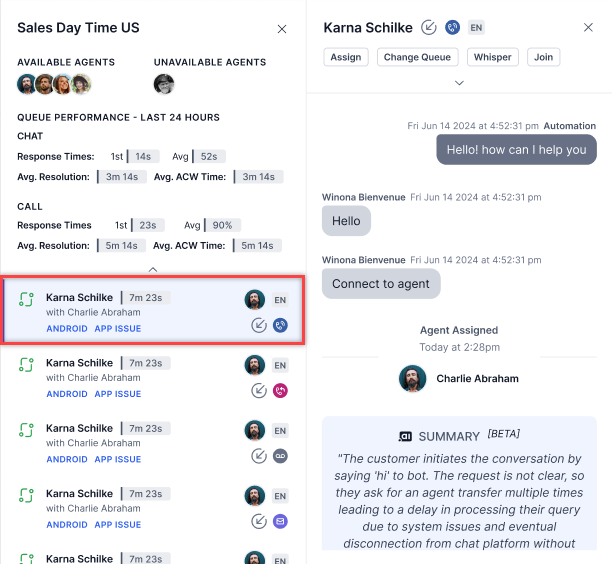
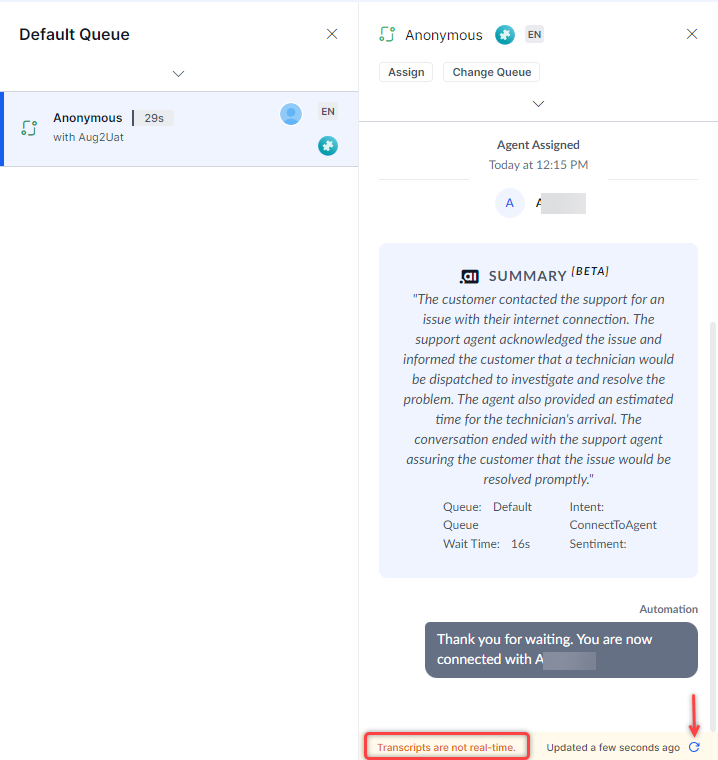
In this section, you can see all the queues to which you are assigned. The number of conversations waiting to be picked up, the number of conversations that are already engaged, and a summary of agents assigned to a particular queue along with their current status. In addition to the above details, the manager can see the average wait time, max wait time (an indicator of peak load handling capacity), and drop-off rate.
Clicking the sort icon allows you to sort the columns in ascending/descending order. The default sorting is by Queue Name.
To monitor the agents:
- On the Monitor tab, click the Queue tab. On the left menu, click a queue that you want to view.
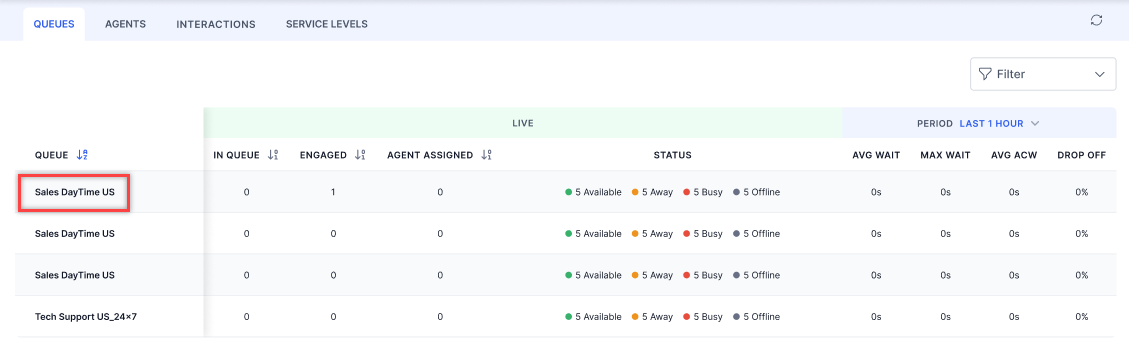
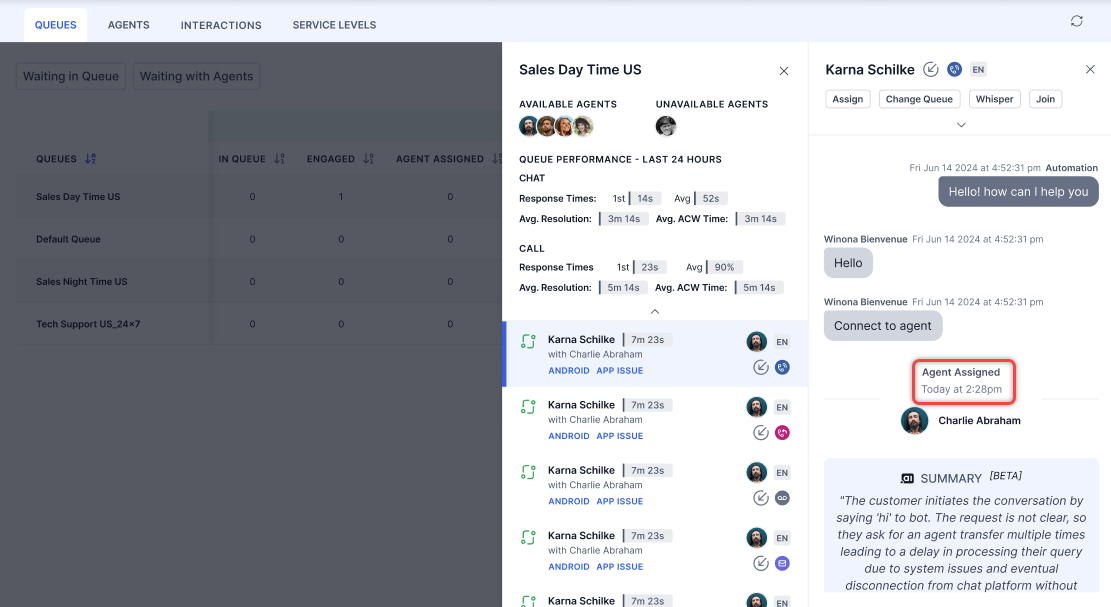
- The queue screen appears as shown below (Chat, Email, and Call):
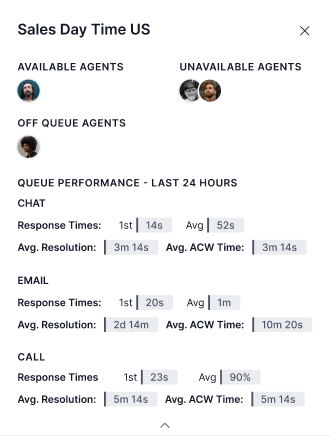
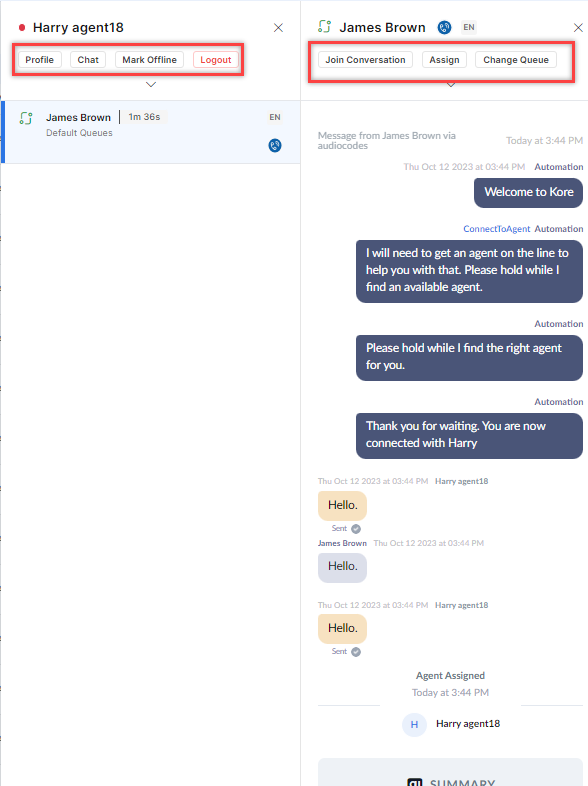
- Click the agent name. The detailed screen of the agent conversation opens up on the right.
Chat, Messaging, and Voice:
The assigned agent’s name is shown immediately upon assignment, even if the agent has not yet sent a response.
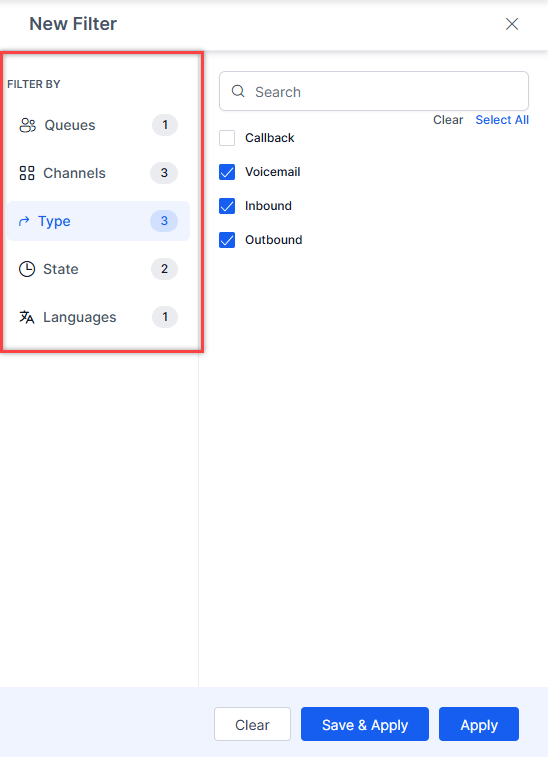
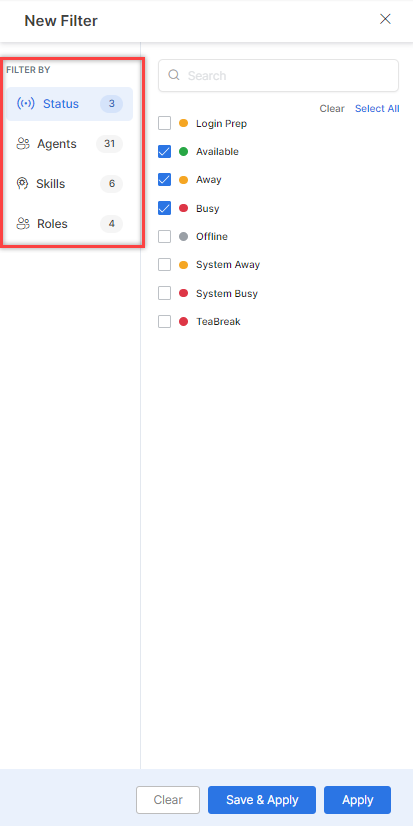
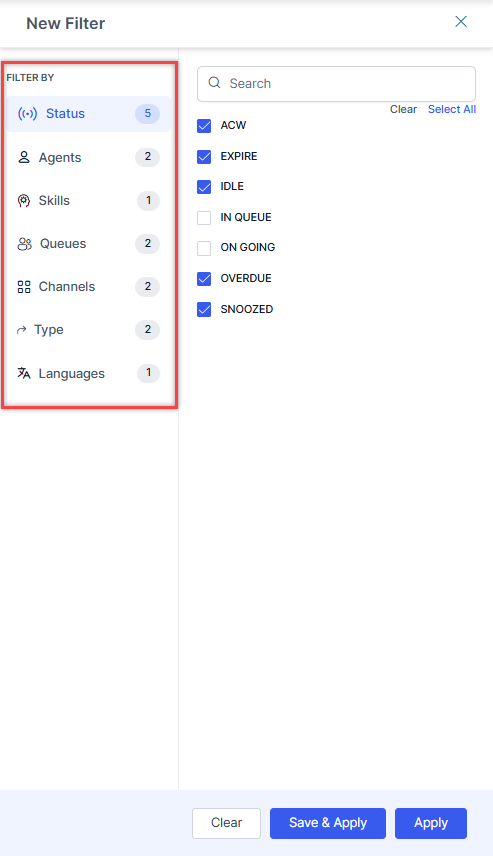
Filter
Create Filter
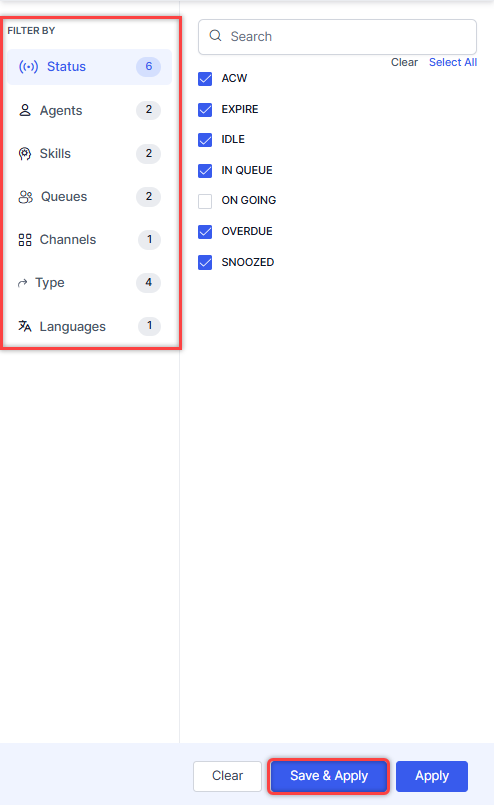
- Click the Filter button.

- Click New Filter.

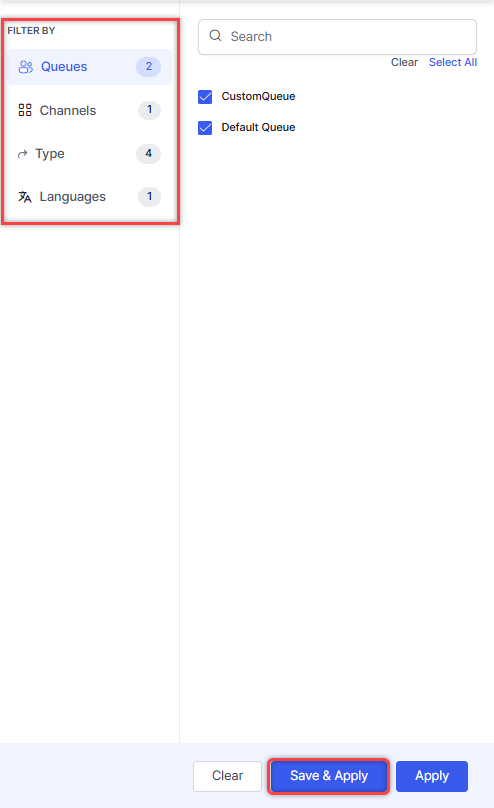
- Select the Queues, Channels, Type, State, and Language.
Select from the below available options:- Clear – Clears the selection.
- Save & Apply – Saves the filter, and it appears when selected.
- Apply – Applied for one instance and not saved.
- Click Save & Apply.

- On the pop-up window, enter a name (up to 20 characters) for the filter and click Save & Apply.

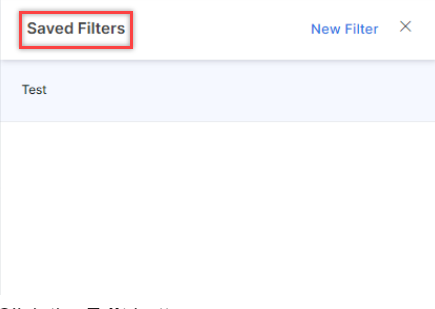
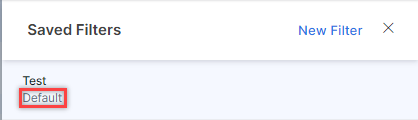
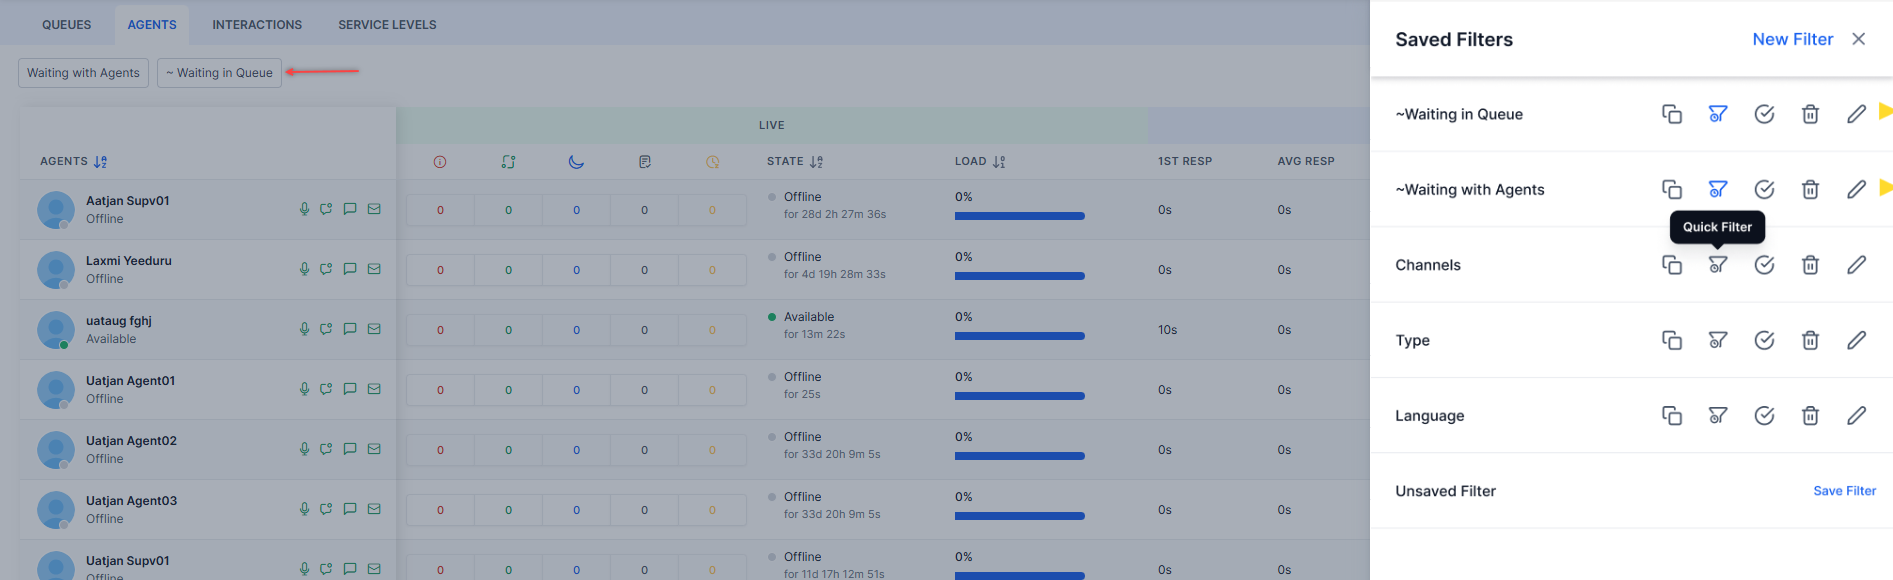
A confirmation message is displayed, and the filter is created. - Click Saved Filters. By default, the system shows the following:
- The Waiting with Agents and Waiting in Queue quick filters are pre-selected. These filters are editable and can be deleted.
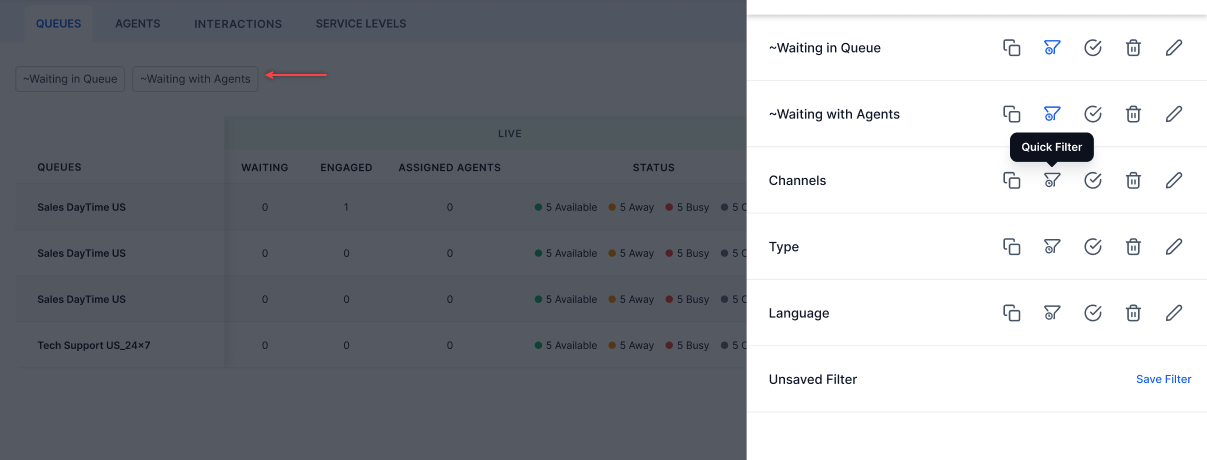
- You can select up to four quick filters. Quick filters appear along with unsaved filters.
- If a filter is set as the default but not selected as a quick filter, the system still treats it as a quick filter.
- You cannot disable a quick filter while a default filter is applied. To disable the quick filter, first remove the default filter.
- The Waiting with Agents and Waiting in Queue quick filters are pre-selected. These filters are editable and can be deleted.
Edit Filter
Steps to edit a filter:
- Click the Filters tab. The Saved Filter name appears.
- Click the Edit button.
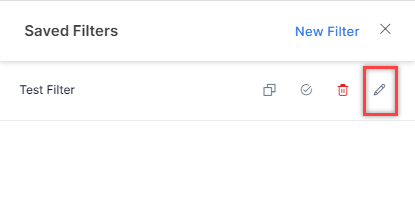
- Make the necessary changes and click Save & Apply.
A confirmation message is displayed and the filter is updated.

Copy Filter
- Click the Duplicate button.
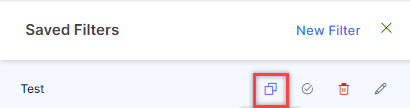
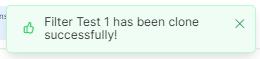
- On the Rename Filter window, enter a name for the filter and click Save.
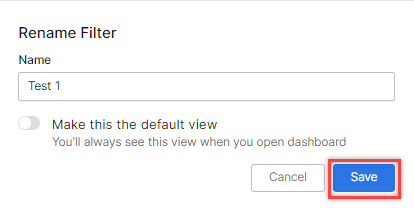
A confirmation is displayed and a copy of the filter is created.
Mark as Default
- Click the Mark as Default button.
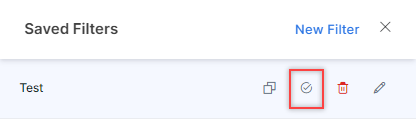
- A confirmation message is displayed and the filter is marked as default.
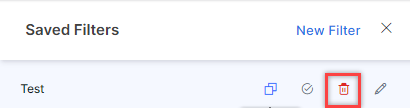
Delete Filter
- Click the Delete button.
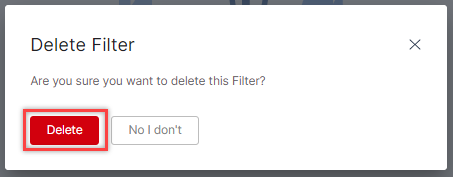
- A Delete Filter message appears. Click Delete.
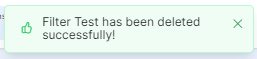
A confirmation message is displayed and the filter is deleted.
Join a Conversation
Managers can monitor live conversations between agents and customers. The supervisor can view the agent engagement metrics. At any point, the supervisor can view details of the agent-customer conversation, or the supervisor can manually assign the agent to another available agent. It applies to both inbound and outbound conversations.
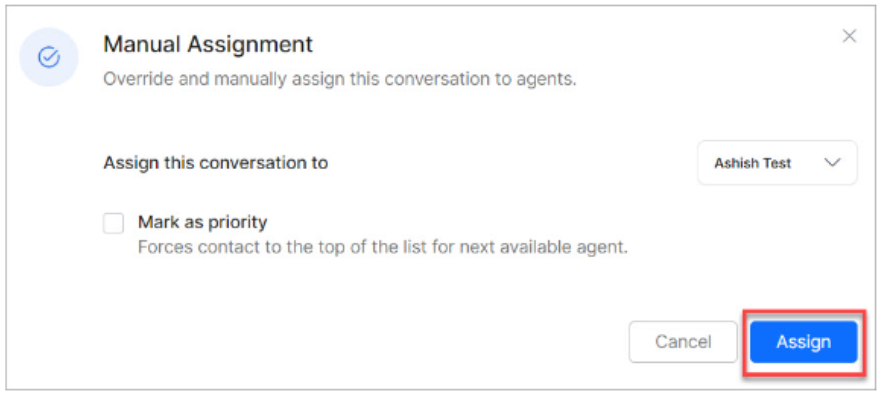
Manually Assign Conversations from the Queue to an Agent
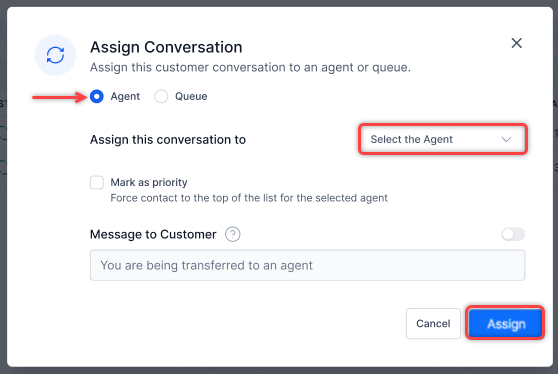
To assign a conversation from the queue to an agent (including themselves):
- Select the conversation from the Queue on the right pane and click Assign.
- A pop-up appears. Select the agent and assign the conversation to that agent.
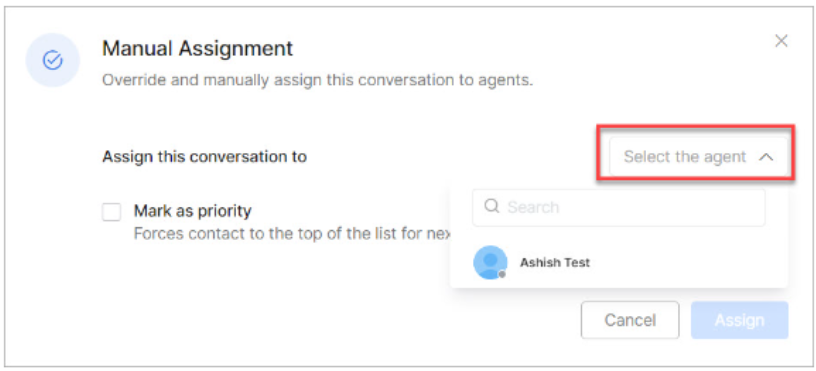
- Select Mark as priority if required and click Assign.
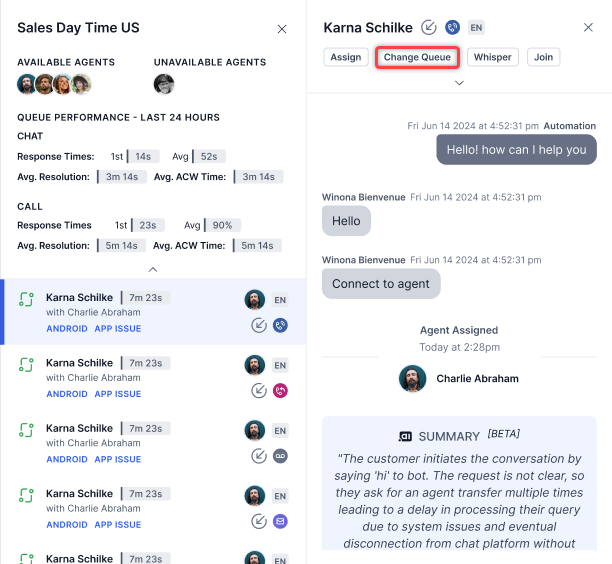
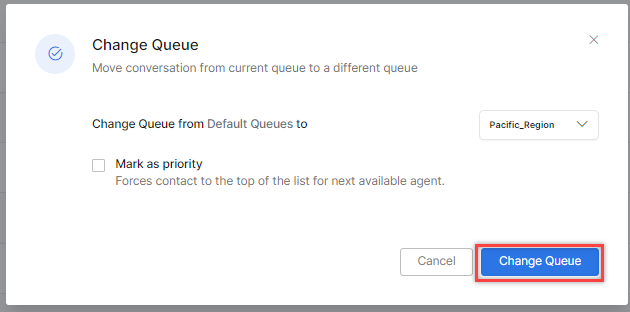
Change Queue for a Conversation
Supervisors can change the queue for a conversation. They can move a conversation to a different queue and prioritize it by placing it at the top.
To change the queue for a conversation:
- Go to MONITOR > QUEUES.
- Select a queue and then select the conversation.
- Click Change Queue.
- On the Change Queue pop-up window, click the Change Queue from drop-down, select a queue, and then click Change Queue. Select Mark as priority to place the conversation at the top of the list in the destination queue.
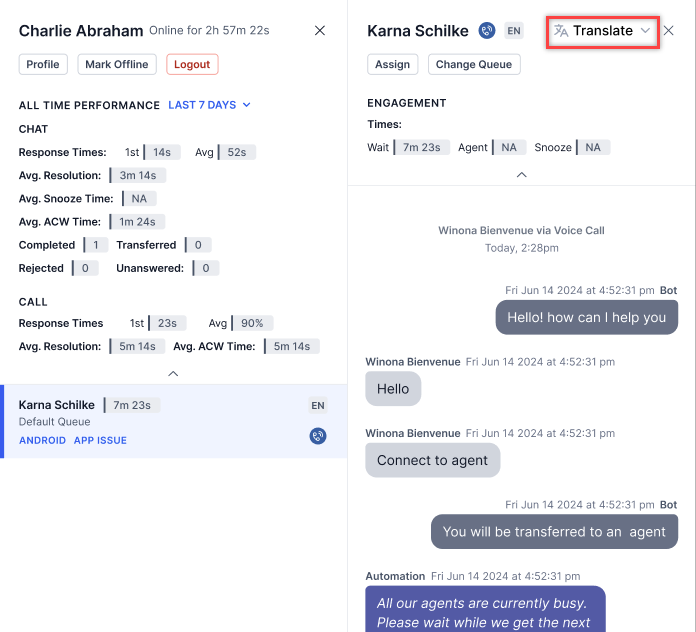
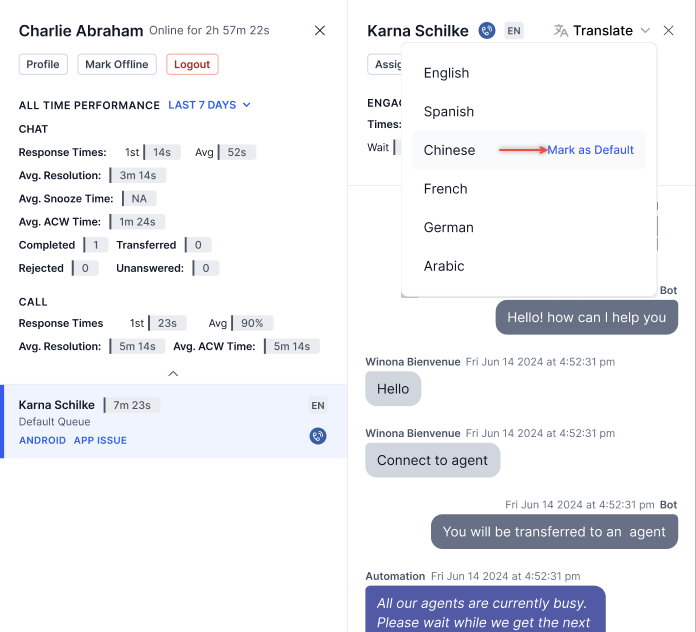
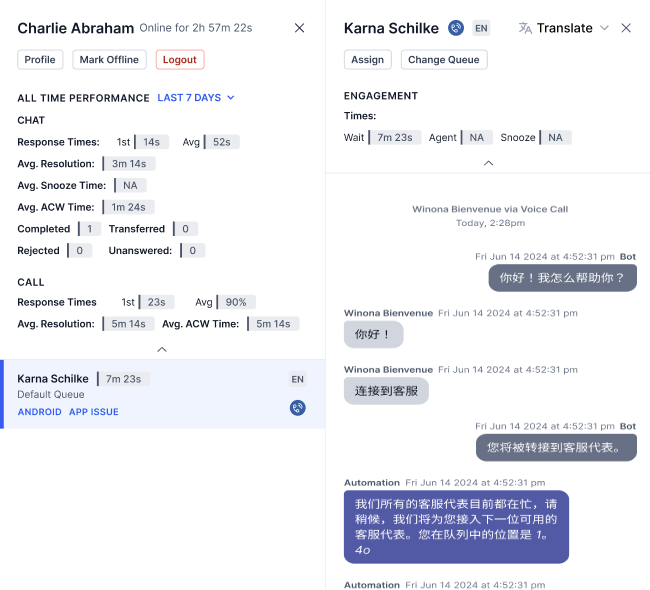
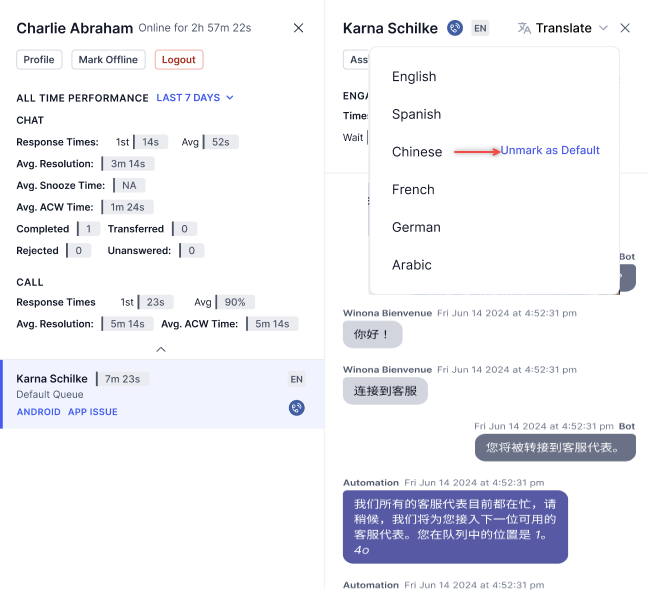
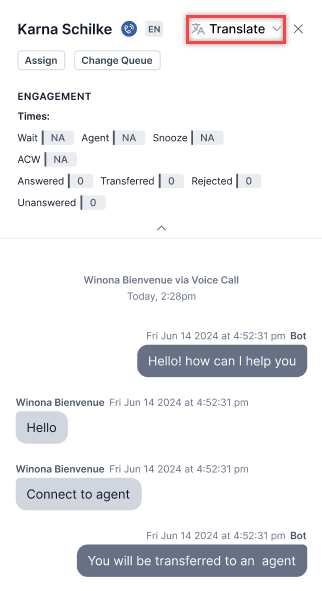
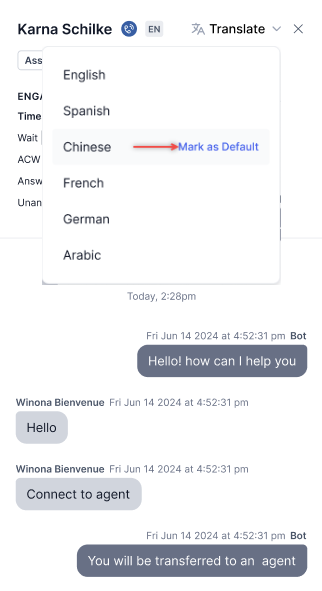
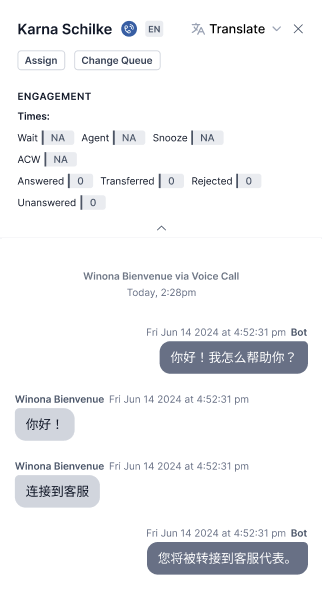
Translate Transcripts
Supervisors can review transcripts in their preferred language by selecting a target language for transcript translation. To enable this option, refer to Translation Configuration.
Steps to select a language for transcript translation:
- Click the Translate button on the top right corner.
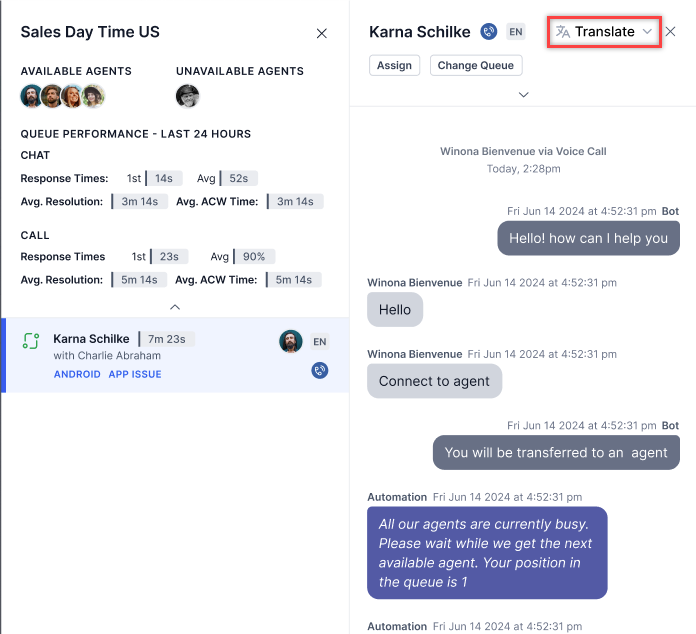
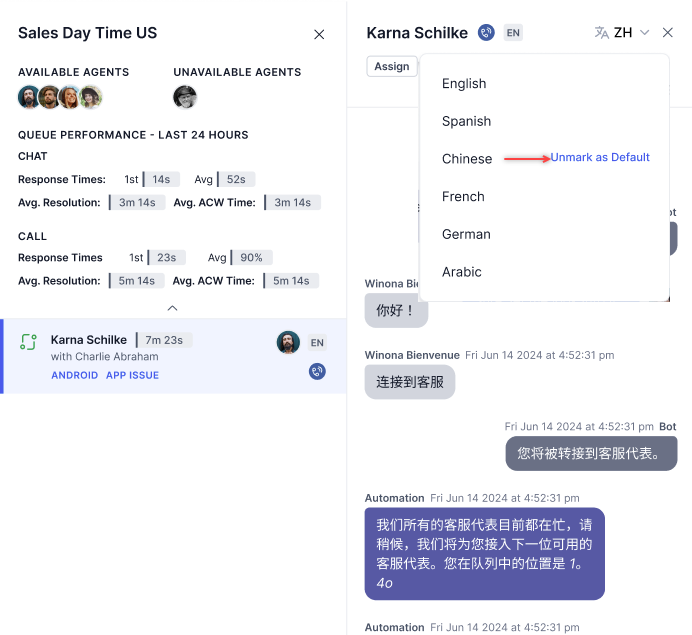
- Select the language for transcript translation and click Mark as Default.
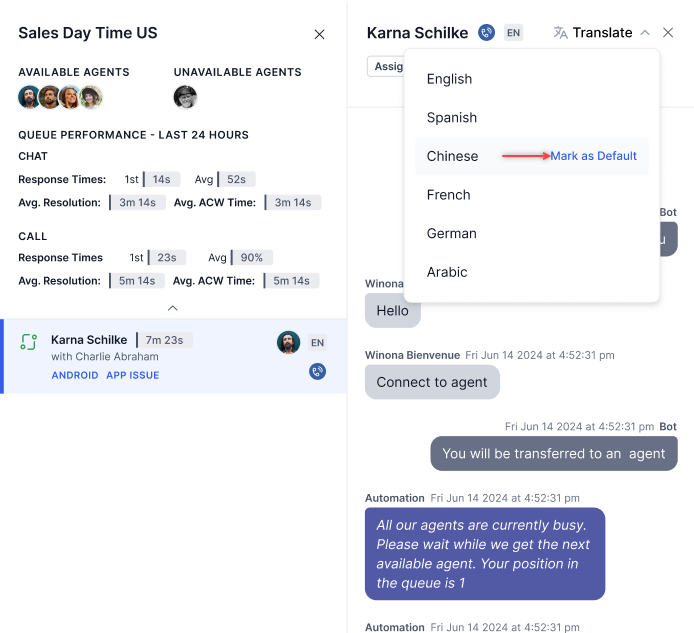
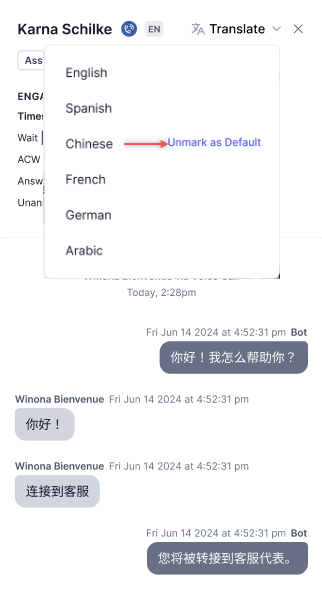
- The transcript is translated into the selected language.
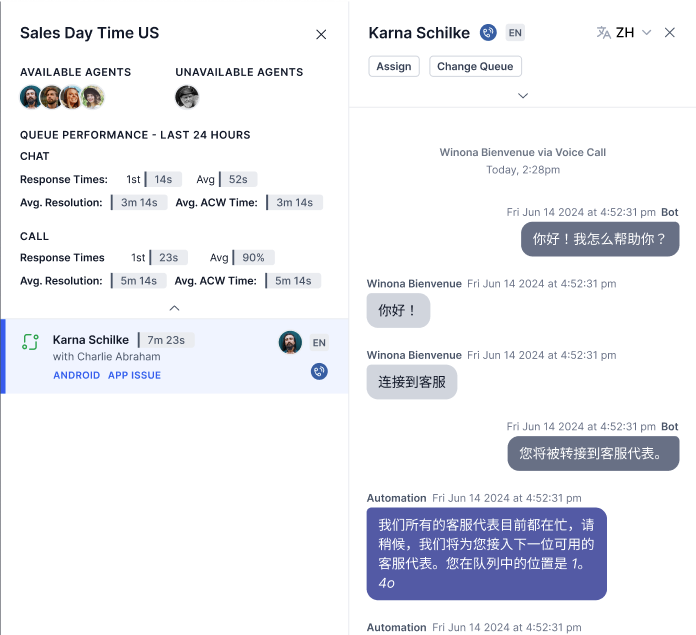
The transcripts will continue to be translated in the selected default language until manually marked as Unmark as Default.
View Voicemails
When converted to a voicemail, a call can be viewed in the Monitor tab. Supervisors can view voicemails in waiting status and “Assign” them to an agent or “Change Queue.”
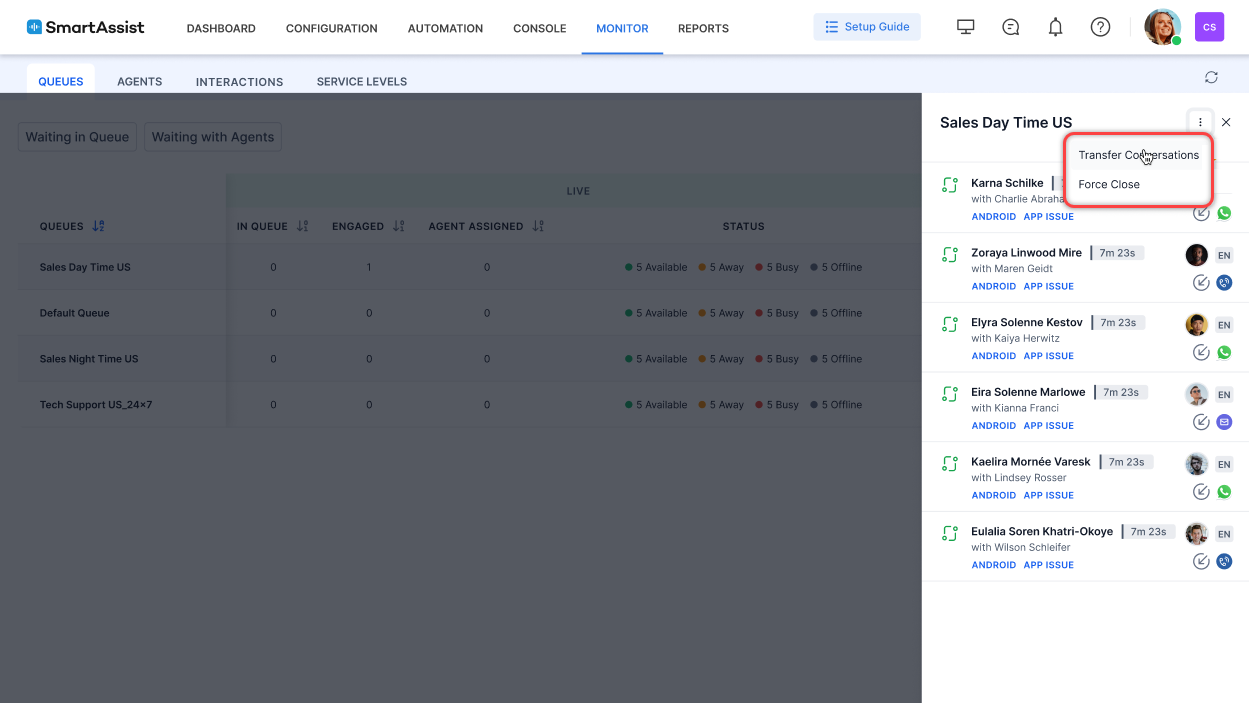
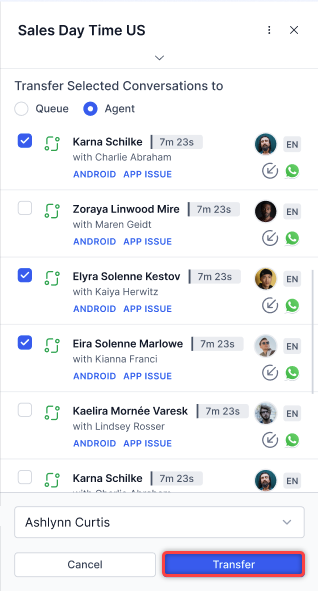
Transfer all Calls/Chats/Emails in the Agent Queue
Supervisors can transfer or end multiple conversations at once across all supported digital channels, including chat, email, and voice. It improves workload management by allowing bulk actions directly from the Monitor tab. By default, the option is disabled for Agents and Custom roles. Supervisors, Admins, Owners, and App Developers can access the feature when permissions are explicitly granted—role-based permissions control access.
Steps to transfer all Calls/Chats/Emails in the Agent Queue or to a specific agent:
- Open the Monitor tab.
- Select a queue. A panel appears with all active and waiting conversations.
- Click the ⋮ menu in the top-right corner of the panel.
- Choose one of the following options:
- Transfer Conversations
- Force Close
Transfer Conversations to a Queue
- Selecting Transfer Conversations on the Queues tab activates multi-selection mode.
- Click the Queue radio button and select one or more conversations. An option to select all or clear the selection is available.
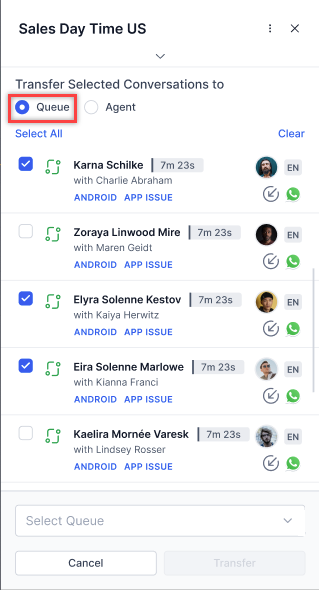
- A bottom action bar appears, displaying a “Transfer” button.
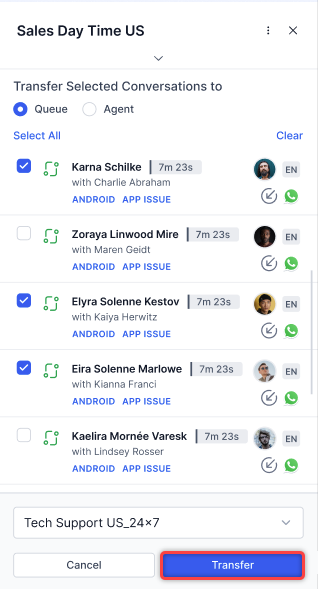
- From the queue dropdown, choose a destination queue.

- Click Transfer. The selected conversations are reassigned to the chosen queue.
-
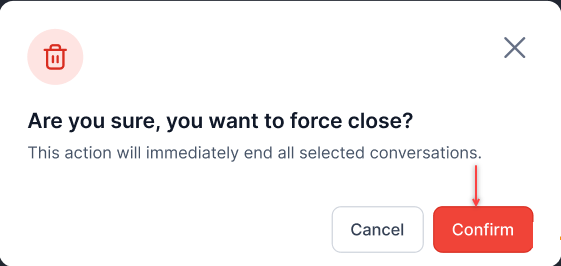
- Selecting Force Close activates multi-selection mode.
- Select one or more conversations.
- A bottom action bar appears, displaying a Force Close button.
- Click Force Close.
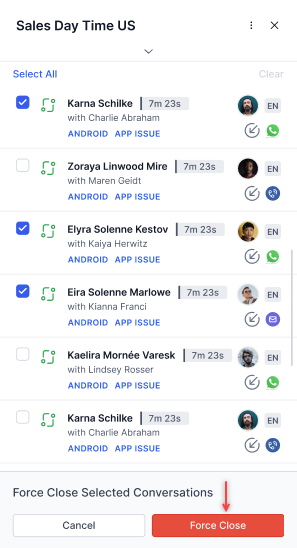
- A confirmation pop-up is displayed. Click Confirm. The selected conversations are closed across their respective channels.
Post-Action Behavior
After completing the transfer or end actions, the interface:
- Exits selection mode.
- Updates the conversation list.
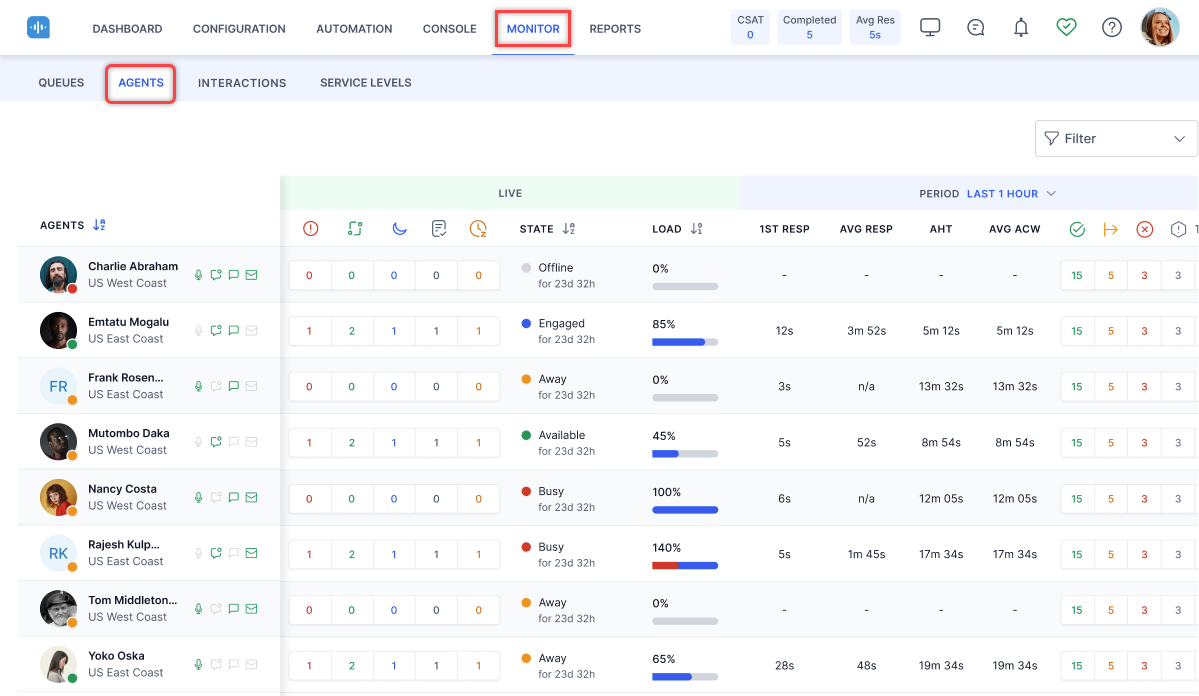
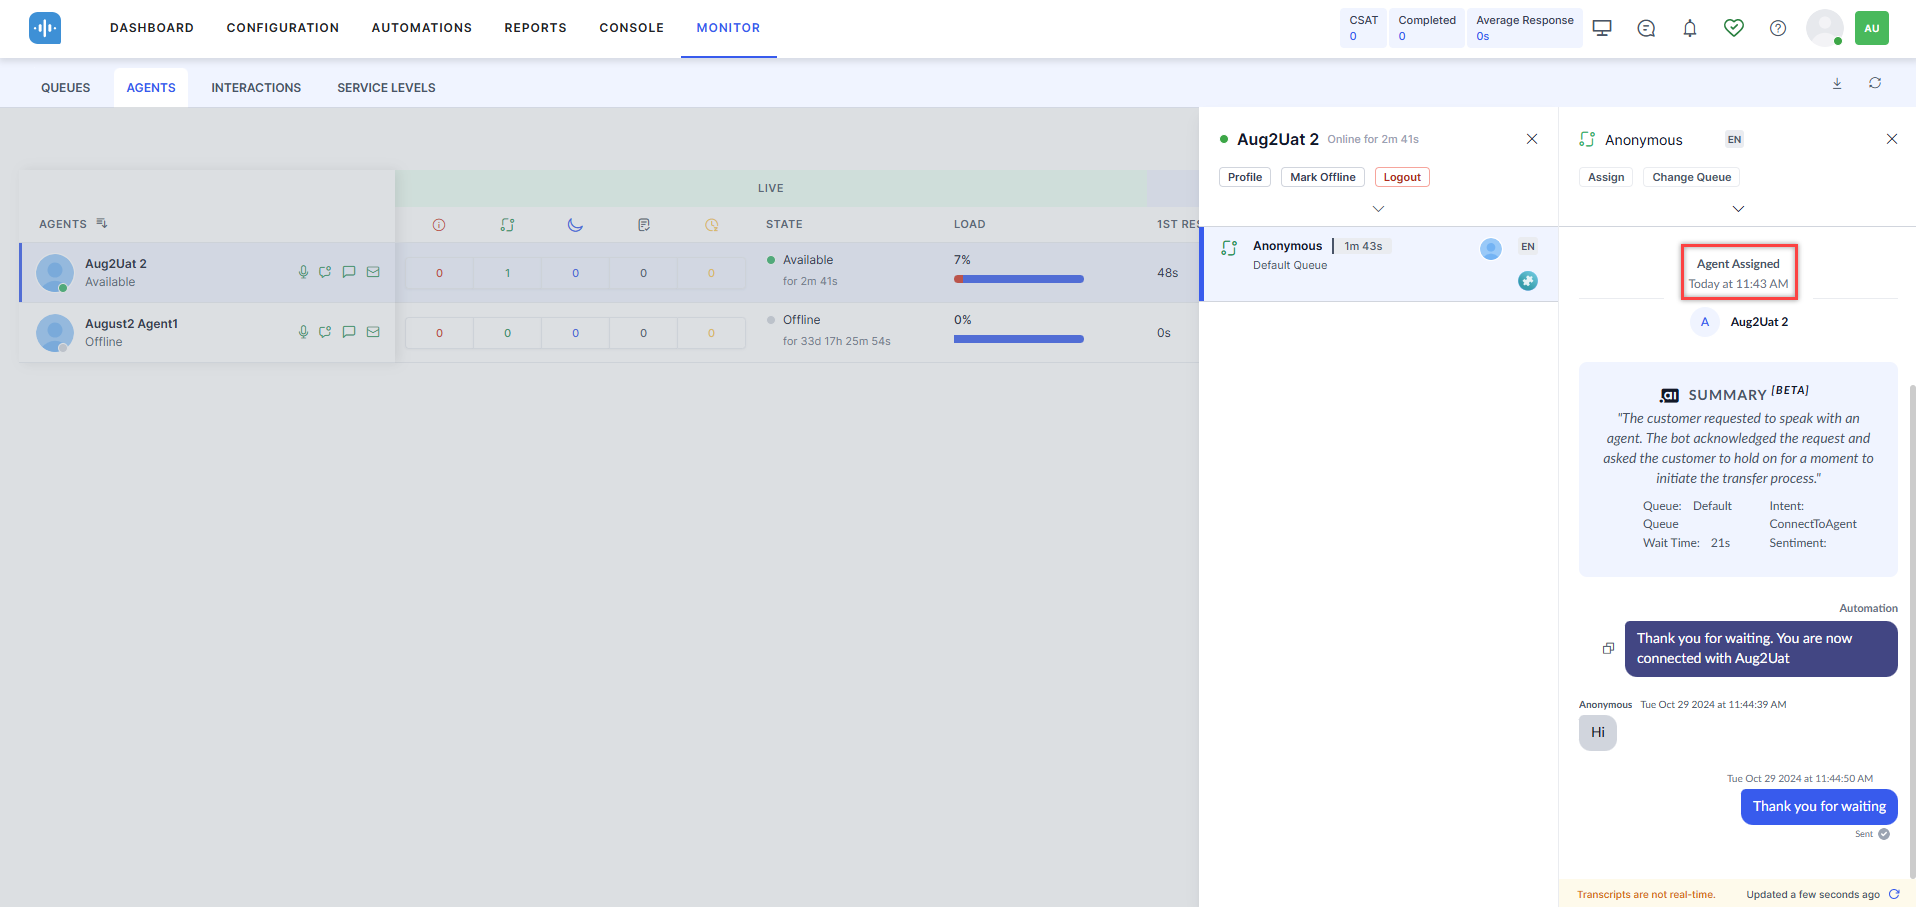
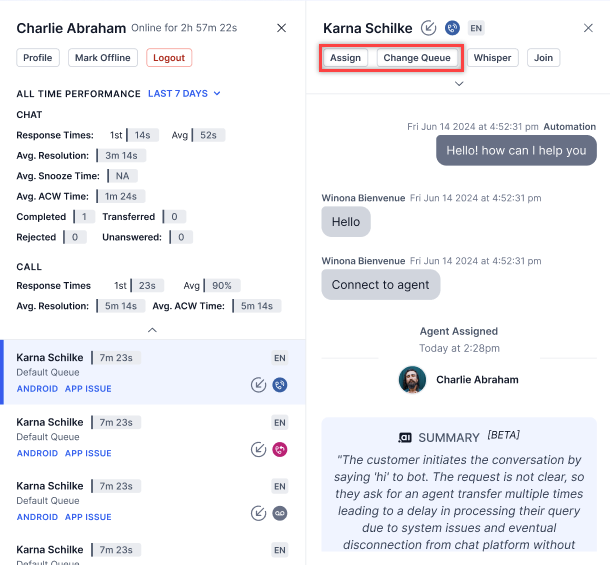
Agents
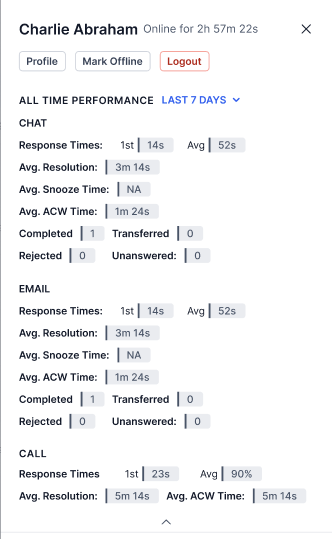
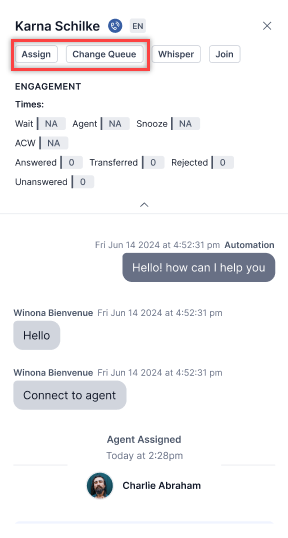
You can check agent details and monitor and intervene in ongoing conversations. The agents in this section are restricted to those assigned to the same queues as you. A list of conversations currently being handled by the agents is displayed with parameters such as state, load, first response, average response, AHT, etc.
Clicking the sort icon allows you to sort the columns in ascending/descending order. The default sorting is by State.
The following metrics and their total counts are displayed:
- Completed: Count of interactions completed and closed by the agent.
- Transferred: Count of interactions an agent has transferred to a queue or another agent.
- Rejected: Count of interactions explicitly rejected by an agent using the reject button.
- Unanswered: Count of interactions assigned to an agent where the agent did not pick up the interaction within the acceptance timeout.
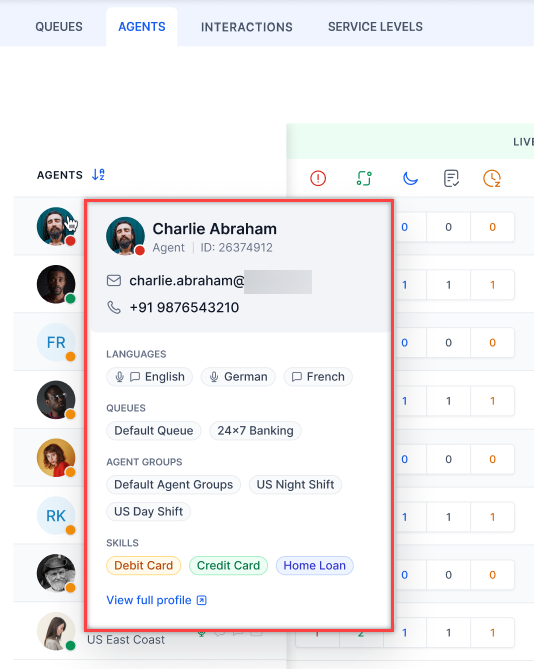
- Hovering over an agent’s name displays a pop-up with the following information:
- Agent status (for example, Available, Busy, Inactive).
- Agent Name and profile icon, email ID, phone number, role.
- Skills assigned to the agent.
- Queues the agent is associated with.
- Agent Groups the agent is part of.
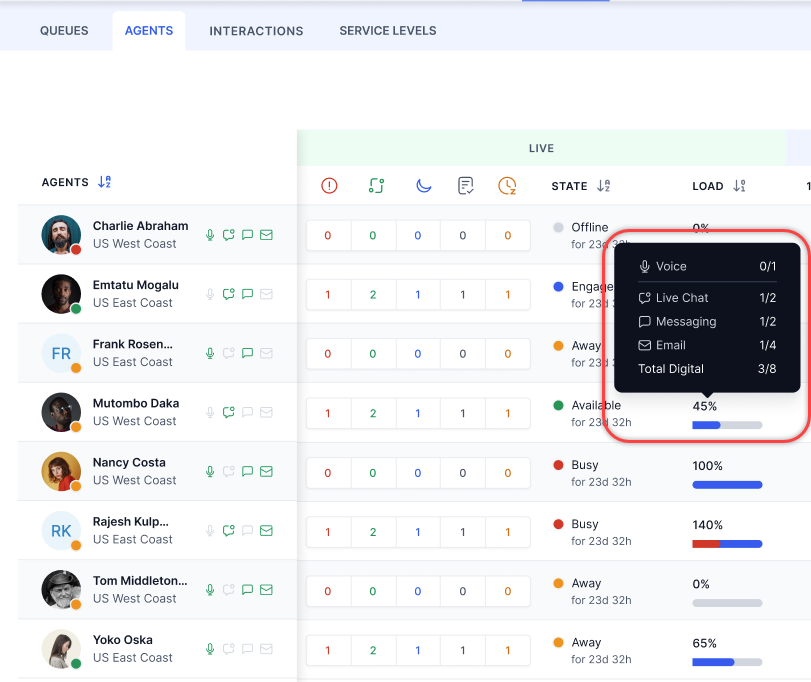
- The load capacity indicator displays the agent’s overall load capacity. Hovering over the load shows the channel-wise load capacity—for example, Live Chat ⅔ (2 slots out of 3 defined slots are engaged) and the total digital conversation limit.
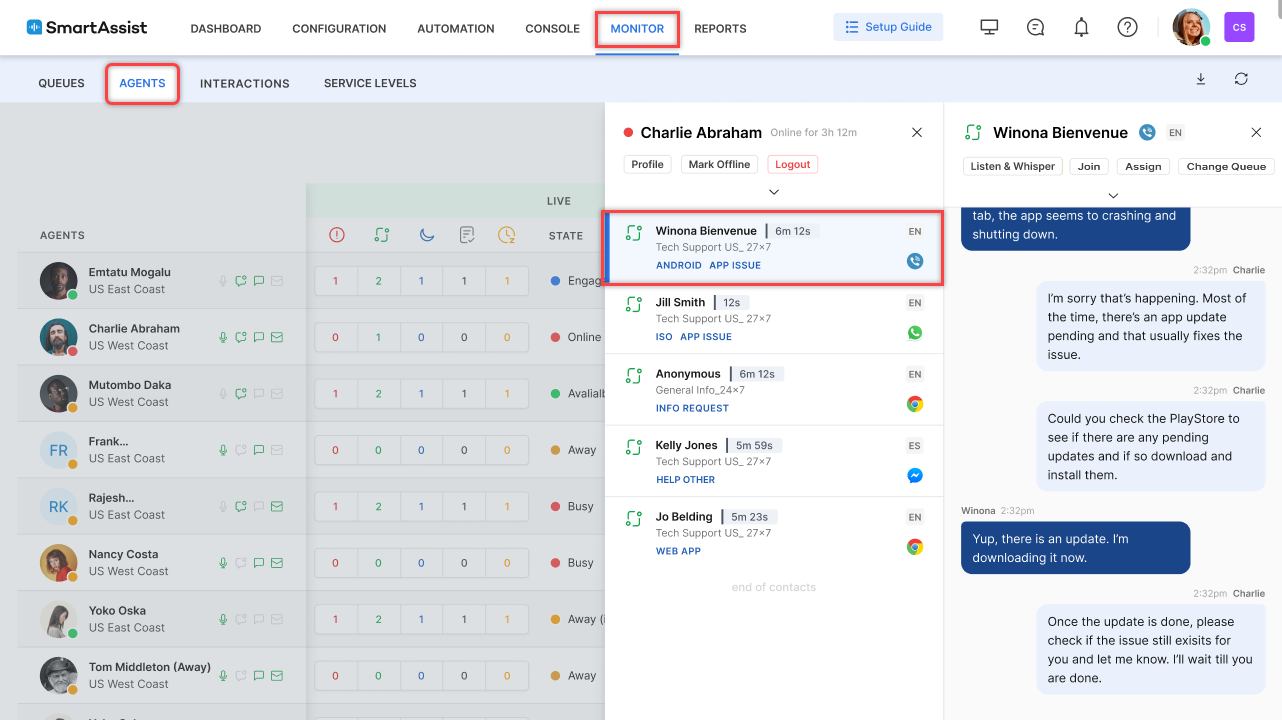
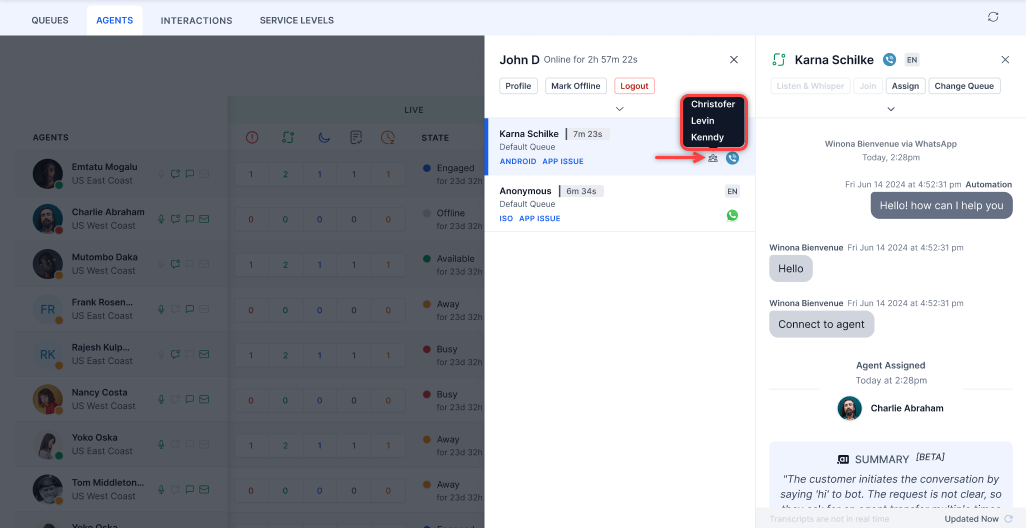
- On the monitor tab, select an agent on the left side. The manager can view the agent’s ongoing conversation on the right and check the engagement metrics.
- On the right window, click the agent’s name. Another window opens to the right as shown below. To check the agent engagement metrics, on the right window, click the down arrow as shown below:
Chat, Messaging, and Voice:
Upon assignment, the assigned agent’s name is shown for conversations for the corresponding agent, including auto-accepted conversations.
Email:
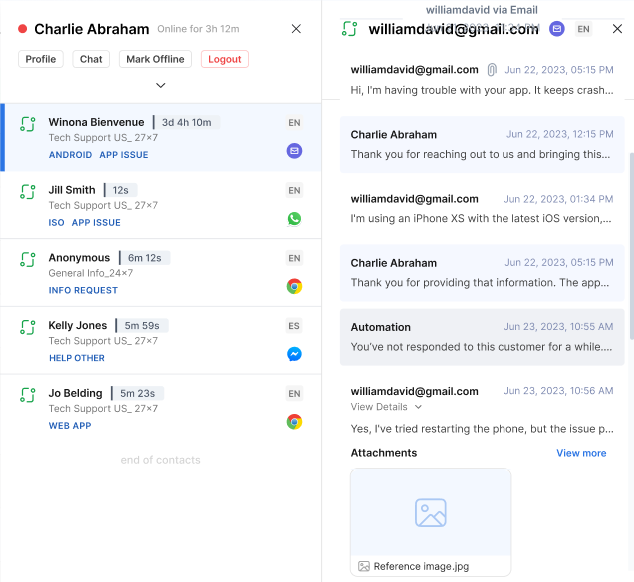
- For a selected agent, the manager can check the agent profile, chat with the agent, change the queue, and assign the conversation to other agents as shown below:
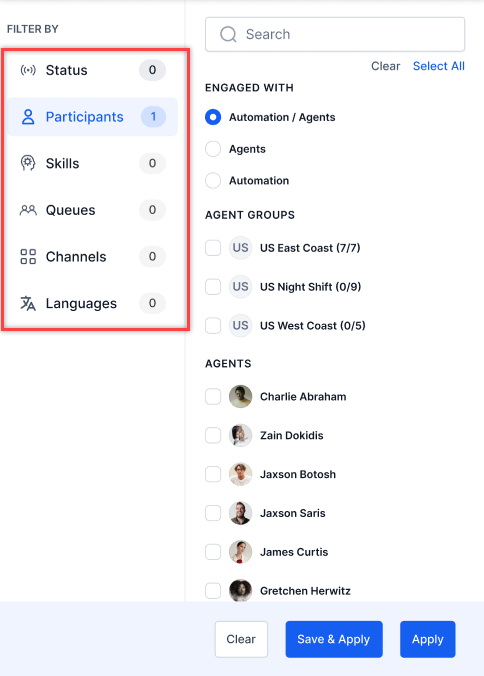
Filters
Create Filter
- Click the Filter button.

- Click New Filter.
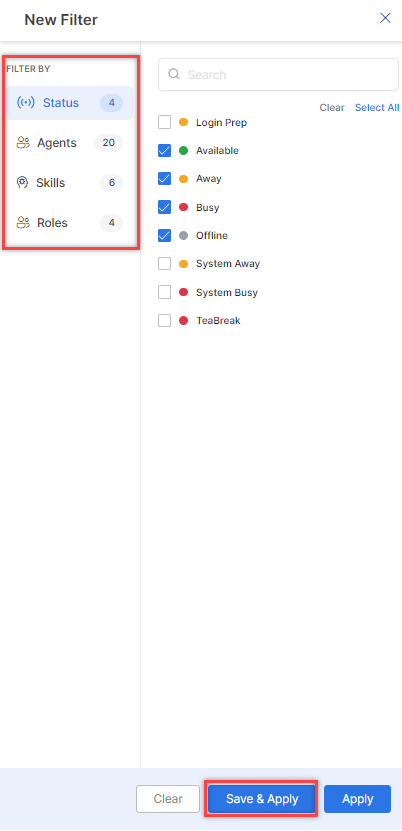
- Select the Status, Agents, Skills, and Roles.
Select from the below available options:
- Clear – Clears the selection.
- Save & Apply – Saves the filter, and it appears when selected.
- Apply – Applied for one instance and not saved.
4. Click Save & Apply.

5. On the pop-up window, enter a name (up to 20 characters) for the filter and click Save & Apply.
A confirmation message is displayed, and the filter is created.
6. Click Saved Filters. By default, the system shows the following:- The Waiting with Agents and Waiting in Queue quick filters are pre-selected. These filters are editable and can be deleted.
- You can select up to four quick filters. Quick filters appear along with unsaved filters.
- If a filter is set as the default but not selected as a quick filter, the system still treats it as a quick filter.
- You cannot disable a quick filter while a default filter is applied. To disable the quick filter, first remove the default filter.
Edit Filter
Steps to edit a filter:
- Click the Filters tab. The Saved Filter name appears.
- Click the Edit button.
- Make the necessary changes and click Save & Apply.
A confirmation message is displayed and the filter is updated.
Copy Filter
- Click the Duplicate button.
- On the Rename Filter window, enter a name for the filter and click Save.
A confirmation is displayed and a copy of the filter is created.
Mark as Default
- Click the Mark as Default button.
- A confirmation message is displayed and the filter is marked as default.
Delete Filter
- Click the Delete button.
- A Delete Filter message appears. Click Delete.
A confirmation message is displayed, and the filter is deleted.
Transfer Conversations to a Human Agent
- Selecting Transfer Conversations on the Agents tab activates multi-selection mode.
- Click the Agent radio button and select one or more conversations.

- A bottom action bar appears, displaying a “Transfer” button.
- From the agent dropdown, choose an agent.
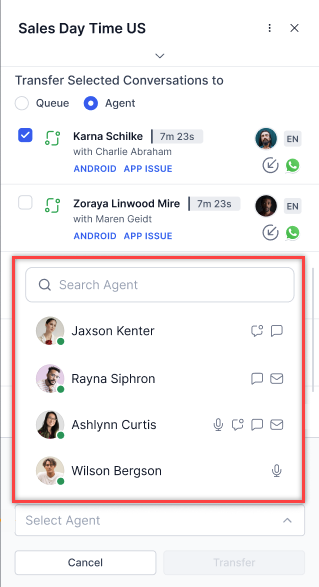
- Click Transfer. The selected conversations are reassigned to the agent.
Translate Transcripts
Supervisors can review transcripts in their preferred language by selecting a target language for transcript translation. To enable this option, refer to Translation Configuration.
[/us_message]Note: By default, all transcripts are available in English.[/us_message]
Steps to select a language for transcript translation:
- Click the Translate button on the top right corner.
- Select the language for transcript translation and click Mark as Default.
- The transcript is translated into the selected language.
The transcripts will continue to be translated in the selected default language until manually marked as Unmark as Default.
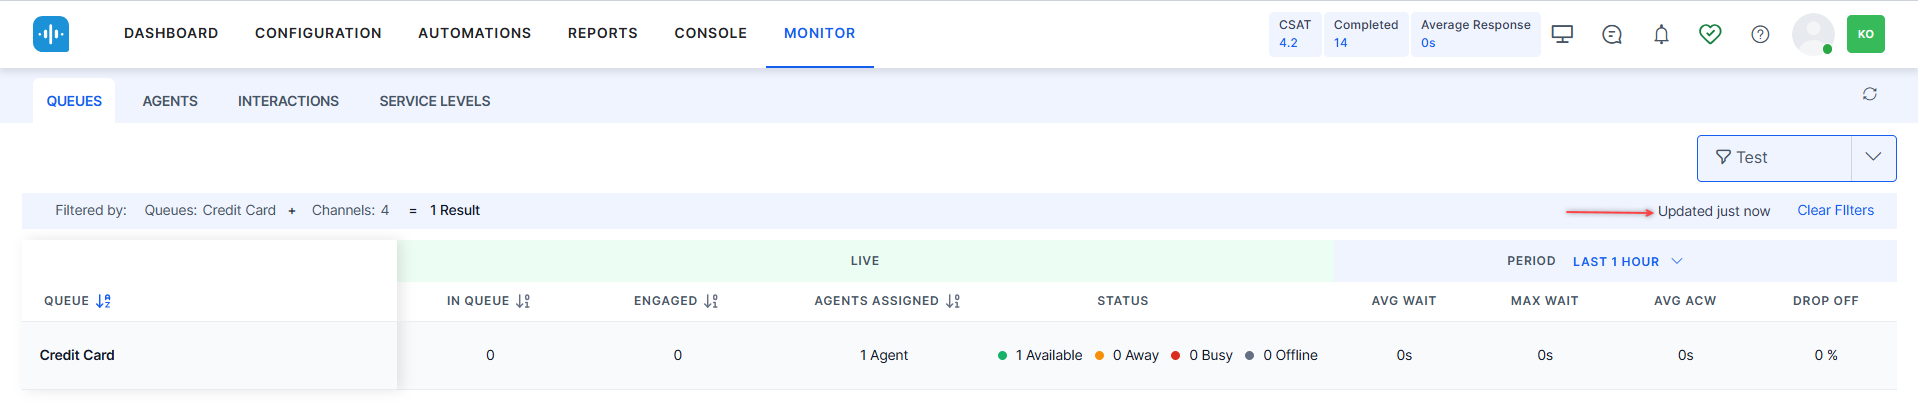
Auto Refresh When Filters are Applied
When a supervisor applies a filter, the page automatically refreshes at fixed intervals to maintain real-time data accuracy. For example, any changes in the status of agents are reflected after the auto-refresh, ensuring the data is up-to-date.
The page refreshes every 10 seconds to update data changes. Supervisors can pause updates by clicking the Pause button.
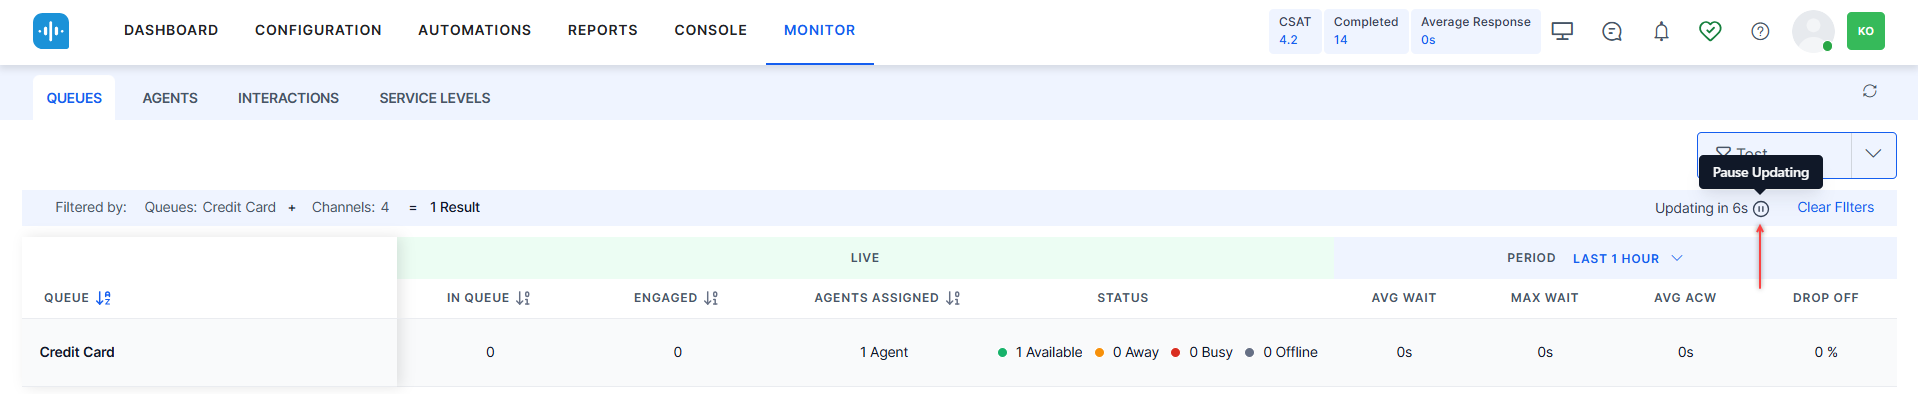
Clicking the Play button resumes updates.
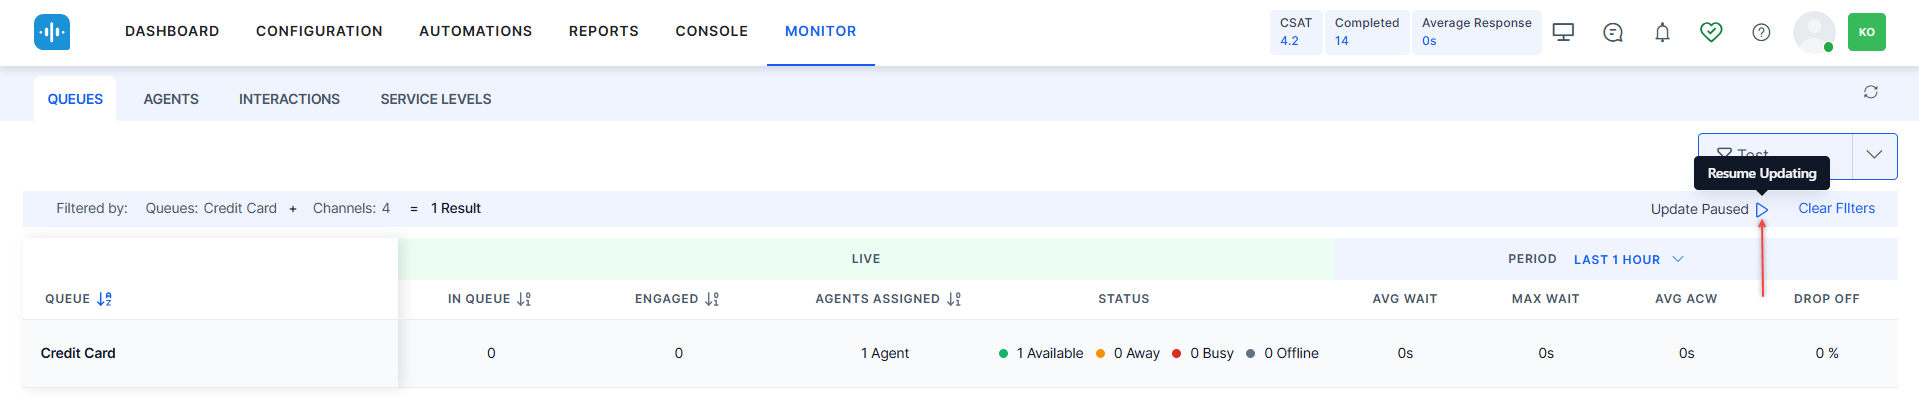
A confirmation is displayed once the refresh is completed, and the updated data is shown.
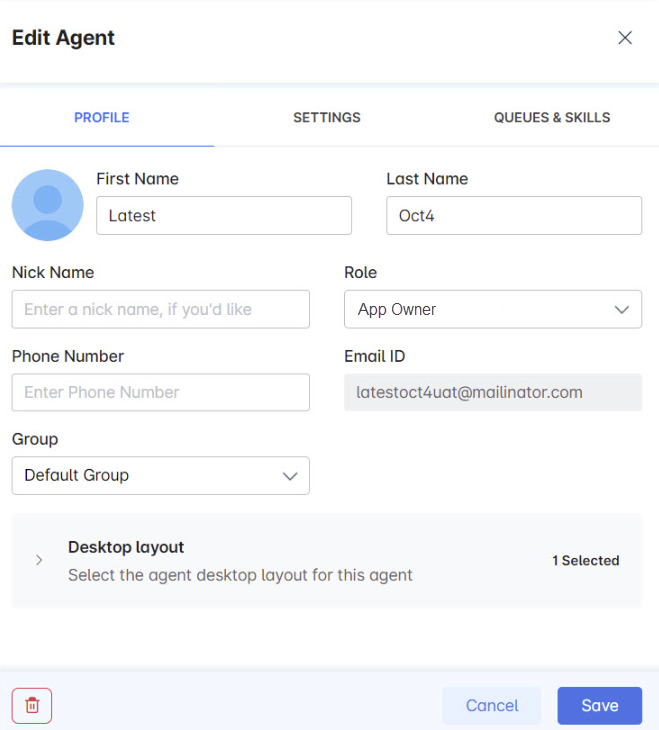
Check Profile
To check the agent profile:
There are three tabs, Profile tab, Settings tab, and Queue & Skills tab.
- On the Profile tab, check/edit the profile of the agent.
- Click Save.
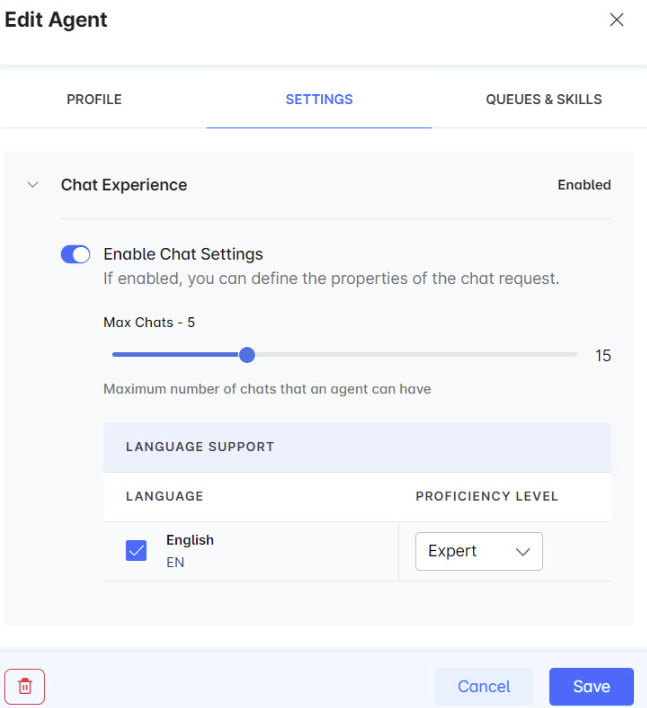
Settings tab
On the Settings tab, you can configure the chat experience and voice experience settings.
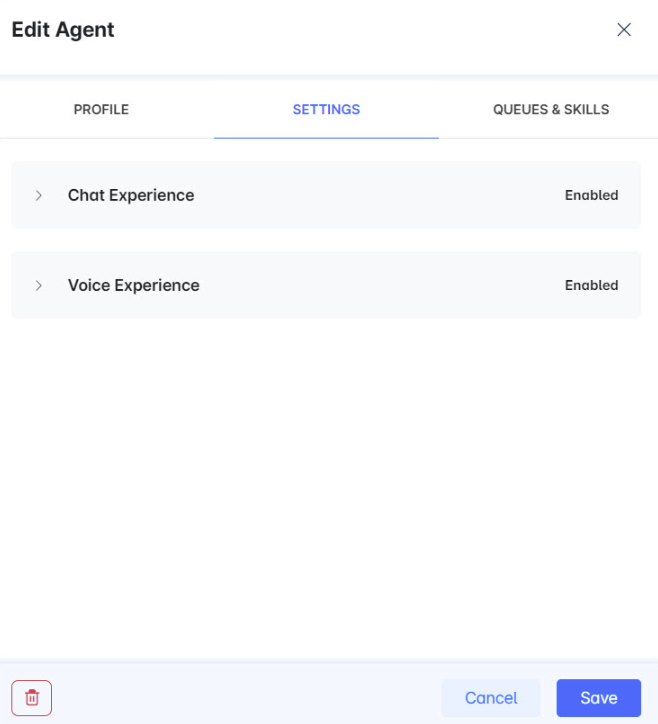
For chat experience, you can enable chat settings. If enabled you can define the properties of the chat request, for example, max chats = 5. You can choose the language and the proficiency level.
Similarly, for voice experience, you can enable voice settings. If enabled, you can define the properties of the voice request. You can choose the language and the proficiency level.
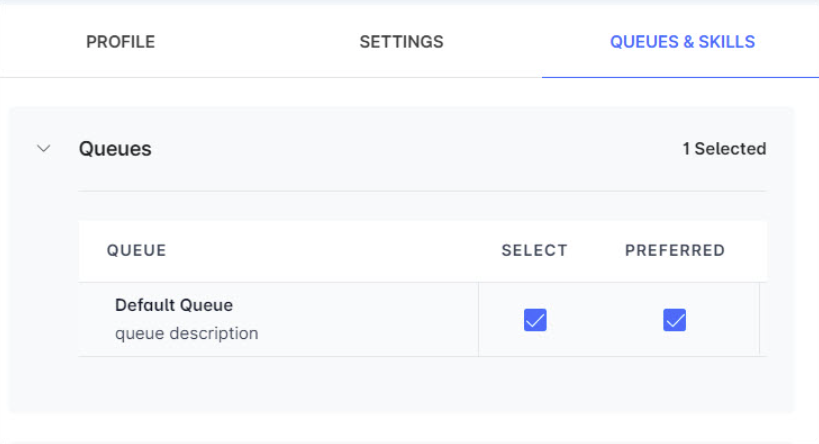
Queues & Skills tab
On the Queues & Skills tab, you can configure the Queues and Skills settings.

Queues
You can select the default queue and the preferred queue.
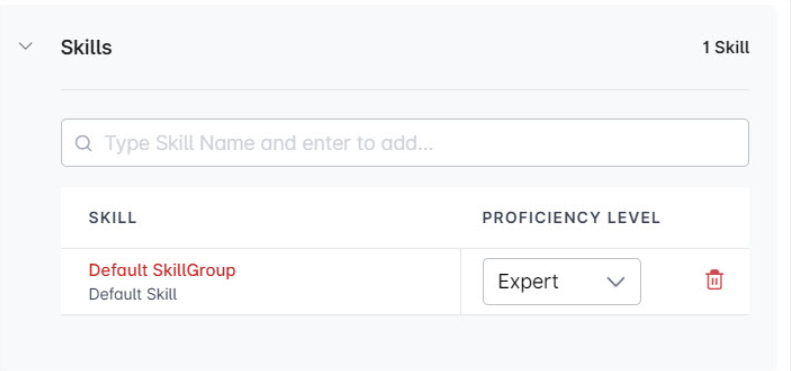
Skills
You can select the Proficiency level of the skill.
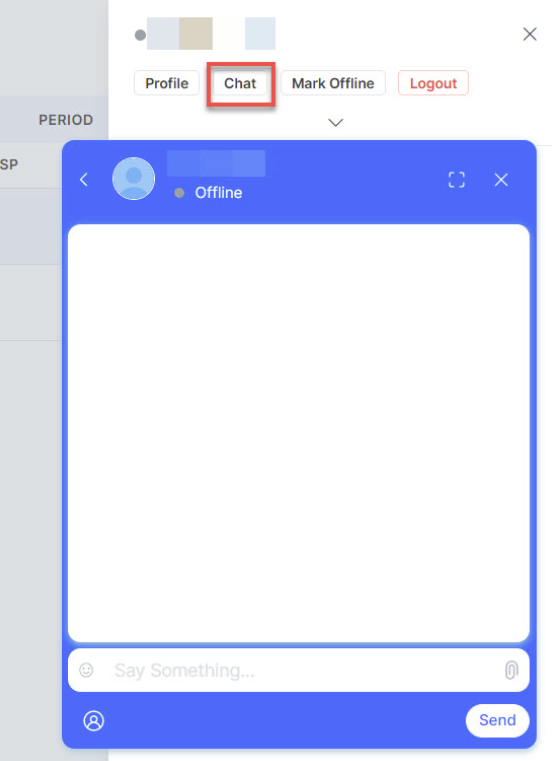
Chat with an Agent
To chat with an Agent:
- Select the Chat option. A pop-up chat window appears, where the manager can type messages for the agent.
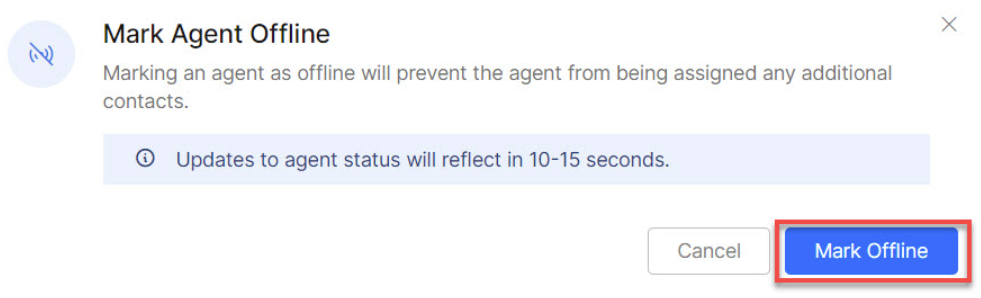
Mark Offline
You can mark an agent as offline to prevent the agent from being assigned to any other customers.
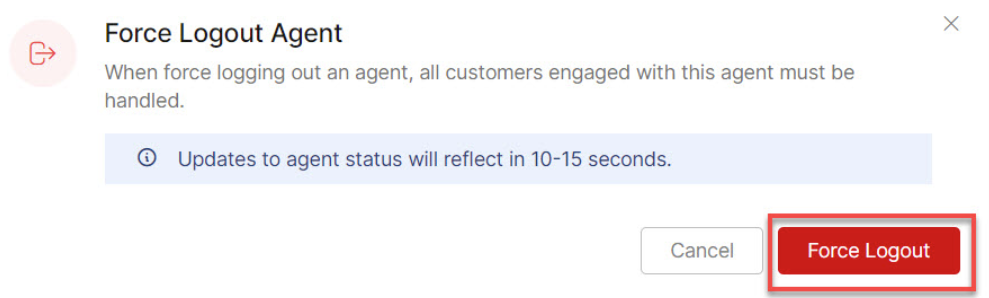
Logout
Force Logout is a feature that allows the agent to be freed up and the ongoing customer engagements can be re-assigned to other agents.
Join a Conversation
Managers can monitor live conversations between agents and customers. The manager can view the agent engagement metrics of the agent. At any point, the manager can Join a conversation (conference) and view details of the agent-customer conversation.
To Join a conversation:
- On the right pane, click Join Conversation.
- A confirmation pop-up appears. Click Confirm to join.
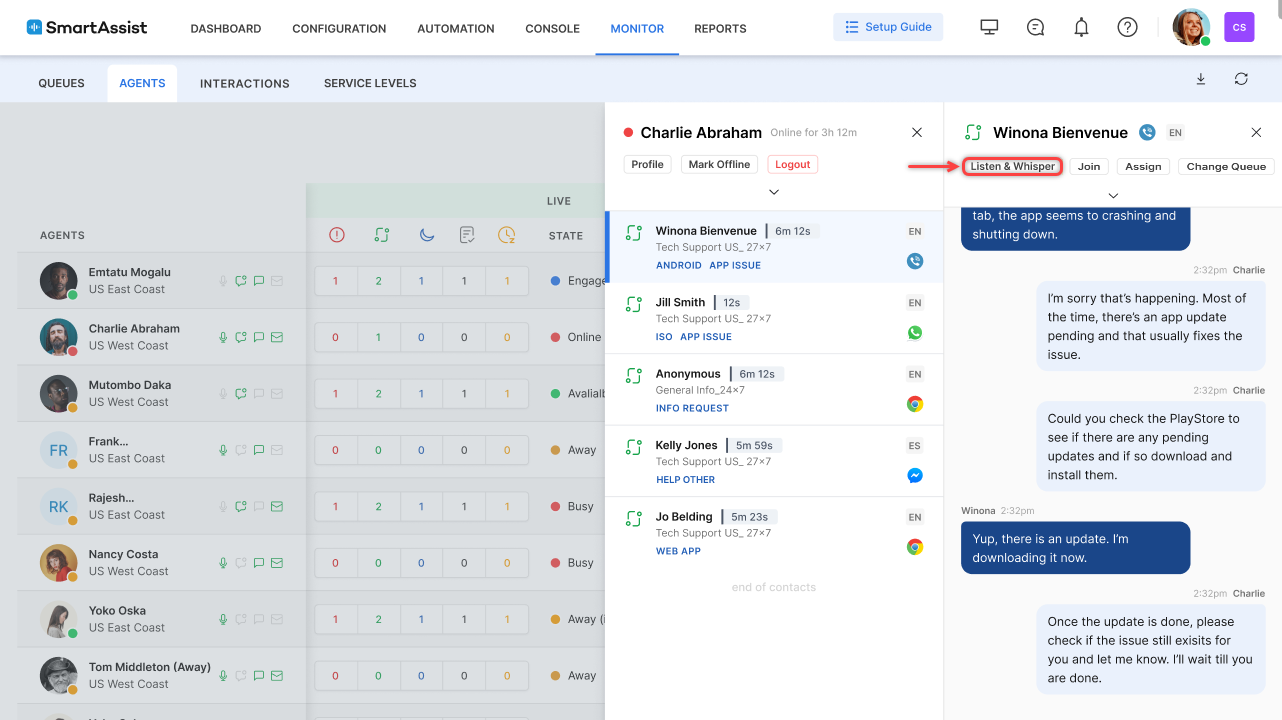
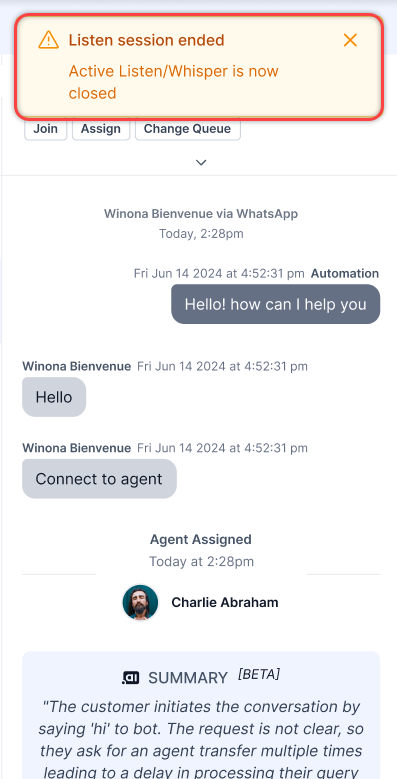
Listen & Whisper [Voice Calls]
Listen and Whisper functionalities enhance supervisors’ oversight and support capabilities in real-time voice conversations.
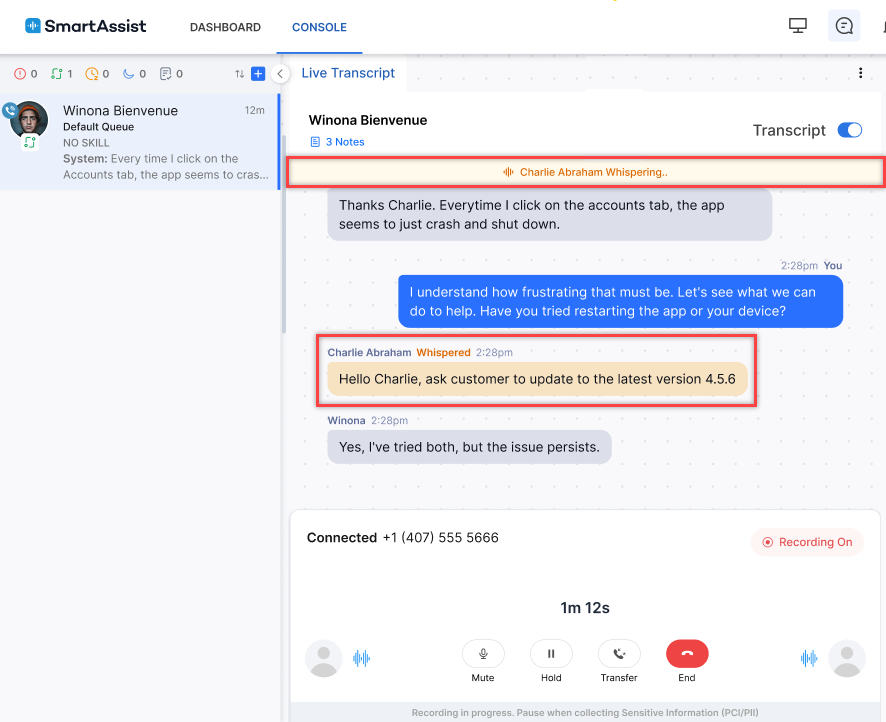
Listen: This allows supervisors to monitor live voice conversations between agents and customers discreetly. By enabling this feature, supervisors can stay informed about ongoing interactions without participating directly, ensuring they are always aware of the dialogue and can step in if necessary.
Whisper: This functionality provides a means for supervisors to give real-time guidance to agents without the customer hearing the communication. Supervisors can use the whisper functionality to offer immediate support or corrective instructions, enhancing the agent’s performance and the overall quality of customer interaction.
Steps to Listen and Whisper Voice Conversations:
- Go to MONITOR > AGENTS > Click the conversation you want to Listen to & Whisper.
A conference icon is displayed if there are multiple participants on the call. The Listen & Whisper and Join options are disabled.
- Click Listen & Whisper.
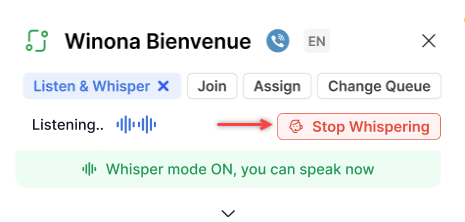
- You can listen to the conversation between the customer and the agent. Click the Whisper to Agent button to whisper to the agent.
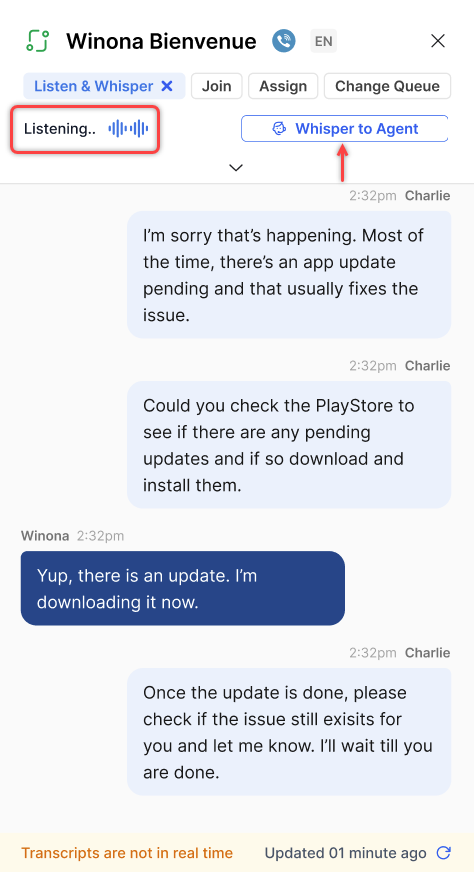
- A confirmation is displayed that whisper mode is enabled.
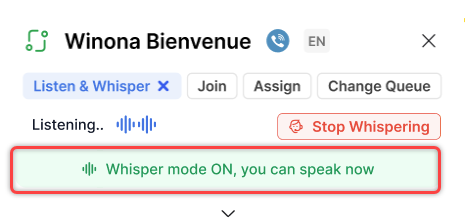
When a supervisor whispers, an indication appears at the top of the live interaction, and the transcript is displayed in yellow.
- Click Stop Whispering to end the Listen and Whisper Session.
- When a supervisor stops listening to a conversation, the message Listen session ended is displayed.
The transcripts are not real-time. Click the Refresh icon to refresh the transcript.
Interactions
You can view all live interactions on the SmartAssist console. This view includes only interactions that involve agent transfers. Clicking the sort icon allows you to sort the columns in ascending/descending order. A summary of the interactions view is shown below:

Manually Assign Conversations to an Agent and Change Queue
- Managers can assign conversations to an agent and change queues for conversations. Click an ONGOING conversation to view the Assign and Change Queue options. Managers can also view an agent’s engagement metrics.
Manually Assign a Bot-led Conversation to an Agent or Queue
Supervisors can assign bot-led conversations to an agent or a queue. To do so, click an Ongoing conversation and then click Assign.
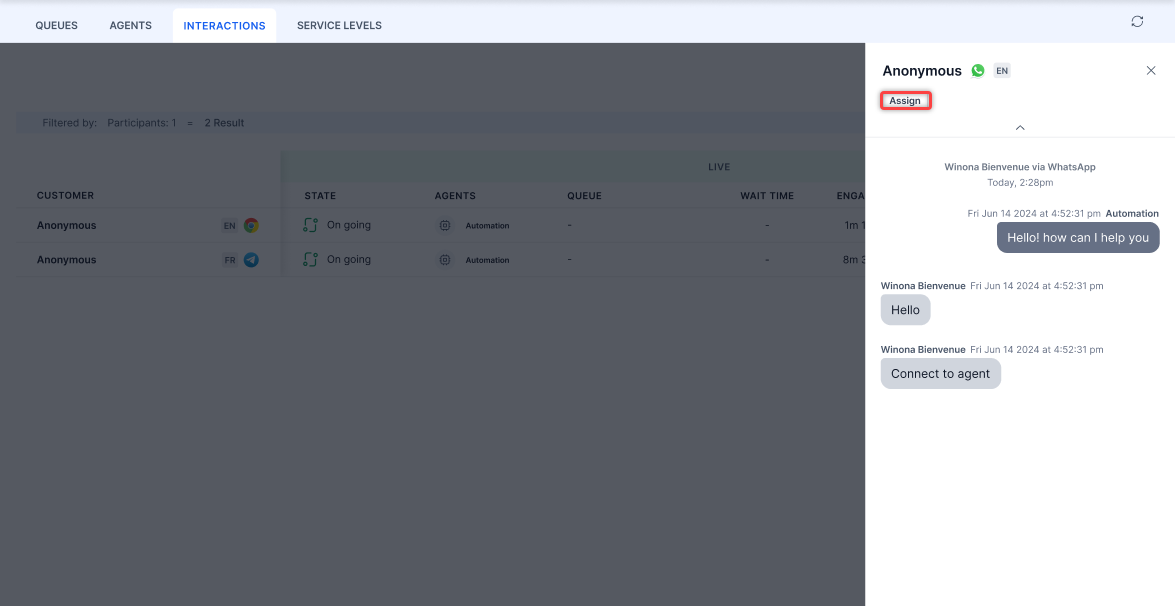
In the Assign Conversation pop-up window, select Agent/Queue, select the agent or queue from the dropdown, mark as priority if required, turn on the message to customer toggle if you want to send a message to the customer, and click Assign.
Filters
Create Filter
- Click the Filter button.

- Click New Filter.
- Select the Status, Agents (bot-led interactions disabled), Skills, Queues, Channels, Type, and Language.
Select the Status, Participants (bot-led interactions enabled), Skills, Queues, Channels, Type, and Language.
Select from the below available options:- Clear – Clears the selection.
- Save & Apply – Saves the filter, and it appears when selected.
- Apply – Applied for one instance and not saved.
- Click Save & Apply.
- On the pop-up window, enter a name (up to 20 characters) for the filter and click Save & Apply.
A confirmation message is displayed, and the filter is created. - Click Saved Filters. By default, the system shows the following:
- The Waiting with Agents and Waiting in Queue quick filters are pre-selected. These filters are editable and can be deleted.

- You can select up to four quick filters. Quick filters appear along with unsaved filters.
- If a filter is set as the default but not selected as a quick filter, the system still treats it as a quick filter.
- You cannot disable a quick filter while a default filter is applied. To disable the quick filter, first remove the default filter.
- The Waiting with Agents and Waiting in Queue quick filters are pre-selected. These filters are editable and can be deleted.
Edit Filter
Steps to edit a filter:
- Click the Filters tab. The Saved Filter name appears.
- Click the Edit button.
- Make the necessary changes and click Save & Apply.
A confirmation message is displayed and the filter is updated.
Copy Filter
- Click the Duplicate button.
- On the Rename Filter window, enter a name for the filter and click Save.
A confirmation is displayed and a copy of the filter is created.
Mark as Default
- Click the Mark as Default button.
- A confirmation message is displayed and the filter is marked as default.
Delete Filter
- Click the Delete button.
- A Delete Filter message appears. Click Delete.
A confirmation message is displayed and the filter is deleted.
Translate Transcripts
Supervisors can review transcripts in their preferred language by selecting a target language for transcript translation. To enable this option, refer to Translation Configuration.
Steps to select a language for transcript translation:
- Click the Translate button on the top right corner.
- Select the language for transcript translation and click Mark as Default.
- The transcript is translated into the selected language.
The transcripts will continue to be translated in the selected default language until manually marked as Unmark as Default.
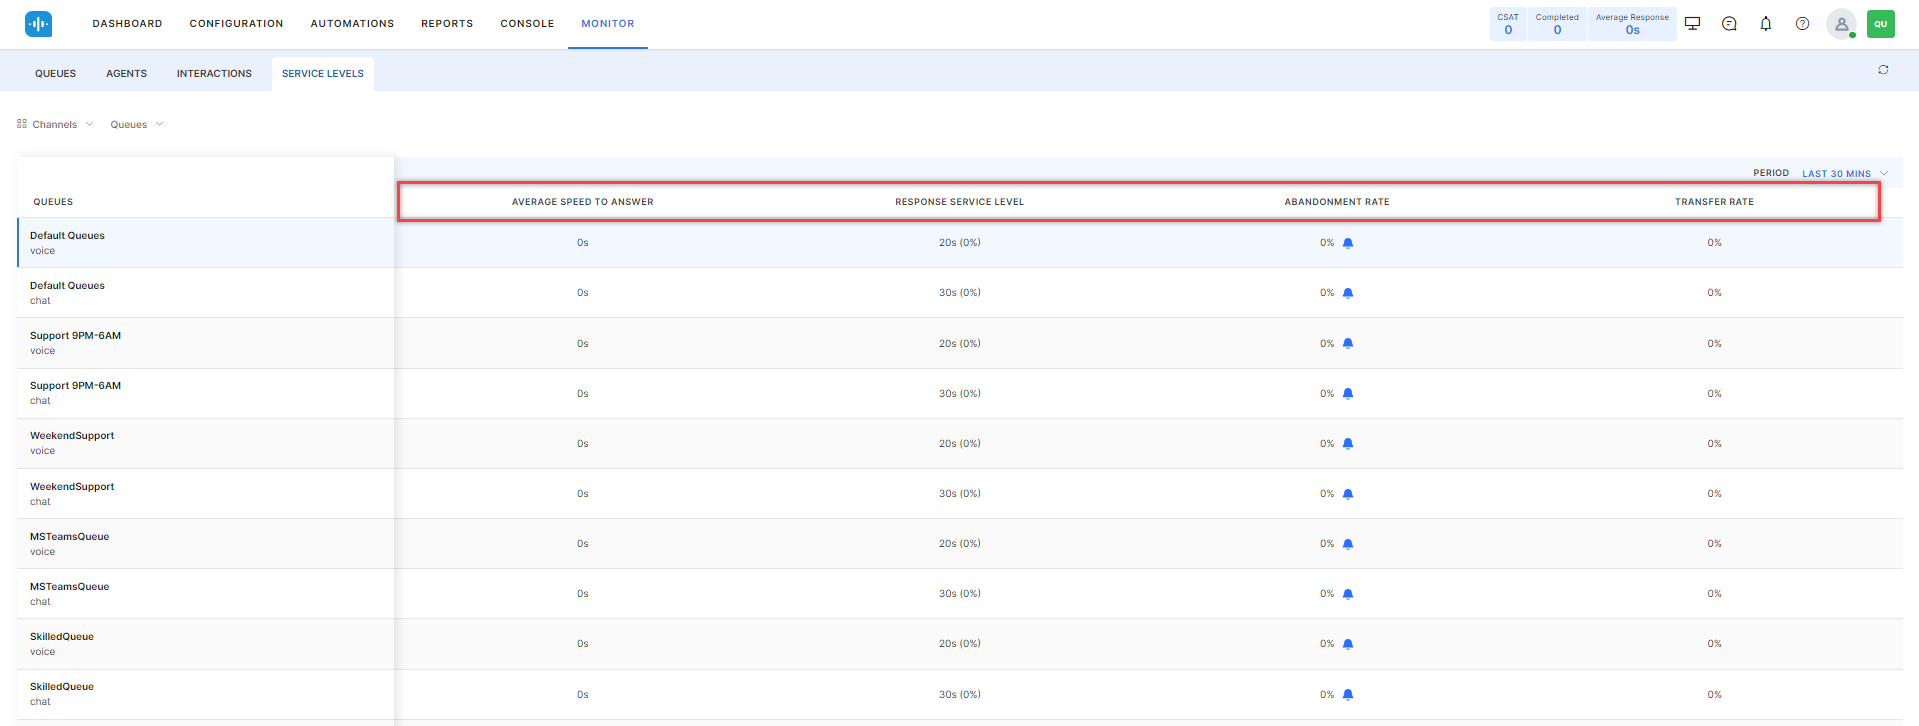
Service Levels
Service level targets establish the acceptable threshold for key performance indicators such as Average Speed to Answer, Response Service Level, Abandonment Rate, and Transfer Rate for interactions, including voice calls and chats.
Administrators and Supervisors can access service levels by going to MONITOR > SERVICE LEVELS.
![]()
The following Key Performance Indicators are displayed:
Refresh Service Levels
You can refresh the service levels by clicking the refresh icon on the upper right corner.
![]()
Filter Service Levels
The following filters are available on service levels:
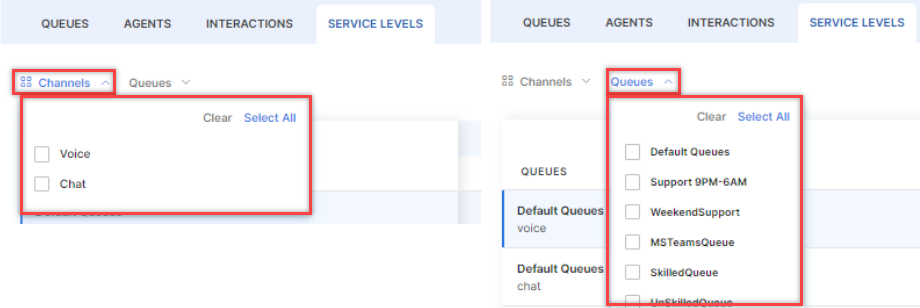
You can clear the filters by clicking Clear Filters in the upper right corner.
![]()
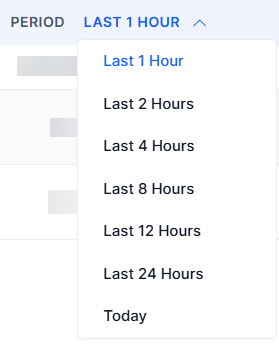
Time Intervals
You can configure the service level targets for each channel type and measuring interval. The measuring intervals can be configured in 30-minute increments, with a minimum interval of 30 minutes and a maximum interval of 24 hours. You can also select Today, which displays all conversations from 12:00:00 AM (midnight) of the current day in the user’s time zone.
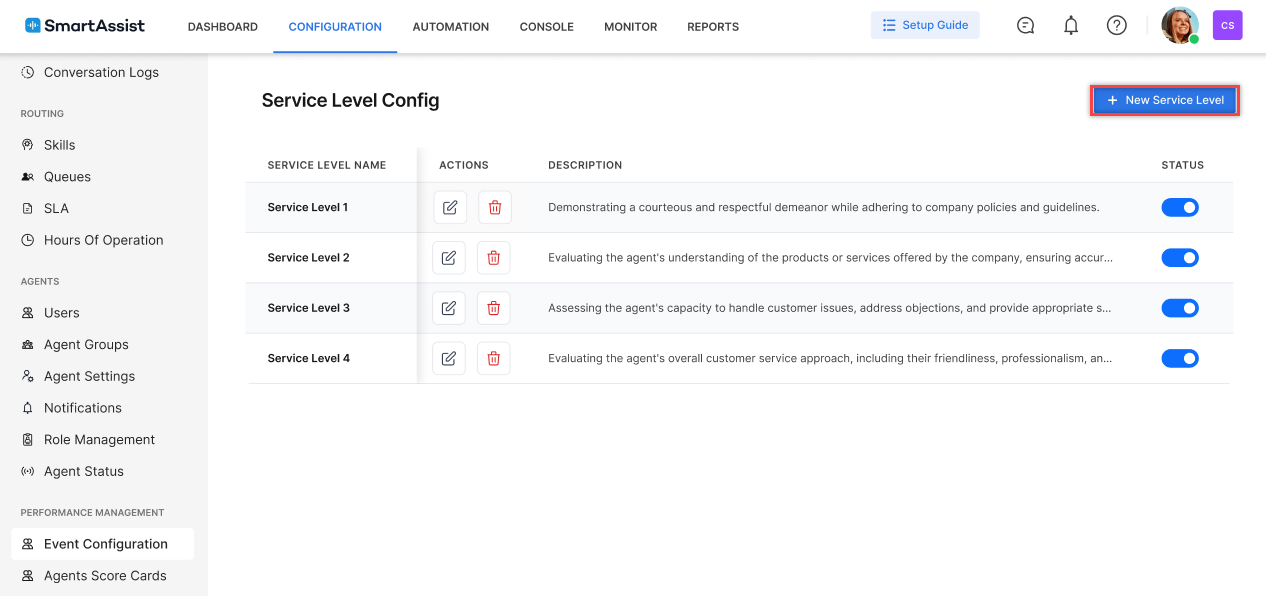
Configure Service Levels
This feature enables administrators to define, customize, and monitor service-level targets based on specific needs.
To configure service levels, go to CONFIGURATION > PERFORMANCE MANAGEMENT > Event Configuration.

Create a New Service Level
Steps to create a new service level:
- Click the + New Service Level button on the upper-right corner.
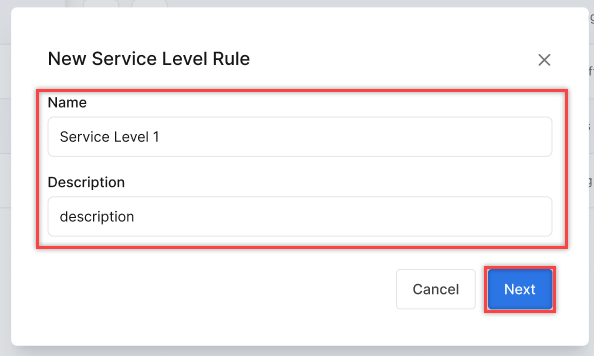
- On the New Service Level Rule pop-up window, enter a Name and Description for the service rule and click Next.
The service level configuration screen is displayed.
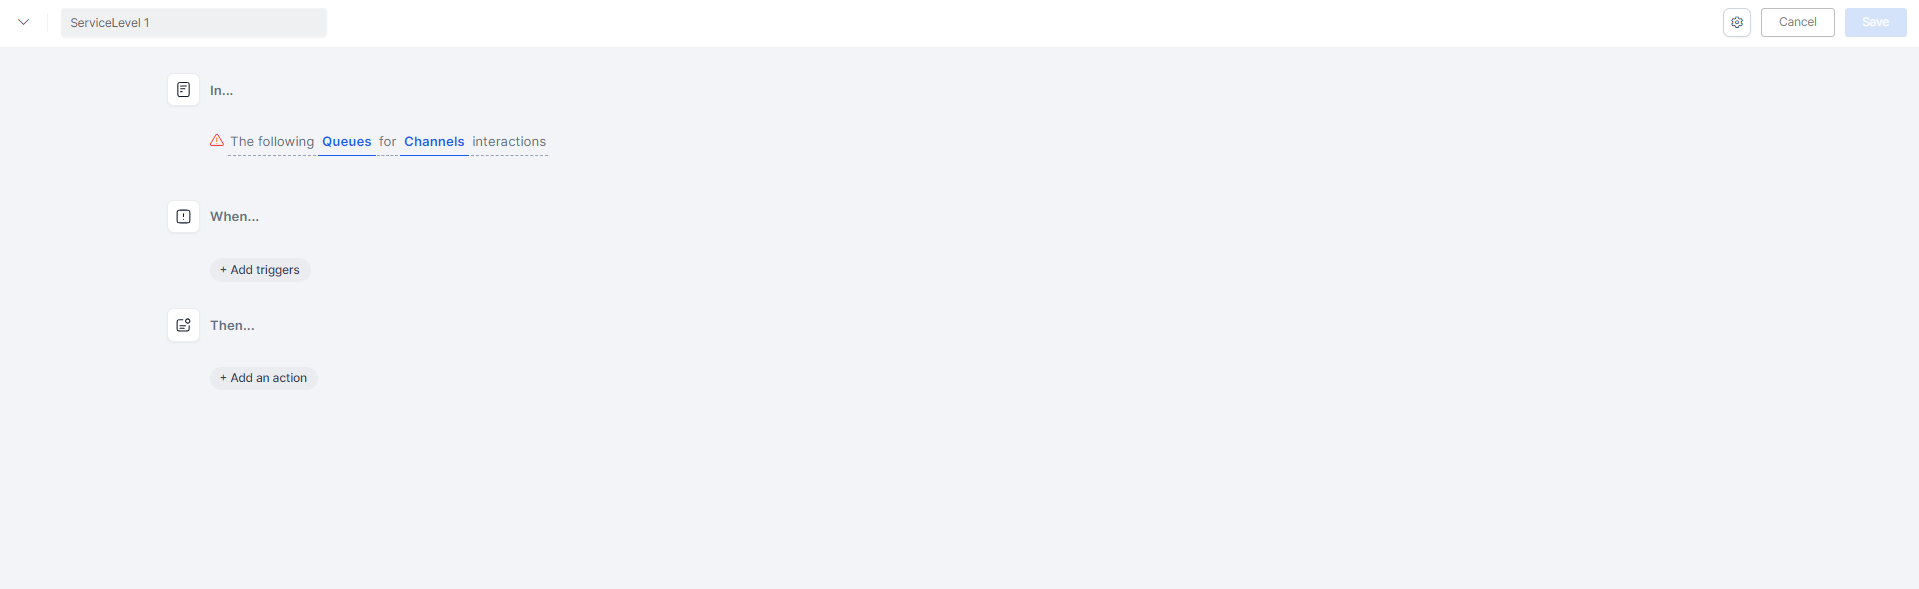
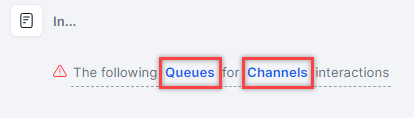
- Click and select the Queues and Channels from the drop-down menus.
- Click + Add triggers and choose a trigger.

Based on your selected trigger, you can choose the following:
Abandonment rate:

Average speed to answer:

Response service level:

Transfer rate:

- Click + Add an action and choose an action.
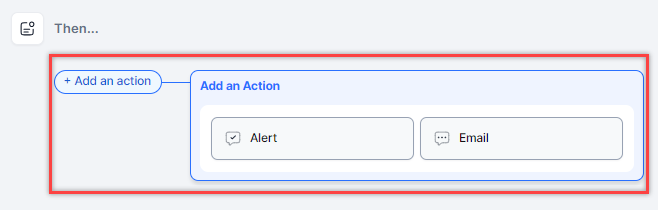
Based on your selected action, you can choose the following:
Alert:

Email:

- Click Save to create the service level.
A confirmation message is displayed and the service level is created.

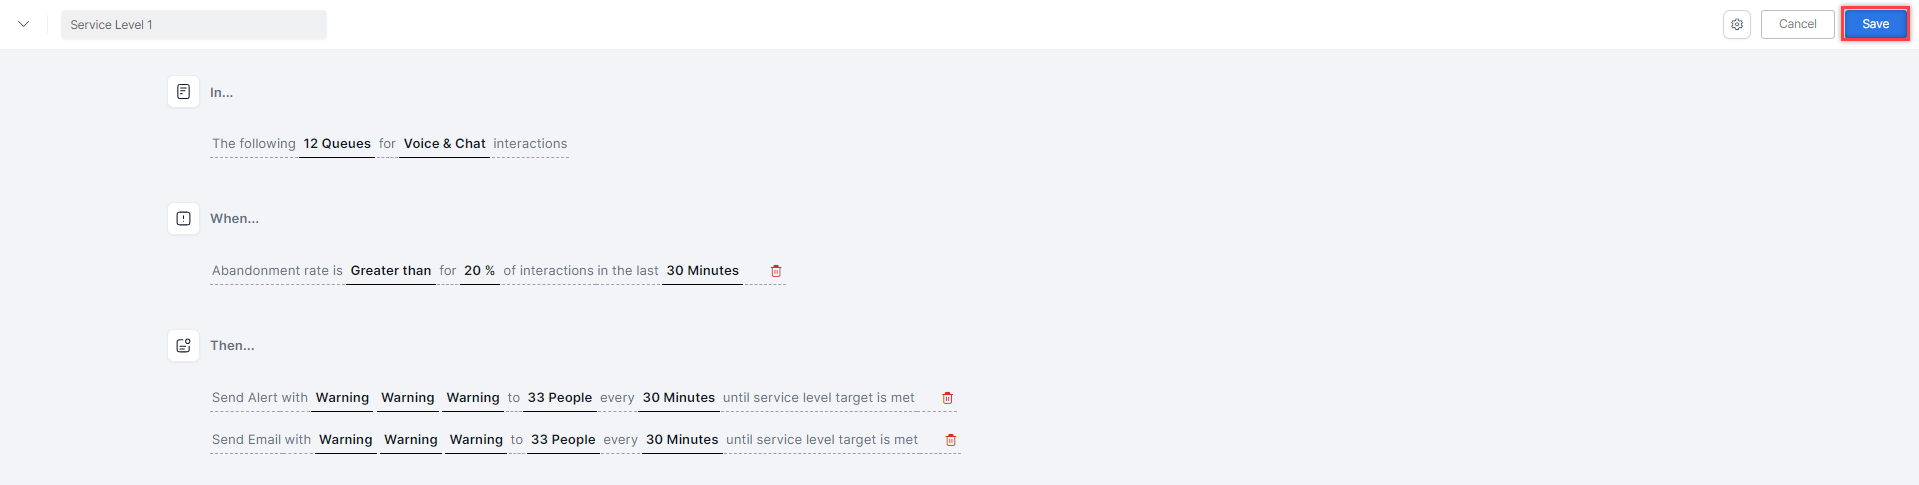
Edit a Service Level
Steps to edit a service level:
- Click the Edit button.

- Make the necessary changes to the service level and click Save.
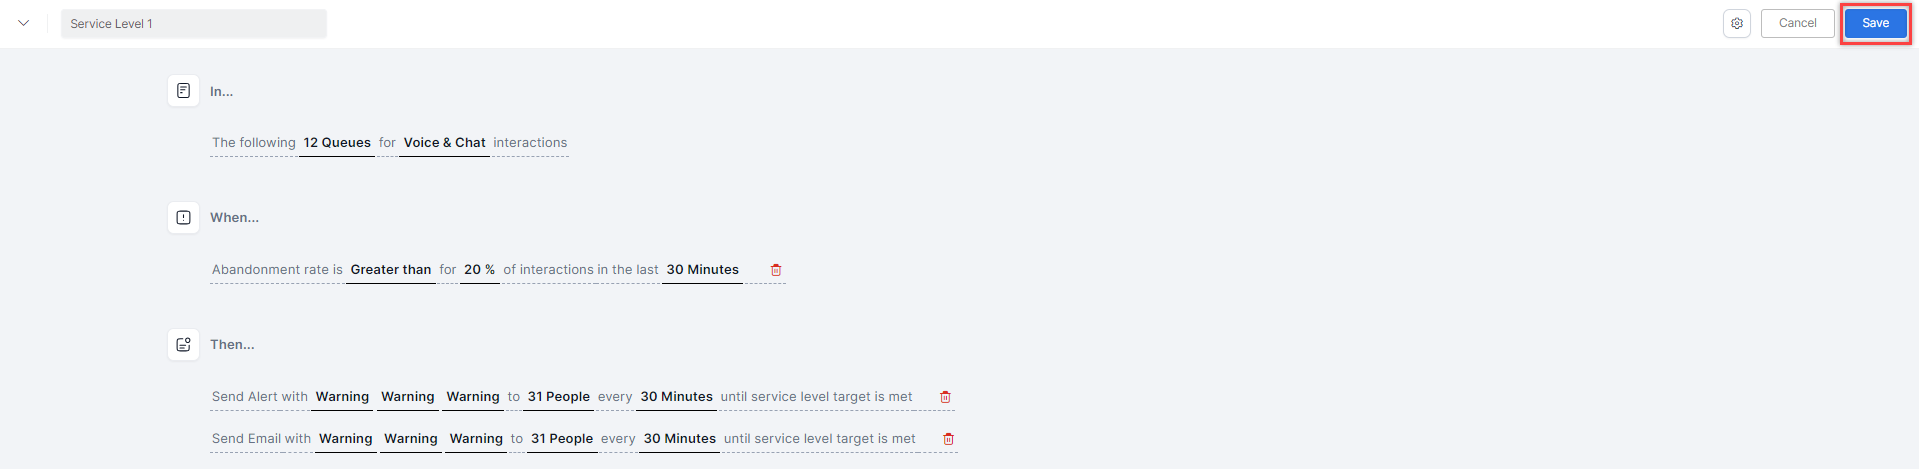
A confirmation message is displayed.

Edit a Service Level Name
Steps to edit a service level name:
- Click the Edit button.

- Click the Settings button.
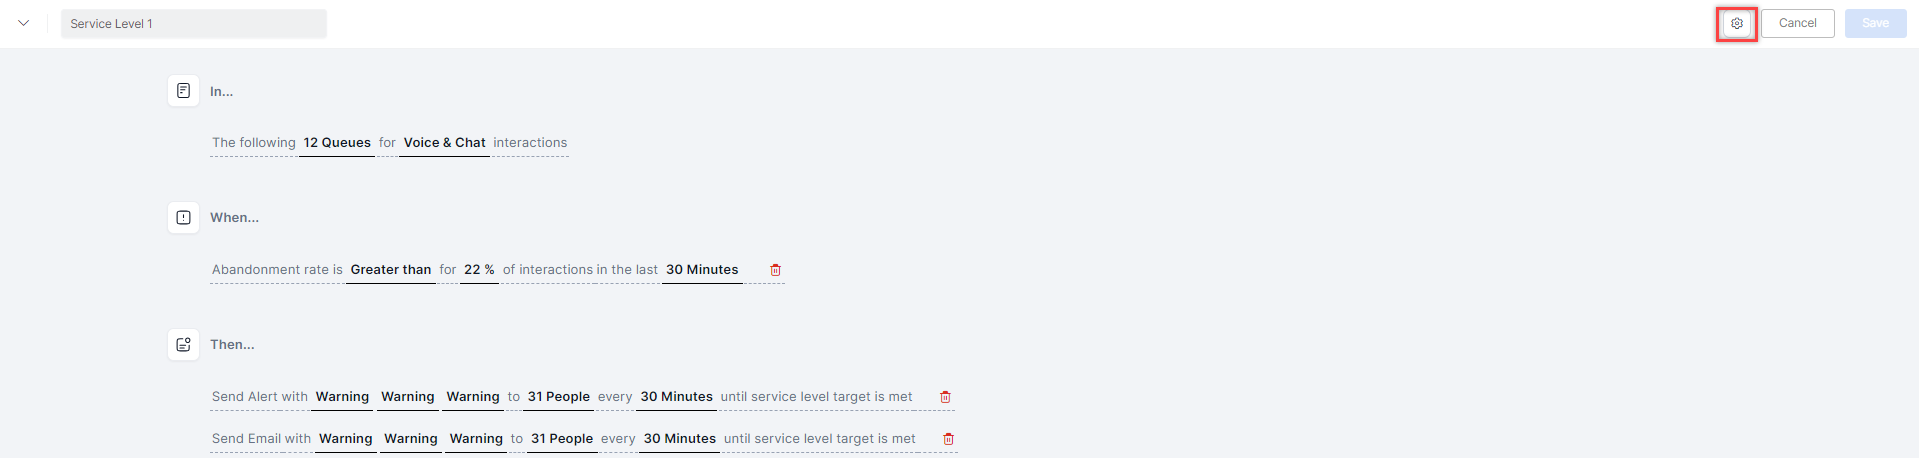
- Make the changes on the Edit Sevice Level Name pop-up and click Apply.
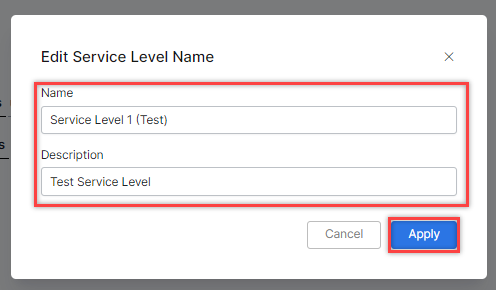
- Click Save.

The revised service level name is displayed.

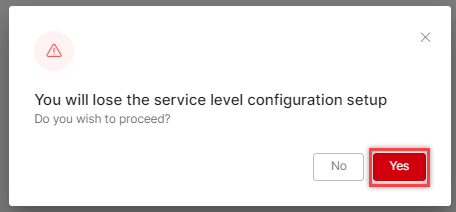
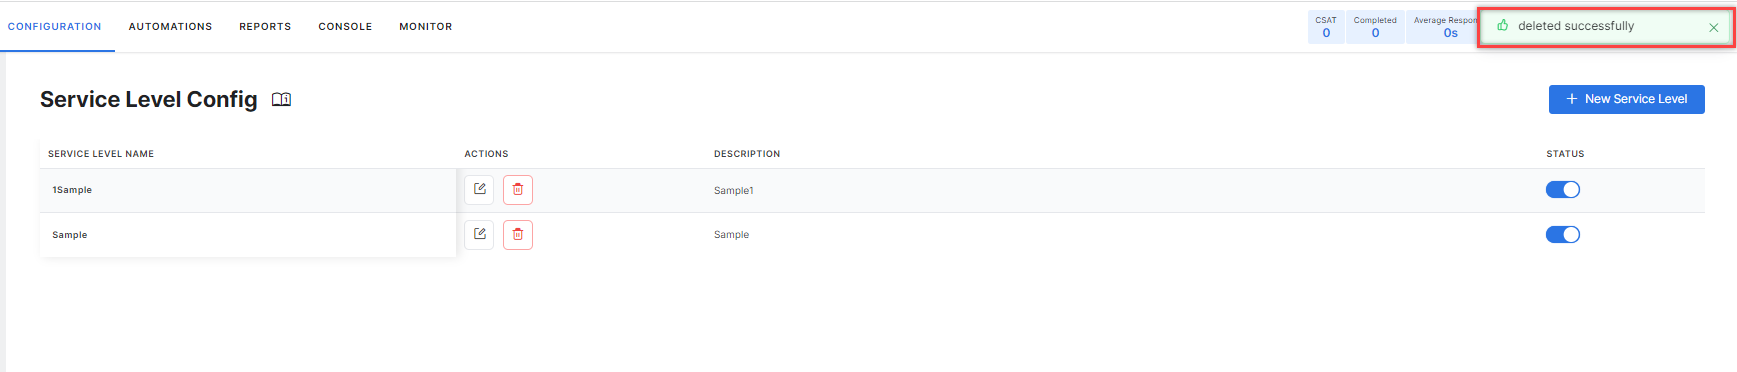
Delete a Service Level
Steps to delete a service level:
- Click the Delete button.

- Click Yes on the confirmation pop-up window.
- A confirmation message is displayed and the service level is displayed.
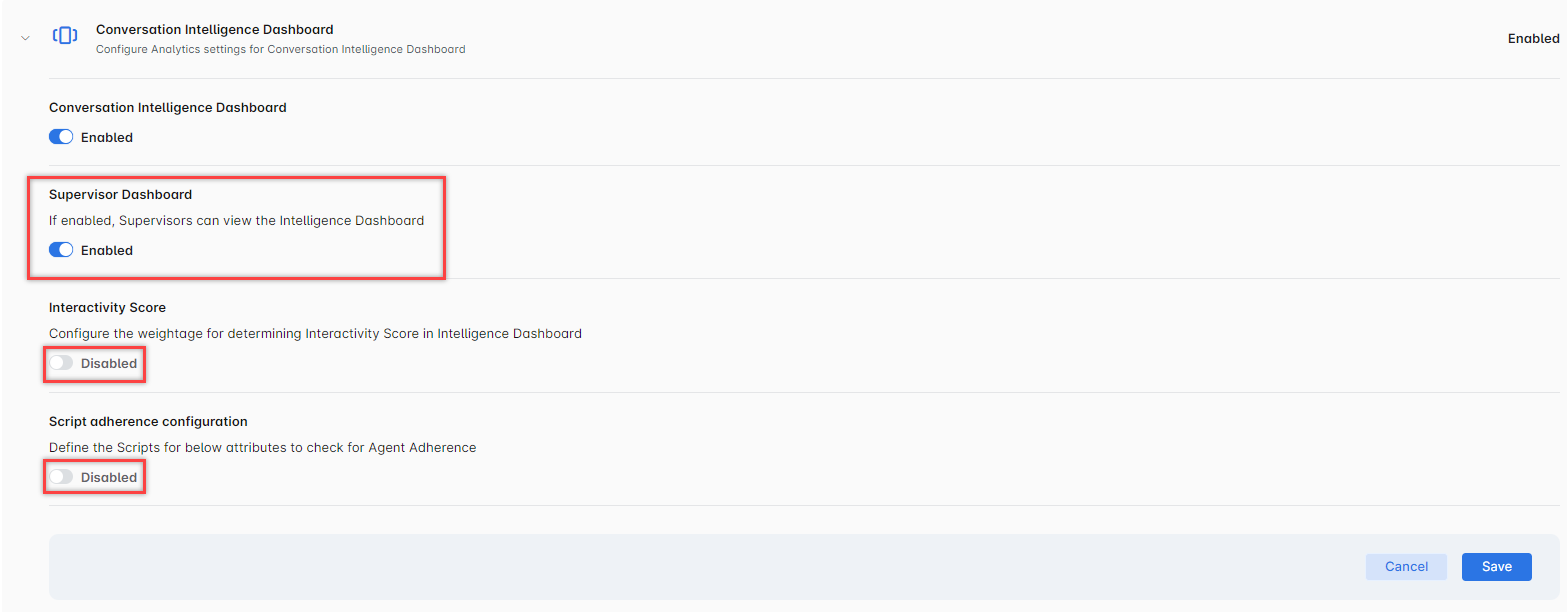
Configure Conversation Intelligence Dashboard
- To configure the Conversation Intelligence Dashboard, go to CONFIGURATION > PERFORMANCE MANAGEMENT > Settings > Conversation Intelligence Dashboard.
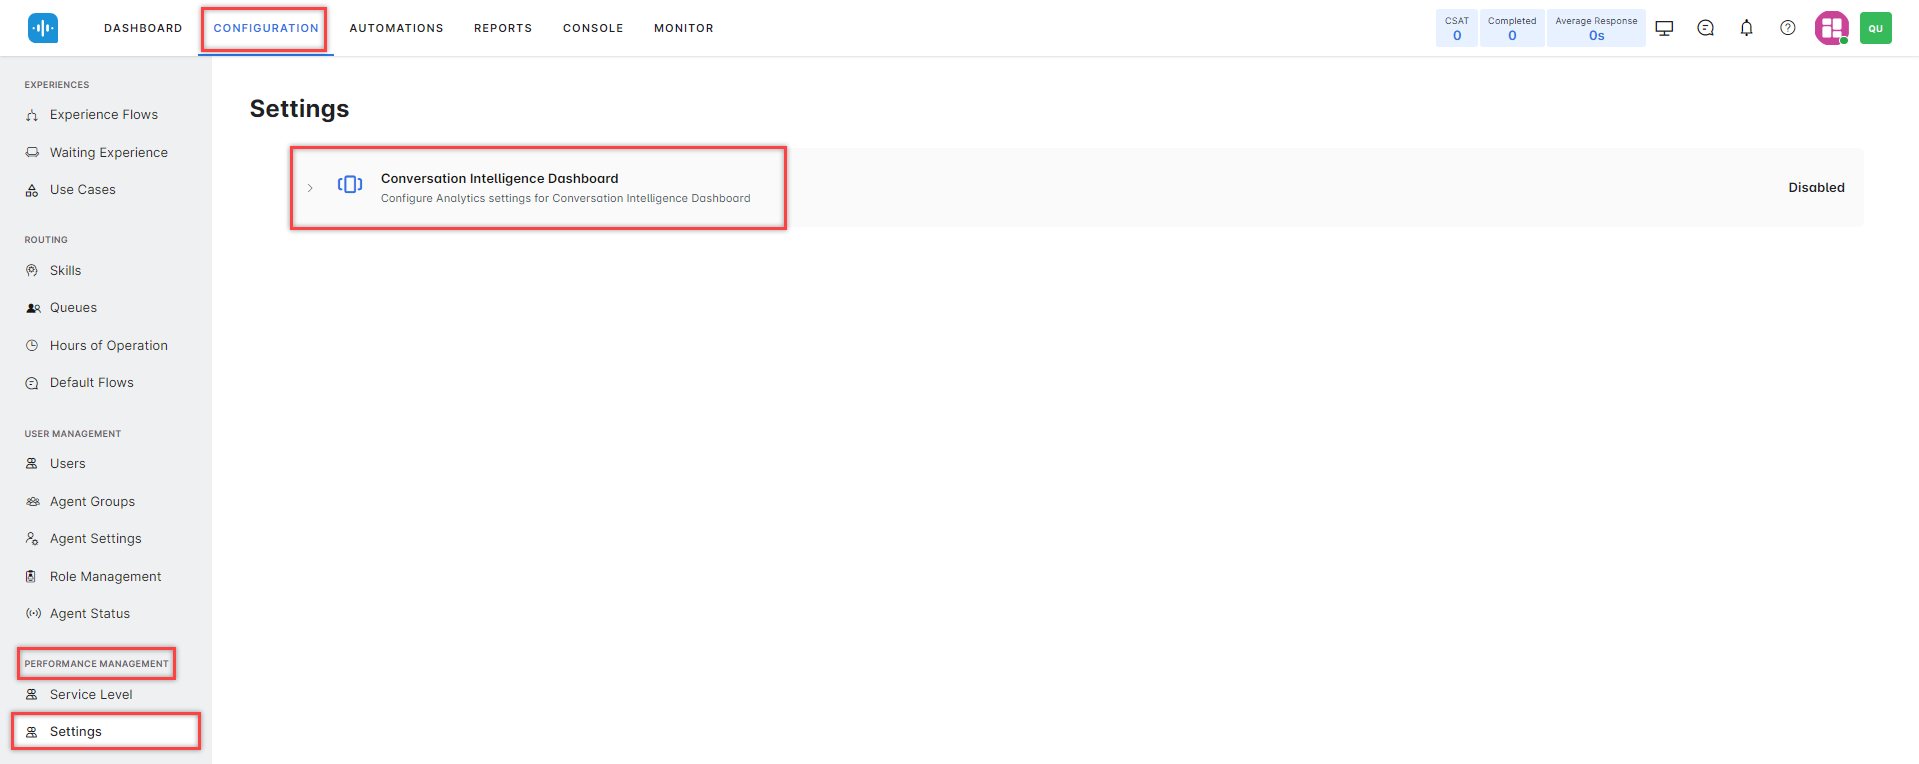
- By default, the conversation intelligence dashboard is disabled. Toggle on the conversation intelligence dashboard to enable it. The Supervisor Dashboard is displayed in a disabled state.
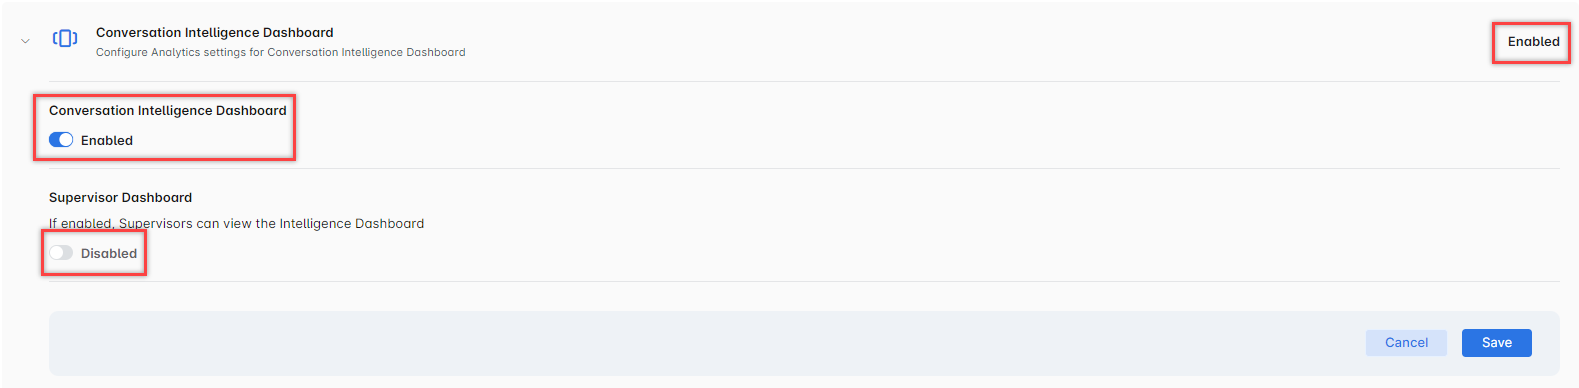
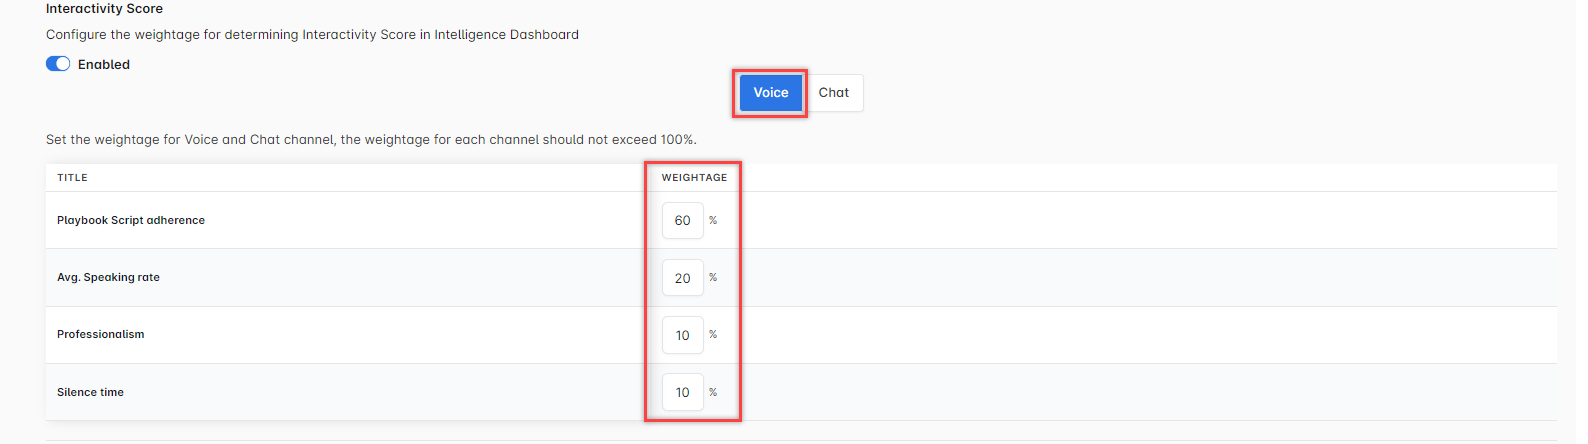
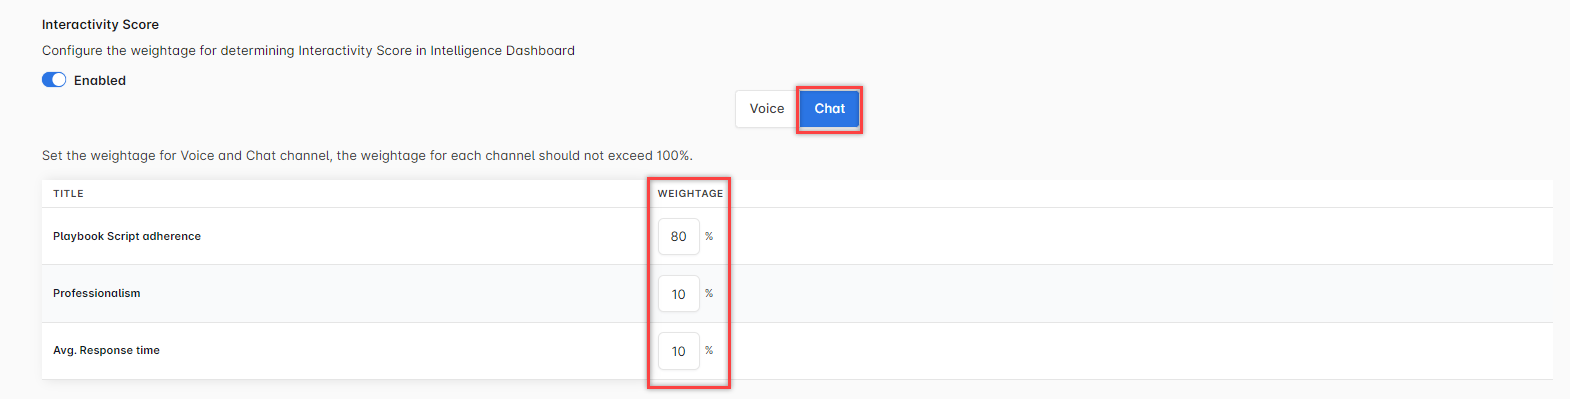
- Toggle on the Supervisor Dashboard to enable it. The Interactivity Score and Script Adhererence Configuration options are displayed in the disabled state.
- Set the weightage for the voice and chat channels, the weightage for each channel must not exceed 100%.
Voice:
Chat:
- Toggle on Script adherence configuration and define the scripts for agent adherence attributes
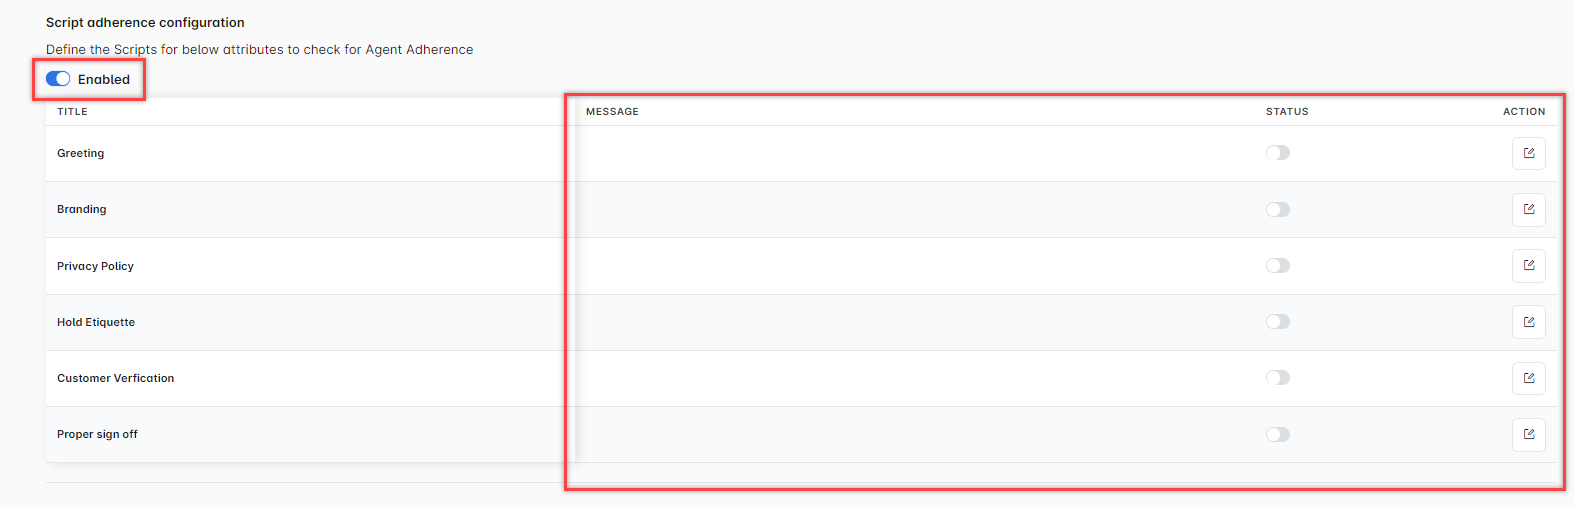
- Toggle on the STATUS to enable it. A message is displayed to enter a message for the attribute. Click the Edit icon to add a message.

- Click Add Message to add the message.
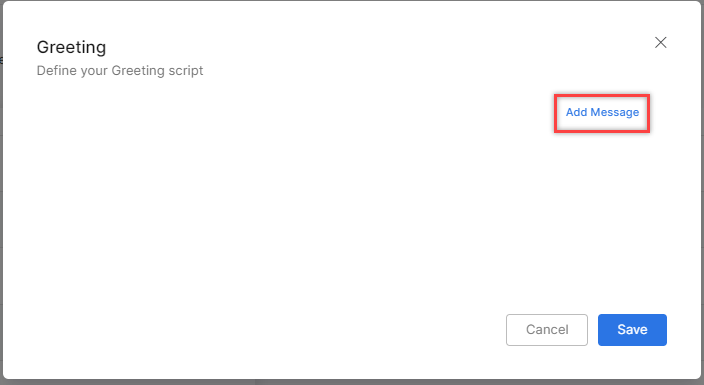
- Enter the message in the message field. You can add multiple messages by clicking the Add Message button. Click the (-) icon to delete a message.
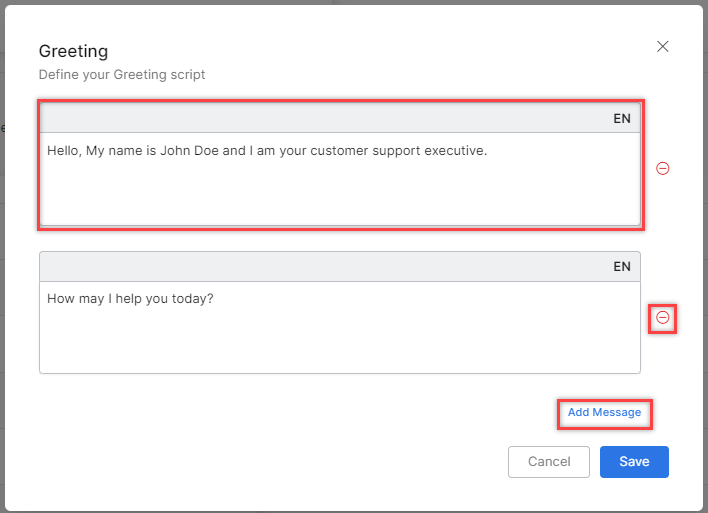
- Click Save to update the message.
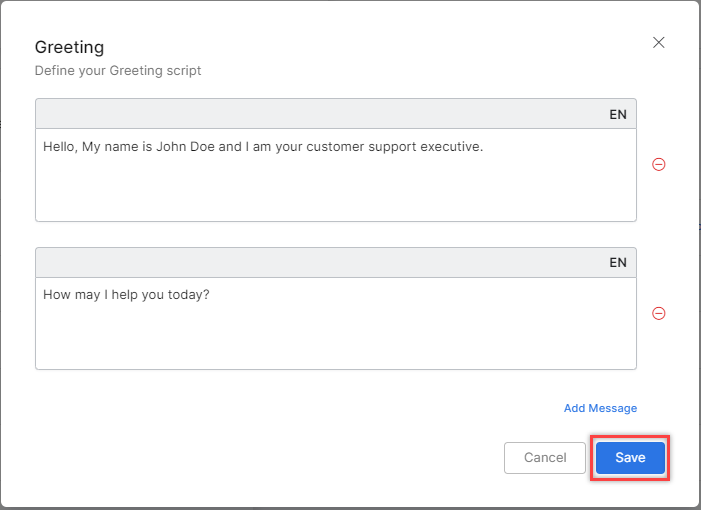
The configured message is displayed under MESSAGE.

-
Click Save after the messages are defined for the required attributes.

A confirmation message is displayed.
