
Voice bots help automate your customer service and reduce live contacts making your team more efficient. Kore provides automated voice bot solutions for Genesys.
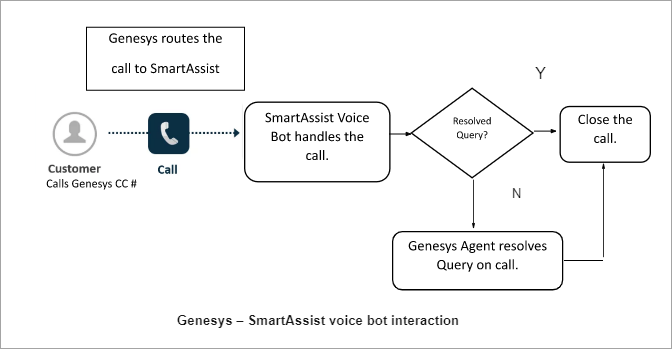
To understand the flow between the voice bot and customer interaction, consider a scenario where a customer calls the Genesys Agent desktop. This call gets routed internally to Kore’s voice bot. The voice bot handles the customer interaction. If the voice bot cannot handle the customer query, it automatically transfers the call to a human agent at the Genesys contact center.
To enable Genesys and SmartAssist voice bot interaction, you will have to:
- Install the Genesys application.
- Create an account in the SmartAssist application.
- Create and configure experience flows.
Go to Genesys to test if the SmartAssist voice bot handles the interactions. If not, the automatic agent transfer handles the customer’s call to resolve the query.
Prerequisites
Before you begin the installation, perform the following tasks:
- Install the Kore XO Platform and SmartAssist instances. An Enterprise Plan is preferred for production usage as it provides the necessary resources, tools, and support to ensure a successful and efficient implementation of a voice bot.
- Develop and configure well-designed experience flows. Kore professional services can also assist you with designing experience flows and configuration.
- Get the Genesys PureCloud environment, with administrative access sufficient to install Premium Applications. By leveraging the full capabilities of the PureCloud platform with administrative access, you can optimize and enhance your contact center operations, improving customer engagement and support.
- Buy a Phone number from Genesys.
- Get a working knowledge of the configuration of SIP integrations between telephony systems.
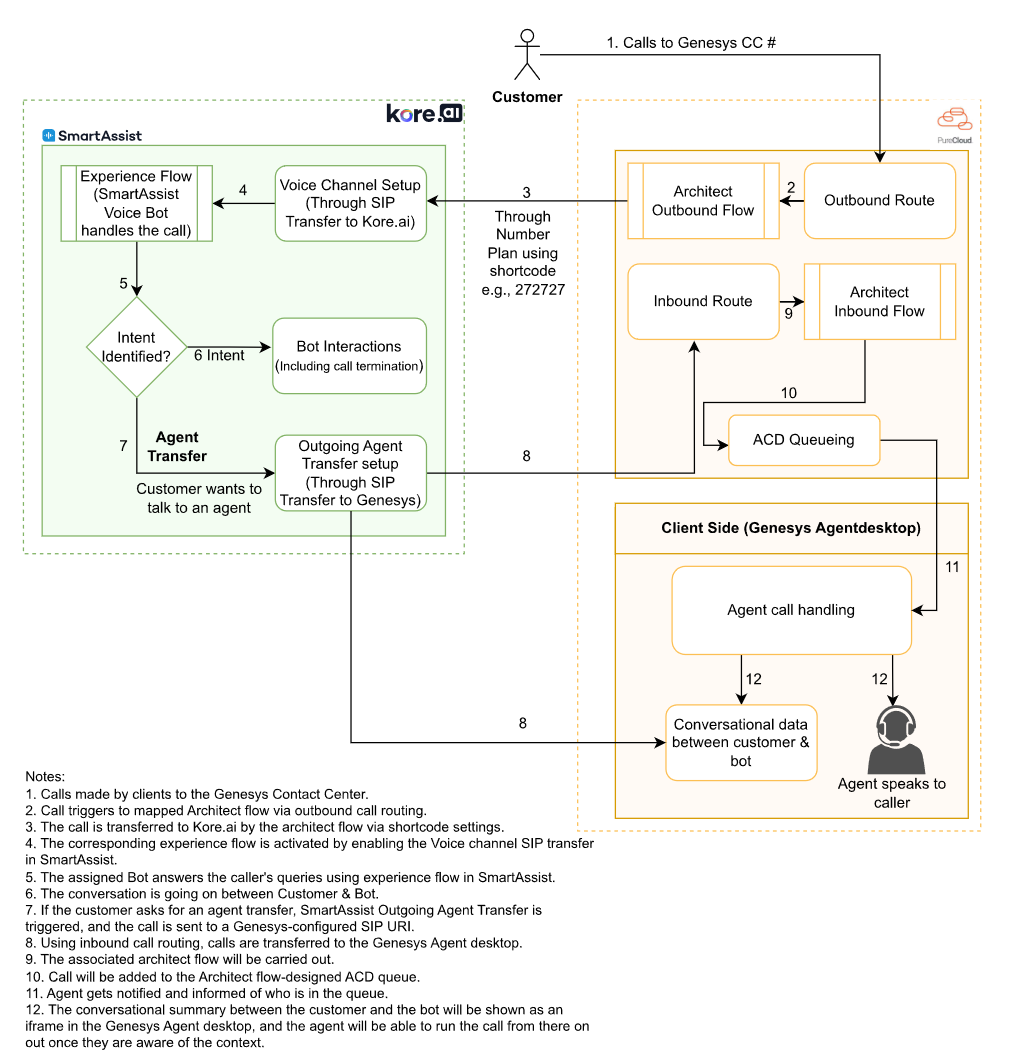
Architecture Diagram
Step 1: Installation Steps for SmartAssist
On the SmartAssist application, you need to perform the installation steps manually.
- Log in to the SmartAssist application.
- Navigate to Configurations > System Setup > Channels.
- In the SIP Transfer drop-down, click New.
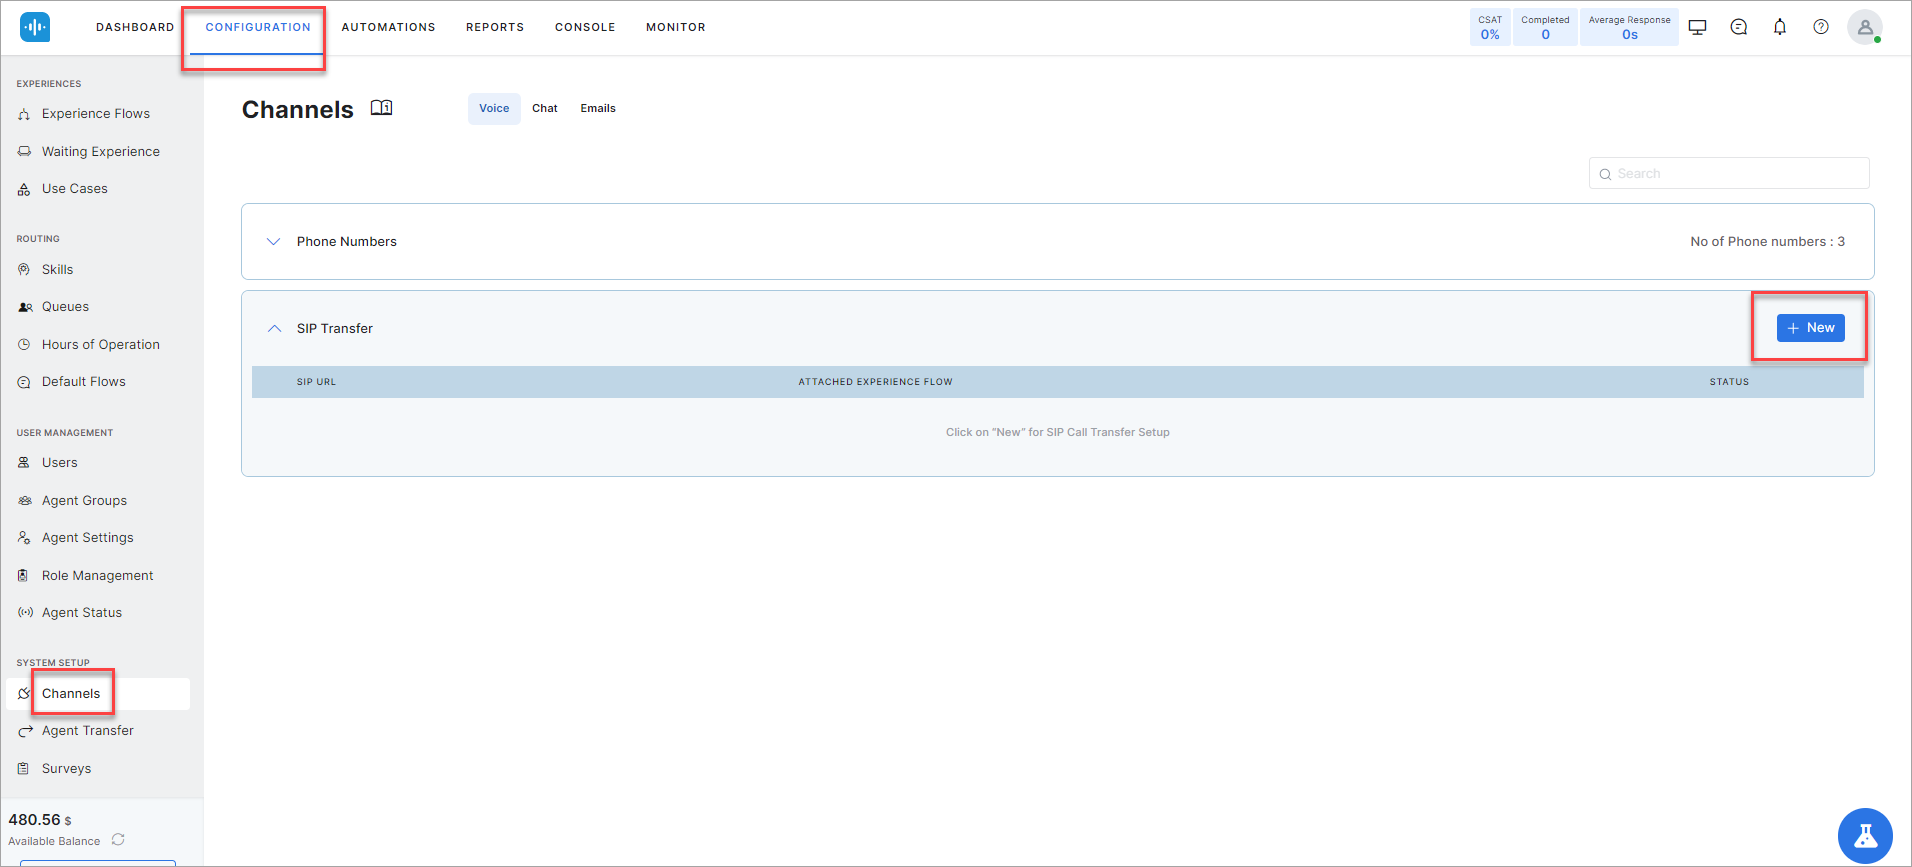
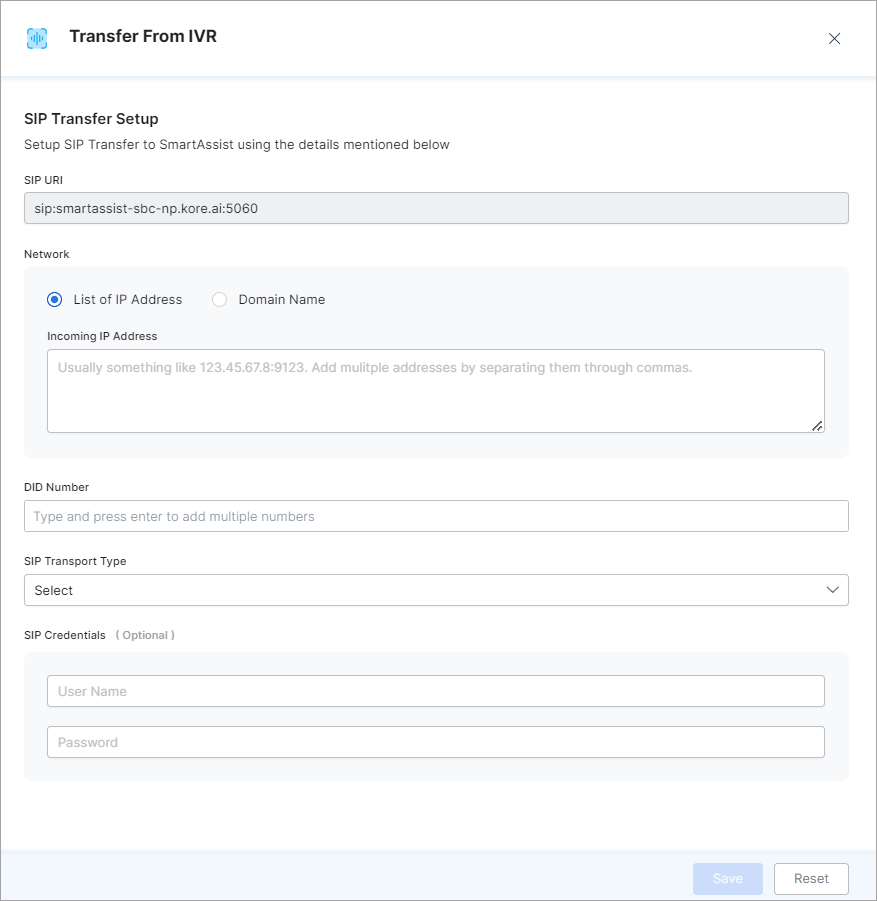
The Transfer From IVR screen opens where you set up the SIP Transfer.
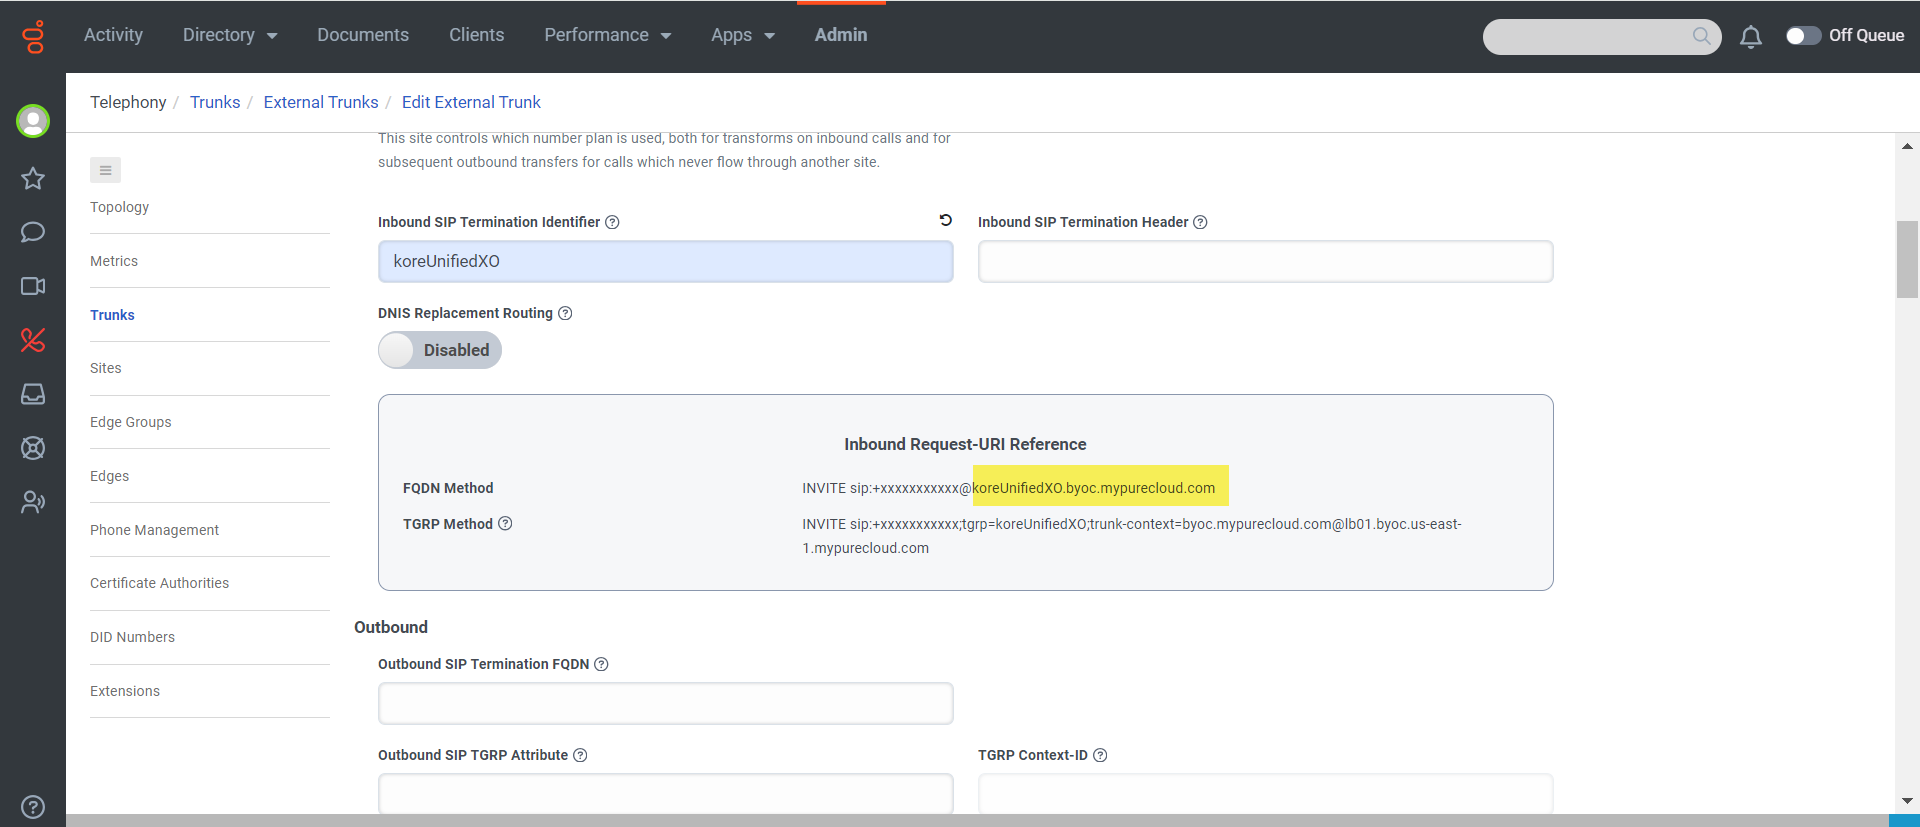
 For the Domain Name field, navigate to Admin > Trunks in Genesys and copy the content under the Inbound Request URI Reference field (content following the @ symbol), as highlighted in the following image:
SIP Transfer Setup
Setup SIP Transfer to SmartAssist using the details mentioned below:
- Enter the SIP URL. (For example, sip:smartassist-sbc-np.kore.ai:5060)
- In Network, select Domain Name and set the FQDN to the name of your trunk. For example {your-trunk-name}.byoc.mypureclound.com.
- Enter DID Number (Enter the number you created in your Number Plan.)
- Set the SIP Transport Type to UDP.
- (Optional) Enter SIP Credentials (Username and password).
- Click Save.
Next, set up the SmartAssist experience flows.
Create Experience Flows
- Navigate to Configurations > Experience Flows.
- Click + New Flow.
- Create a Voice Flow pointed to the Kore.ai XO Platform automation you wish to use. Refer to the SmartAssist documentation for creating Experience Flows and Configuration of Nodes.
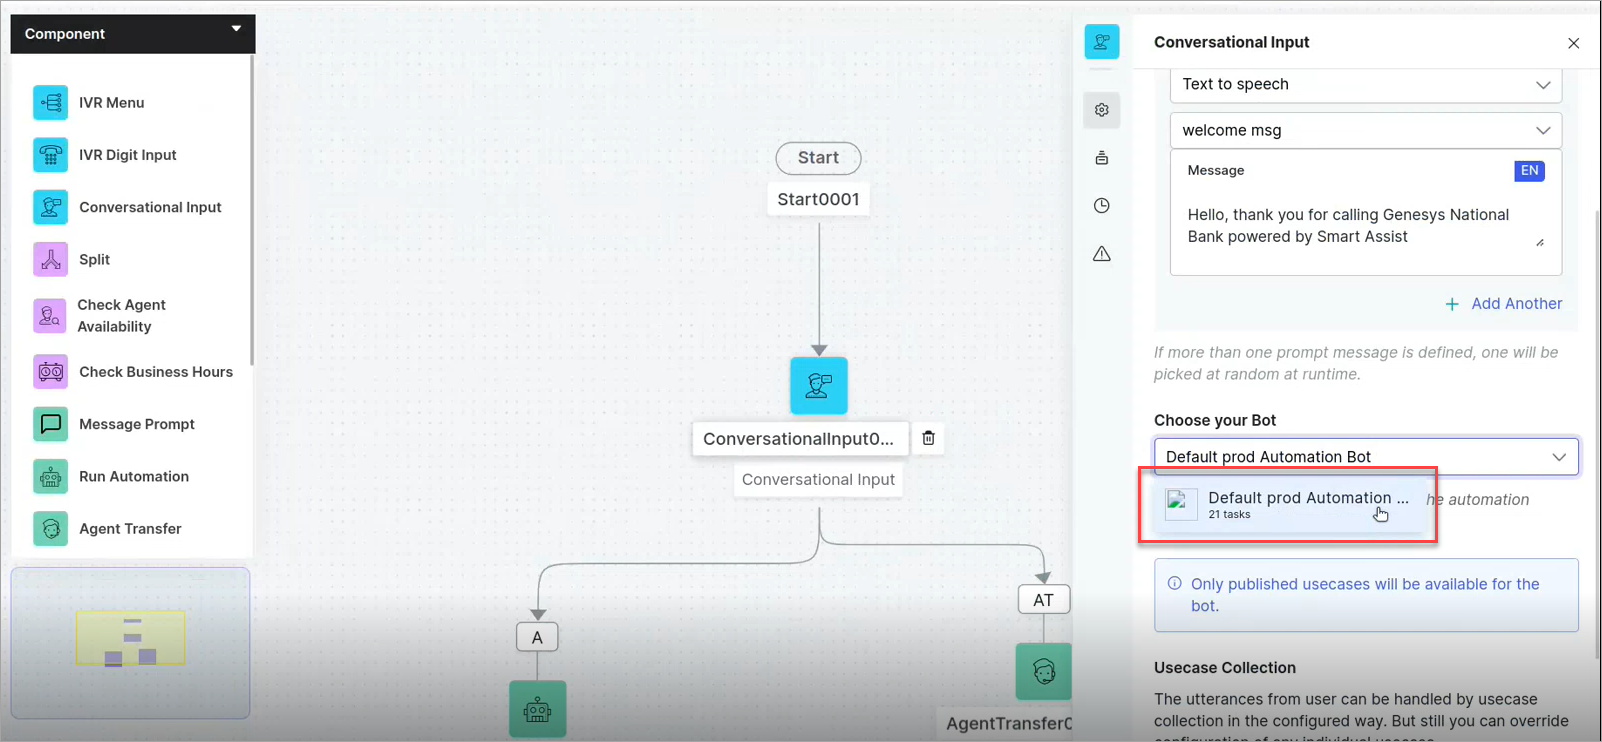
- Add a Conversational Input node.
- Go to Configuration.
- Select your Automation Bot from the list.
- In the Start node, select your SIP Transfer setup as indicated by the DID number to be used with this Experience Flow.
 The screen below shows the matched short code and the associated experience flow attached to SIP URL.

If the bot cannot handle the customer query, then the call gets transferred to a human agent on Genesys. Finally, set up the Agent Transfer from SmartAssist back to Genesys.
Agent Transfer Configuration from SmartAssist to Genesys
- Navigate to Configurations > System Setup > Agent Transfer.
- In Outgoing Voice Agent Transfer, select the SIP Transfer option.
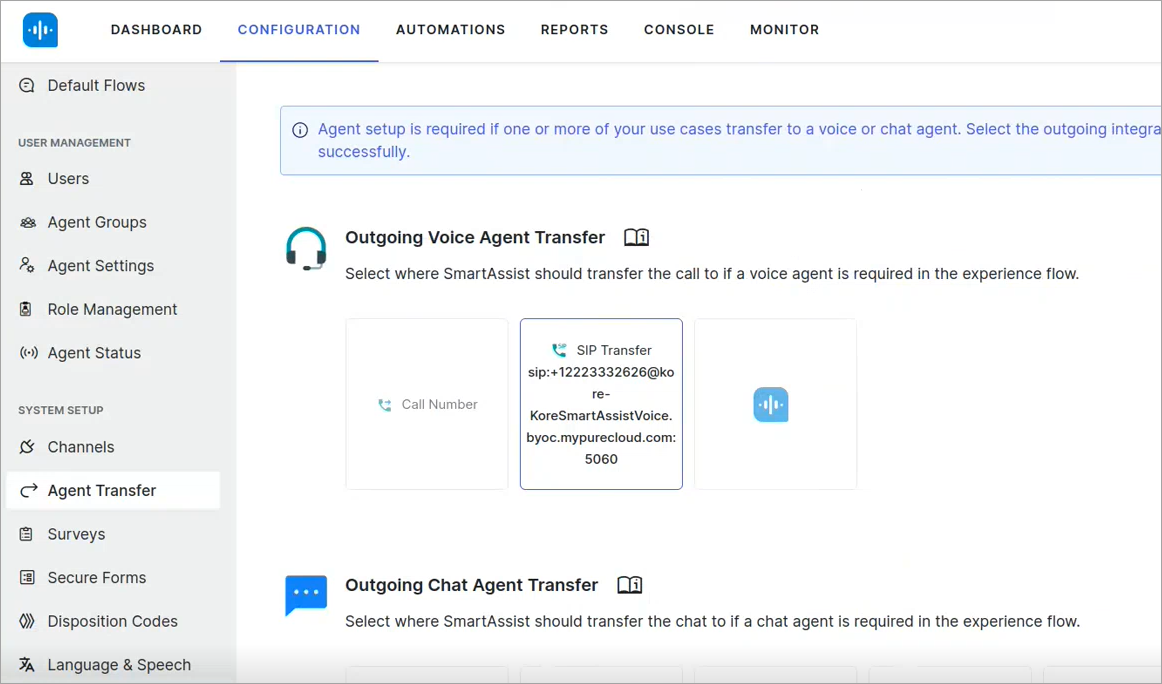
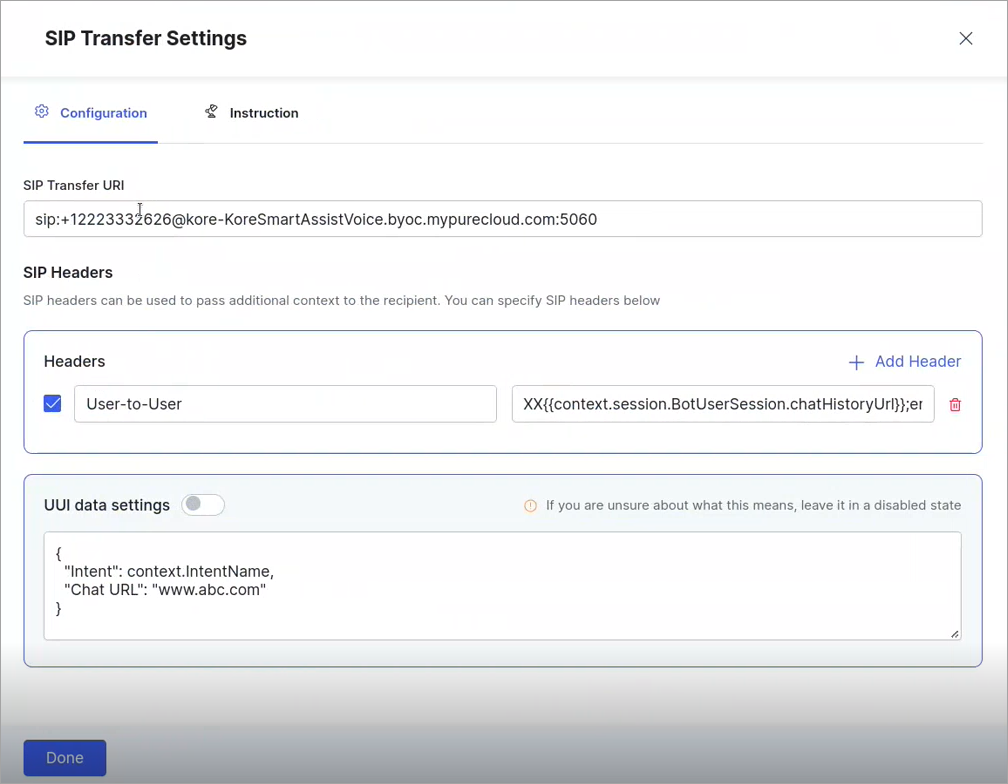
- Set the SIP Transfer URI to a valid phone number connected to an inbound call flow in Genesys PureCloud. The format should be similar to sip:+{phone-number}@{your-trunk-name}.byoc.mypurecloud.com. The phone number used here is a DID number that is only configured for routing inside Genesys Cloud CX, not a publicly available phone number. For example, it can be something like “+12223334444”.
- Configure SIP Headers to pass back to Genesys PureCloud.
- Click Done.
Step 2: Install Genesys Application
After you have fulfilled all the prerequisites, you need to install the Genesys application.
- Log in to the Admin Console for Genesys Cloud CX.
- If you don’t already have a public customer service phone number that you wish to use with this automation solution, create a new public DID number that you can assign to the inbound call route and flow.
- To install the Kore.ai application, please visit the App Foundry in the Bots and Automation category: https://appfoundry.genesys.com/filter/genesyscloud/telephonyAndTechnology/botsAndAutomation. You may also search for Kore.ai in the AppFoundry.
When you start the installation, you should see the start page displayed as shown below:
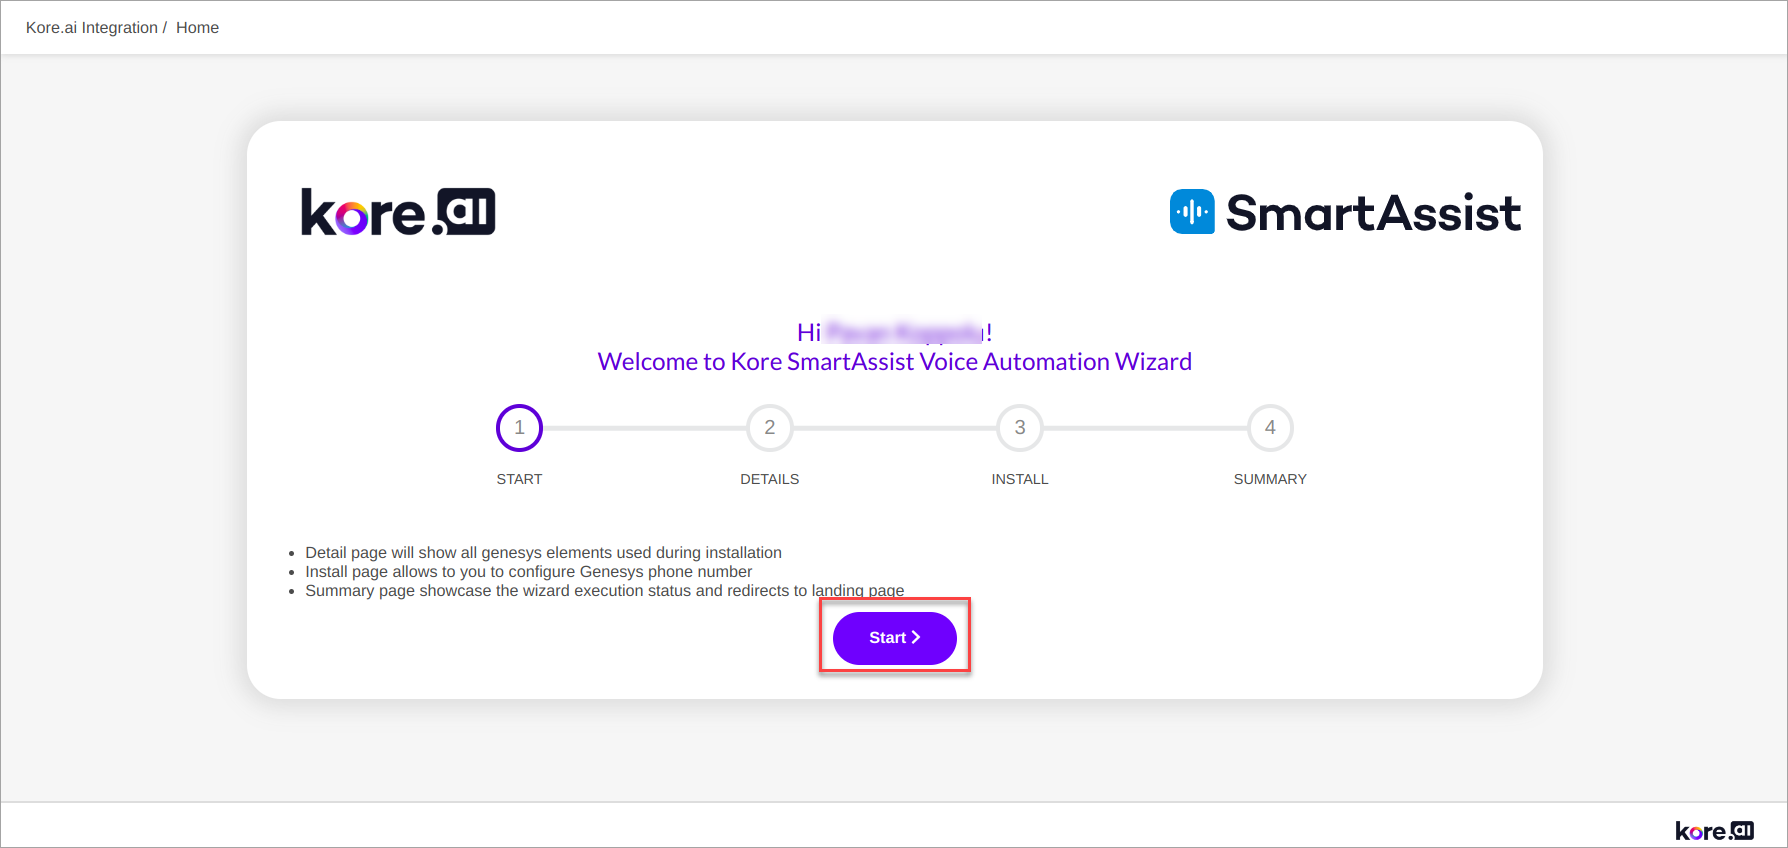
- Click Start.
On the Details page, the wizard performs the following steps (Automatically):
- Create an OAuth Client
- Create Role
- Create Queue
- Create Script
- Create Call Flow
- Create Call Routing
- Create BYOC Cloud trunk
- Create a Site
- Create DID number setup
- Click Next.
The install page is displayed as shown below:
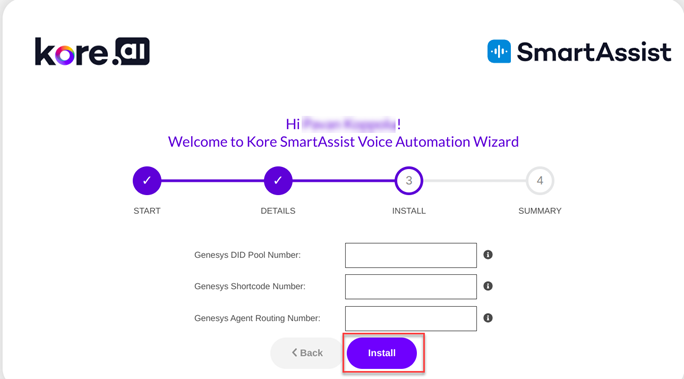
- Enter the Genesys Phone Number.
- Click Install.
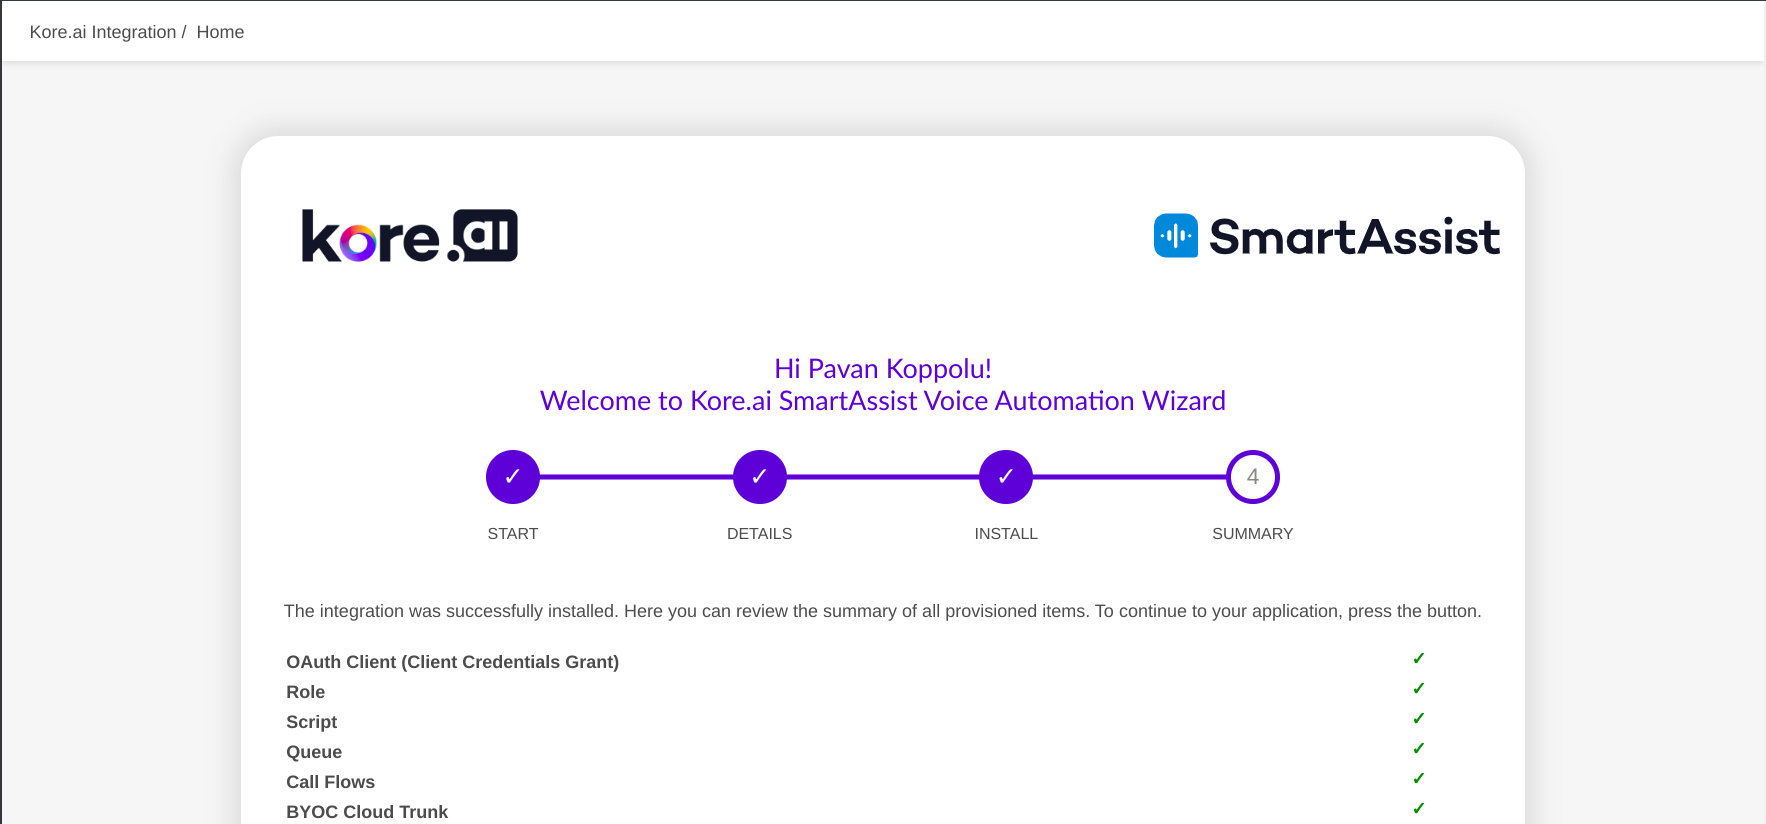
The summary of all the steps the wizard has performed is shown below:
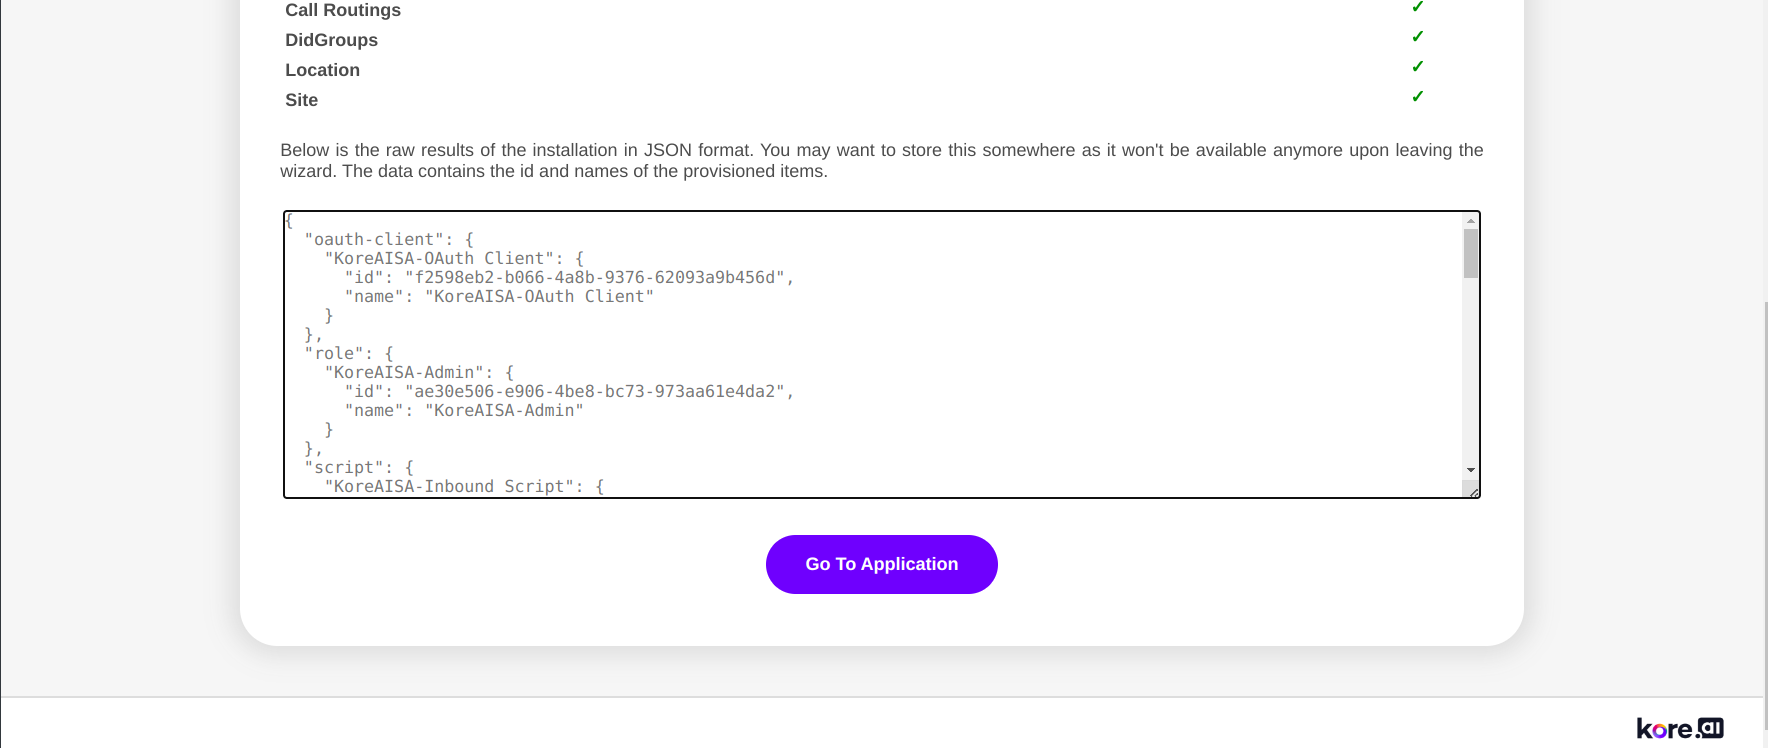
- Click Go to Application.
The Application landing page is displayed.
- Configuration Quick Test
Genesys provides a phone number for routing testing directly in the agent desktop. You can use this to confirm the Number Plan is correctly routing to the Kore.ai gateway.
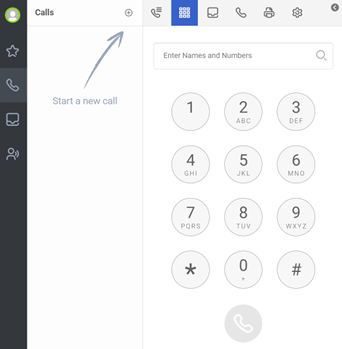
Enter the Short Code number you chose in the initial installation wizard screen. If the application is configured correctly, you should route to Kore.ai and hear the opening prompt configured in the SmartAssist Experience Flow.
If this works correctly, call the public telephone number you created to start the customer interaction. You should eventually reach the same prompt. If so, you have successfully configured Kore.ai to provide voice automation at the beginning of your customer voice interactions.
To test transfers back to a live agent, choose the Agent Transfer option in the SmartAssist Experience Flow. You should hear the initial prompt (if any) of your Architect Flow and if agents are On Queue, the call should reach the Genesys Cloud CX agent desktop.