
While Q&As help you answer simple customer queries with pre-existing answers, Conversations are used for advanced activities, such as placing an order or checking an order status. This requires a multi-step exchange of information between the user and the bot.
Like Q&As, Conversations start by understanding the customer’s intent. After you define the customer intent, you can choose one of three options:
- Trigger an automated dialog.
- Transfer to an agent.
- Deflect to chat.
An Automated Dialog drives the customer through an experience based on their intent. For example, a welcome dialog provides a greeting experience during the first interaction. You can use the dialog tasks within the Kore.ai XO Platform to build custom dialogs.
| Note: This is different from chat/call automations, where a static chat or voice message is mapped to a use case and triggered by an event such as hold, transfer, drop-off, etc. A dialog is scenario-based, thus dynamic in nature. Dialogs help trigger a more natural conversation with customers or respond in real-time, based on the current conversation and scenario. |
For example, “Hello! How are you today? Would you like to get your boarding pass via email?” is displayed if an airline customer selects the “receive boarding pass ” option.
When transferring to an agent, the user is directed to a live agent as configured in the Outgoing Call Setup. You can also give the user an option to direct to an automated chat agent.
Deflect to Chat transfers the current conversation from the call to the chat channel and the user is provided with a link to initiate the chat experience.
Conversations Features
- Utterances – These are the conversational utterances typically used by customers in their queries. For example, a customer looking for directions would ask – “How do I get to your office in South Beach?”
- Alternate Utterances – Used to augment the primary utterance with similar or alternative utterances like “Where is your South Beach office?”
- Experiences – These include the responses given to the customer and are configured differently based on the interface they use to call or chat at a SmartAssist-hosted contact center.
- Chat Experience – Delivered to customers when they use chat on SmartAssist over a medium like a website widget. Responses can be configured for Automated Dialog and Transfer to Agent flows here.
- Voice Experience – Delivered to customers when they call a SmartAssist-hosted call center. Responses can be configured for Automated Dialog, Transfer to Agent, and Deflect to Chat flows.
The Conversations Live Board
You can find the Conversations Live Board by navigating to Configuration > Use Cases > Conversations.
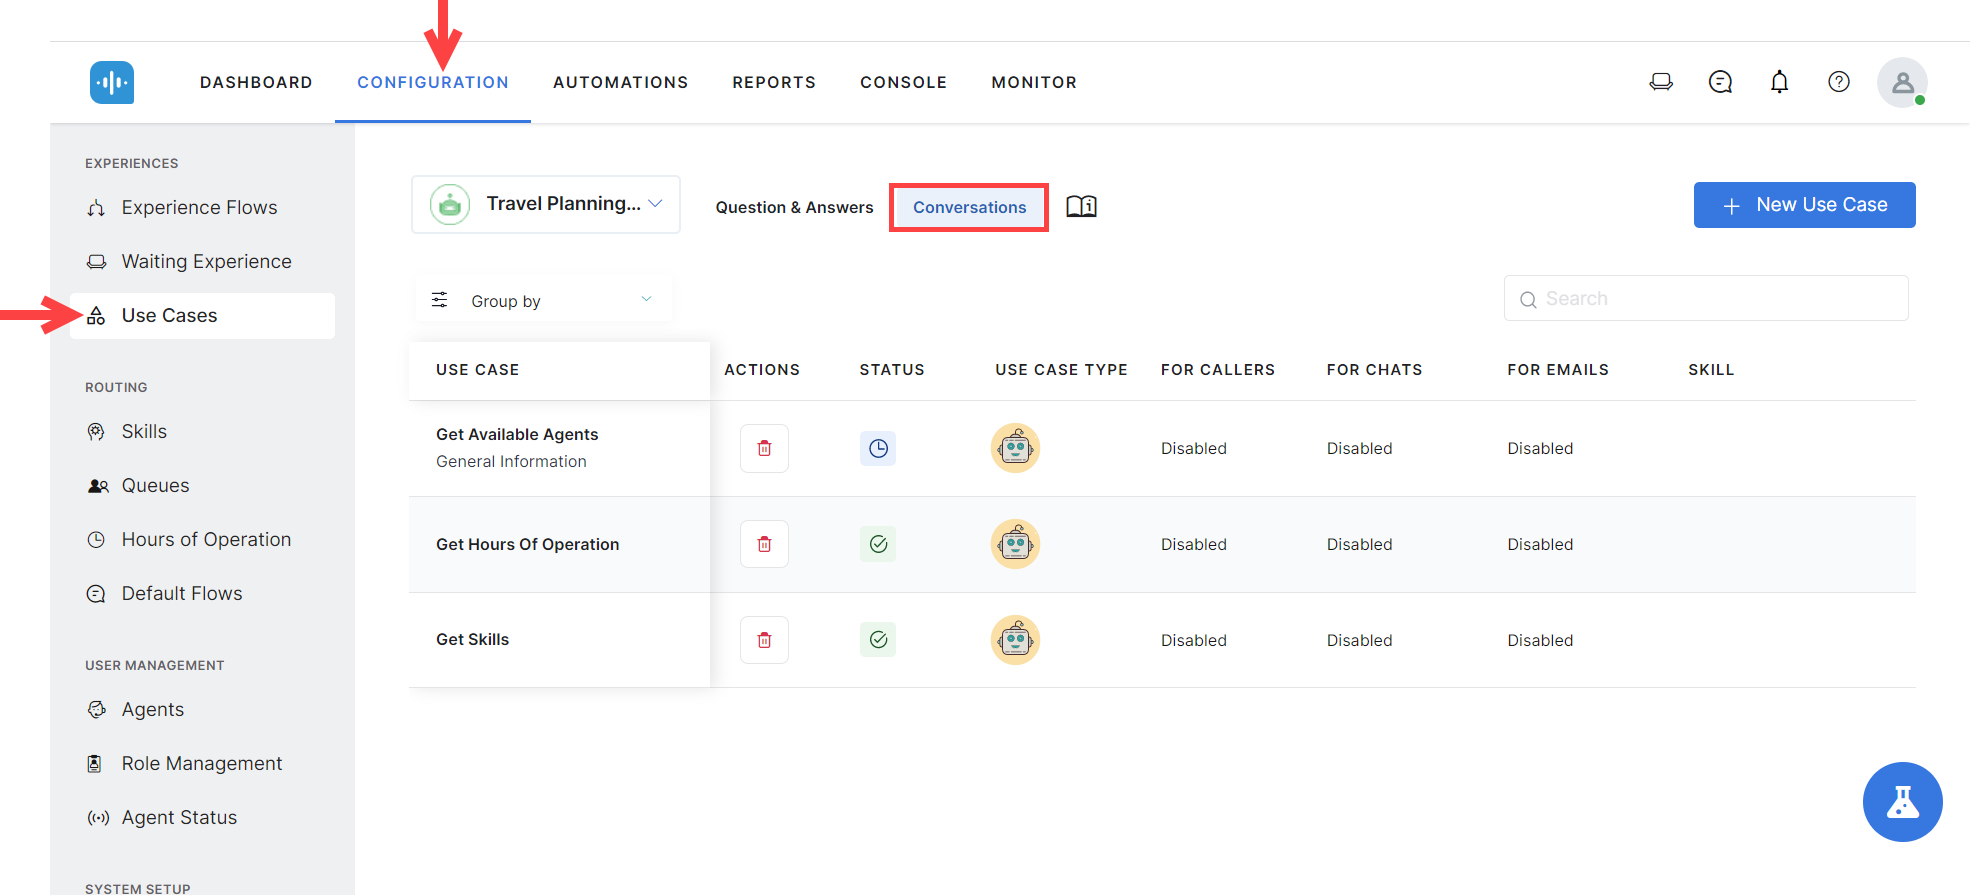
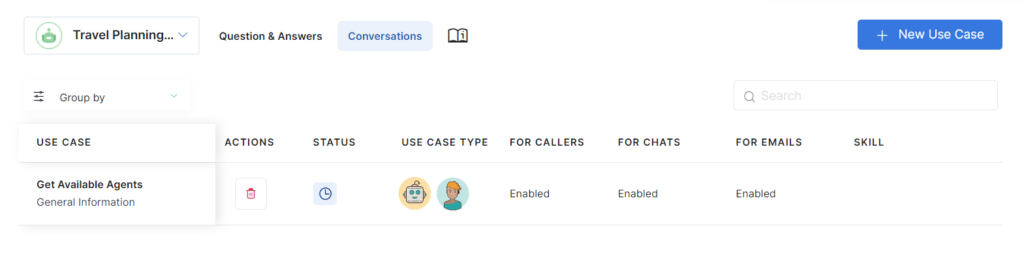
Conversation Entry Information
The fields displayed for each Conversation entry are as follows:
| Field | Description |
|---|---|
| Use Case | Name of the use case. |
| Actions (Icon) | Displays the Delete icon, which allows removing the Conversations entry. |
| Status | Displays the status ‘Published’ if the conversation has been published; otherwise, it displays ‘In Development.’ |
| Use Case Type | Category of the use case – Customer Use Case or Agent Assistant Use Case. (See the following section for more information) |
| For Callers | Displays whether the specific use case is enabled or disabled for callers. If enabled, it would be available during a call conversation. |
| For Chats | Displays whether the specific use case is enabled or disabled for chats. If enabled, it would be available during a chat conversation. |
| For Emails | Displays whether the specific use case is enabled or disabled for emails. If enabled, it would be available during an email conversation. |
| Skill | Displays the skills assigned to the conversation. |
Conversations Live Board Features
In the Conversations list view page, you can perform more actions as follows:
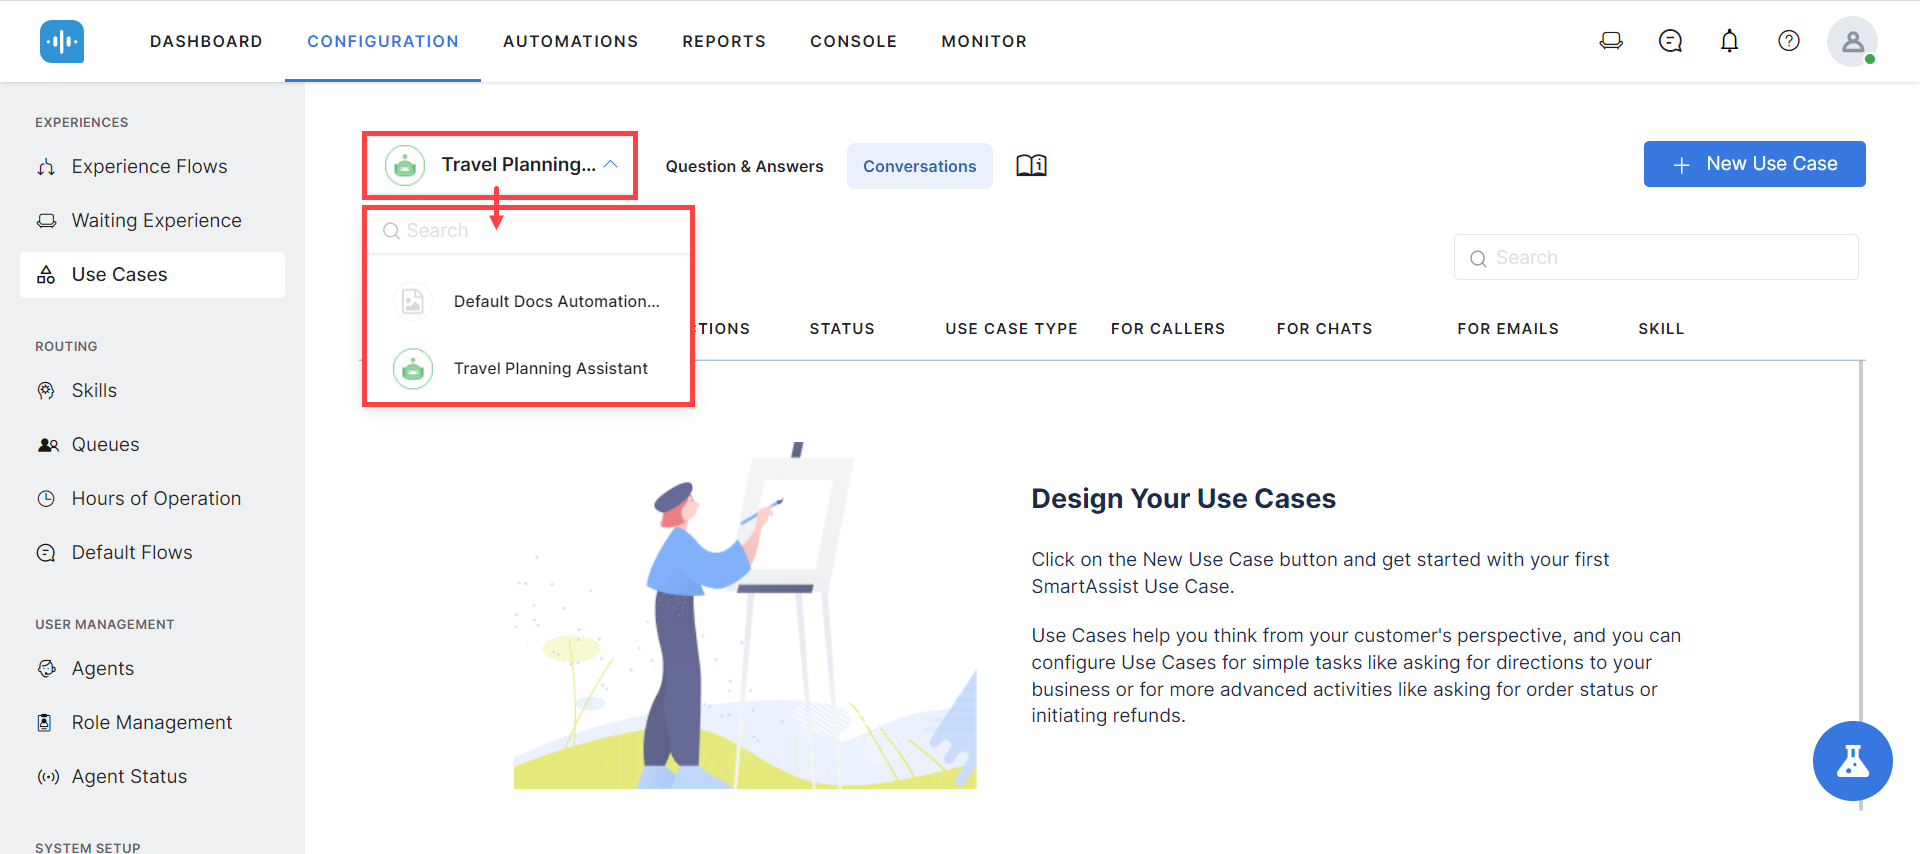
- If you have more than one bot, your list of available bots is displayed at the top left of the Use Cases section. Use the dropdown to search and/or select the bot to work with.

- Use the Group by drop-down to arrange conversations into groups based on None, Category, or Status (In Development/Published).

- Use the Search option to enter matching words and search for a specific conversation.

- Click any Conversation to modify its settings.

- If you want to delete the Conversation, click the Delete option under Actions.

Note: Deleted entries cannot be restored. Please proceed with caution.


Add a Conversation
To add a new Conversations use case, perform the following steps:
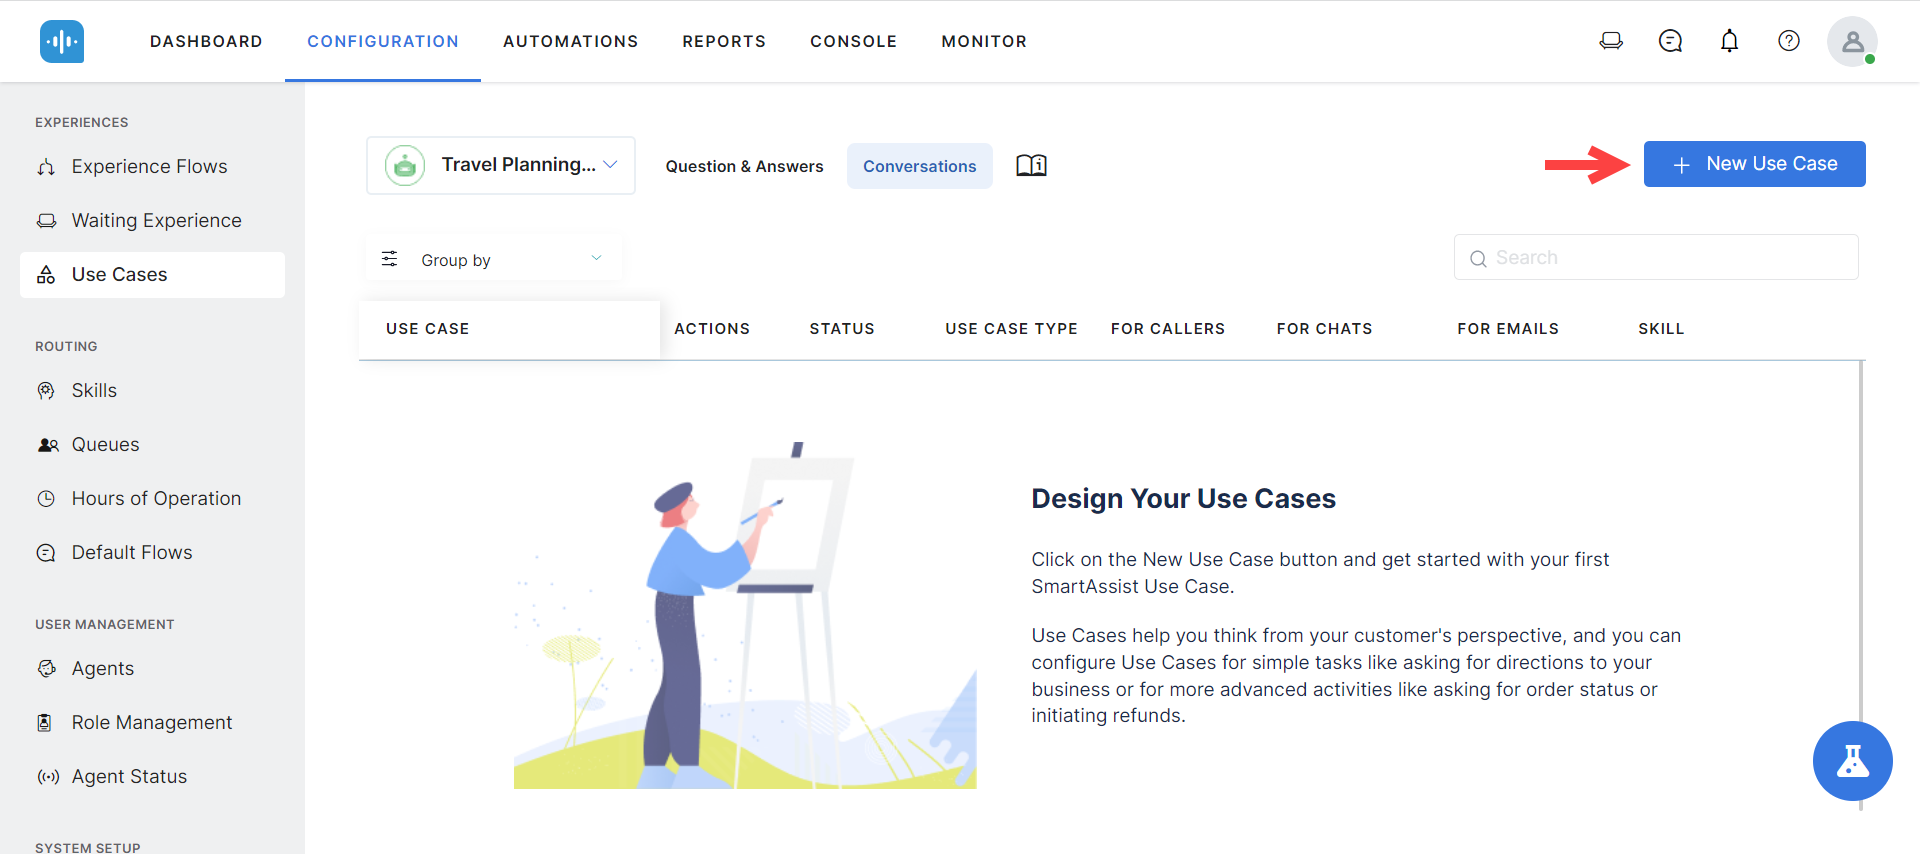
- Navigate to Configuration > Use Cases > Conversations tab. Click + New Use Case.

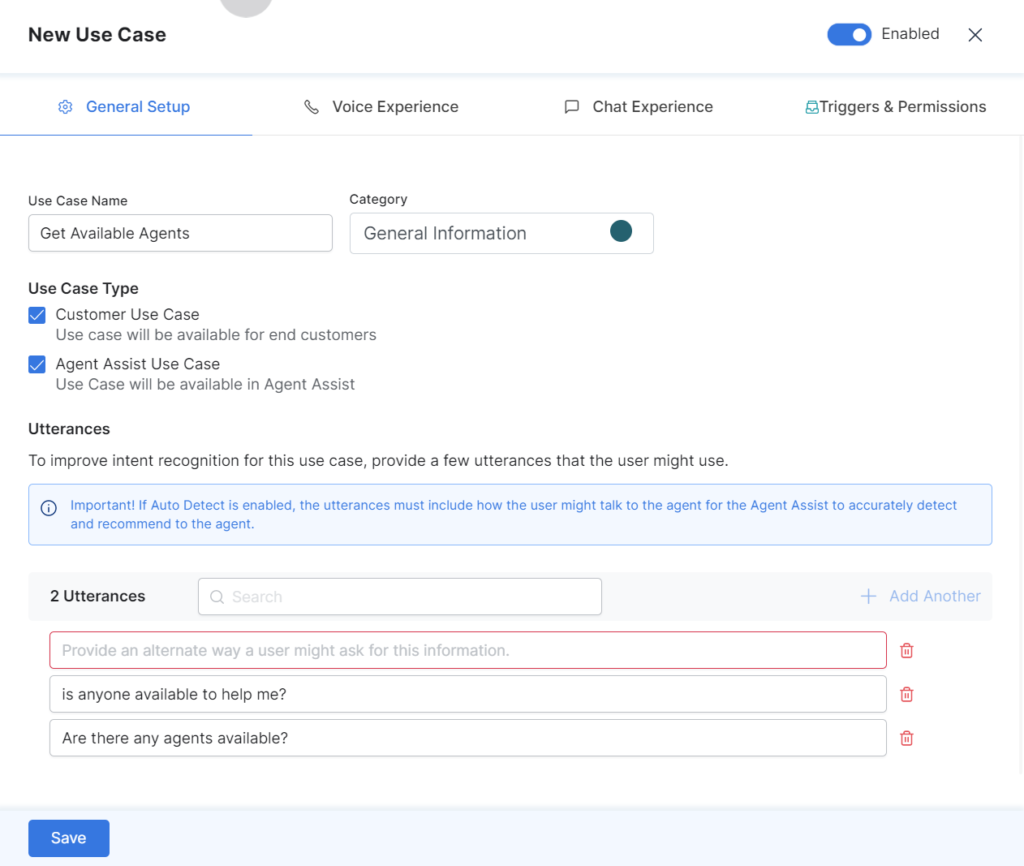
- In the New Use Case panel, the General Setup tab is selected by default.
- Enter the Use Case Name.
- In the Category field, enter a category or select a category from the list. This helps you organize the Conversations for easy management.
- Next, select the Use Case Type:
- Customer Use Case: On selecting this, the Use case will be available for end customers. Voice Experience and Chat Experience tabs are displayed.
- Agent Assist Use Case: On selecting this, the Use case will be available for agents, and only the Triggers & Permissions tab is displayed.
Note: If you select both checkboxes, all three tabs (Voice Experience, Chat Experience, and Triggers & Permissions) are displayed.
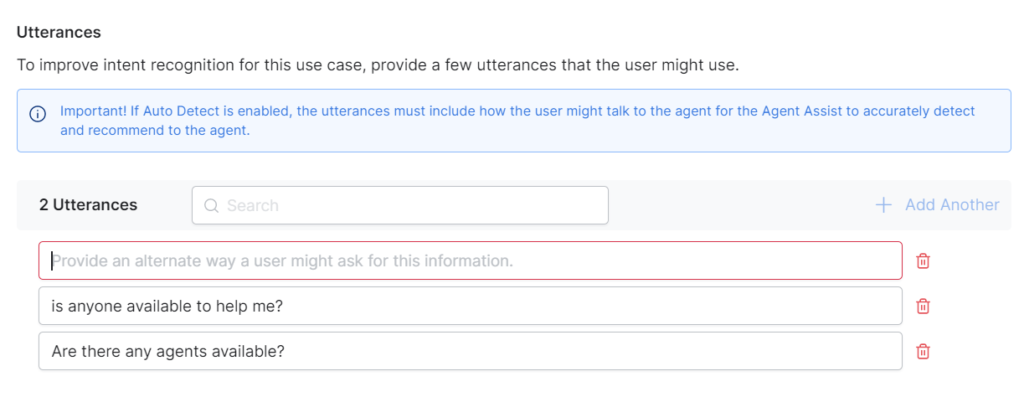
- Enter user Utterances. Press Enter/Return after typing in each utterance.
- The number of existing utterances is displayed at the top left of the section.
- Use the Search box to find a specific utterance in the list.
- To add another utterance, click + Add another or type it into the new Utterance field after adding the previous one.
- If you want to delete any utterance, click the Delete (bin) icon provided next to the utterance.
- Toggle on the Enabled option at the top right to make the conversation available immediately. When user utterances match, the use case will be triggered.
- Click Save. The new Use Case is displayed on the Conversations tab.


| Note: Under the Use Case Type, the icons are displayed based on your selection. Both Customer Use Case Type and Agent Assist Use Case Type are displayed in this example because both options are selected. |
After you add use cases, you can complete the configuration under Voice Experience, Chat Experience, and Triggers & Permissions tabs or you can save the use case and configure later. The following sections explain the steps to follow to complete the configurations.
Configure the Voice Experience
The Voice Experience has three types of configurations. To configure them, click the Use Case under Conversations. In the Voice Experience tab, select any or all of the following options:
- Automated Dialog
- Transfer to Agent
- Deflect to Chat
Automated Dialog
This option lets you set an automated dialog for the current conversation on the Kore.ai XO Platform. You must add the required nodes and logic to build the desired conversation flow.
Callers for this use case will trigger an automated dialog that can be customized on the XO Platform.
Click Edit to access the Platform.
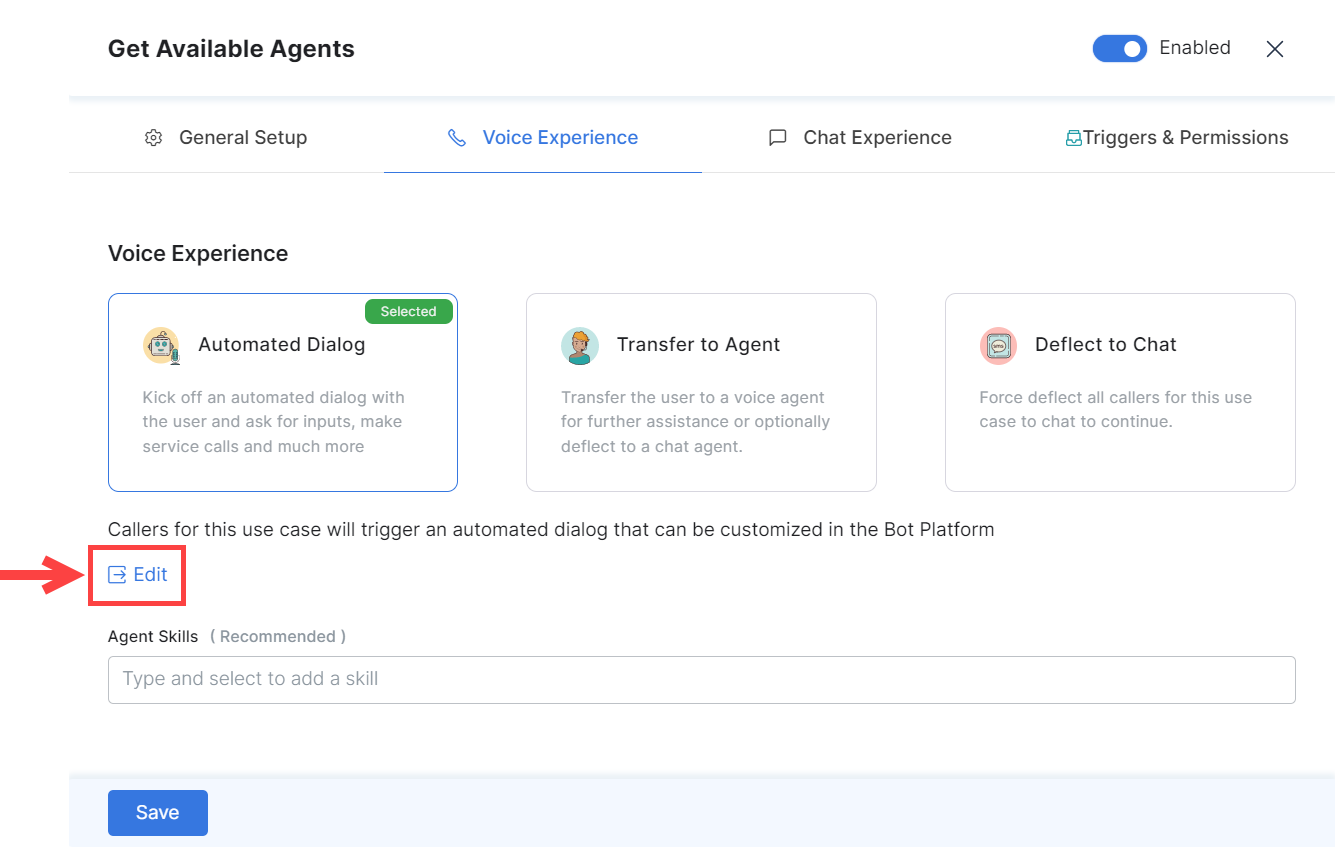
| Note: This option takes you to Kore.ai’s XO Platform, where, by default, a bot is generated with a Dialog Task for the current conversation. You must add the nodes and logic flow for the use case. To learn more, see XO Platform Dialog Tasks. |
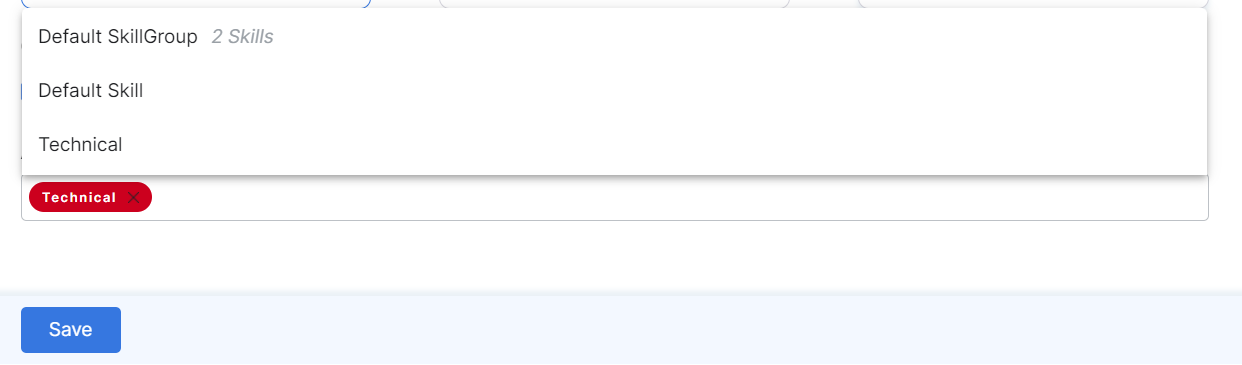
You can assign agent skills to an automated dialog. This option redirects the user to an agent with the selected skill. To select the skill:
- Select a skill group from the Agent Skills list. You can select only a specific group of skills to map to the agent.

- Click Save to save the selected preferences.
Transfer to Agent
Users are transferred to a voice agent for further assistance. Configure the message to be played before the call transfer. You need to set up the outgoing call details to complete this configuration.
![]()
Agent Skills
Select a skill group from the Agent Skills list. You can select only a specific group of skills to map to the agent.
Pre-Transfer Message
This option lets you set the pre-transfer message that the user will hear before the agent transfer dialog begins.
You can select either the Default Message from the drop-down or create your own Custom Message. Click Save.
If you select Custom Message from the list, enter your message in the text box and click Save.
![]()
Offer Chat Deflection
If this option is enabled, the caller is redirected to a chat agent for faster service when their response is ‘yes’. If disabled, the caller is put on hold for a voice agent allocation.
When this option is enabled, the caller is directed to Chat Automation or Live Chat Agent.
- Chat Automation – An automated chat experience as configured.
- Live Chat Agent – A chat with a live agent is initiated.
In both Chat Automation and Live Chat Agent, configuration options are available to set either a Default confirmation prompt or a Custom message as the confirmation.

Deflect to Chat
This option defines the deflection flow that users will experience for the selected use case. Users are presented with a link to initiate a conversation with the chat agent.
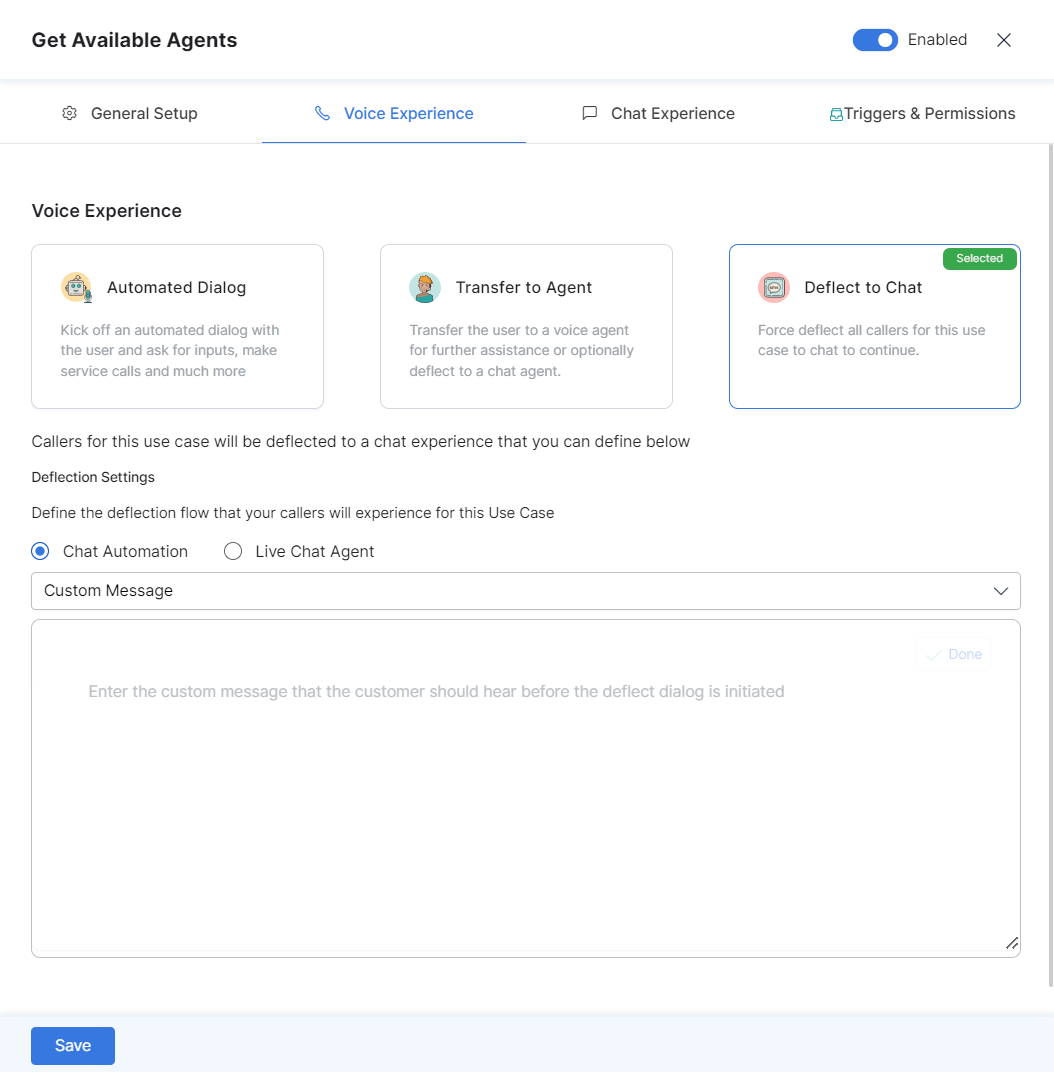
Deflecting to chat allows you to handle conversations using one of the following options:
- Chat Automation – The conversation is deflected to a chat automation, as configured within the Chat Experience tab.
- Live Chat Agent – A chat with a live agent is initiated.
In both Chat Automation and Live Chat Agent, configuration options are available to set either a Default confirmation prompt or a Custom message as the confirmation.
Configure the Chat Experience
To configure the Chat Experience for a Conversation, follow these steps:
- Click the Use Case under Conversations.
- On the Chat Experience tab, configure one or both of the following options:
- Automated Dialog: Chat conversations for this use case will trigger an automated dialog that can be customized in the XO Platform. See Automated Dialog within Voice Experience to understand the detailed configuration steps.
- Transfer to Agent: Users are transferred to a chat agent for further assistance. You must set up the agent skills and configure the message to be displayed before the user is transferred to a chat agent. See Transfer to Agent within Voice Experience to understand the details. The Offer Chat Deflection option is not available here. Configuration steps for Agent Skills and Pre-Transfer Message are the same as in Voice Experience.
Configure Triggers & Permissions
Under the Triggers & Permissions tab, set the permissions for the options in the new conversation.
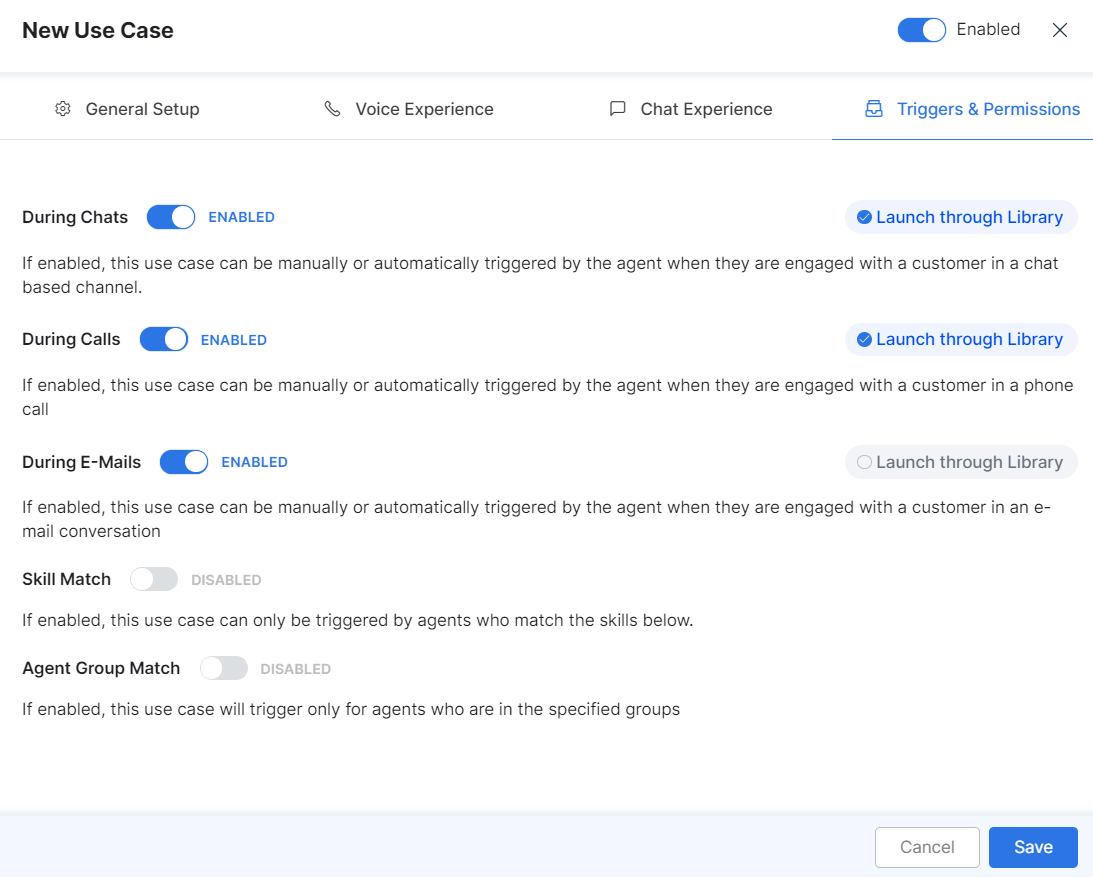
The following options can be enabled or disabled in this section:
- During Chats: If enabled, agents can manually or automatically trigger this use case when they are engaged with a customer in a chat channel.
- During Calls: If enabled, agents can manually or automatically trigger this use case when they are engaged with a customer in a phone call.
- During E-Mails: If enabled, agents can manually or automatically trigger this use case when they are engaged with a customer in an email conversation.
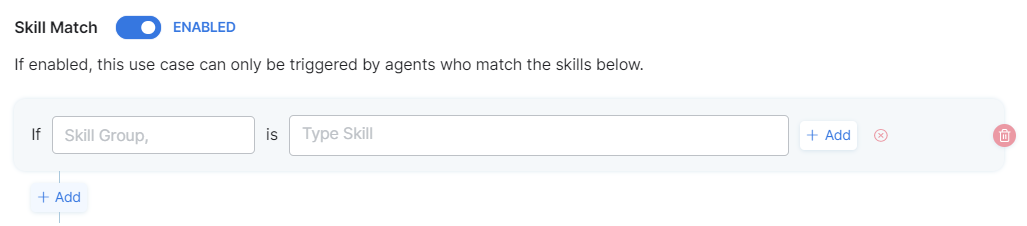
- Skill Match: If enabled, agents who match the skill conditions listed below can trigger the use case.

- Agent Group Match: If enabled, this use case triggers only for agents who are in the specified groups. The option to list the Agent Groups is provided when enabled.

- Launch through Library:
- Enabled: The dialog task is listed under all available dialog tasks in the Search tab of the widget.
- Disabled: The dialog task doesn’t appear on the list, but remains searchable via the “Ask a question” search bar in the Search tab of the AgentAssist widget, allowing agents to browse and find this use case to trigger it.

Click Save to save the changes.
Publish a Conversation Use Case
Use Cases must be published to be made available live for customers. Conversation Use Cases reflect as Dialog Tasks within the XO Platform as part of the bot you selected when creating the Use Case in SmartAssist. For example, if your Conversation Use Case was added to a “Default Customer Service Automation Bot” in SmartAssist, then the XO Platform will display it as a Dialog Task within the same bot.
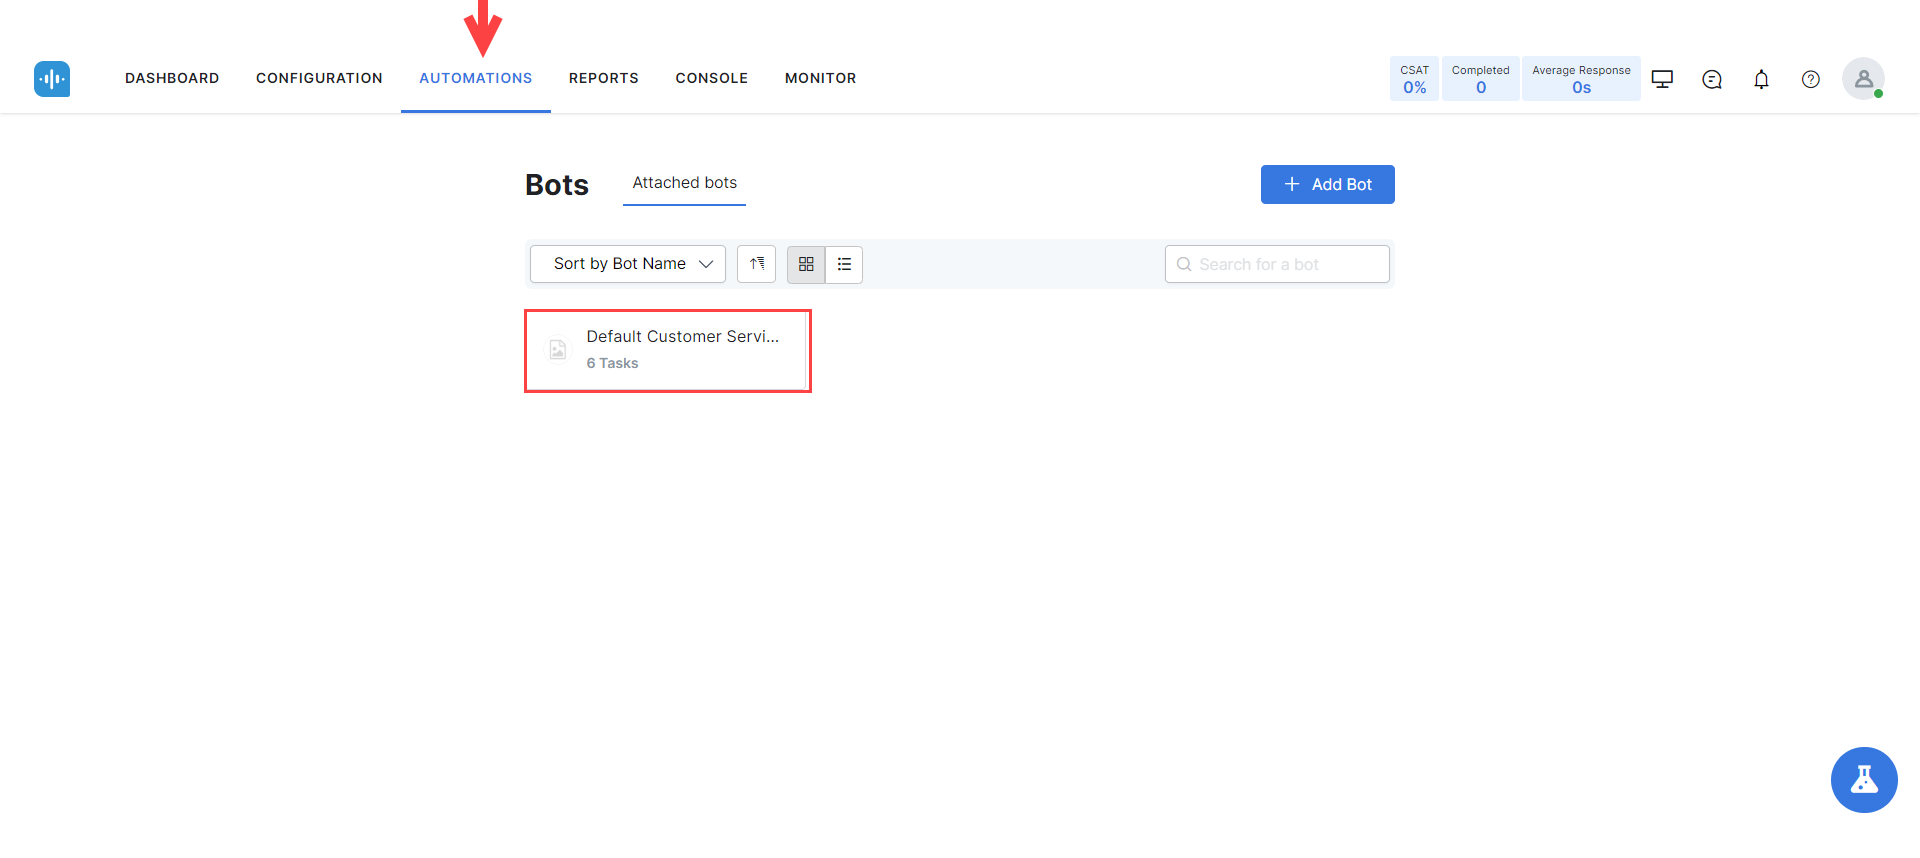
To publish a Conversation Use Case, follow these steps:
- In SmartAssist, go to Automations.
- Select the bot to which you want to add the Conversation Use Case.
- The XO Platform opens within the Automations tab. Go to Conversation Skills > Dialog Tasks to see the task you created. Learn more about Dialog Tasks.
- When ready to publish, go to Deploy > Publish, still within the XO Platform.
- Expand the Tasks and ensure that under Dialog Tasks, the one relevant to your use case is selected.
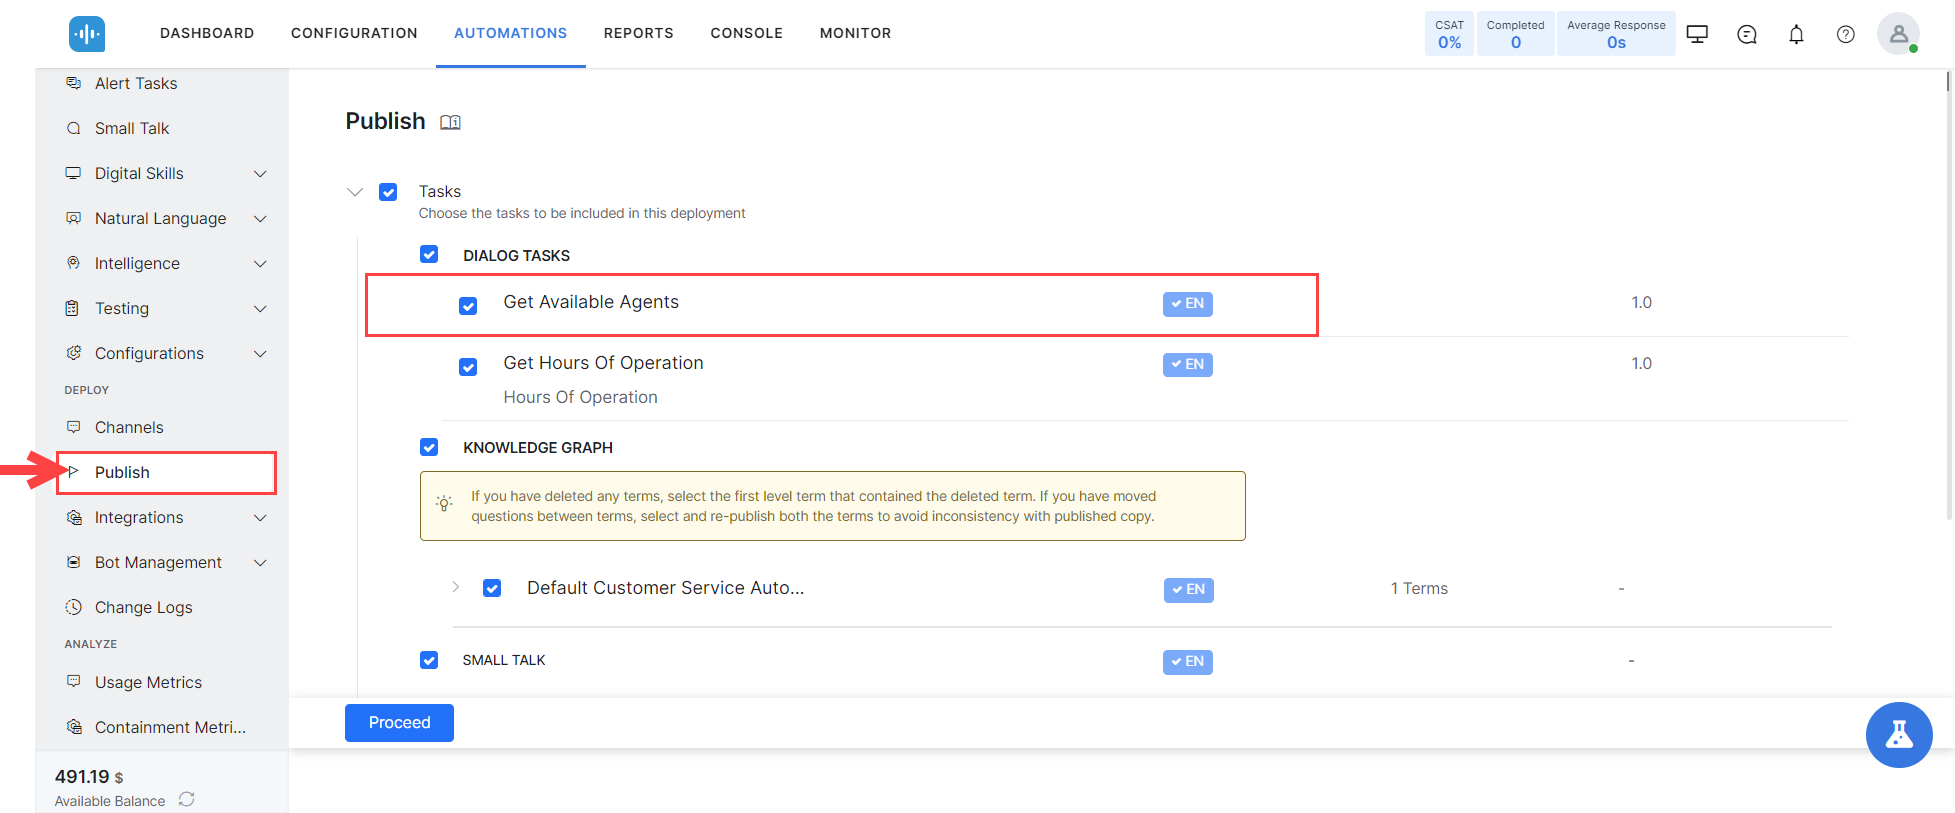
- Click Proceed when ready.
- Enter a comment related to your publish request, then click Confirm. The publishing process follows your configuration within the XO Platform. You may need to wait for an administrator to approve your request. Learn more.

- Once the bot is published, you can test your Conversation Use Case. Learn more about testing bots in the XO Platform.