
Queues are virtual, temporary waiting rooms that hold and process incoming requests for conversations between agents and customers. These are the holding areas for digital and audio conversations waiting for an agent to be assigned.
All conversations get assigned to queues based on the agent selection logic and skill proficiency match. A conversation can only be in one queue at any given time. Once conversations get assigned to a queue, SmartAssist assigns them to agents. The agent assignment works based on pre-established rules and criteria, as shown in the illustration below:

Once a conversation comes in, it gets assigned to a queue. Afterward, the next step is to check the routing mode.
The Simple Routing mode checks for agent skills and agent availability. After the skill and availability match, an agent gets assigned to the conversation.
The Advanced Routing mode checks for preferred agents. If a queue has preferred agents configured, admins can specify a time, after which the routing extends to skill match. If a preferred agent becomes available before the configured time expires, they will have priority over agents selected via skill match.
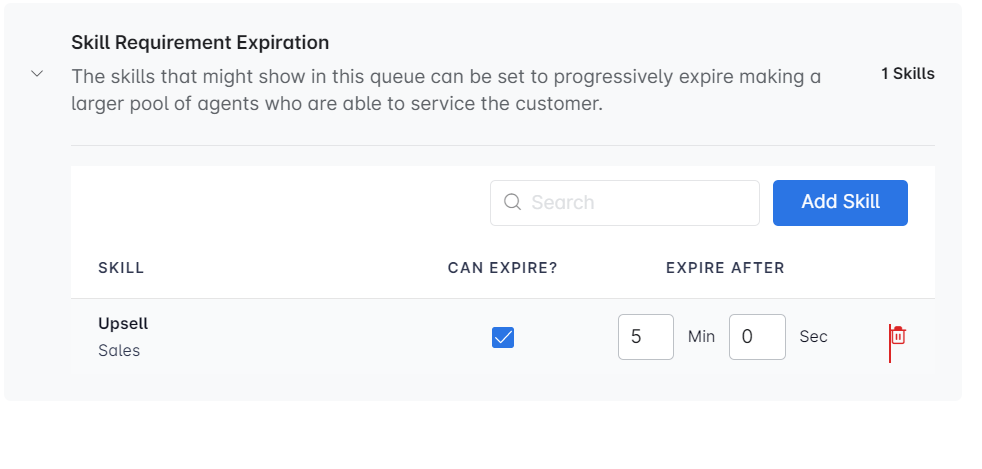
For the agent to answer the conversation, they must have a required skill attached to their profile. The conversation cannot be assigned to the agent if the skill does not match.
It is possible, however, to define a skill and its expiry period. SmartAssist will search for an agent with this skill for the configured time. If no agent with this skill is available before the skill expiration period ends, the skill is no longer considered a requirement.
Queue Routing Modes
All conversations will get assigned to queues as they come in. This process is based on two Routing modes, as described below.
Standard Routing
- Queue routing is primarily based on the highest average skill and proficiency match for a given conversation. This routing mode only considers proficiency after a skill match has occurred.
- If multiple agents match a skill, the routing is done based on currently utilized slots. Agents with fewer utilized slots get priority, as per proficiency thresholds. Also, agents get prioritized if more time has passed since their last conversation compared to other agents.
Advanced Routing
- In this case, the conversation first routes to a preferred agent.
- For each new conversation, SmartAssist checks preferred agents (if any) for availability. During a preferred agent check, skills are ignored. If a preferred agent is not assigned and the preferred agent timeout expires, the check is expanded to the full agent list, and skills are matched to select the best available agent (according to the Simple Routing Mode).
The Queues Live Board
To access Queues, go to Configuration > Routing > Queues.
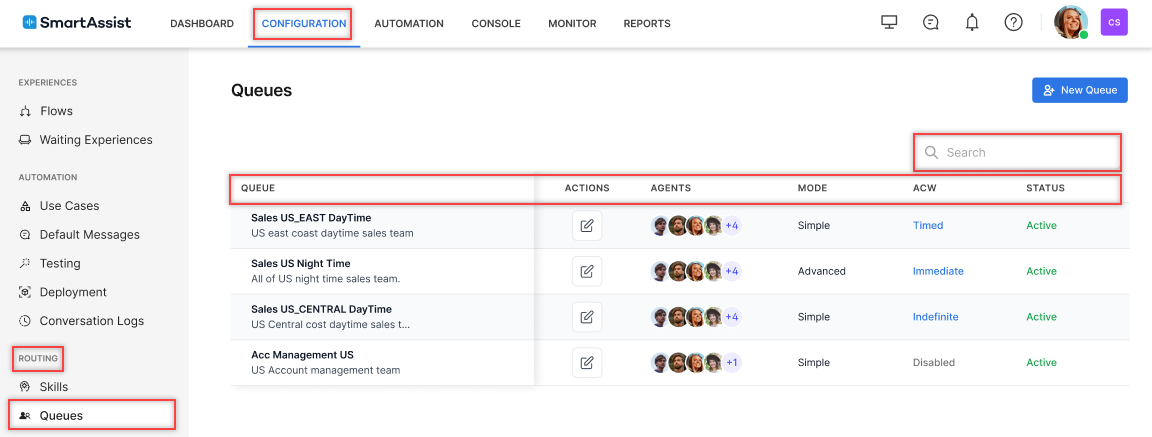
This section displays the following:
- Search: Enter keywords to find queues by name;
- Queue: The name and description of available queues;
- Actions: Lists the Edit Queue option;
- Agents: Shows the agents available for a particular queue;
- Mode: Specifies whether the queue is set to the Simple or Advanced routing mode;
- ACW: Displays the After Call Work (ACW) configuration;
- Status: Displays the status of the conversation, Active or Inactive.
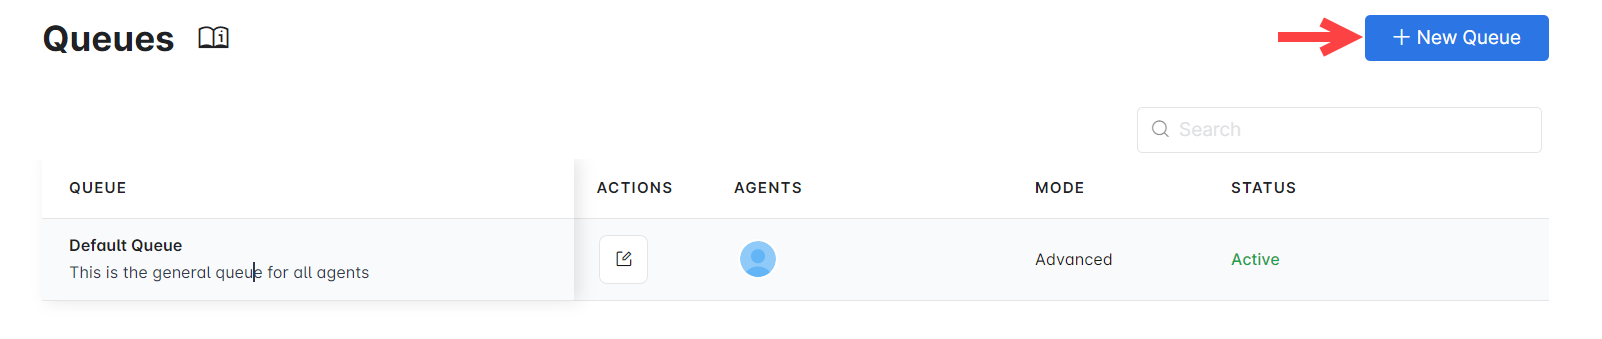
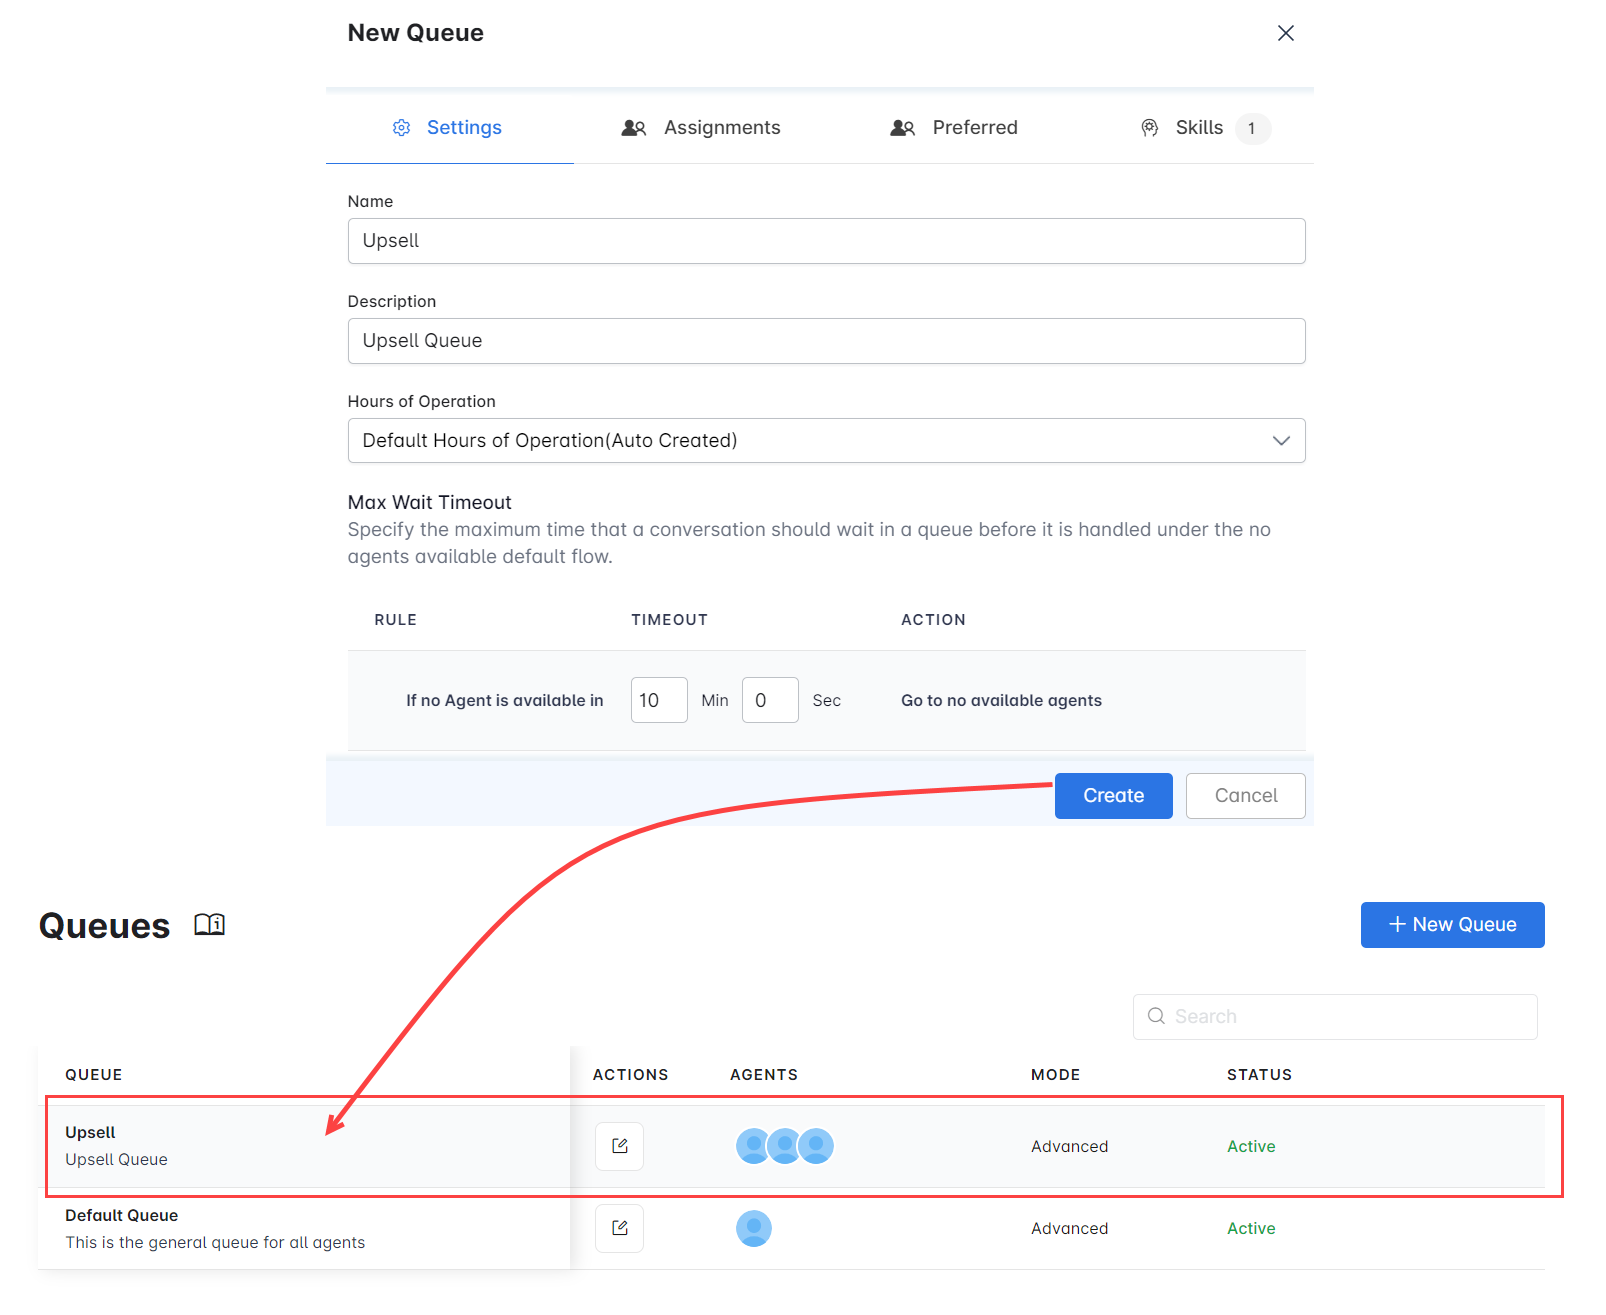
Add a Queue
- At the top-right corner of the Configuration page, Click New Queue.
- In the New Queue window, you can set up the queue as follows:
- With Simple Routing, you can configure the Queue Settings and Assignments;
- With Advanced Routings, you can configure the Queue Settings, Assignments, Preferred Agents, and Skills.
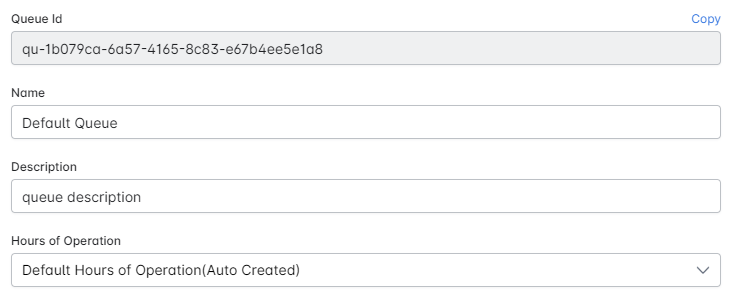
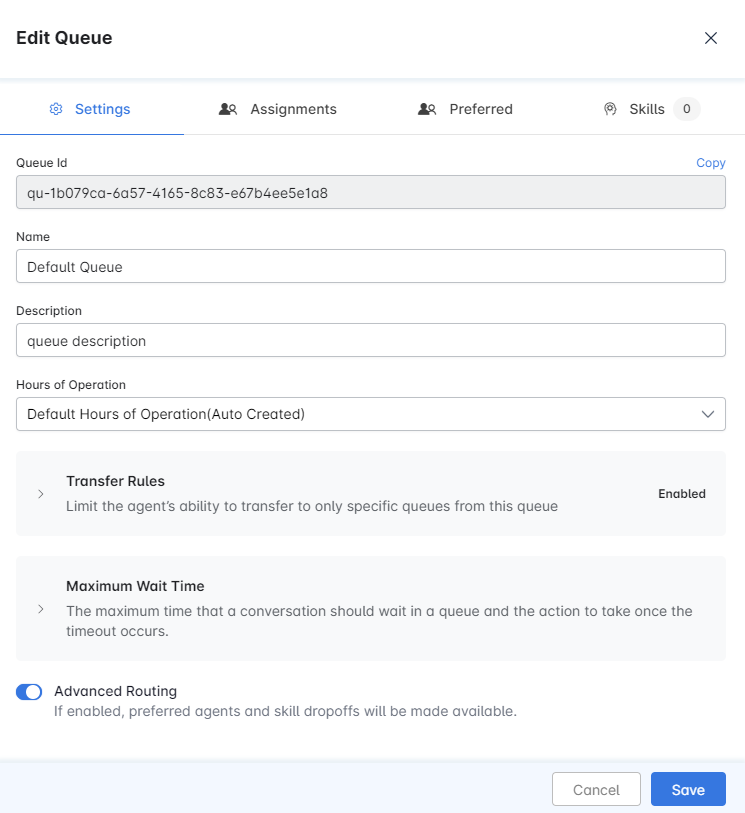
Settings
This section is available in Simple and Advanced Routing modes and allows you to configure the following:
- The Name by which to identify the queue;
- A short Description of the queue (optional);
- Hours of Operation: Select from the available hours of operation.
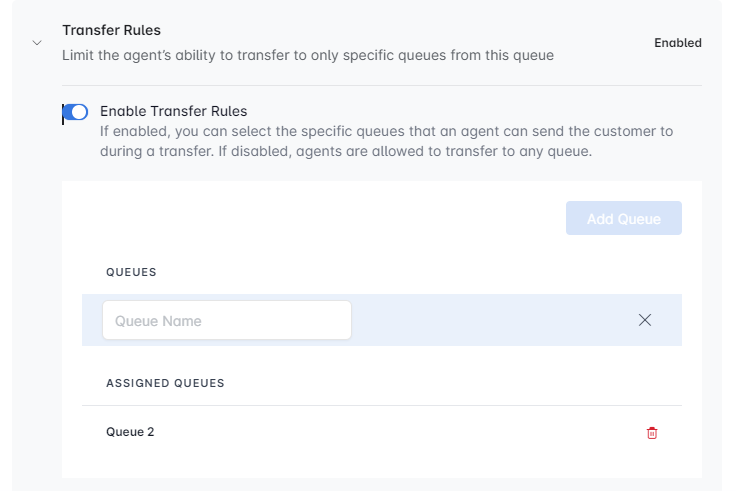
- Transfer Rules: This feature lets you limit the agents’ ability to transfer from one queue to another. If this feature is enabled, you can select the specific queues to which agents can transfer customers. If disabled, agents can transfer to any queue from the current one.
- Maximum Wait Time: Configure how long a conversation can wait in the queue before fallback handling is triggered.
Before Agent Transfer: Specifies the maximum wait time for conversations when they first enter the queue.
After Agent Transfer: Specifies the maximum wait time for conversations that re-enter the queue after an agent transfer. The system resets the wait timer at the point of transfer.
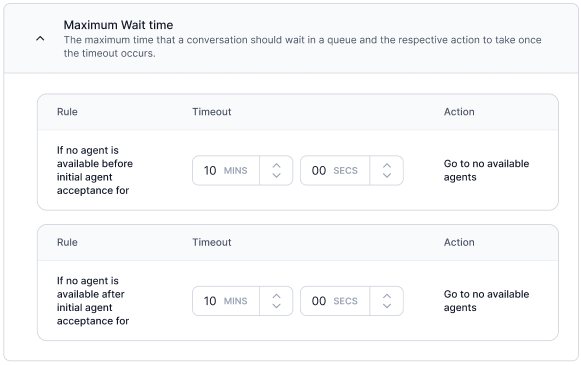
If you don’t configure the After Agent Transfer value, the system uses the Before Agent Transfer value by default. When the configured wait time is exceeded, the system triggers the applicable fallback flow (for example, No Agent Available or OOBH). The supported range is 1 minute to 43,200 minutes (30 days).
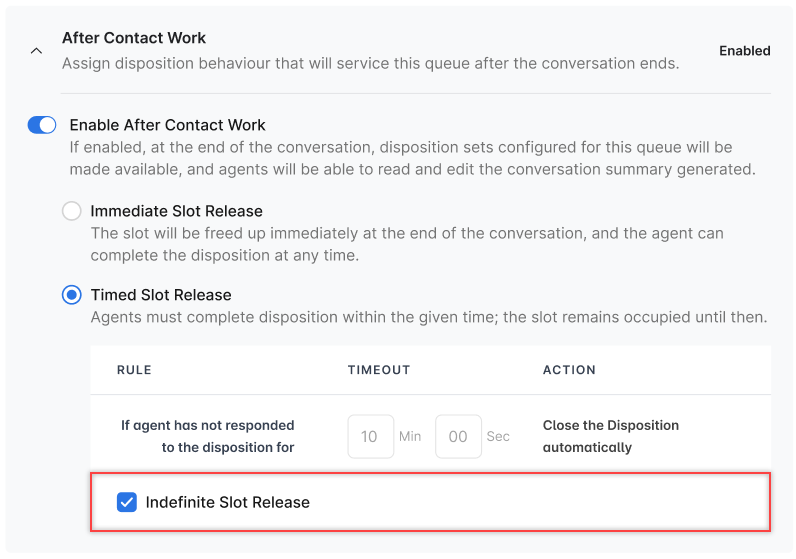
- After Call Work (ACW): Administrators can enable or disable ACW.ACW Enabled
-
- Immediate Slot Release: The slot becomes available immediately when the conversation ends. Agents can finalize the disposition at their convenience.
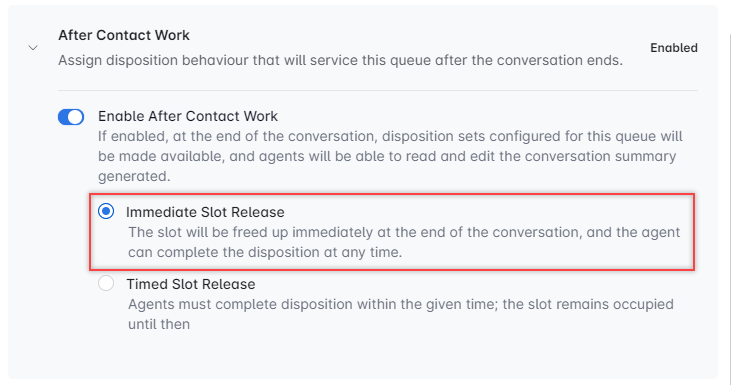
- Timed Slot Release: Agents are required to complete the disposition within a pre-set time duration, during which the slot will remain occupied. A default 30-second timer appears by default, which administrators can modify. The configurable time duration ranges between a minimum of 10 seconds and a maximum of 90 minutes. If the timer field is blank, an alert message is displayed to enter a timeout value ranging between 10 seconds and 90 minutes for the timed slot release.
Admins can edit the ‘Is Required?’ and ‘Assignment’ fields for disposition sets, including the default disposition sets. This allows existing users to switch any configured disposition set to an optional mode.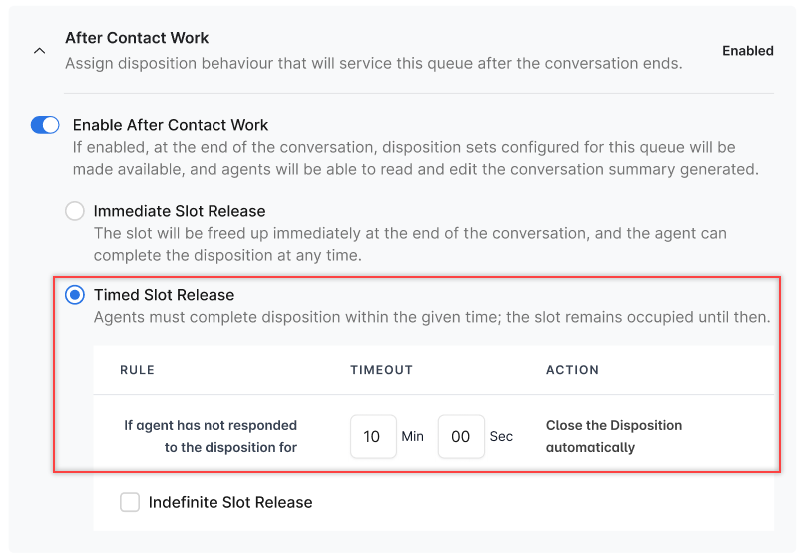
- Indefinite Slot Release: If selected, the slot remains occupied until the agent submits the disposition.
ACW Enabled
When ACW is disabled for a specific queue, any conversation concluding within that queue disappears from the agent console after the conversation ends, freeing up slots. Agents do not receive any disposition sets or summary notes related to these conversations.
- Immediate Slot Release: The slot becomes available immediately when the conversation ends. Agents can finalize the disposition at their convenience.
-
- Enable Advanced Routing: Preferred agents and skill dropoffs will be available if you enable this option.
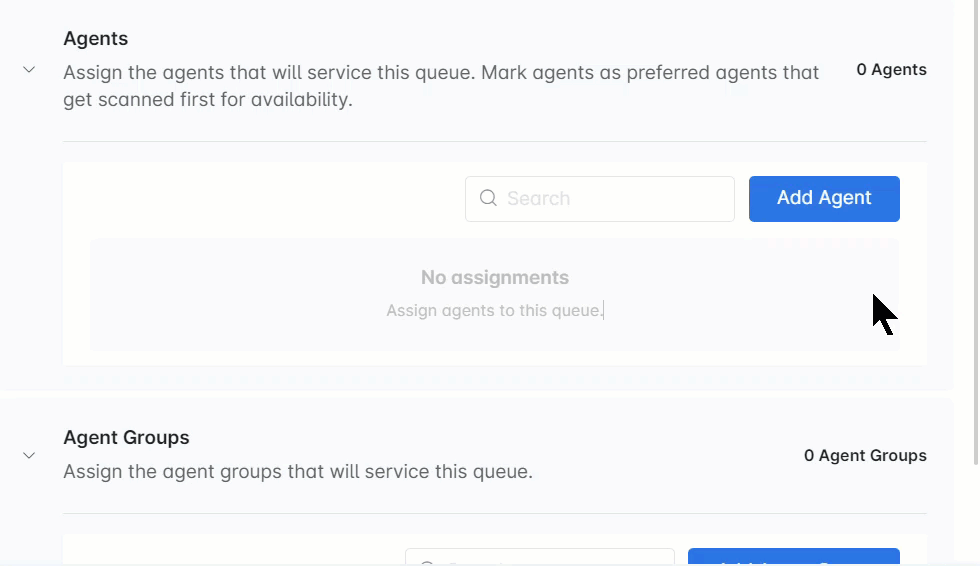
Assignments
This section is available in Simple and Advanced Routing modes, allowing you to assign agents, agent groups, or both to the queue.
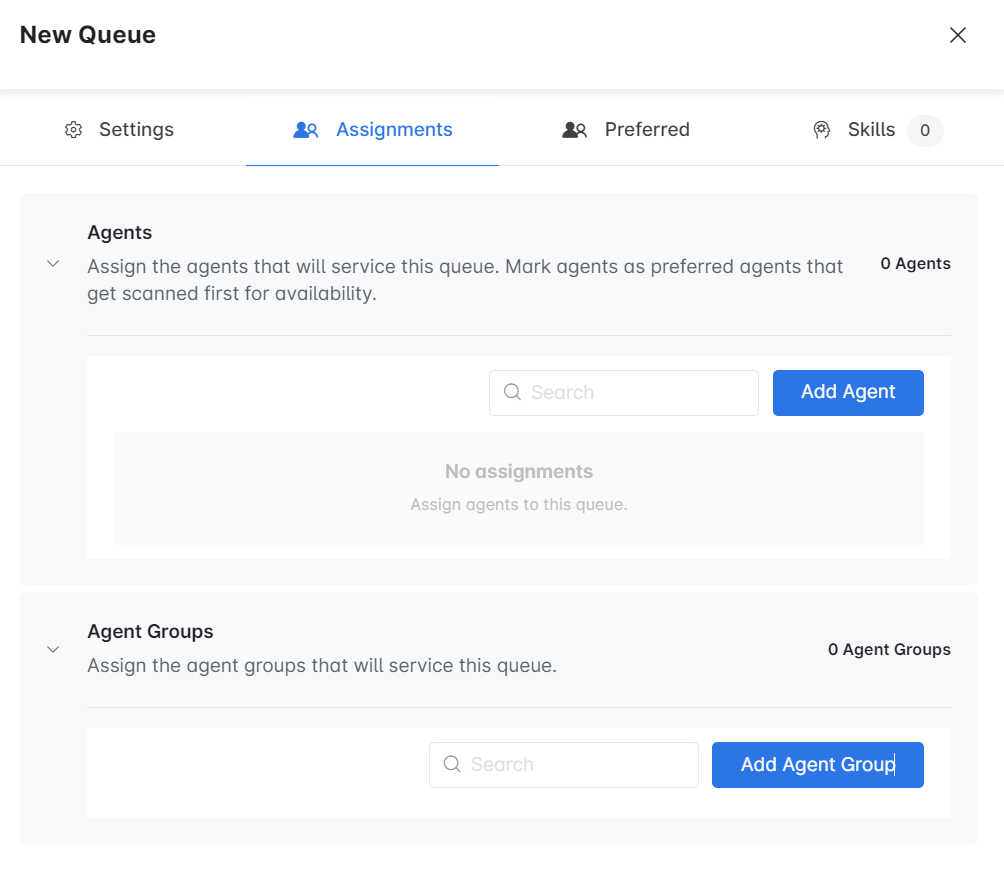
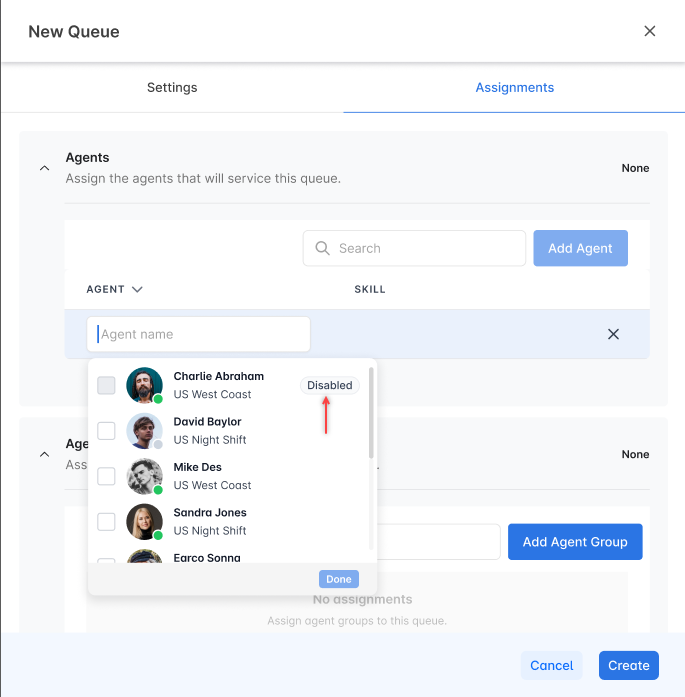
Users with full user management access can restrict selected users from participating in interactions until they complete mandatory tasks or meet other requirements. A disabled tag is displayed beside users if they try to assign Agents or Agent Groups.
Assign Agents
Follow these steps to assign agents to a queue:
- Click Add Agent;
- Click the checkbox next to an agent’s name to select it. You can use the Search field at the top of the list to find a specific person.
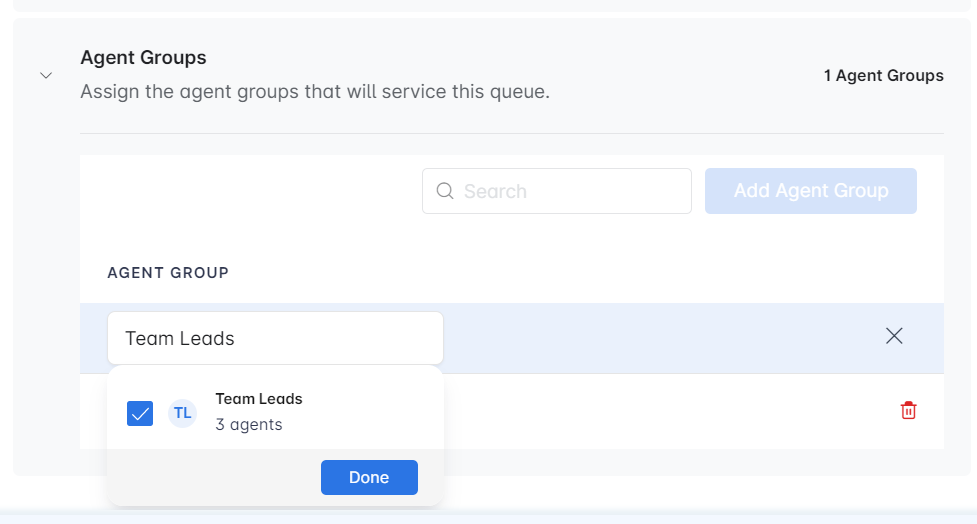
Assign Agent Groups
- Click Add Agent Group;
- Click the checkbox next to the name of a group to select it. You can use the Search field at
the top of the list to find a specific group.
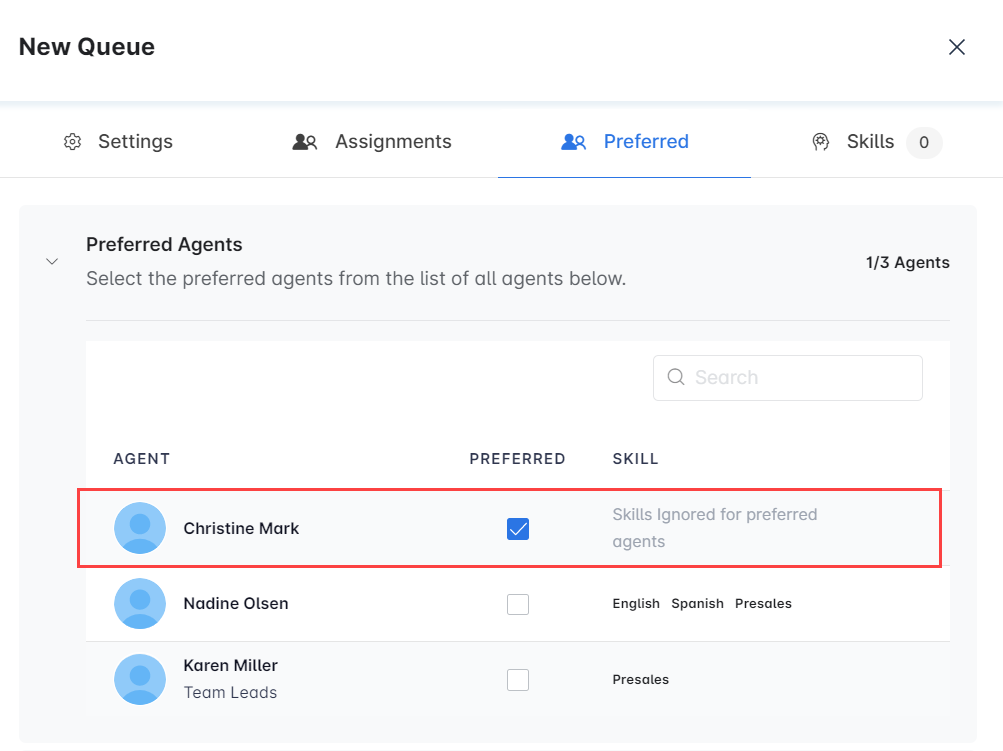
Preferred Agents
In the Preferred tab, you can assign preferred agents to the queue.
- Under Preferred Agents, find the agent you need in the list. You can use the Search field for this purpose. Select the corresponding Preferred checkbox to set the agent as preferred.
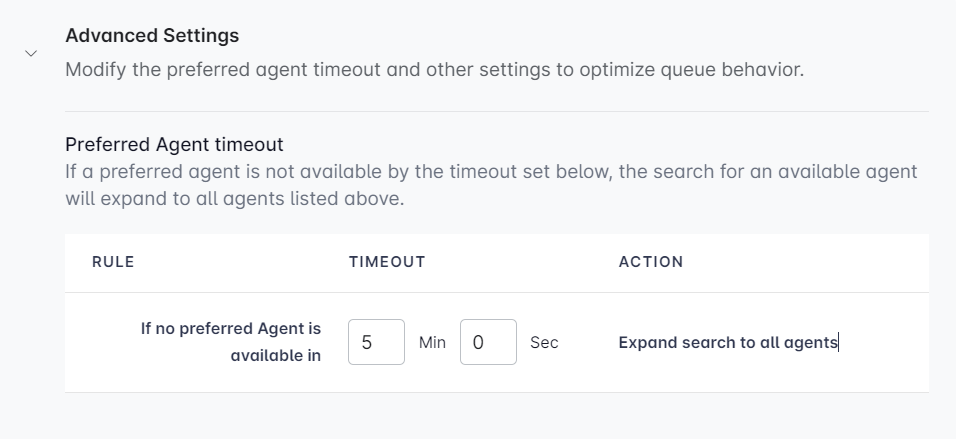
- Under Advanced Settings, configure the preferred agent timeout. During a preferred agent check, skills are ignored. If a preferred agent is not assigned and the preferred agent timeout expires, the check expands to the full agent list, and skills match to select the best available agent for the conversation.
Skills
- In the Skills tab, search for a specific skill to assign to the Queue.
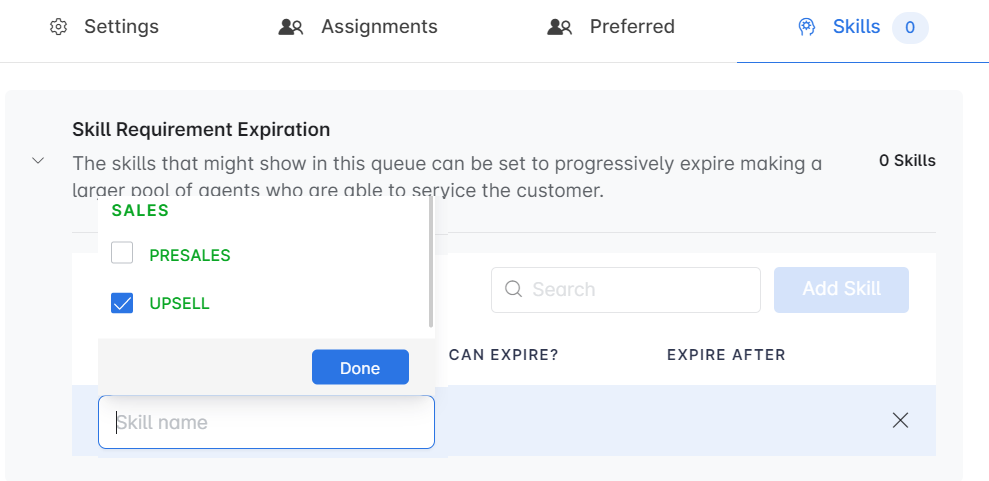
- Choose whether you want the skill to expire and set the time for this. Once a skill assignment expires, the conversation routes to other assigned skills.
When you are ready to save the Queue, click Create. The new Queue is then listed among your available queues. You must configure at least the Settings and Assignment tabs to save a queue.
Edit a Queue
- Click the Edit icon corresponding to the queue you want to edit.

- Make the required changes and click Save.
Delete a Queue
To delete a queue, follow these steps:
- Click the Edit icon corresponding to the queue you want to edit.
- Click the Delete (bin) button on the right of the bottom toolbar.

- Confirm your choice.
Assign a Conversation to a Queue
There are two ways to assign a conversation to a queue:
- Using the Set Queue node within an experience flow.
- Using the agentUtils.setQueue() method.