
The Interaction Pane
Compose Responses
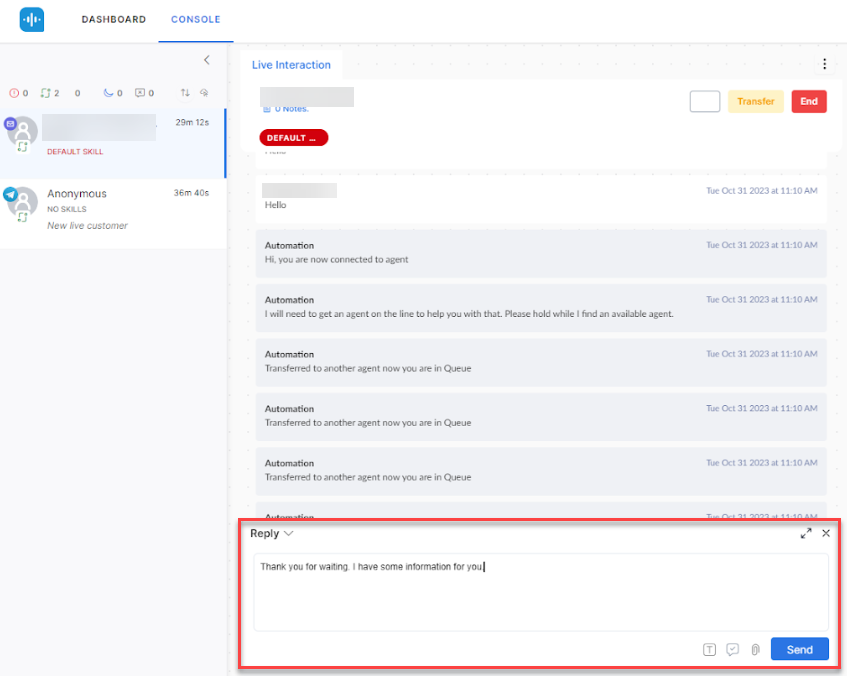
Agents can respond to customers by typing their messages in the text editor.
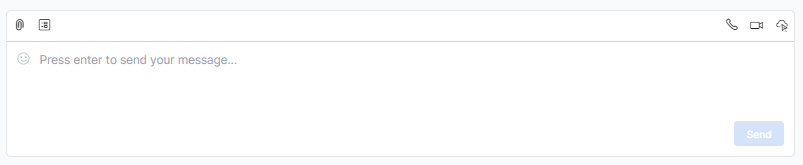
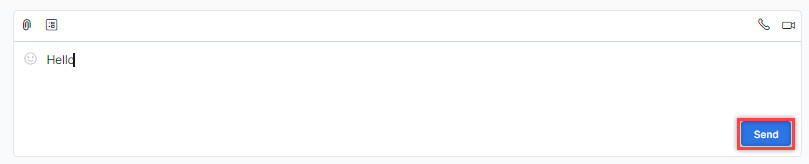
Agents can type their responses in the text editor and send the message by clicking the Send button at the bottom right corner of the text editor. When the agent types a response during a chat conversation with a customer, the customer’s chat window displays three dots, indicating that the agent is responding to the customer. Learn more.
Pressing the Tab button on your keyboard shifts the focus to the Send button. You can also press Tab + Enter to send a message.
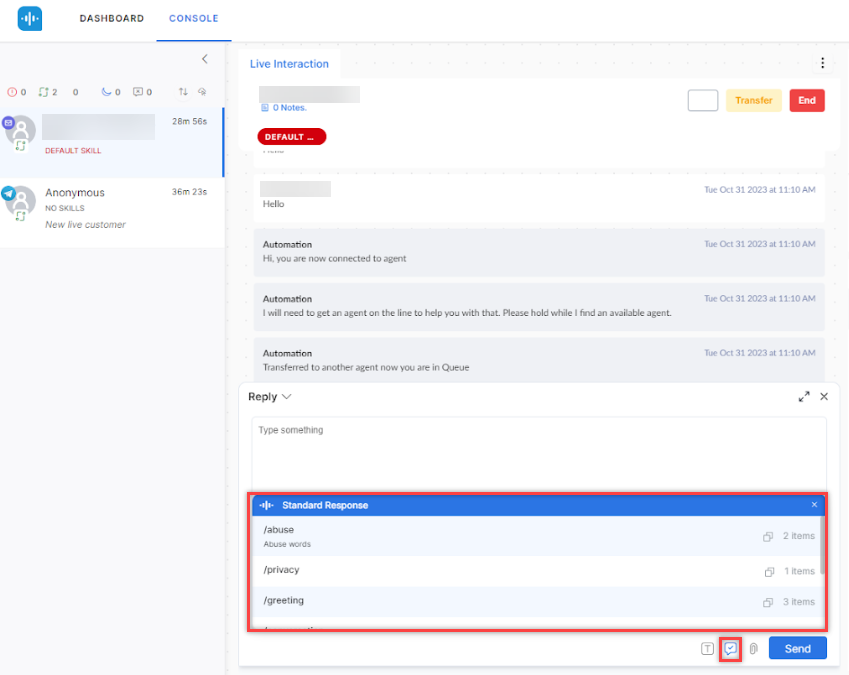
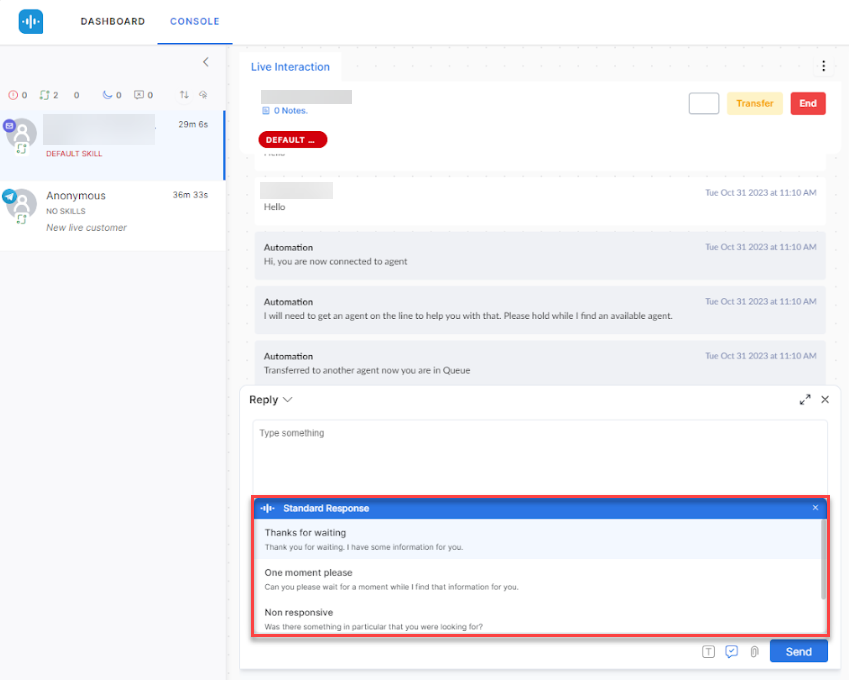
Agents can send a standard response to the customer from a pre-configured library. Press / in the text editor to display the
standard response templates window.
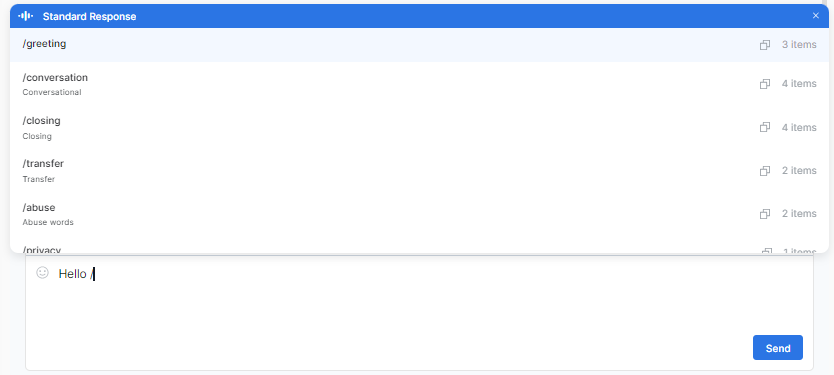
Pressing Escape after typing “/” closes the standard response window.
When translation is enabled: Responses appear in the agent’s selected target language in both the text editor shortcut command and the response widget.
When translation is disabled: Standard responses appear in the conversation language, as set through Agent Utils at the time of agent transfer. This ensures responses are provided in the conversation language rather than limited to the application language.
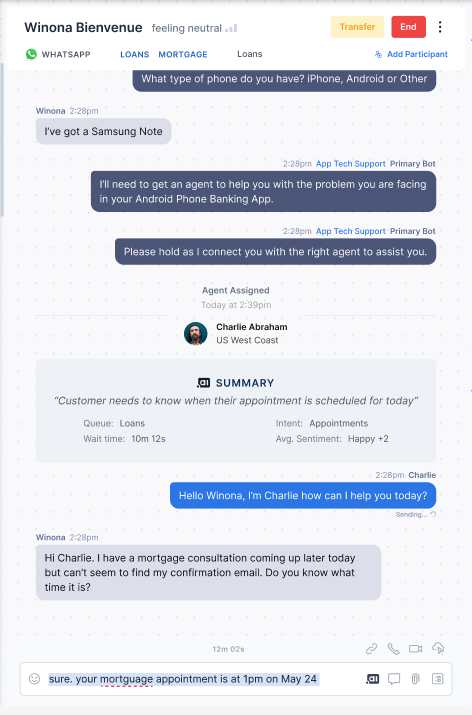
AI-enhanced Compose Text Box
Using the AI-enhanced compose text box, agents can create customized responses to address customer inquiries, concerns, or issues.
They can also add personal touches to their messages to make the communication more human and empathetic. There are three choices available:
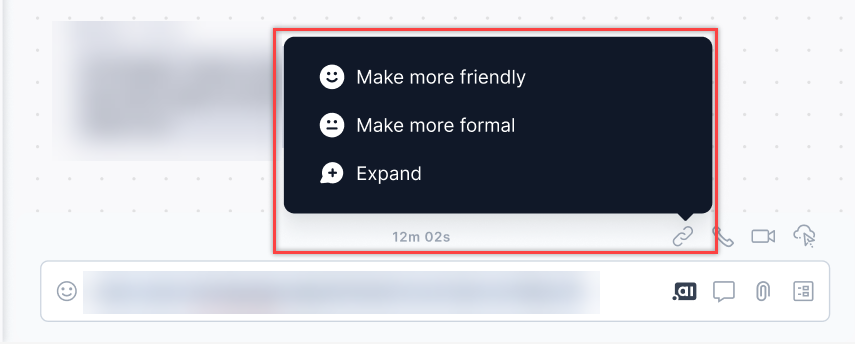
- Make more friendly: This option rephrases the draft response to make it more friendly and informal. For example, the formal draft response “Your mortgage appointment has been scheduled for Jun 24, 2023, 1 pm” is rephrased as “Great news! We’ve scheduled your mortgage appointment for Jun 24, 2023, at 1 pm.”
- Make more formal: This option rephrases the draft response to make it more formal. For example, the draft response “Your mortgage appointment has been scheduled for Jun 24, 2023, at 1 pm” is transformed into a more formal response, “We would like to inform you that your mortgage appointment has been scheduled for Jun 24, 2023, at 1:00 pm.”
- Expand: This option expands the draft response. For example, the draft response “Your mortgage appointment has been scheduled for Jun 24, 2023, at 1 pm” is elaborated as “We would like to notify you that your mortgage appointment has been successfully scheduled for June 24, 2023. Please arrive promptly at 1:00 pm for your appointment.”
This feature can be enabled from CONFIGURATION > Advanced Settings > Intelligent Agent Tools.
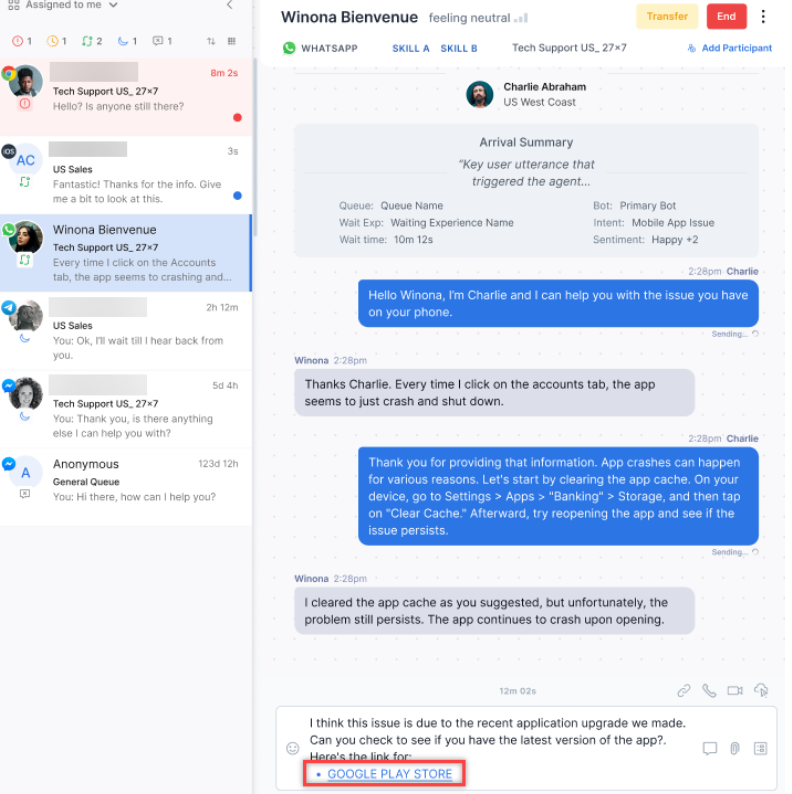
Add/Delete Hyperlinks in the Text Editor
Agents can add/delete hyperlinks in the text editor while responding to the messages.
Steps to add/remove hyperlinks:
- Highlight the text that you want to hyperlink and click the Add Link icon.
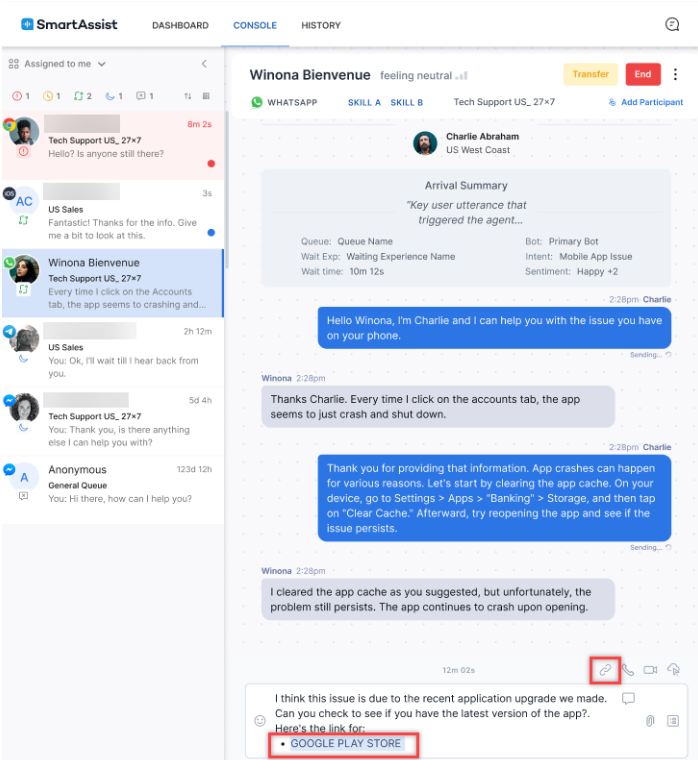
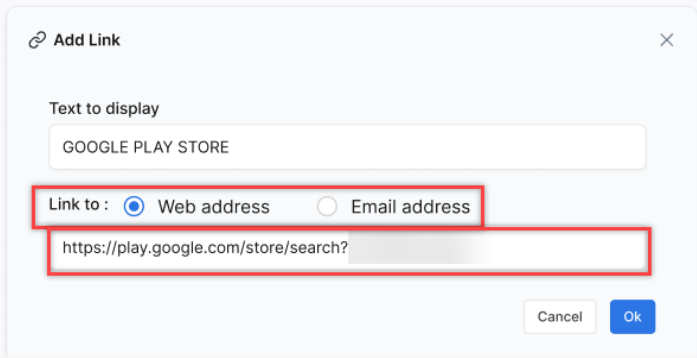
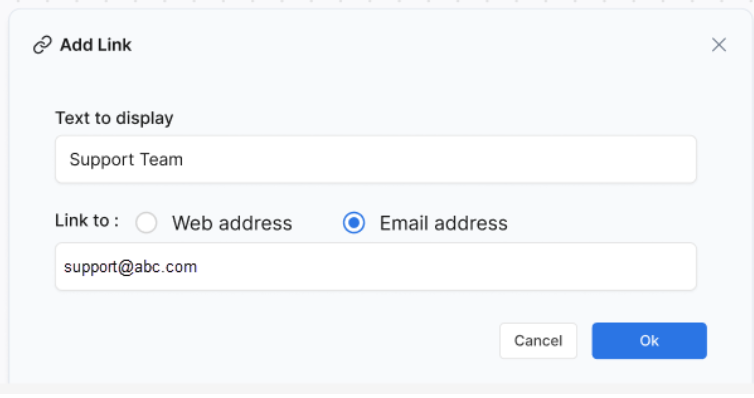
- In the Add Link dialog box, do the following:
- Select the web address option and enter the URL in the box, for linking a web page.
- For linking an email address, select the Email Address option and enter the email address in the box.
- Select the web address option and enter the URL in the box, for linking a web page.
- Click Ok. The selected text is hyperlinked.
- Hover over the hyperlinked text to view the following options:
- Open
- Break Link (icon)
- Edit
- Press Enter to send the message.
Message Formatting Guidelines
The system automatically removes unsupported formatting to maintain message security and reduce security risks. If a message appears as an empty bubble in the chat, the message likely contains unsupported formatting.
Use only the supported options listed below to ensure the system displays your messages correctly for both you and your customers.
✅ Supported Formatting
| What It Does | How to Write It |
|---|---|
| Plain text | Type normally |
| Bold text | *bold* |
| Italic text | ~italics~ or _italics_ |
| Hyperlinks | [Link text](https://example.com) |
| Bullet list | * Item |
| Numbered list | 1. Item |
| Preformatted text | `text` |
❌ Not Supported
Don’t use any of the following items because the system removes them and may display your message as blank:
- Angle brackets (for example, <hello>)
- Custom HTML tags
- Script tags
- HTML event handlers (for example, onclick)
- Embedded content (for example, iframes)
- Inline CSS styling
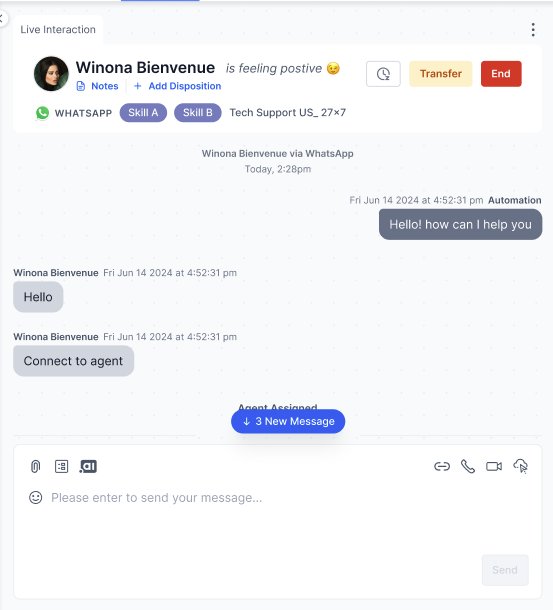
Viewing New Messages in the Agent Console
When agents are reviewing earlier parts of a conversation, and a new message arrives while you are scrolled up, a New Message button appears at the bottom of the conversation thread. The button also displays the number of unread messages. To view the latest message, click the New Message button. The most recent message is displayed.
Resend Message When Network Disconnects
The following table lists scenarios with expected results in case of a network failure while an agent attempts to send a response.
| SCENARIO | RESULT |
|---|---|
| When an agent sends a message | “Sending” appears on the chat window. |
| If the message is sent successfully | “Sent” appears on the chat window. |
| If the network is disrupted | The chat window is disabled.
Undelivered messages appear as “Not Delivered” |
| When the network is restored | The chat window is enabled. |
| If the resend icon is clicked | The message is sent again. |
| If the conversation is terminated | The Resend icon does not appear. |
| If the page is refreshed | The undelivered messages do not appear. |
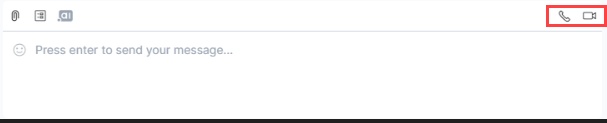
Audio and Video Calls with Customers
Agents can request the customer for an audio or video call during the chat conversation if required. Clicking the Audio or Video Call icon initiates a call.
Manual Outbound Call
Agents can initiate manual outbound calls from the agent console. Following are the conditions under which agents can or cannot initiate outbound calls. These rules ensure efficient call management while maintaining system routing integrity.
Rules for Outbound Calls
- Initiating Outbound Calls from Any Status
- Agents can initiate outbound calls from any status within the agent interface.
- Exceptions:
- Agents cannot initiate outbound calls when their status is “System Away” for both Chat and Voice interactions.
- Agents cannot initiate outbound calls when their status is “System Busy” for voice interactions.
- Outbound Calls During Digital Interactions
- Agents can initiate an outbound call even when handling digital interactions.
- If an agent’s slots are full and their status is “System Busy,” they can still initiate an outbound call.
- Inbound Voice Interaction Restriction
- Agents cannot initiate an outbound call if they are handling an existing inbound voice call.
Outbound Calling Button
- The outbound calling button is disabled:
- When agents are in a status that does not permit outbound calls (for example, System Away for both Chat and Voice interactions, System Busy for Voice interactions).
- When agents are handling an inbound voice call.
- When agents are handling an outbound call.
Handling Multiple Outbound Calls
Agents can initiate a secondary outbound voice call only after completing the ongoing call. This approach helps agents manage their workload effectively and provide undivided attention to each customer interaction.
Status Updates
When an agent initiates an outbound call, the system automatically changes the agent’s status to “System Busy”. This automatic status update helps manage agent availability and workload distribution, ensuring efficient call handling and resource allocation.
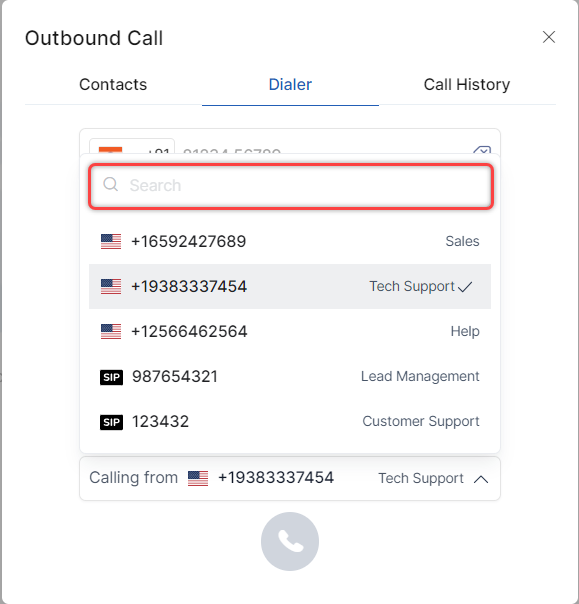
Outbound Dialer
The outbound dialer has the following functionalities:
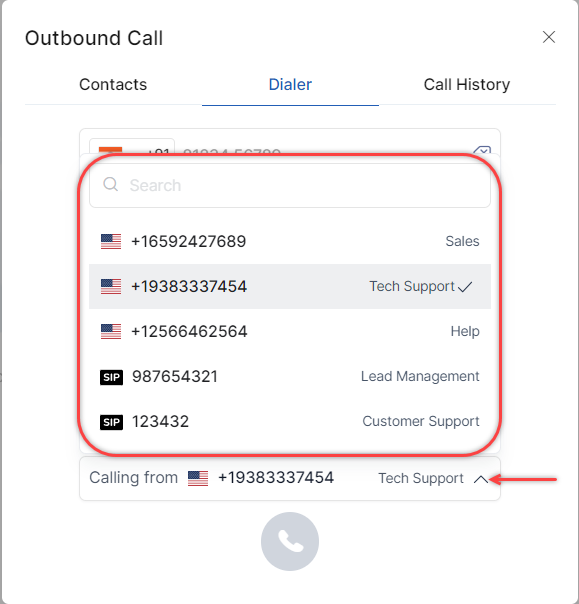
- Search Bar: The search bar on the dialer interface allows agents to enter keywords or partial numbers to find configured contacts quickly.
- International Subscriber Dialing (ISD) Code Update: The dialer automatically adjusts the outbound phone number’s ISD code based on the last used country code. This streamlines the process for agents making calls to different regions. For example, if an agent selects India as the country but enters a phone number from the USA, the dialer automatically changes the country to the USA.
- Phone Number Formatting: The system displays the phone number in a standardized format when an agent enters it for dialing, regardless of whether the original number contains hyphens or brackets, as long as the format is valid (for example, 090-1234-5678 or (123) 456-7890).
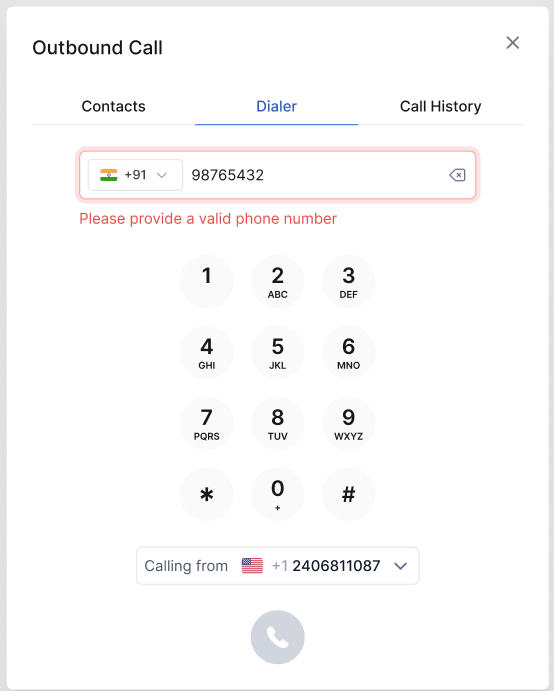
- Validation and Error Handling: If an invalid number is entered (for example, incorrect length, or characters), an error message is displayed. The call button is disabled until a valid number is entered, preventing accidental calls to inaccurate numbers.
- Enable Call Controls during ringing: Turning on this toggle allows agents to use the call control features (mute, hold, keypad, transfer) when the call is in the dialing phase. To enable this functionality, refer to the Permissions section.

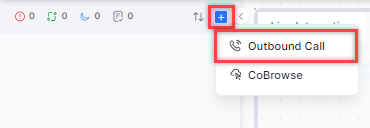
Agents can make outbound calls to the customers as follows:
- Click the + button on the conversation tray and click Outbound Call. The dial pad is displayed.
- Click the Calling from button on the Dialer tab, and select the number for placing the outbound call. Agents can use phone numbers or configured SIP trunks while making outbound calls.
- Agents can dial the outbound calls in two ways:
- Enter the phone number with the country code, and the country’s flag will appear automatically on the left. Click the Call button to place the outbound call.
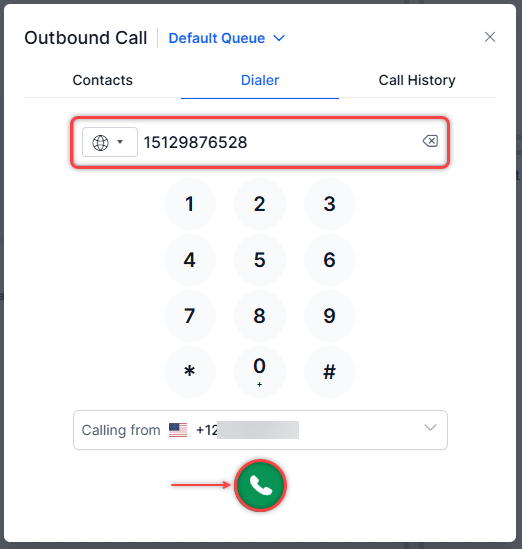
- (Optional) On the Dialer tab, select the country, enter the phone number, and select the transcription language.

- Select Call.
The transcription language dropdown shows your enabled languages and an Autodetect option. If no language is selected, the bot language is used by default. Your selection is saved for future outbound calls, but can be changed before each call.You can also change the transcription language during an active call from the call controls.The following scenarios are possible:- A user enters “123124”:
- By default, no country code is selected, and no country code validation is made. A call is directly placed to this number.
- If the user has already dialed a call with a US number, they should be able to change the country code to unknown.
- A user pastes “123121”:
- Initially, a validation error is displayed if the number does not match the defined format for the default country.
- The user can change the country code to unknown and a call is directly dialed to this number.
- User pastes/enters “+91987654321”:
- The country code is selected as India and the call is dialed.
- User pastes “+919876543”:
- A validation error is displayed and the call button is disabled.
- A user enters “123124”:
- Enter the phone number with the country code, and the country’s flag will appear automatically on the left. Click the Call button to place the outbound call.
Voicemail
If auto answer mode is enabled in Agent Settings, the transcript and recording appear automatically in the conversation tray of the agent.
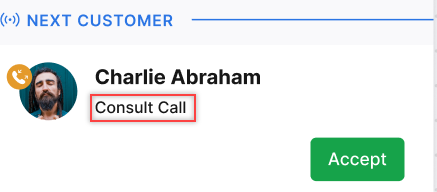
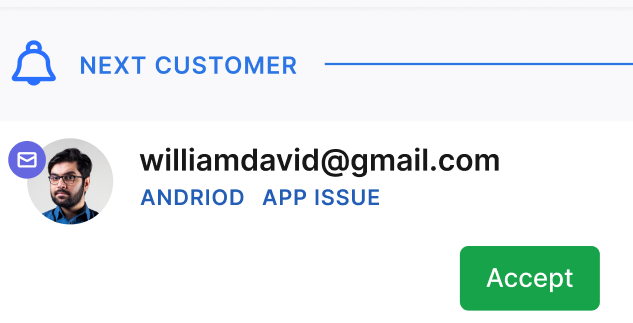
If manual mode is enabled, a notification is displayed on the Next Customer Notification panel. The agent must accept the voicemail, although no
inbound conversation slots are consumed.
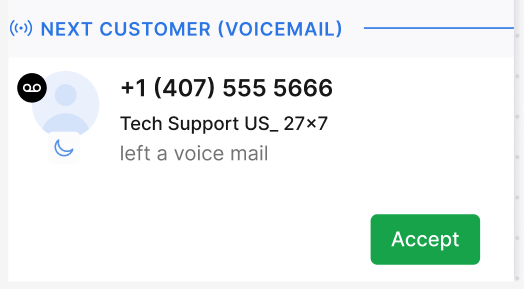
When the agent accepts the voicemail, the transcript and recording are displayed on the interaction pane. The agent can play, transfer, call (outbound),
and download the voicemail from the interaction pane.
![]()
CallBack Option
Once the inbound interaction is disconnected, it is considered complete. A separate callback request is then created. Learn more.
You can call the customer as follows:
- Click the Call button on the VOICE MAIL panel.
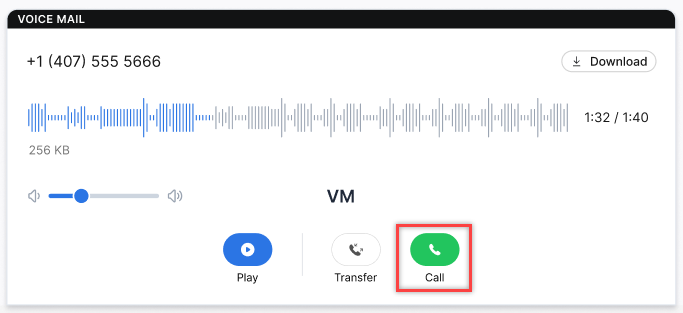
- The outbound call dialer is displayed. Click the Call button to initiate the outbound call.
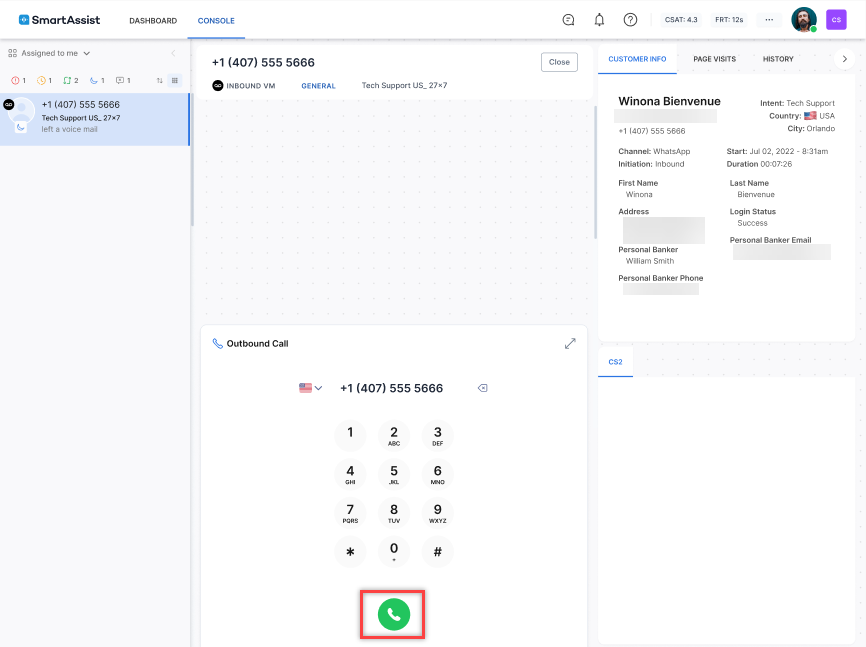
- The agent can continue the conversation.
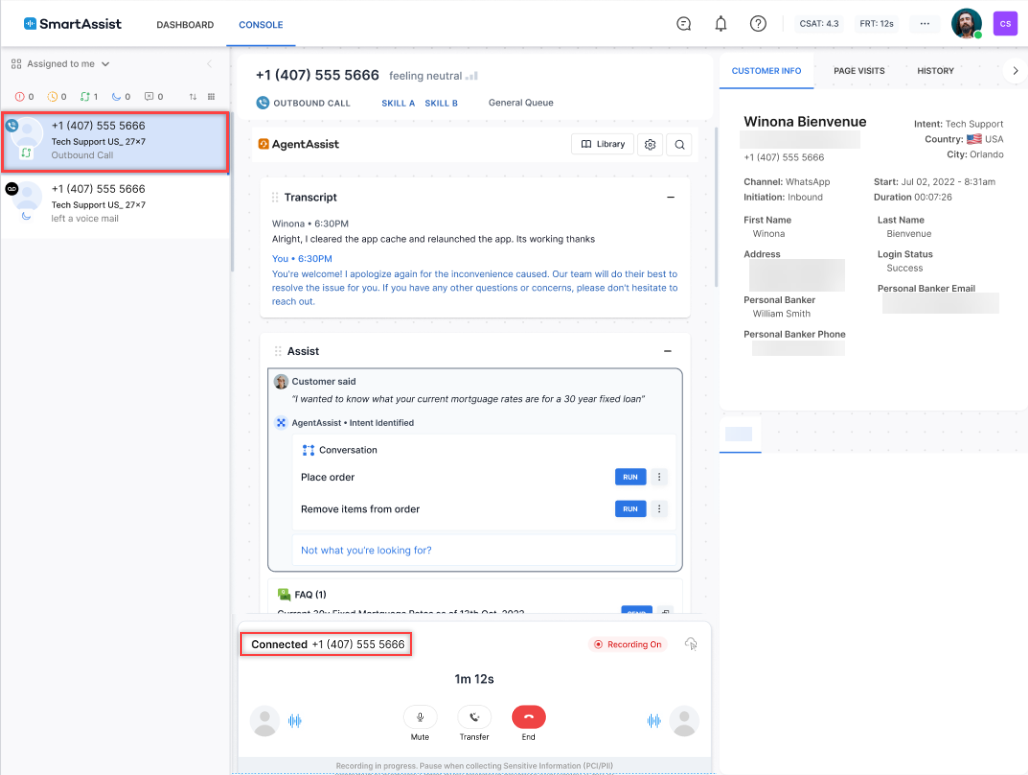
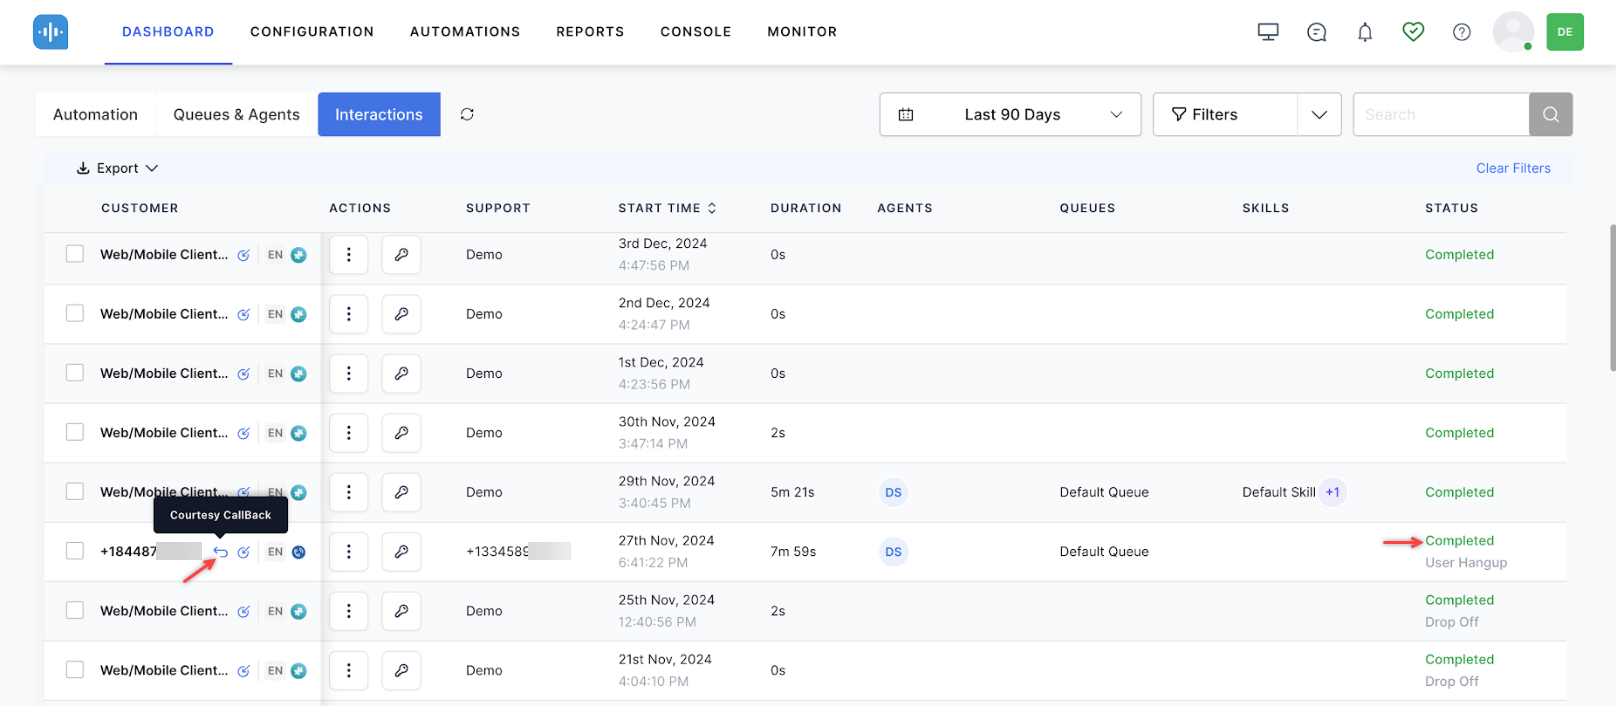
The callback conversations can be tracked on the DASHBOARD > Interactions tab.
Consult Call, Conference Call, and Warm Transfer for Voice Calls
Agents can initiate Consult calls, Conference calls, and Warm Transfer voice calls while interacting with customers. It increases agent efficiency by allowing the
initiating agent to share relevant context with the receiving agent before transferring the call. To ensure effective call handling, the receiving agent provides the
necessary information, leading to smoother transitions and improved customer outcomes. Additionally, this feature enables seeking expert opinions during customer calls.
Consult Call
Selecting an agent from the transfer list activates the consult and subsequent merge to a conference call. Consult functionality will not be available if the conversation is being transferred to a queue.
The agent chosen for consultation must be available and have zero load occupation. If an agent is brought in for consultation, their slots remain occupied throughout the consultation and conference call.
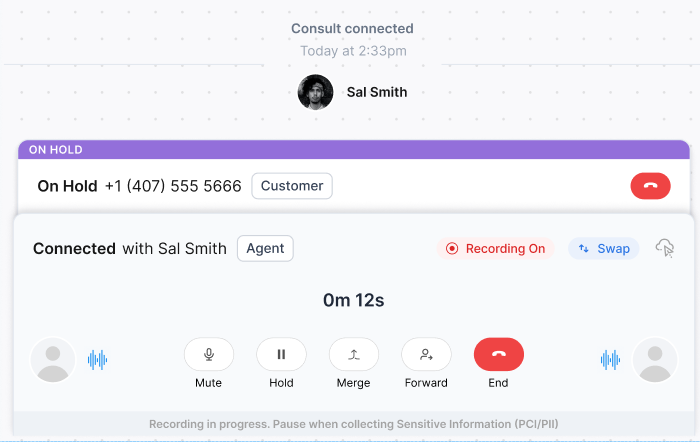
During the consult call, the system automatically places the customer on hold, allowing internal agents to communicate with each other. All calls are recorded if recording is enabled. Calls can be transferred to external agents by pre-saving their phone numbers through an API.
The initiating agent can switch to the original customer call if needed, and vice versa, using the Swap functionality. The initiating agent can merge the two calls,
converting them into a conference call.
Consult to a queue: Select a queue during the consult action to route the consult to an available agent in that queue. The system connects to the first available agent based on skills, availability, and capacity.
Queue-level consult without selecting an agent:
- During an active interaction, select External Consult Call.
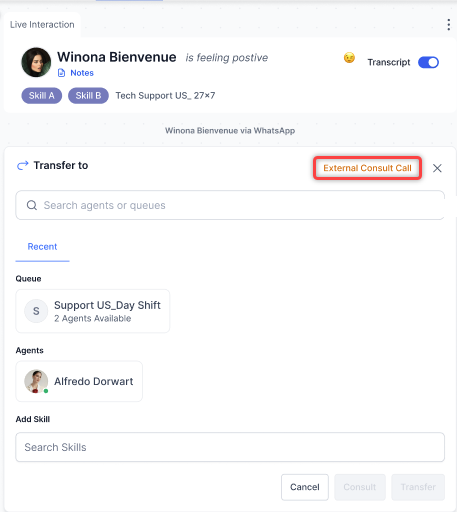
- Select a Queue. The count of available agents in the queue is displayed.
- Optionally select a specific agent.
- Select Queue Consult to initiate the call.
Conference Call
Up to 4 supervisors, and the primary agent, can join the same conference call from the contact center side.
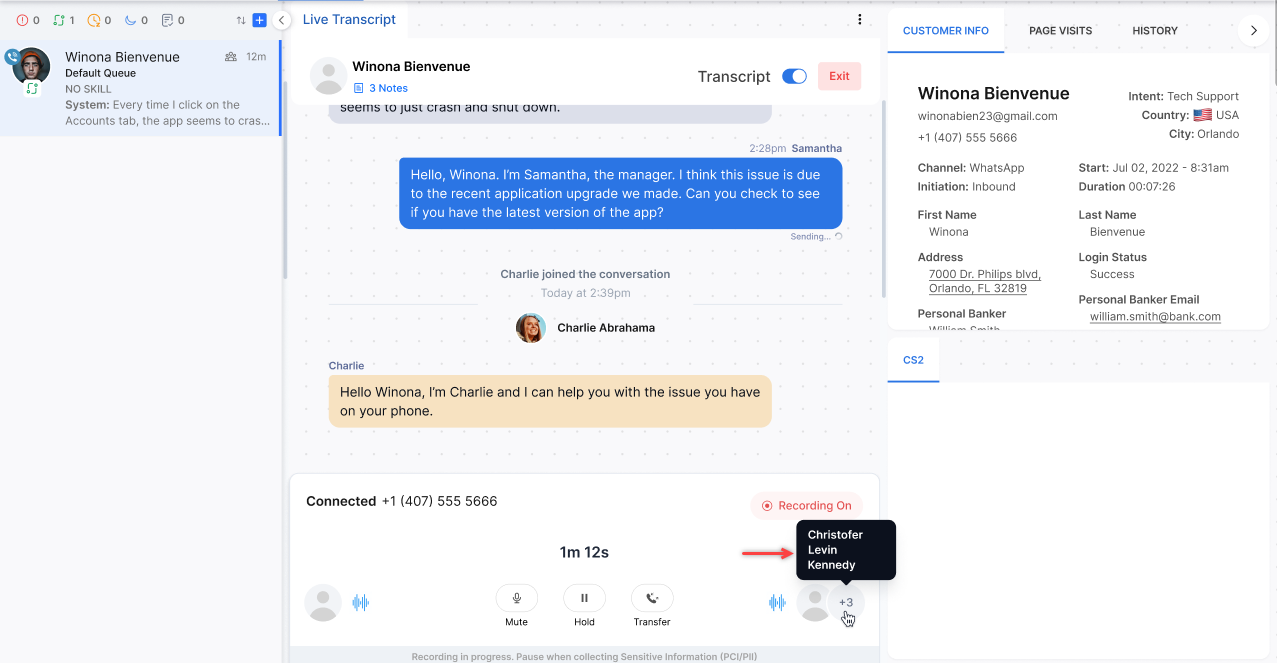
If a network disruption occurs, only the affected participant will be dropped. They can rejoin the conversation seamlessly. Agents and supervisors can manage only one call at a time.
When a supervisor joins a call, their slot will be consumed, and their status will change to “system busy” for both chat and voice interactions. All chat transcripts from supervisors will appear in yellow.
Warm Transfer
Following the consult or conference call, the initiating agent can proceed with a warm transfer by clicking the “Forward” button. This applies to both Inbound and Outbound calls.
Limitations
| Category | Sub-category | Detail | Scenario |
| Consult Calls | Ongoing consult call | A conference call cannot be initiated during an ongoing consult call. | – |
| Consult Calls | Post Consult call is merged | A conference call cannot be initiated during an ongoing consult call. | When the agent and user are on call and the agent initiates a consult with the Supervisor
a) If the consult is merged, then a conference is not allowed. b) If the Supervisor has dropped from the consult call, then the conference will be allowed. |
| Consult Calls | Ongoing conference call | Consult calls are restricted during an ongoing conference call. | – |
| Consult Calls | Post-conference call ends | Consult calls are restricted even if the ongoing conference call ends and the call is only between the user and the agent. | When the agent and user are on a call and the supervisor joins from the monitor tab, it gets converted to a conference call. Even if the Supervisor exits, the call will still be considered a Conference. |
| Call Transfers/Consult | Outbound calls
Inbound and Outbound (SAVG only) |
Call transfers and Consult calls are restricted to Outbound calls.
Call transfers and Consult calls are permitted for Inbound and Outbound calls on SAVG. |
– |
| AgentAssist Widget | Ongoing conference/consult | AgentAssist Widget should be hidden during ongoing conference/consult calls. | – |
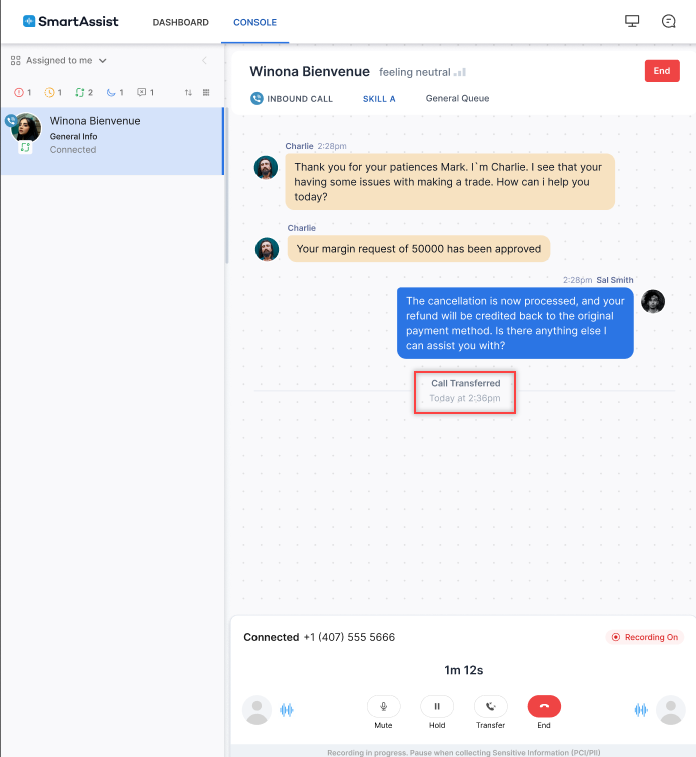
Call Transfer
Steps to initiate a Call Transfer:
- Click the Transfer button to initiate the transfer.
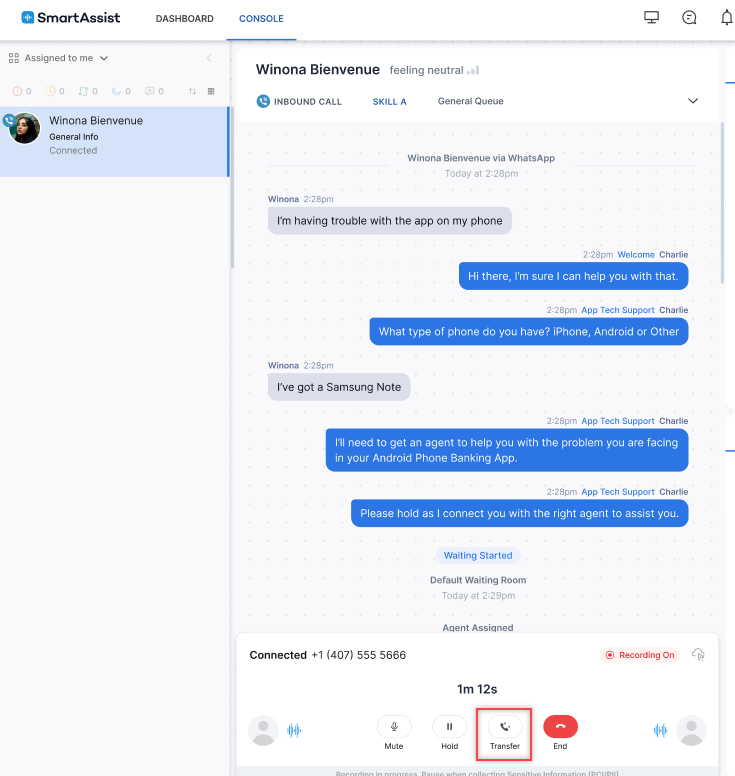
Recent transfer results are displayed.
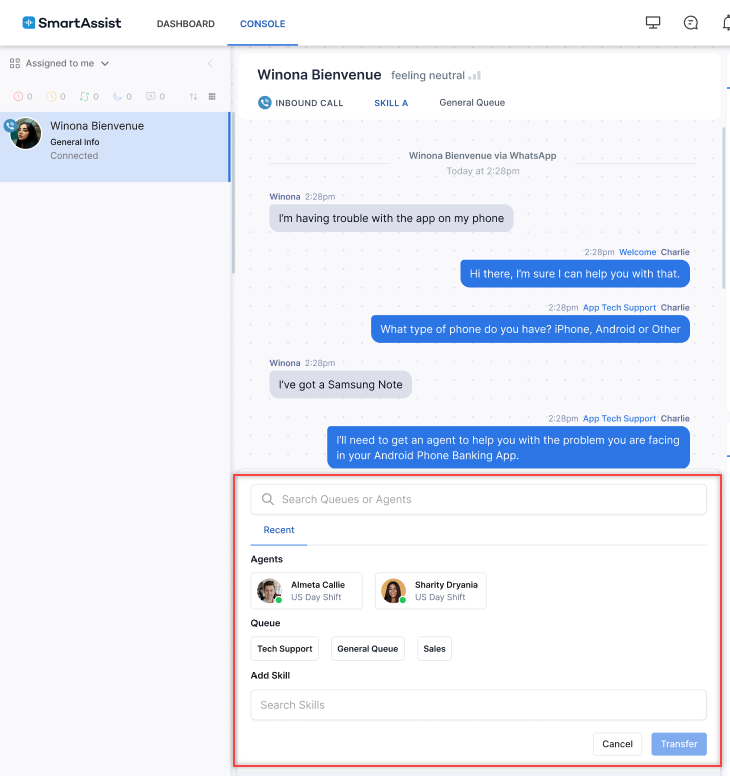
- You can search for an Agent or Queue to transfer the call.
Agent Transfer
- The following options are displayed when an agent is selected:
- Click Transfer to directly transfer the call to another agent.
Consult Call
- Click Consult to initiate a call with another agent while the external call progresses.
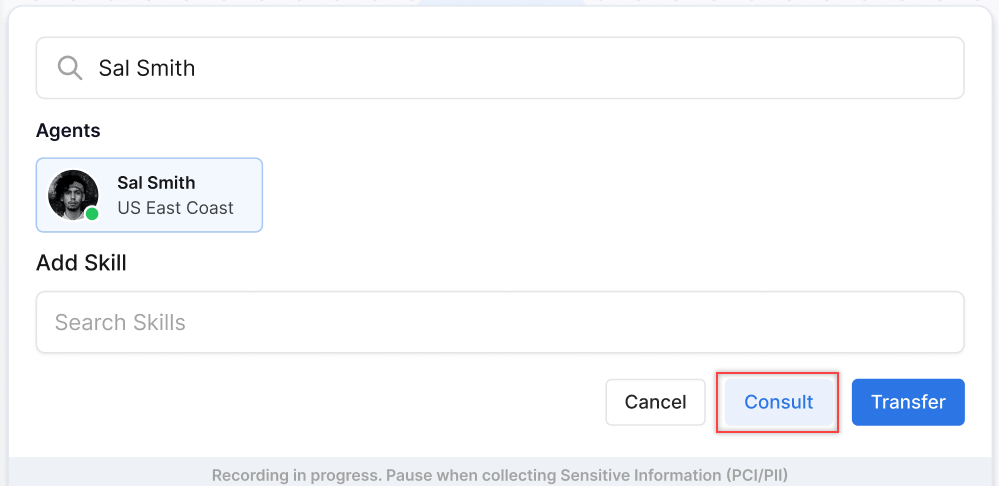
- A consult call is initiated, and the external call is placed on hold.
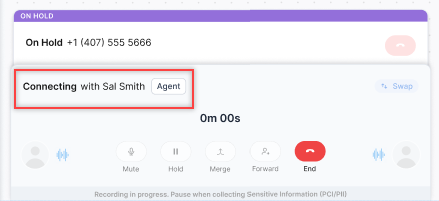
- The consult call is displayed on the conversation tray of the receiving agent.
- On accepting the call it appears on the Live Interaction pane of the receiving agent.

- The initiating agent can continue the conversation with the receiving agent. The following options are available to the initiating agent.
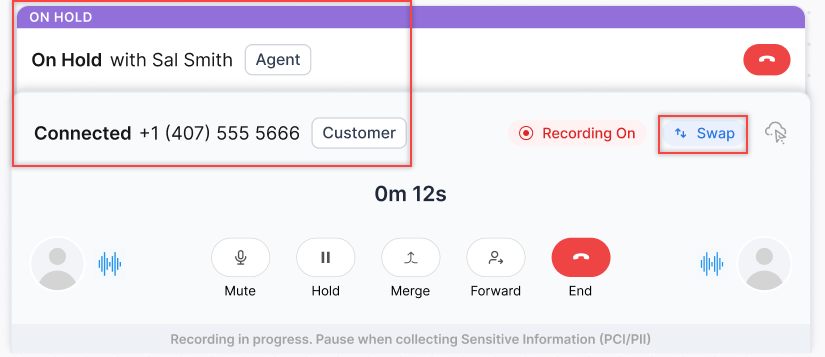
- Click the Swap button to swap between the external and internal (consult) calls. When switching to the external call,
the internal call is placed on hold and the recording is paused.
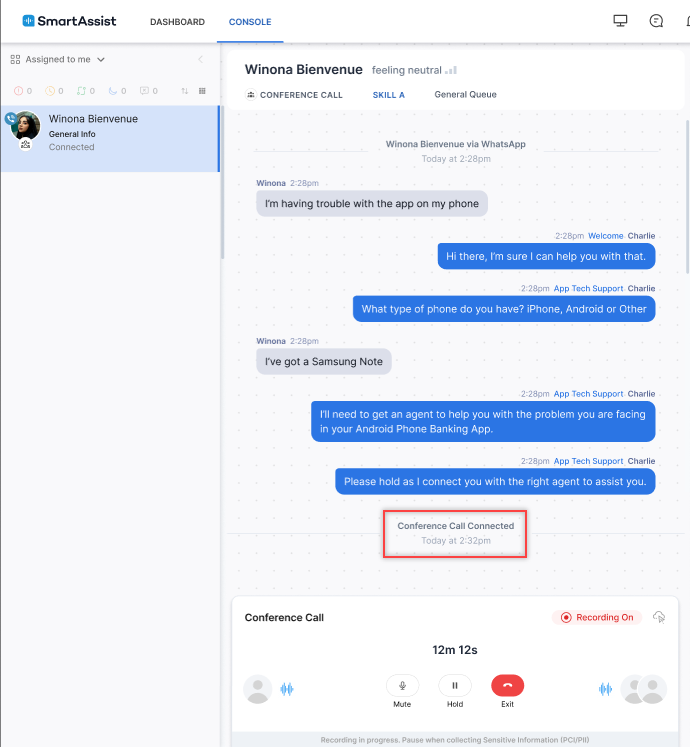
Conference Call
- Click the Merge button to initiate a Conference Call with the customer.
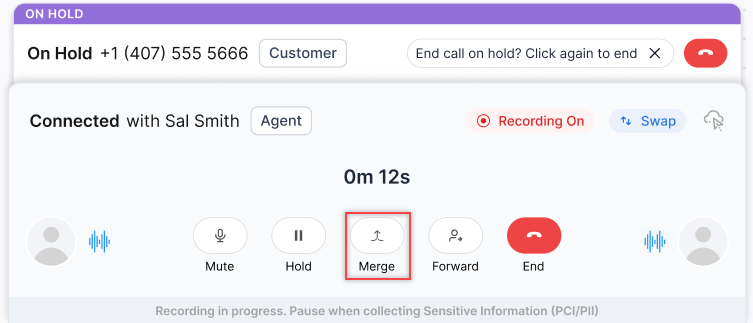
- The conference call appears on the conversation tray of the receiving agent and a notification is displayed on the top right corner of the agent console.
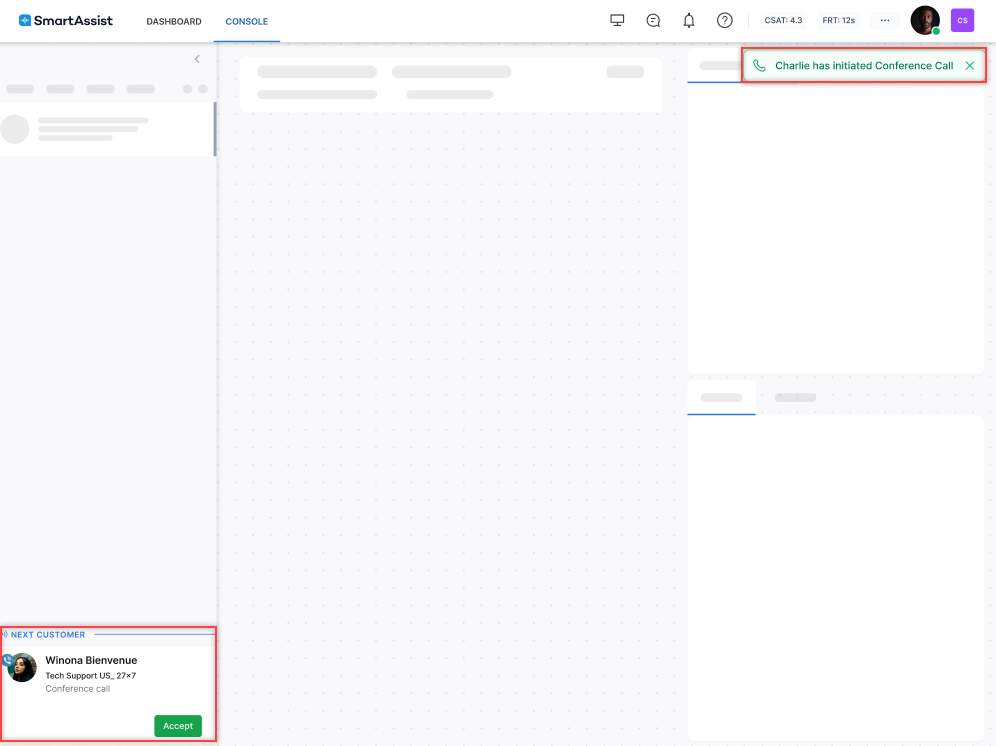
- On accepting the call, the conference call is connected and the agents can no longer interact privately.
- A notification is displayed on the top right corner of the console if the customer drops off during a conference call.

Warm Transfer
- Click the Forward button to transfer the conversation to another agent.
- The initiating agent is disconnected and the conversation appears on the conversation tray of the receiving agent. A notification is displayed on the
top right corner of the agent console.
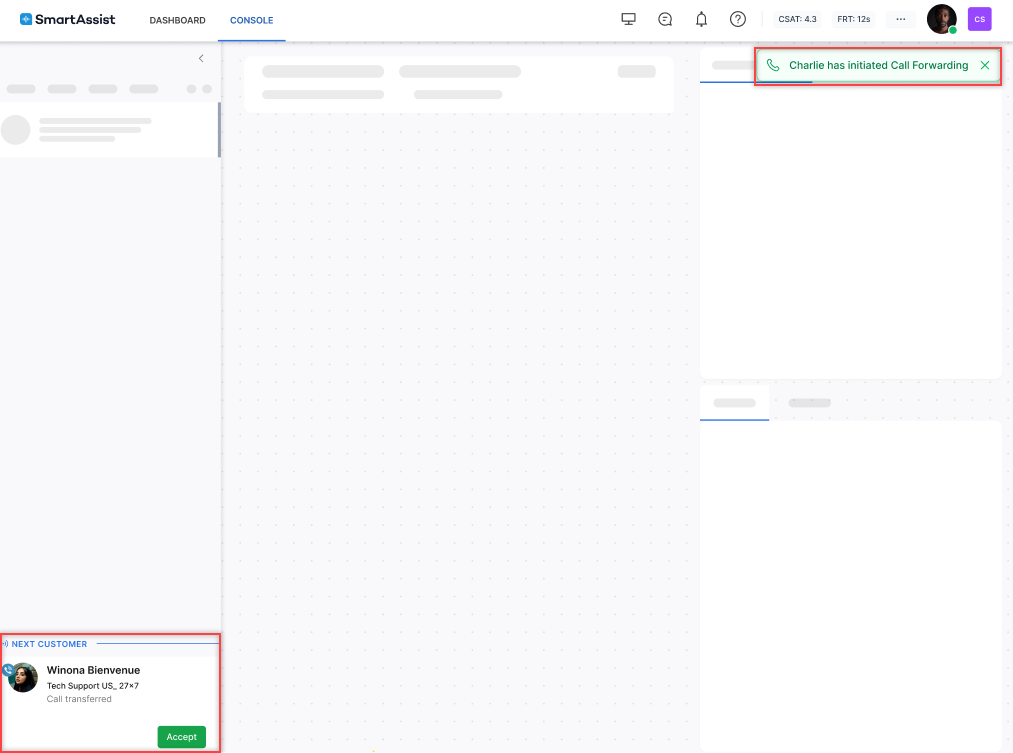
- On accepting, the call is transferred to the receiving agent.
Queue Transfer
- The following options are displayed when a queue is selected:
- Click Transfer to directly transfer the call to another queue.
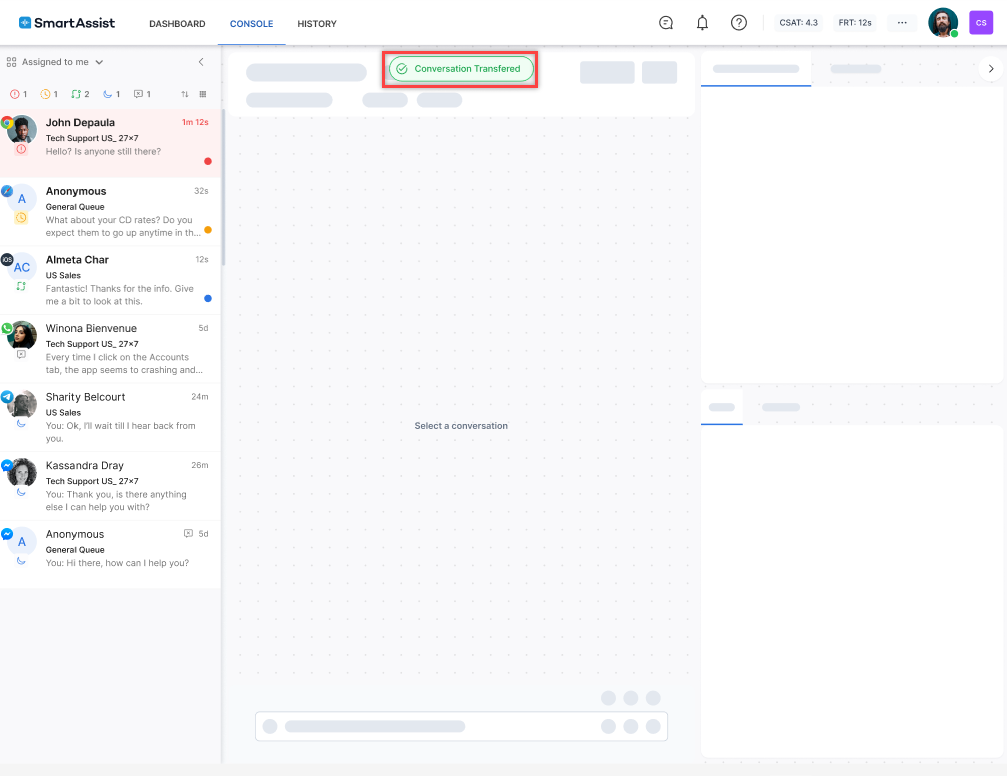
Conversation Transfer Scenarios
There are two possible scenarios when transferring conversations between agents or queues, each with different re-routing behaviors:
- Agent-to-Queue Transfer: When a conversation is transferred to a queue, it is placed in that target queue, and any subsequent routing occurs among the agents within that target queue.
- Agent-to-Agent Transfer: When a conversation is transferred directly from one agent (A1) in Queue 1 (Q1) to another agent (A2) in Queue 2 (Q2), any re-routing will still take place within the original queue (Q1), not the target agent’s queue. This is because the target agent (A2) can belong to multiple queues, and the system ensures that re-routing is done within the queue where the conversation was first handled (Q1).
The key difference is that agent-to-queue transfers modify the routing queue, whereas agent-to-agent transfers preserve the original routing queue.
External Consult and Conference During an Ongoing Interaction
While interacting with a customer, if an agent needs to seek external consultation, they can initiate an outbound call as follows:
- Click the Dialpad icon.

- The External Consultation Call window appears. The external call can be dialed in three ways:
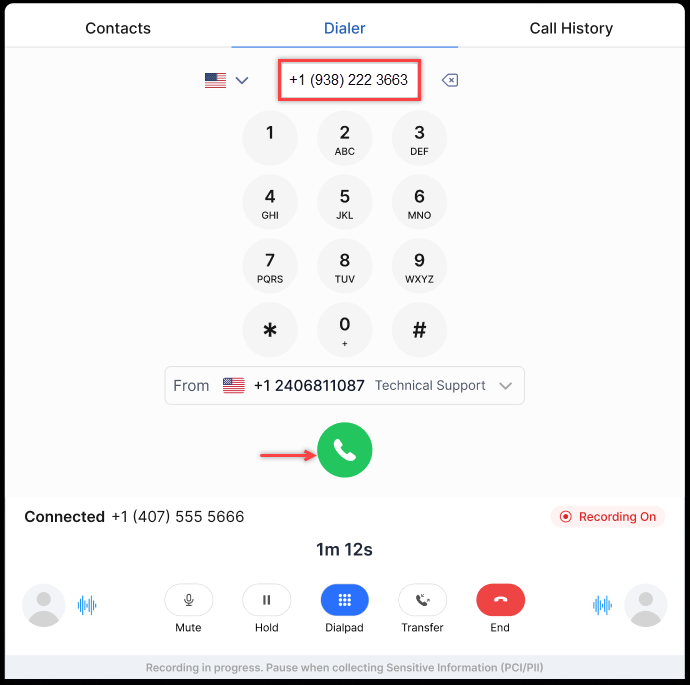
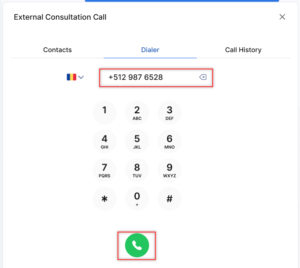
- Manual Dialer
- Enter the phone number with the country code, and the country’s flag will appear automatically on the left. Click the 🕻 button to initiate an external outbound call.

- Enter the phone number with the country code, and the country’s flag will appear automatically on the left. Click the 🕻 button to initiate an external outbound call.
- Contacts Tab:
- Click the Contacts tab, enter the contact’s name in the search bar, and press enter.
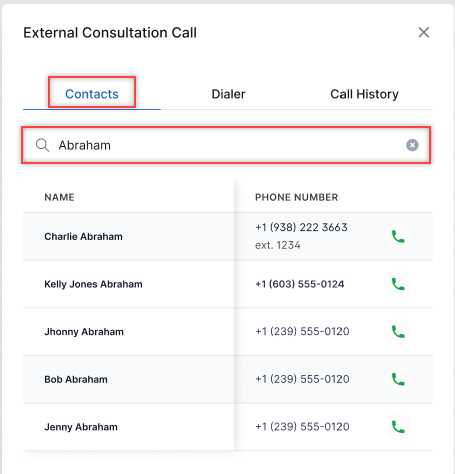
- The search results are displayed. Click the 🕻 button.
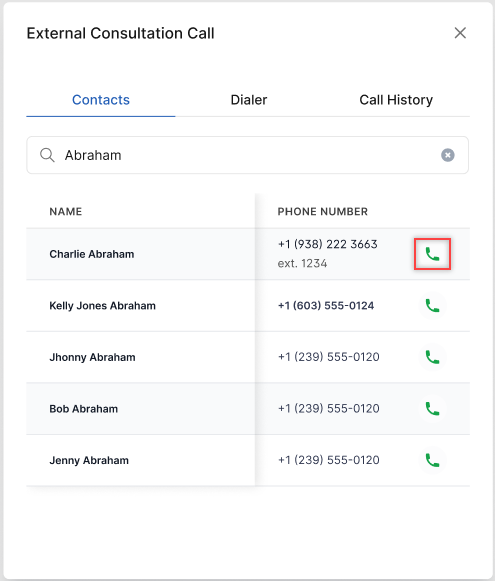
- The phone number appears on the dialer tab. Click the 🕻 button to dial the call.
- Click the Contacts tab, enter the contact’s name in the search bar, and press enter.
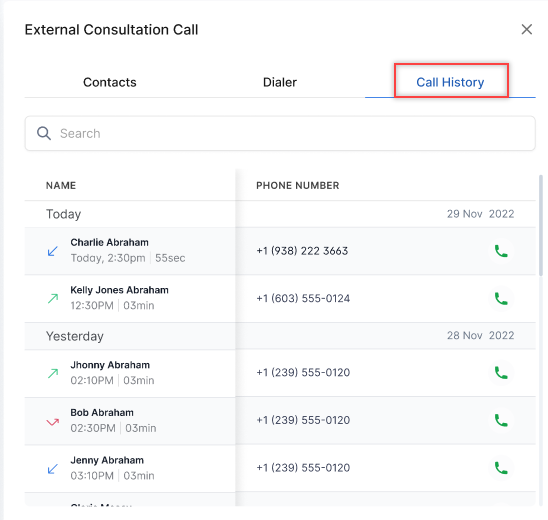
- Call History:
- Click the Call History tab.
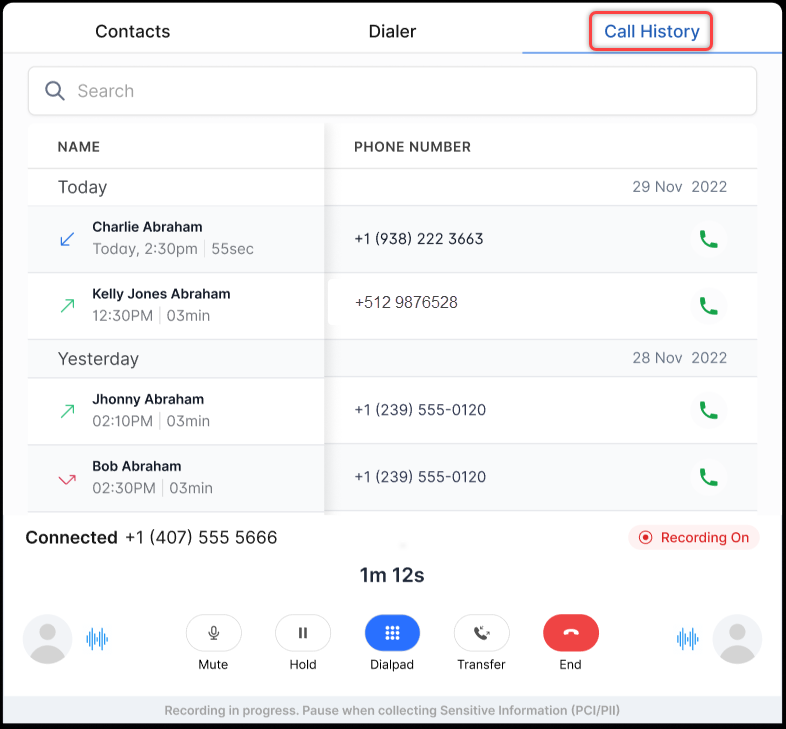
- Click the 🕻 button for the number to which you want to forward the call.
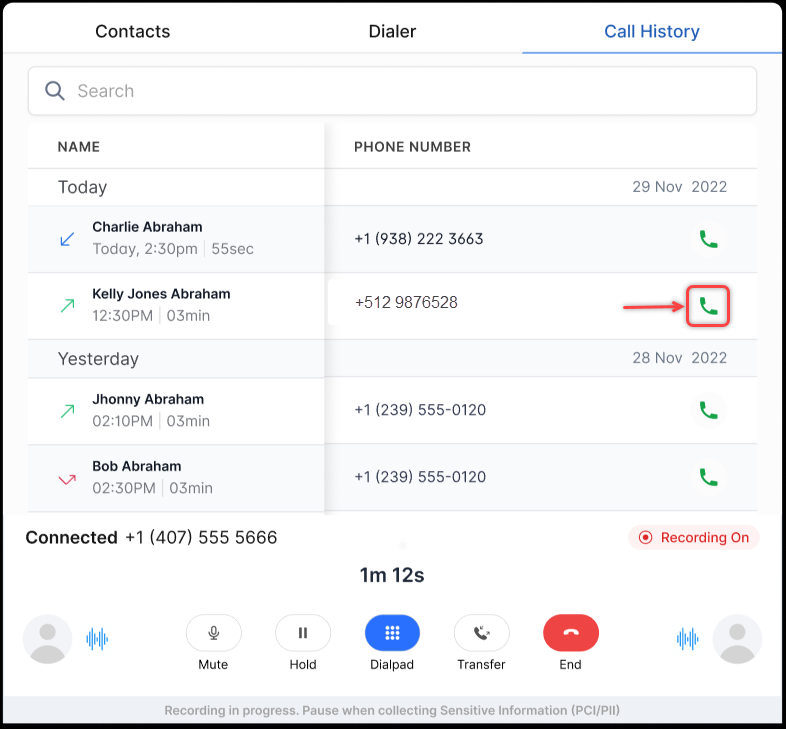
- The phone number appears on the dialer tab. Click the 🕻 button to dial the call.

- Click the Call History tab.
- Manual Dialer
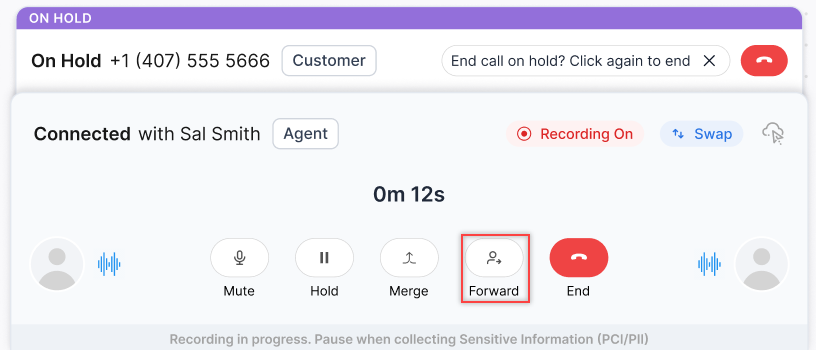
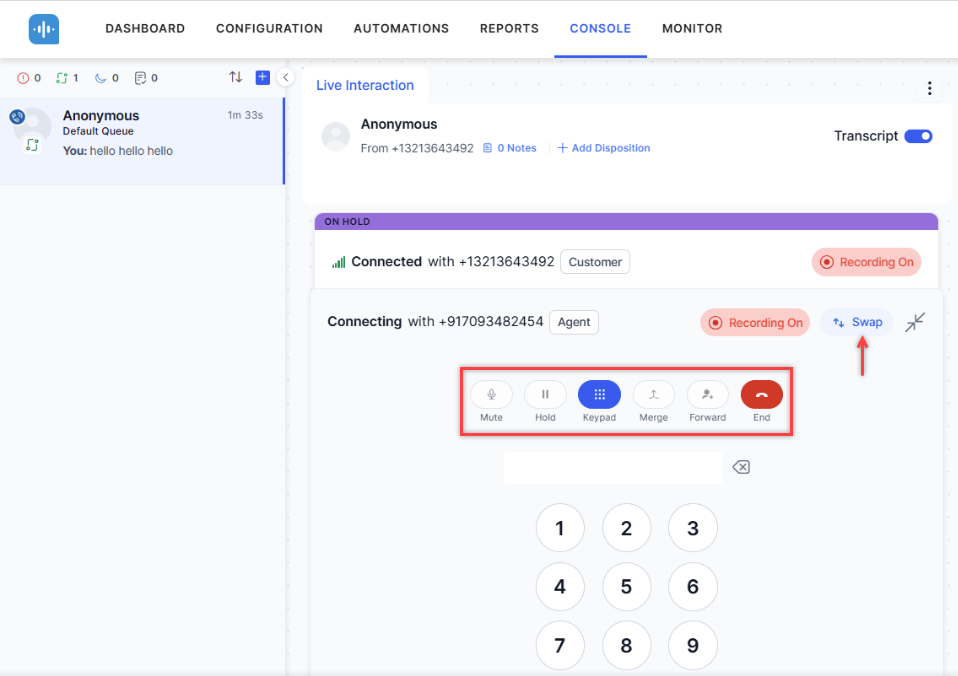
- The external consult call is connected, and the customer is placed on hold. The following options are available with agents during the external consult call:
- Mute – Mute the conversation.
- Hold – Place the external consult call on hold.
- Keypad – To send DTMF inputs, enabling users to navigate IVR menus to connect external parties to the conference.
- Merge – Merge the external call with the existing inbound call (conference).
- Forward – Forward the call to another agent.
- End – End the external consult call.
- Swap (Top Right Corner) – Swap between the customer and the external call.
The Call History tab contains records of the outbound calls.
Voice Chat
The Voice Chat functionality facilitates communication between customers who prefer voice interactions and agents who handle chat interactions, particularly when they speak different languages. This system incorporates ASR (Automatic Speech Recognition) across languages and a translation layer to connect customers and agents speaking different languages.
Configuring Voice Chat
The voice chat function can be configured in the Experience Flows.
Steps to configure a Voice Chat:
- Create a new Experience Flow. Learn more.
- Add a Script Task and enter the script to enable voice chats. Learn more.
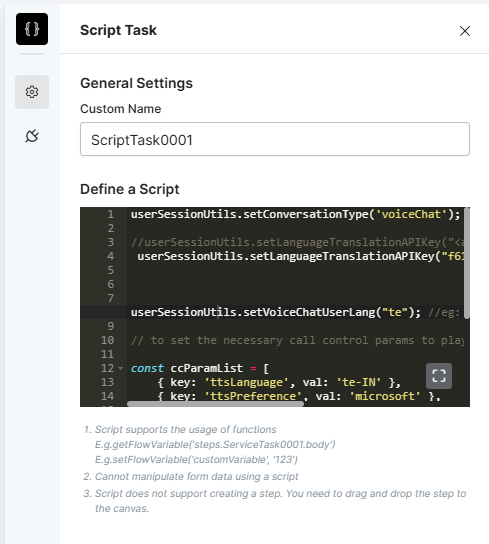
- Connect to an Agent Transfer node.
Voice Chat Experience
The following example explains the working of the voice chat functionality:
- If a Spanish-speaking customer calls the contact center number, the system identifies the customer as speaking Spanish. When the customer speaks, Automatic Speech Recognition (ASR) converts their spoken Spanish into text.
- This text is then translated to English through the Microsoft Azure/Google translation layer. The system routes this conversation to an available English-speaking agent who has a single chat slot dedicated to voice interactions.
- When the agent types a response in English, the system translates it back to Spanish and converts it to speech for the customer.
- If all agents are busy, the customer remains in a voice queue, and they cannot leave a voicemail or request a callback, as it is disabled for voice chat interactions.
This setup allows the customer to have a natural voice conversation in their preferred language while the agent chats in their language.
Co-Browse
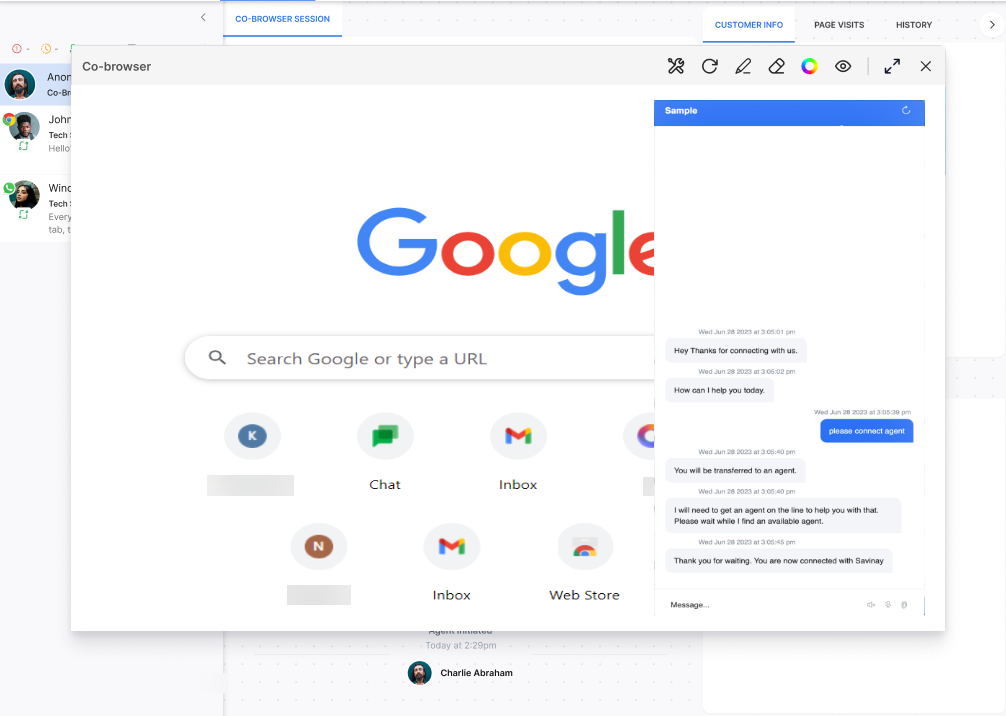
The Co-browse functionality allows agents and customers to collaborate in real time by sharing the customer’s web session. Agents can guide customers, highlight areas of interest, and, if permitted, temporarily control the session to assist with navigation. Customers remain in control at all times. To configure Co-browse, refer to Co-browse Settings.
Starting a Co-browse Session
Agent
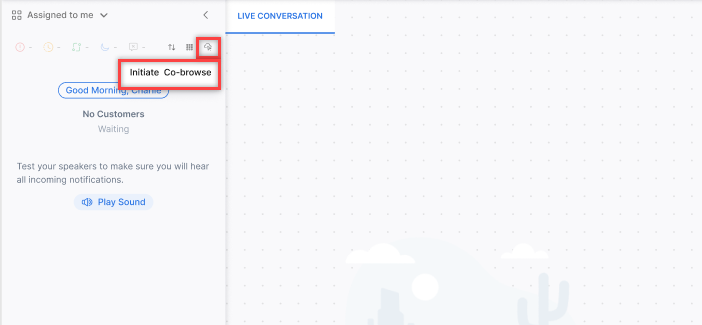
- In the agent console, click the CoBrowse button.
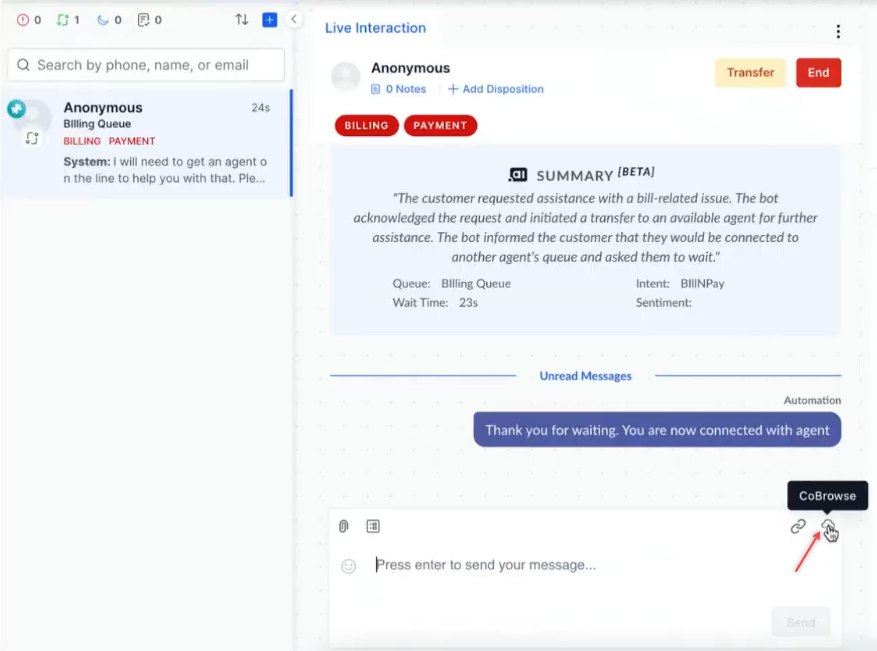
- Click Start CoBrowse on the pop-up window. A session request is sent to the customer.

Customer
-
- A pop-up request appears on the website.
- Click Accept to start the session or Reject to decline.
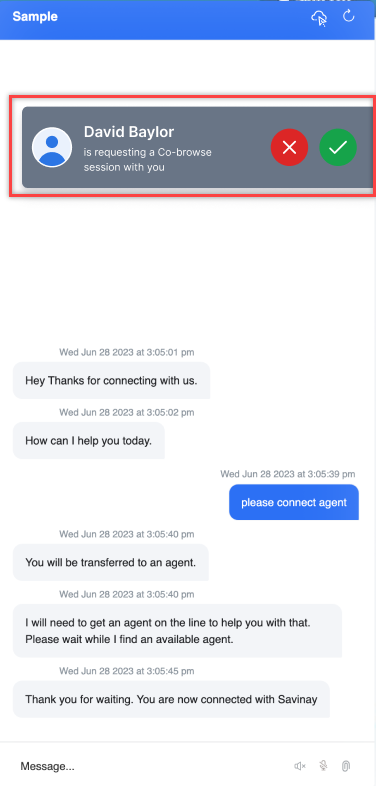
- If accepted, the agent can view the shared screen.
Toolbar Options
Agent Tools
During a session, the agent can access the following toolbar options:
- Color Selection: Choose different annotation styles for clarity.
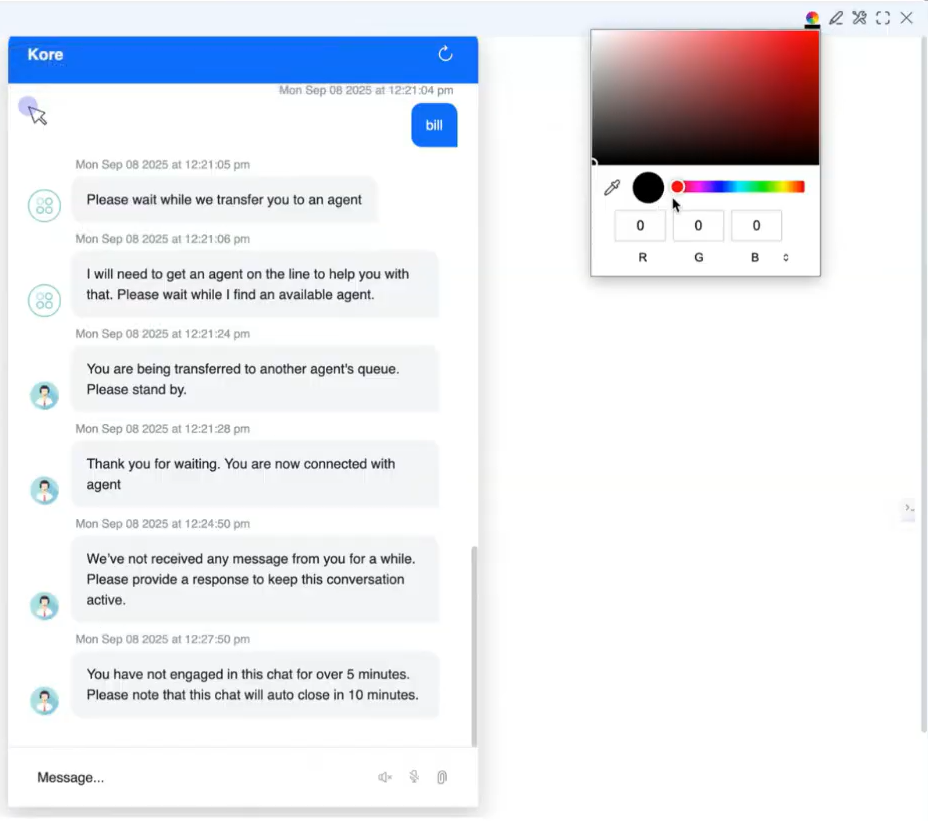
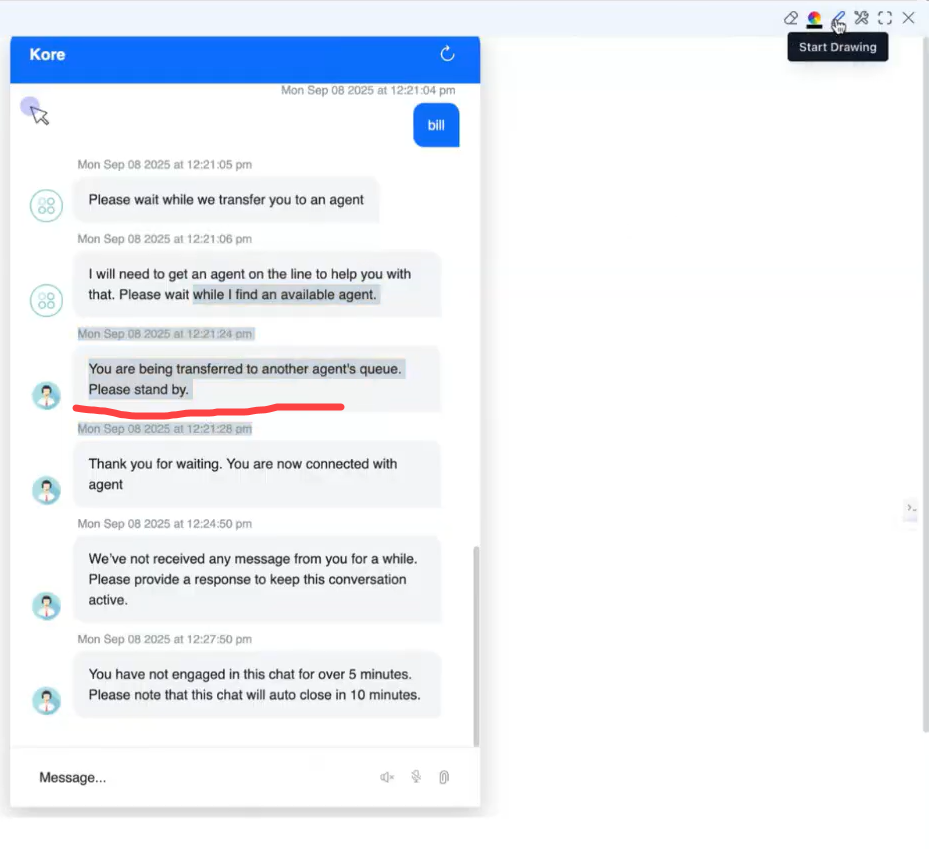
- Annotate: Draw or highlight elements on the customer’s screen. Use the Eraser tool to remove annotations or undo the most recent action.
- Request Control: Ask permission to control the customer’s screen. If granted, the agent can navigate or type on behalf of the customer.
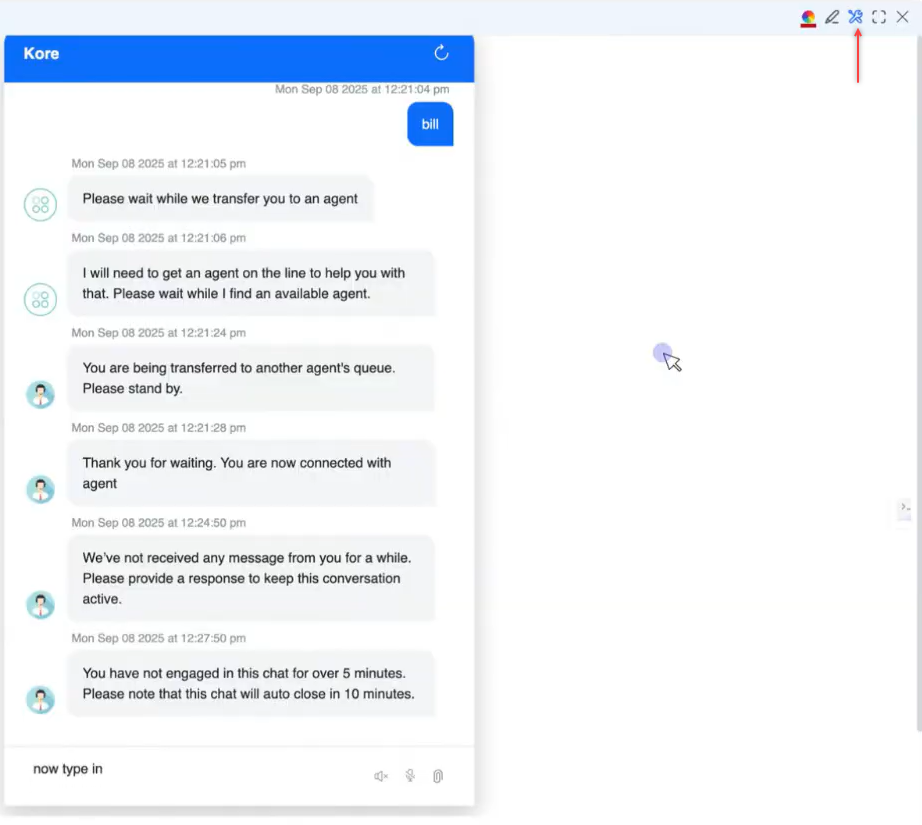
- Release Control: Release control after completing an action.
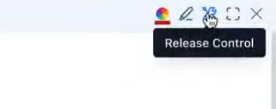
Customer Tools
Customers always remain in control of their session and can access the following toolbar options:
- Release Control: Withdraw the agent’s control at any point.
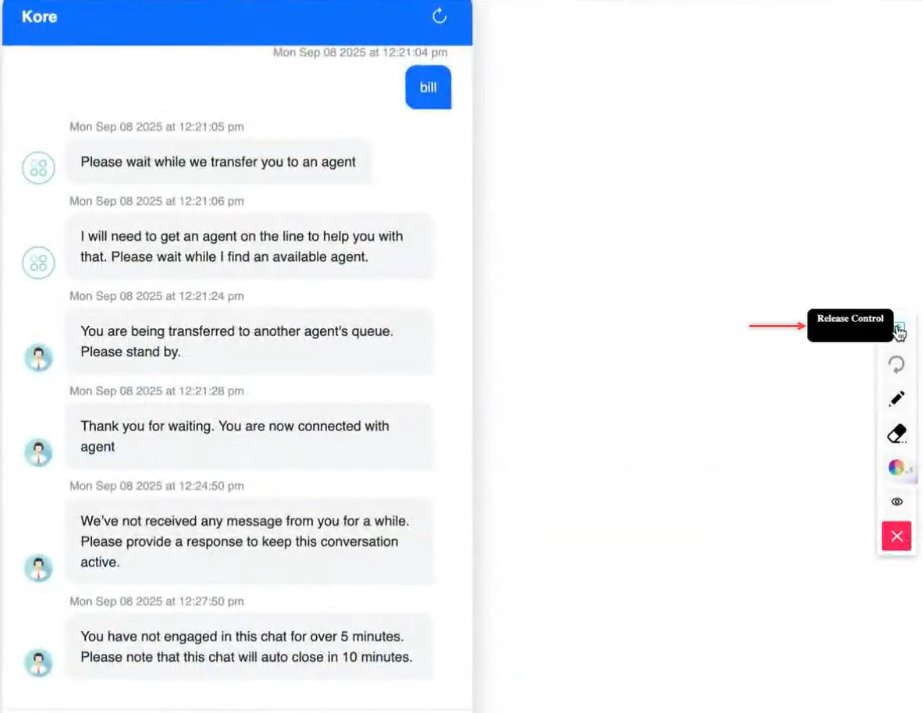
- Reconnect: Re-establish the session if connectivity issues occur.
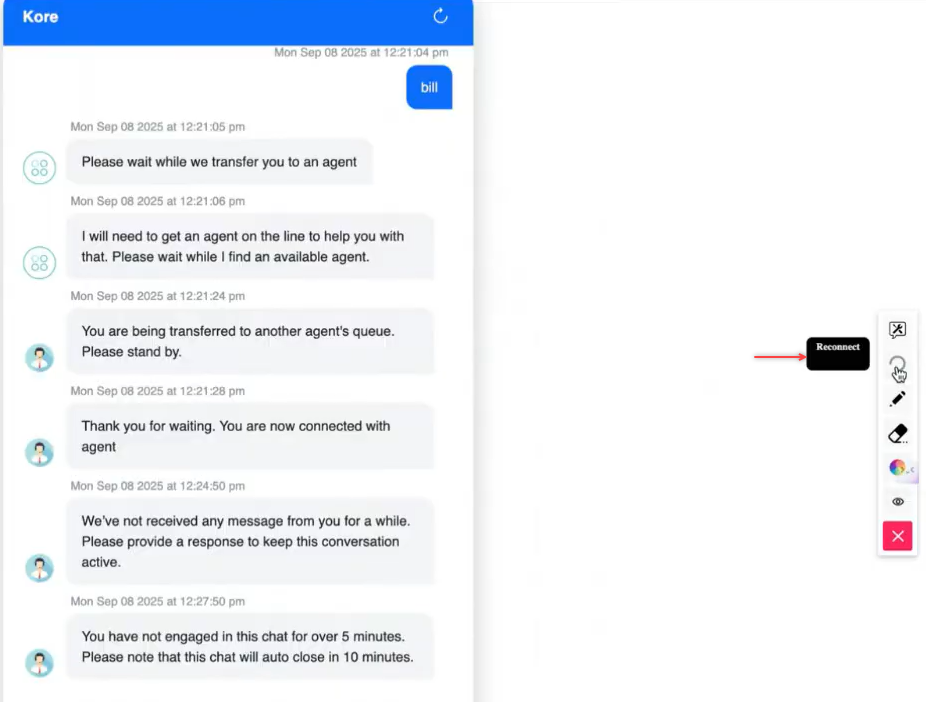
- Annotate: Mark areas on the screen to show the agent what needs attention.

- Mask/Block Input: Hide sensitive information while typing, such as passwords or payment details.
- Customers select which inputs or areas to mask.
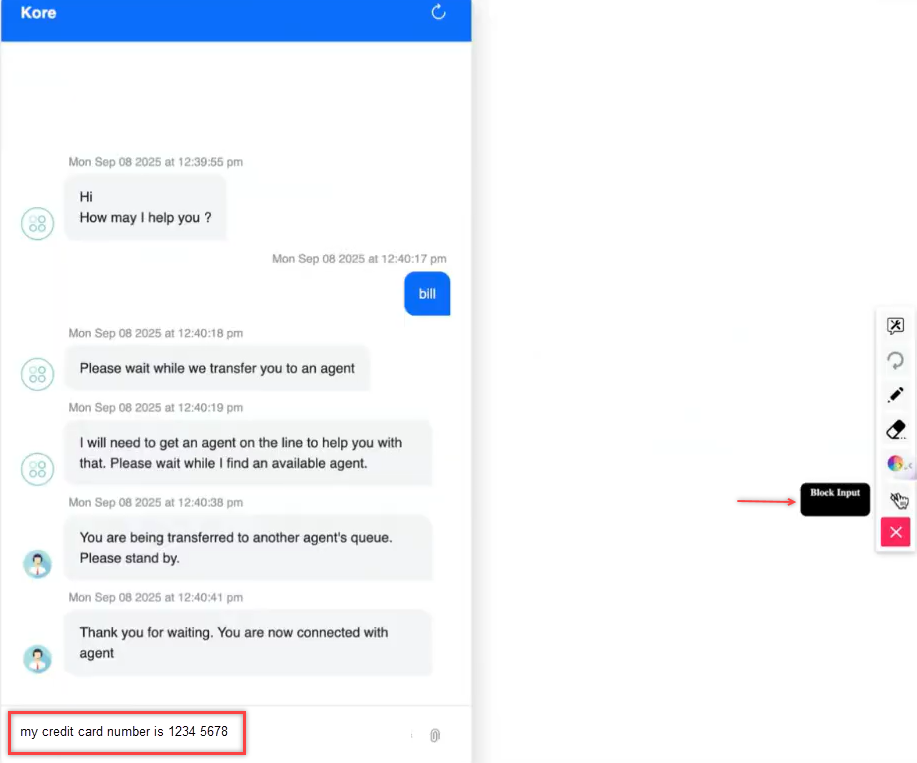
- Masked fields are invisible to the agent and not stored in logs. Masking does not apply to all inputs automatically.
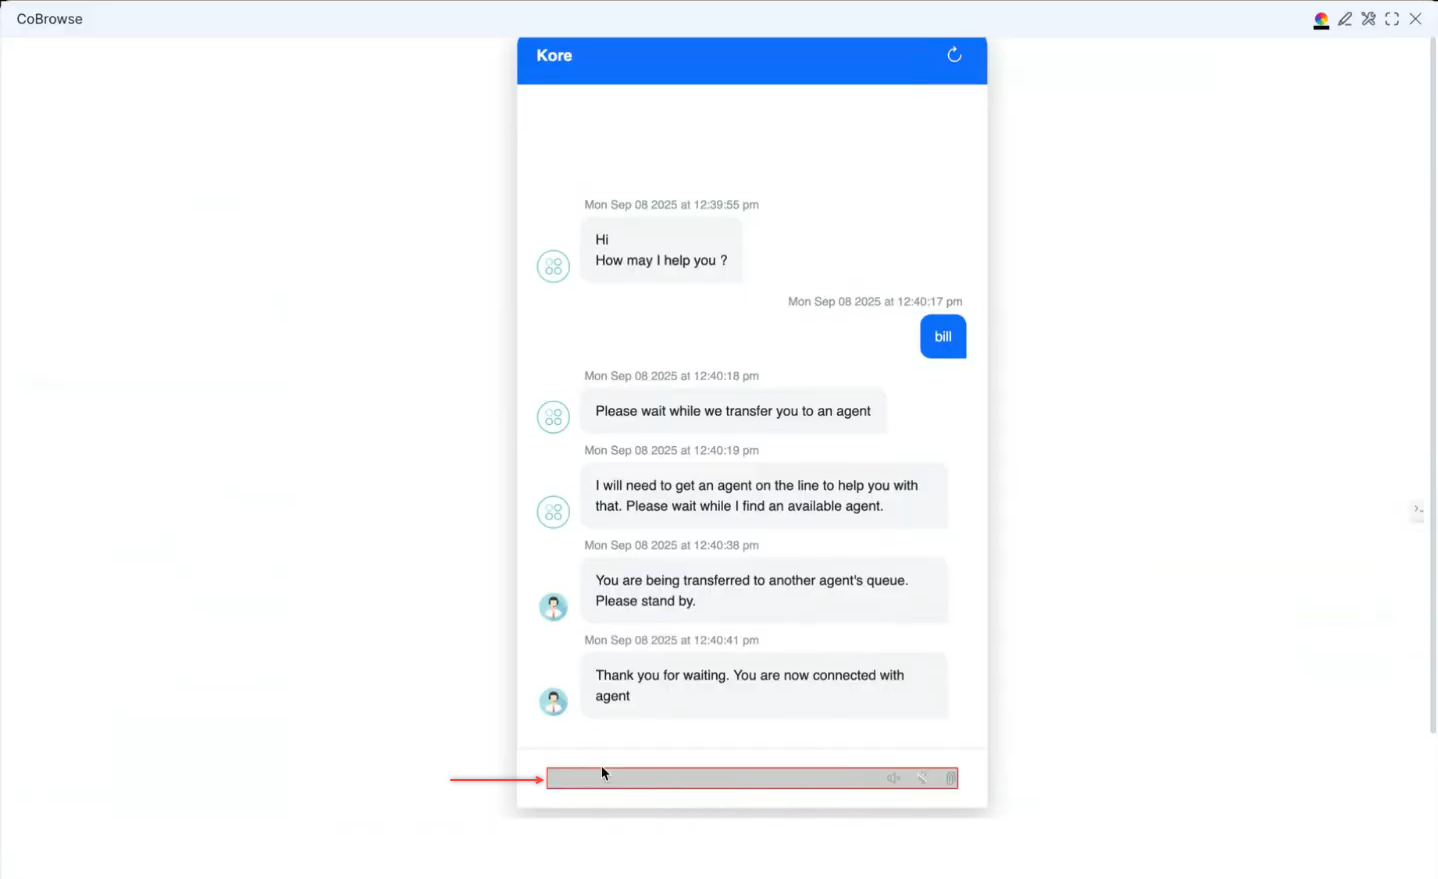
- Customers select which inputs or areas to mask.
Initiate a Co-browse Session Between the Agent and the Customer Desktop Over the Phone
To initiate a Co-browse session when the connection between the agent and the customer’s desktop screen is over the phone:
-
-
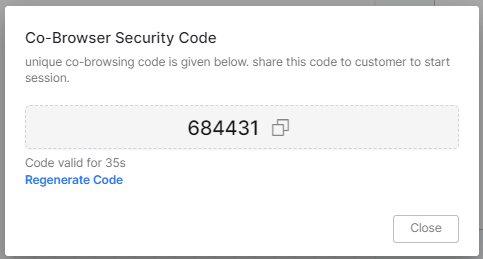
- The agent generates a security code to establish a website-to-website connection.
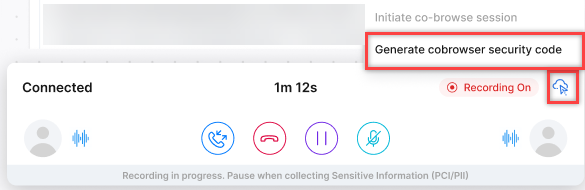

- Share the security code with the customer.
- The customer clicks the Co-browse button. A prompt appears to enter the code shared by the agent during the voice call.

- After entering the code, the system establishes an end-to-end connection between the agent and the customer desktops to initiate co-browsing.
- The agent generates a security code to establish a website-to-website connection.
-
Initiate Co-browse on the Console When Connected to an External System
When the agent and user connect through an external system (for example, Genesys) and need to initiate a co-browse session using the SmartAssist console,
they can achieve this using this feature.
Steps to initiate co-browse session:
- Click the Co-browse icon on the conversation tray.
- A security code is generated. Share the security code with the customer.
A co-browse session is initiated.
Sending Emojis
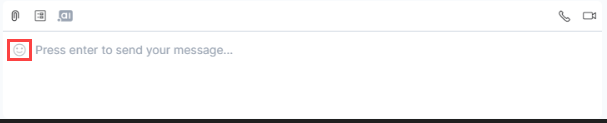
During a conversation, agents can click the Emoji icon to react to the conversation.
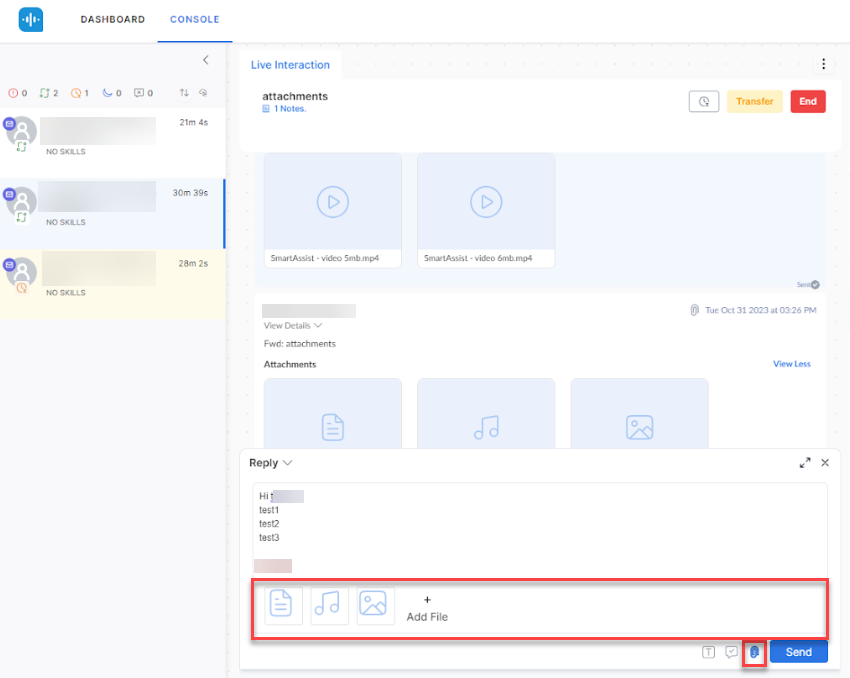
Sending Attachments to Customers
During a conversation, agents can click the Attachments icon to share attachments with customers.

Agent Forms for Handling Sensitive Information
Agents can guide customers to fill in data using agent forms. The agent forms option is an additional security layer that helps customers provide information
faster while maintaining confidentiality.

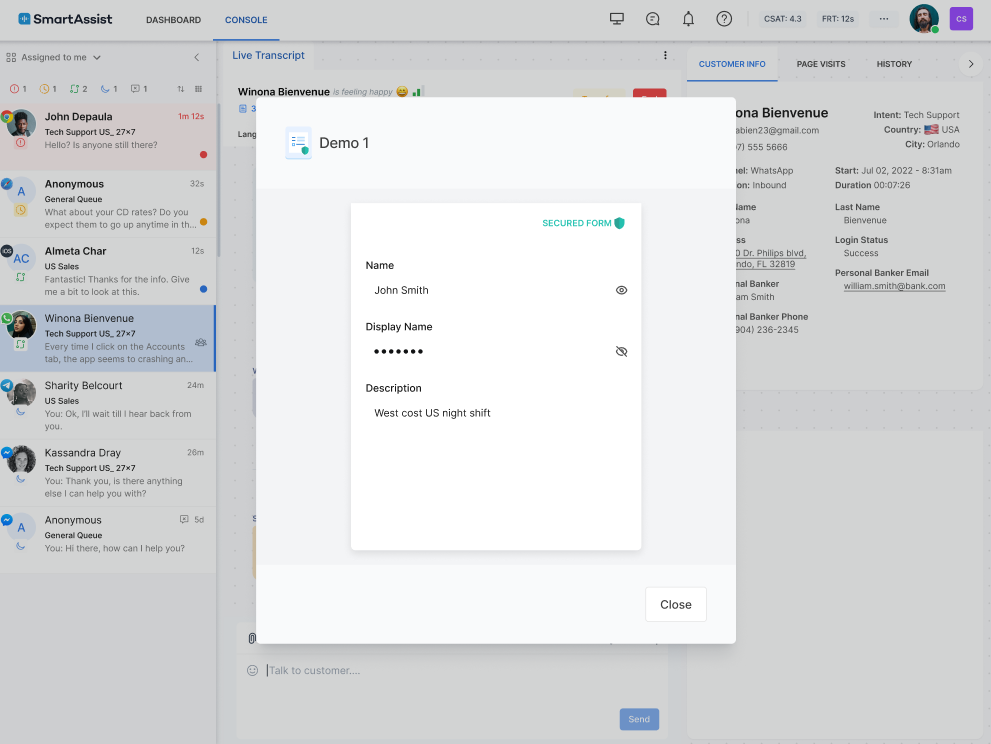
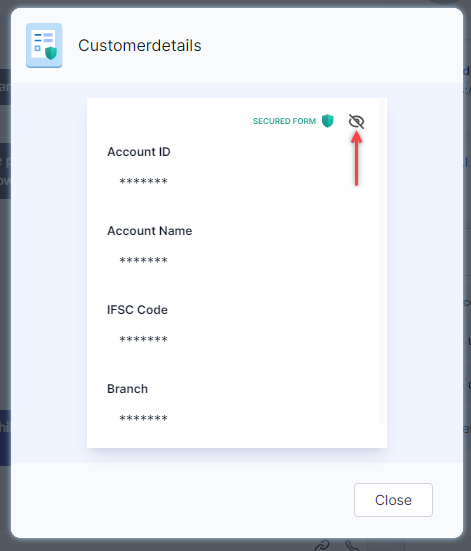
When a user submits information on an agent form, the agent cannot directly view the submitted information when trying to open the data in their console.
While the form headers are visible, the data is redacted. The information is revealed to the agents when they click the 👁 button.
There are two ways to secure the agent form:
- The entire form is secured by turning on a toggle at form creation. In this case, the 👁 icon appears to view masked data in the header with the agent form text.
All headers are visible, and only submitted data is masked.
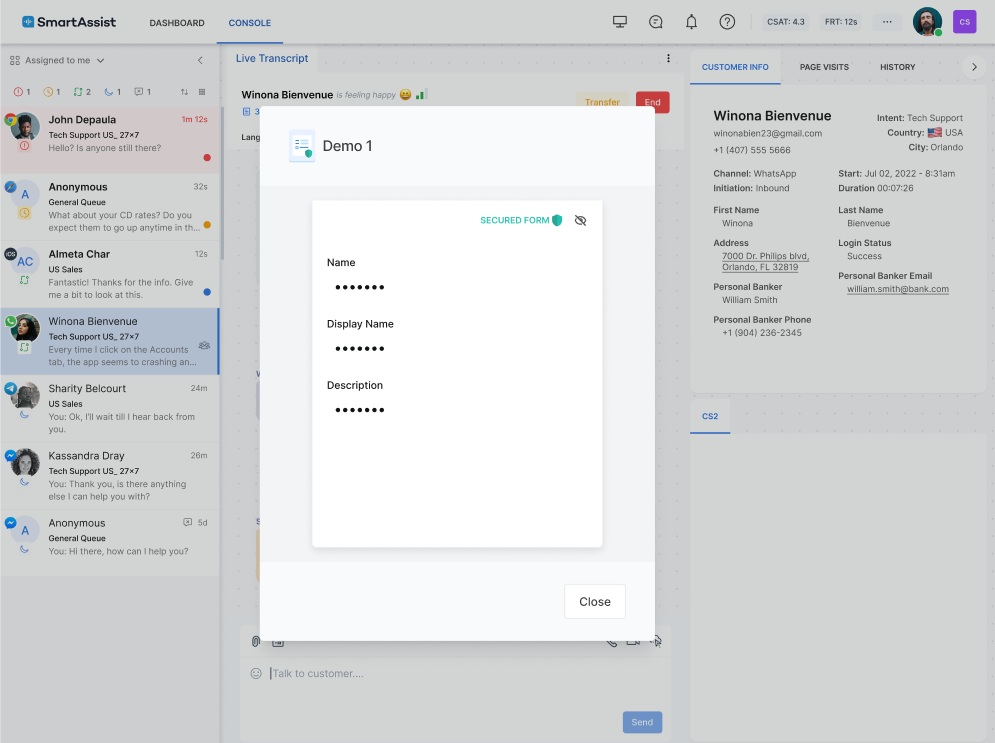
- Only specific fields are masked, retaining the redaction as per the configuration for that field. The data is unmasked when the agent clicks the unmask button.
Steps to share an agent form:
- Click the Agent Form icon.
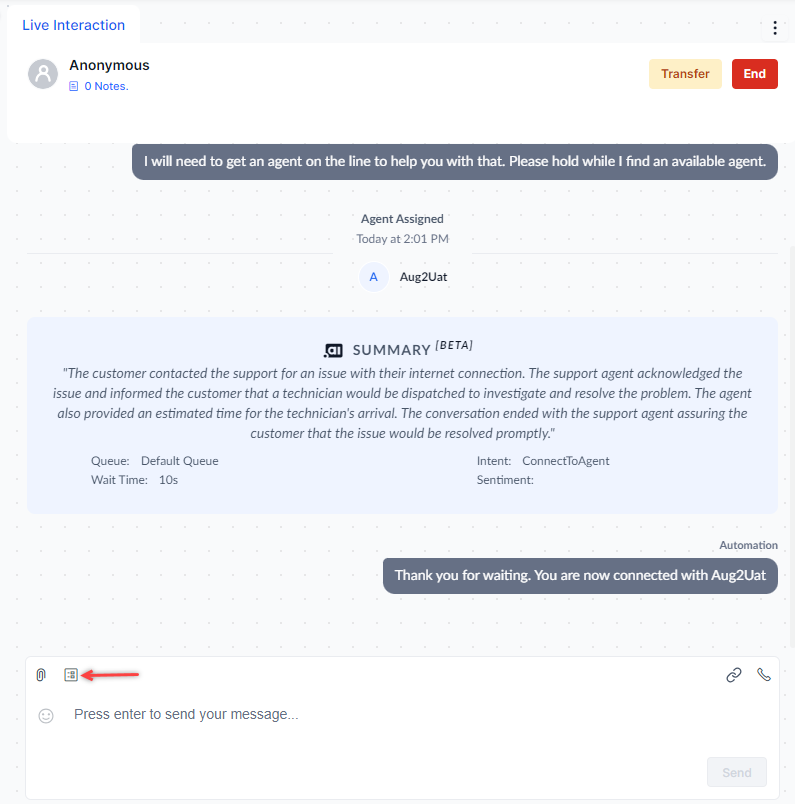
- Select the form and click Send Form.
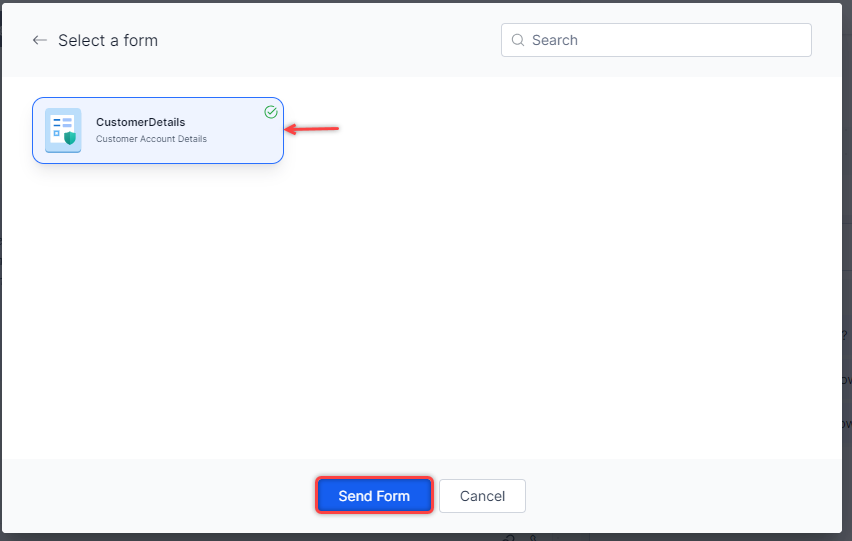
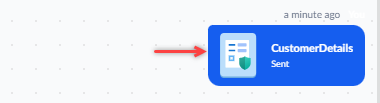
- The form is sent to the customer, and the status of the form on the live interaction pane shows Sent.
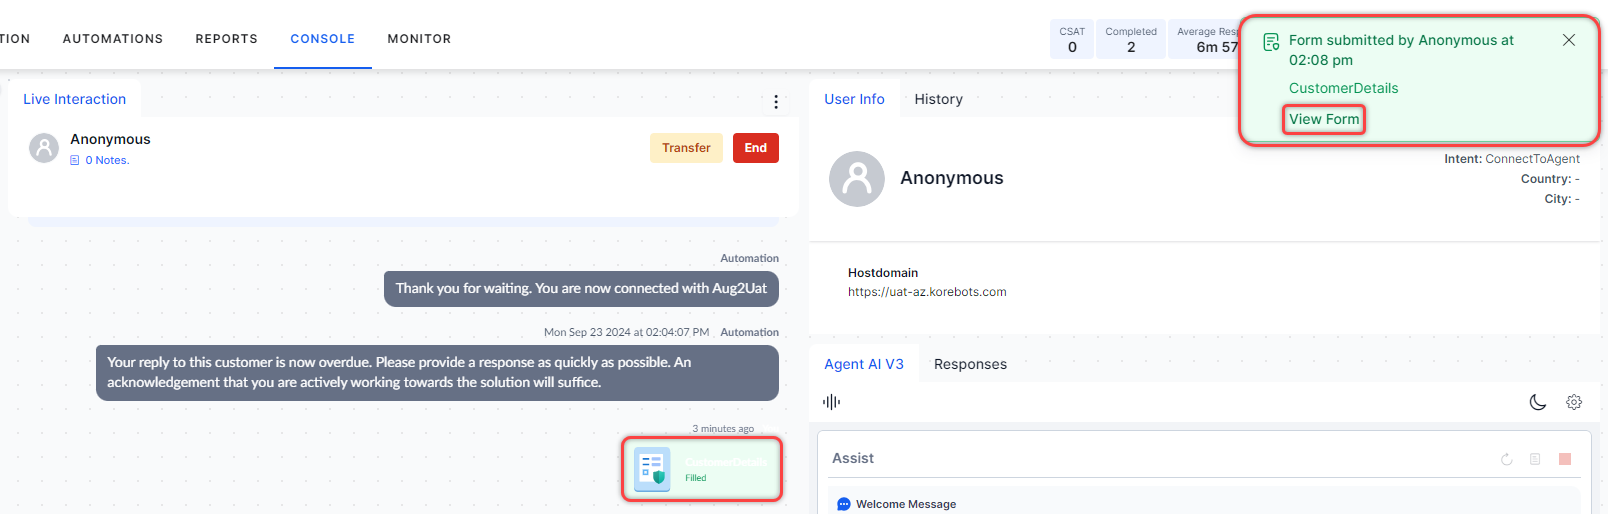
- A message is displayed on the console once the customer submits the form, and the status of the form shows Filled. Clicking the form/View Form on the confirmation message displays the form.
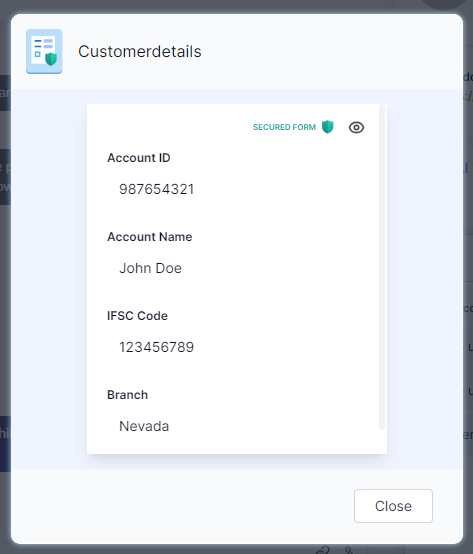
- Click the Unmask icon to view the fields (applicable if the mask is enabled during form creation).
The agent form fields are displayed.
 The demonstration below shows how you can share an agent form with a customer and view the filled form.
Manual PII Redaction
During live chat sessions, the manual redaction feature enables agents to remove or mask sensitive information, including Personally Identifiable Information (PII). This capability allows agents to respond immediately to accidental disclosures and helps prevent the storage or exposure of sensitive data, supporting compliance with data privacy regulations. Administrators can configure this functionality from Permissions.
Steps to manually redact PII data:
- Highlight the text you want to redact. The Redact Data option appears.
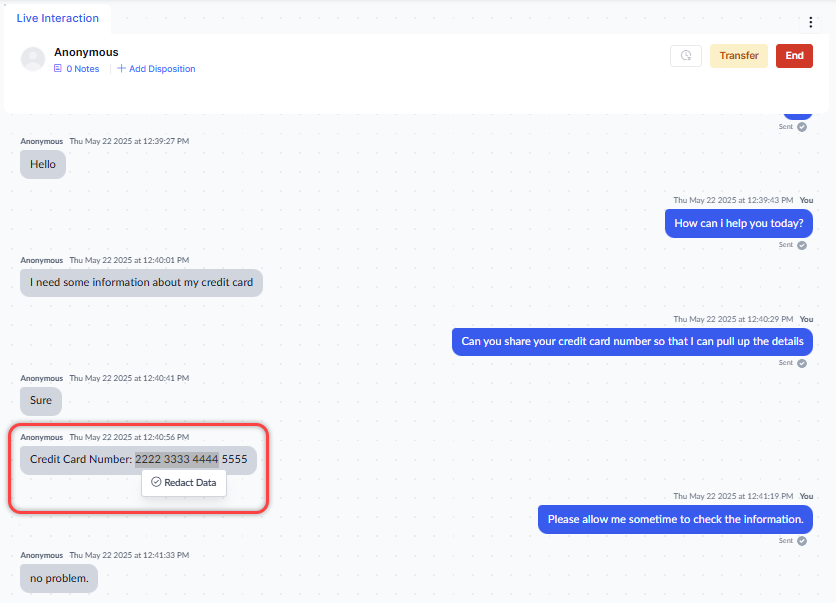
- Click Redact Data.
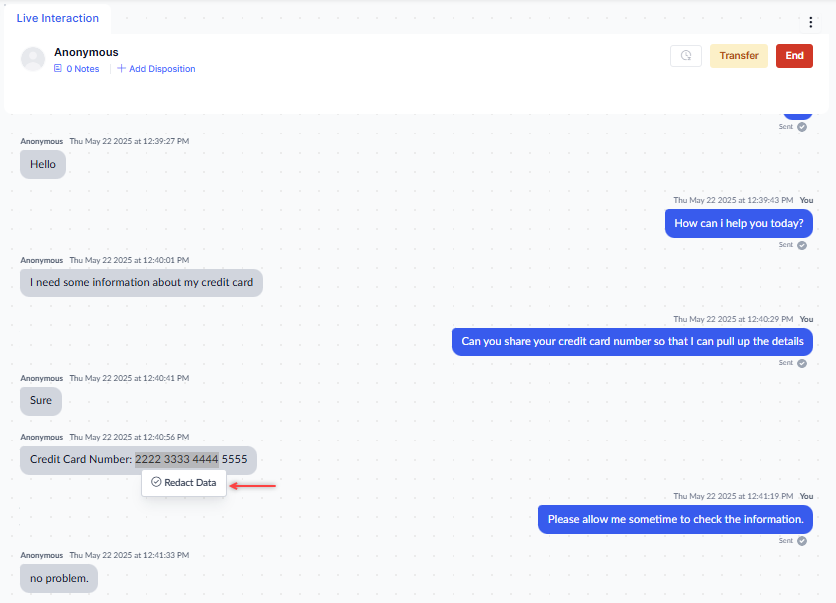
- In the confirmation prompt, click Redact Data again.
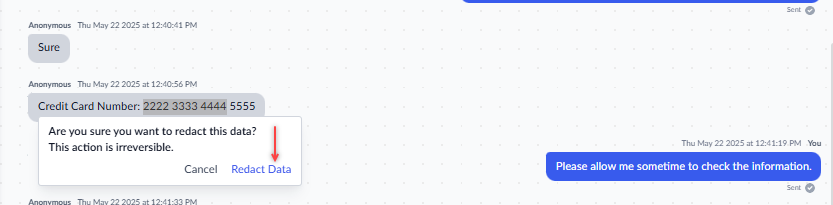
The selected text is redacted.
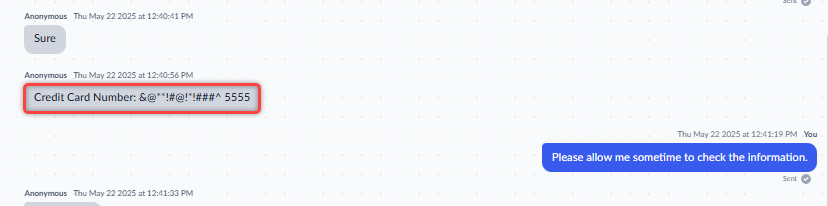
The following demonstration illustrates this process.
Snooze
Waiting for customer responses or time spent on information retrieval can result in prolonged conversations and negatively impact agents’ performance
metrics like Average Handle Time (AHT). Snooze allows agents to pause the conversation timer and resume it when the agent responds while freeing up slots for
additional conversations.
Administrators can configure the snooze functionality from the Agent Settings.
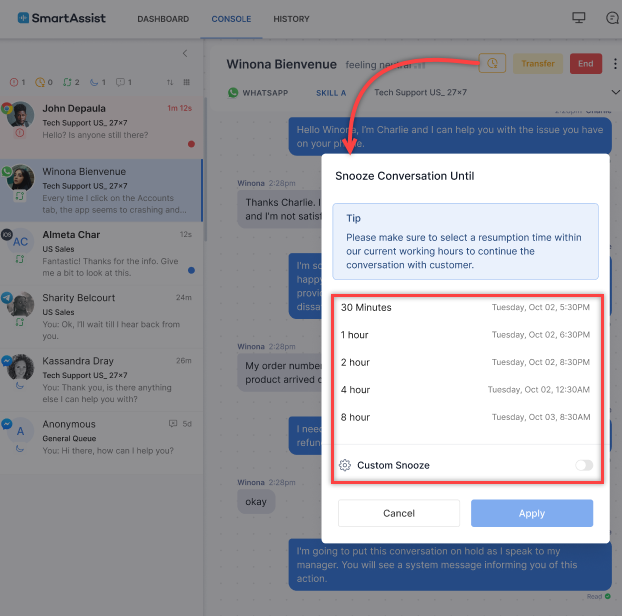
Steps to snooze a conversation:
- Click the Snooze button at the top of the live interaction window.
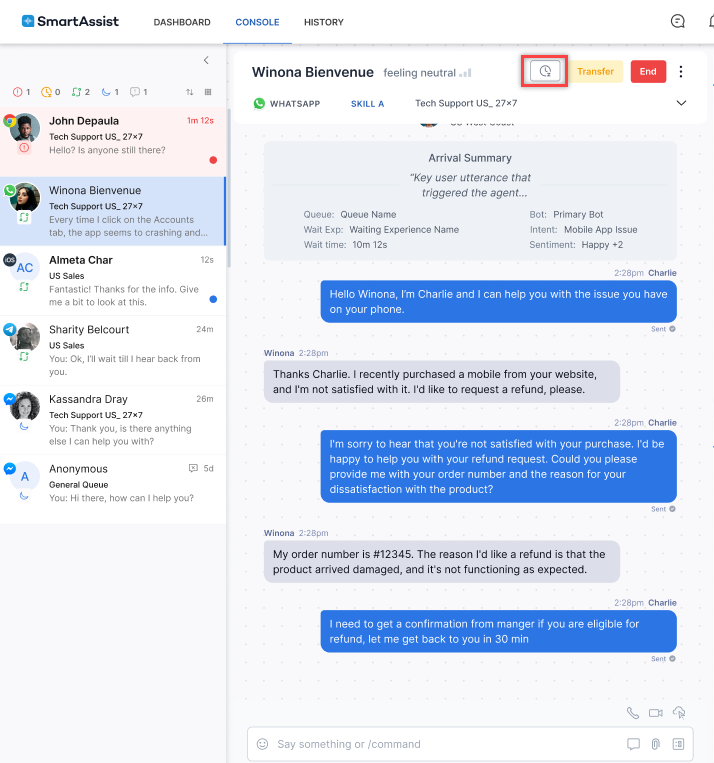
- On the Snooze Conversation Until pop-up window, select the snooze duration from the available options or select a custom snooze duration.

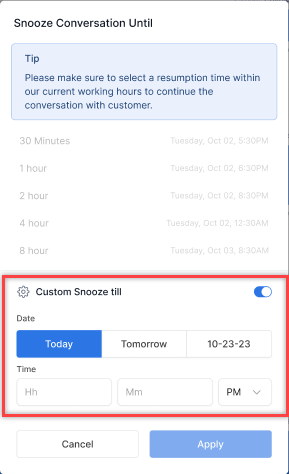
- To select a custom snooze duration, turn on the Custom Snooze toggle, configure your required snooze duration, and set the snooze duration.

- Click Apply. The snooze duration is set, a message appears on the live interaction pane at the top, and an intimation is sent on the live interaction to the agent.
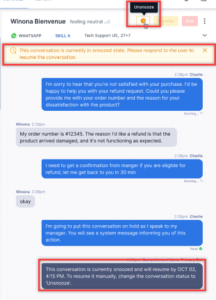
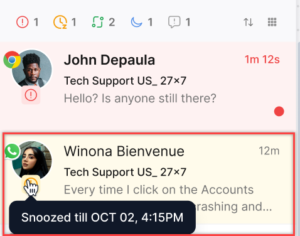
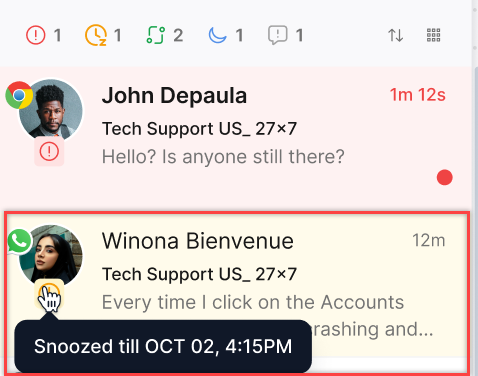
Hovering over a snoozed conversation in the conversation tray shows the duration for which the conversation is snoozed. It also displays the count of snoozed conversations.

Emails
Agents can view and respond to emails on the console. The emails appear on the console as follows:
Threaded email structure: A threaded email structure features a visible distinction between agent and user emails.
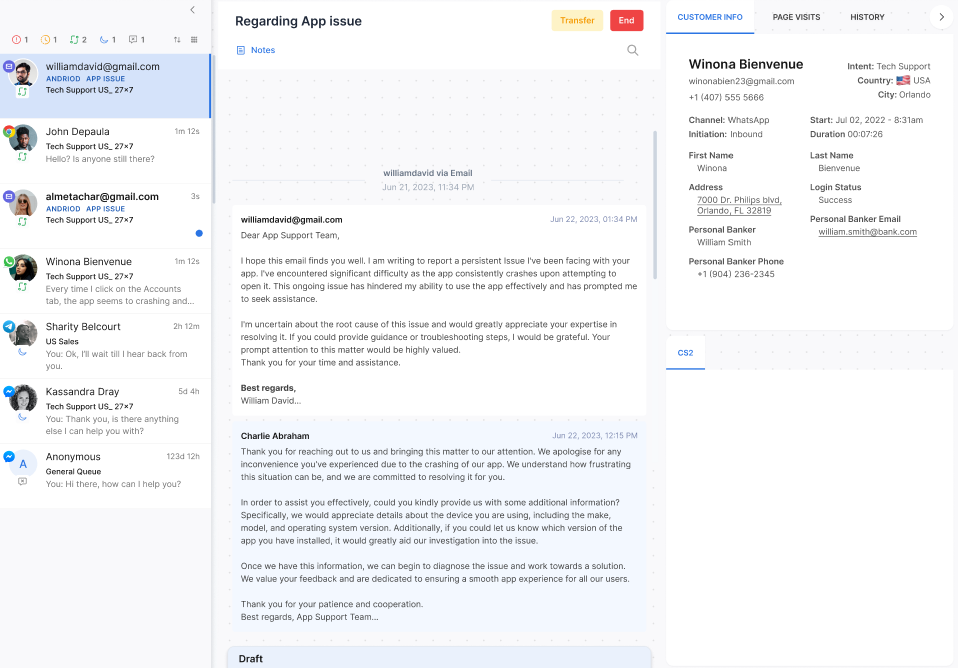
Collapsible email tiles: This allows agents to minimize or expand email threads as needed, reducing clutter and improving the organization of the email inbox.
These settings can be configured from Agent settings.
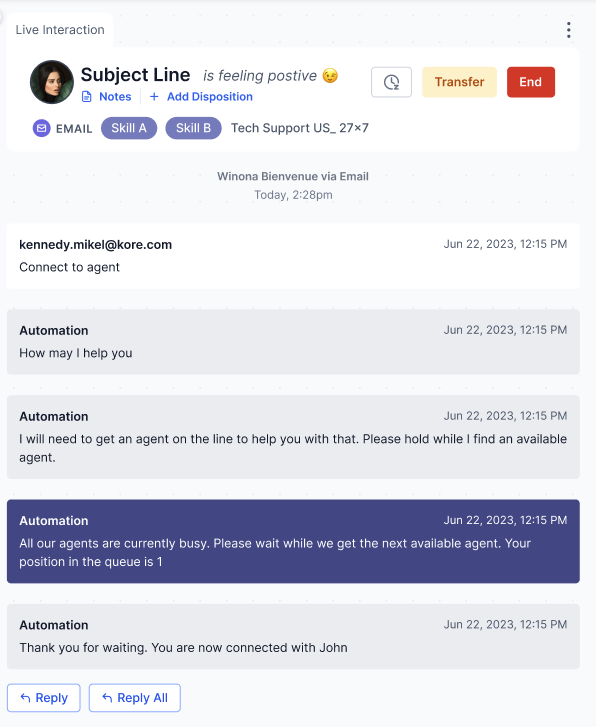
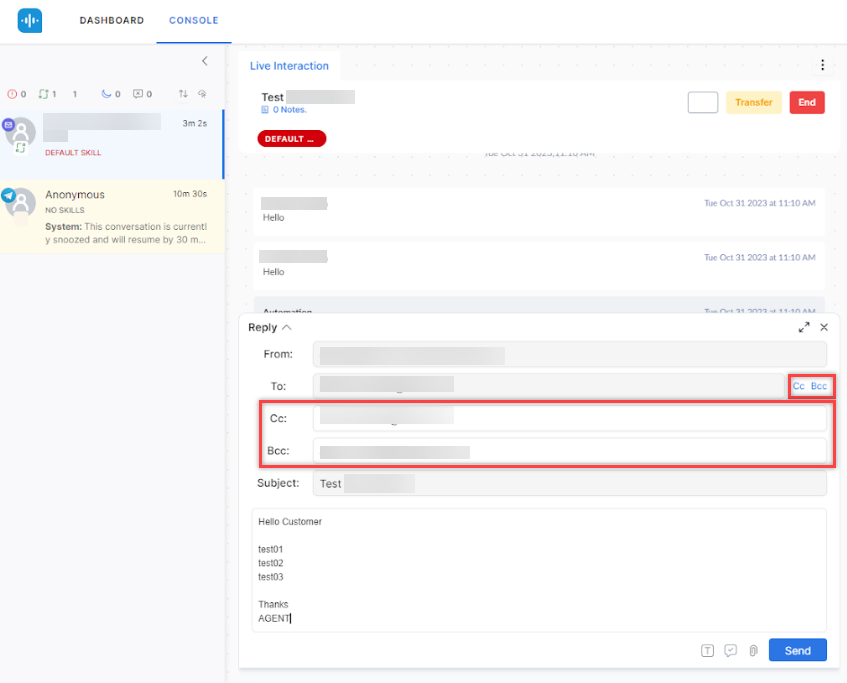
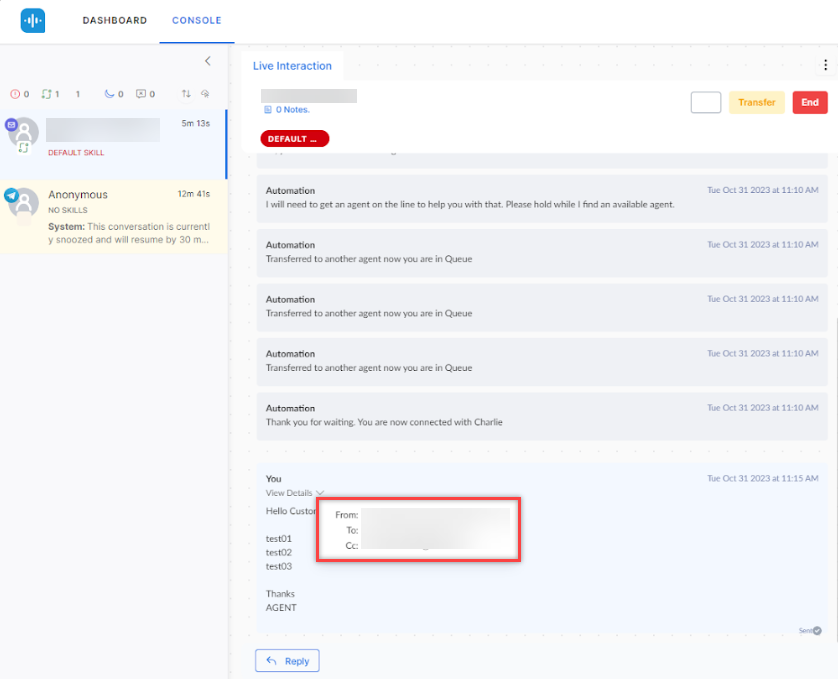
Reply and Reply All: Agents can click Reply to open a response window addressed only to the most recent sender. Clicking Reply All opens a response window addressed to all participants in the email thread, including the original sender and all CC’ed recipients.
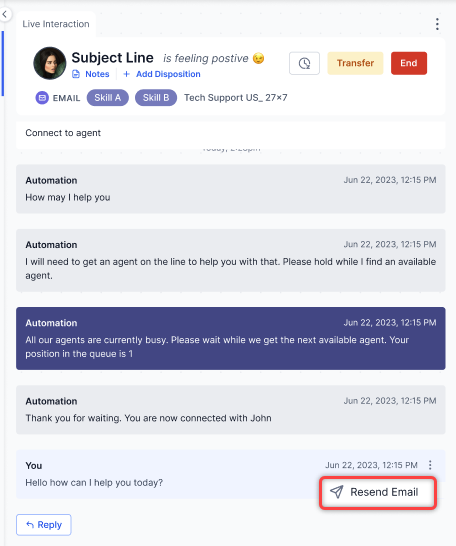
Resend Emails: The Email Resend feature allows agents and supervisors to resend email interactions directly from the Agent Console. It supports two scenarios:
- Resending the same email content to the same recipient, including formatting and attachments.
- Editing the email before resending, which can include adding missed information, correcting errors, or attaching additional files.
Re-sent emails are linked to the original interaction for audit and traceability, ensuring agents maintain consistent and accurate communication with customers.
Steps to resend an email:
- Open the email interaction.
- Click the Resend button.
The email composer opens with the recipient details and original email content prefilled. (Optional) Update the email content. - Click Send.
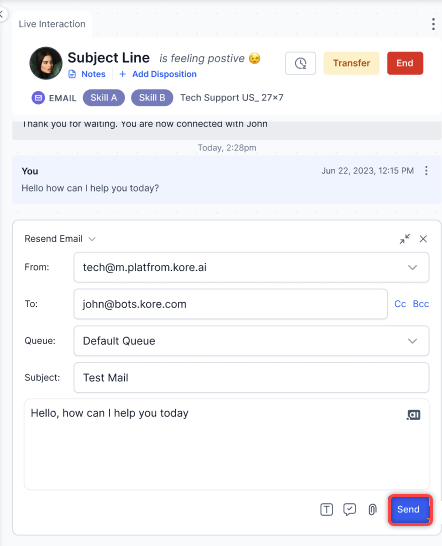
- The re-sent email is sent as a new interaction but linked to the original interaction.
- The interaction log marks the message as Resent for clarity.
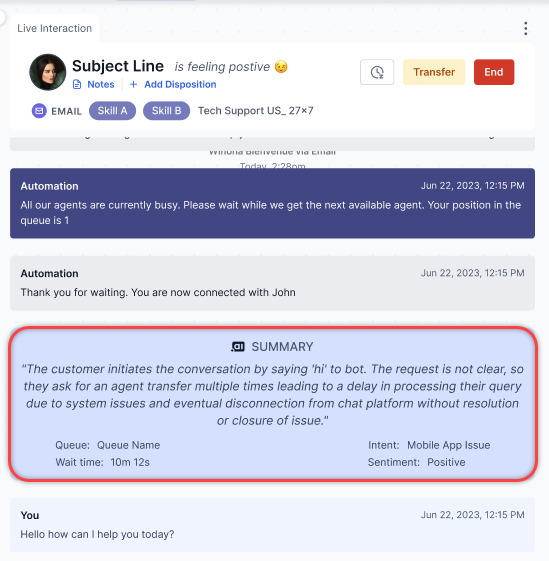
Arrival Summary: Every email conversation begins with an Arrival summary once an agent accepts it. For more information about the arrival summary, refer to Arrival Summary.
Distribution: You can distribute emails to multiple recipients using CC (Carbon Copy) and BCC (Blind Carbon Copy) fields.
Standard Responses: You can choose from a library of configured standard responses.
- Click the Standard Response icon at the bottom of the email text editor. The count of response templates in each category is displayed.
- Click the category to view the standard response templates in that category.
- Click the Standard Response from the list to use that response in the email.
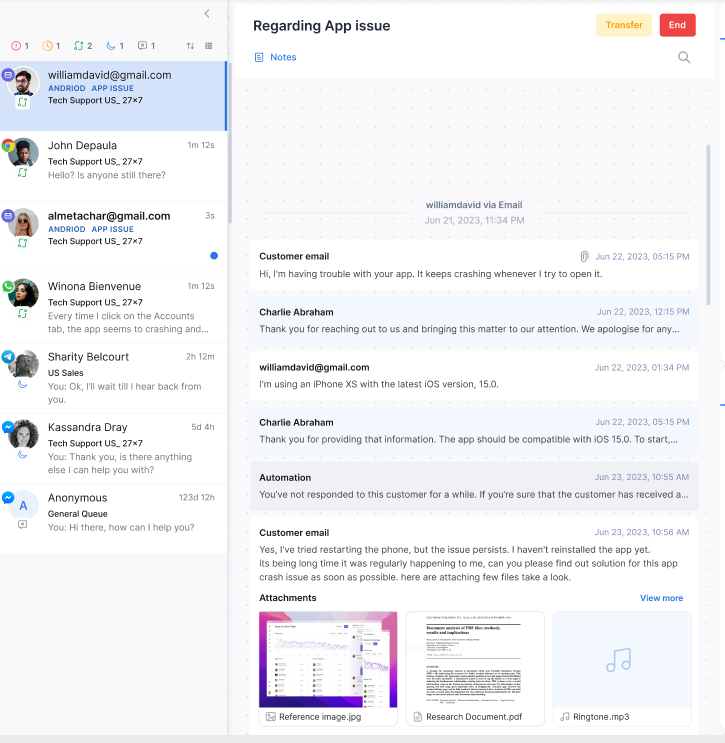
Attachments: You can attach files and documents to the email to share relevant information or resources with customers. Attachments appear in a list format. If there are more than three attachments, a ‘View More’ button is displayed.
Click the Attachment icon to select and upload files.
To add a new note:
- Click Notes.
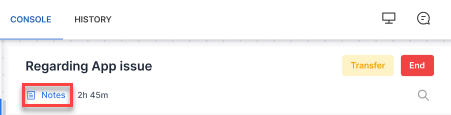
- Click + Add New Note.
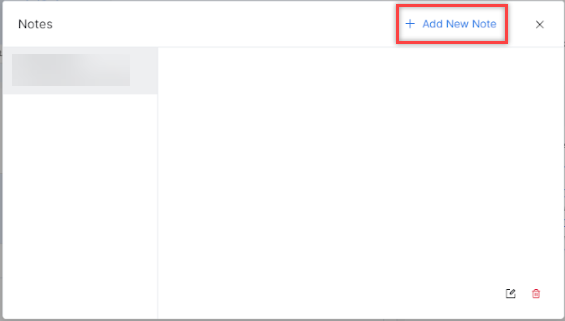
- Type the message and click Save. A confirmation message is displayed, and the note is displayed.

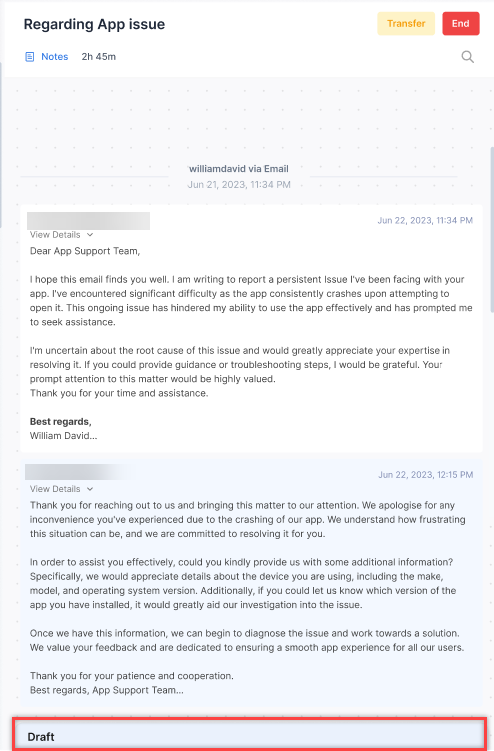
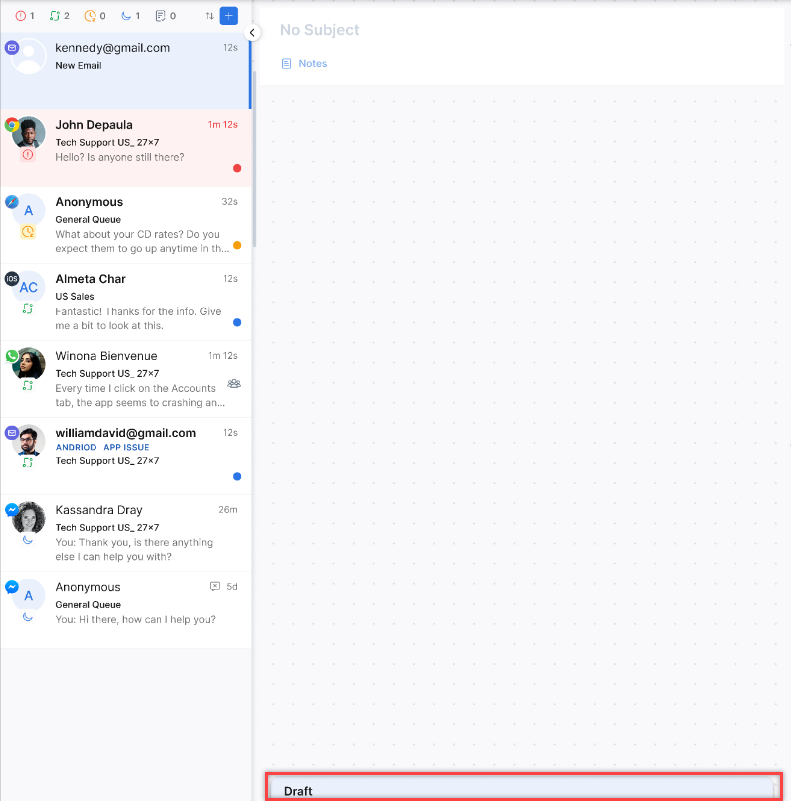
- Drafts: If you click the Close button on the email editor and there’s content inside, the mail is preserved as a draft. Drafts are accessible at the bottom of the console.
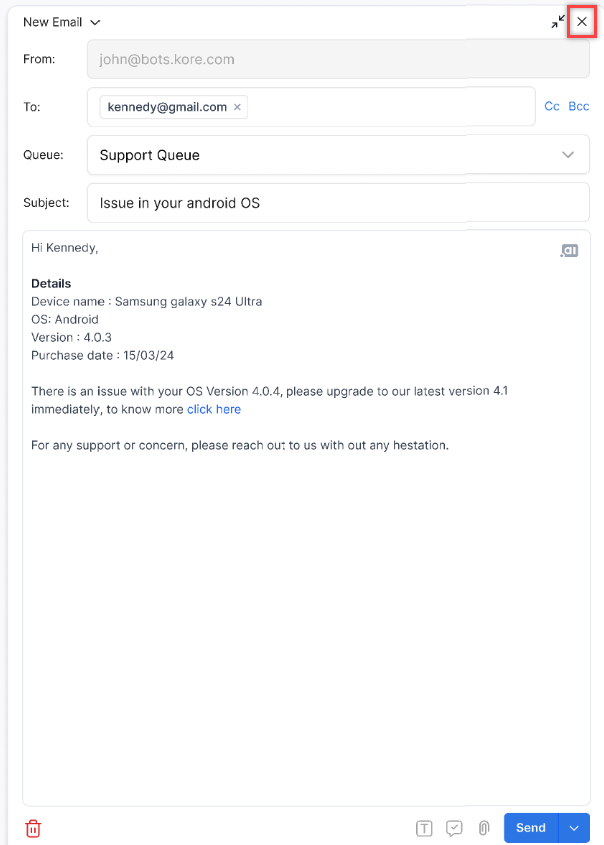
Outbound Email
Outbound email functionality is a key feature within SmartAssist designed to streamline communication between agents and customers through email channels. It is crucial to reach out to customers proactively and provide personalized interactions based on their needs and preferences. Expanding omnichannel capabilities allow customers to be reached through various channels to address their needs. This allows seamless follow-up after interactions to guarantee satisfaction and provide timely support whenever required.
Send Outbound Email
Steps to send an outbound email:
- Click the + button on the top right corner of the conversation tray.
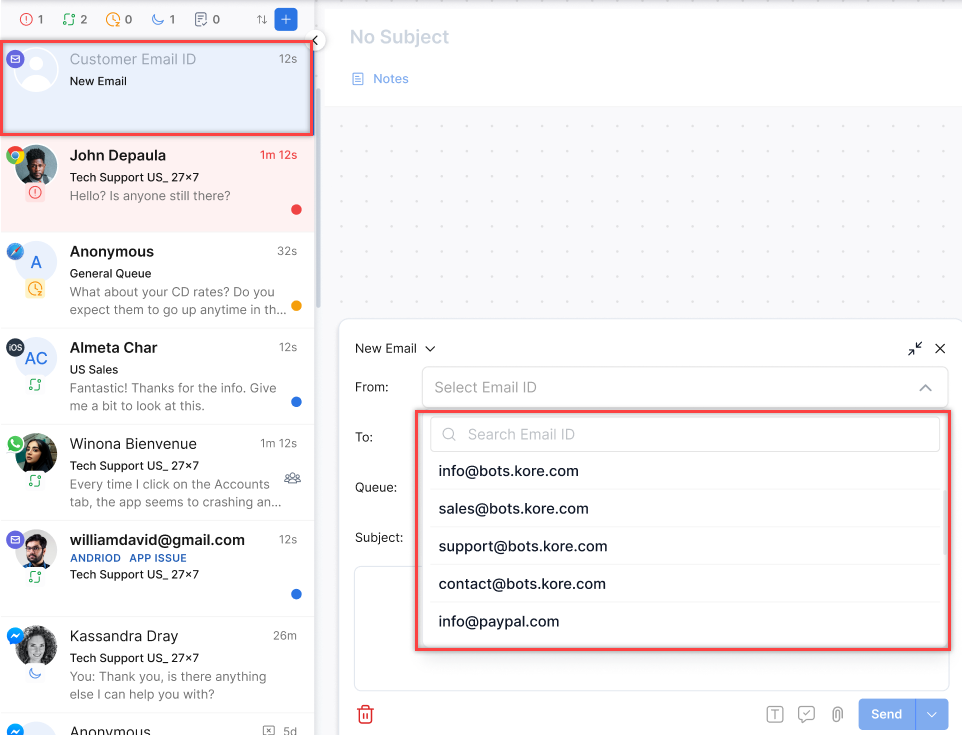
- Click the New Mail button.
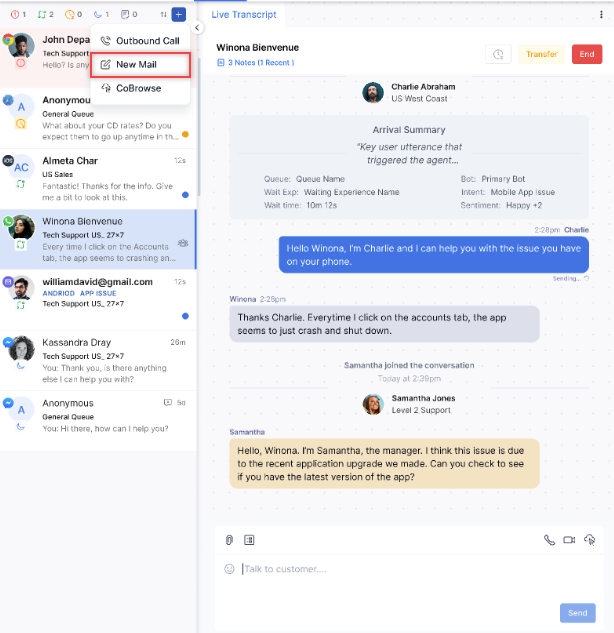
- The email panel is displayed, and an email conversation appears on the conversation tray. Enter the recipients’ Email addresses, such as john.doe@xyz.com.
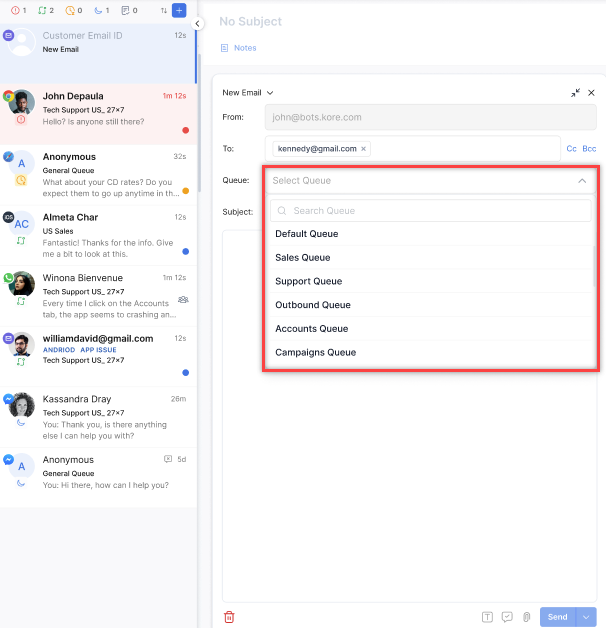
- Select a Queue from the dropdown.
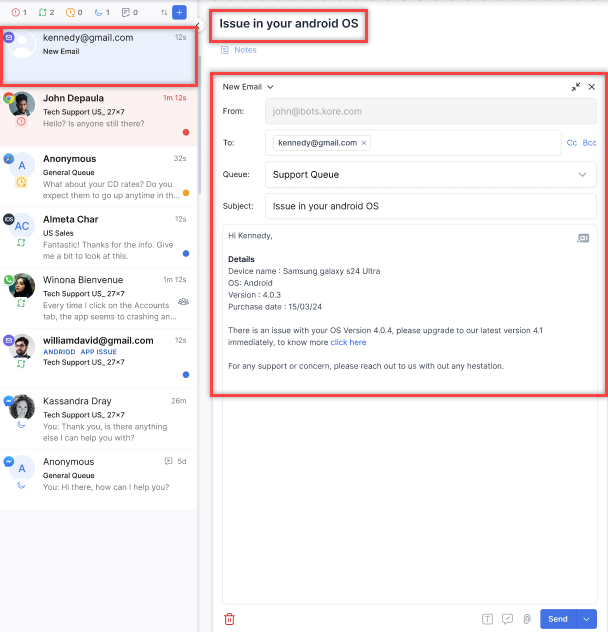
- Enter the Subject and body of the email. The email address appears on the conversation tray and the subject appears as the email thread header.
- You can perform the following actions:
Send:
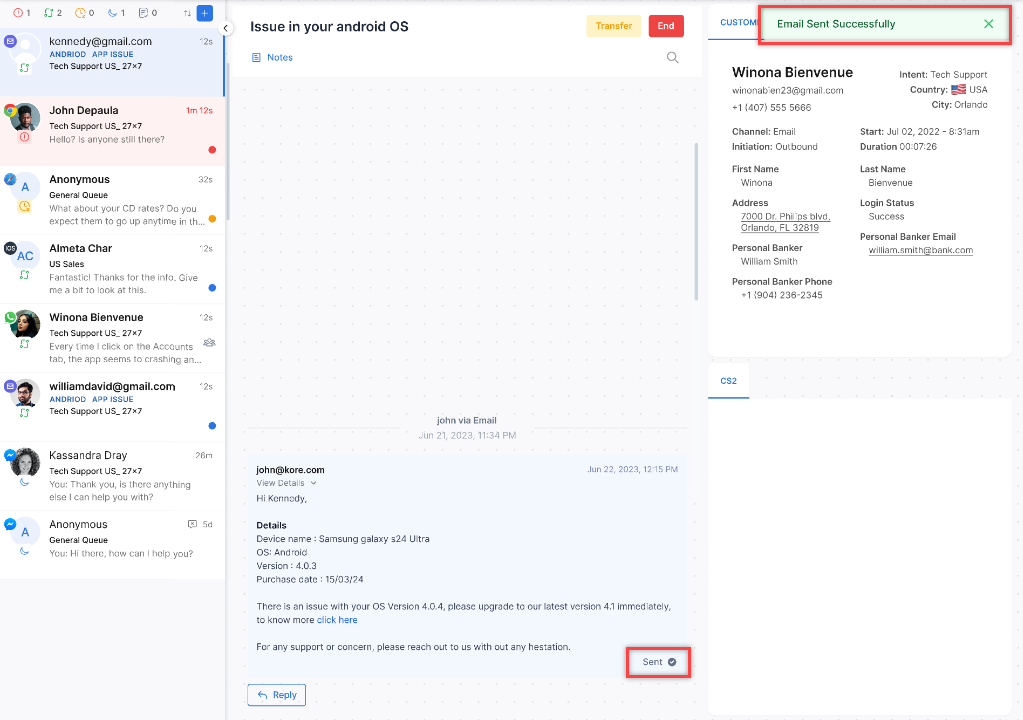
Click the Send Button to send the email.
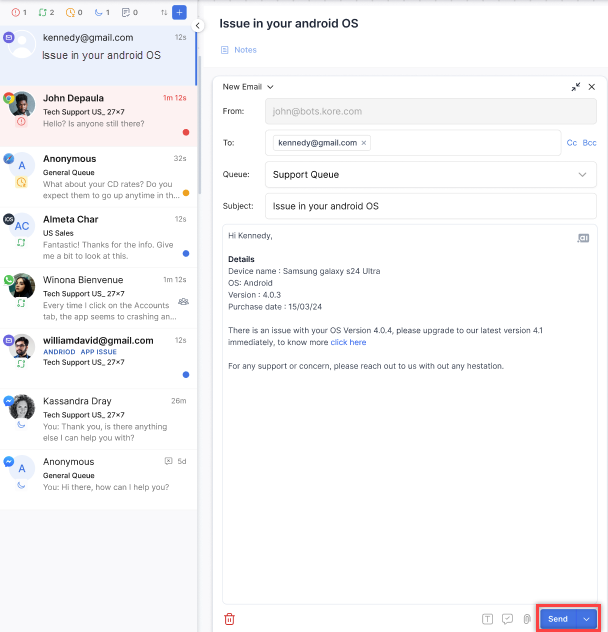
A confirmation is displayed, and the email is sent.
Send & Close:
Click the down arrow button ”V” beside Send and click Send & Close.
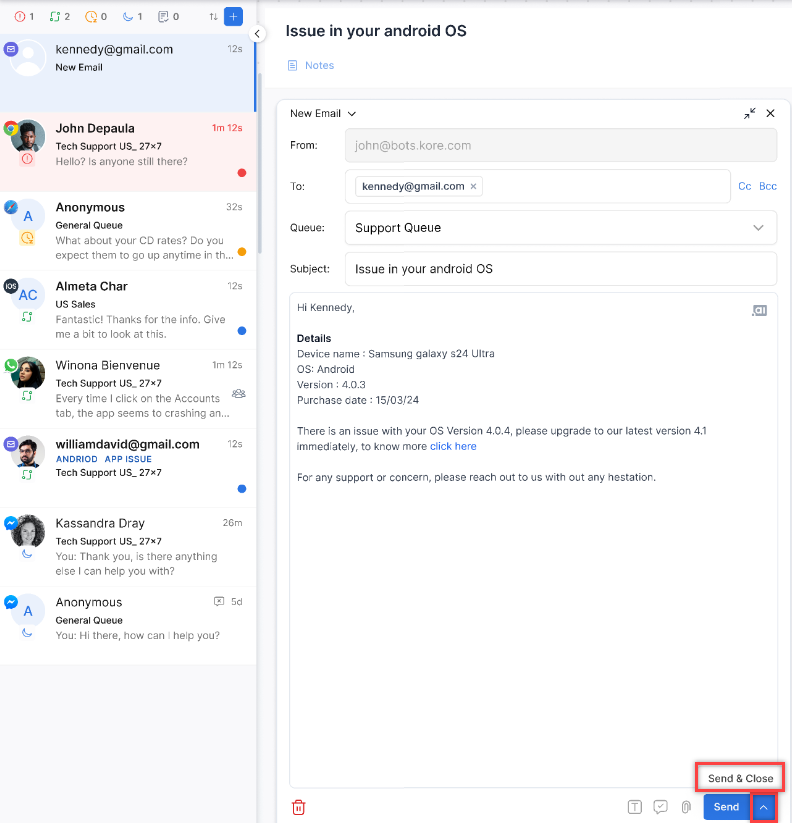
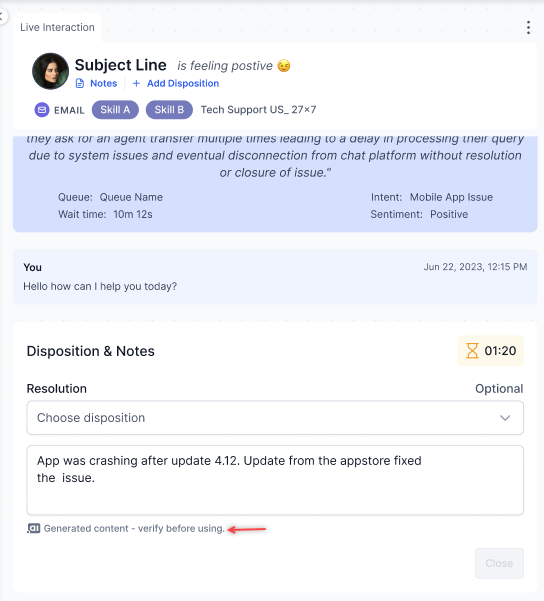
A confirmation is displayed, and the email is sent. A disposition window appears. Select a disposition and click Close.

If LLM-based summary generation is enabled, a disclaimer appears requesting users to verify the content before using it.
Draft:
Click the X on the top right corner of the email editor window.
The editor window is minimized, and the mail is saved as a draft.
Drafts are automatically saved and remain accessible in the following scenarios:
-
- After an agent logout and subsequent login.
- Network interruptions and subsequent reconnections.
- The current email content is saved as a draft if the editor is closed.
- Drafts are saved only after the mandatory fields (recipient, subject, queue, and email body) are updated.
Multiple drafts can be saved for individual email conversations. Each draft is easily identifiable and accessible within its respective email thread.
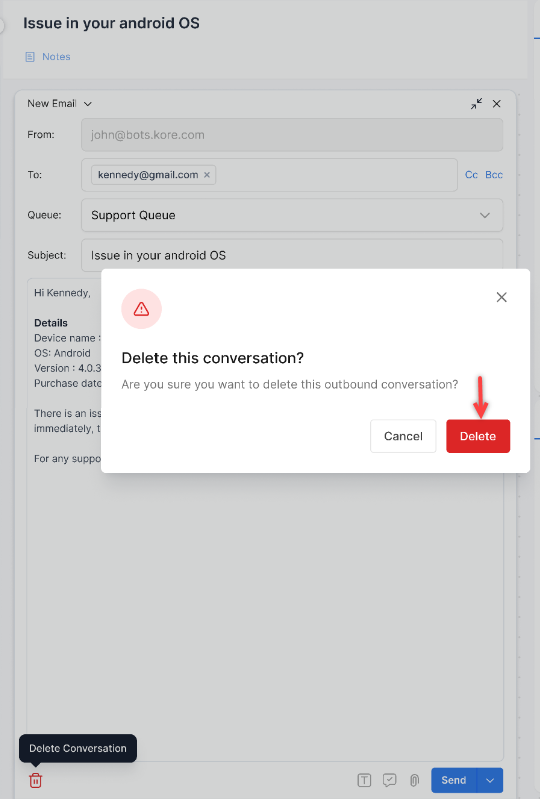
Delete:
Click the Delete (bin) icon on the bottom left corner of the editor.
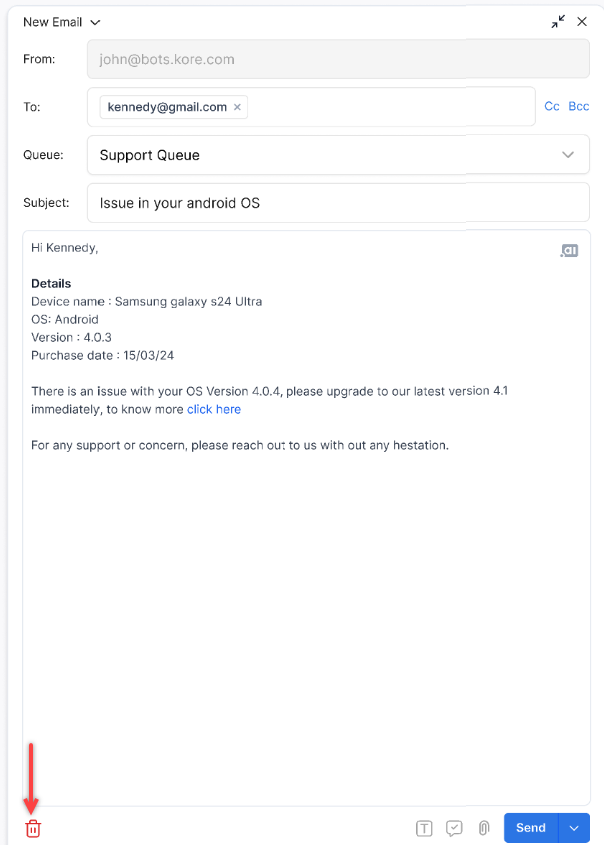
A confirmation message is displayed. Click Delete. The email is deleted.
Color Codes
Color codes help in easy identification and better readability of conversations on digital channels.
- The blue dot represents a conversation in which an agent is engaged.

- The red dot represents an overdue conversation.

- New email conversations in the conversations tray.
Add Notes to Interactions
You can add notes on the interaction (customer feedback, key points, next action, suggestions). This section includes any previous notes added by agents while
interacting with the same customer.
To add a new note:
- Click Notes.

- Click + Add New Note.
- Type the message and click Save.
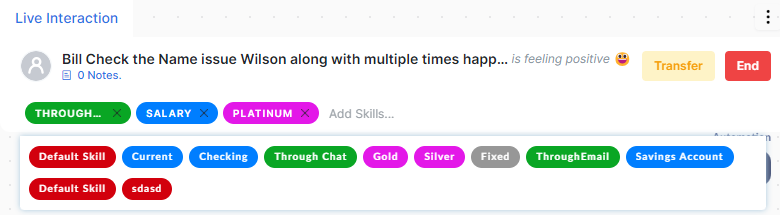
Modify Skills in Interactions
To modify skills in a live interaction when the Live Interaction option is selected in Skill Modification:
- Click the Add Skills option on the Skills bar.

- Select the necessary skills from the drop-down.
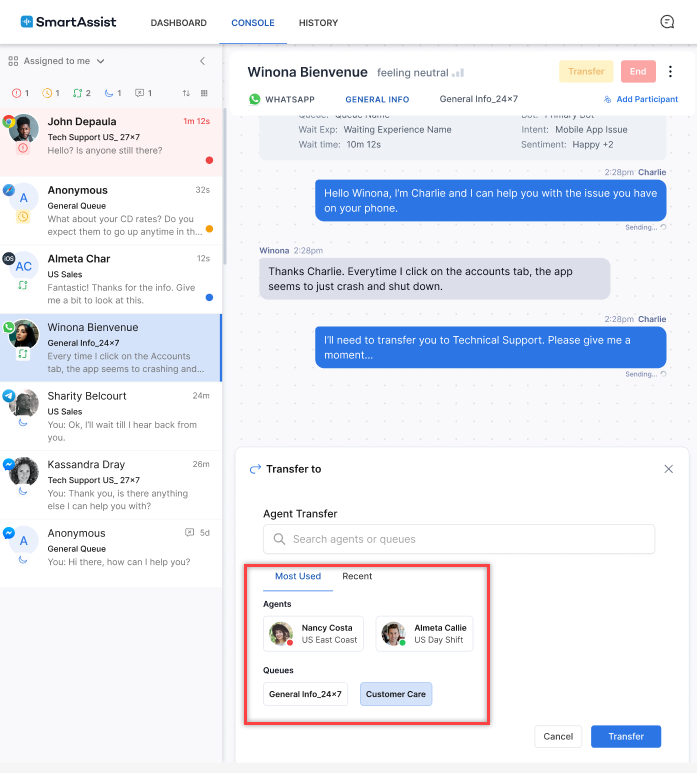
Transfer Interactions
SmartAssist allows agents to transfer ongoing conversations to other queues, other agents, or both. The Agent Console displays transfer options according to the Transfer Destinations setting. In the example screenshots below, both queues and agents are enabled for transfers.
Transfer to Another Queue
To transfer a conversation to another queue when the Enforce Skill Match for Transfers setting is enabled:
- Click Transfer at the top of the Conversation space.

- Search for a queue in the search bar on the Transfer to window.
- Select a queue from the dropdown list. Agents with matching skills are displayed for the queue during the transfer.
- Click Transfer. The conversation gets transferred to the selected queue.
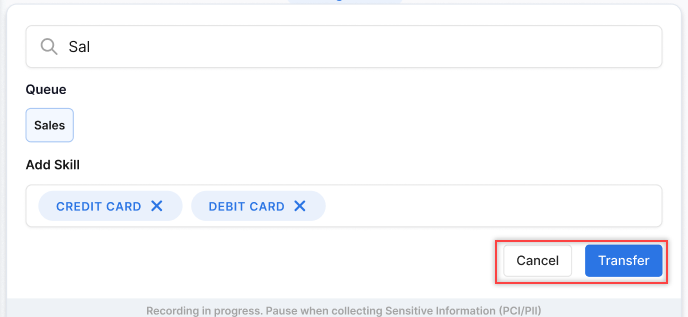
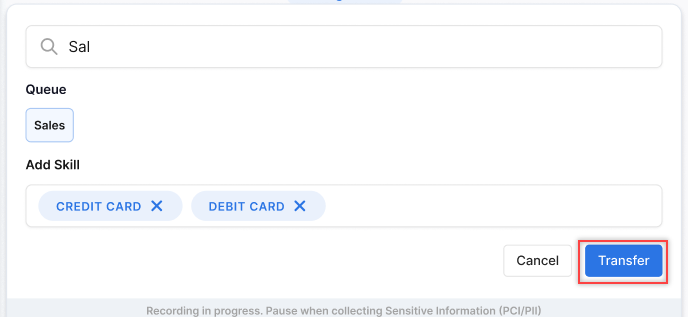
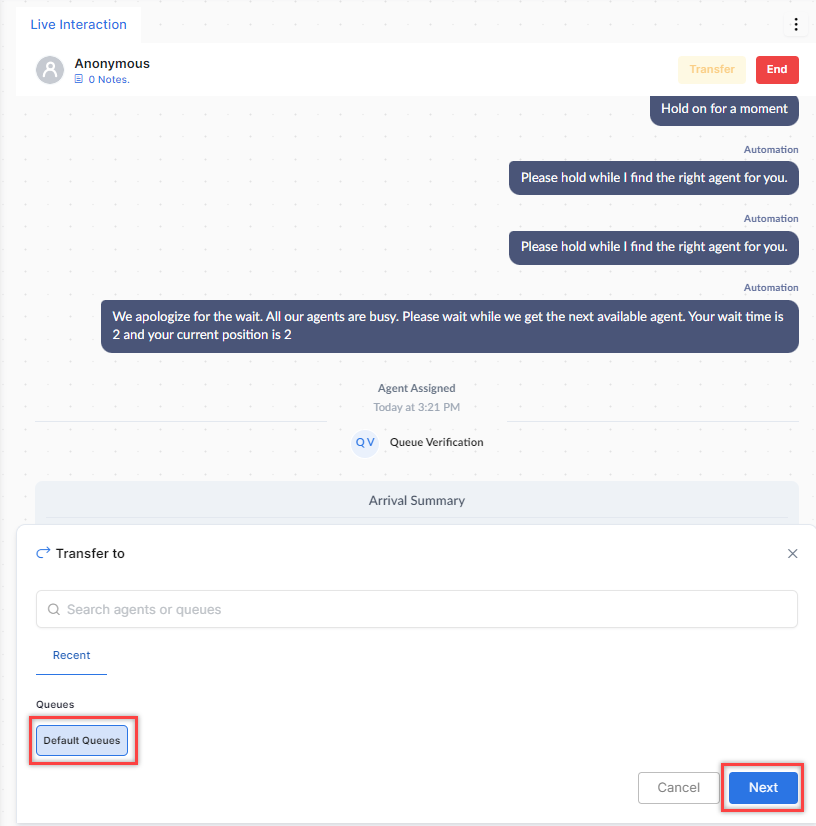
To transfer a conversation to another queue when the Skill Modification setting is enabled:
- Click Transfer at the top of the Conversation space.

- Search for a queue in the search bar on the Transfer to window. All matching queues are displayed.
- Select the queue and click Next.
- You can add or delete skills to the interaction before transferring it to another queue.
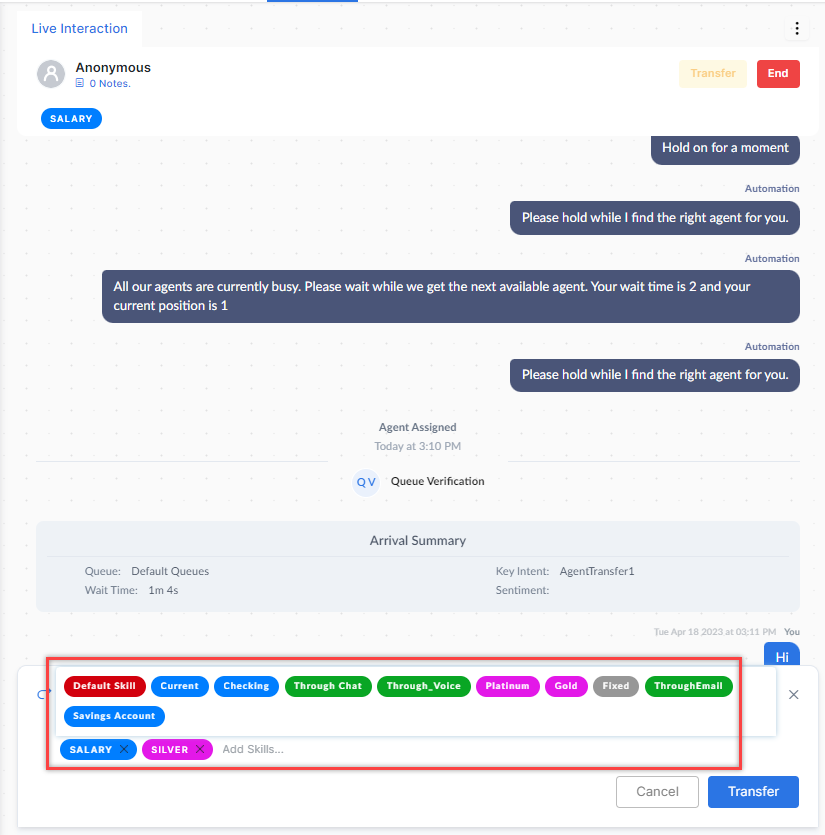
- Click Transfer. The conversation is transferred to the selected queue.

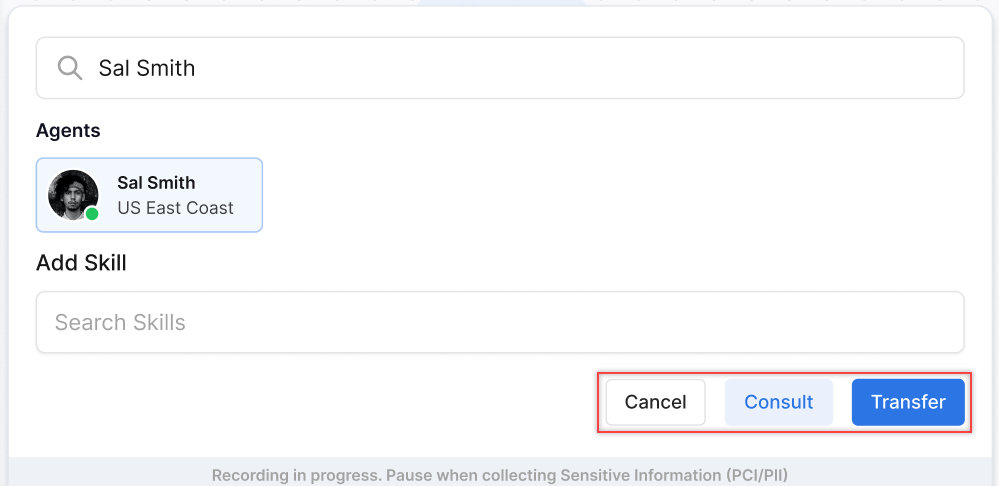
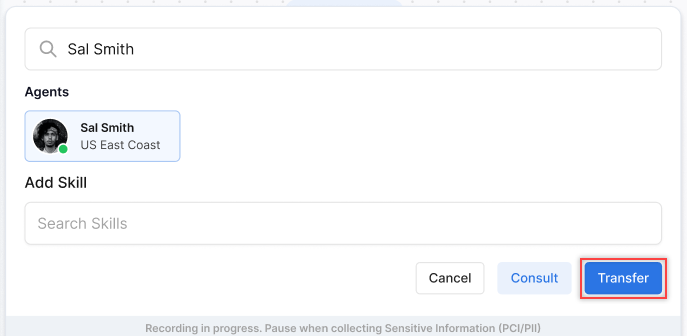
Transfer to Another Agent
To transfer a conversation to another agent:
- Click Transfer at the top of the Live Interaction pane.

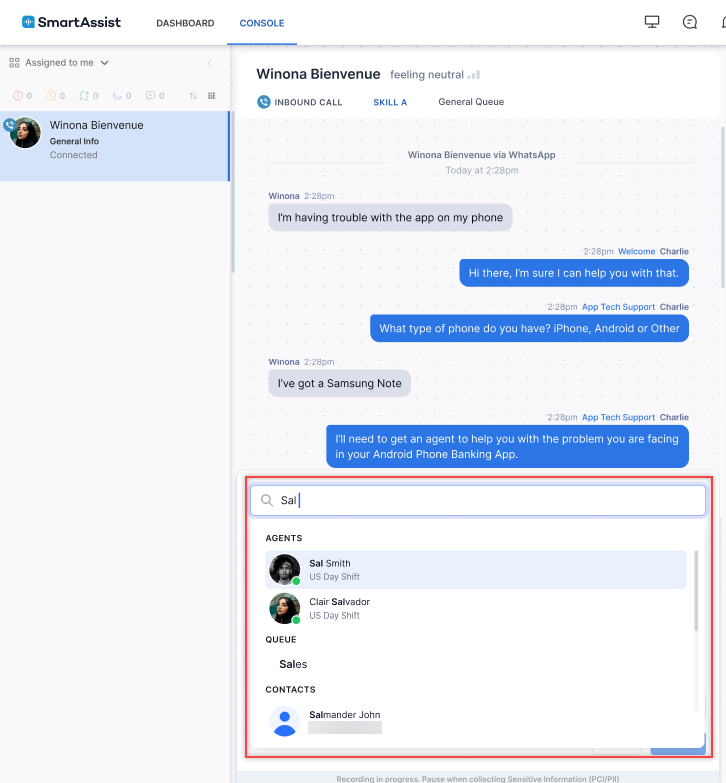
- Search for an agent in the search bar on the Transfer to window.
- Select an available agent.
- Click Transfer. The conversation gets transferred to the selected agent.

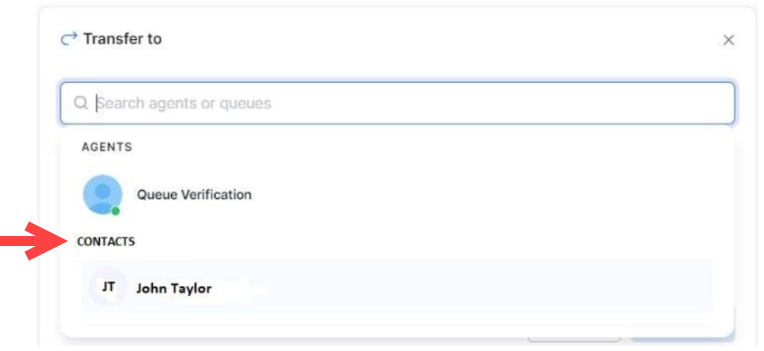
Transfer to External Contacts
An agent can transfer the call to an external contact during a voice interaction. An administrator must enable this feature in Agent Settings to allow external transfer of ongoing customer calls. To transfer a conversation to an external contact from the Agent Console, follow these steps:
- Click Transfer at the top of the Conversation space.
- Search for an external contact in the search bar on the Transfer to window.
- Select an available contact.
- Click Transfer. The conversation gets transferred to the selected contact.
End Interactions
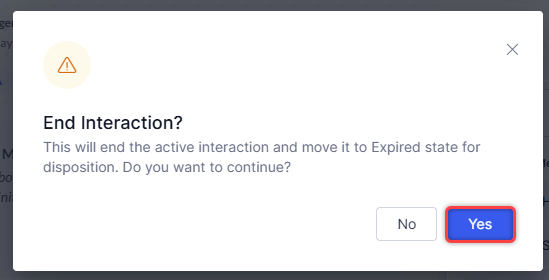
- To end an interaction session, click the End button at the top right of the Live Interaction pane.

- Once clicking End, you must confirm that you want to end the interaction. Click Yes to do so, or otherwise, click No.
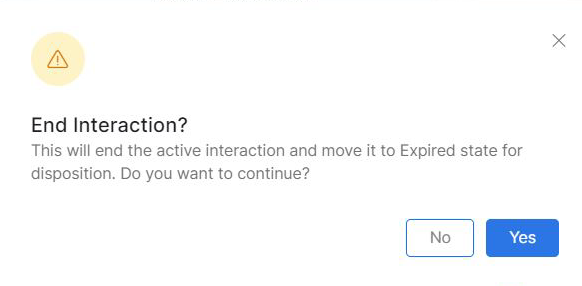
Clicking Yes ends the session and moves the interaction to After Call Work.
Timer After Caller Disconnects a Voice Call
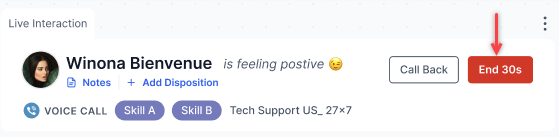
When a caller disconnects, agents can either call back or end the call. If an agent does not take any action, a depleting timer prompts the agent to take action within a specified timeframe. By default, this feature is disabled for existing users. Administrators can enable this functionality from the Agent Settings. Learn more.
Timer when the caller disconnects the call: A depleting timer is displayed on the live interaction pane, with options to end the call or call back.
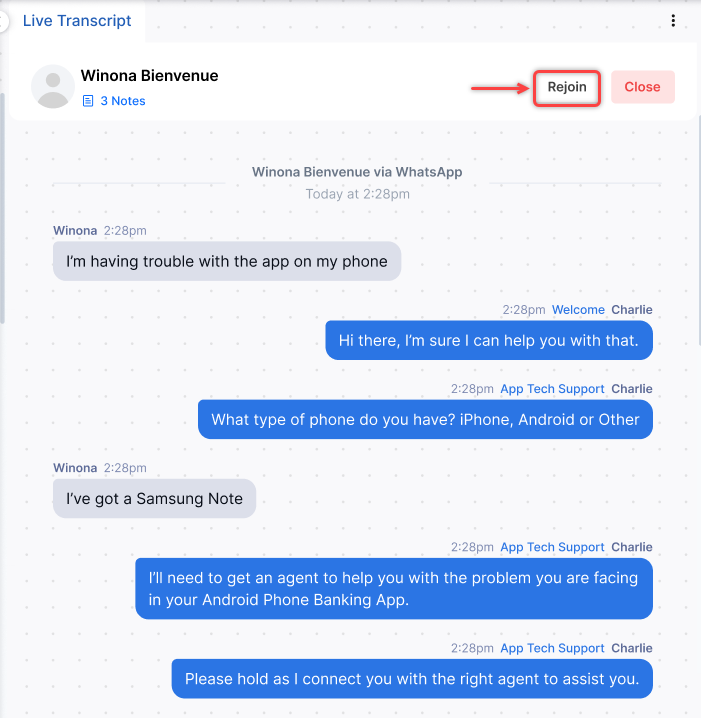
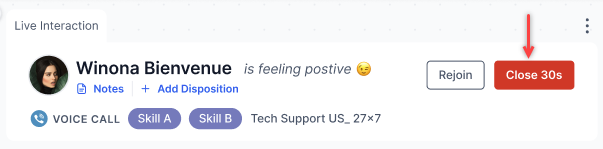
Timer when the caller disconnects during a conference call: A depleting timer is displayed on the live interaction pane, with options to close or rejoin the conference call.
The call transitions to After Call Work (ACW) at the end of the configured timeout duration.
After Call Work (ACW)
If ACW is enabled, then the conversations are managed based on the ACW configuration:
Immediate Slot Release:
- Slots are freed up, allowing other conversations to be accepted.
- The close button is enabled when all the required disposition codes are selected.
- There is no time restriction for selecting the disposition codes and they are available until the agent manually closes them.
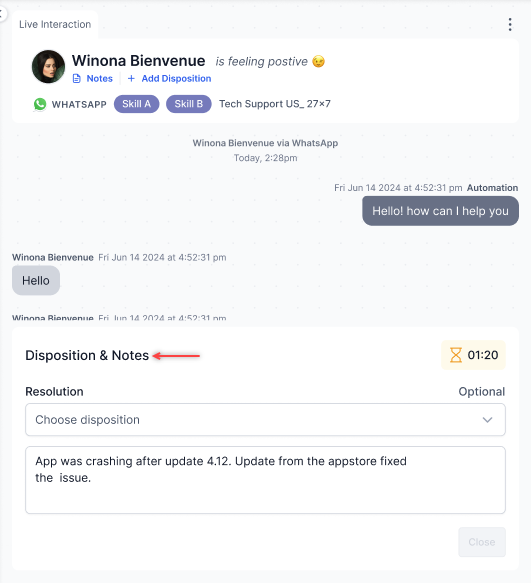
Timed Slot Release:
- Agents can see a countdown timer when the conversation ends, indicating the time left to provide a disposition.
- The slot becomes available if the agent submits a disposition or when the timer elapses.
- Empty disposition fields are filled with a ‘system-generated disposition code’ if no disposition is provided within the allotted time.
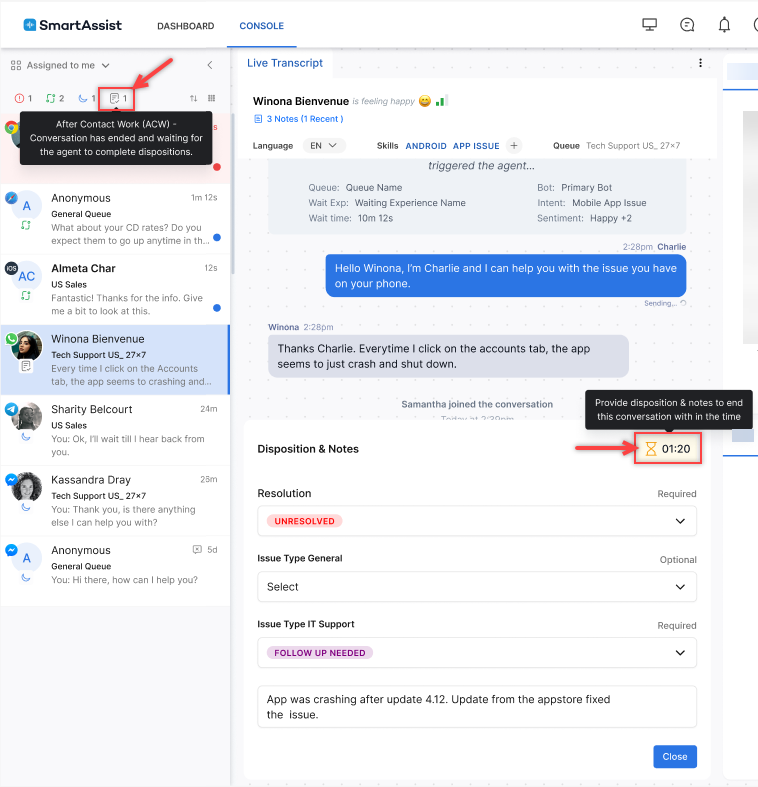
- When the disposition timer expires, the system displays a message to the agent.

- For conversations transferred to another queue, the final queue’s disposition mode is applied to determine the required dispositions. If ACW is disabled the conversation disappears from the agent console at the end of the conversation, freeing the slots for accepting other conversations. Agents do not receive any disposition sets or summary notes related to these conversations.
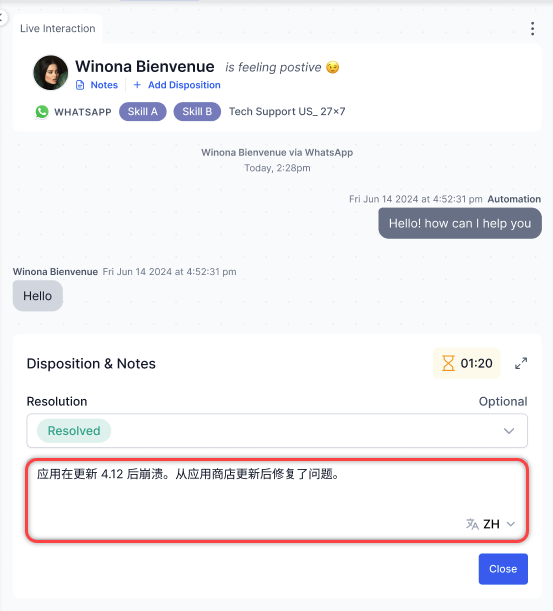
Dispositions
Dispositions can be assigned in two ways:
- During the conversation (Dynamic):
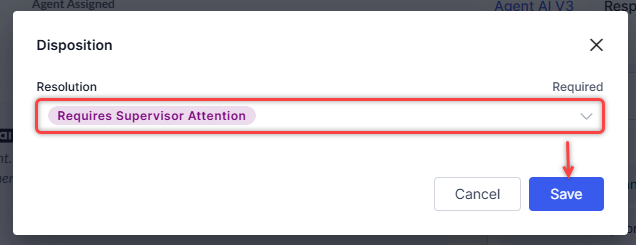
- Click + Add Disposition.
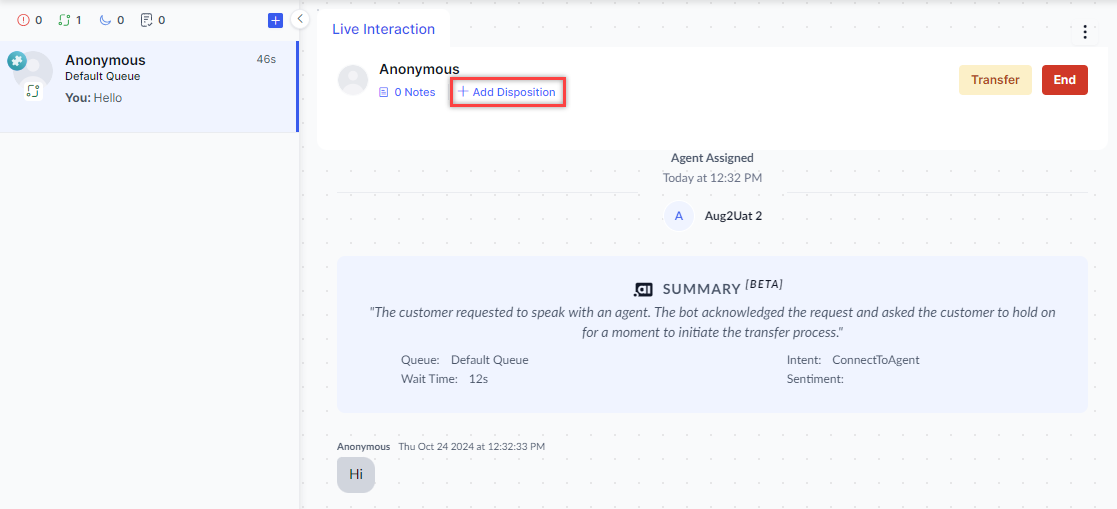
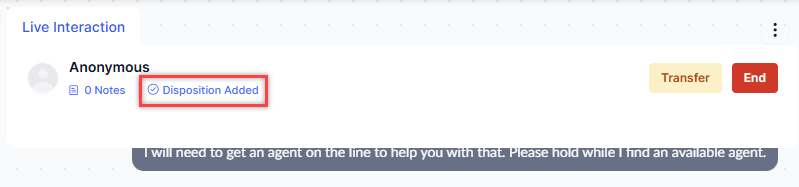
- Select a disposition from the dropdown menu and click Save.
- The disposition is added. You can either Transfer or End the conversation.
- When you click End, a confirmation message is displayed. Click Yes to confirm.
- The Disposition & Notes window will appear, and you can make any necessary changes. Click Close, and the conversation will close with the disposition attached.
- Click + Add Disposition.
-
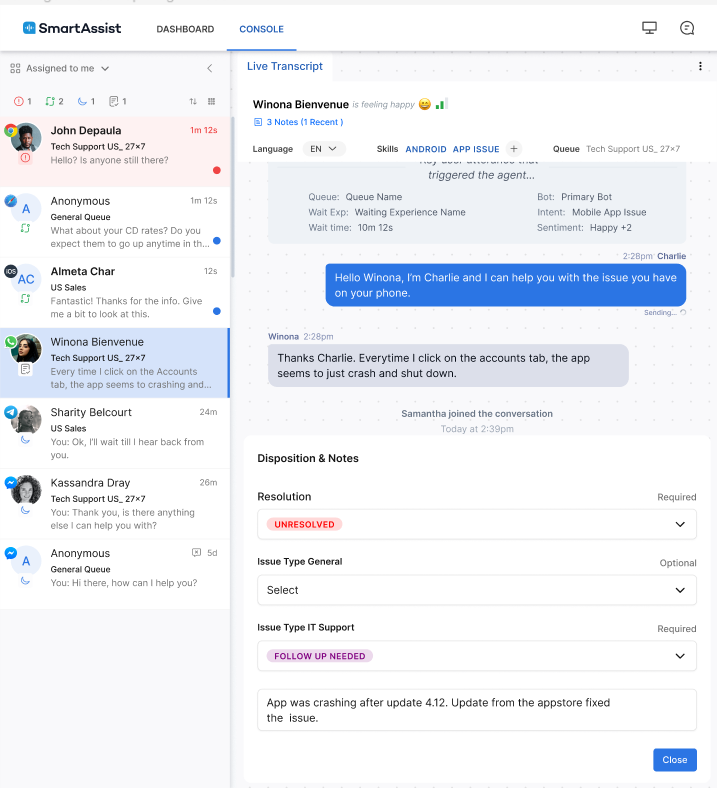
At the end of the conversation:
-
- Select the conversation in your tray.
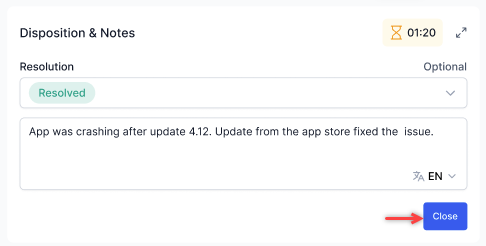
- You must select a Disposition from the following available options:
- Resolved: Select when the customer query is resolved.
- Abandoned: Select if the customer has abandoned the conversation and is no longer responding.
- Pending: Select if the query is still pending resolution.
- Custom: Administrators can create custom disposition codes to address specific business needs. Select according to your use case.
- Optionally, type a Description of your reason for selecting the disposition.
- Click Close to close the conversation.
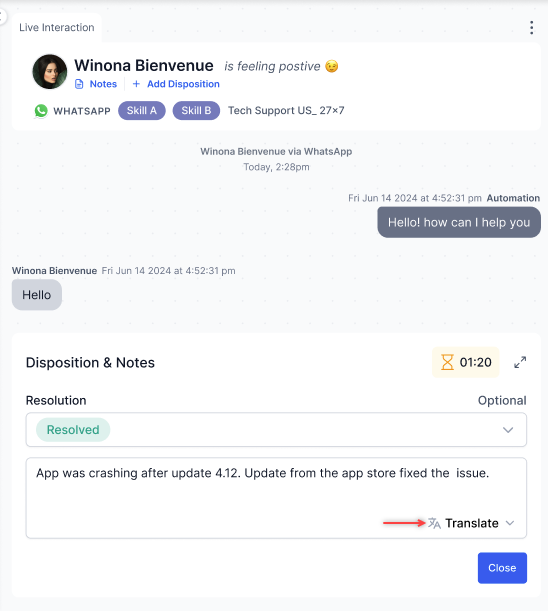
Translate Dispositions
Agents can review dispositions in their preferred language by selecting a target language for disposition translation. To enable this option, refer to Translation Configuration.
Steps to select a language for disposition translation:
- Click the Translate button at the bottom right corner.
- Select the language for disposition translation.
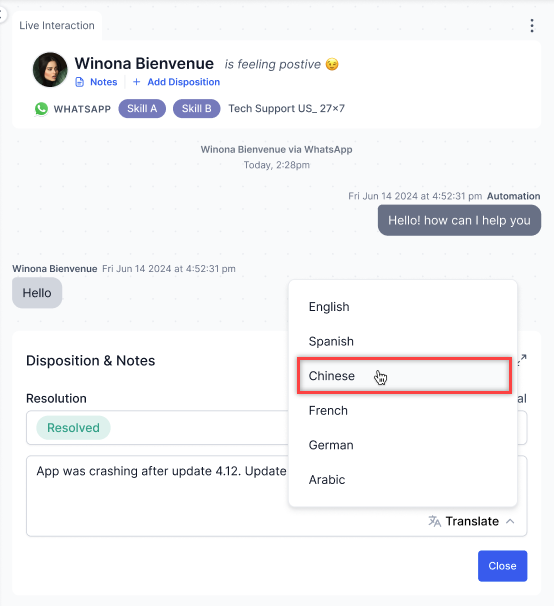
- The transcript is translated into the selected language.
Information Provided to Agents and Customers During Live Interactions
You can interact with customers within the Live Interaction area of the Agent Console.
The Live Interaction area provides access to features and information that can be used during live conversations, as follows:
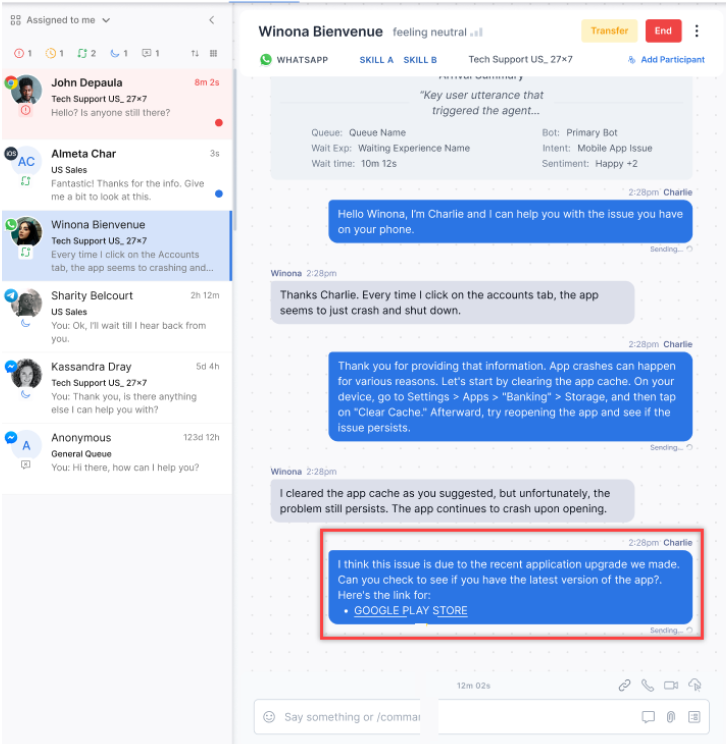
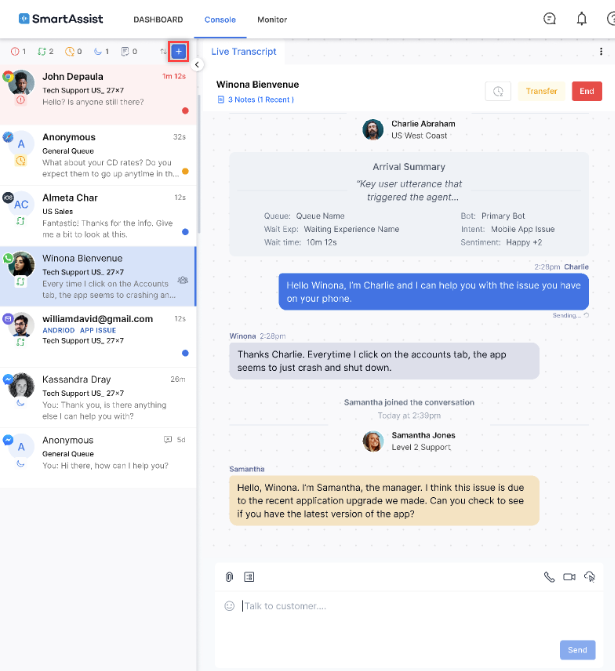
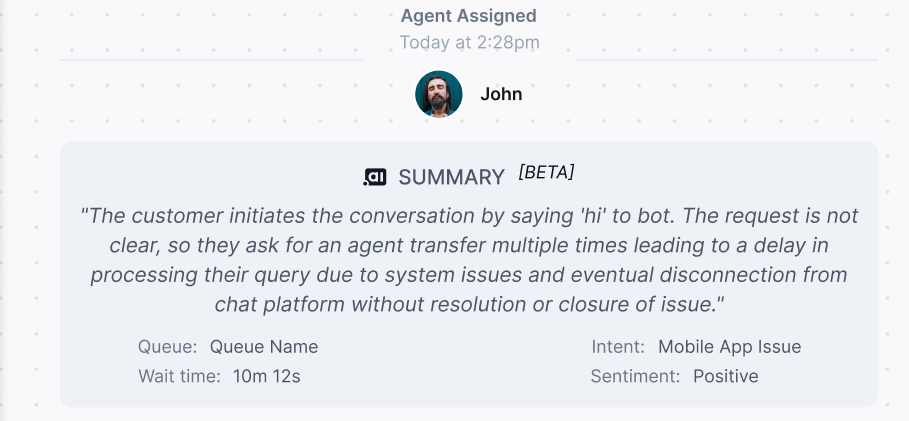
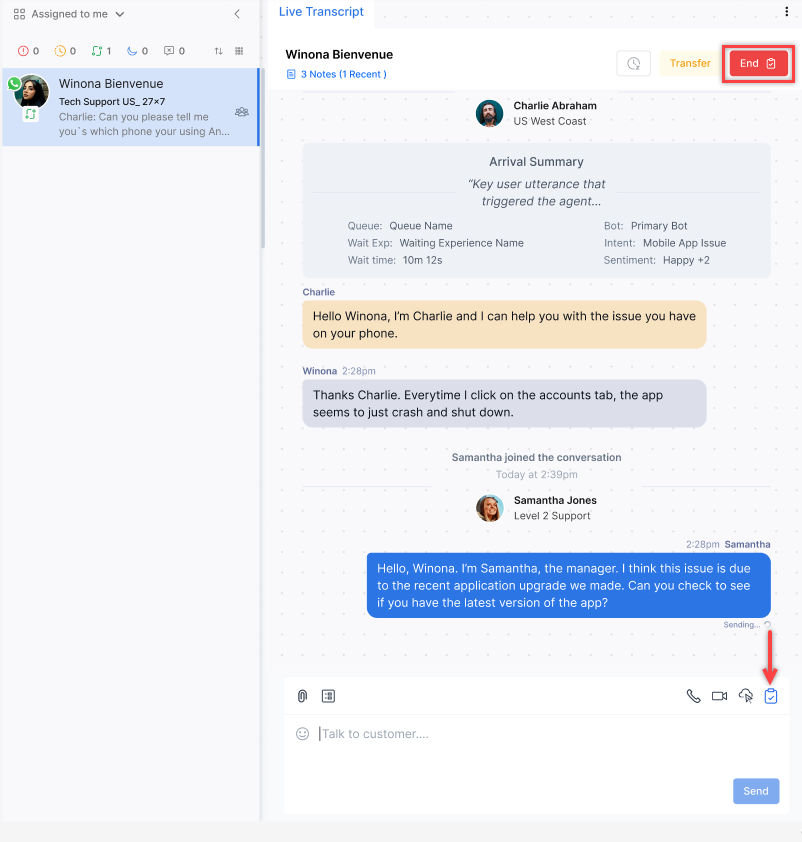
Arrival Summary
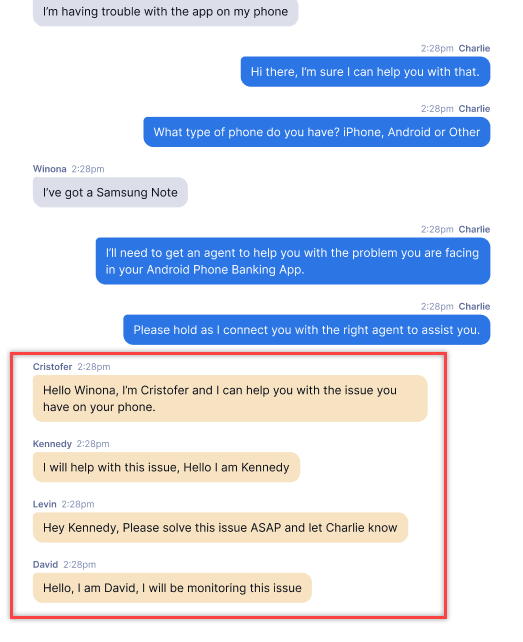
Every conversation begins with an Arrival summary once an agent accepts it. This section displays the live interaction summary with the following details:
- Agent Name: Identifies the agent who is handling the live interaction.
- SUMMARY: Conversation Summary leading up to the transfer. In case of multiple transfers, the summary of all transfers is shown.
- Queue: Indicates the queue in which the conversation is placed.
- Wait Time: Shows the time that the chat has been waiting for an agent to respond.
- Intent: Shows the customer’s primary purpose for initiating the live interaction.
- Sentiment: Captures the customer sentiments based on their responses.
After accepting the conversation, all interactions by the agent are displayed below the arrival summary. If generating the arrival summary takes time, a loading indicator appears until the summary is ready. After an agent transfer, Agent 2 will see the entire summary of the prior conversation, displayed immediately after the last message from Agent 1.
Refreshing Bot-Customer Interactions
A reload button appears at the top of the conversation transcript when the bot-customer conversation transcript is missing. Clicking Reload displays the missing information.

Typing Chat Indicator
When the agent types a response during a chat conversation with a customer, the customer’s chat window displays three dots, indicating that the agent is responding to the customer.
Do the following to enable the typing indicator for chat conversations:
- To integrate Kore.ai bots chat capability into custom applications, install WebSDK 2.0 on your server. WebSDK 2.0 is a set of libraries that
offer a quick and convenient way to do this. Refer to the installation instructions for additional information on installing WebSDK 2.0. - To receive read receipts, and typing indicators, install the AgentDesktop plugin in WebSDK 2.0. The Agent Desktop plugin allows the
user to interact with the agent through the bot and supports the following features::
-
- Audio Calling
- Video Calling
- Co-browse
- Screen Sharing
Refer to the installation instructions for additional information on installing the plugin.
Stacked Messages, Timestamp, and Read Status
- Any message sent by an agent will display along with a date and timestamp.
- If the customer does not respond to the first message sent by an agent, the message displays a timestamp, and the following messages
will not show a timestamp until the clock minute changes. For example, If an agent sends a message at 11:30:24, the second message at 11:30:36,
the third message at 11:30:45, and the fourth message at 11:31:08, then the first three messages will be stacked under one timestamp, and the fourth
message will have a different timestamp. - If the customer responds in the same minute, the response will display with the date and timestamp. The responses from the customer will
only show a timestamp once the clock minute changes. - Agents can see the read status on the last message sent. If the messages are stacked, the read status will appear only against the most recent one.
Copy Transcript
Agents can export a copy of the conversation transcript including text, images, and files.
Steps to export a transcript:
- Click the Ellipsis (⋮) on the top right corner of the live interaction pane and then click Copy Transcript.

- The transcript appears on the Copy Transcript pop-up window. Select the Timestamp, Send Status, or Embedded Media if you want them to be exported.
- Click Copy.
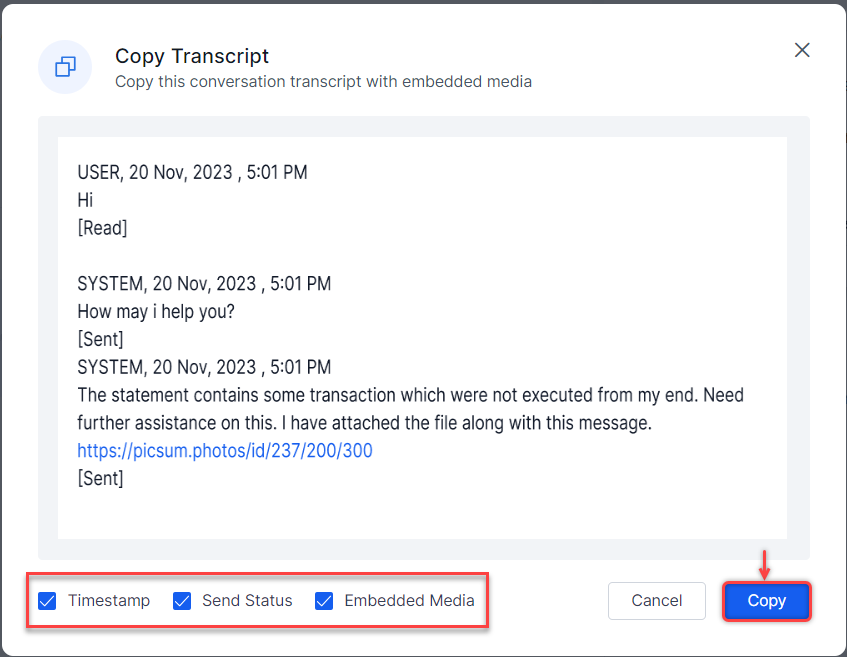
The transcript is exported successfully.
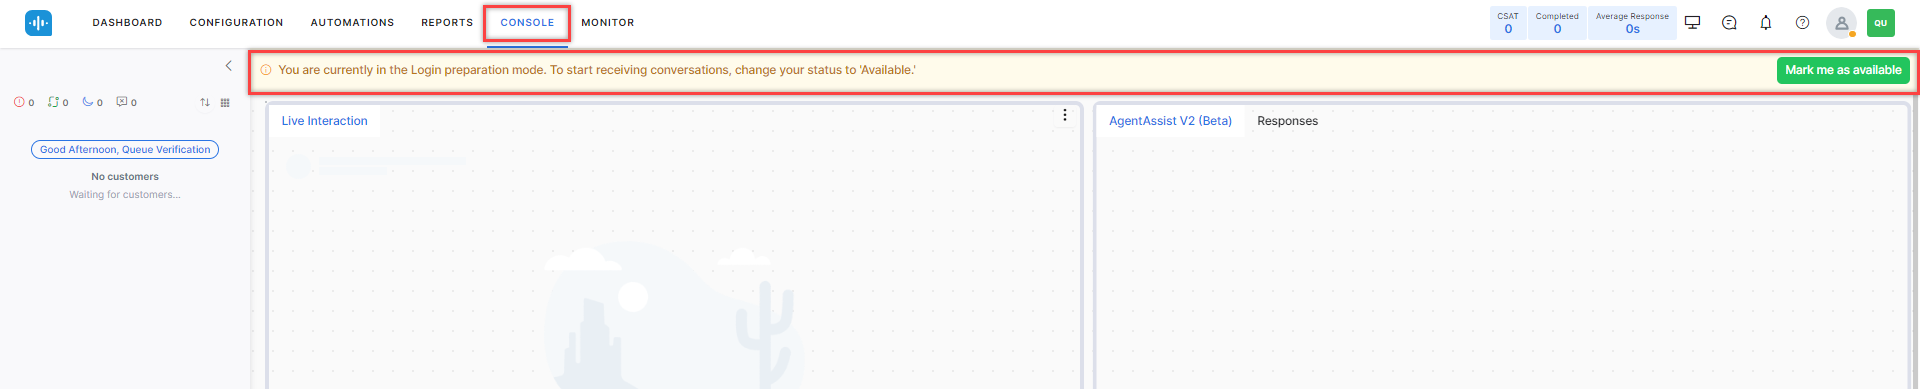
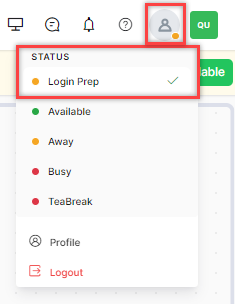
Behavior When Login Prep Status is Enabled
A message appears on the console for the duration configured on the Agent Status page. This status allows an agent to prepare themselves
before they start receiving interactions.
At the end of the Login Preparation time slot, the system automatically marks the agent as ‘Away,’ and a pop-up message appears with
the following content:
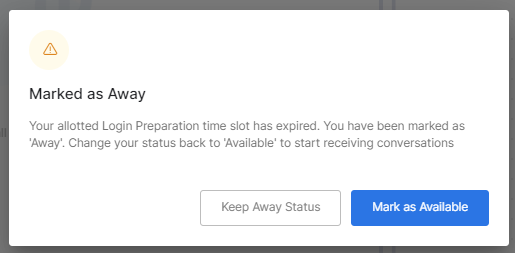
Agents can choose the following options:
Mark as Available – Clicking this button changes an agent’s status to Available.
Keep Away Status – Clicking this button keeps the status as Away. If agents click Keep Away Status, they remain in the ‘Away’ state
with a notification displayed for the ‘Away’ status. Agents can mark themselves as ‘Available’ when they are ready to receive conversations.
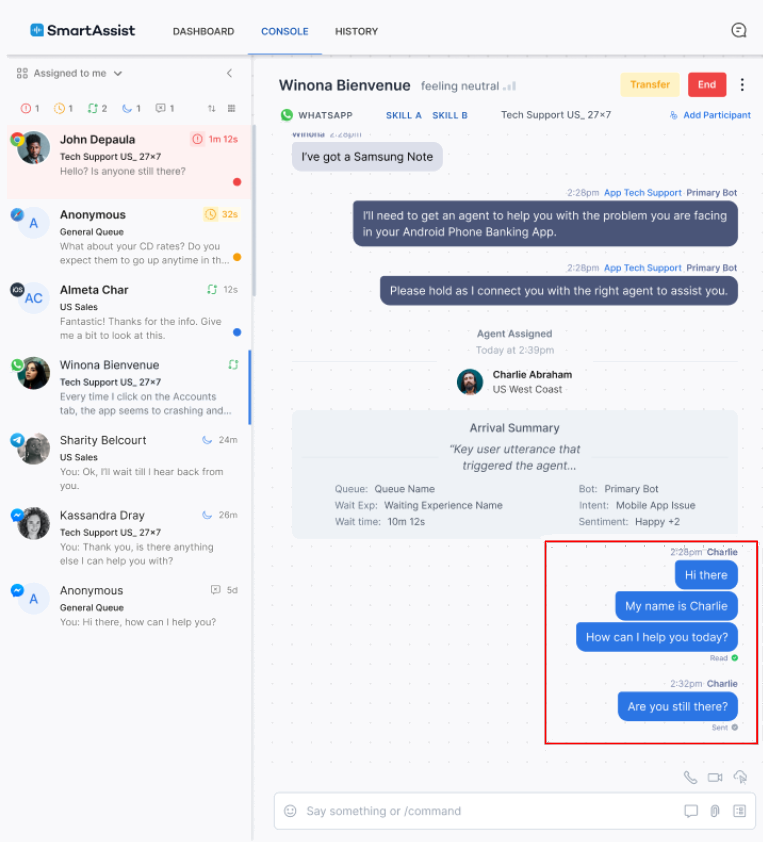
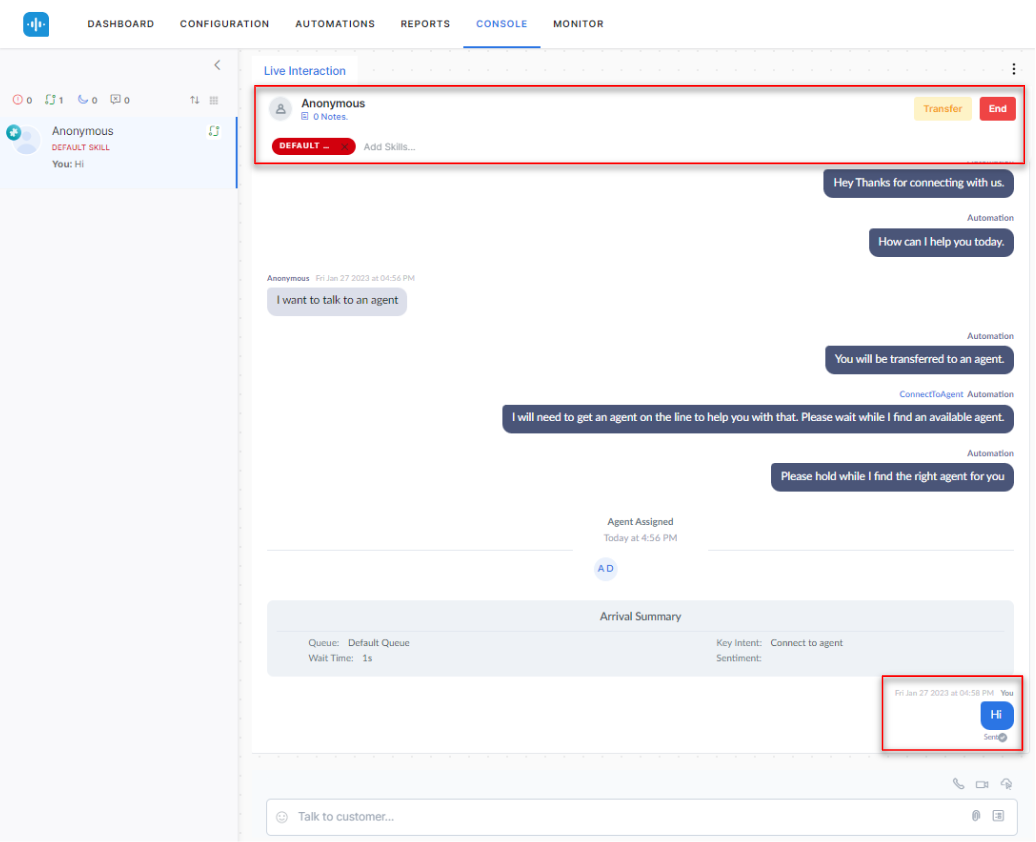
Behavior During Active Interactions
If Auto-Answer Is Enabled, Transfer and End are Disabled Until the First Agent Response
If the Auto Answer mode is enabled in Agent Settings, the Transfer/End buttons do not display on the Live Interaction pane until the assigned agent sends the first message.
Below is what the Agent Console looks like before the first message from the agent:

Below is what the Agent Console looks like after the first message from the agent:
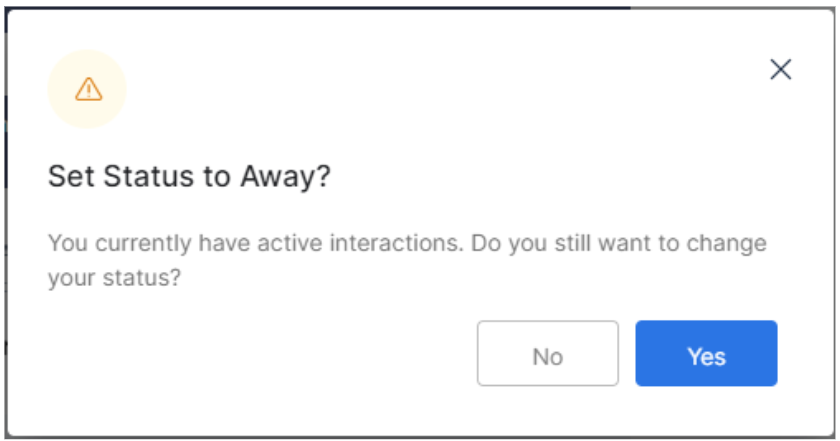
Behavior When an Agent Changes Their Status
A warning message will appear if an agent changes their status to Away, or a custom status will be tagged to Away during an active interaction.
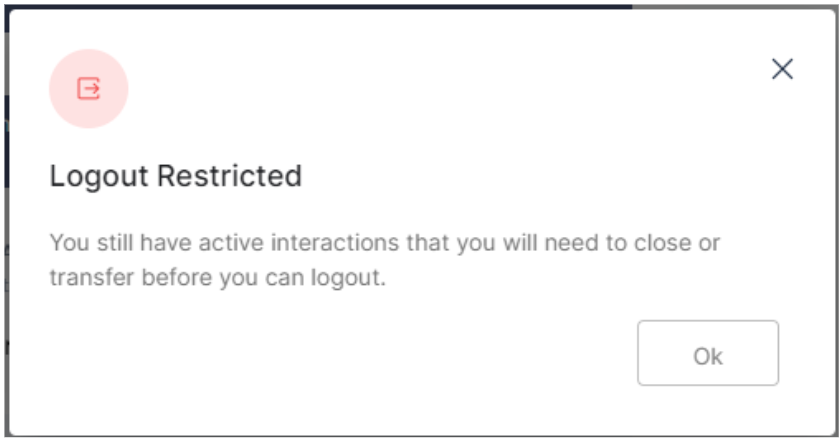
Behavior When an Agent Tries Logging Out
SmartAssist does not permit agents to log out during an ongoing conversation.
If an agent tries to log out during an ongoing conversation, SmartAssist prevents the agent from logging out without transferring or closing the conversation.
A pop-up window is displayed along with the following message:
If an agent logs out suddenly (the browser is closed or the system crashes, for example), then the counter for Agent inactivity starts and after the threshold,
any active conversations are assigned back to the Queue.
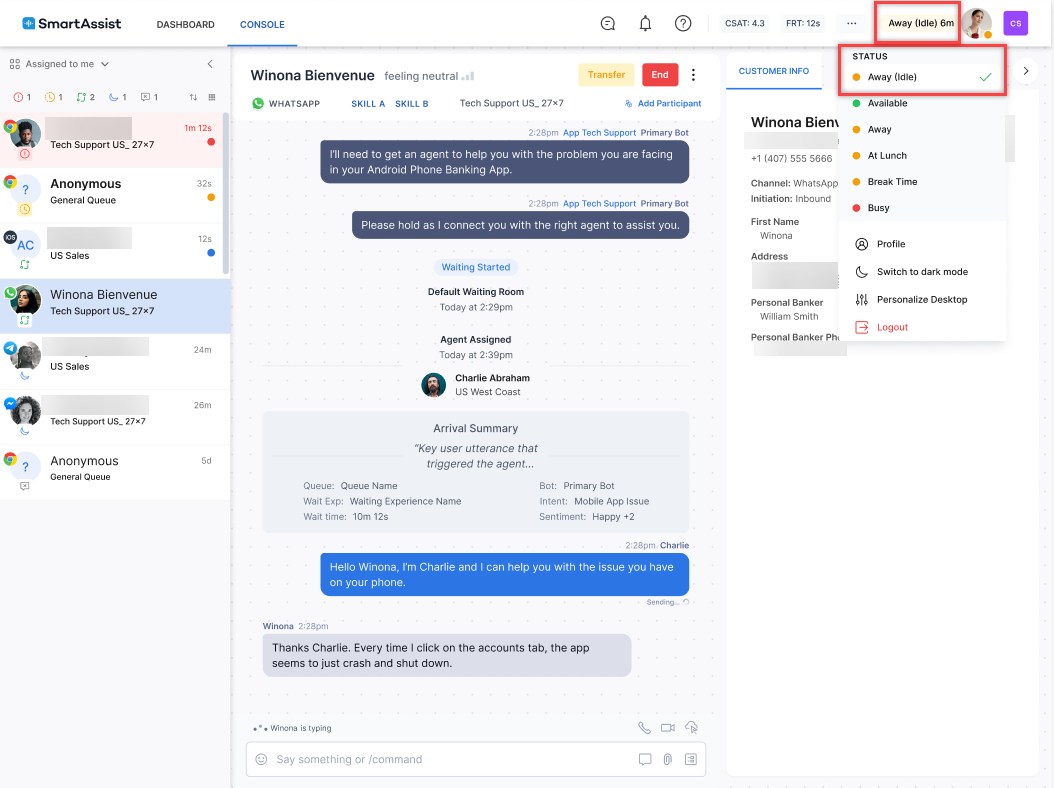
Behavior When an Agent Does Not Accept/Send a Response Within a Specified Time
If an agent does not accept/send a response within a specified time, the system automatically changes the status to Away (Idle). This status is not available for selection by an agent.
Behavior When No Agents Are Available
If no agents are logged in, conversations will wait until the maximum wait time specified for the queue.
After the queue max timeout occurs, the “no agents available” flow is triggered. This is enabled at the account level for new accounts and applies to all channels.
The existing routing logic applies to existing accounts. If you want to modify your routing logic, please contact Kore Support.
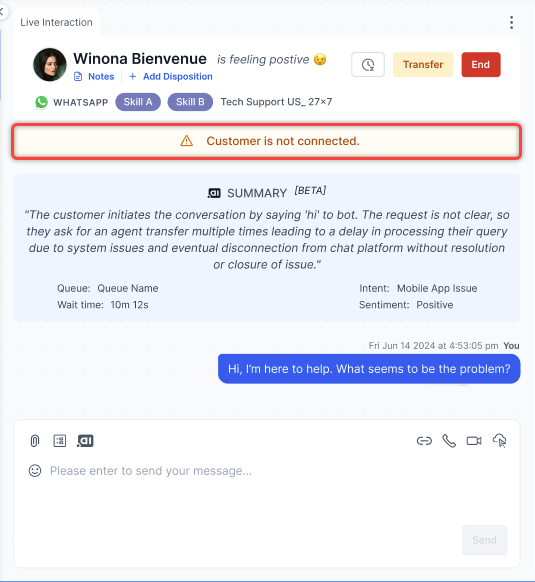
Behavior When Customer or Network is Disconnected
The message will not be delivered if the agent sends a message while the customer or network is disconnected. To proactively inform the agent, a notification is displayed at the top of the live interaction pane whenever the user-side socket disconnects. This notification disappears immediately when the user reconnects. Administrators can configure a timeout for continued disconnection, after which the system terminates the session. They can also configure the message to be sent to the agent from Agent Settings.
If the user does not reconnect within the configured timeout period, an automated message is displayed to the agent if they remain idle, and the system terminates the conversation.
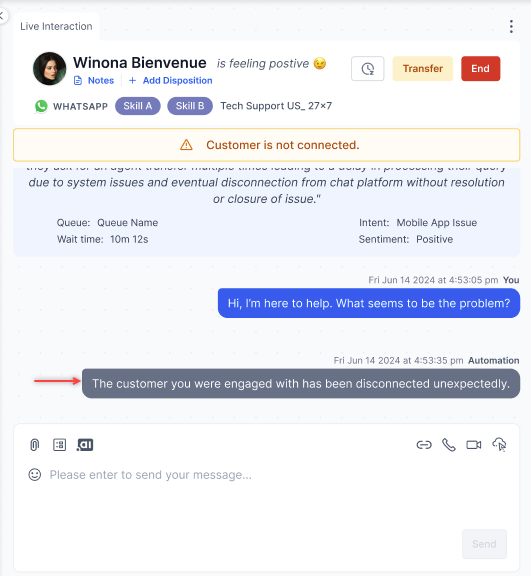
Following this, the agent transitions to After Call Work (ACW).
CSAT Survey
The CSAT (Customer Satisfaction) survey is essential for contact centers because it provides valuable feedback on customer satisfaction levels, enabling continuous improvement of service quality.
CSAT surveys can be triggered based on the scenarios configured by administrators/supervisors while Creating a Survey:
- Show to Everyone: If the “Show to Everyone” scenario is configured while creating the survey, the survey is triggered automatically for every interaction
that concludes between an agent and a customer on digital or voice channels. - Show to Every nth User: If the “Show to nth User” scenario is configured while creating the survey, the survey is triggered automatically for the nth interaction
that concludes between an agent and a customer on digital or voice channels. For example, If the frequency is set to 2, then the survey is triggered for
every second customer. - Agents can trigger: If the “Agents can trigger” scenario is configured while creating the survey, the survey can be triggered by agents at any point during the
interaction as follows:- Click the Send Survey button at the top-right corner above the text editor. The send survey button is highlighted, and a survey icon appears on the End button
at the top right corner of the live interaction pane.
- The survey is triggered to the customer when the agent clicks the End button with the survey selected.
- Click the Send Survey button at the top-right corner above the text editor. The send survey button is highlighted, and a survey icon appears on the End button
For the above scenarios where the agent actively participates in interactions and the interactions end, the feedback from surveys contributes to their CSAT scores.
CSAT surveys can also be triggered in scenarios when there are no active participants:
- Outside hours of operation
- No Agents Available flow
- Agent/Customer side terminations or system terminations due to user inactivity
- Subflows (No agents flow/Out of hours flow)
For these scenarios, the CSAT scores are assigned to the interaction.
CSAT Survey for Inbound and Outbound Calls
The Voice Gateway (VG) provides a CSAT survey feature to deliver surveys consistently across inbound and outbound calls. All survey responses are recorded for reporting and analysis.
Inbound Calls
Inbound calls include internal and external transfers, agent-initiated callbacks, courtesy callbacks, and consult calls. For internal transfers, the survey configuration of the last agent in the call chain takes priority, and the customer receives the survey after the call ends. If the transfer fails, the system routes the call according to fallback rules such as queues or IVR.
For external transfers, the survey triggers are based on the internal agent’s survey preference; requirements are under discussion. Agent-initiated callbacks and courtesy callbacks follow agent-specific survey settings. During consult calls, when Agent 1 consults Agent 2 and ends the call, the survey is triggered based on the last agent’s configuration. All survey recordings are stored.
Outbound Calls
Outbound calls include agent-to-caller calls, internal transfers, consult calls, agent-initiated callbacks, and calls using the Outbound Dialout API. During agent-to-caller calls, agents can trigger surveys, and the caller receives the survey immediately after the call ends.
For internal transfers and consult calls, surveys follow the last agent’s configuration. Agent-initiated callbacks respect agent-specific settings. All survey recordings are stored.
- Related Links