This document describes how to configure inbound call handoff from Genesys Cloud CX to SmartAssist for automation and transfer the call to a live agent while displaying Agent AI on the Genesys Agent Desktop.
Prerequisites
- Admin access to SmartAssist, XO Platform, and Agent AI.
- Admin access to a Genesys Cloud CX account
- Familiarity with creating Architect flows in Genesys Cloud CX.
SmartAssist Configuration for Automation
This section describes the configuration process of SmartAssist for automation:
1. Create/Import App into XO Platform
- Sign in to SmartAssist.
- Go to the Automations tab.
- Click + Add Bot to create a new bot or attach a bot from the library. For help, refer to Introduction to Bots.
- Publish the bot to enable the SmartAssist channel.
2. Purchase a Phone Number
- Go to the Configuration tab, and click Channels > Voice > Phone Numbers.
- Click + New to purchase a phone number.
- Attach this phone number to an Experience Flow.
3. Create Experience Flow in SmartAssist
- Click Configuration > Experience Flow > + New Flow.
- Add the Run Automation node to configure the bot for automation.
- Optional: Add an Agent Transfer node to transfer calls to agents in Genesys Cloud CX.
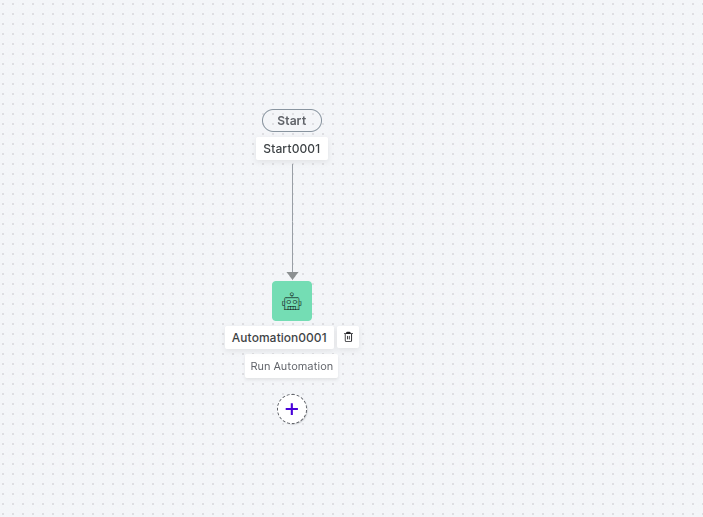
- Publish the flow.
- Click Test Flow to verify the call connects to the correct flow.
4. Configure the Agent Transfer
- Go to the Configuration tab.
- Click SYSTEM SETUP > Agent Transfer.
- Select SIP Transfer.
- Configure the following values:
Parameter Value SIP Transfer Method SIP BYE Headers X-KoreSession-ID TransferToAgent X-KoreSession-ID {{context.session.BotUserSession.conversationSessionId}} X-KoreBotId {{context.session.opts.streamId}} X-Queue-Name Kore Inbound (queue created in Genesys) 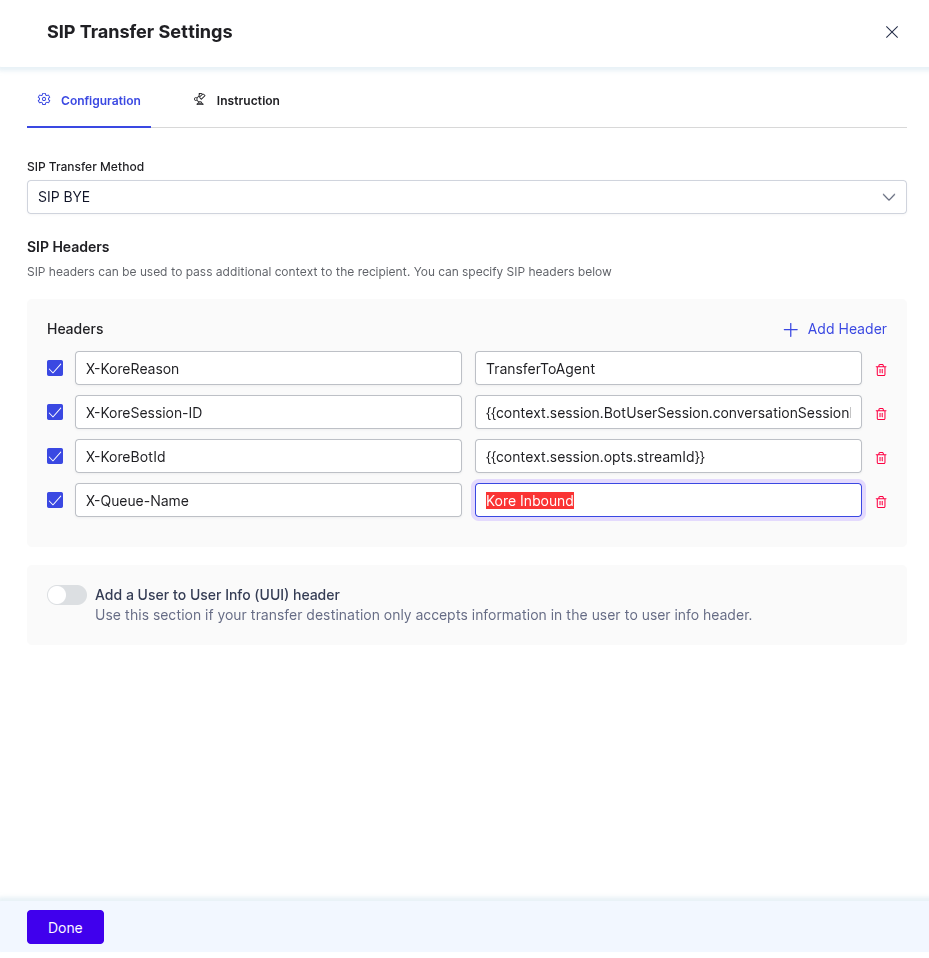
- Click Done.
Genesys Side Configuration for Inbound Agent Transfer
Step 1 – Queue
If you haven’t created an Agent Queue to route live agent transfers, create and add the necessary members. Refer to Set up AgentAssist for Genesys for help.
Step 2 – Architect Flow
Create an Inbound Call Flow
Create a new Inbound Call Flow to transfer calls from SmartAssist to Genesys.
- Sign in to Genesys Cloud.
- Click Admin > Architect.
- Click + Add to add a new call flow.
- Enter a name and a description in the Name and Description fields.
- Click Create Flow.
- Create the flow (Add tasks) in the Main Menu or create a Reusable Task and mark this task as set this as the starting task from the ellipsis menu in the upper-right corner.
- After the Start node, add a Call Audio Connector node in the architect flow.
- Inside the Call Audio Connector node, give any descriptive name (optional).
- Select Literal and add the following variables:
- isAgentTransfer – with key Name as isAgentTransfer and validate to assign as Task.isAgentTransfer
- X-Queue-Name – with key Name as X-Queue-Name and validate to assign as Task.XQueueName
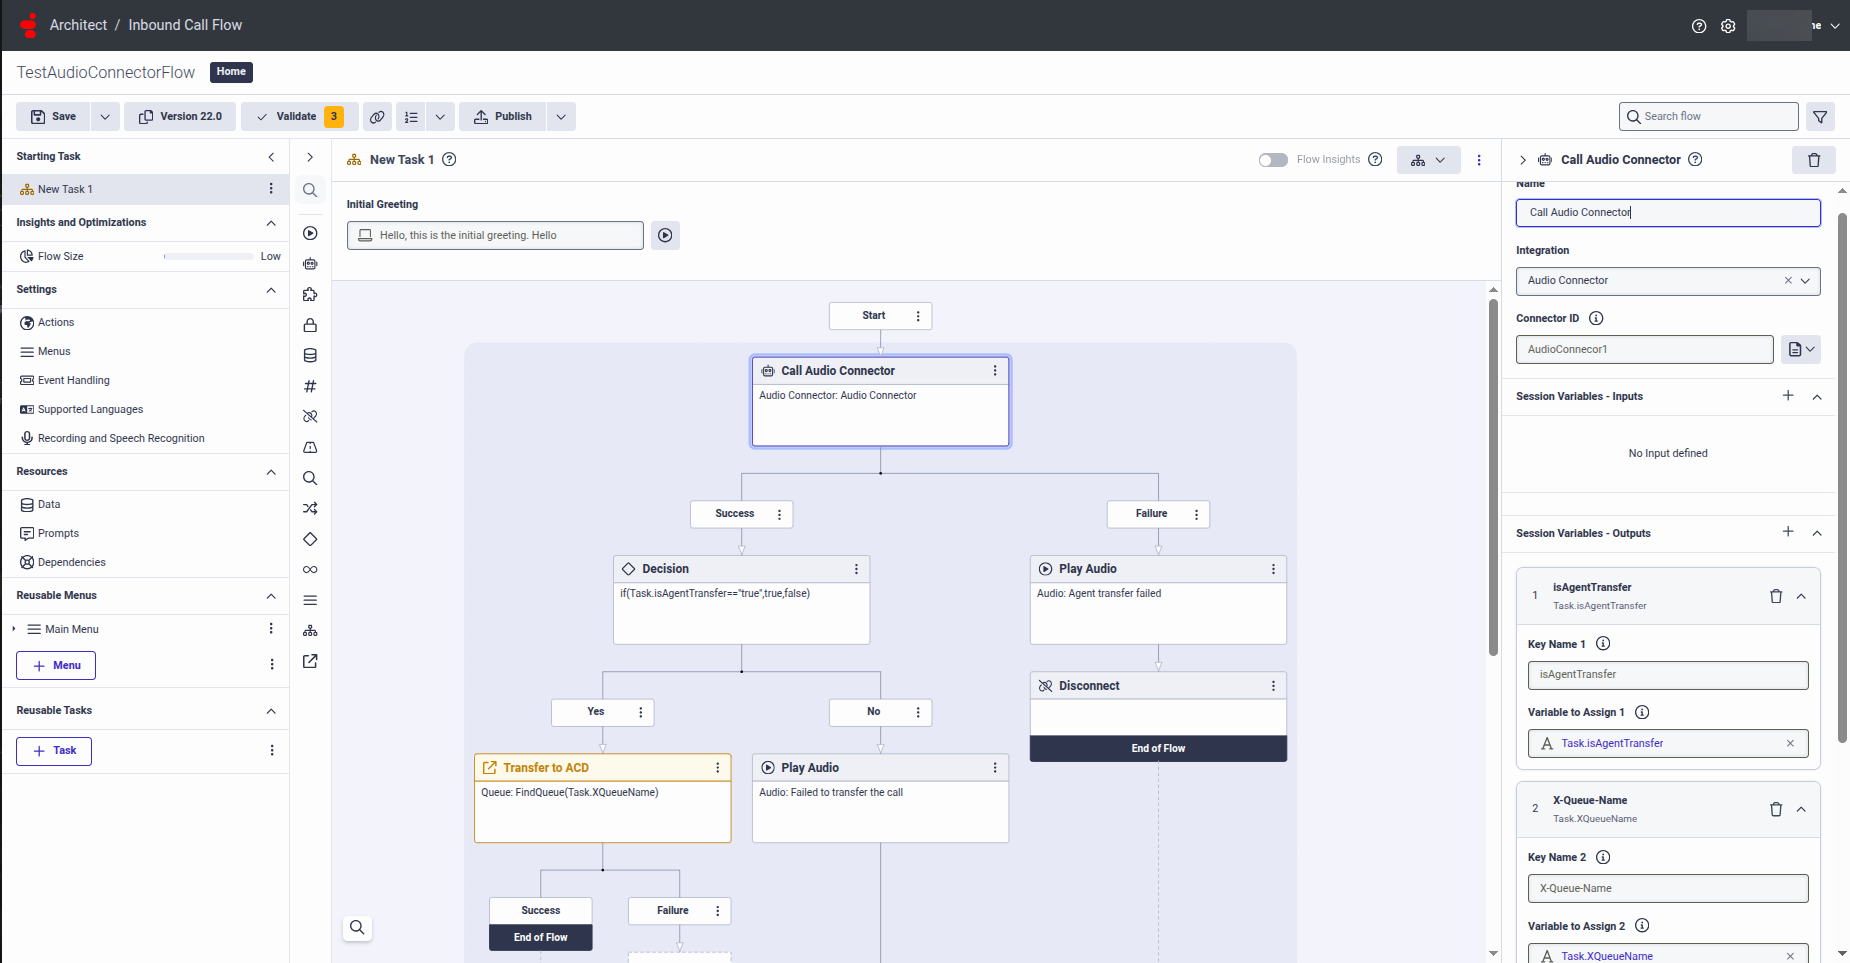
- Add a Decision node immediately after the previous node in the Architect flow.
- Inside this node, give any name.
- Assign the following value (as an Expression):
if(Task.isAgentTransfer==”true”,true,false)a
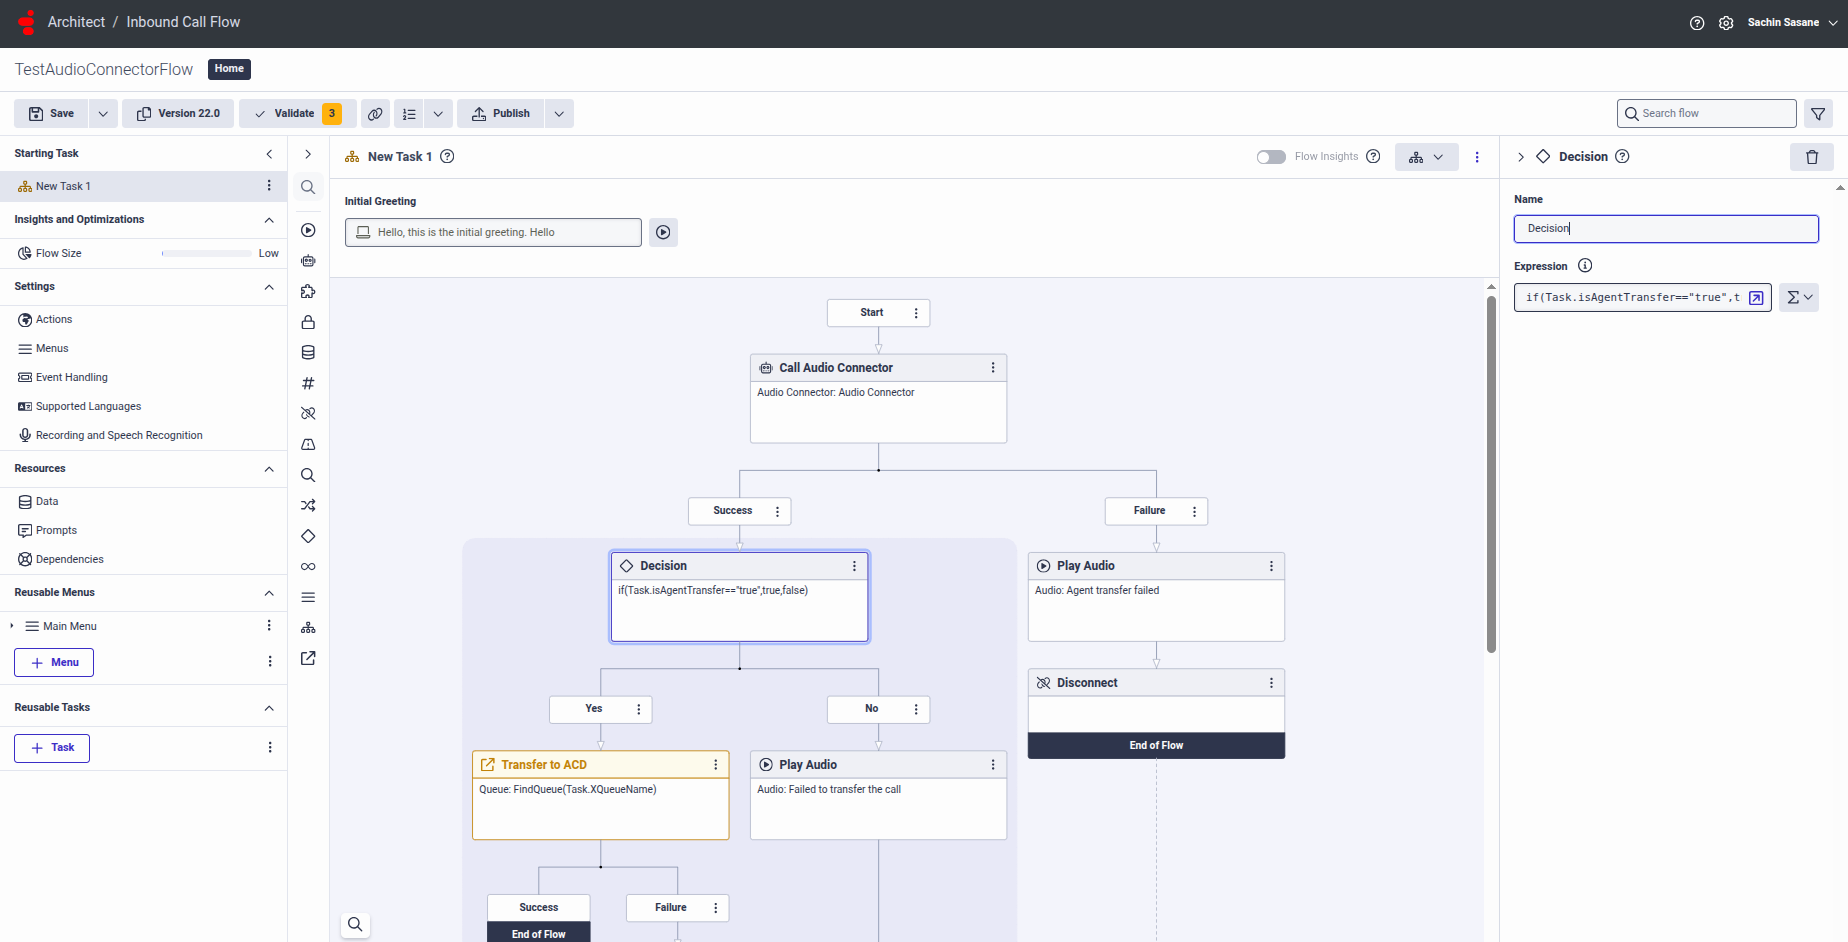
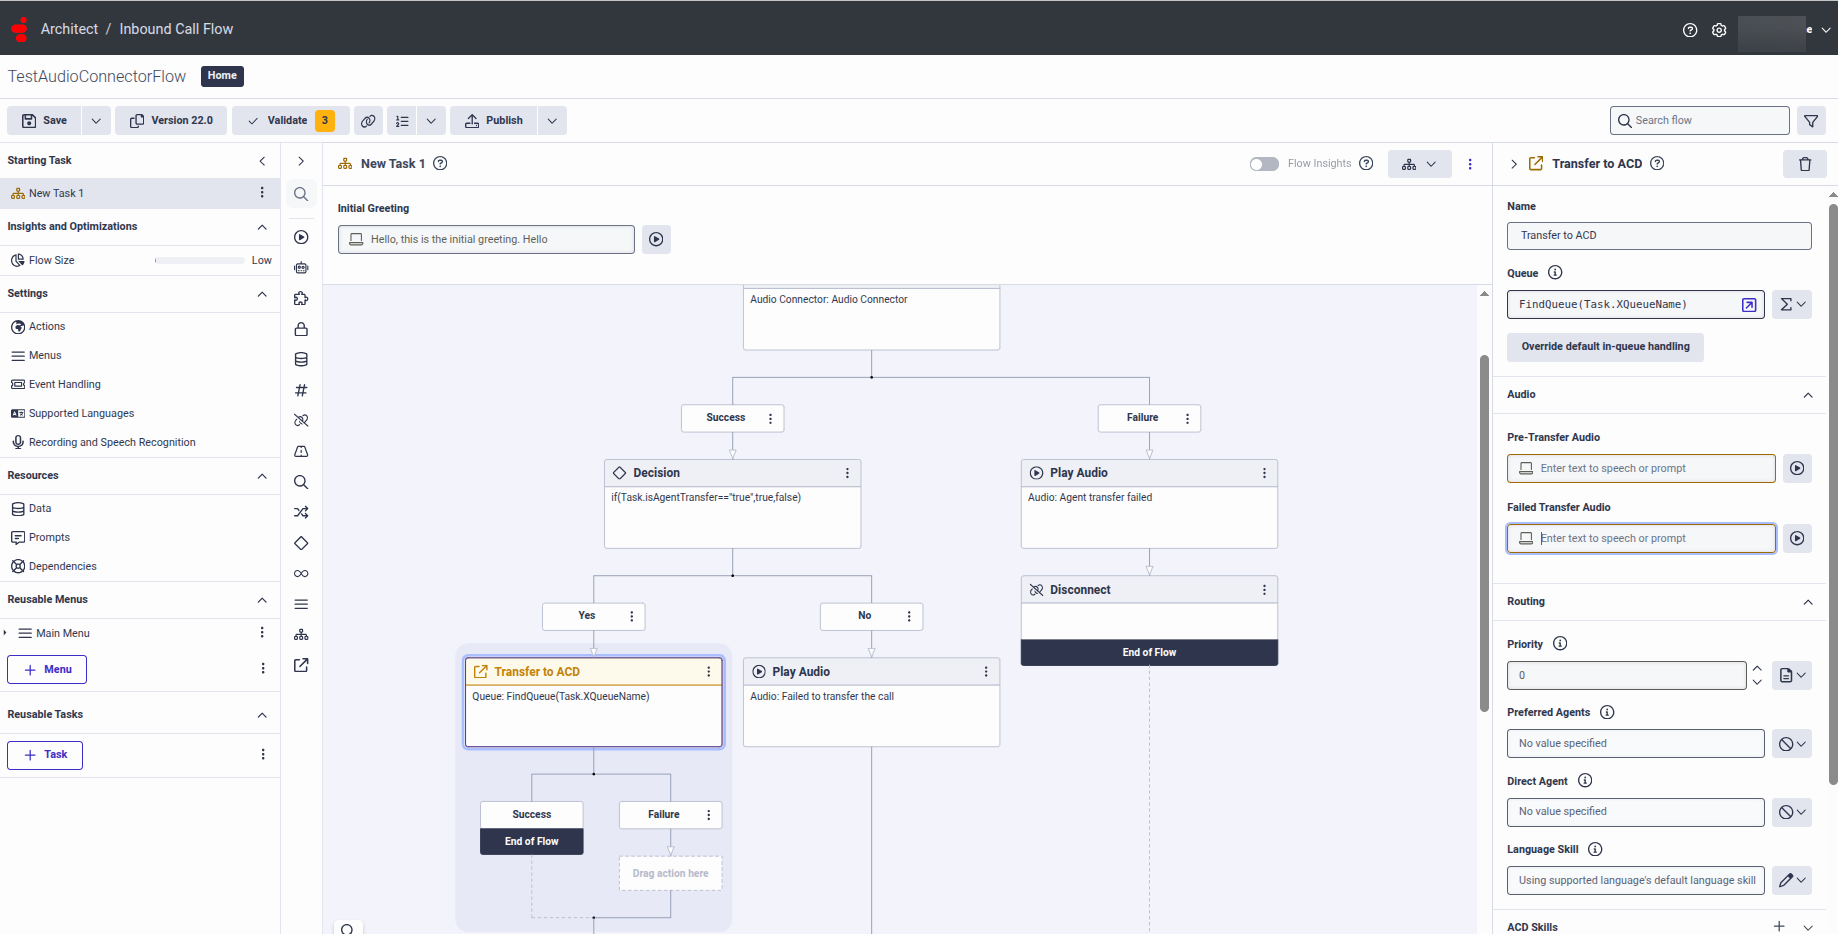
- After the Decision node, add Transfer to ACD node at Success path.
- Inside this node, give any name.
- Point it to the queue you want to use for agents by assigning the following value (as an Expression): FindQueue(Task.XQueueName)
Step 3 – DID Numbers
You need a DID Number that is internally routable inside Genesys.
DID Ranges
Create a new single-number DID Range:
- Keep the Start Number and End Number the same.
- Use a number that is not a typical external number (for example, +12223334444).
- For Service Provider, select Internal.
- Add a comment that explains the purpose of the range.

DID Assignments
Assign the number you created to the Call Route from Step 4.
Assignee Type: Call Flow
DID Number: Your number
Step 4 – Call Route
- Go to Admin > Call Routing.
- Click the + button to create a new call route.
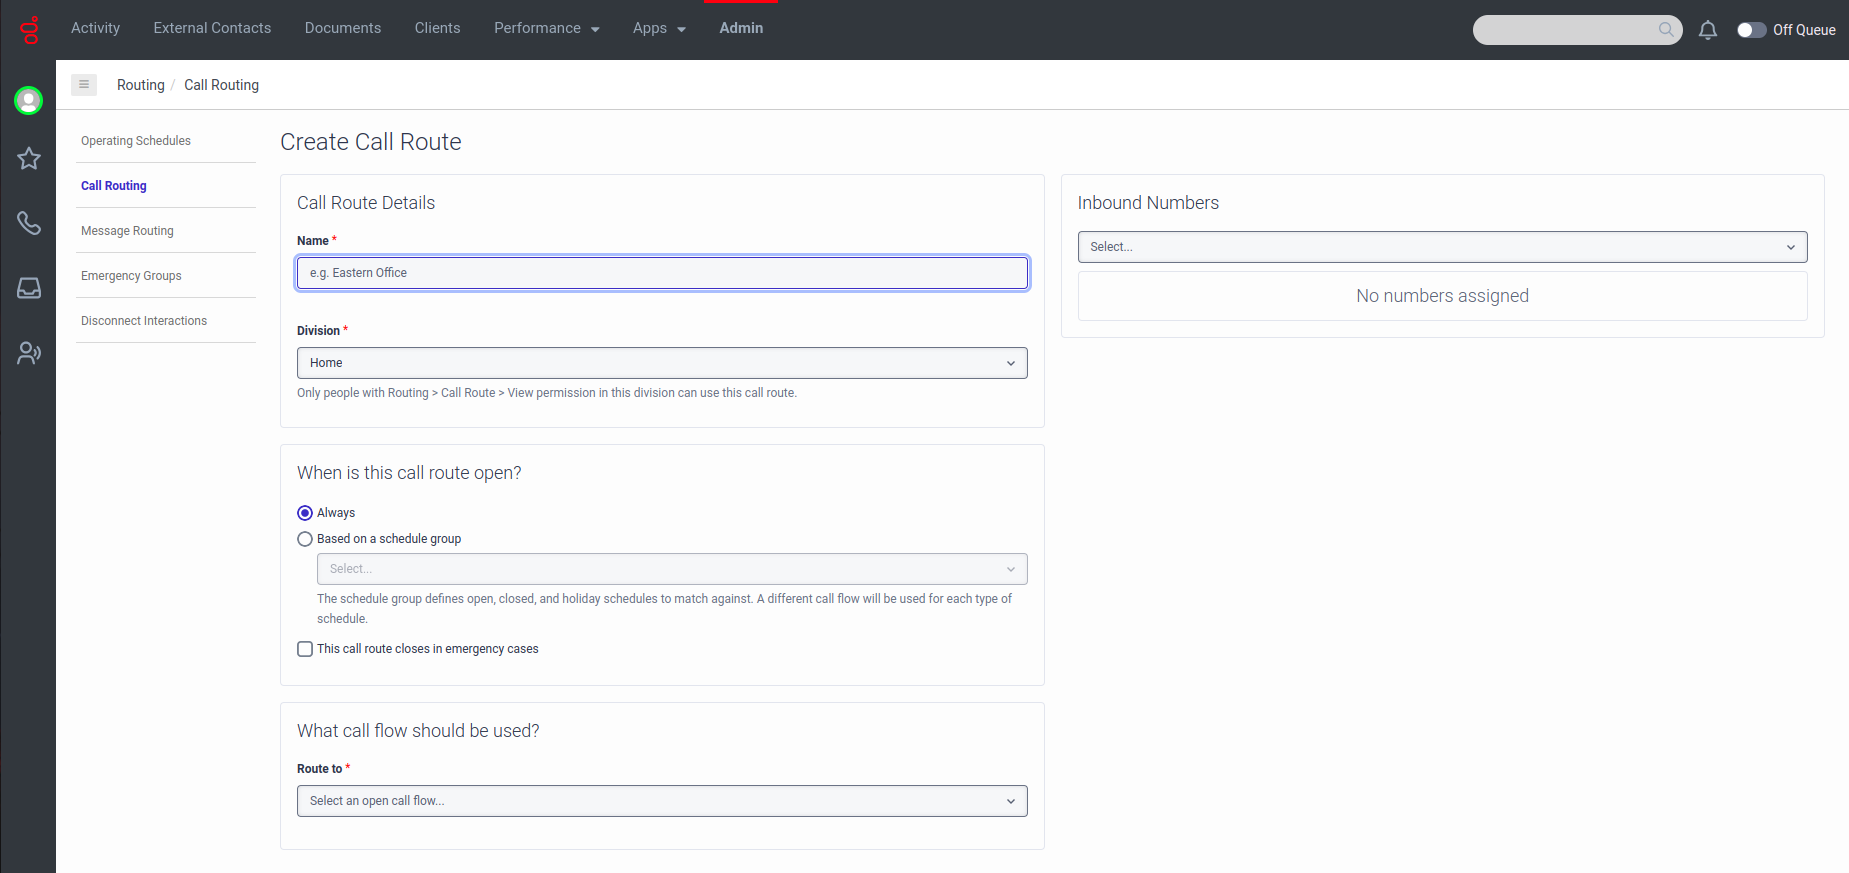
- Set up a call route to map the DID Number created in Step 3 to the call flow created in Step 2.
Install AudioConnector for Automation Voice Streaming
The final step is to install Audiohook for voice streaming, if using Kore-managed Transcriptions. To do that:
- Sign in to Genesys Cloud.
- Go to Admin > Integrations > Integrations.
- Enter audioconnector in the search bar.
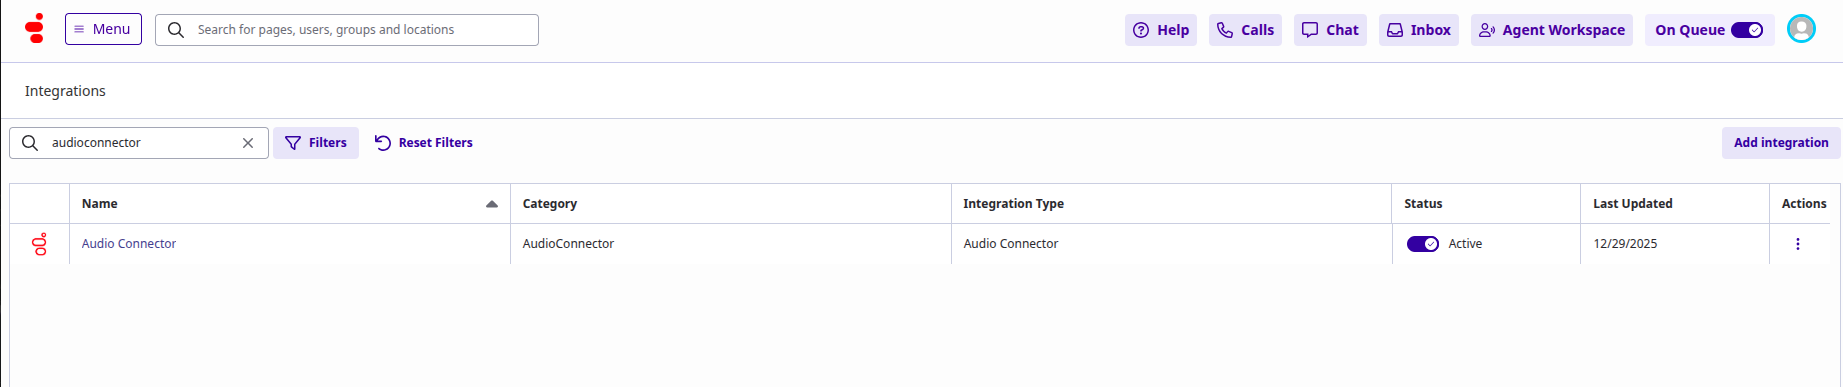
Audio Connector integration requires specific configuration values to support Agent AI configuration. - Install a new audio connector app by clicking the Add Integration button in the top-right corner.
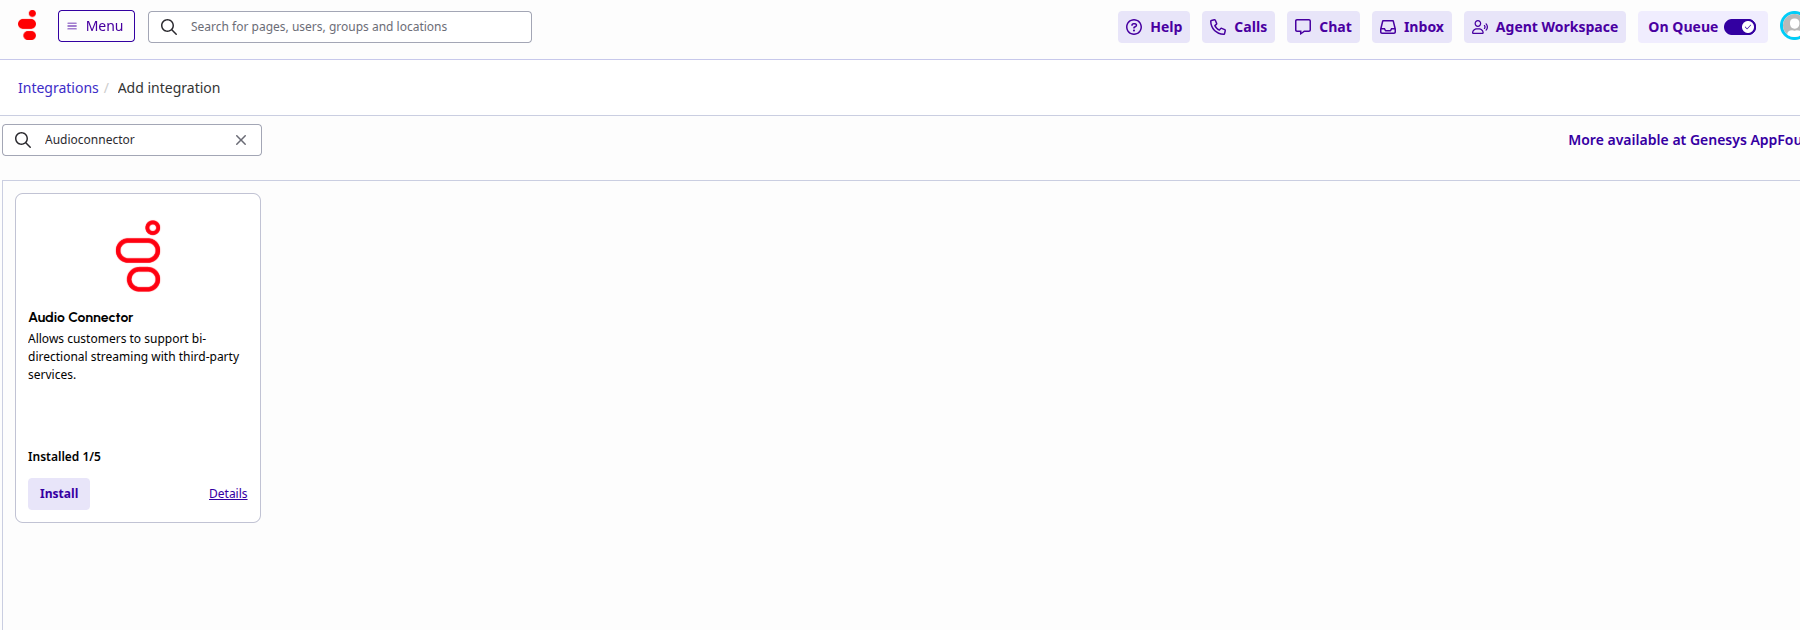
- Open the Audio Connector, and go to the Configuration tab.

- The Base Connection URI format should be similar to “wss://{Kore Voice Gateway(KVG)}/audiosocket/genesysconnect/?sipuri=xxx&token=xxx&botId=xxx&accountId=xxx&agentassist=false”.
Agent AI Integration
1. Add the Bot
Use the same automation bot used in SmartAssist for automation.
- Sign in to Agent AI.
- Go to the Automation tab.
- Click Add Bot.
- Attach a bot from the Library.
- Select the bot.
- Click Convert Bot.
2. Follow the Documentation
Follow the steps from Agent AI Integration with Genesys Cloud CX for Agent AI integration.
Points to be noted:
- In the above link, in step 4, while adding the Agent AI bot credential, add the details of the bot added in the previous step.
- You must configure AudioHook or enable the AudioHook monitor to get the transcripts on the Agent AI widget.
Test Your Integration
Call the phone number you purchased in the previous steps. After automation and a successful agent transfer from SmartAssist to Genesys, the signed-in Genesys agent can accept the incoming calls.
- Click the Answer button to accept the call.
- Click Tools and select the interaction widget you configured in the previous steps.
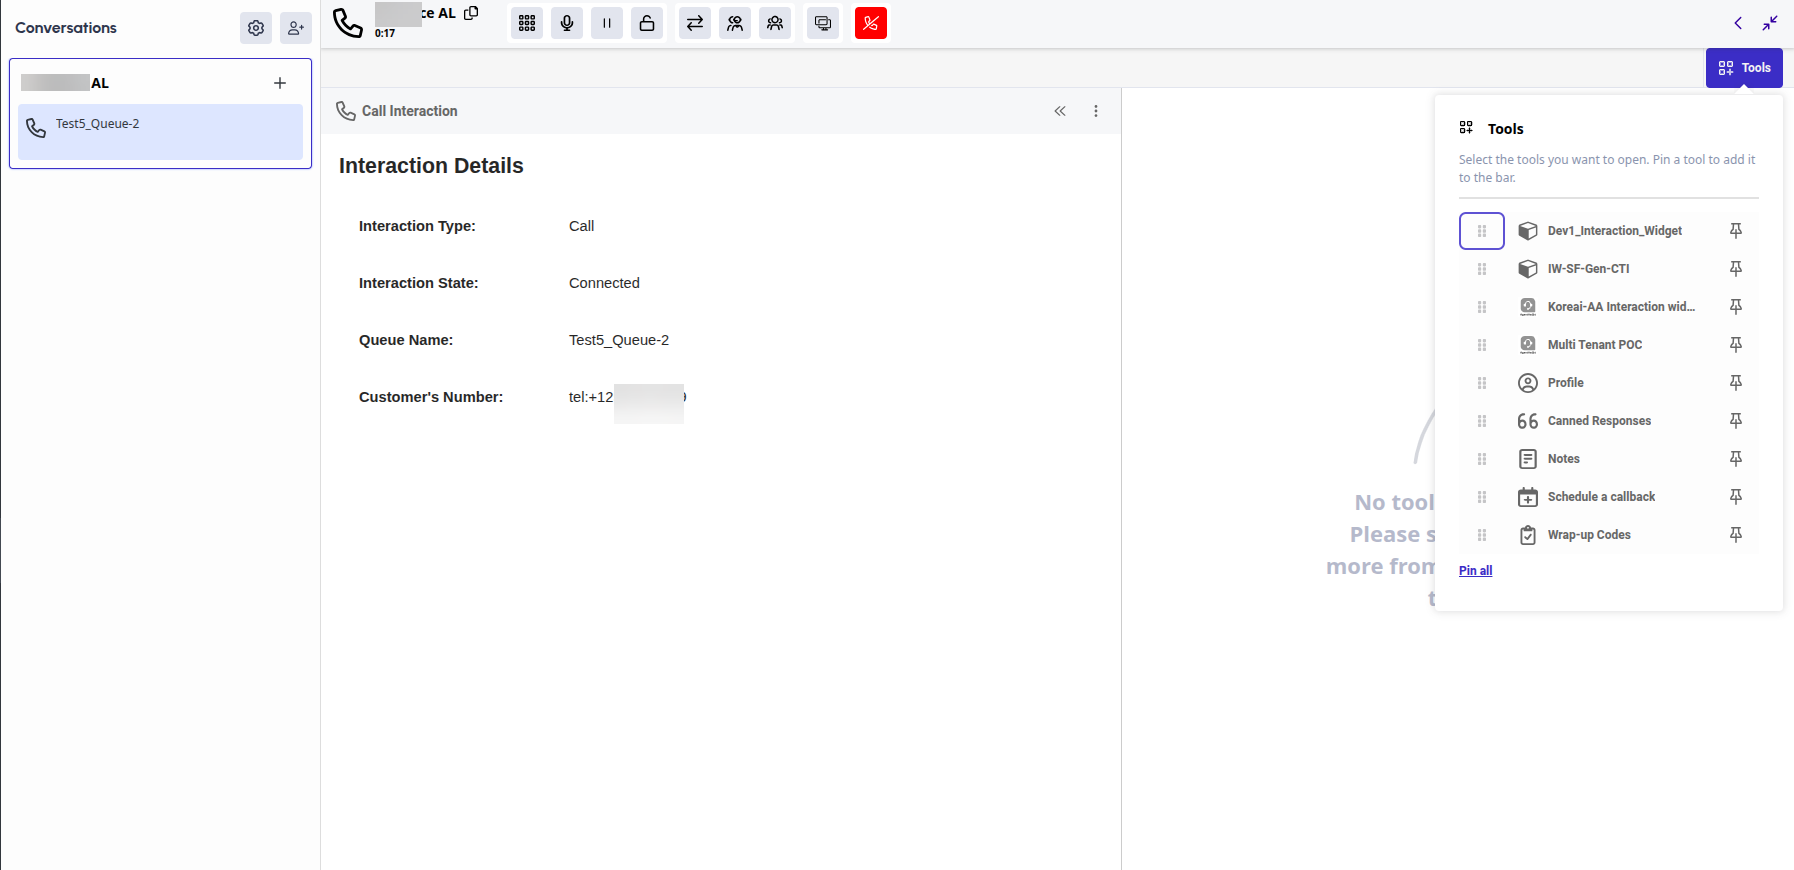
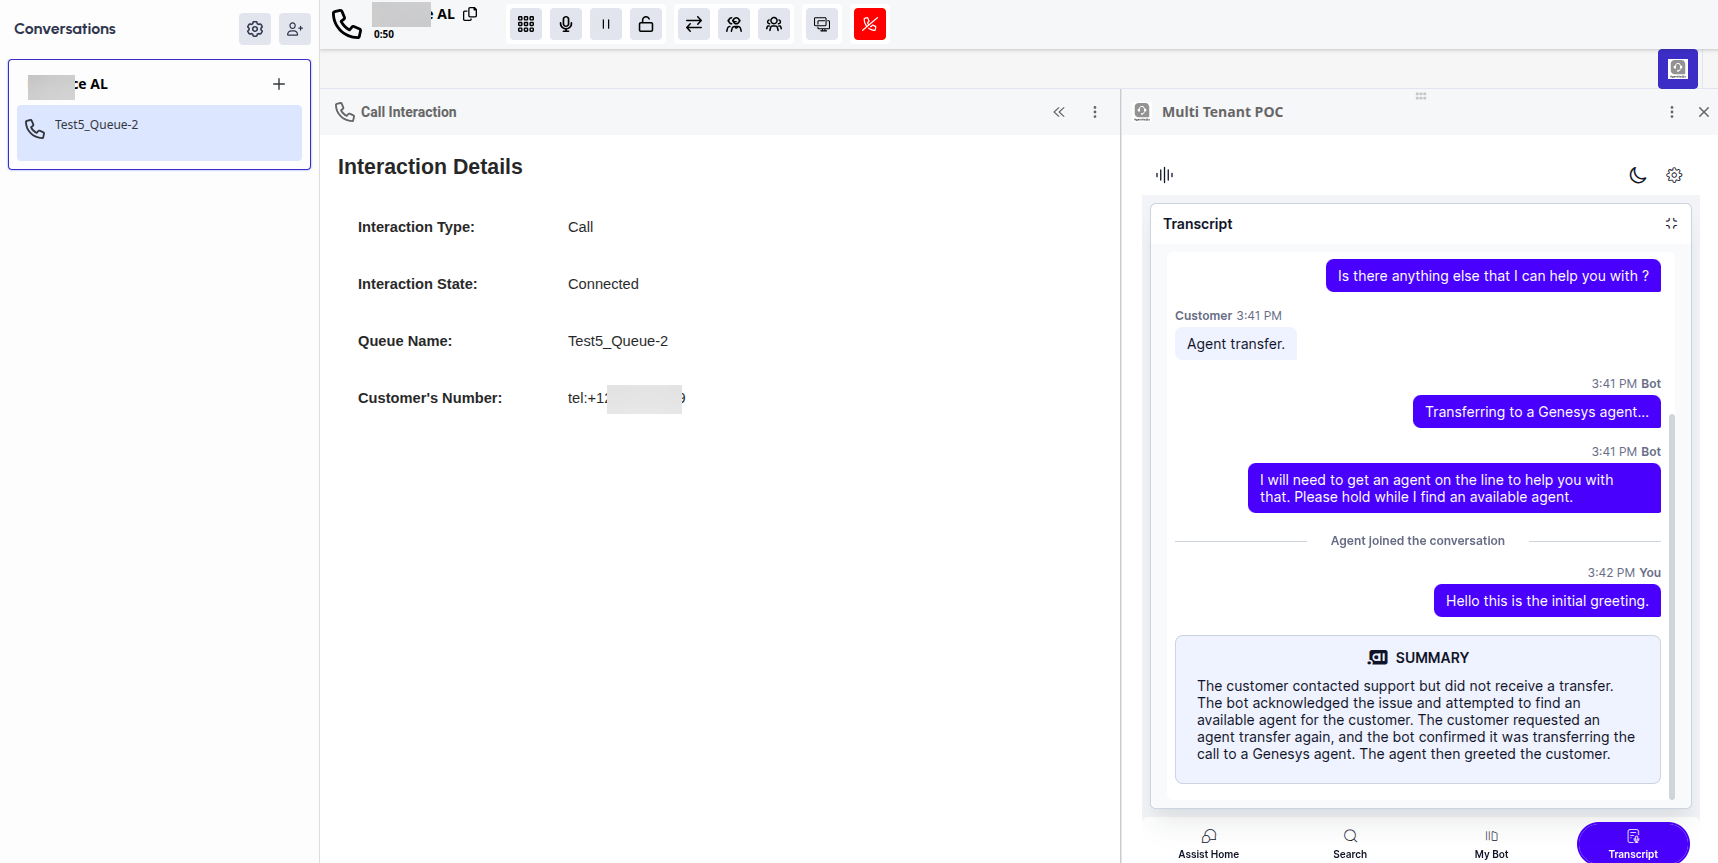
- The Agent AI widget appears on the right side of the Genesys Agent desktop.
- Switch to the Agent AI Transcript tab to view the user-bot history and the summary between the user and the automation bot. All the real-time transcripts between the live agent and the user are captured in the Transcript tab.
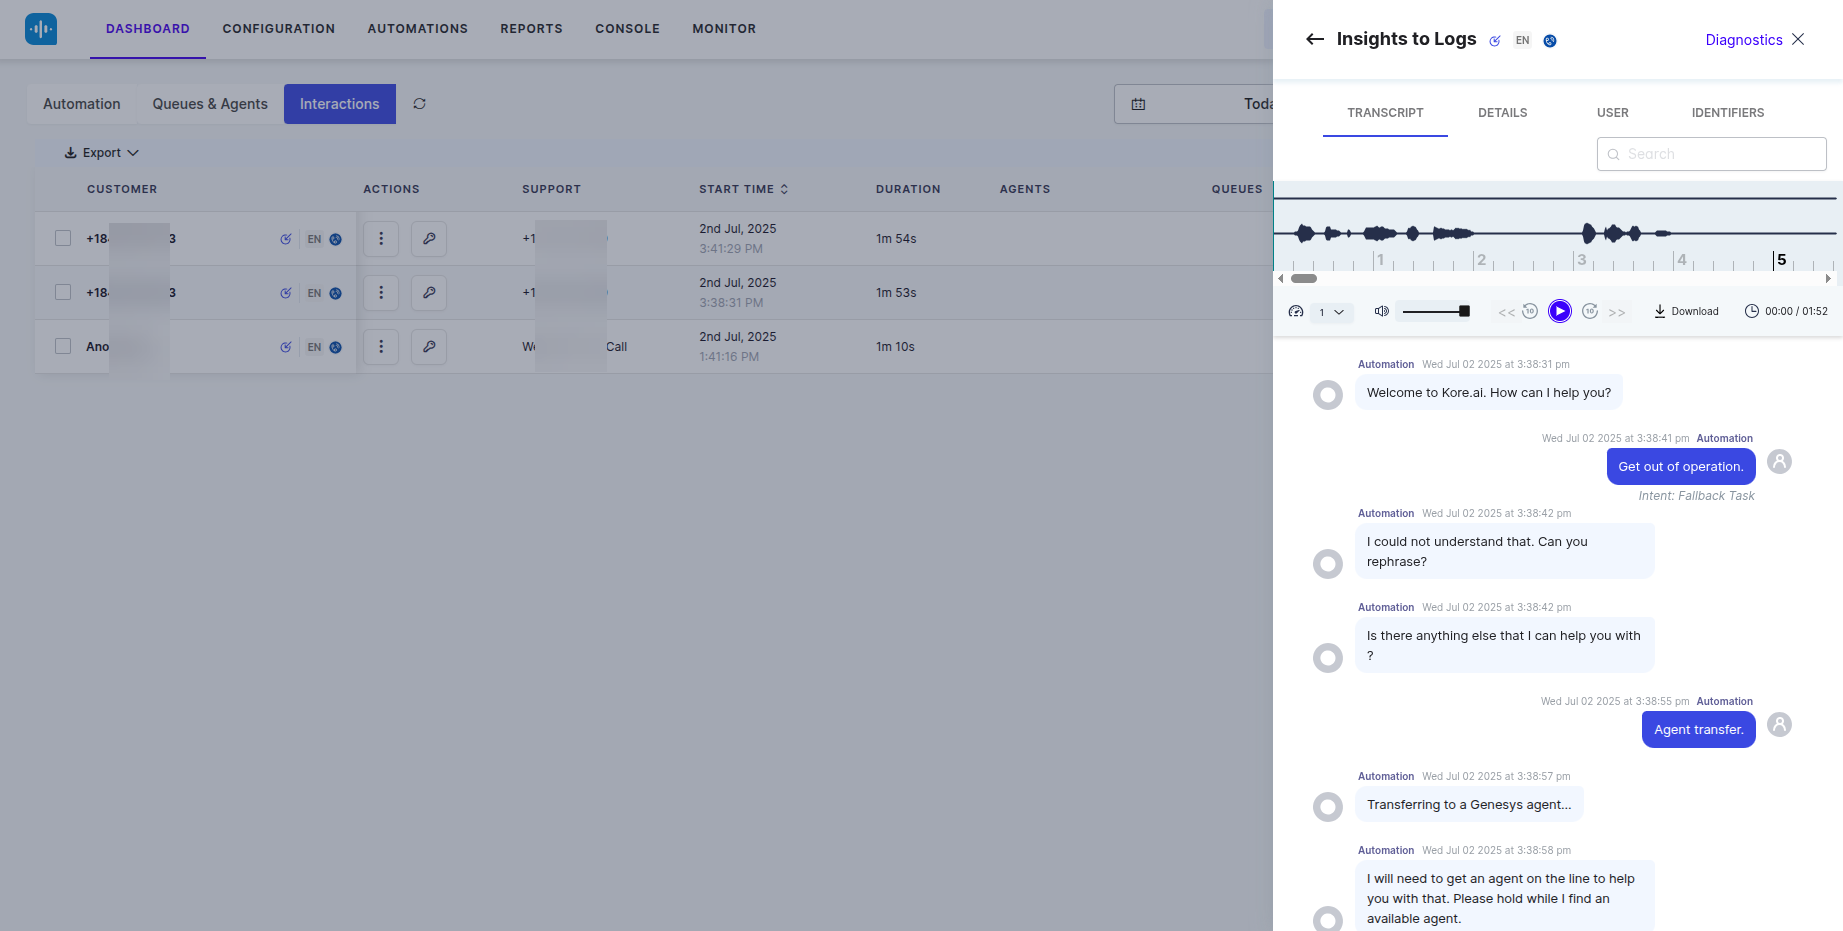
Check the Interaction Details in SmartAssist
You can view all interaction details between the user and the bot during the call and the conversation between the user and the live agent after agent transfer in the SmartAssist dashboard:
- Sign in to SmartAssist.
- Go to Dashboard.
- Click the Interactions tab.
- Select the interaction you want to view.