
Generating the IVR Containment Report
The IVR Containment Report shows data on all incoming calls. It identifies callers and provides details on each caller’s purpose and how their conversations ended.
To generate the IVR Containment Report:
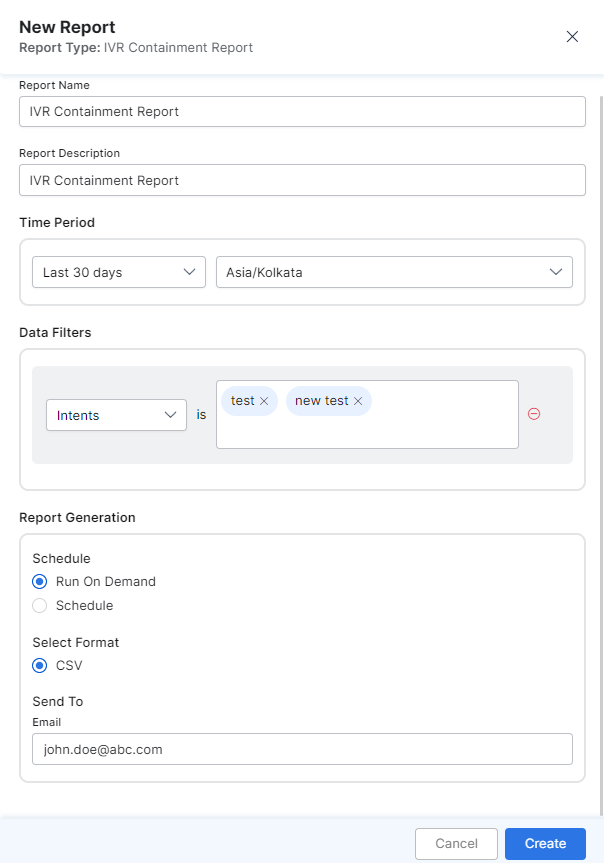
- On the Reports tab, click New Report.
- In the list of reports, choose the IVR Containment Report.
- Enter the Report Name and Report Description.
- Select the Time Period.
- Select the Data Filters.
- Select Report Generation and choose from the following options:
- Schedule
- Run On Demand
- Schedule
- You can create up to six schedules (only one if you select Hourly).
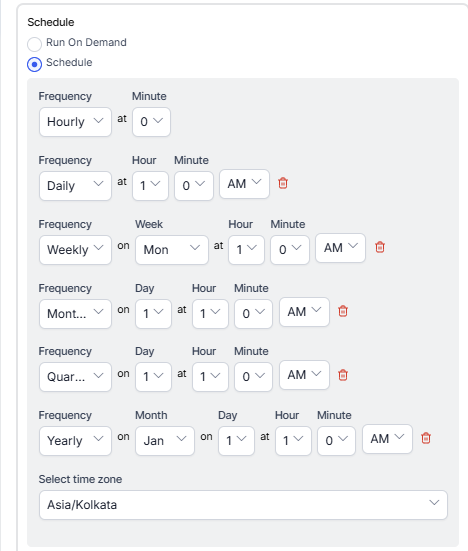
- You can create up to six schedules (only one if you select Hourly).
- Select Format
- CSV
- Send To (single email address or a mailing list)
- Schedule
- Click Create.
- An instance of the IVR Containment Report is generated.

- Click the Run icon next to the instance of the report.

While generating reports, you have two options – Run On Demand and Schedule.
Run On Demand: While creating a new report or editing an existing report, the report’s schedule can be set to run on demand.
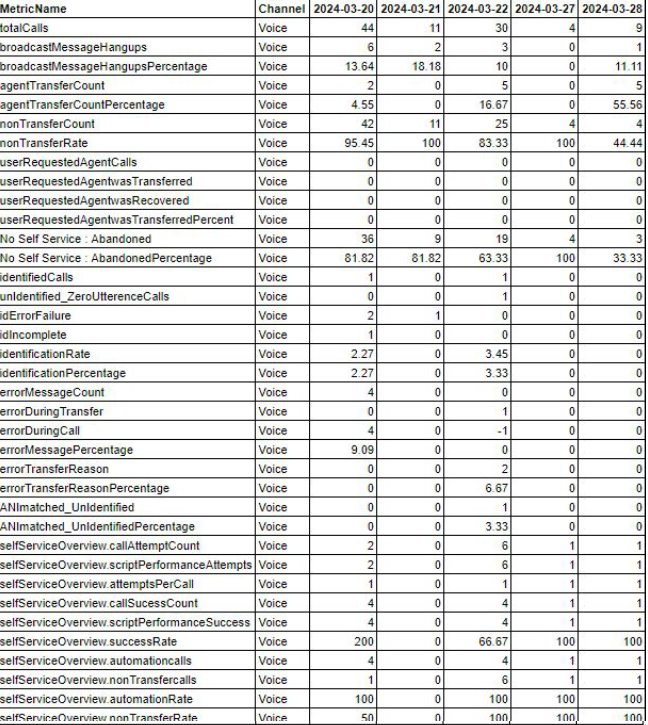
Schedule: While creating a new report or editing an existing report, the report’s schedule can be changed. The use of the schedule is the standard way to generate a report. If the report is scheduled for later, then it will automatically be generated on the scheduled day and time without the need to click Run. - Click the CSV icon and generate the output of that report, as shown below.

- The IVR Containment Report is generated and is available for download.
Message Tags for Bots
| Pre-defined Message Tags | Place in bot where message tag should be emitted |
| {didUserAskForAgent: true} | When the caller has made at least one request for an agent. |
| {wasTransferredOnRequest: true} | When the caller was transferred after making at least one request for an agent |
| {isCallerIdentified: true} | When the Caller was successfully identified |
| {isCallerIdentified: false} | When the Caller identification process failed. |
| {iDFailure: true} | When the caller identification failed with specific errors |
| {iDIncomplete: true} | When the Caller identification failed, non-specified errors and the customer utterances were greater than zero. |
| {errorMessage: true} | When a call had at least one Pega error. |
| {errorDuringTransfer: true} | When the first Pega error occurred during the transfer. |
| {errorContainsTransferReason: true} | When the error contained a specified transfer reason |
| {ANImatchNotIdentified: false} | When the Caller ID process was not successful, but the ANI did match. |
| {paymentTriggered: true } | transferred to payment |
| {completedTransactionNotTransfered:true} | Completed Self-Service Transaction; AND Not transferred to Payment; AND Not transferred to SmartAssist; |
| Per-intent Message Tags | Within Every Business Relevant DialogTask, Please Use These Message Tags |
| {showBalance: attempted} | The intent name is key, (showBalance is just an example). Show this when the main PEGA script is attempted. |
| {showBalance: success} | The intent name is key, (showBalance is just an example). Show this when main PEGA script returns success. |