
SmartAssist provides role-based user access to features. As such, Roles designate the users’ permissions and access level. The Role Management section lets you create and customize permissions for each.
You can find the Role Management section by going to Configuration > User Management > Role Management.
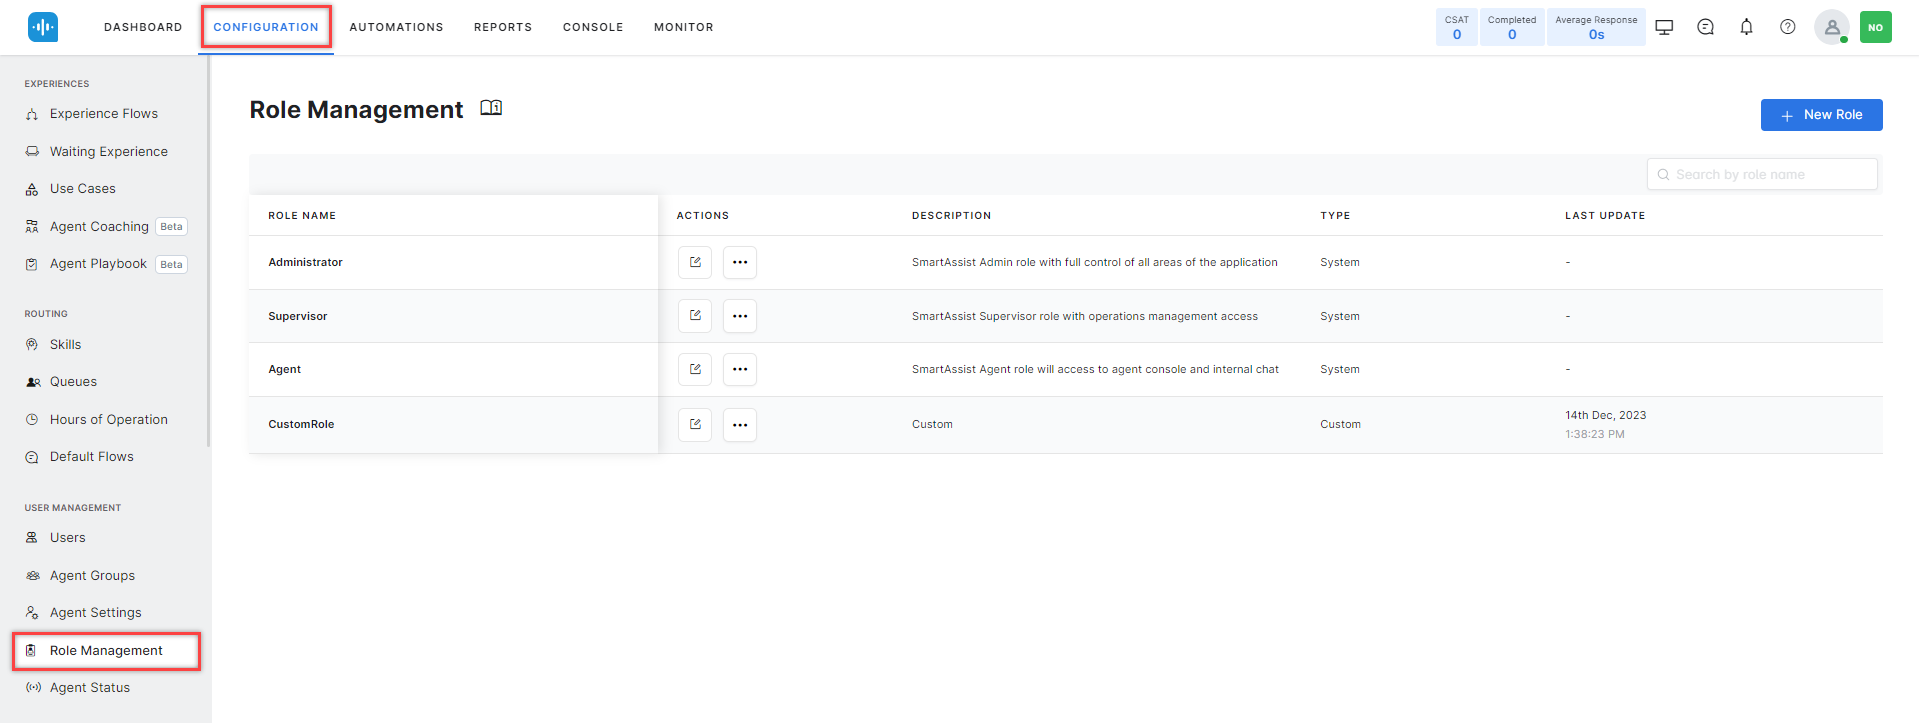
The Role Management Live Board
This section lets you create, search (by name), and manage user roles; and lists existing roles along with the following information:
- Role Name: The name of the user role is available throughout SmartAssist.
- Actions: Let you edit, clone, or delete a role.
- Description: A short description of the role.
- Type: Lists the role type: System is assigned to default, preconfigured roles, while Custom is assigned to custom roles.
- Last Update: This shows the date when the role was last updated.
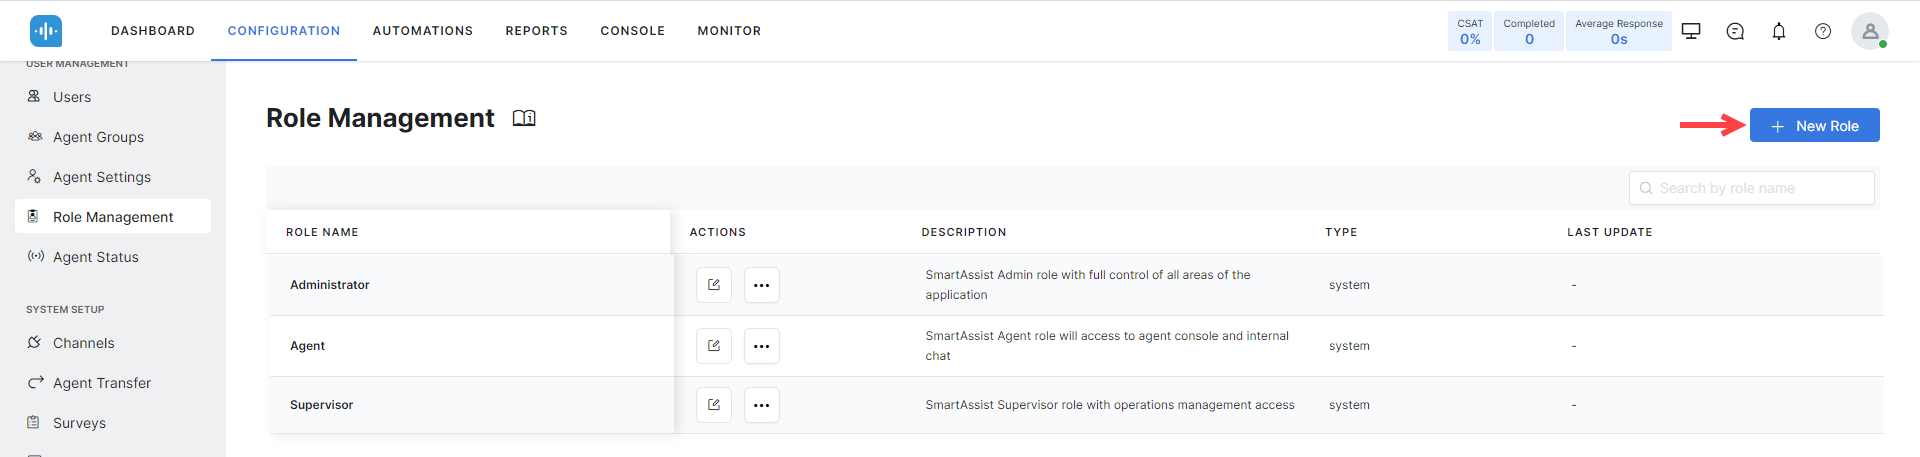
Default Roles
The default roles available within SmartAssist are as follows:
- Administrator: Users assigned to the Administrator role have full access to and control over all areas of the application.
- Supervisor: Users assigned to the Supervisor role have operations management access.
- Agent: Users assigned to the Agent role can access the agent console and internal chat.
Default roles are uneditable and non-removable, and all permissions are fixed. See the Permissions section below for details on what permissions are assigned by default to each default role.
Permissions
The table below shows the permissions available within SmartAssist and their assignment to each user role. In the Custom Role column, you can see all available permissions that can be assigned to custom roles.
| User Management | |
| Agent Settings
Modify global agent settings |
Full |
| Agent Status
Create and manage agent status types |
Full |
| Role Management
Create and manage user roles and permissions |
Full |
| Agent Group Management
Create and manage agent groups |
Full |
| Skill Management
Create and manage agent skills & skill groups |
Full |
| User Management
Invite and manage users in the account |
Full |
| Change User Role
Allow user roles to be modified |
Yes |
| Visibility of Captured Sentiment
Manage the visibility of the customer’s sentiment captured in the agent console |
Yes |
| Agent & Supervisor Experience | |
| Standard Responses
Create and manage standard responses |
Full |
| Agent Desktop Console
Access and use the agent desktop console |
Yes |
| Widget Management
Create and manage custom widgets |
Full |
| Survey Management
Create and manage surveys |
Full |
| Agent Form Management
Create and manage agent forms |
Full |
| Agent Form Data View
View filled out agent forms and data |
Yes |
| Disposition Management
Create and manage dispositions |
Full |
| Reports
Create, view and run reports |
Full |
| Interactions
Access to interactions in Dashboard |
Yes |
| Desktop Layout Creation
Create custom desktop layouts in console |
Yes |
| Desktop Layout Publishing
Publish custom layouts for account wide use |
Yes |
| Monitor Console
Access to the monitor tab for live interactions |
Yes |
| Edit Disposition from Dashboard -> Interactions
Access to edit disposition code after the conversation is completed |
Yes |
| Queues and Agents
Queues and Agents tab – for Admins and Supervisors |
Yes |
| Join Conversation
Allow user to join a conversation |
Yes |
| Call Dialing Stage Settings
Enable call controls during dialing by toggling the option in ‘Outbound Dialer’ |
No |
| Listen and Whisper Conversation
Allow user to listen and whisper to a conversation |
Yes |
| My Dashboard tab
To access My Dashboard – for Agents |
No |
| Dashboard Content
Whose interactions should he have access to |
All |
| Direct Outward Dialing
Users can make direct outward calls |
Yes |
| Monitor Queue Visibility
Determines which queues can be accessed by the user |
All |
| Internal Chat
Chat internally with others in the account |
Yes |
| Audio calls in messaging conversations
Allow agents to add audio calls to a messaging interaction |
Yes |
| Video calls in messaging conversations
Allow agents to add video calls to a messaging interaction |
Yes |
| Outbound Email
User can make direct outward emails |
Yes |
| Transfer/Close Multiple Conversations Allow user to redistribute or terminate conversations more flexibly accross all channels |
Yes |
| Flows & Routing | |
| Waiting Experience
Create and manage waiting experiences |
Full |
| Hours of Operation
Create and manage hours of operation |
Full |
| Flow Management
Create and manage experience flows |
Full |
| Default Flows
No ability to manage default flow properties |
Full |
| Queue Settings
Create and manage queues |
Full |
| Transfer Routing Rules
Configure global transfer rules for chat/voice |
Full |
| AgentAssist settings
Define AgentAssist Widgets accessibility to Agents |
Full |
| Agent Coaching – Configuration
Manage the accessibility of real time coaching feature |
Full |
| Service Level – Configuration
Manage the accessibility of service level feature |
Full |
| Agent Playbook – Configuration
Manage the accessibility of agent playbook feature |
Full |
| Automation | |
| Use Case Management
Create and manage FAQ and conversations |
Full |
| Automations DashBoard
Access to automation metrics in Dashboard |
Yes |
| Automations Tab
Access to automations tab and XO Platform |
Yes |
| System | |
| Outbound Dialer Configuration
Setup and manage Outbound Dialer |
Yes |
| Realtime SearchAssist Integration
Enables instant connection between AgentAI and SearchAssist for dynamic answer generation. |
Yes |
| Channel Management
Manage communication channels |
Full |
| Billing
Manage account level billing preferences |
Full |
| API
Manage API setup and configuration |
Full |
| Language & Speech Control
Manage ASR/TTS voice preferences |
Full |
| Agent Playbook – Configuration
Manage the accessibility of agent playbook feature |
Full |
| WFM Configuration Management
Can Manage WFM Configurations. |
Yes |
| VoiceGateway Settings
Manage ‘Bot Delay Response Behaviour’ and ‘Real-Time LLM Streaming’ settings |
Full |
| AgentAssist settings
Define AgentAssist Widgets accessibility to Agents |
Full |
| Agent Coaching – Configuration
Manage the accessibility of real-time coaching feature |
Full |
Transfer/Close Multiple ConversationsAllow user to redistribute or terminate conversations more flexibly accross all channelsYes
Transfer/Close Multiple ConversationsAllow user to redistribute or terminate conversations more flexibly accross all channelsYes
| User Management | |
| Agent Settings
Modify global agent settings |
Full |
| Agent Status
Create and manage agent status types |
Full |
| Role Management
Create and manage user roles and permissions |
None |
| Agent Group Management
Create and manage agent groups |
Full |
| Skill Management
Create and manage agent skills & skill groups |
Full |
| User Management
Invite and manage users in the account |
Full |
| Change User Role
Allow user roles to be modified |
Yes |
| Visibility of Captured Sentiment
Manage the visibility of the customer’s sentiment captured in the agent console |
Yes |
| Agent & Supervisor Experience | |
| Standard Responses
Create and manage standard responses |
None |
| Agent Desktop Console
Access and use the agent desktop console |
Yes |
| Widget Management
Create and manage custom widgets |
Full |
| Survey Management
Create and manage surveys |
None |
| Agent Form Management
Create and manage agent forms |
Full |
| Agent Form Data View
View filled out agent forms and data |
Yes |
| Disposition Management
Create and manage dispositions |
None |
| Reports
Create, view and run reports |
Full |
| Interactions
Access to interactions in Dashboard |
Yes |
| Desktop Layout Creation
Create custom desktop layouts in console |
Yes |
| Desktop Layout Publishing
Publish custom layouts for account wide use |
Yes |
| Monitor Console
Access to the monitor tab for live interactions |
Yes |
| Edit Disposition from Dashboard -> Interactions
Access to edit disposition code after the conversation is completed |
Yes |
| Queues and Agents
Queues and Agents tab – for Admins and Supervisors |
Yes |
| Join Conversation
Allow user to join a conversation |
Yes |
| Call Dialing Stage Settings
Enable call controls during dialing by toggling the option in ‘Outbound Dialer’ |
No |
| Listen and Whisper Conversation
Allow user to listen and whisper to a conversation |
Yes |
| My Dashboard tab
To access My Dashboard – for Agents |
No |
| Dashboard Content
Whose interactions should he have access to |
All |
| Direct Outward Dialing
Users can make direct outward calls |
Yes |
| Monitor Queue Visibility
Determines which queues can be accessed by the user |
Self |
| Internal Chat
Chat internally with others in the account |
Yes |
| Audio calls in messaging conversations
Allow agents to add audio calls to a messaging interaction |
Yes |
| Video calls in messaging conversations
Allow agents to add video calls to a messaging interaction |
Yes |
| Outbound Email
User can make direct outward emails |
Yes |
| Transfer/Close Multiple Conversations Allow user to redistribute or terminate conversations more flexibly accross all channels |
Yes |
| Flows & Routing | |
| Waiting Experience
Create and manage waiting experiences |
None |
| Hours of Operation
Create and manage hours of operation |
None |
| Flow Management
Create and manage experience flows |
None |
| Default Flows
No ability to manage default flow properties |
None |
| Queue Settings
Create and manage queues |
Full |
| Transfer Routing Rules
Configure global transfer rules for chat/voice |
None |
| AgentAssist settings
Define AgentAssist Widgets accessibility to Agents |
None |
| Agent Coaching – Configuration
Manage the accessibility of real time coaching feature |
None |
| Service Level – Configuration
Manage the accessibility of service level feature |
Full |
| Agent Playbook – Configuration
Manage the accessibility of agent playbook feature |
None |
| Automation | |
| Use Case Management
Create and manage FAQ and conversations |
None |
| Automations DashBoard
Access to automation metrics in Dashboard |
Yes |
| Automations Tab
Access to automations tab and XO Platform |
No |
| System | |
| Outbound Dialer Configuration
Setup and manage Outbound Dialer |
Yes |
| Realtime SearchAssist Integration
Enables instant connection between AgentAI and SearchAssist for dynamic answer generation. |
No |
| Channel Management
Manage communication channels |
None |
| Billing
Manage account level billing preferences |
None |
| API
Manage API setup and configuration |
None |
| Language & Speech Control
Manage ASR/TTS voice preferences |
Full |
| Agent Playbook – Configuration
Manage the accessibility of agent playbook feature |
None |
| WFM Configuration Management
Can Manage WFM Configurations. |
No |
| VoiceGateway Settings
Manage ‘Bot Delay Response Behaviour’ and ‘Real-Time LLM Streaming’ settings |
Full |
| AgentAssist settings
Define AgentAssist Widgets accessibility to Agents |
None |
| Agent Coaching – Configuration
Manage the accessibility of real-time coaching feature |
None |
| User Management | |
| Agent Settings
Modify global agent settings |
None |
| Agent Status
Create and manage agent status types |
None |
| Role Management
Create and manage user roles and permissions |
None |
| Agent Group Management
Create and manage agent groups |
None |
| Skill Management
Create and manage agent skills & skill groups |
None |
| User Management
Invite and manage users in the account |
None |
| Change User Role
Allow user roles to be modified |
No |
| Visibility of Captured Sentiment
Manage the visibility of the customer’s sentiment captured in the agent console |
Yes |
| Agent & Supervisor Experience | |
| Standard Responses
Create and manage standard responses |
None |
| Agent Desktop Console
Access and use the agent desktop console |
Yes |
| Widget Management
Create and manage custom widgets |
None |
| Survey Management
Create and manage surveys |
None |
| Agent Form Management
Create and manage agent forms |
None |
| Agent Form Data View
View filled out agent forms and data |
No |
| Disposition Management
Create and manage dispositions |
None |
| Reports
Create, view and run reports |
None |
| Interactions
Access to interactions in Dashboard |
Yes |
| Desktop Layout Creation
Create custom desktop layouts in console |
No |
| Desktop Layout Publishing
Publish custom layouts for account wide use |
No |
| Monitor Console
Access to the monitor tab for live interactions |
No |
| Edit Disposition from Dashboard -> Interactions
Access to edit disposition code after the conversation is completed |
No |
| Queues and Agents
Queues and Agents tab – for Admins and Supervisors |
No |
| Join Conversation
Allow user to join a conversation |
Yes |
| Call Dialing Stage Settings
Enable call controls during dialing by toggling the option in ‘Outbound Dialer’ |
No |
| Listen and Whisper Conversation
Allow user to listen and whisper to a conversation |
No |
| My Dashboard tab
To access My Dashboard – for Agents |
Yes |
| Dashboard Content
Whose interactions should he have access to |
Own |
| Direct Outward Dialing
Users can make direct outward calls |
No |
| Monitor Queue Visibility
Determines which queues can be accessed by the user |
Self |
| Internal Chat
Chat internally with others in the account |
Yes |
| Audio calls in messaging conversations
Allow agents to add audio calls to a messaging interaction |
Yes |
| Video calls in messaging conversations
Allow agents to add video calls to a messaging interaction |
Yes |
| Outbound Email
User can make direct outward emails |
No |
| Transfer/Close Multiple Conversations Allow user to redistribute or terminate conversations more flexibly accross all channels |
No |
| Flows & Routing | |
| Waiting Experience
Create and manage waiting experiences |
None |
| Hours of Operation
Create and manage hours of operation |
None |
| Flow Management
Create and manage experience flows |
None |
| Default Flows
No ability to manage default flow properties |
None |
| Queue Settings
Create and manage queues |
None |
| Transfer Routing Rules
Configure global transfer rules for chat/voice |
None |
| AgentAssist settings
Define AgentAssist Widgets accessibility to Agents |
None |
| Agent Coaching – Configuration
Manage the accessibility of real time coaching feature |
None |
| Service Level – Configuration
Manage the accessibility of service level feature |
None |
| Agent Playbook – Configuration
Manage the accessibility of agent playbook feature |
None |
| Automation | |
| Use Case Management
Create and manage FAQ and conversations |
None |
| Automations DashBoard
Access to automation metrics in Dashboard |
No |
| Automations Tab
Access to automations tab and XO Platform |
No |
| System | |
| Outbound Dialer Configuration
Setup and manage Outbound Dialer |
No |
| Realtime SearchAssist Integration
Enables instant connection between AgentAI and SearchAssist for dynamic answer generation. |
No |
| Channel Management
Manage communication channels |
None |
| Billing
Manage account level billing preferences |
None |
| API
Manage API setup and configuration |
None |
| Language & Speech Control
Manage ASR/TTS voice preferences |
None |
| Agent Playbook – Configuration
Manage the accessibility of agent playbook feature |
None |
| WFM Configuration Management
Can Manage WFM Configurations. |
No |
| VoiceGateway Settings
Manage ‘Bot Delay Response Behaviour’ and ‘Real-Time LLM Streaming’ settings |
None |
| AgentAssist settings
Define AgentAssist Widgets accessibility to Agents |
None |
| Agent Coaching – Configuration
Manage the accessibility of real-time coaching feature |
None |
| User Management | |
| Agent Settings Modify global agent settings |
Yes No |
| Agent Status
Create and manage agent status types |
View None Full |
| Role Management
Create and manage user roles and permissions |
Yes
No |
| Agent Group Management
Create and manage agent groups |
View None Full |
| Skill Management
Create and manage agent skills & skill groups |
View None Full |
| User Management
Invite and manage users in the account |
View None Full View & Invite Edit Edit & Delete |
| Change User Role
Allow user roles to be modified |
Yes
No |
| Visibility of Captured Sentiment
Manage the visibility of the customer’s sentiment captured in the agent console |
Yes
No |
| Agent & Supervisor Experience | |
| Standard Responses
Create and manage standard responses |
View None Full |
| Agent Desktop Console
Access and use the agent desktop console |
Yes
No |
| Widget Management
Create and manage custom widgets |
Yes
No |
| Survey Management
Create and manage surveys |
Yes
No |
| Agent Form Management
Create and manage agent forms |
Yes
No |
| Agent Form Data View
View filled out agent forms and data |
Yes
No |
| Disposition Management
Create and manage dispositions |
Yes
No |
| Reports
Create, view and run reports |
None View & Run Full |
| Interactions
Access to interactions in Dashboard |
Yes
No |
| Desktop Layout Creation
Create custom desktop layouts in console |
Yes
No |
| Desktop Layout Publishing
Publish custom layouts for account wide use |
Yes
No |
| Monitor Console
Access to the monitor tab for live interactions |
Yes
No |
| Edit Disposition from Dashboard -> Interactions
Access to edit disposition code after the conversation is completed |
Yes
No |
| Queues and Agents
Queues and Agents tab – for Admins and Supervisors |
Yes
No |
| Join Conversation
Allow user to join a conversation |
Yes
No |
| Call Dialing Stage Settings
Enable call controls during dialing by toggling the option in ‘Outbound Dialer’ |
Yes No |
| Listen and Whisper Conversation
Allow user to listen and whisper to a conversation |
Yes
No |
| My Dashboard tab
To access My Dashboard – for Agents Note: Default permission will be Yes if the custom role has Join Conversation permission. |
Yes
No |
| Dashboard Content
Whose interactions should he have access to |
Own
All |
| Direct Outward Dialing
Users can make direct outward calls |
Yes
No |
| Monitor Queue Visibility
Determines which queues can be accessed by the user |
All
Self |
| Internal Chat
Chat internally with others in the account |
Yes
No |
| Audio calls in messaging conversations
Allow agents to add audio calls to a messaging interaction |
Yes
No |
| Video calls in messaging conversations
Allow agents to add video calls to a messaging interaction |
Yes
No |
| Outbound Email
User can make direct outward emails |
Yes
No |
| Transfer/Close Multiple Conversations Allow user to redistribute or terminate conversations more flexibly accross all channels |
Yes
No |
| Flows & Routing | |
| Waiting Experience
Create and manage waiting experiences |
View None Full |
| Hours of Operation
Create and manage hours of operation |
View None Full |
| Flow Management
Create and manage experience flows |
View None Full |
| Default Flows
No ability to manage default flow properties |
Yes
No |
| Queue Settings
Create and manage queues |
View None Full |
| Transfer Routing Rules
Configure global transfer rules for chat/voice |
Yes
No |
| AgentAssist settings
Define AgentAssist Widgets accessibility to Agents |
View None Full |
| Agent Coaching – Configuration
Manage the accessibility of real time coaching feature |
View None Full |
| Service Level – Configuration
Manage the accessibility of service level feature |
View None Full |
| Agent Playbook – Configuration
Manage the accessibility of agent playbook feature |
None Full |
| Automation | |
| Use Case Management
Create and manage FAQ and conversations |
Yes
No |
| Automations DashBoard
Access to automation metrics in Dashboard |
Yes
No |
| Automations Tab
Access to automations tab and XO Platform |
Yes
No |
| System | |
| Outbound Dialer Configuration
Setup and manage Outbound Dialer |
No
Yes |
| Realtime SearchAssist Integration
Enables instant connection between AgentAI and SearchAssist for dynamic answer generation. |
Yes
No |
| Channel Management
Manage communication channels |
View
None Full |
| Billing
Manage account level billing preferences |
View
None Full |
| API
Manage API setup and configuration |
View
None Full |
| Language & Speech Control
Manage ASR/TTS voice preferences |
View
None Full |
| Agent Playbook – Configuration
Manage the accessibility of agent playbook feature |
None
Full |
| WFM Configuration Management
Can Manage WFM Configurations. |
Yes
No |
| VoiceGateway Settings
Manage ‘Bot Delay Response Behaviour’ and ‘Real-Time LLM Streaming’ settings |
View
None Full |
| AgentAssist settings
Define AgentAssist Widgets accessibility to Agents |
View
None Full |
| Agent Coaching – Configuration
Manage the accessibility of real-time coaching feature |
View None
Full |
Custom Roles
You can create custom user roles within SmartAssist to suit your business needs. Unlike the default ones, custom user roles let you assign preferred permissions. You can add, edit, and delete custom roles if you have the Role Management permission set to Yes.
Add a New Role
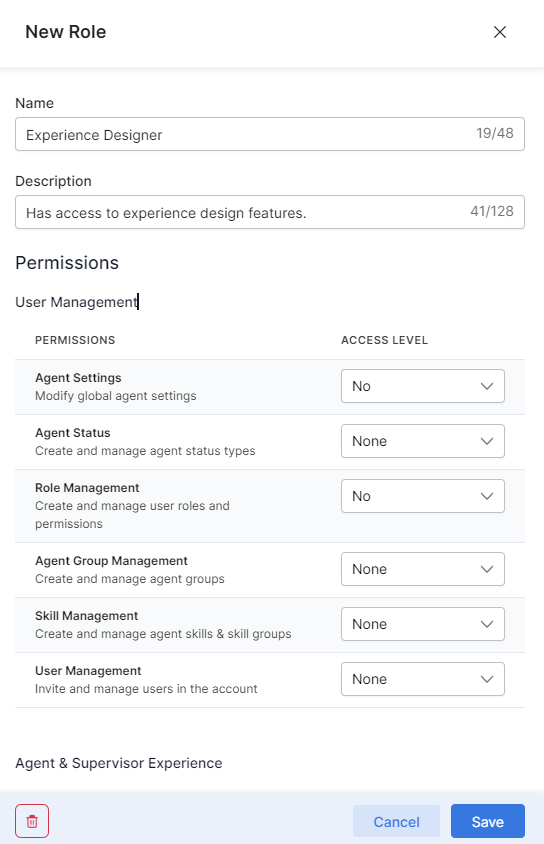
To add a new role, follow these steps:
- Click + New Role.
- In the New Role window, fill out the following fields:
- Role Name: This name is assigned to the user role across SmartAssist. For example, Experience Designer.
- Description: Add other information on the role, responsibilities, or access level.
- Permissions: Set the access permissions by selecting one of the available options within the dropdown next to each permission.
- Click Save.
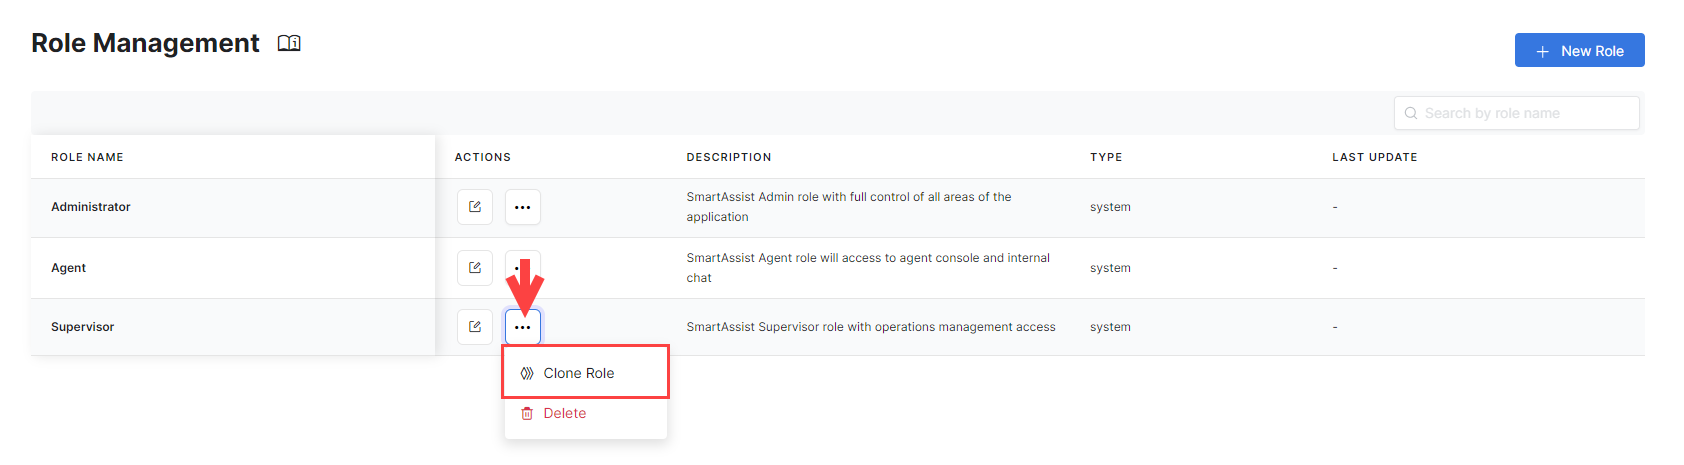
Clone a Role
An alternative way to add a new, custom role is to clone an existing one. You can clone both default and custom roles. By cloning, you create a copy of the original role, then adjust the role name, description, and permissions, and save the clone as a new role.
To clone a role:
- Under the Actions column corresponding to the role you want to clone, click the More Options button. (⋯).
- Select Clone Role.
Edit a Role
To edit an existing role, follow these steps:
- Click the Edit icon under Actions for the role you want to update.
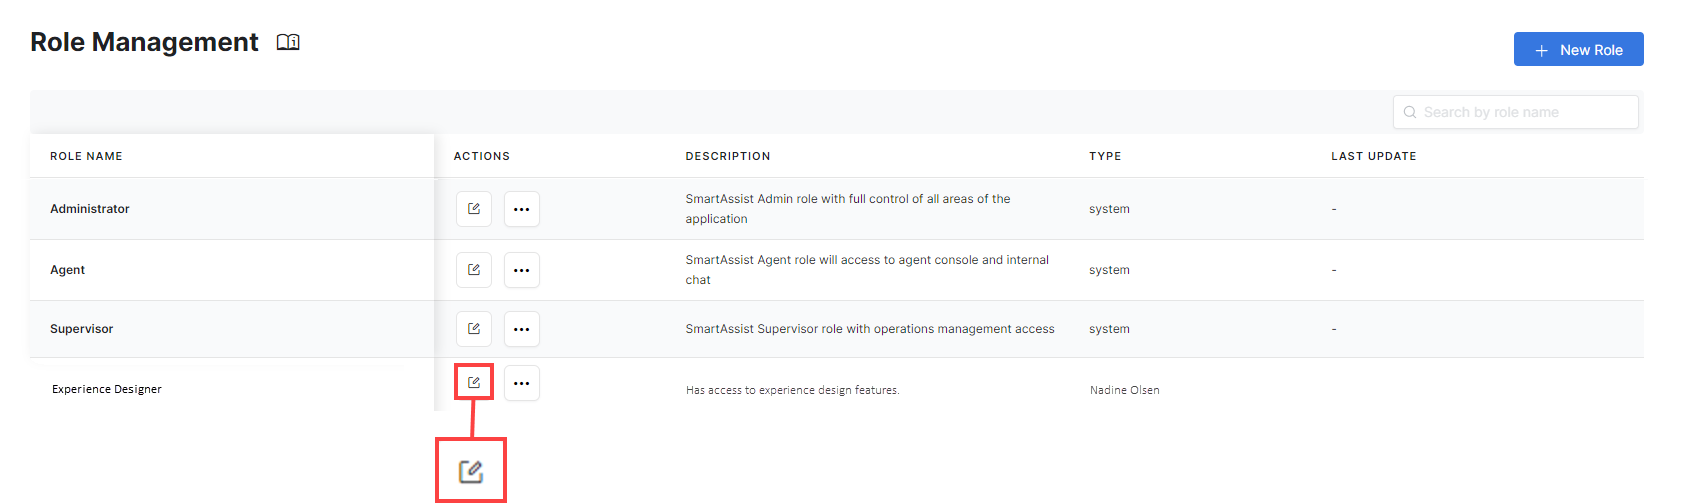
- In the Edit Role window, make changes to the required fields and click Save.
Delete a Role
To delete a custom role, follow these steps:
- Under the Actions column corresponding to the role you want to delete, click the More Options button. (⋯).
- Select Delete.
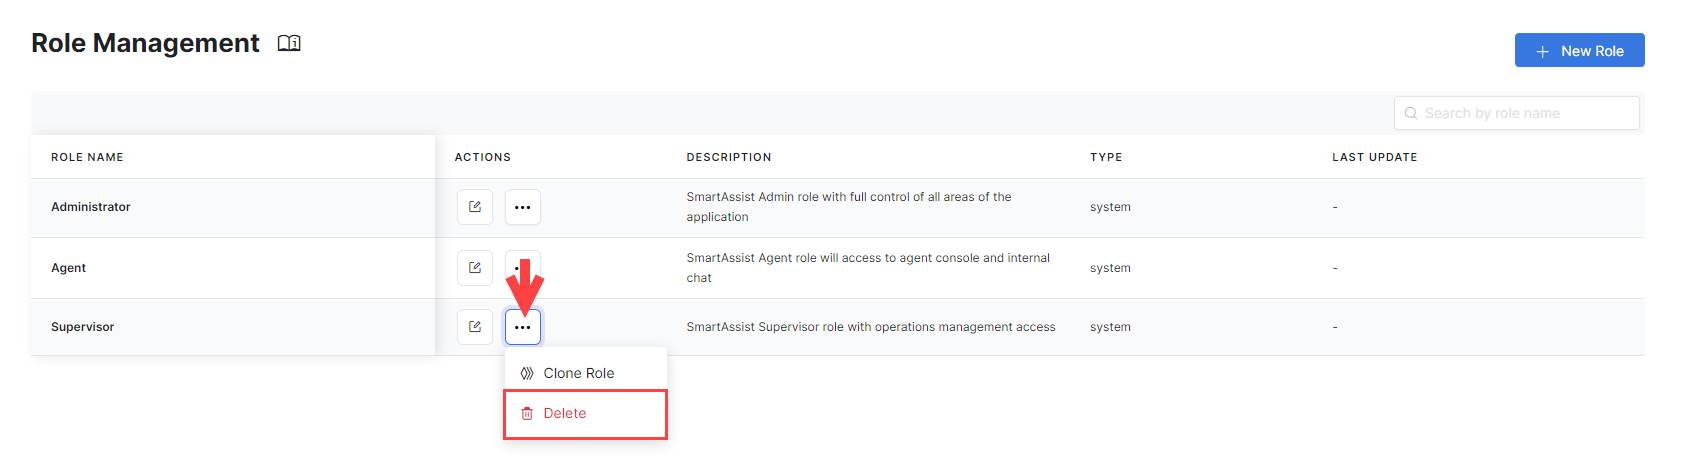
- You must confirm your choice. Click Yes to do so.
Alternatively, you can delete a custom role by editing it, then clicking the Delete button on the bottom left of the Edit Role window.
![]()