
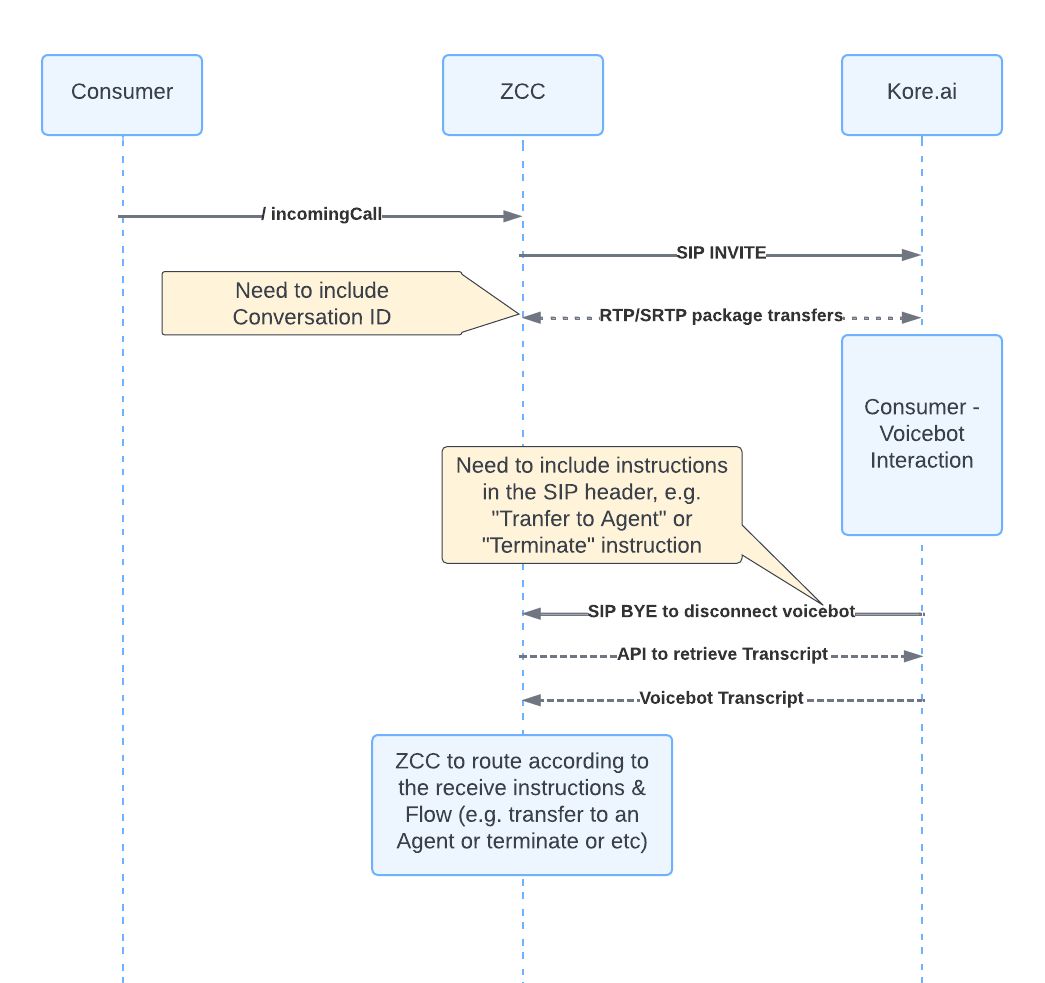
Zoom Contact Center (ZCC) is an automation solution for enterprises to manage customer interactions across voice and chat channels. This Integration will enable Voice automation through SIP Integration. Kore.ai now supports the Zoom Contact Center voice channel to integrate voice virtual assistants.
This integration streamlines customer support, automates responses, and improves overall operational efficiency, leading to enhanced customer experiences and increased productivity.
How it Works
Here’s a general overview of how voice virtual assistant interactions work on the Zoom Contact Center:
- Setup and Configuration: Kore.ai sets up and configures the integration between their virtual assistant and ZCC. This involves installing specific connectors provided by Zoom and configuring the settings to establish a connection.
- Channel Integration: Once the integration is set up, the virtual assistants on Kore.ai can be configured to use ZCC as one of its communication channels (setting includes “Transfer form IVR” and “Agent Transfer”). This means that incoming customer inquiries can be handled through Zoom’s communication platform, which may include voice calls and then routed to Kore’s IVR for running voice automation.
- Routing and Distribution: When a customer initiates contact through ZCC and the call is received by Kore, Admins can use the Agent Transfer Node within the Kore platform to transfer the call back to ZCC if a human agent is required. Admins can also define appropriate SIP headers to provide the necessary information that can be used within ZCC to direct the interaction to the appropriate agents.
- Agent Interaction: The agent receives the customer interaction and responds to the customer using ZCC’s communication features, such as answering voice calls.
Prerequisites
Please ensure you have the following before enabling this channel:
- A Zoom App Marketplace Developer account. Don’t have an account? Sign up here.
- Developer access to the XO Platform. Need Developer Access? Contact us.
Setting up Zoom Contact Center
The important steps to set up the ZCC channel are summarized below:
- Associate a Bot within an experience flow. Know more.
- Configure “Transfer from IVR.”
- Configure “Agent Transfer.”
- Create a Bot Connector instance on Zoom App Marketplace to associate a virtual assistant.
- Fetch Conversation Details and Summary.
Architecture Diagram
Step 1: Associate a Bot within an Experience Flow
If you have your Bot ready with you, you can use the “Automation” node in the flow and attach that Bot with an experience flow that you want to trigger upon transferring the call from ZCC to Kore IVA. Learn more.
Step 2: Configure “Transfer from IVR”
This option is used to transfer the calls to SmartAssist from a toll-free or local phone number using the Session Initiation Protocol (SIP) in your IVR system. You must configure Transfer from IVR to transfer a call from ZCC to Kore.
SIP Call Transfer Setup
This feature helps to set up the network IPs, domains, DID number, SIP transport protocol, and SIP credentials (optional) while the SIP URI is pre-configured.
To configure SIP Call Transfer, follow these steps:
- Sign in to SmartAssist.
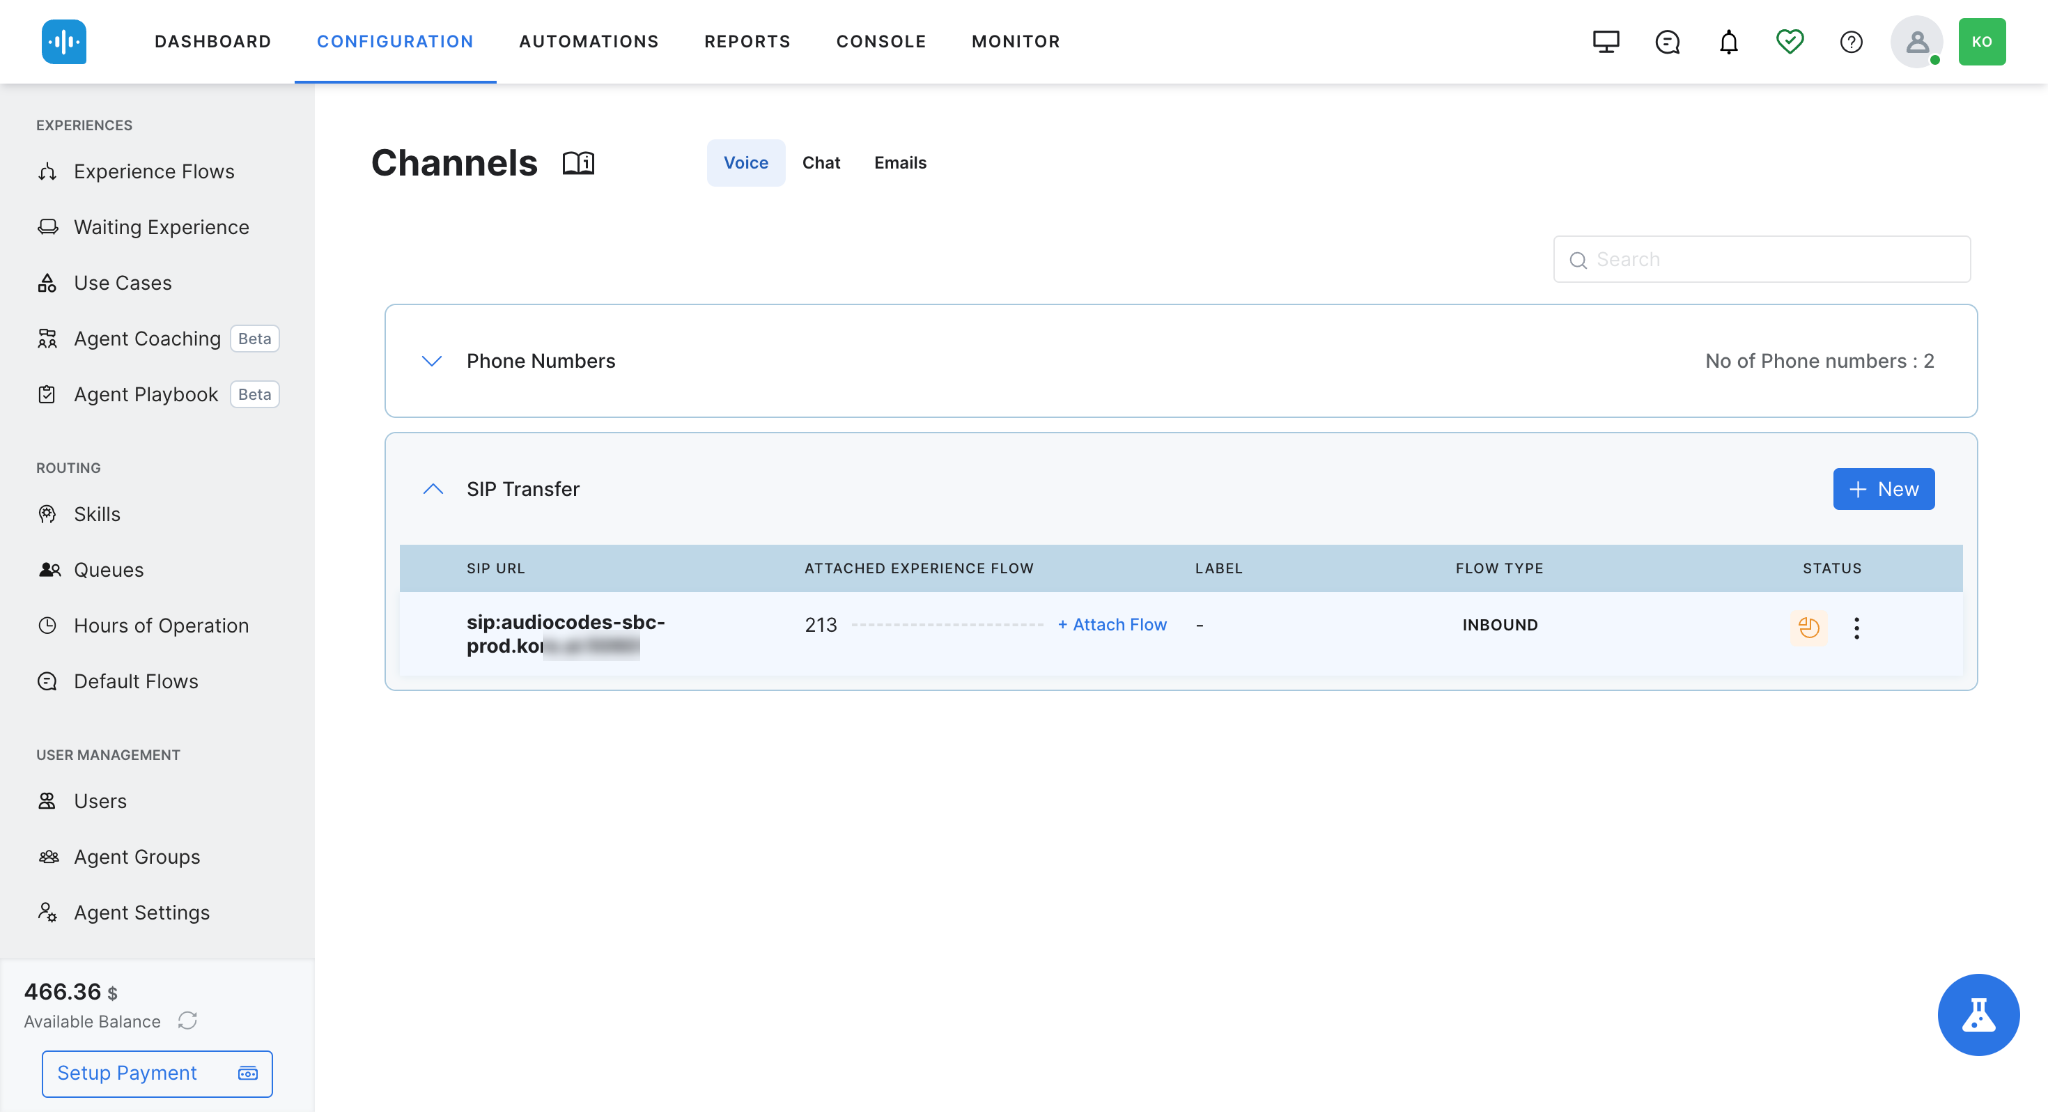
- Click SYSTEM SETUP > Channels. The following screen appears with Phone Numbers and SIP Transfer options listed on the page.
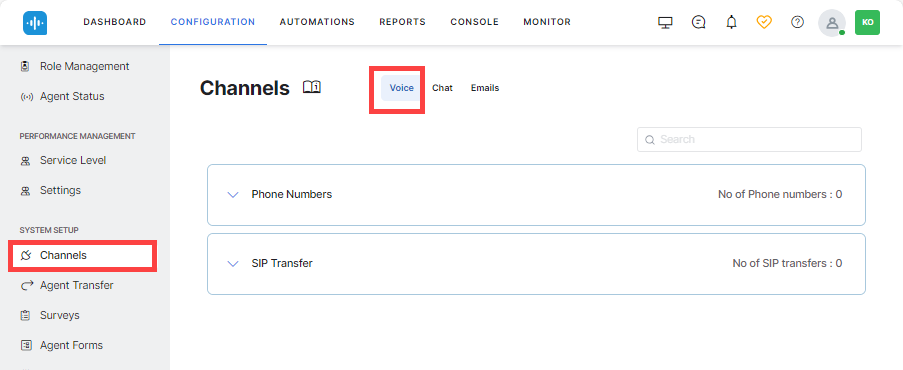
- Click New in SIP Transfer section. If there are no addresses configured, Click on “New” for SIP Call Transfer Setup is displayed.
When transferring control of the customer call from ZCC to Kore’s IVA, Kore needs to whitelist the specified IP addresses or domain names to ensure that only authenticated networks can connect. You have two options to select in the Network section for this:
- Enter IP Addresses: Select the List of IP Addresses option and add the IP addresses from Zoom.
- Enter domain names and select the appropriate configuration: Select the Domain Name option and follow the below steps:

- Add the Domain name from Zoom in the Fully Qualified Domain Name field.
- Select srv from the DNS Resolve Method (Optional) list.
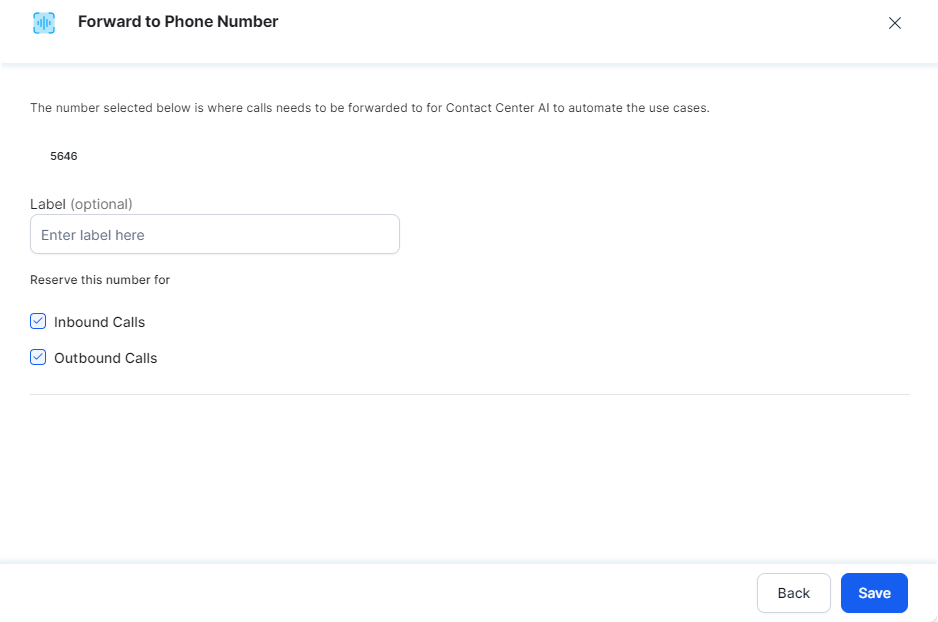
- Add the DID Number from Zoom. (Note that this phone number is used to identify the bot and flow for a call received from Zoom on Kore.)
- Select TLS from the SIP Transport Type list.
- Select Pad Crypto.
- Click Next.
- Select Inbound Calls and Outbound Calls.
- Click Save.
Note: Upon configuring the above SIP transfer configuration, you need to attach one flow created in Step 1 to this configuration. - Click Attach Flow and attach the flow created on step-1. For help, refer to Attach Flow.
Step 3: Agent Transfer Configuration
After the customer interacts with Kore’s IVA, you can perform agent transfer from Kore IVA to ZCC through one of the following two approaches:
- Agent Transfer Node in Experience Flow
- Agent Transfer Node in a Dialog Task
Agent Transfer Node in Experience Flow
- Select Agent Transfer node from Component.
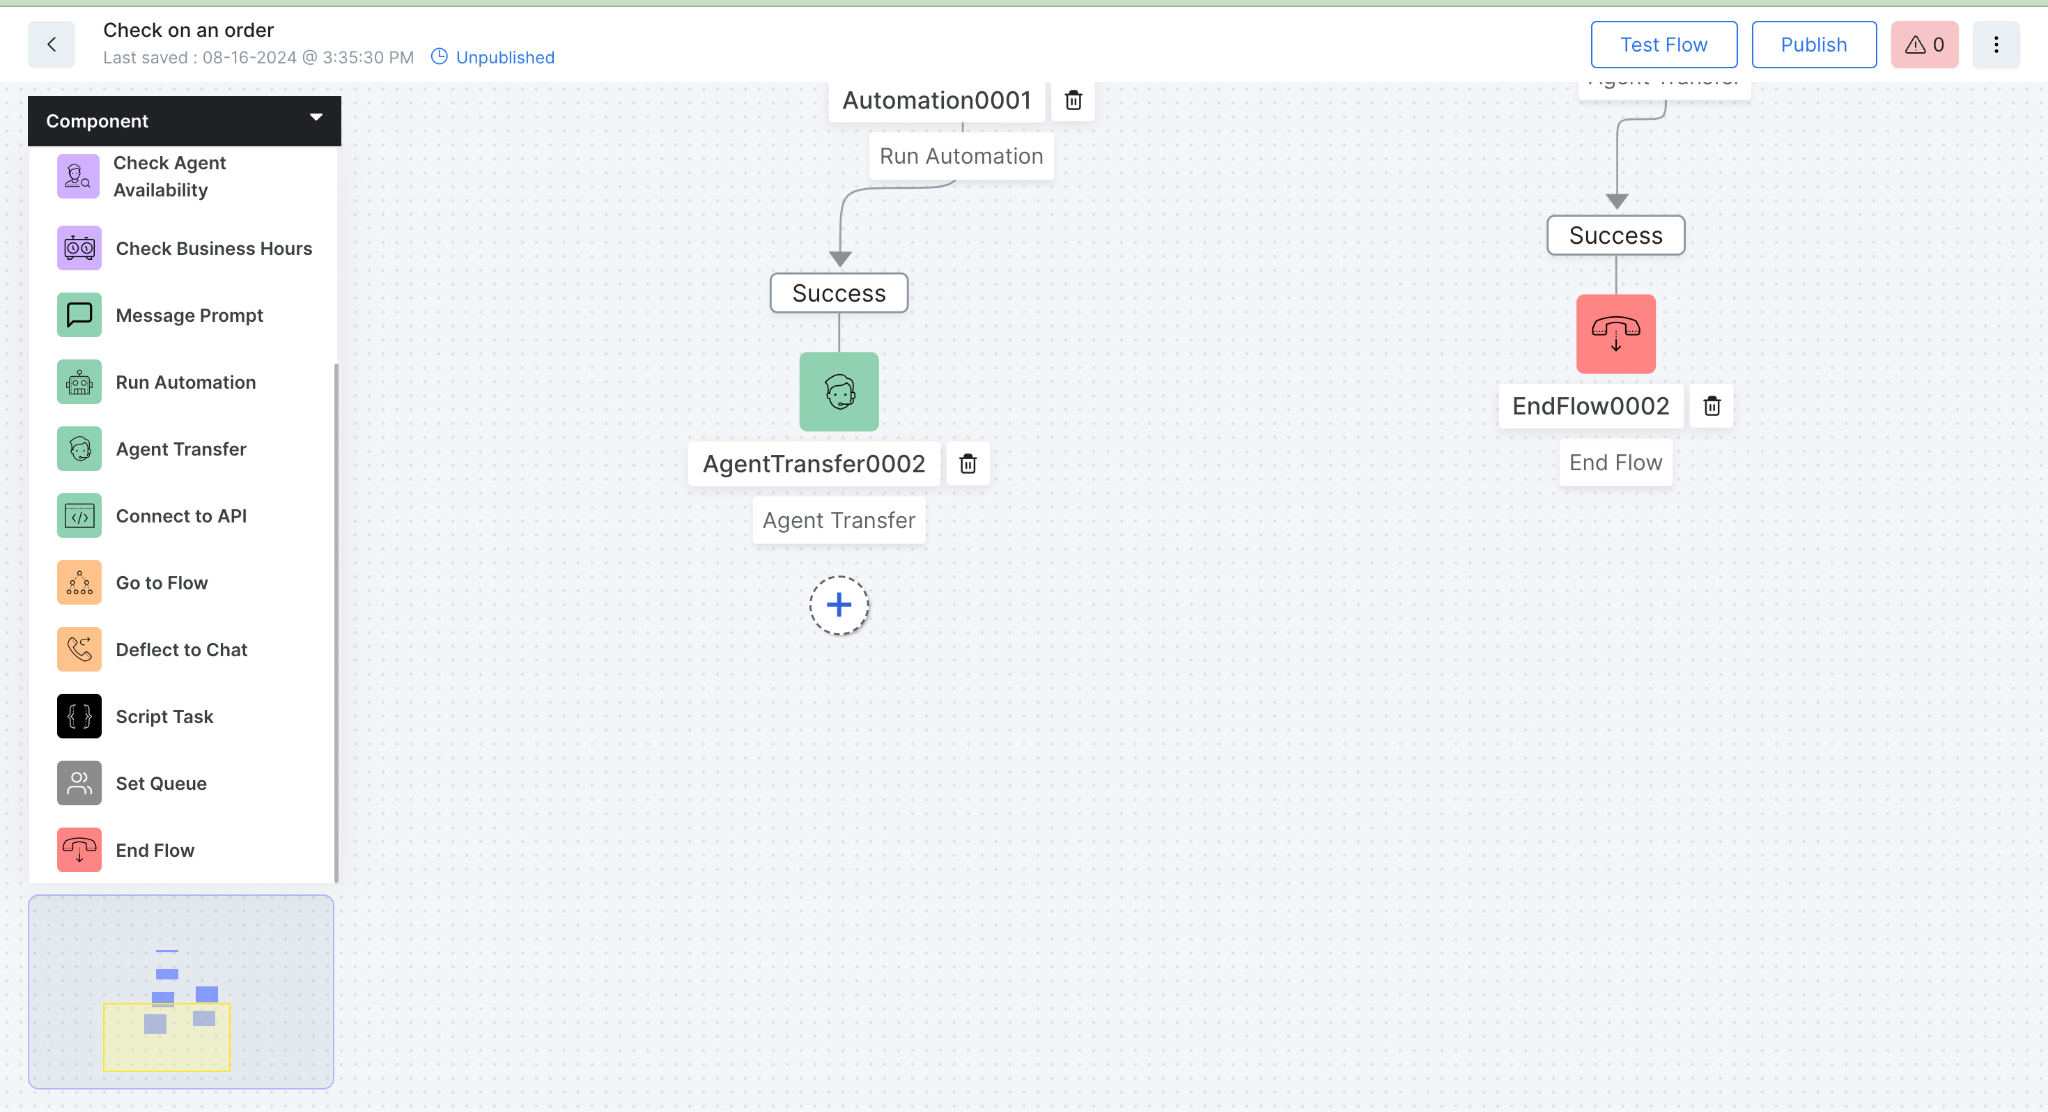
- Add configuration for Agent Transfer node.
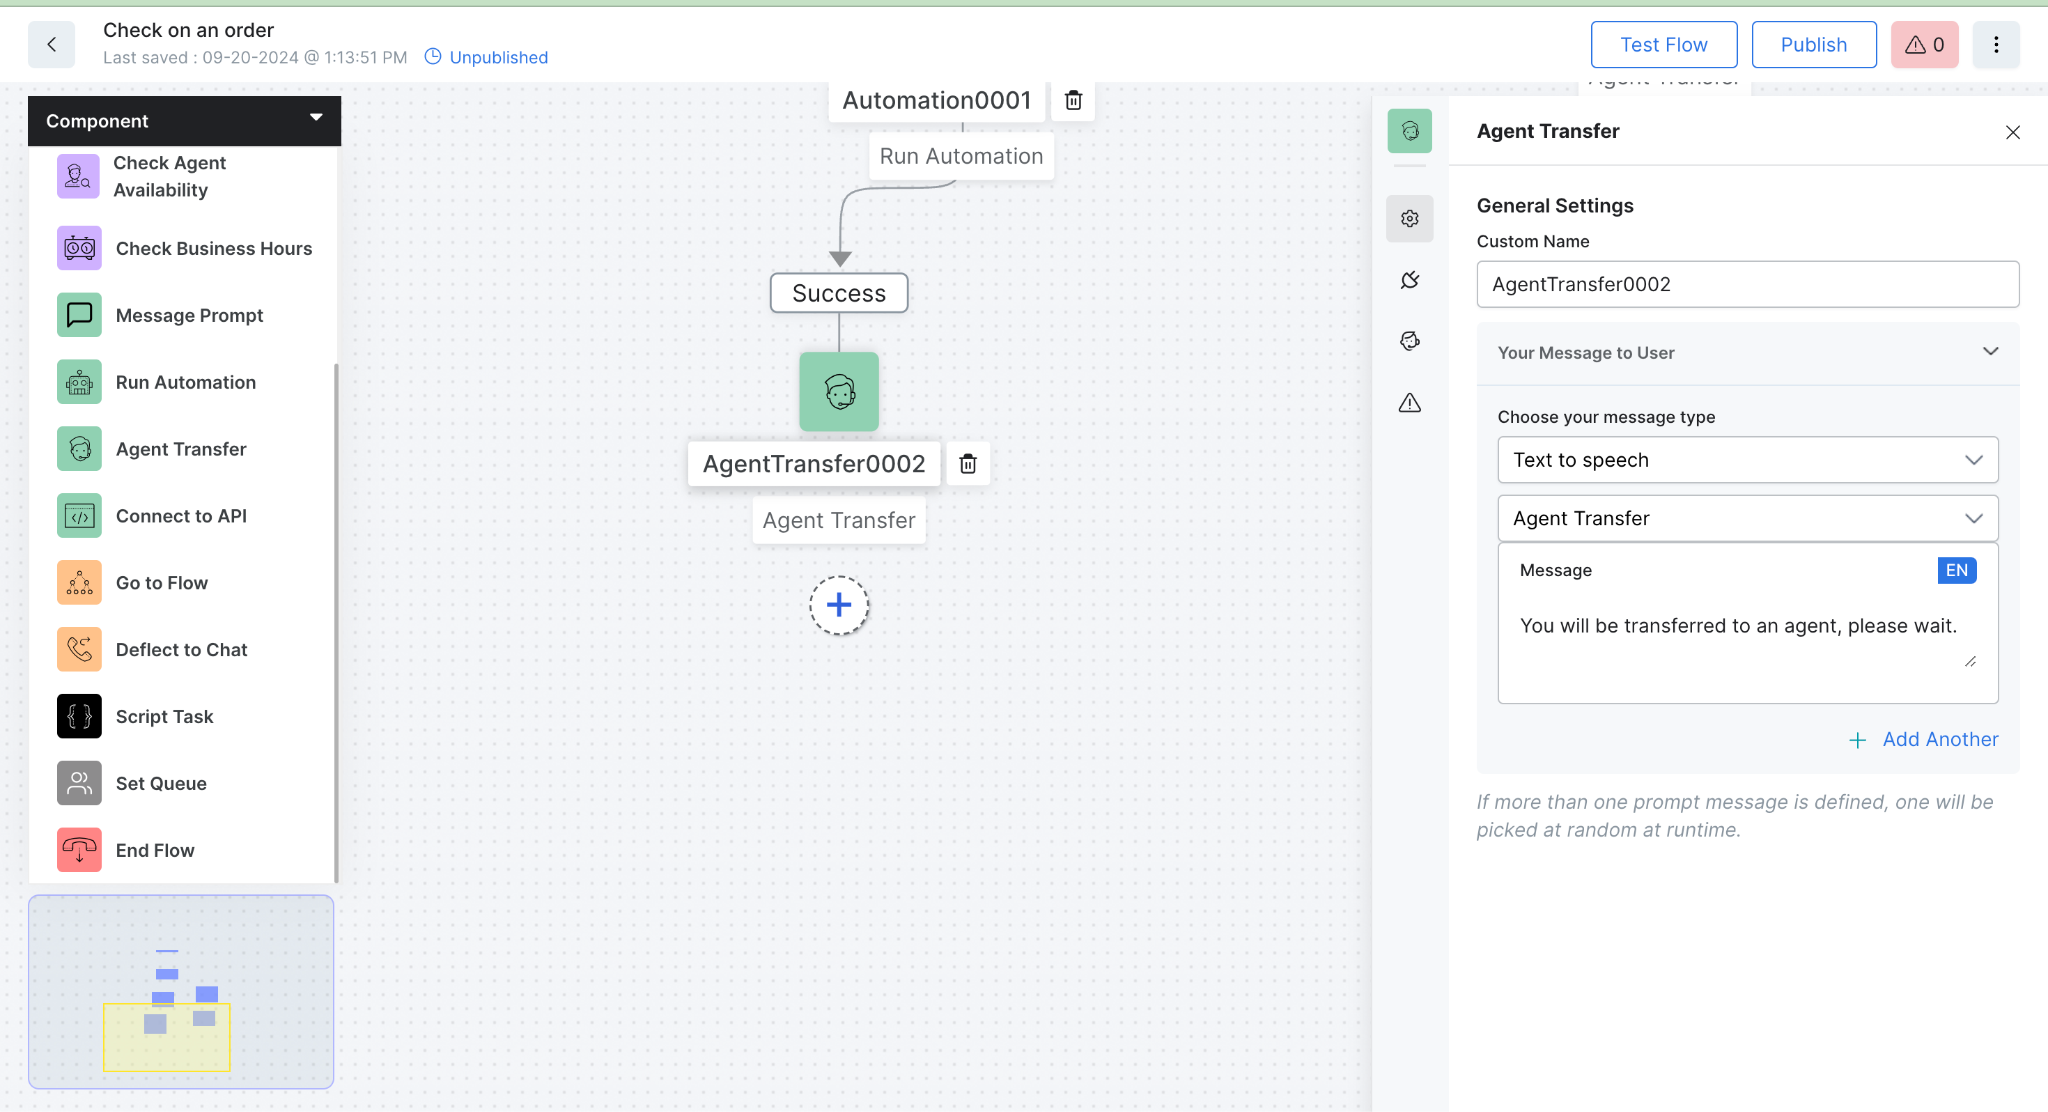
-
- After configuring the Agent Transfer node in Experience Flow, head to Configuration > Agent transfer > Outbound Voice Agent Transfer and create a new SIP transfer here.
- For ZCC, we are using SIP BYE for Agent Transfer.
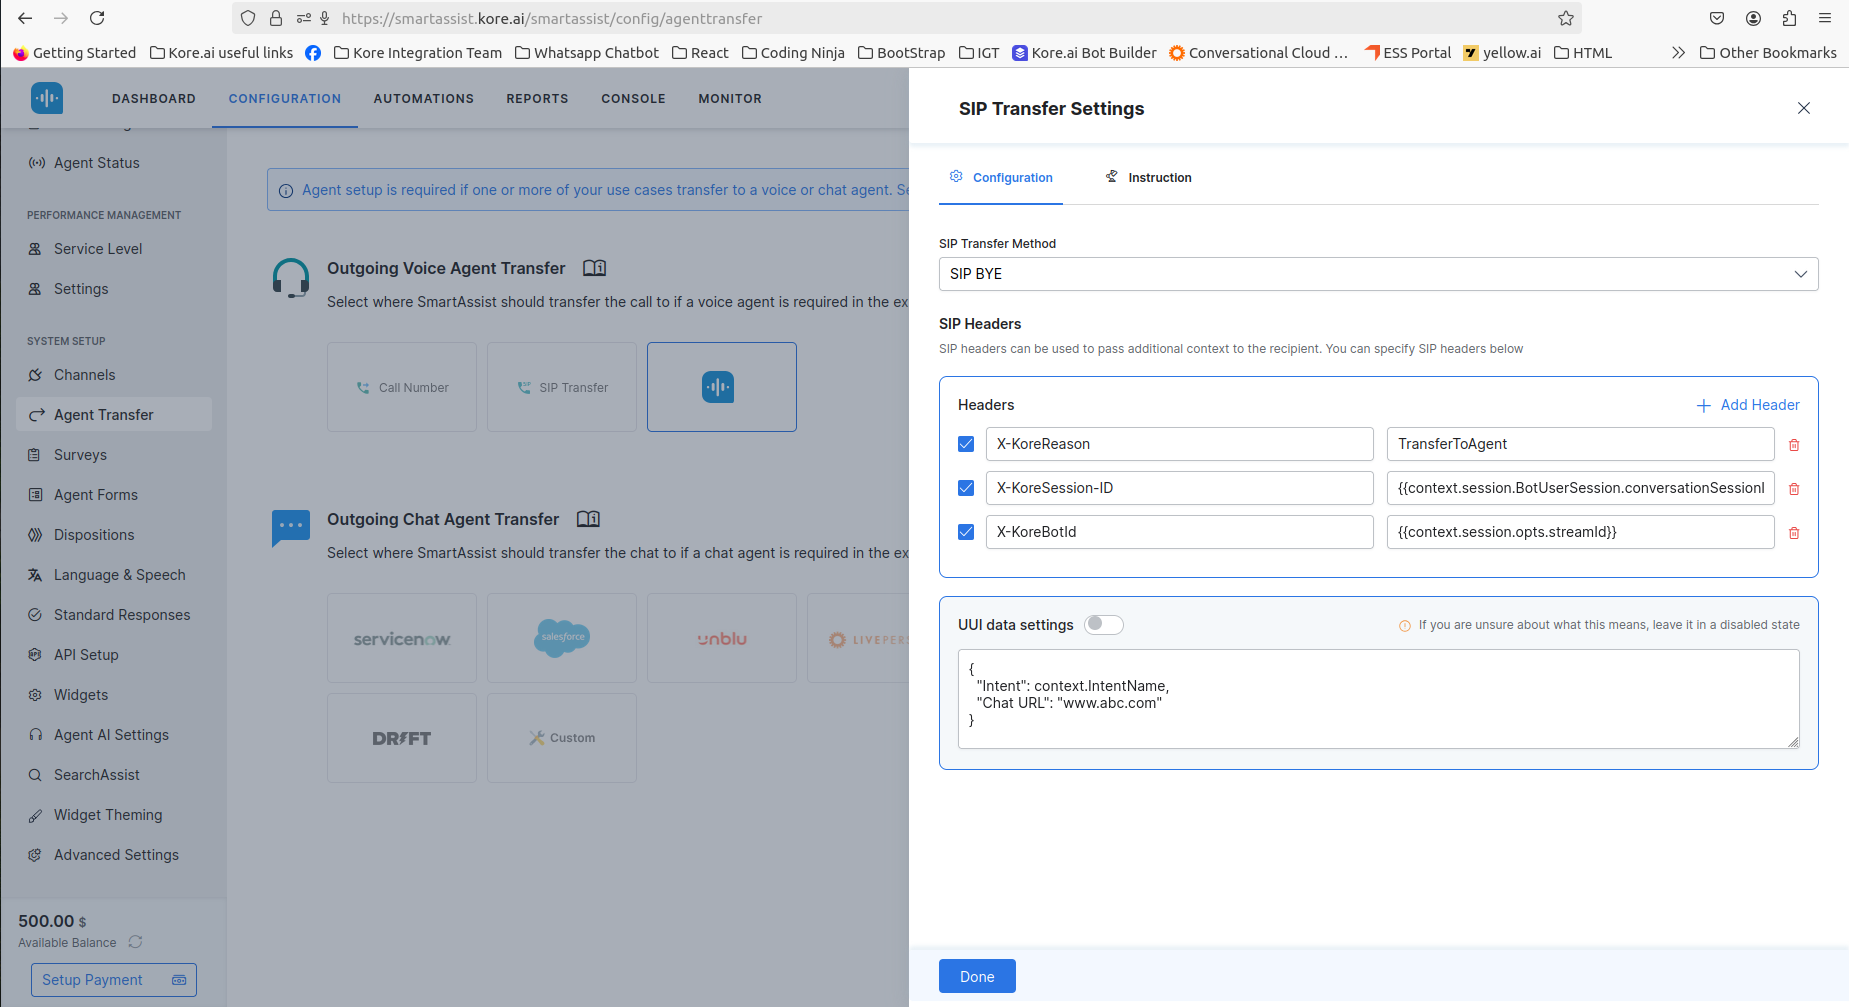
- Configure SIP headers to be transferred to ZCC on Agent Transfer via SIP BYE.
-
Agent Transfer Node in a Dialog Task
Zoom users can also invoke agent transfer from the Dialog Task using a message node. Read more here on Kore Automation / Dialog task.
Add the following code on the message node for agent transfer:
Note: Agent transfer can be to a number or any SIP URI.
var message = "Transferring Call to xxxx number";

var ReferTo = "+91xxxxxxxxxx";   // or sipUrl

var headers = {

   "X-Reason" : "Call Received from Kore"

}

print(voiceUtils.refer(message,ExternalPhoneNumber,headers))
Note: The following scenarios can be considered upon Agent Transfer:
Scenario 1: Question Resolved, Customer Hangs Up
- Given that a customer’s query has been resolved by the voice bot,
- When the customer chooses to hang up directly,
- Then Zoom triggers a SIP BYE, Kore sends ACK, and no SIP headers are passed.
Scenario 2: Question Resolved, Voice Bot Ends the Call
- Given that a customer’s query has been resolved by the voice bot,
- When the voice bot ends the call,
- Then Kore should send the kore-session_id and kore-bot_id in the INVITE’s 200 OK response, kore-reason(HangUp) in the SIP BYE message, and any custom header configured in Voice Gateway.
Scenario 3: Question Unresolved, Customer Needs Transfer to ZCC Agent
- Given that the customer’s query cannot be resolved by the voice bot,
- When the customer requests to speak with a live agent,
- Then Kore should send the kore-session_id and kore-bot_id in the INVITE’s 200 OK response and send kore-reason(TransferToAgent) in the SIP BYE message.
Step 4: Create a Connection from ZCC to Kore IVA – Transfer from IVR (SIP Transfer)
- Sign in to Zoom App Marketplace as an Admin.
- Select App Types > Connectors from the left navigation filter menu, and navigate to the Connectors page, or simply type “kore.ai” in the Search field.
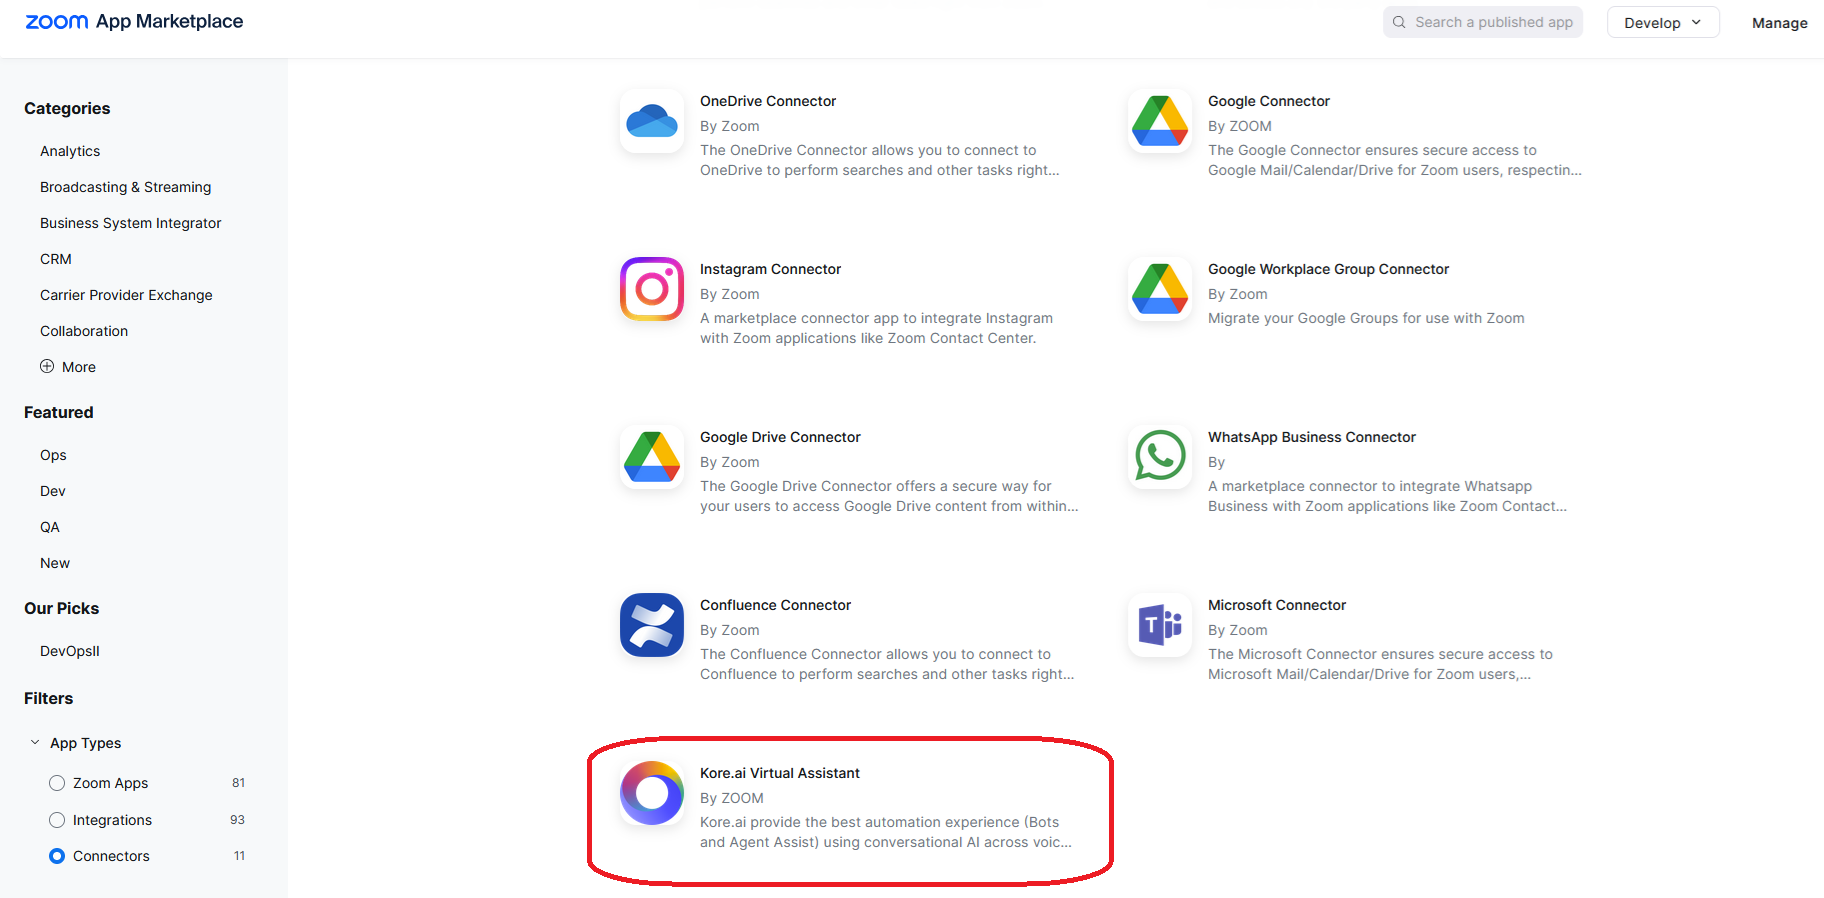
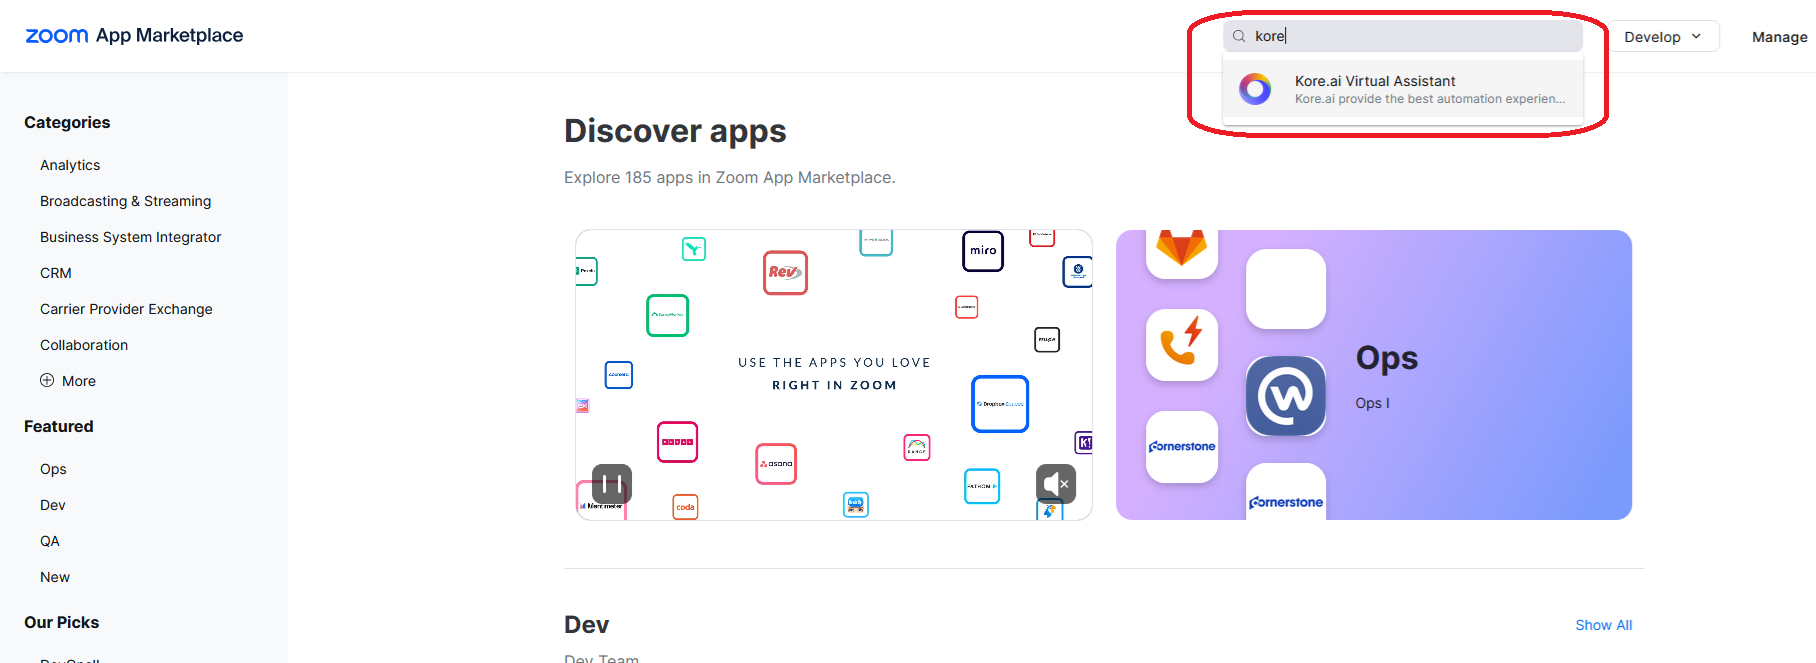
- Select Kore.ai Virtual Assistant connector, and navigate to the Connector Details screen.
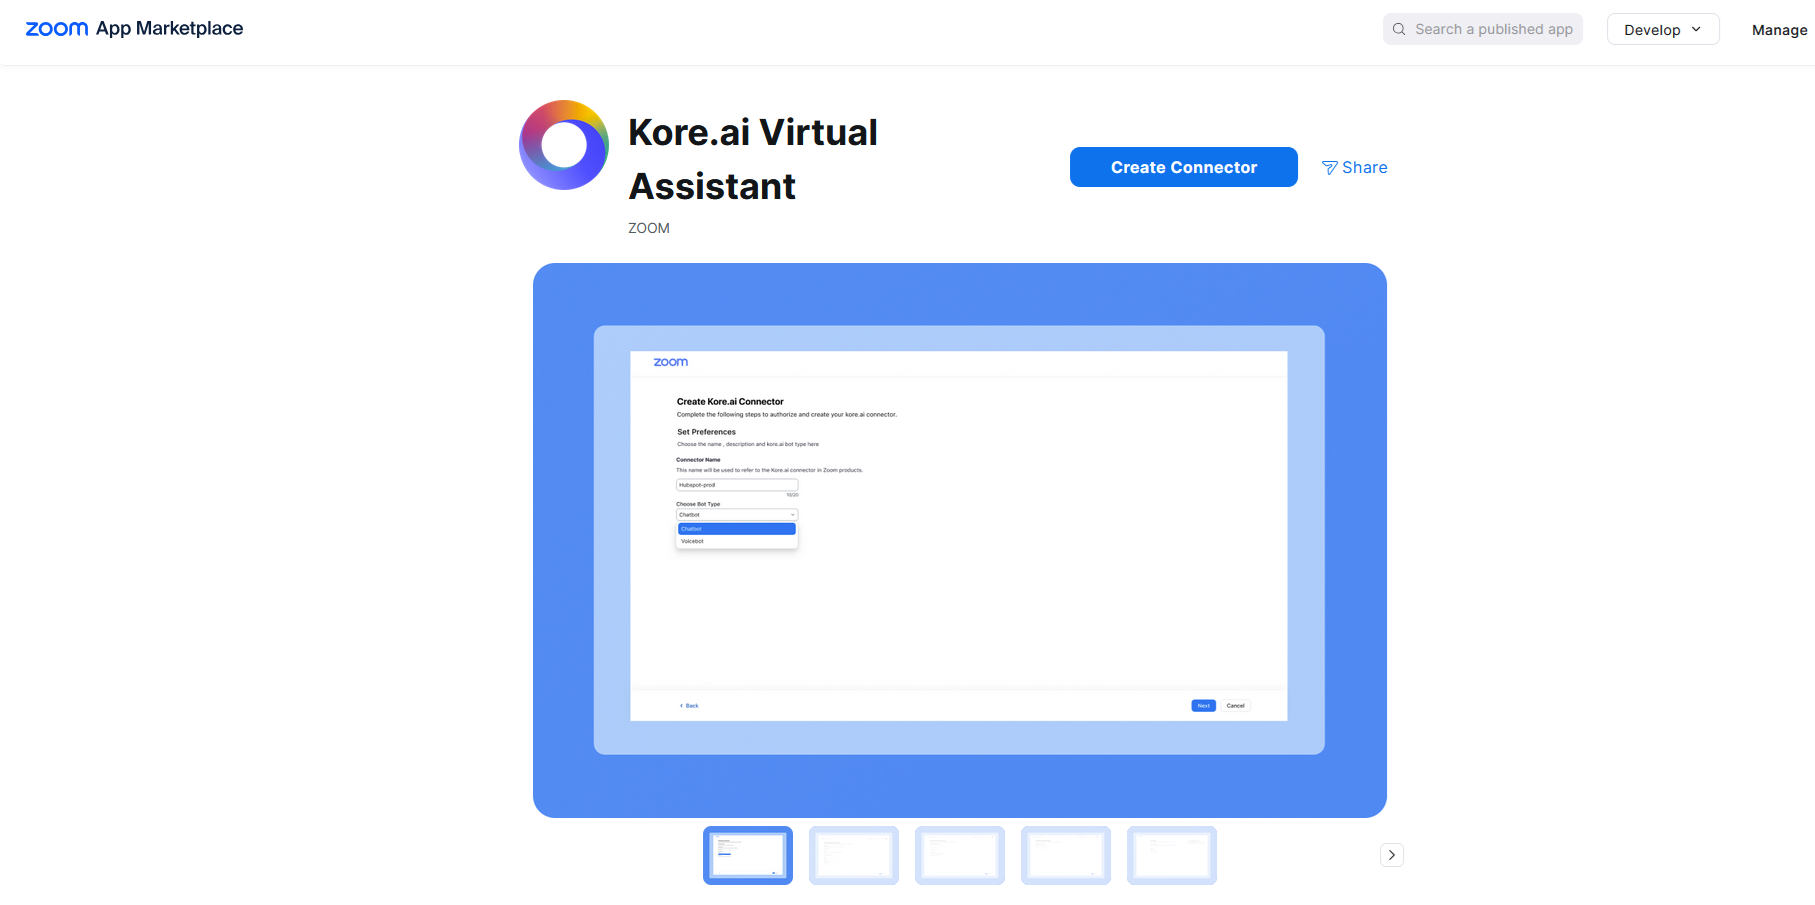
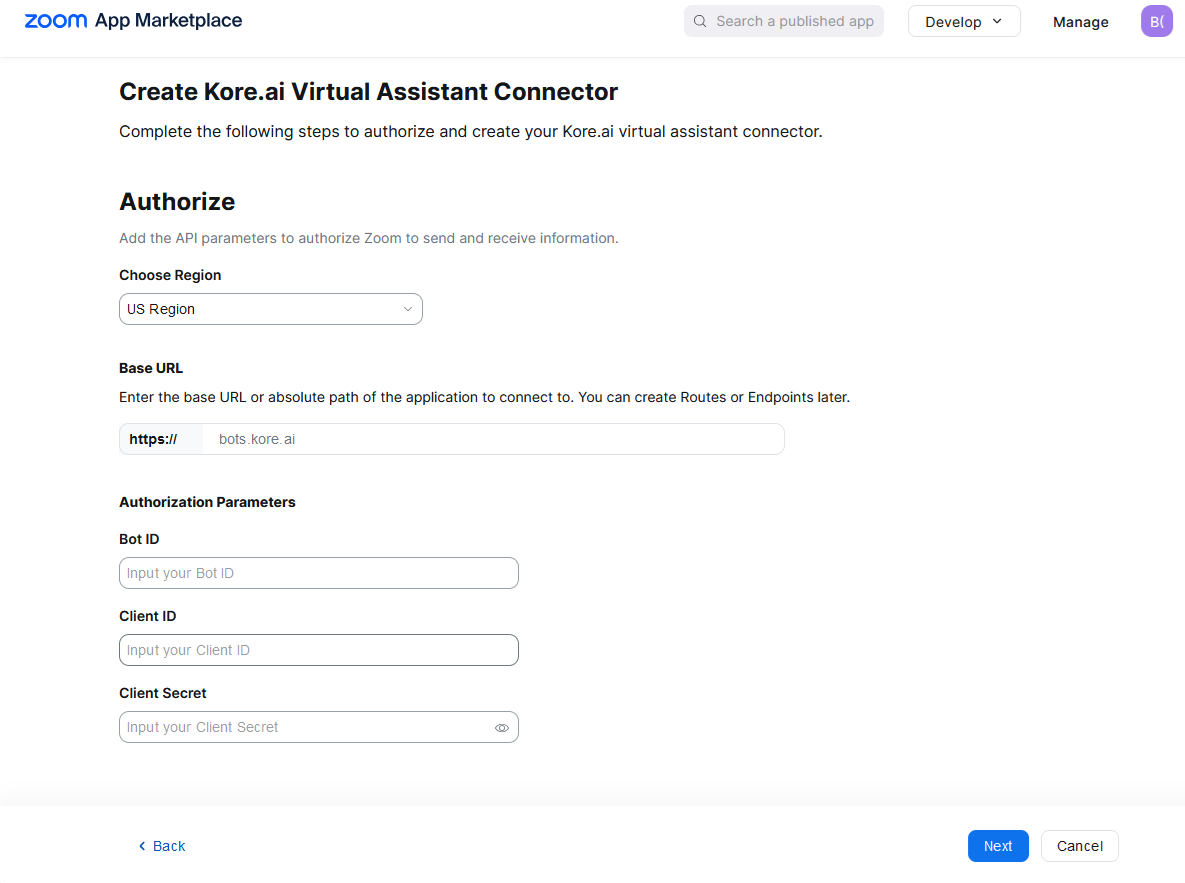
- Click Create Connector, and navigate to the Create Kore.ai Virtual Assistant Connector screen.
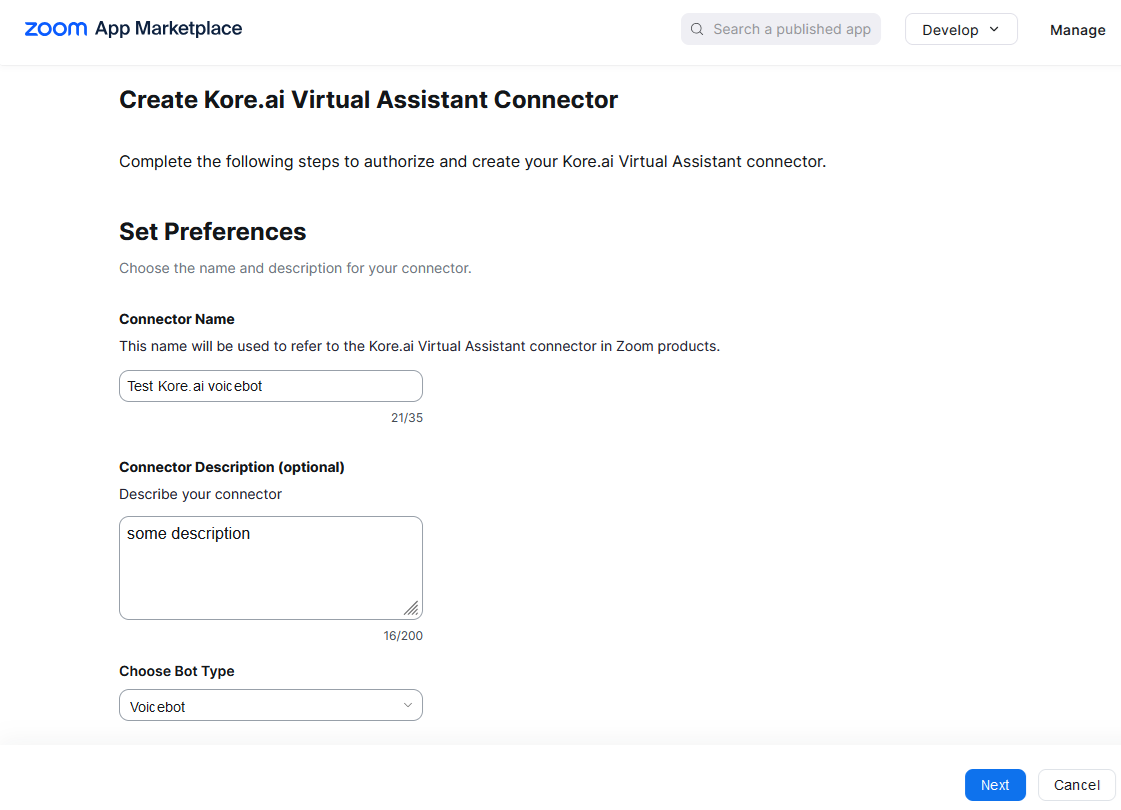
- Enter a name in the Connector Name field, select “Voicebot” from the “Choose Bot Type” dropdown list, and then click Next.
- Select the desired region for the voice bot from the dropdown list to automatically populate the Base URL of the regional Kore.ai platform.
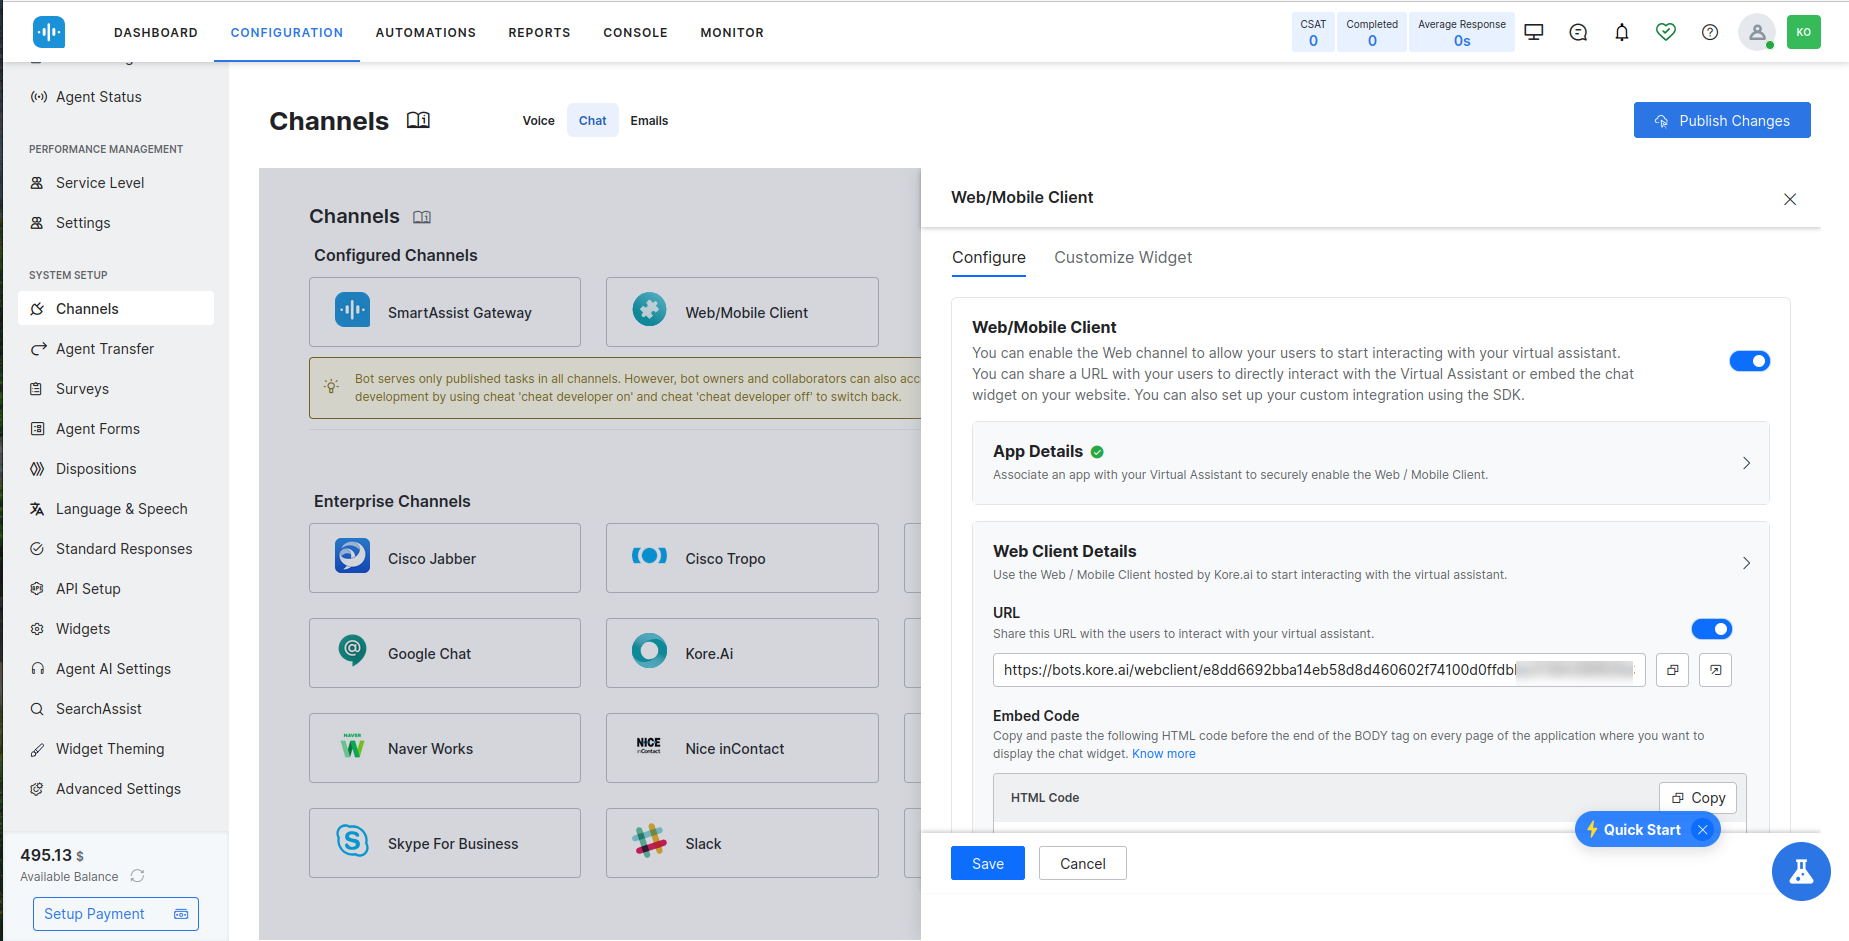
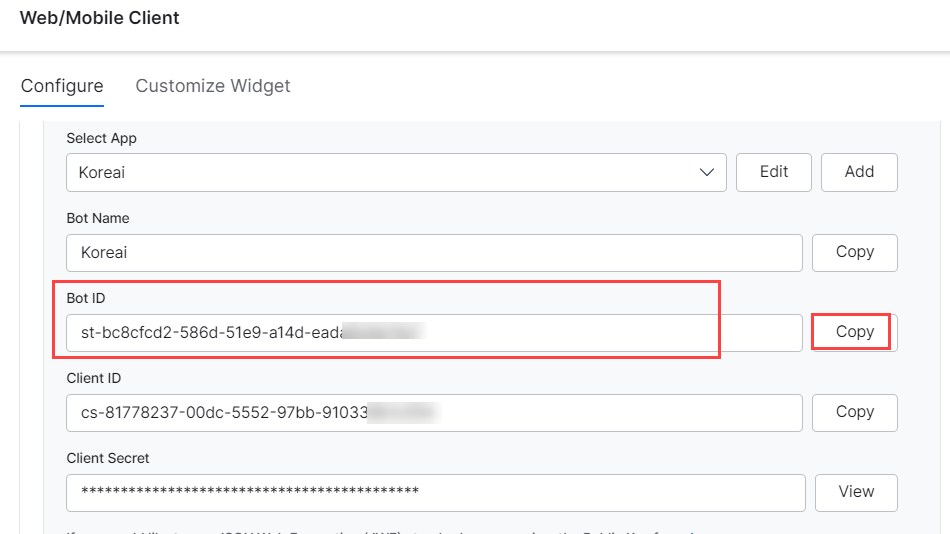
- Copy the Bot ID, Client ID, and Client Secret of your respective app on kore.ai. (Go to CONFIGURATION > SYSTEM SETUP > Channels and switch to Chat > Web/Mobile Client > App Details).
- Paste them into the Bot ID, Client ID, and Client Secret fields under the Authorization Parameters section on the Zoom Kore.ai Virtual Assistant Connector page, and then click Next.
- Copy the Domain Name and DID Number from the Zoom Kore.ai Virtual Assistant Connector page.
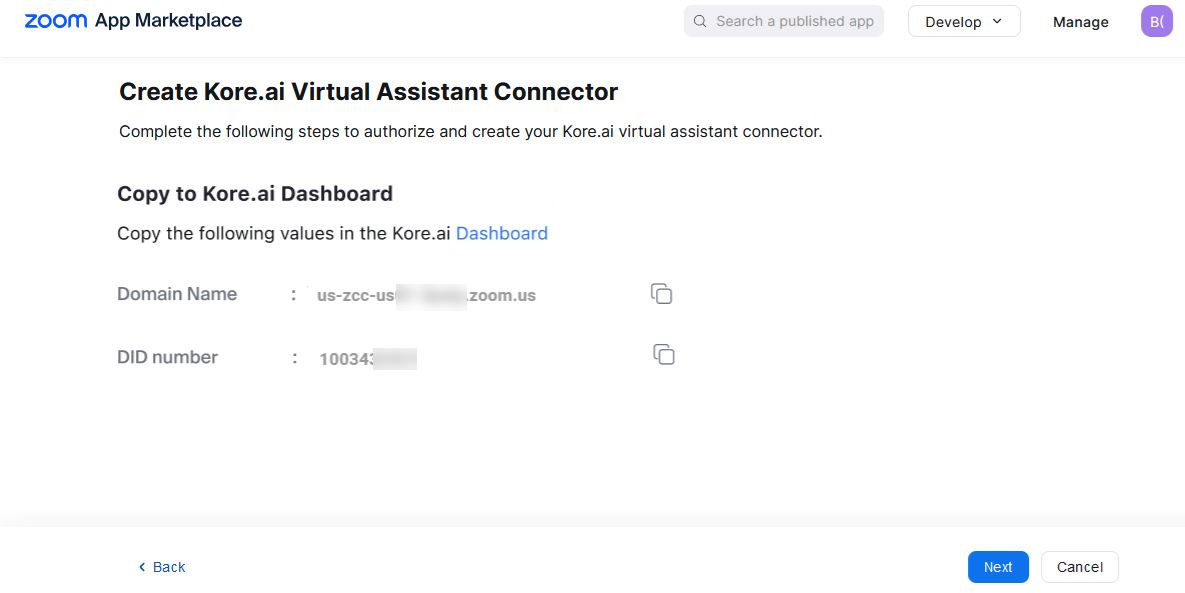
- Paste them into the Virtual Assistant Connector on ZCC.
- Click Next to authorize the Kore.ai Chatbot Connector with the Kore.ai platform.
After creating an Experience Flow, you must attach a DID Number to this flow. (Since Zoom integration is based on DID Number, you don’t need to purchase any number from Kore.)
Step 5: Fetching Conversation Details and Summary
This section explains the process of fetching the details and summary of the conversation between the bot and the customer.
Steps
- Sign in to SmartAssist.
- Go to Dashboard > Interactions and ensure there are call records.
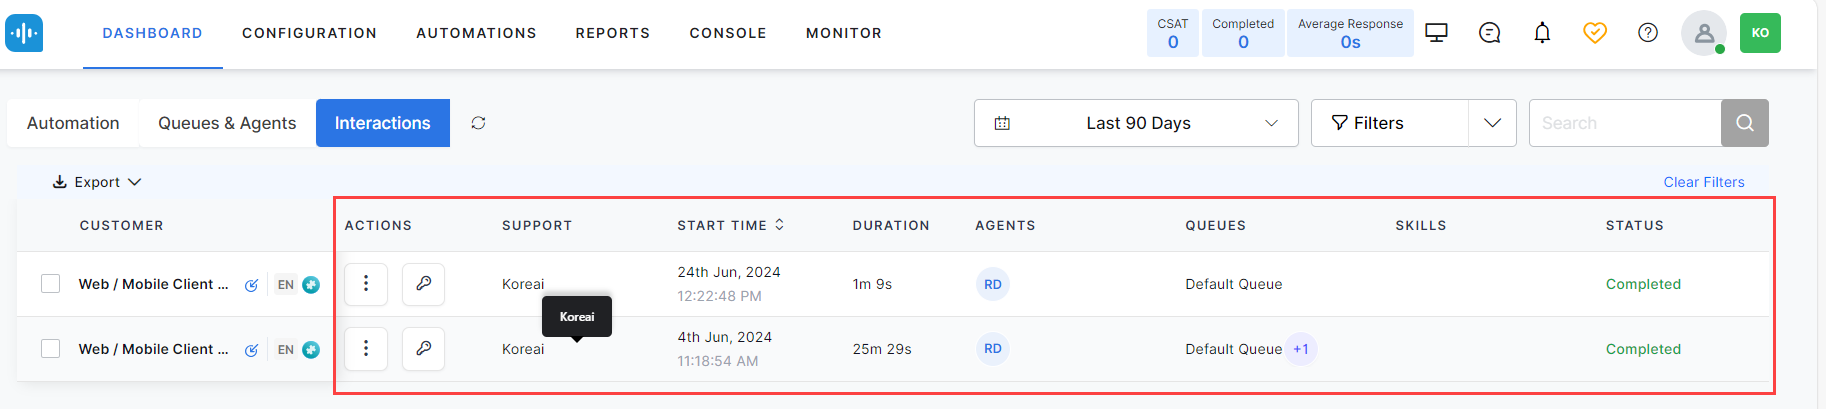
- Sign in to SmartAssist botbuilder using the same credentials.
- Click the Instance Bot.
Note: You can identify the instance bot by its unique symbol and matching name with the organization. In the above screenshot, Kore.ai bot is the instance bot as it matches with the organization name and has a unique symbol. - Go to API Scopes. To do so,
- Click the search button and enter API Scopes in it:
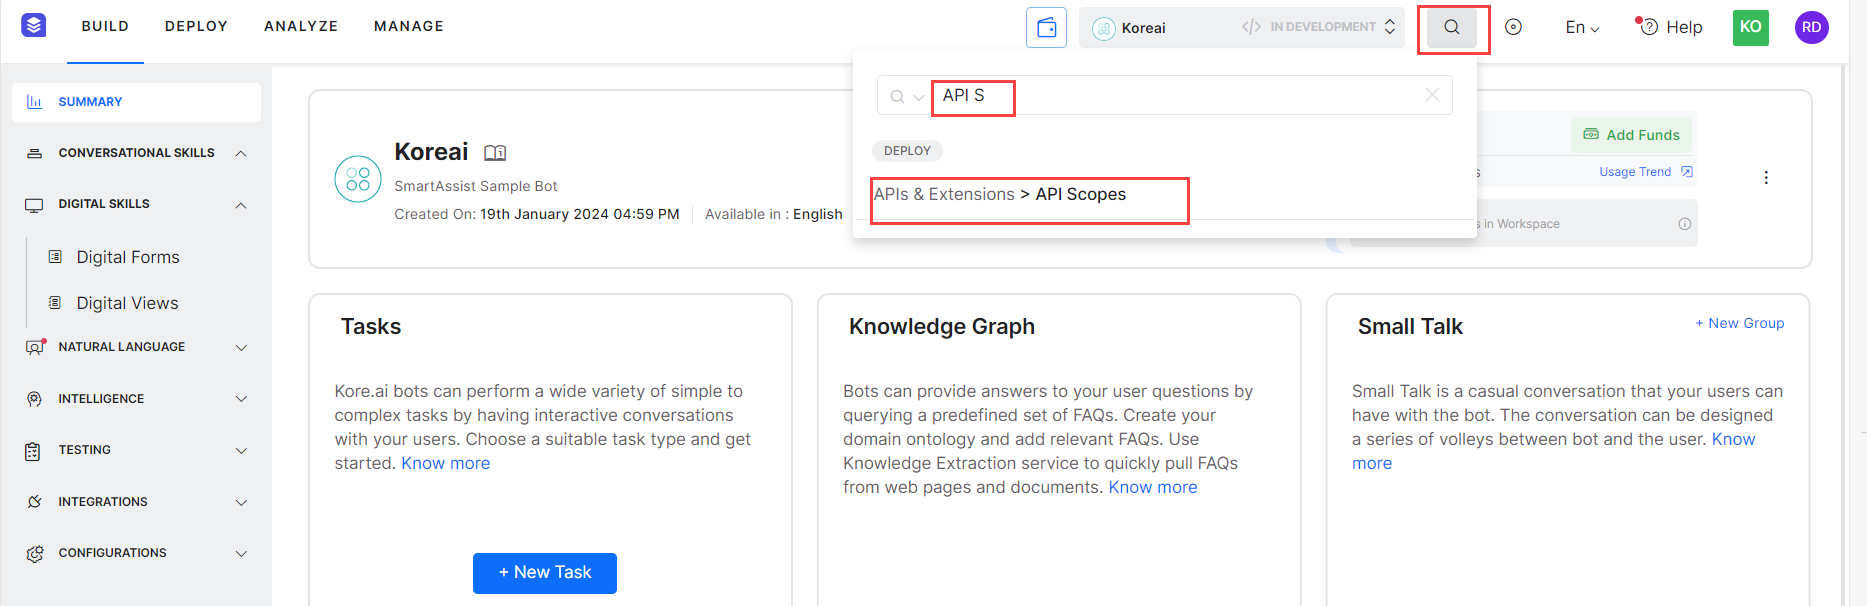
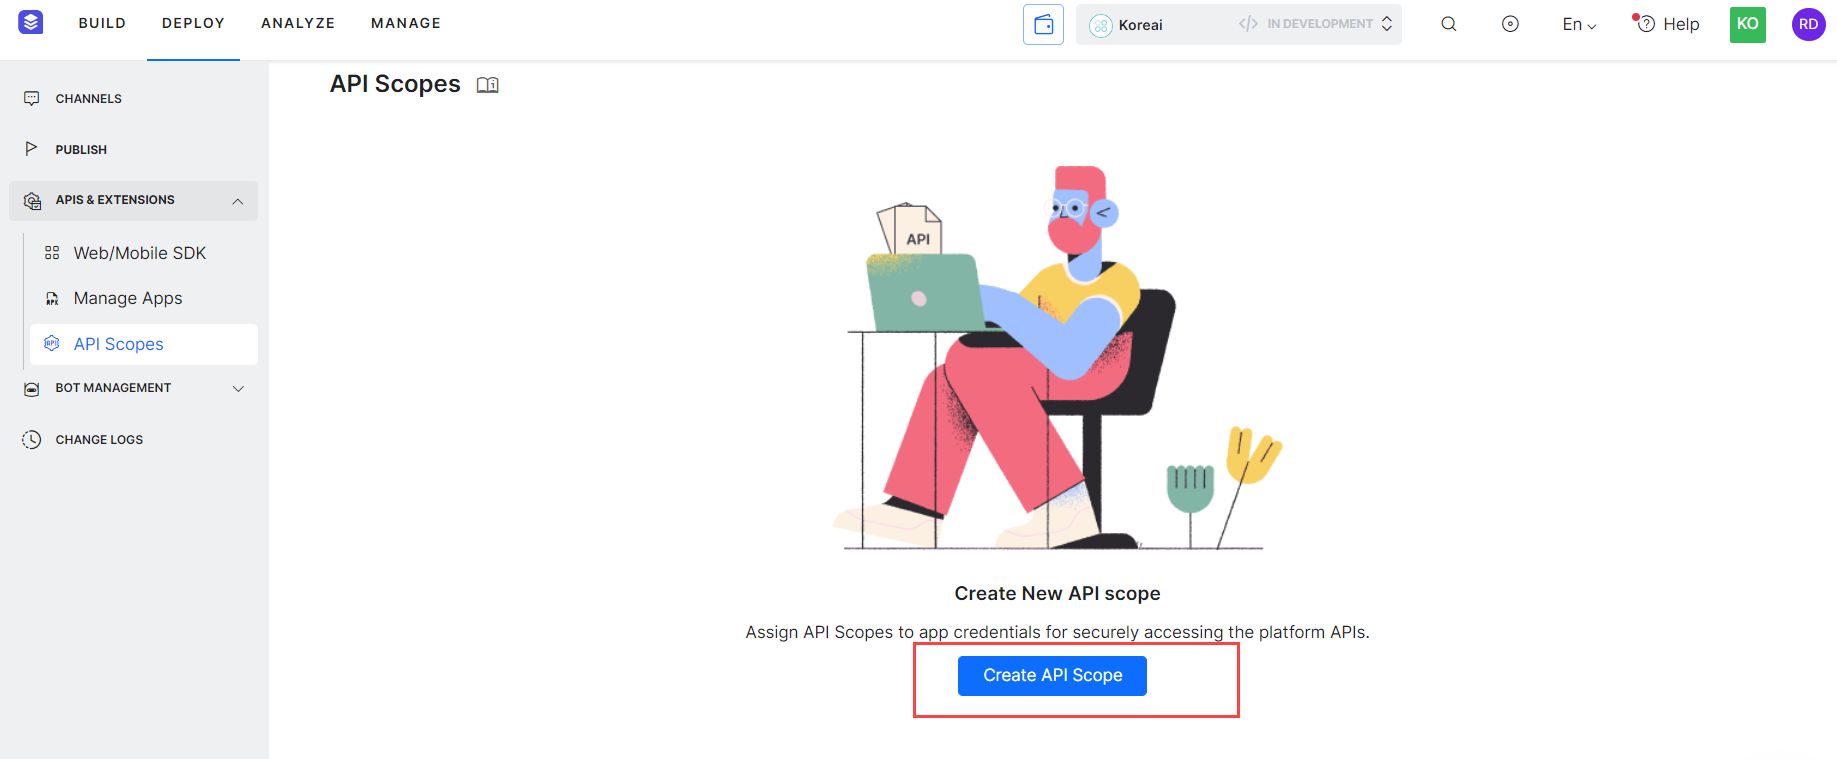
Or - Click Deploy > APIs & Extensions > API Scopes.
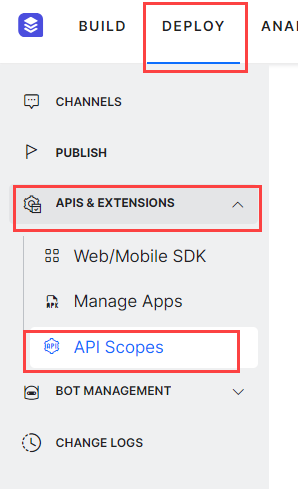
- Click the search button and enter API Scopes in it:
- Click Create API Scope.
- Enter the Instance Bot name in the App field and select the Chat History option.
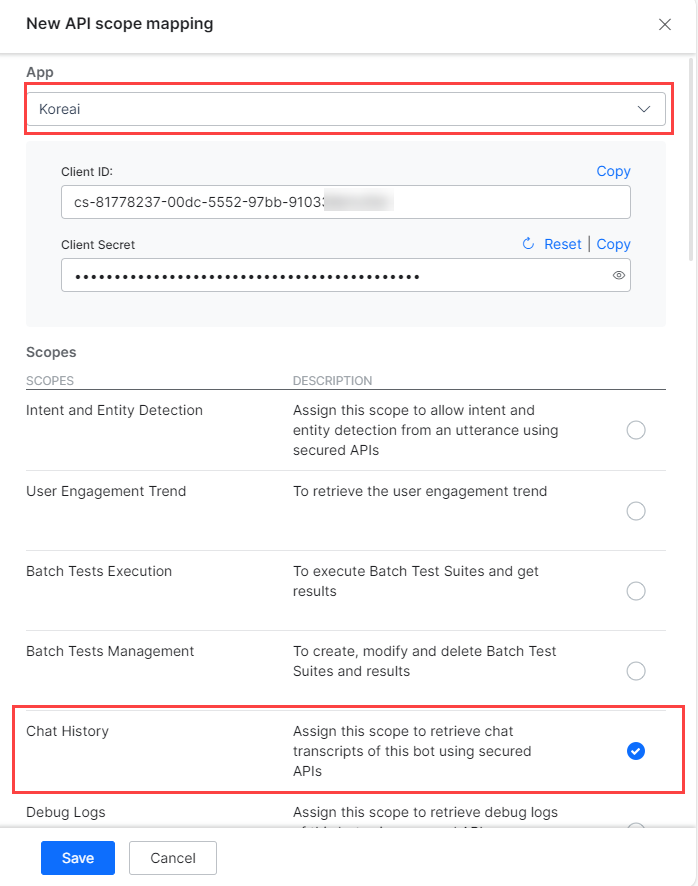
- Click Save.
- Go to Build > Natural Language > Generative AI & LLM, locate Kore.ai XO GPT, and click Enable Now.
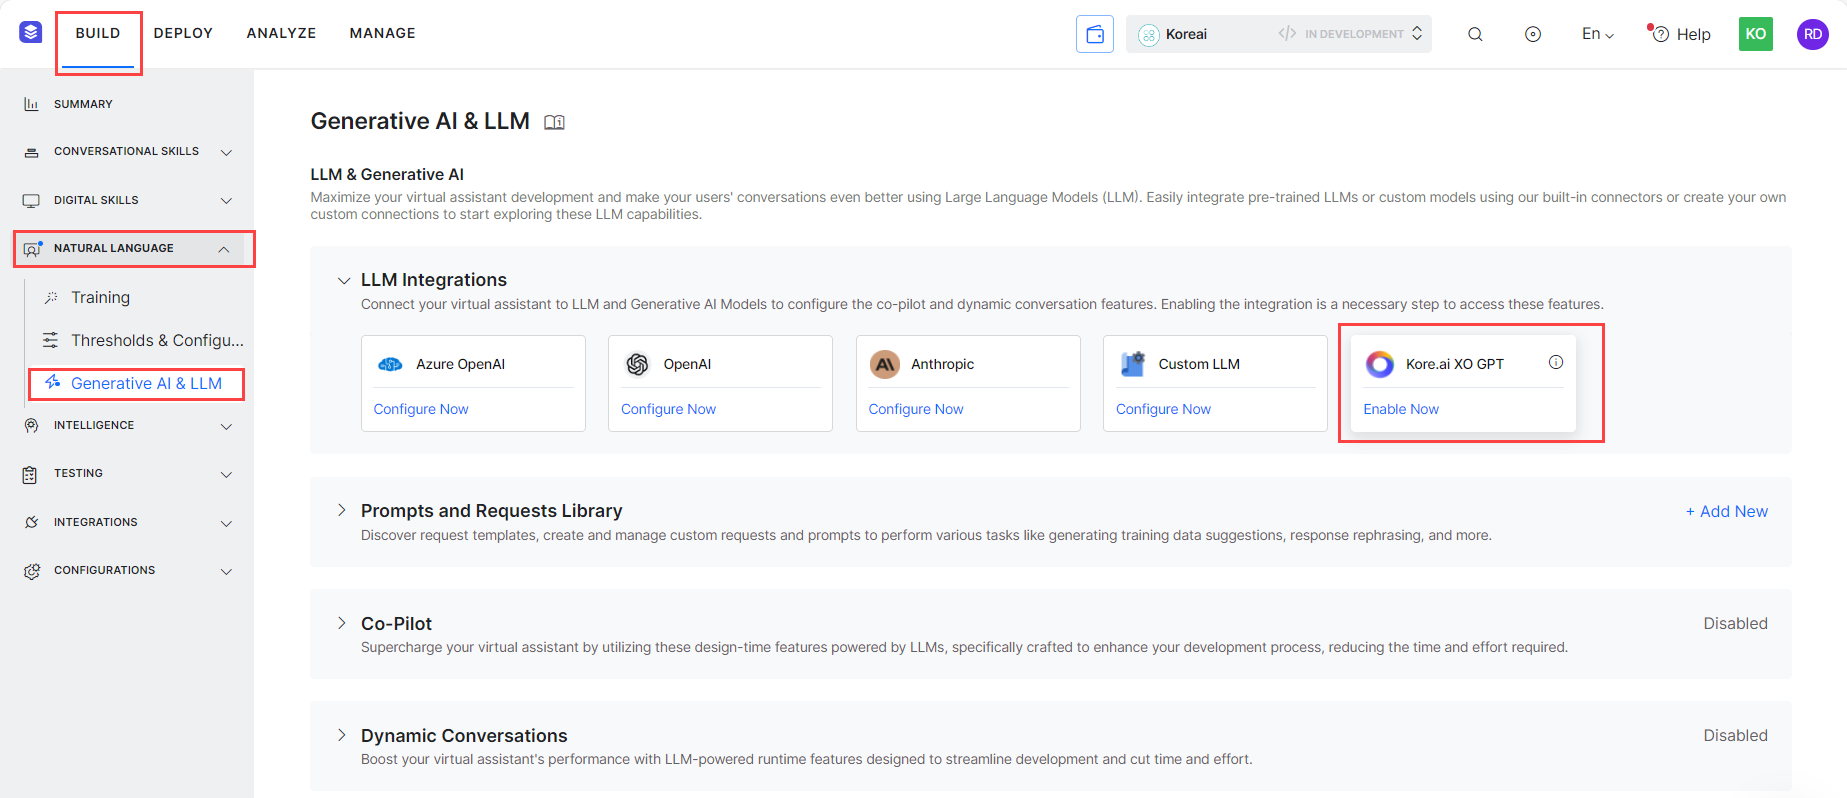
- On the Kore.ai XO GPT page, select:
- Models.
- Fine-tuned model for Summarizing Conversation.
- Please read through the LLM & Generative Policy guidelines and provide your consent to enable the Integration.
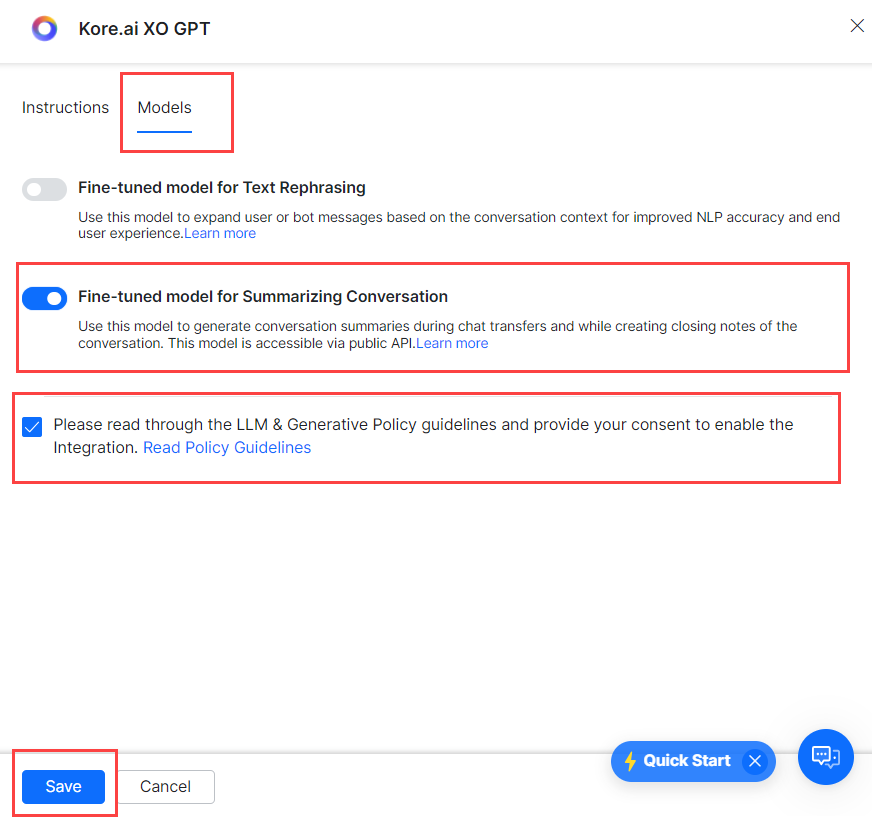
- Click Save.
- Go to the Co-Pilot section and enable Conversation Summary. To enable, select a model from the Select Model list and then click the enable toggle.


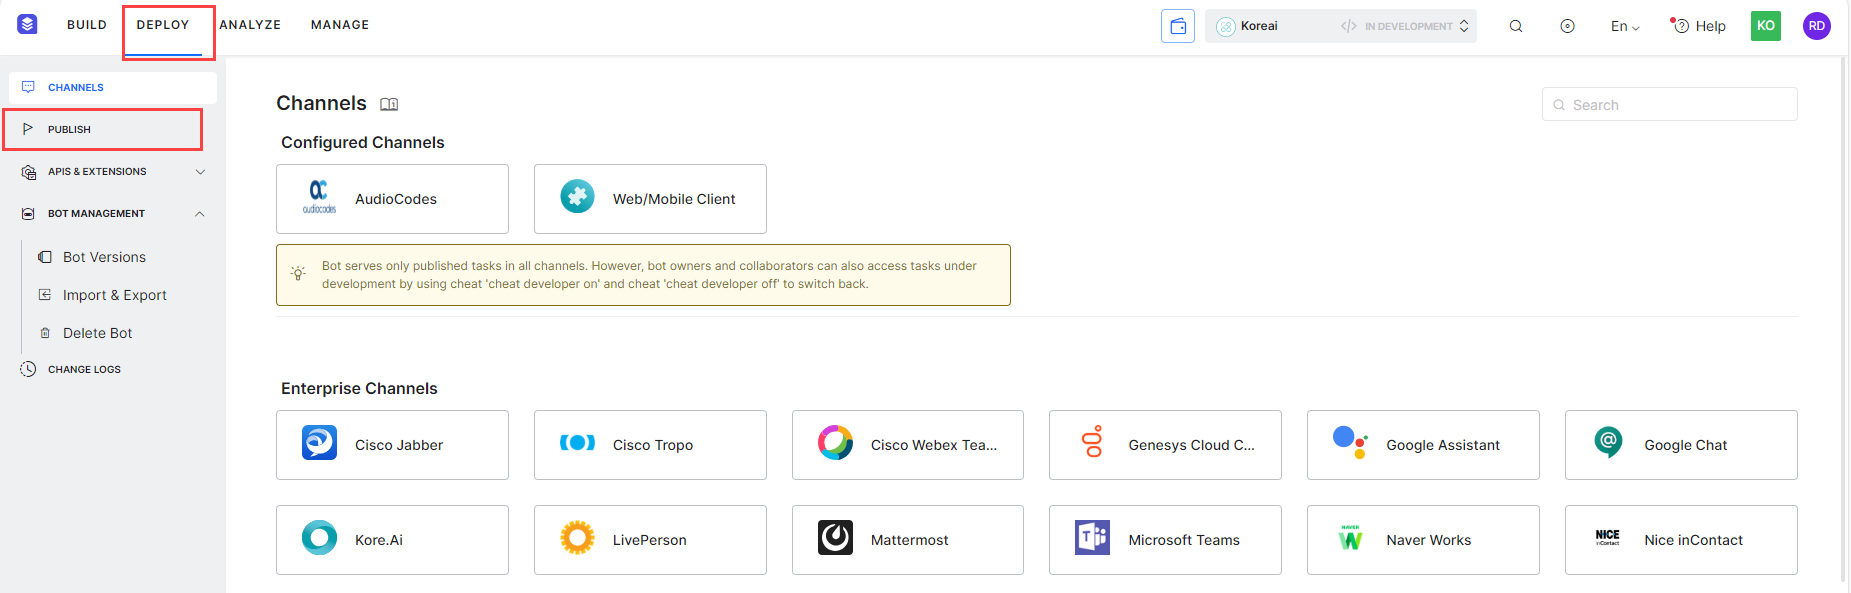
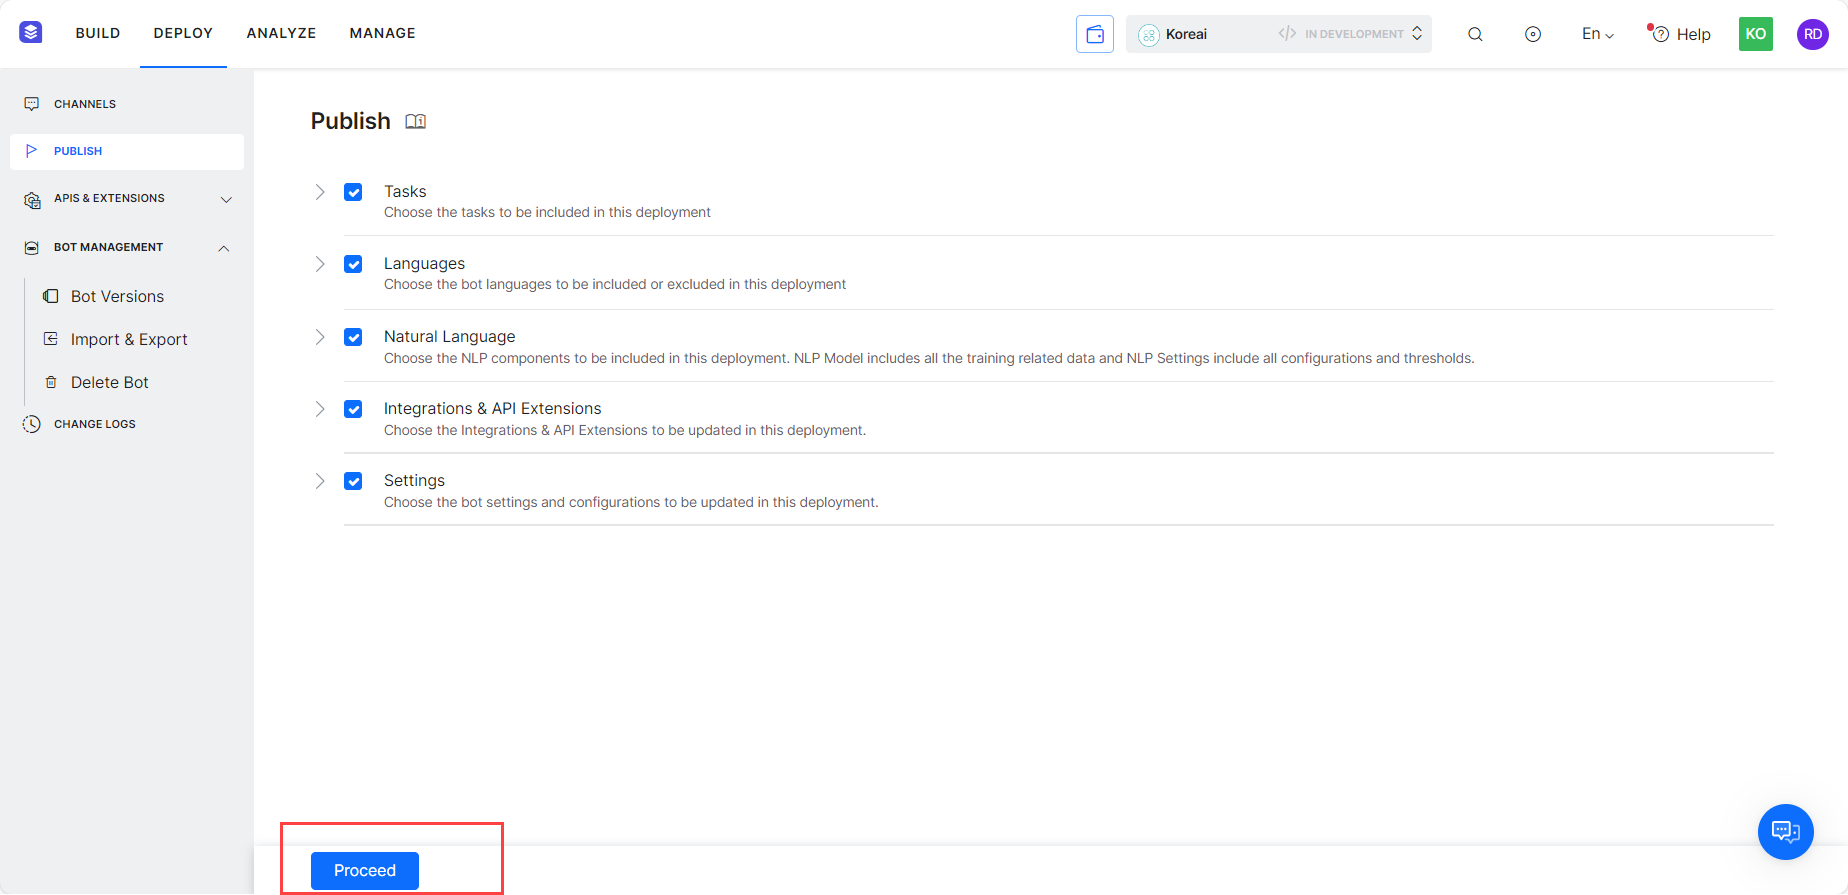
- Go to Deploy and click Publish to publish your bot.
- Click Proceed.
- Enter a comment in the Comment box, and click Confirm.
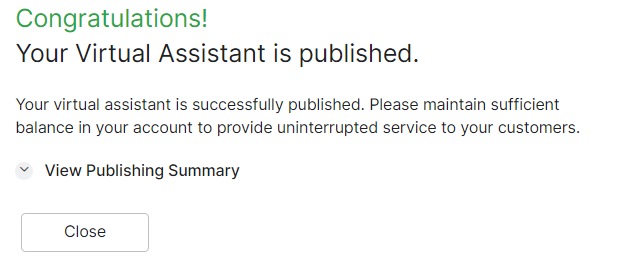
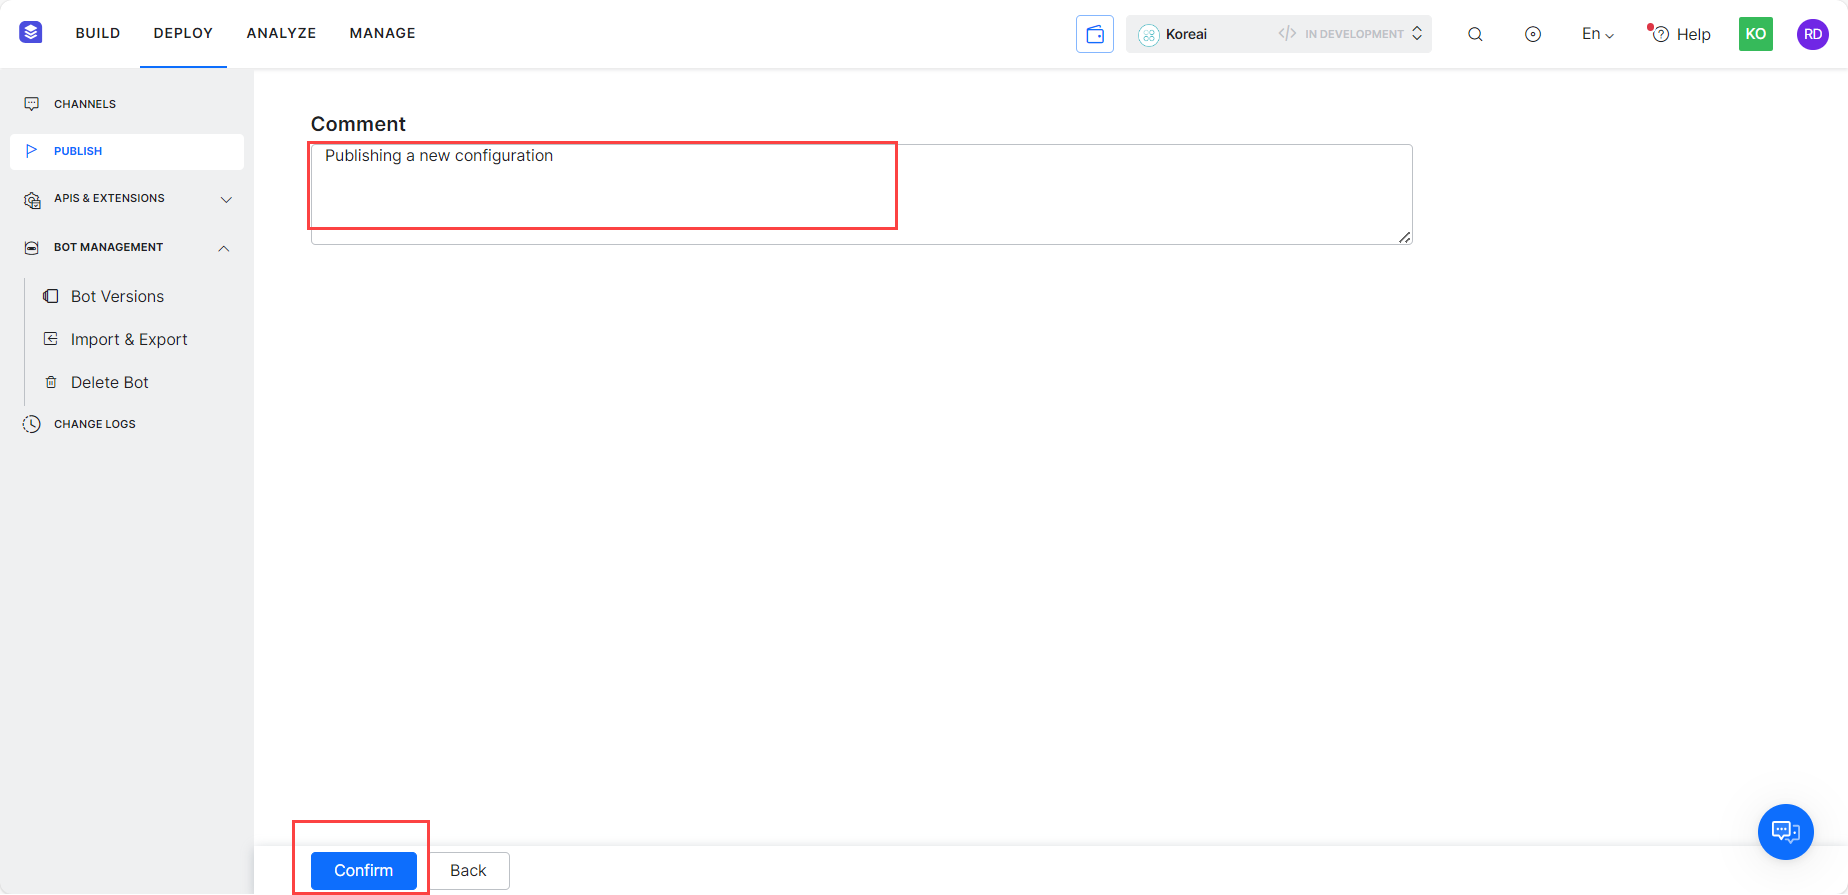 Close the message that confirms publishing of your Virtual Assistant.
- Copy the curl from the Conversation Details and Summary API.
- Go to Postman, paste the curl copied from the API, and then:
- Replace the botID with the Bot ID value copied from SmartAssist.
Follow these steps to get the botID:- Sign in to SmartAssist.
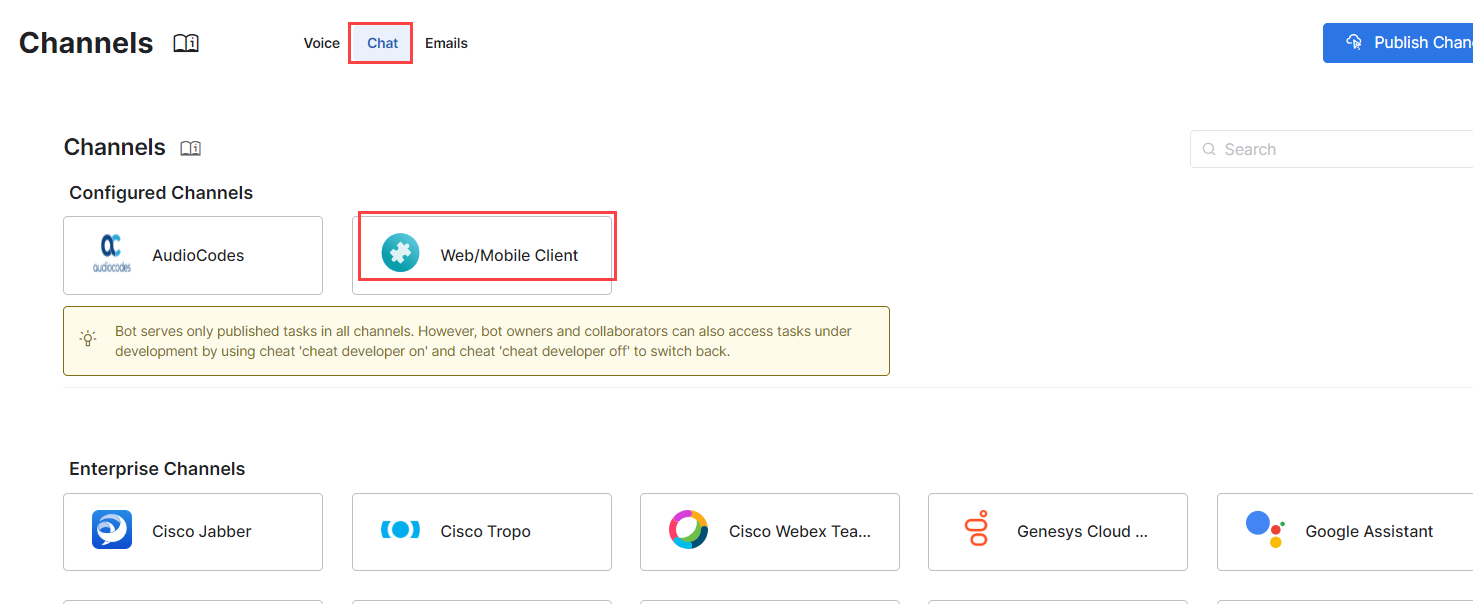
- Go to Configuration > System Setup > Channels.
- Click Chat > Web/Mobile Client.
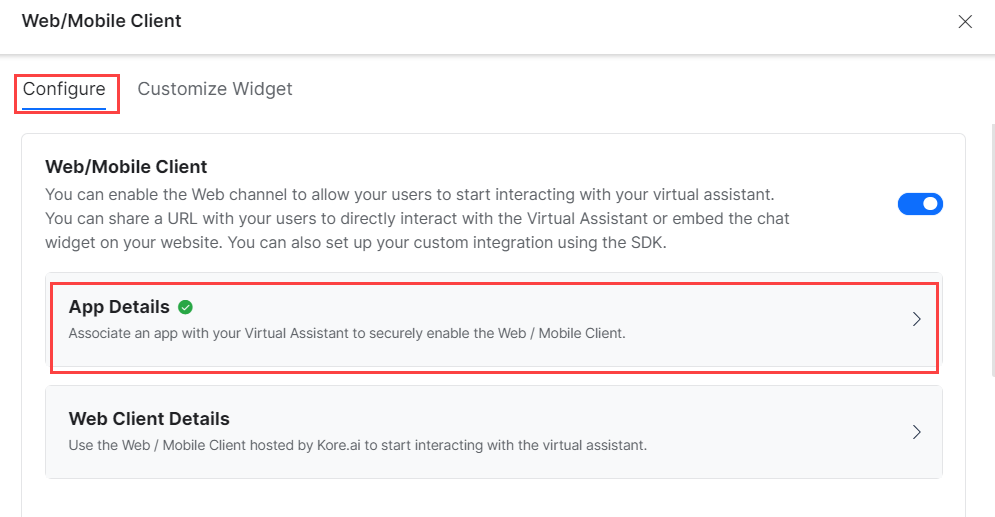
- On the Web/Mobile Client configuration page, click to expand the App Details section.
- Scroll down to the Bot ID section, and click the Copy button to copy the botID value.
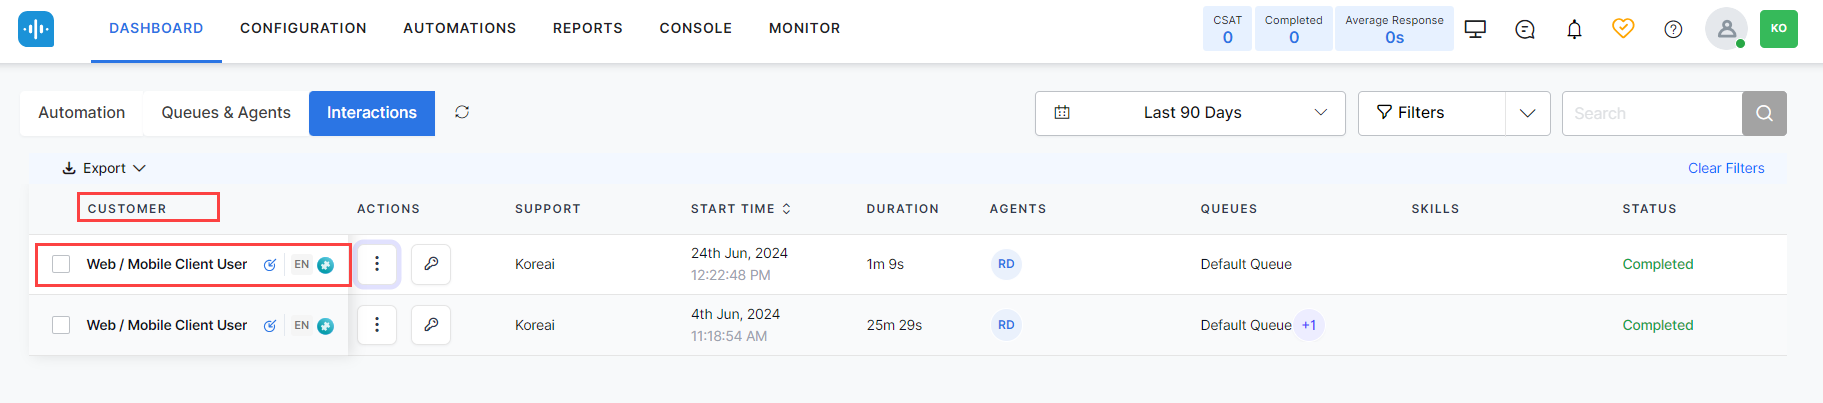
- Copy the sessionID from SmartAssist.
Follow these steps to get the sessionID:- Sign in to SmartAssist.
- Go to Dashboard > Interactions.
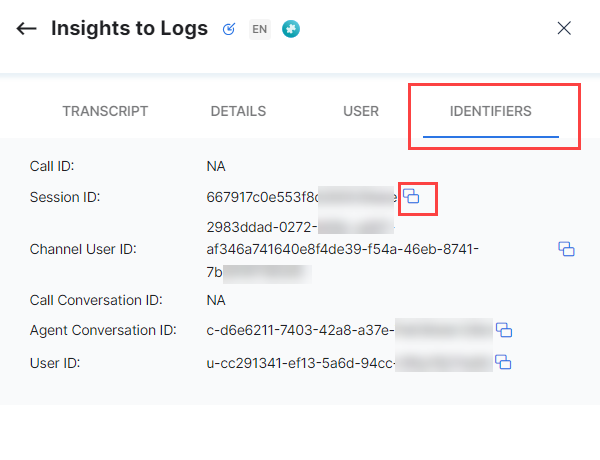
- Click the log for which you want to get the details.
- On the Insights to Logs page, click Identifiers, and then click the copy symbol against the Session ID value.
- Generate and copy the JWT token by following this document.
- Replace the botID with the Bot ID value copied from SmartAssist.
- Run the modified curl to get the conversation details and summary of a session.