GETTING STARTED
Introduction to SmartAssist
Glossary
Minimum System and Browser Requirements
SmartAssist Lifecycle Management
SmartAssist Setup Guide
Sign Up for SmartAssist
Setup SmartAssist for Use With AgentAssist
Release Notes
Recent Updates
Previous Versions
Frequently Asked Questions (FAQ)

EXPERIENCE DESIGNERS
Flow Designer
Introduction
Create Experience Flows
Navigate the Flow Designer
Experience Flow Nodes
Introduction
Node Types
Start
IVR Menu
IVR Digit Input
Conversational Input
Split
Check Agent Availability
Check Business Hours
Message Prompt
Run Automation
Agent Transfer
Connect to API
Go to Flow
Deflect to Chat
Script Task
Set Queue
End Flow
Waiting Experience
Conversation Automation
Testing Widget
Use Cases
Overview
Questions & Answers
Conversations

ADMINISTRATORS
Account Management
Switch Account
Invite Developers to an Account
Routing
SmartAssist Routing
Skills
Skill Groups
Queues
Hours of Operation
Default Flows
User Management
Users
Agent Groups
Agent Settings
Role Management
Agent Status
System Setup
Channels
Voice
Chat
Email
Limitations With Accounts Using AudioCodes
Agent Transfer
Surveys
Agent Forms
Dispositions
Language & Speech
Overview
Language Management
Voice Preferences
Hold Audio
Standard Responses
Widgets
Utils
AgentAssist Settings
SearchAssist
Widget Theming (Layout Customization)
Advanced Settings
Co-Browse Settings
Community WFM (Beta)
Automatic Conversation Summary (Beta)
Intelligent Agent Tools
Reject Calls With a Delayed First Response
API Reference
API Setup
Rate Limits
API List
Integrations
Genesys Voice Bot
Genesys + Kore Voice Automation - Manual Installation Guide
Voice Automation - Integration with Amazon Connect
Voice Automation NiceCX (CX One) - SIP Integration
Talkdesk Voice Automation
Kore Voice Automation (IVA) Integration with Zoom Contact Center (CC)
ID R&D Integration With Kore
Audit Report

AGENTS
Agent Console
Introduction
Conversation Tray
Incoming Interactions
Interacting with Customers
Additional Tools
My Dashboard

SUPERVISORS
Dashboard
Automation
Queues and Agents
Interactions
Monitor Queues, Agents, Interactions, and Service Levels
Manage Layout

BUSINESS USERS
Reports
Introduction
Reports List

Incoming Interactions

Next In Queue Notifications 

The section at the bottom left corner of the Agent Console displays new interactions assigned to an agent along with the count.

The following details are displayed:

  • Customer name
  • Skills tagged to the conversation
  • Queue name

Browser Notifications

A system push notification accompanies new interactions, so you can see them even when the browser is minimized or the SmartAssist tab is not in use. System notifications are supported for Chrome, Firefox, Chromium-based Microsoft Edge, and Safari. Each notification plays a sound, too. 

When the first notification is pushed, your browser will ask you to allow notifications from SmartAssist. Please allow this if you want to receive such notifications or block if you do not. If you block these notifications, you will continue to hear the sound alert and will see the Next in Queue popup under your Conversation Tray when opening SmartAssist.

Handling Incoming Interactions Based on Answer Mode 

Manual Answer Mode

When the manual answer mode is enabled, agents can click Accept to interact with the next customer. The conversation panel corresponding to the newly accepted conversation is displayed when the agent clicks this button. Learn more.
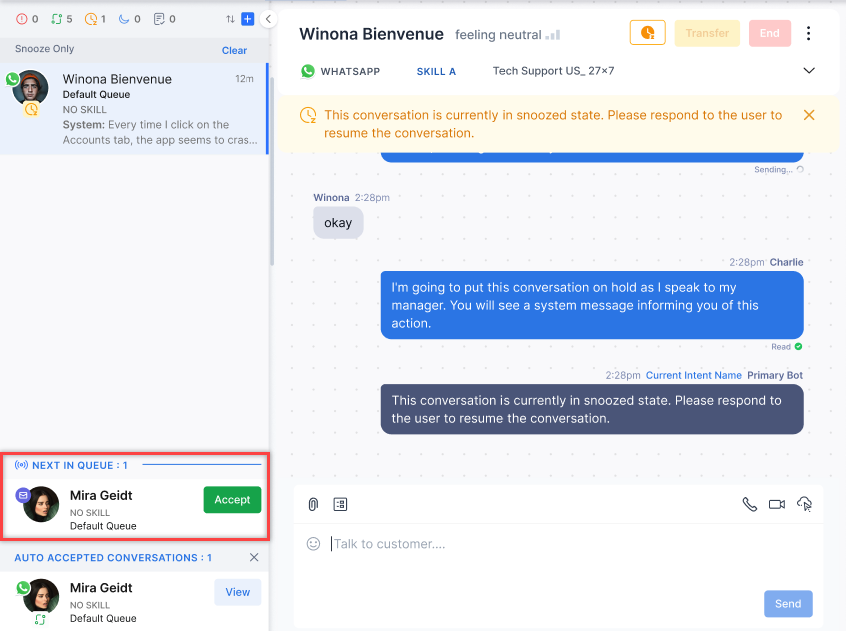
If an agent does not accept the assigned interaction in the period specified under answer mode, the conversation is returned to the queue, and the agent’s status is automatically changed to away to prevent further conversations from being assigned to them.

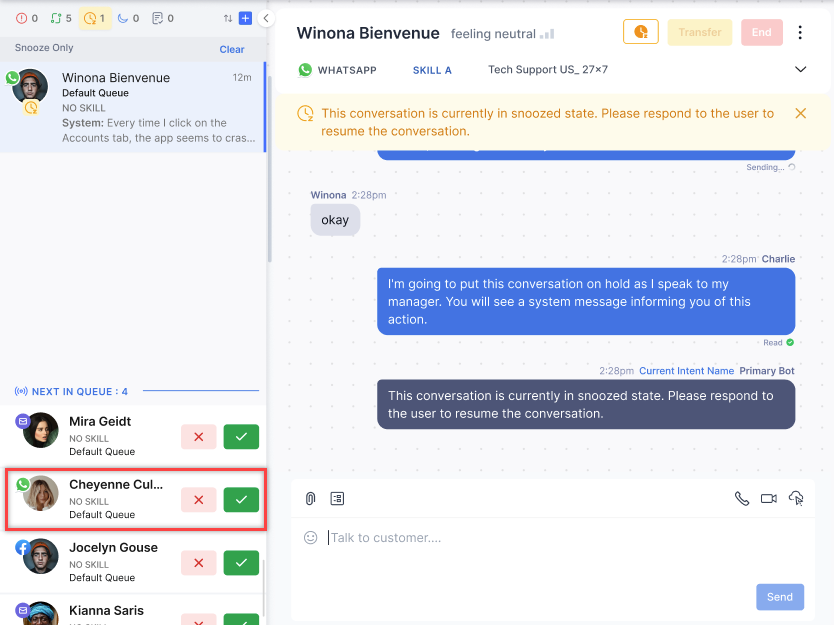
If Explicit Reject is enabled in the Answer Mode:

  • Agents can Accept (✅) or Reject (❌) each interaction on the conversation tray.
  • Accept: Displays conversation panel for that conversation.
  • Reject: Removes conversation from agent’s queue, and returns it to the queue for reassignment.
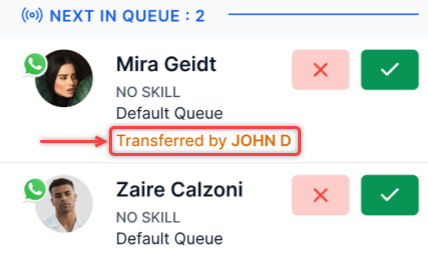
  • In the case of an agent or supervisor transfer, or queue timeout, the transferred conversation appears with a message indicating the transfer source.
Auto-Answer Mode

If auto-answer mode is enabled, the accepted conversations appear at the top or bottom of the conversation tray list, depending on the selected sorting order, and are marked with a New indicator. This will be displayed till the agent clicks the conversation and sends the first message. Learn more.
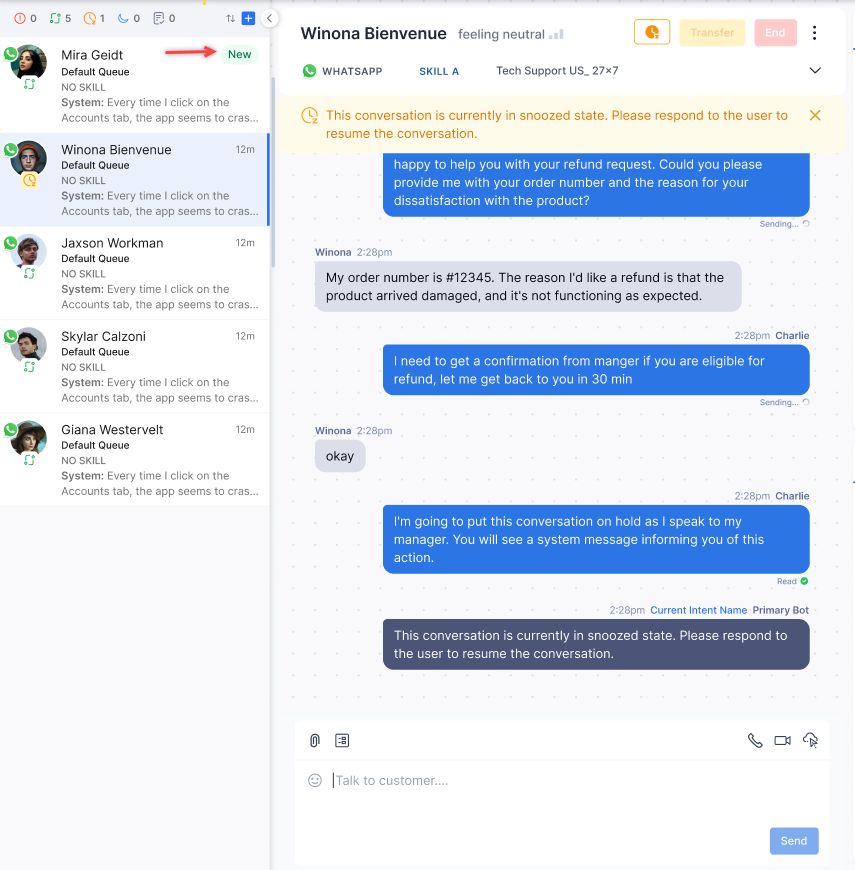
If an agent does not send the first response to the auto-assigned interaction in the period specified under answer mode. In that case, the conversation is returned to the queue and the agent status is automatically changed to away to avoid further conversations from being assigned to them.

Handling Interactions When Conversation Filters Are Applied

When conversation state filters are applied (for example, ongoing, idle), accepted conversations are displayed on the conversation tray with a View option on the conversation. This will be displayed till the agent clicks the conversation and sends the first message.
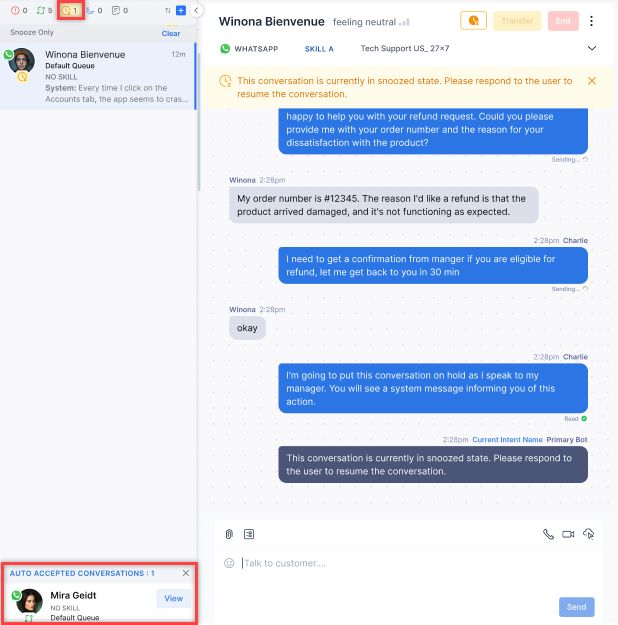
Sort Incoming Interactions

New interactions will appear at the top of the conversation tray based on their order of acceptance. This can be revised as follows:

  1. Click the ↑↓ icon at the top of the conversation tray.

  2. Select either Latest on Top or Latest at Bottom.
  3. A confirmation message is displayed and the sorting order is updated. The blue check mark indicates the current selection.

Related Links