
Search experiences are content-intensive and highly data-driven. For efficient and accurate search results, businesses need to collate content from disparate sources, optimize the data for improved relevance, improve the search user interface and measure the search performance. SearchAssist helps you manage the lifecycle of your search experience by providing all the tools you need using a no-code platform.
You can create multiple search applications (a.k.a projects) in your SearchAssist account. Each app consists of the content to be searched, index and search configurations, relevance rules and the search user interface definitions. To learn more, see Managing SearchAssist apps.
Stages in Lifecycle
The SearchAssist App flows through the following stages in its lifecycle.
Manage Content
From the SearchAssist Sources menu tab, you can add and manage the content associated with any SearchAssist app. Your content can come from any number of sources and in multiple formats. Examples include file uploads, website crawls, structured data files, FAQs from files or websites, and linked virtual assistants. To learn more, see Managing Content.
Index Content
After you add content, index the data for efficient retrieval. The ingested data from web pages, files, or database records pass through various stages of indexing. Indexing management lets you transform the documents and fields as per the business requirements. To learn more, see Managing Indices.
Fine-tune Relevance
Go to the SearchAssist Indices menu tab to manage relevance by fine-tuning both the search and result components to fetch and display outcomes in meaningful ways. You can apply business priorities and generate custom responses for each query and position certain responses. This helps the end-user see the most relevant results. To learn more, see Managing Relevance and Personalizing Results.
Design the Search Experience
Design a search experience that best meets the needs of your end-users. From the Indices menu tab, choose between a traditional or virtual assistant and apply customized templates on the results display. To learn more, see Designing Search Experience and Designing Results Templates.
Deploy
Deployment refers to publishing or launching a SearchAssist app onto the target channel, website, or app. This is a two-step process involving adding credentials and adding channels.
Analyze Performance
Analyzing SearchAssist app results helps you understand your search solution and its impact. From the SearchAssist Analytics menu tab, assess user engagement with metrics like Search Insights and Results Insights. To learn more, see Analyzing Metrics.
Experiment with Variations
An experiment helps you determine which combination of search and index configurations performs best. From the Analytics menu tab, you can create multiple variants, display them to live search users at random, and then analyze the results. To learn more, see Experimenting with Search Variants.
Build and Launch your first SearchAssist App.
You can build and launch your first SearchAssit App as guided by the checklist, a workflow wizard that walks you through the following steps.
Adding Content
You can add many types of content, such as website URLs, PDFs, FAQ files from URLs or files, and structured data. You can map content or ingest content from different sources. You can also add virtual assistant actions.
To build and test your first SearchAssist app, add content from any source like content from a website crawl. To add content from other sources, see Managing Content.
- Fill in the fields on the Create app window.
- Click Create.
- Click through the dashboard tour. (optional but recommended)
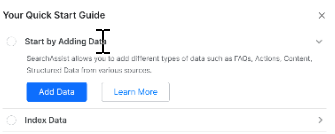
- On the Your Quick Start Guide, click the button next to Start by Adding data.
- Click the Add Data button. A new page displays.
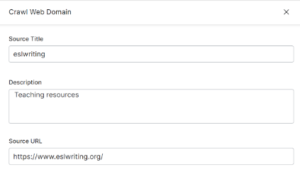
- Click Crawl Web Domain on the Sources page. Note: To exit the platform and return to the Sources page, click 1) Sources on the top menu, 2) Content on the left menu, and 3) the grid icon.
- On the next page, fill in the required fields (Source title, Description, Source URL).
- Customize settings. (optional but not recommended for the first app)
- Click Proceed.
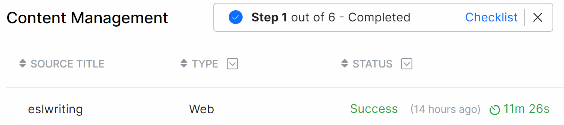
- If the URL validation test passes, click Crawl. Note: If the validation pass fails, check the structure of the URL.

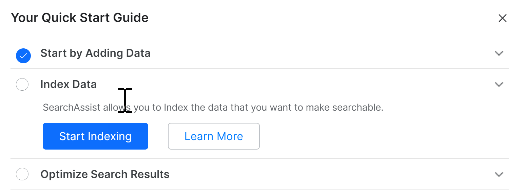
Indexing Data
After SearchAssist adds data, the next logical step is Indexing Data.
Click the Checklist link at the top of the page.
- Click Start Indexing.
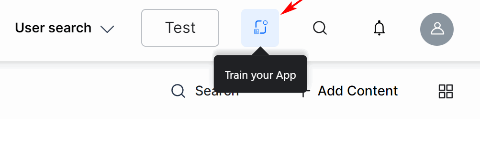
 When the task completes, SearchAssist opens the Indices page. It shows a list of field names and traits.
 - With the Indices tab selected, click the Train your App icon.
 SearchAssist marks the Index Data task complete.
Index Configuration is the default set of parameters like Fields and Traits which can be fine-tuned further for customization. Click the edit icon to review and edit the indexing parameters. See Managing Indices.
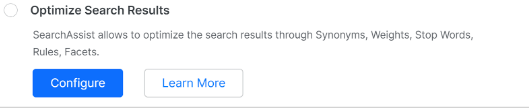
Optimizing Search Results
This step lets you configure attributes like weights, synonyms, and stopwords. SearchAssist assigns default values to these attributes and allows you to edit them before saving the configuration.
To learn more about customizing search configurations (e.g. assign weights, manage synonyms, add stop-words), see Managing Relevance.
You can personalize search outcomes based on user requirements by configuring variables like ranking, business rules, and dynamic facets. To learn more, see Personalizing Results.
To review and accept default settings and mark this step complete:
- Click the Configure button.
- On the Weights page, click Save Weights.
- To add more personalizations, click an item on the left menu and follow the workflow.
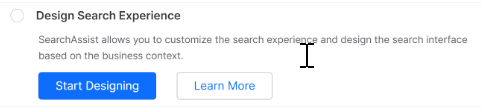
Designing the Search Experience
This step helps you design the search app’s interface. Click Start Designing and follow the workflow as it moves through four steps. To learn more, see Designing Search Experience.
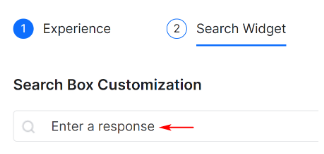
- With the Indices > Experience tab selected, choose an option: Search Bar (Search Bar at the top) or Search Assistant (Search Bar at the bottom of the page).
- Click the Search Widget tab.
- Enter a new label (optional).
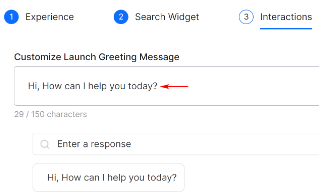
- Click the Interactions tab.
- Enter a new greeting. (optional)
- Click the Results Feedback tab.
- Enable end-user feedback. (The default setting is disabled).

- Click the Done button.
Testing
- Click Test to experience the search before fine-tuning the SearchAssist app.

- Click Let’s start on the next page. (Or click the Test button on the top menu)
- Type a keyword or phrase in the field.

- SearchAssist displays a list of results.

On the results page, you can customize rank results for each URL.
- Click the Customize button.
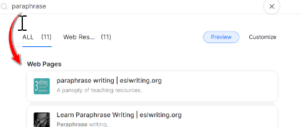
- Hover the mouse on the WEB Response icon.
- Click an icon to choose an option: Hide, Pin, Boost, or Lower.
- Click the X icon to save the customizations and close the Test page.
Fine-tuning Relevance
The checklist is a guided workflow that walks you through all the necessary and essential steps to build your SearchAssist App before you launch it.
- To complete the guided workflow, click the Sources menu tab.
- Click Checklist.
- Click Optimize. The Indices > Results Ranking page displays.

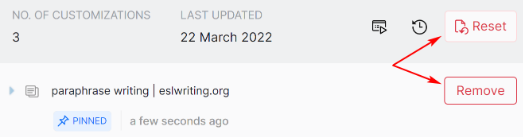
- On the Results Ranking page, you can review page links and customizations.
- Click the Remove button to delete one specific page customization. Click the Reset button to remove all customizations for a single page.
If you want to change page customization, open the Test page, enter the same search keyword, click the Customize button, hover over the WEB Response icon, and select new customization. To learn more about customizing Results Ranking, see Tuning Results Ranking.
Currently, The SearchAssist platform supports only the web-based SDK channel.
Congratulations! Your first SearchAssist app is ready for launch.