
Welcome to SearchAssist. SearchAssist provides a no-code platform for you to build an application capable of searching through content from various sources and providing accurate, and optimum search results and answers. It also offers you all the tools required to customize and manage the search experience for your users.
Building an application using SearchAssist involves configuring content sources, establishing business rules, defining the search experience, and integrating with third-party systems or LLMs. While the fundamental steps in creating a search application via SearchAssist remain consistent, keep in mind that the specific details and configurations differ based on unique business requirements and the end users of the application. This tutorial serves as a starting point.
Overview
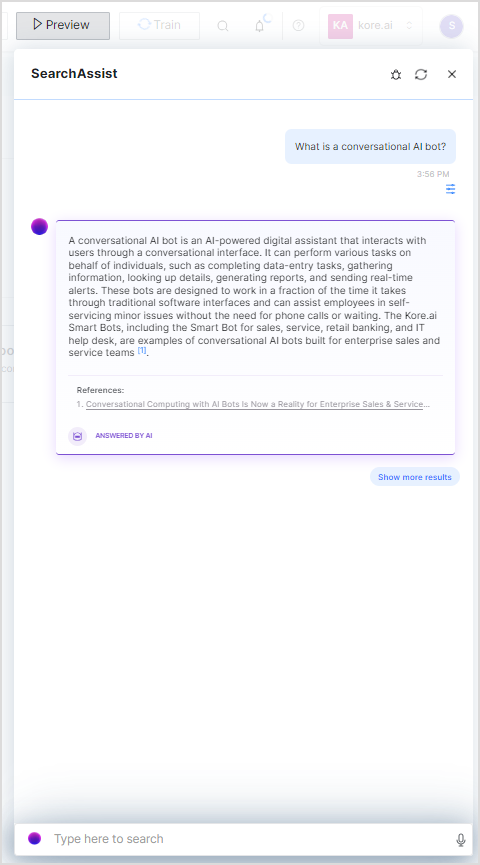
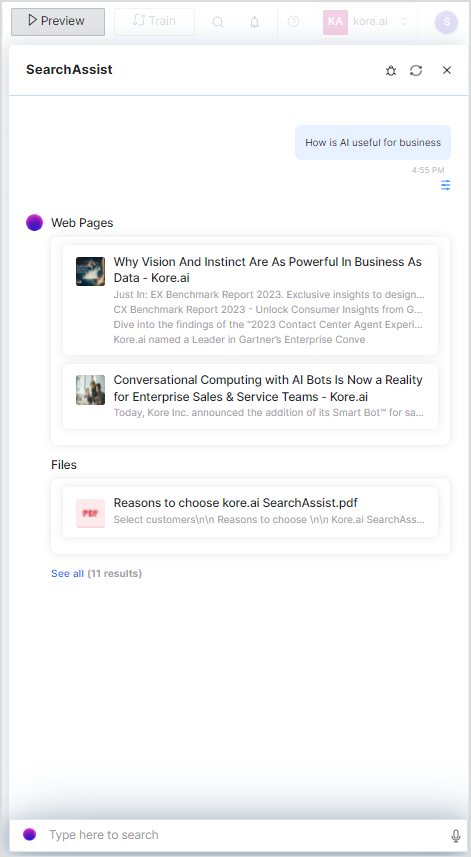
SearchAssist enables you to create applications that can both provide search results to the users and generate answers. Search functionality aims to provide users with a set of results and associated documents or web pages in the order of relevance to the user’s query. On the other hand, the Answers functionality aims to provide a precise response to a user’s query as opposed to providing a list of relevant results.
The following search response illustrates the difference between the search results and answers.
A typical SearchAssist application development goes through the following behind-the-scenes stages to generate answers or provide search results.
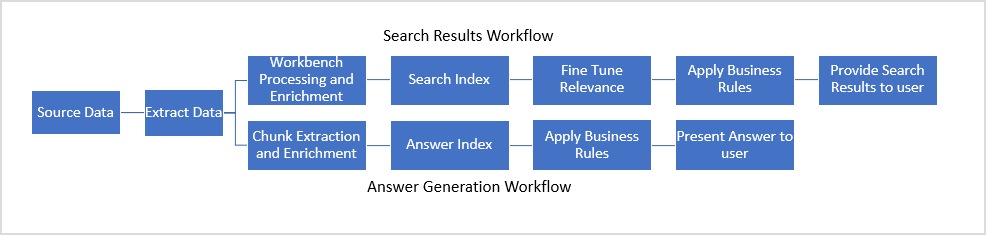
To provide relevant results to a user query, a search application first indexes the data as per the index fields identified for the data. Next, it performs a series of manipulations on the data as per the workbench processes defined followed by fine-tuning the relevance of the fields, and then personalizing the results before presenting to the user as the response. For an answer application, SearchAssist prepares an answer index by dividing the input data into relevant chunks. Depending upon the model selected for answer generation, the most relevant, direct, and precise answer is generated and displayed to the user.
In the following sections, we will explain the steps that you need to follow to create your SearchAssist application.
1. Define Requirements
Before diving into the setup and configurations, list the requirements. Consider factors such as the type of content and source of content you’ll search for, the desired user experience, the type of answers you wish to generate, and any specific business rules to set up for search results or answers.
2. Create your application
If you are a new user, visit our home page and sign up with us. If you have already signed up, log in to the SearchAssist application, create your workspace, or join an existing workspace. Create an application in the workspace. 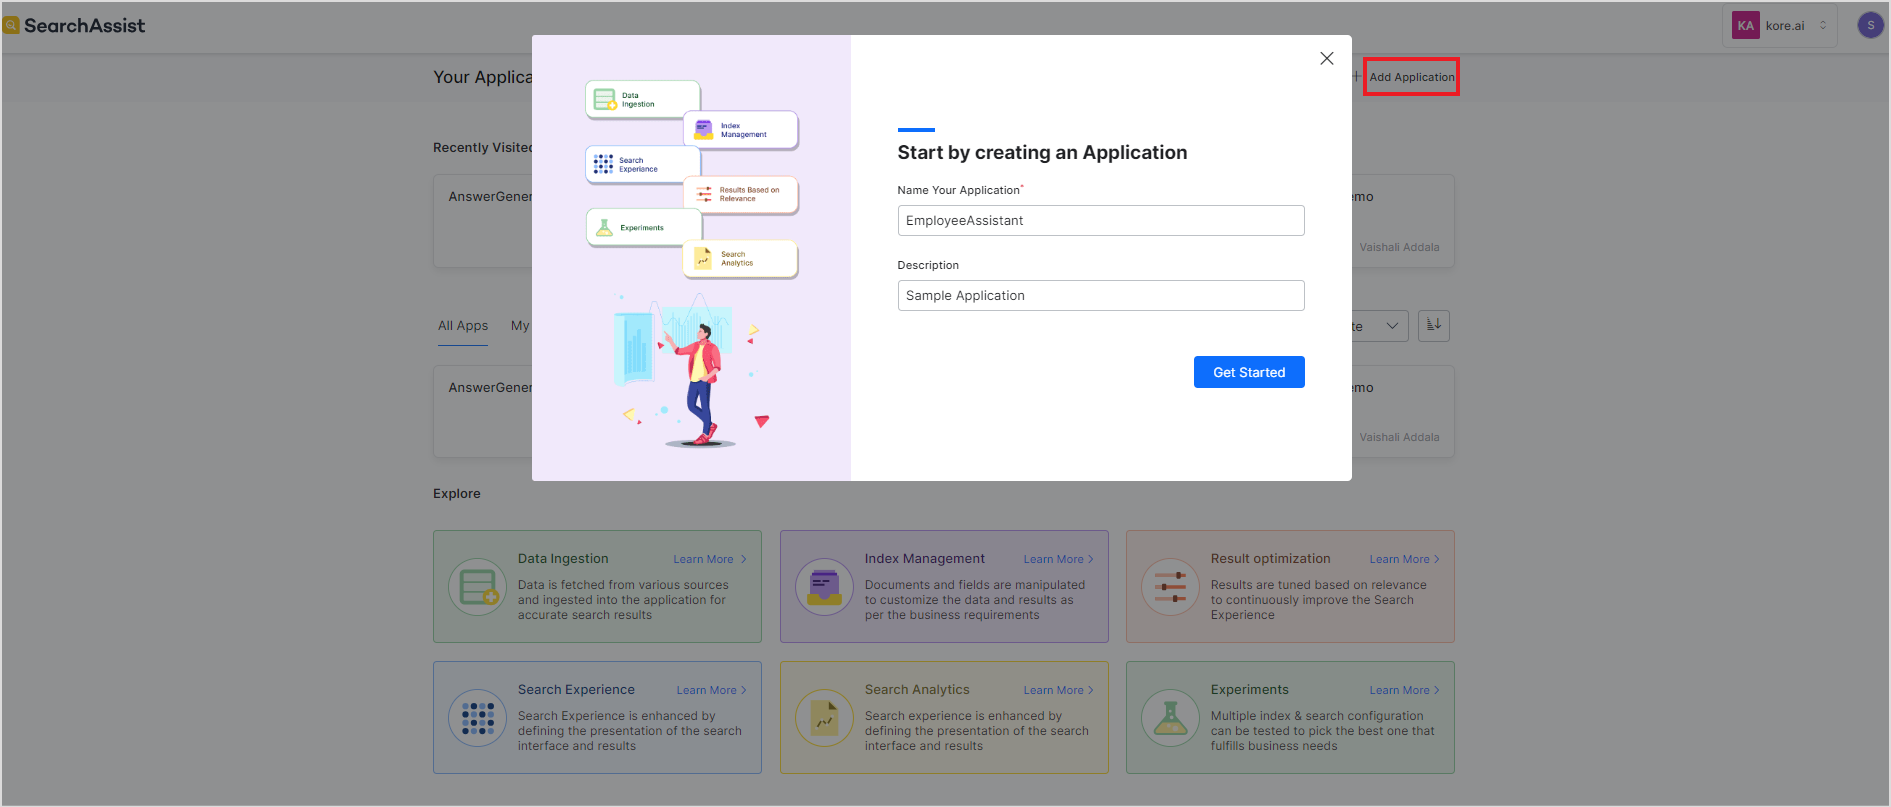
You can create multiple search applications using your SearchAssist account. For step-by-step instructions on how to create your workspace and application, refer to this.
3. Set up Source Data
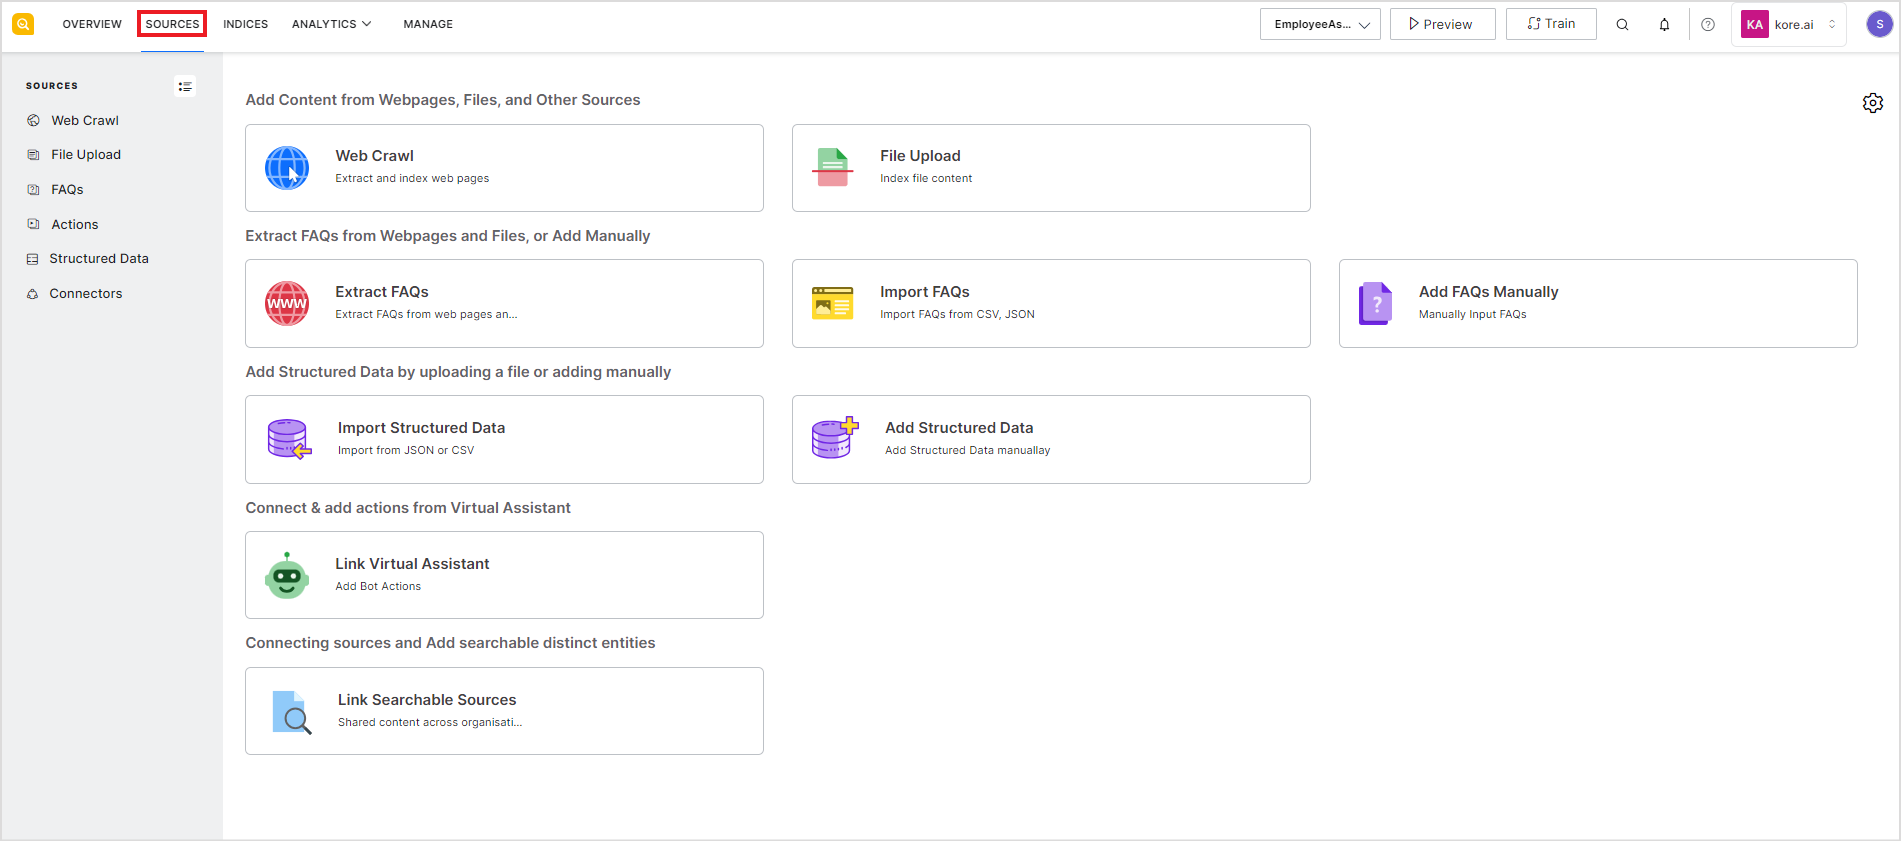
SearchAssist application can index and search through data from different sources. You can directly upload files, FAQs, and structured data to the SearchAssist application, link to web pages, or add third-party content sources like Confluence Cloud, Zendesk, ServiceNow, Google Drive, etc.
To add a source, go to the Sources tab and add your content source. Refer to this guide for step-by-step instructions on how to ingest different types of data.
4. Implement Search Functionality
Search functionality aims to provide users with a set of results along with the URLs or references to the documents or web pages that are used to derive the results or the source of truth. SearchAssist provides you with various configurations to design an optimum search application that provides the most relevant results to its users. This section focuses on the configurations that can help you find the most relevant search results.
4.1 Index Data
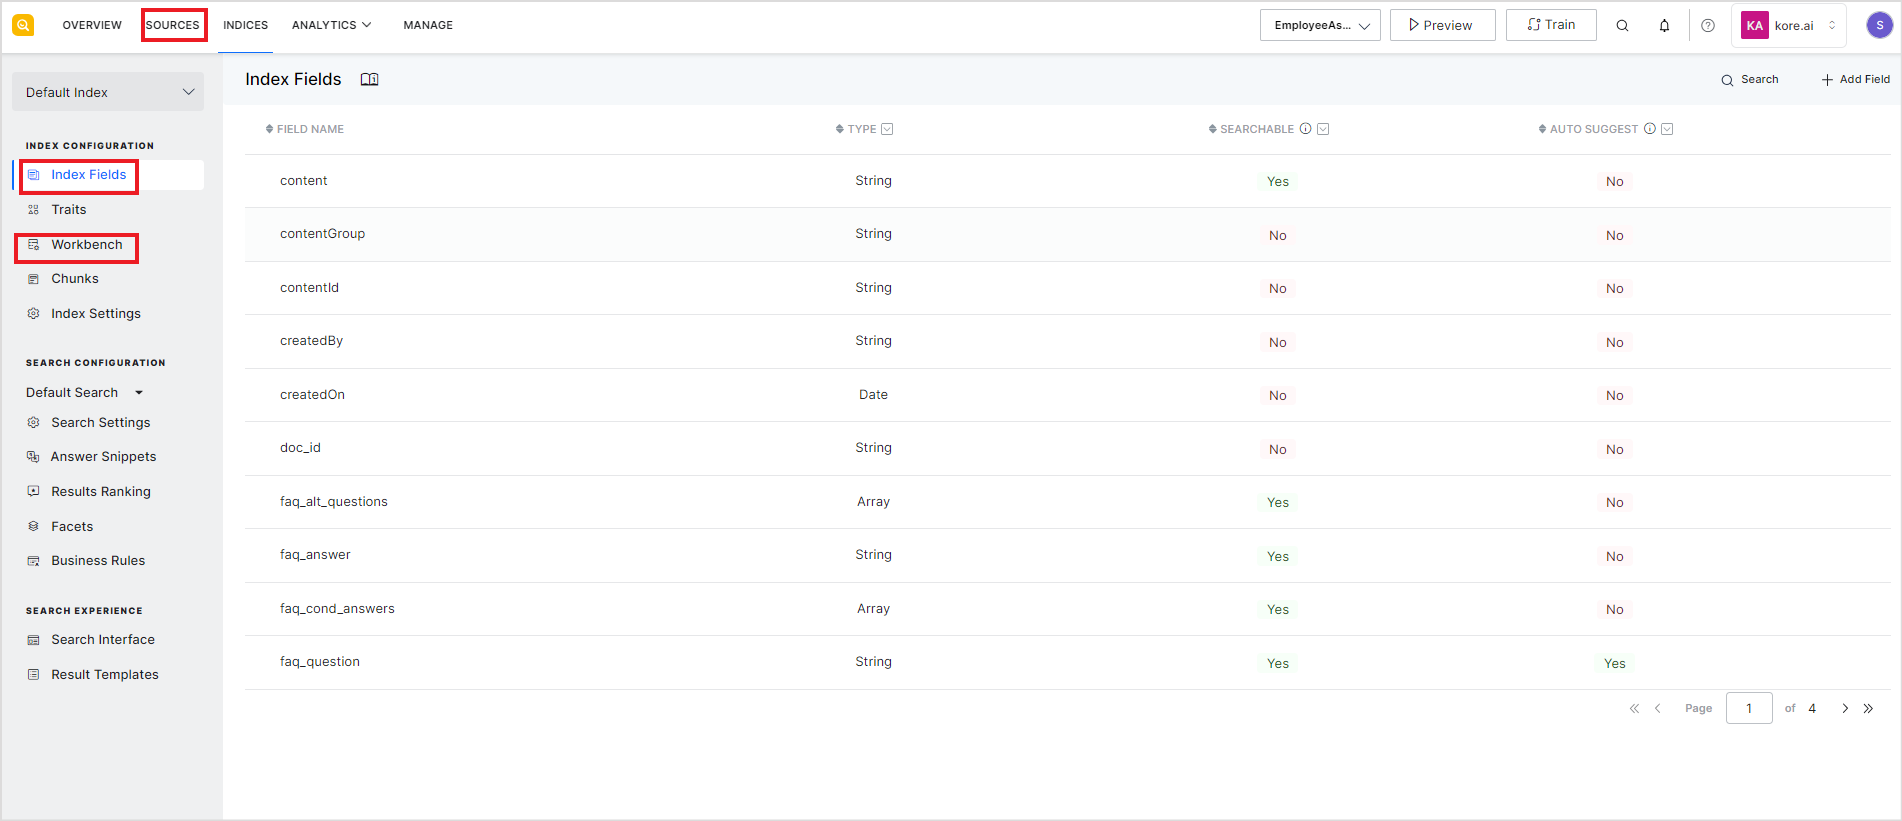
Indexing of data refers to the transformation of ingested data to extract relevant information as per the business requirements and enable efficient retrieval. The first step in this process is to add index fields. Every SearchAssist application has a default set of index fields that enable them to read and interpret the data from the standard file formats. For structured data, define your index fields. Whenever the content from documents, web pages, or connectors is ingested, the data is indexed as per the default index fields. You can also add custom fields for any type of data.
The next step is to configure the workbench stages which define how the ingested data is to be transformed before indexing. The workbench stages are processed sequentially. For example, you can define stages to exclude certain types of documents from your source or extract certain types of information and store them in a special field for further processing. Define the stages as per your business needs. SearchAssist provides various types of stages that you can add to your workbench pipeline. Each stage offers a different type of processing for the input like entity extraction, field mapping, keyword extraction, etc. There are three default stages defined for every application that you create using SearchAssist. For more information on the workbench and the different types of stages that you can add, refer to this.
There are some other Index settings that you can configure for further customization. For more details, refer to this guide.
4.2 Fine Tune relevance
You can fine-tune the search results to fetch and display the most relevant results to the users efficiently. It is the process of adjusting the parameters to improve the quality of search results in terms of accuracy and relevance to the user query. For example, you can associate a weight for each of the index fields. The higher the weightage, the more relevant the field is considered. Similarly, you can define stop words to omit unnecessary words from the query or define synonyms to increase semantic understanding of the SearchAssist application.
Use the Search Settings under the Indices tab to configure the properties of the index fields. Refer to the Managing Relevance section for detailed information on the properties. 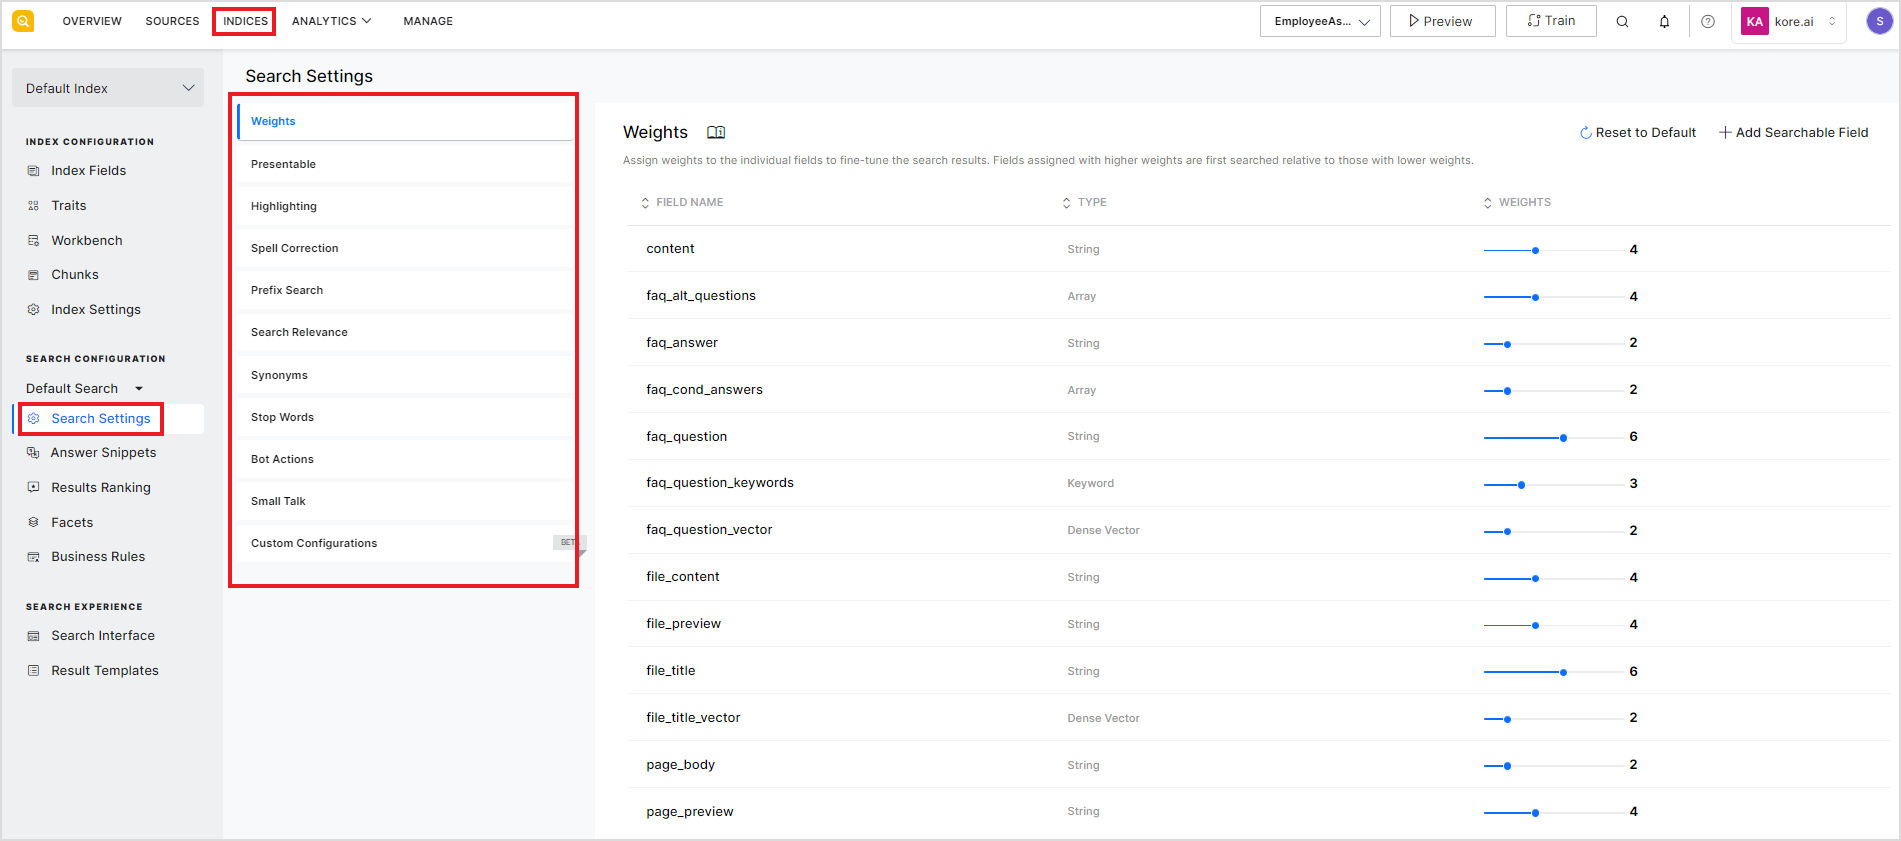
5. Implement Answer Functionality
Answer Retrieval refers to providing a specific response to a user’s query as opposed to providing a list of documents or web pages. This section focuses on the steps required to tune the application to generate the most appropriate answers from the source data.
5.1 Enable Answer Generation Model
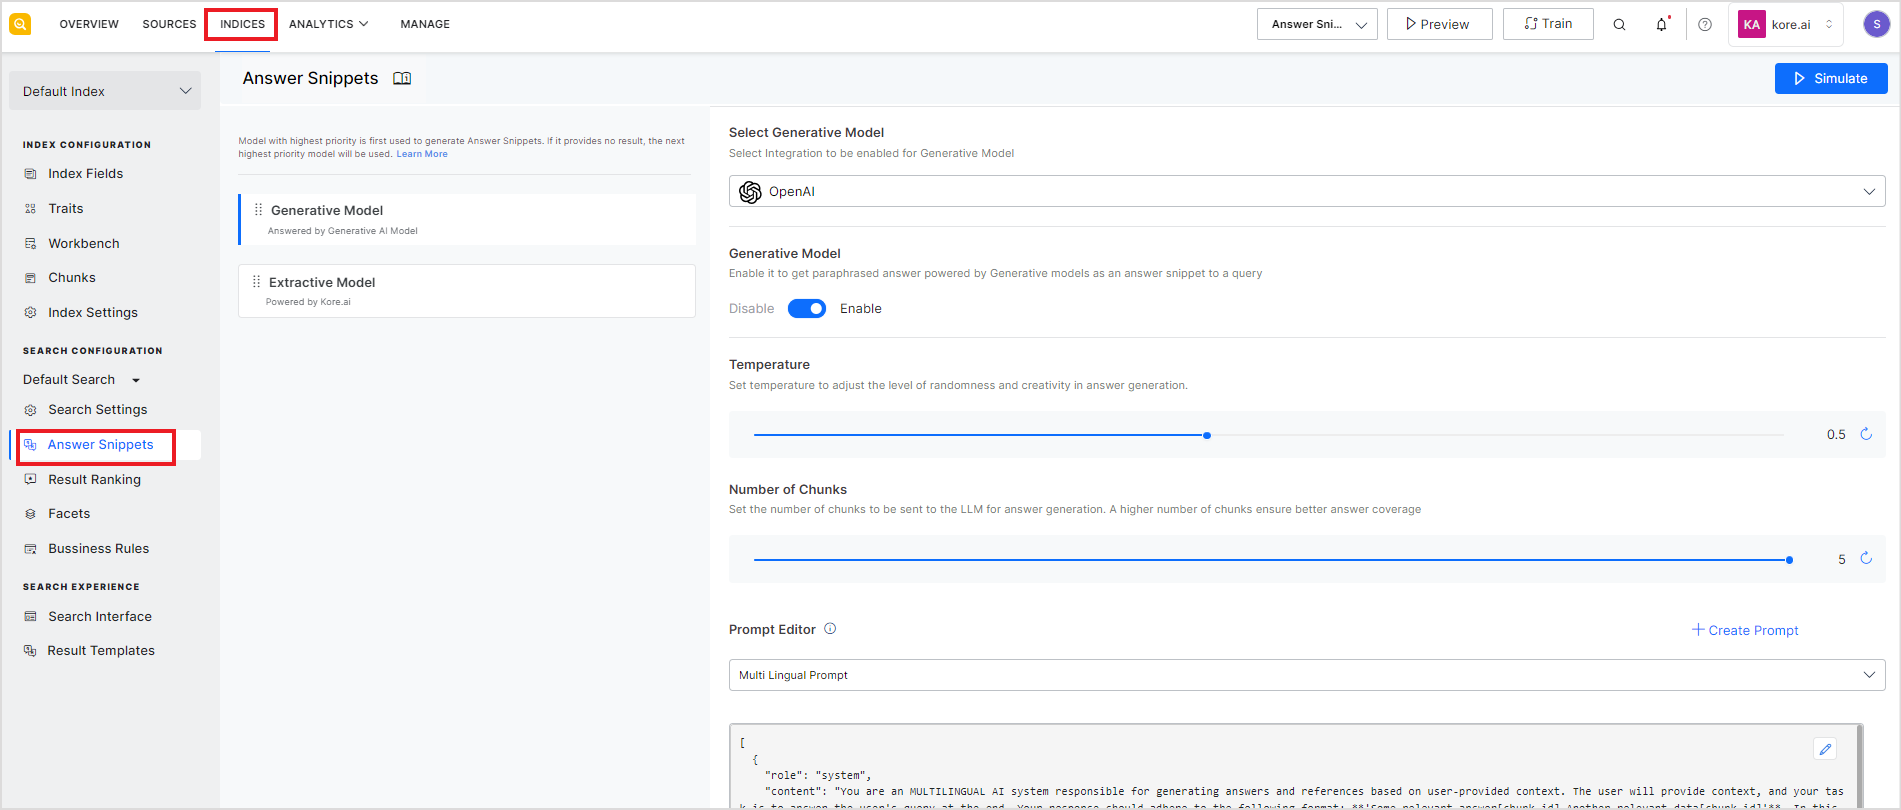
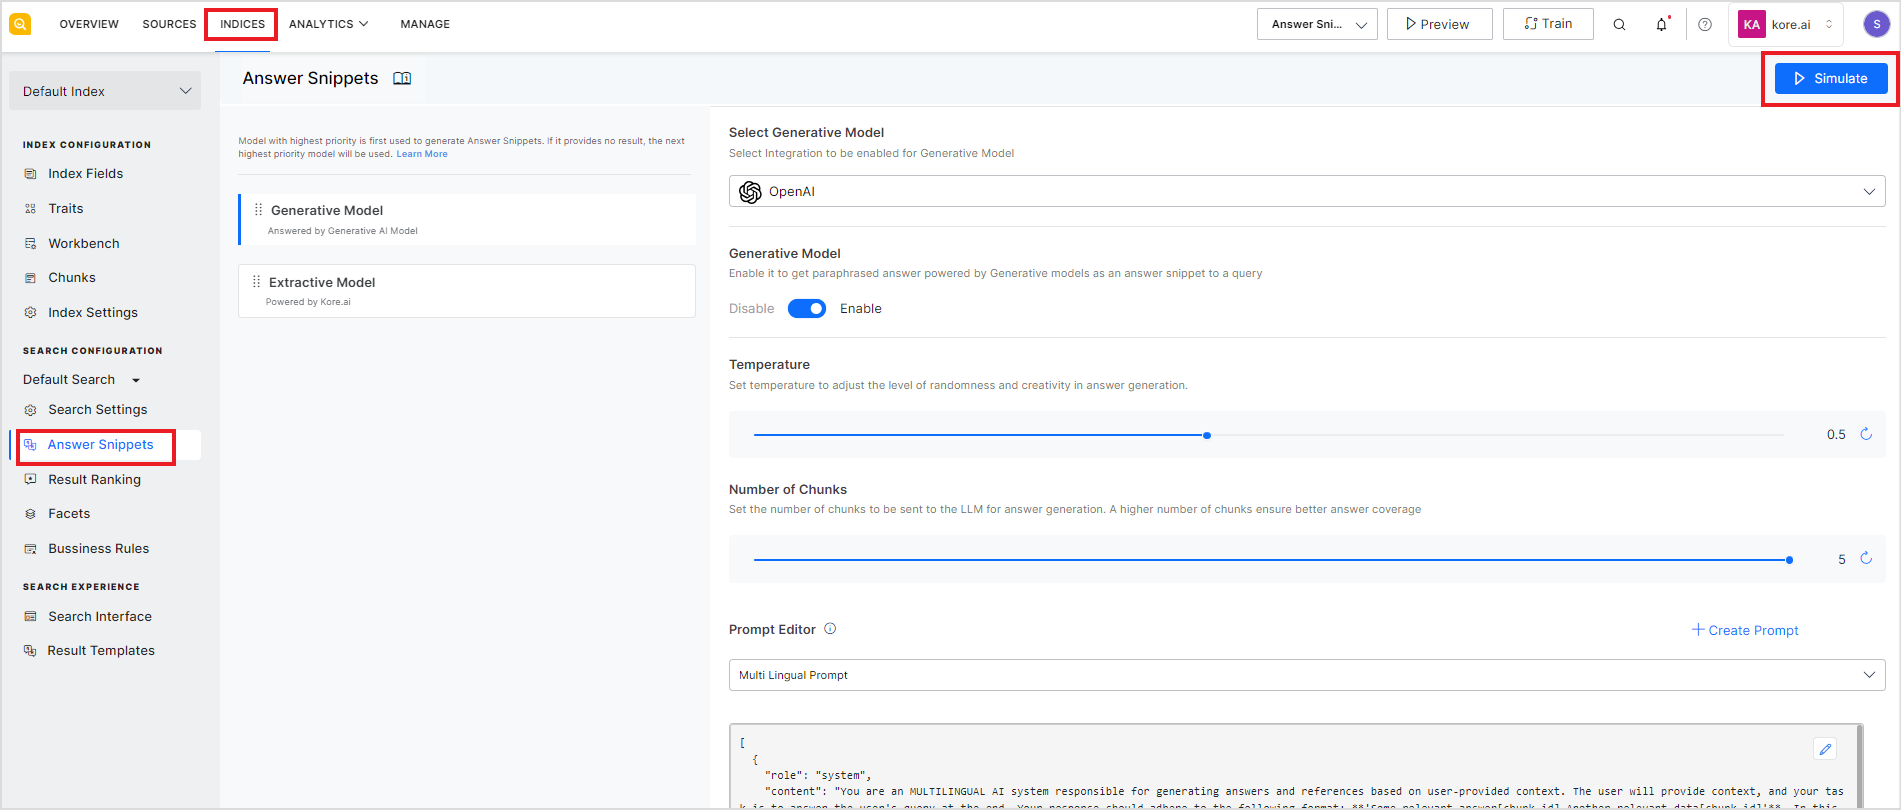
SearchAssist currently offers two models of answer generation – the Extractive model and the Generative model. You can enable one or both of the models to generate answers. When both of the models are enabled, the model placed on top is considered to be higher in priority and takes precedence. To know more about the supported models and learn how to enable or prioritize them, refer to this.
To enable Answer Snippets, go to the Answer Snippets under the Indices tab and enable one or more of the supported models. Next, click on Train to allow the SearchAssist application to prepare its answer index. In this process, the application automatically generates chunks from the source data. These chunks are then used for answer generation.
For all the supported models, SearchAssist provides various config parameters to customize the response formats as per the business needs. Refer to this for more info.
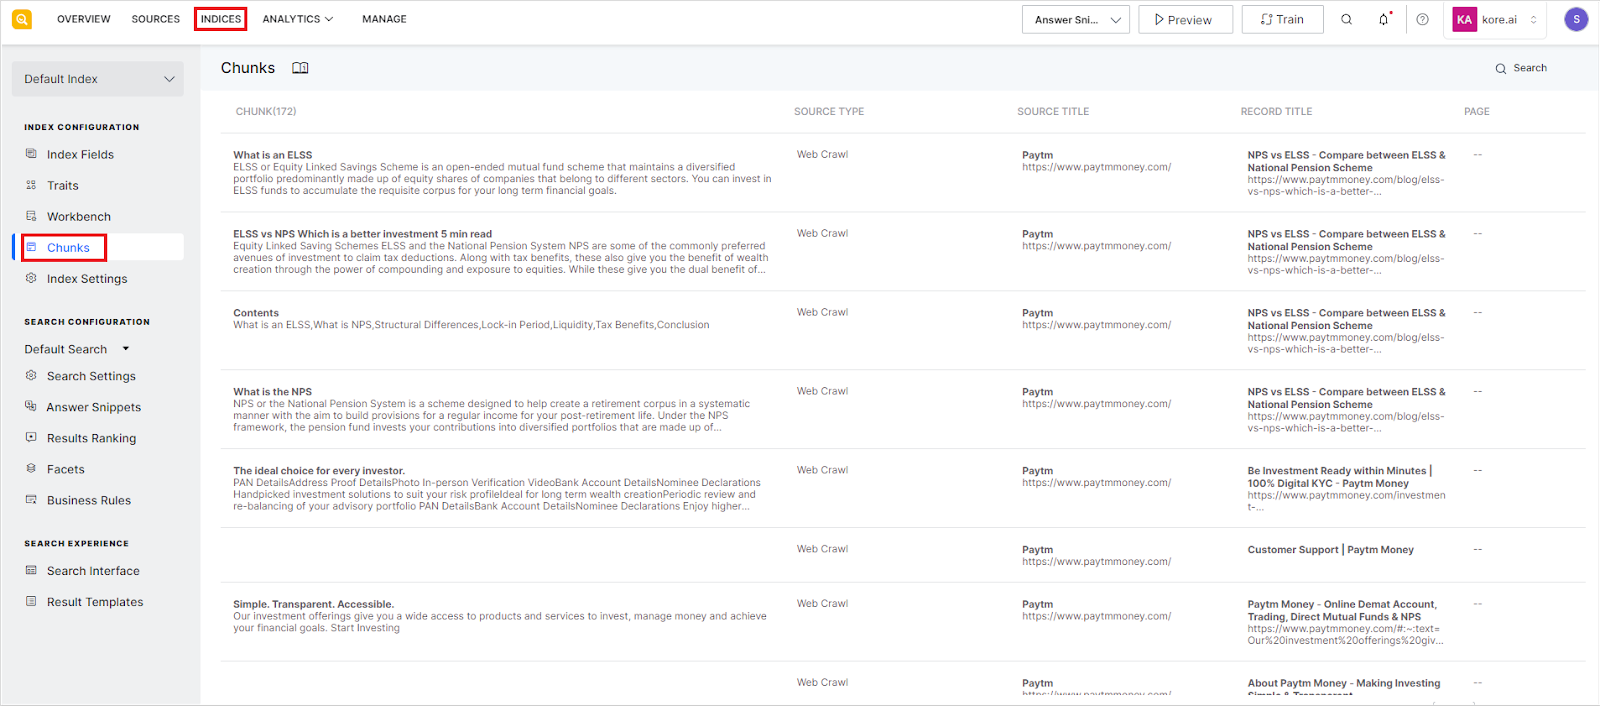
5.2 Optimize Chunks
As mentioned above, on enabling answer snippets for an application, the application automatically generates chunks from the source data. SearchAssist provides a chunk browser for you to assess and analyze the extracted chunk, giving you an insight into the output from the extraction process and enabling you to undertake subsequent actions if required. This not only allows you to verify the extracted chunks but also allows you to edit them enabling you to work with search results in a way that best serves your specific goals and requirements.
For more information, refer to this.
6. Personalize results
Personalizing results is the process of defining rules based on your business requirements that generate custom responses for each query and position responses in the search results. You can use Results Ranking, Facets, and Business Rules to personalize the search results by selecting appropriate filters based on the field values. Similarly, you can use business rules to personalize answers as per your business needs.
Find more details under Personalizing Results.
7. Set up Search Interface
SearchAssist allows you to customize the search experience that you want to offer to your end users. You can choose the search interface you want to offer and apply custom templates to the results to be displayed. To learn more, see Designing Search Experience.
Go to the Indices tab and use the configurations under the Search Experience section to customize the search interface and result templates.
8. Test and Debug the application
It is ideal to test the behavior of the application in terms of the quality and relevance of the search results as well as the look and feel of the application before publishing it. Testing gives the confidence to deploy the application.
To test and debug the application, you can use the Preview option. Type in your test queries, and the widget will display the results found in response to the query. The debug option further shows all the search results, snippets generated, etc to generate the final results.

You can not only preview but also customize the search results while testing. Refer Testing SearchAssist app for detailed instructions.
To test workbench stages while in development, you can use the simulator to test the behavior of the current configuration. The simulator allows you to view the changes you are making to the index fields and how are they affecting the processing of the ingested data. 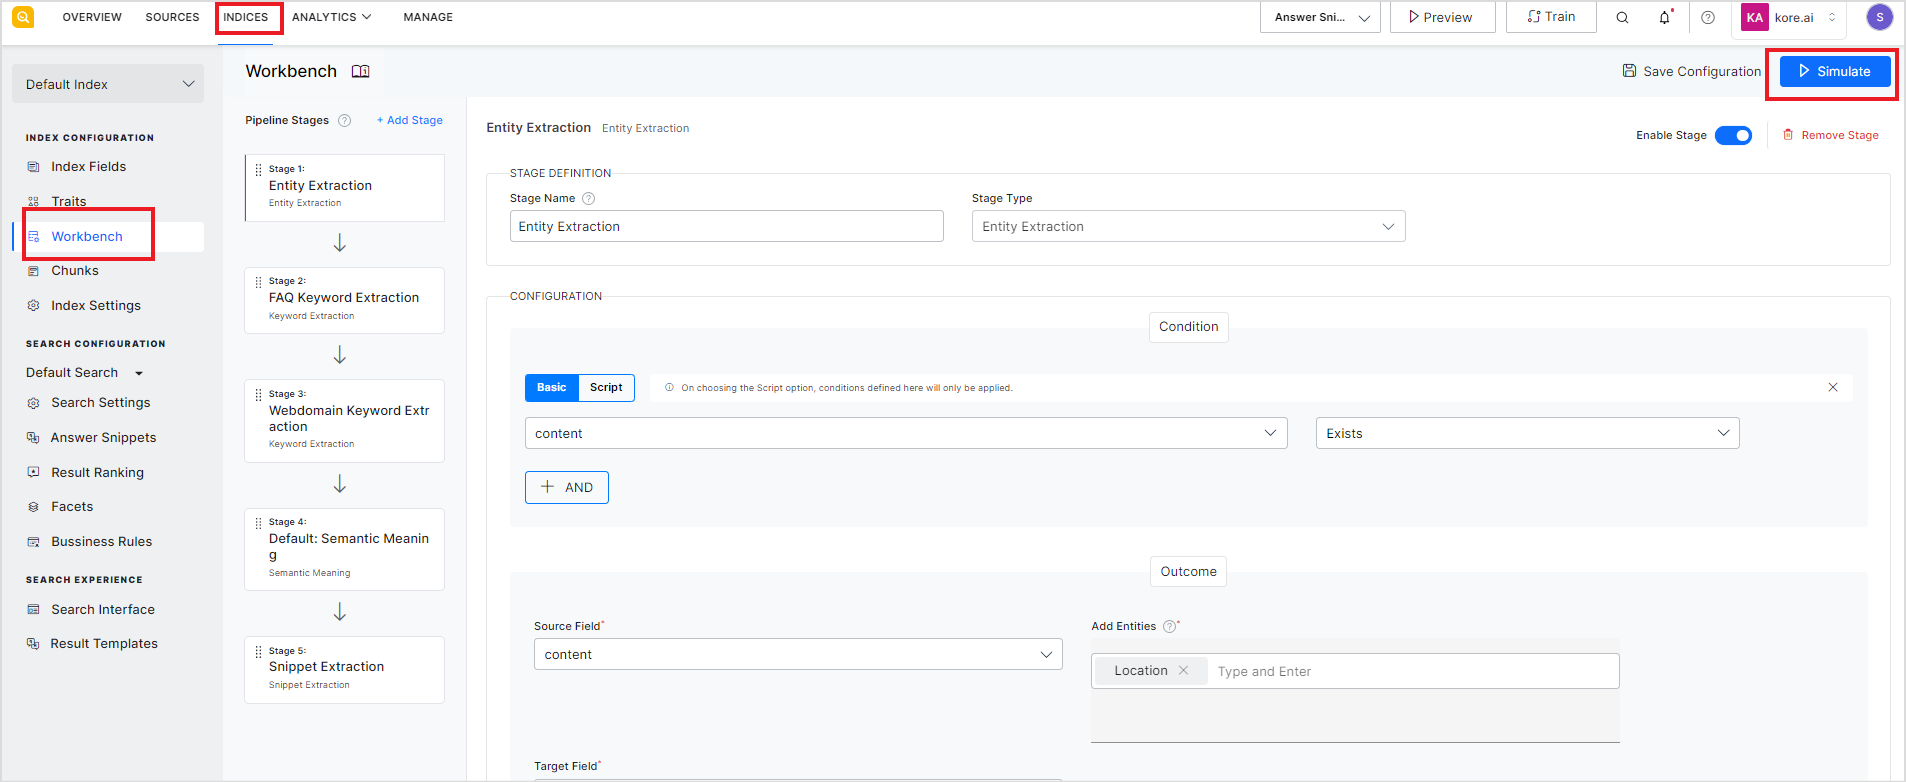
Similarly, to test the behavior of the answer snippet models and compare them for accuracy and performance, you can use the simulator available on the Answer Snippets page. This simulator compares the results from the enabled models allowing you to choose the most appropriate model for your requirements.
9. Deployment
After you have configured the SearchAssist application and tested it locally, publish or launch the app onto the target channel, website, or app. This is a two-step process that requires you to generate credentials and add a channel for communication with the SearchAssist app. For more information, refer to the Web SDK integration guide.
Congratulations! With this step, your first SearchAssist app is ready for launch.
10. Analyze Performance
After successfully deploying the SearchAssist app, you can use the analytics information provided by the app to understand and improve your search solution continuously. It provides you insights into user engagement as well as search solution behavior. To learn more, refer to Analyzing Metrics.