By setting up the Google Drive connector in SearchAssist, you can enhance the search capabilities of your Google drive managed content and experience smooth integration for maximum efficiency.
Specifications
| Type of Repository | Cloud |
| Supported API version | Google Drive API v3 |
| Search Results Support | .doc, .docx, .ppt, .pptx,.pdf, .txt, .OneNote |
| Extractive Model for Answers | Not Supported |
| Generative Model for Answers | .doc, .docx, .ppt, .pptx, .pdf, .txt, .html |
| RACL Support | Yes |
| Note: Password-protected files in any format are not supported. | |
Configuring Google Drive as a content source involves:
- Creating an application project in your Google account
- Configuring the Google Drive connector in SearchAssist
Step 1: Creating an application project in the Google account
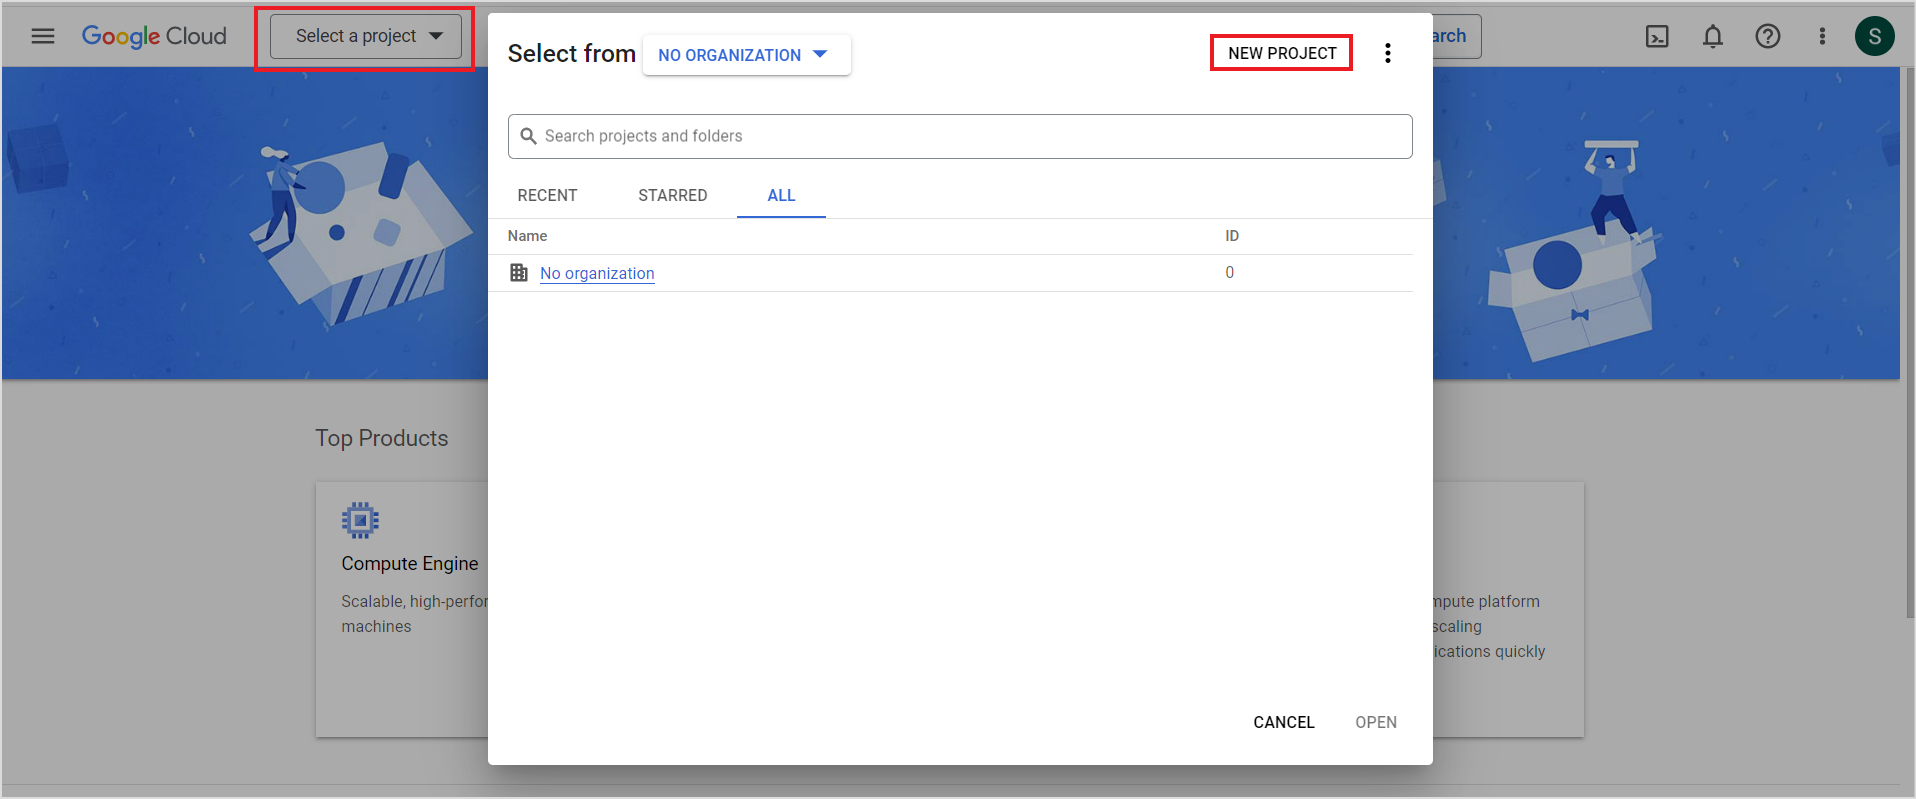
Login to your Google developer console.
Select the drop-down for the project and create a new project.
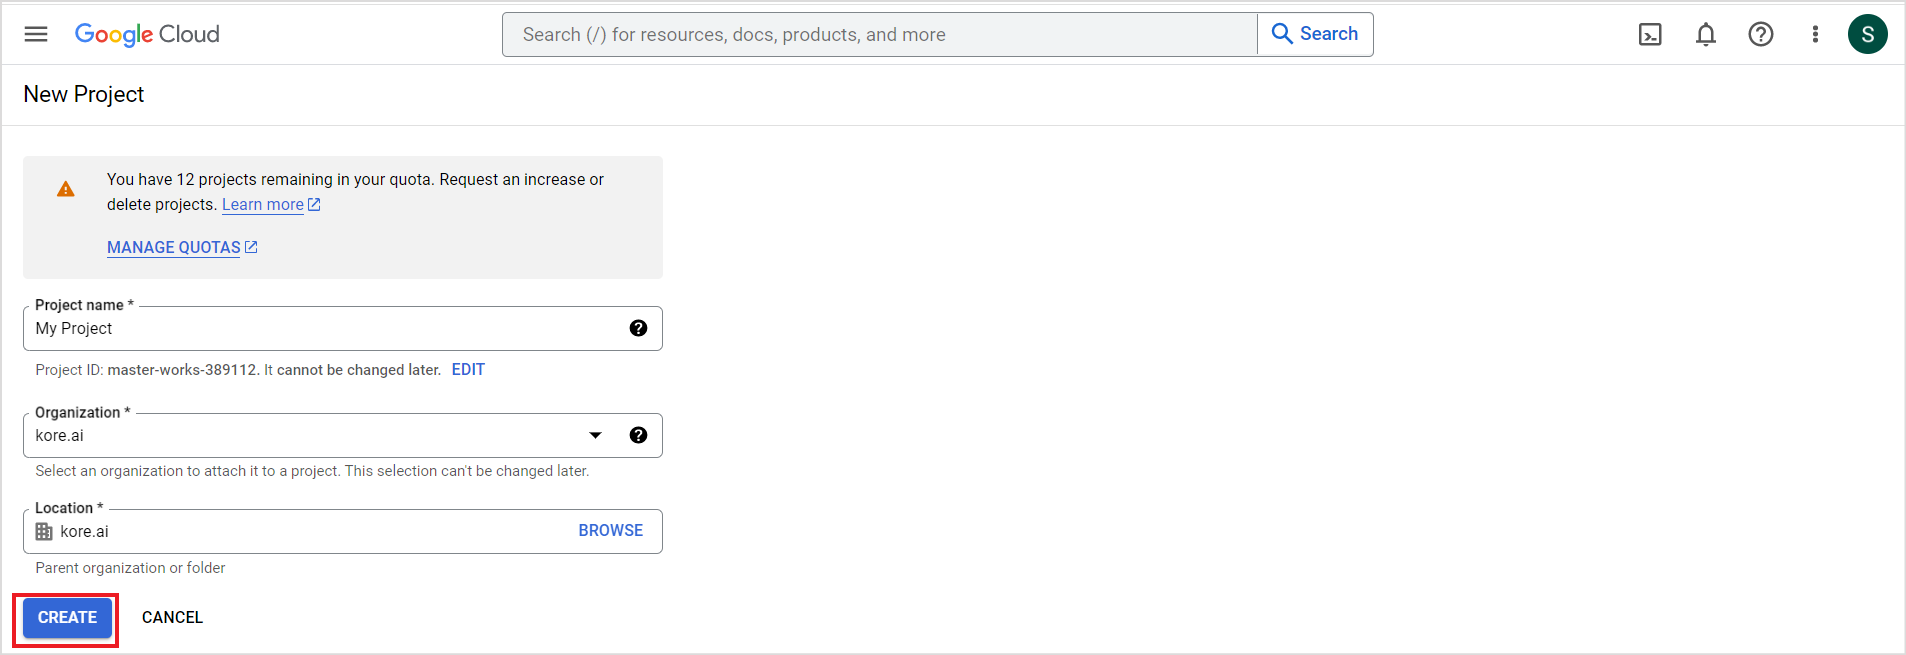
Provide the basic details for the project and click CREATE.
From the left navigation menu, go to APIs & Services and click Enabled APIs & services. 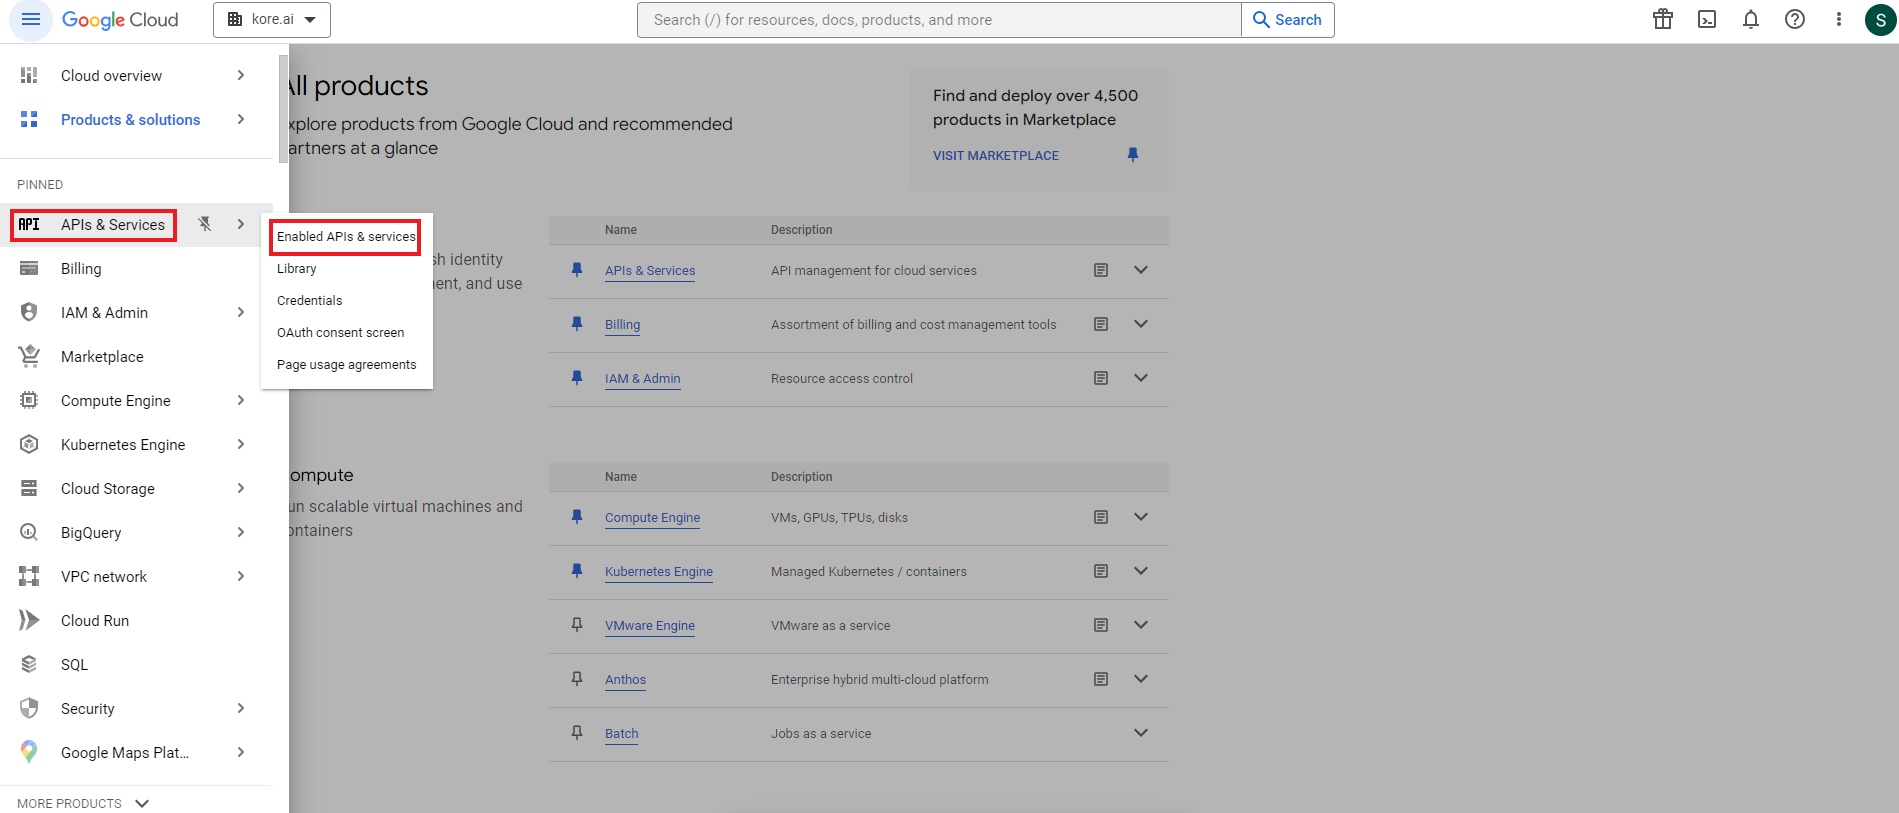
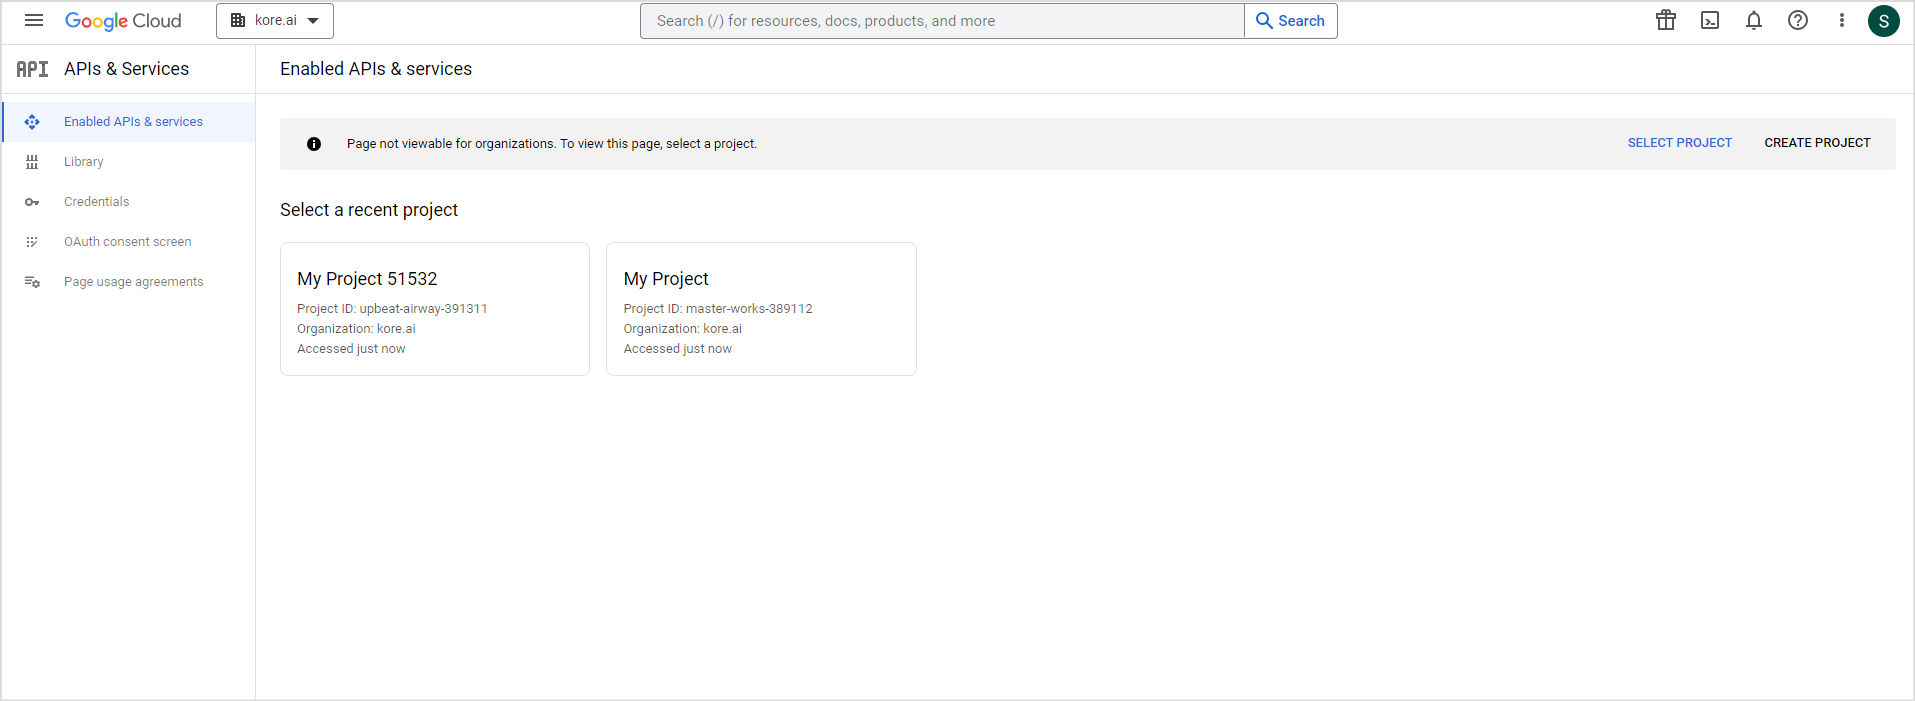
Select your project.
Click on ENABLE APIS AND SERVICES. 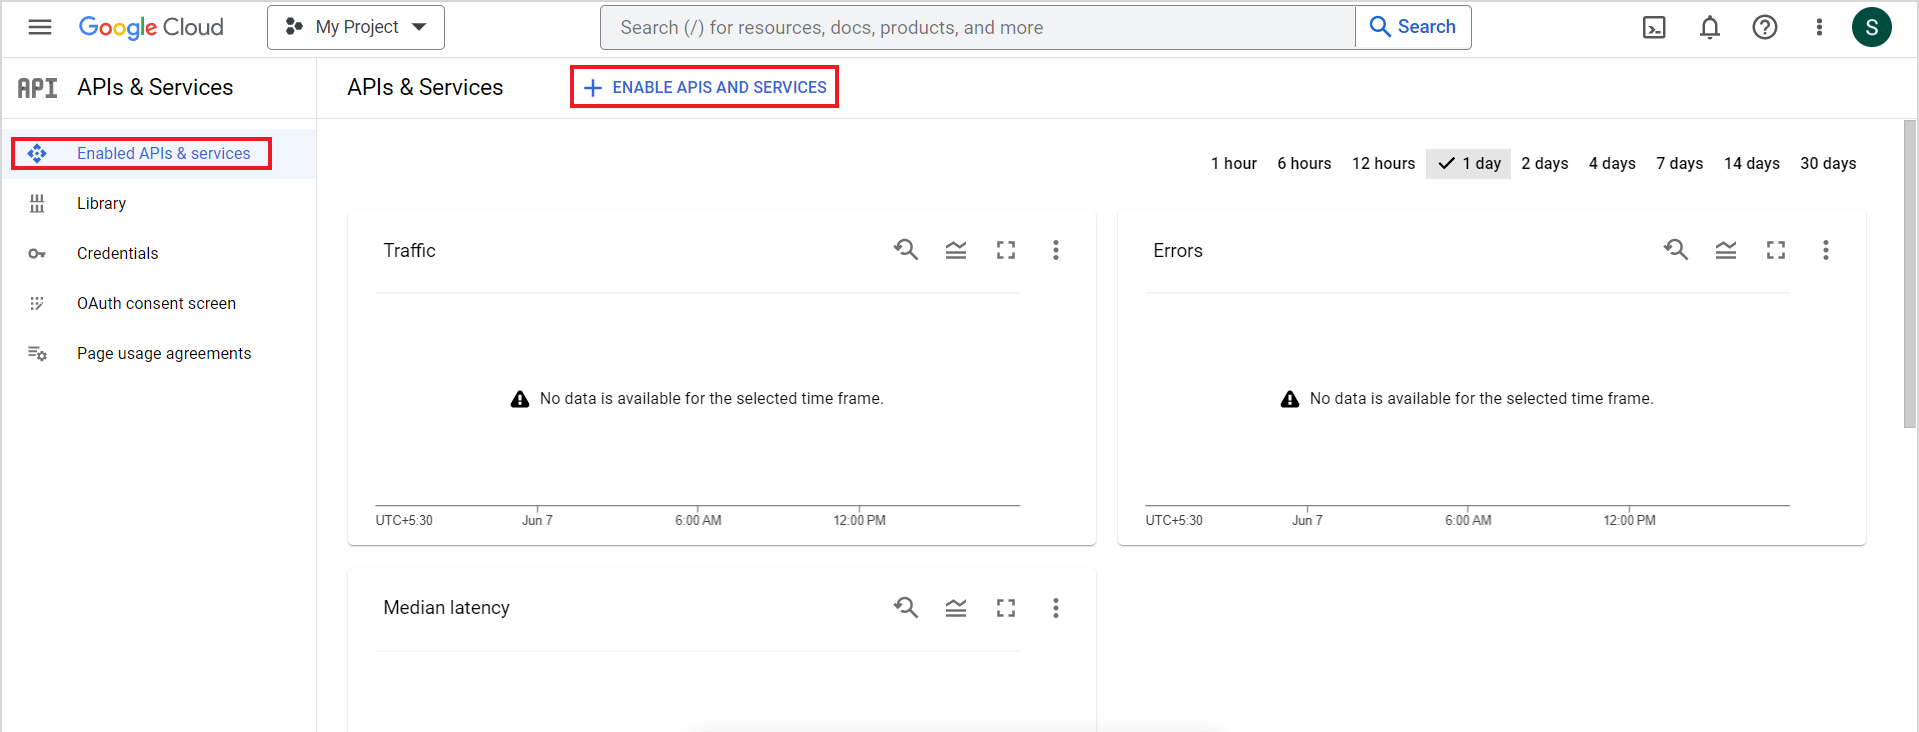
The following page will list all the API libraries. Find Google Drive API and enable it. 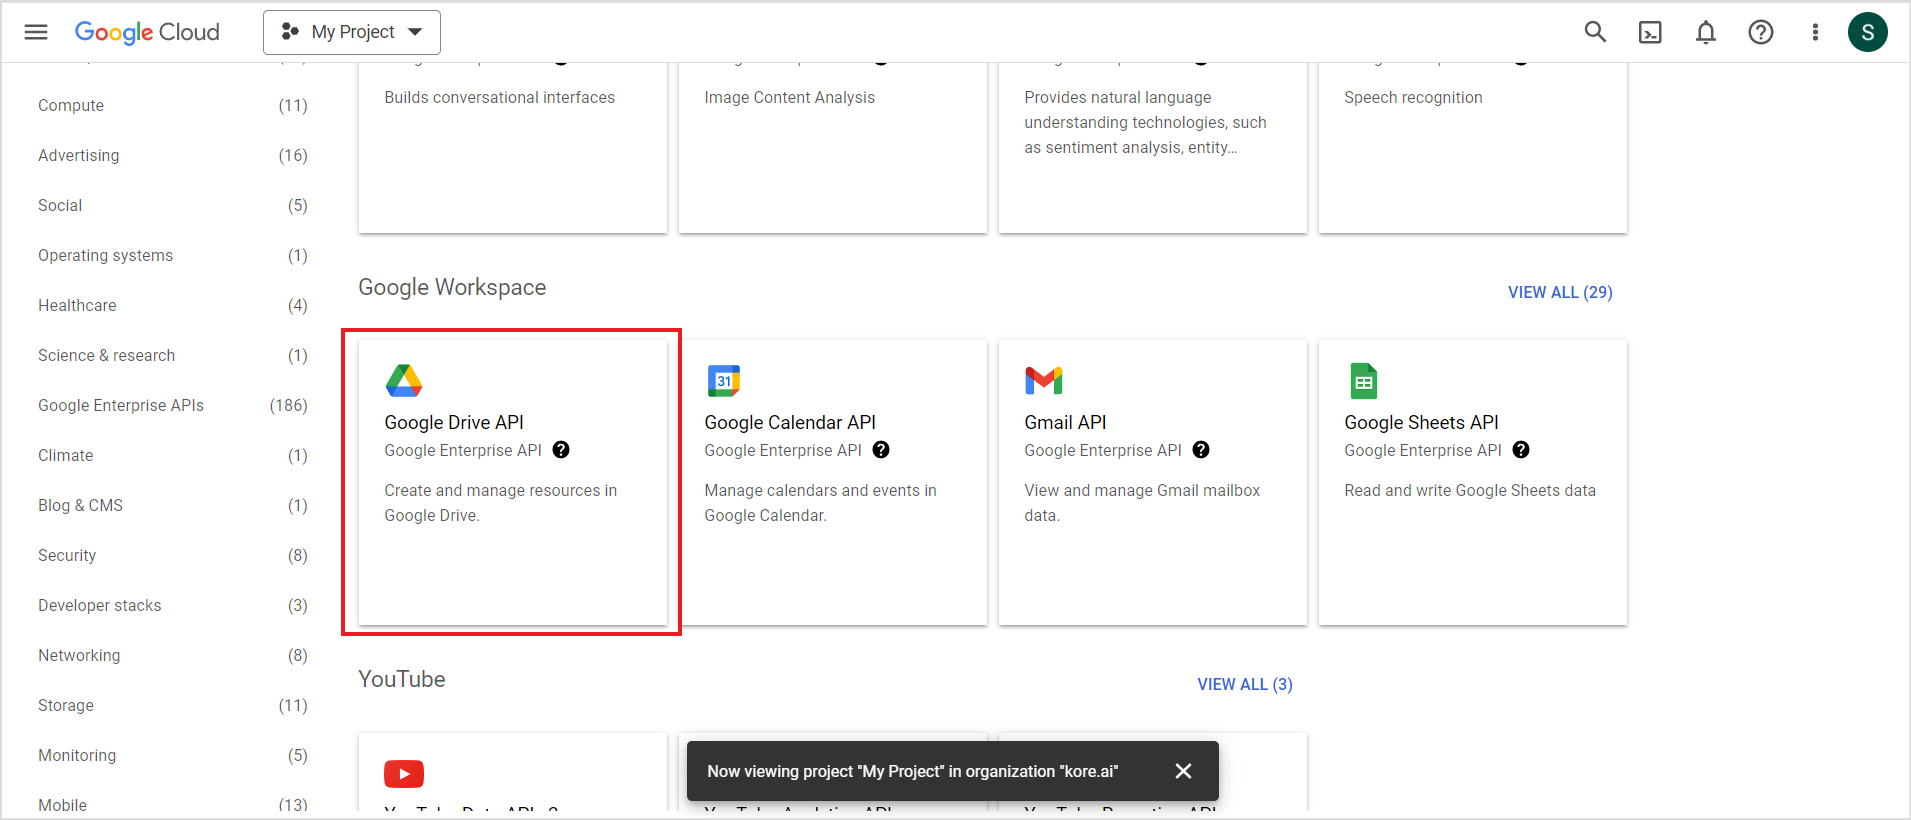

Once enabled, it will show the details of the API. Click on CREATE CREDENTIALS. 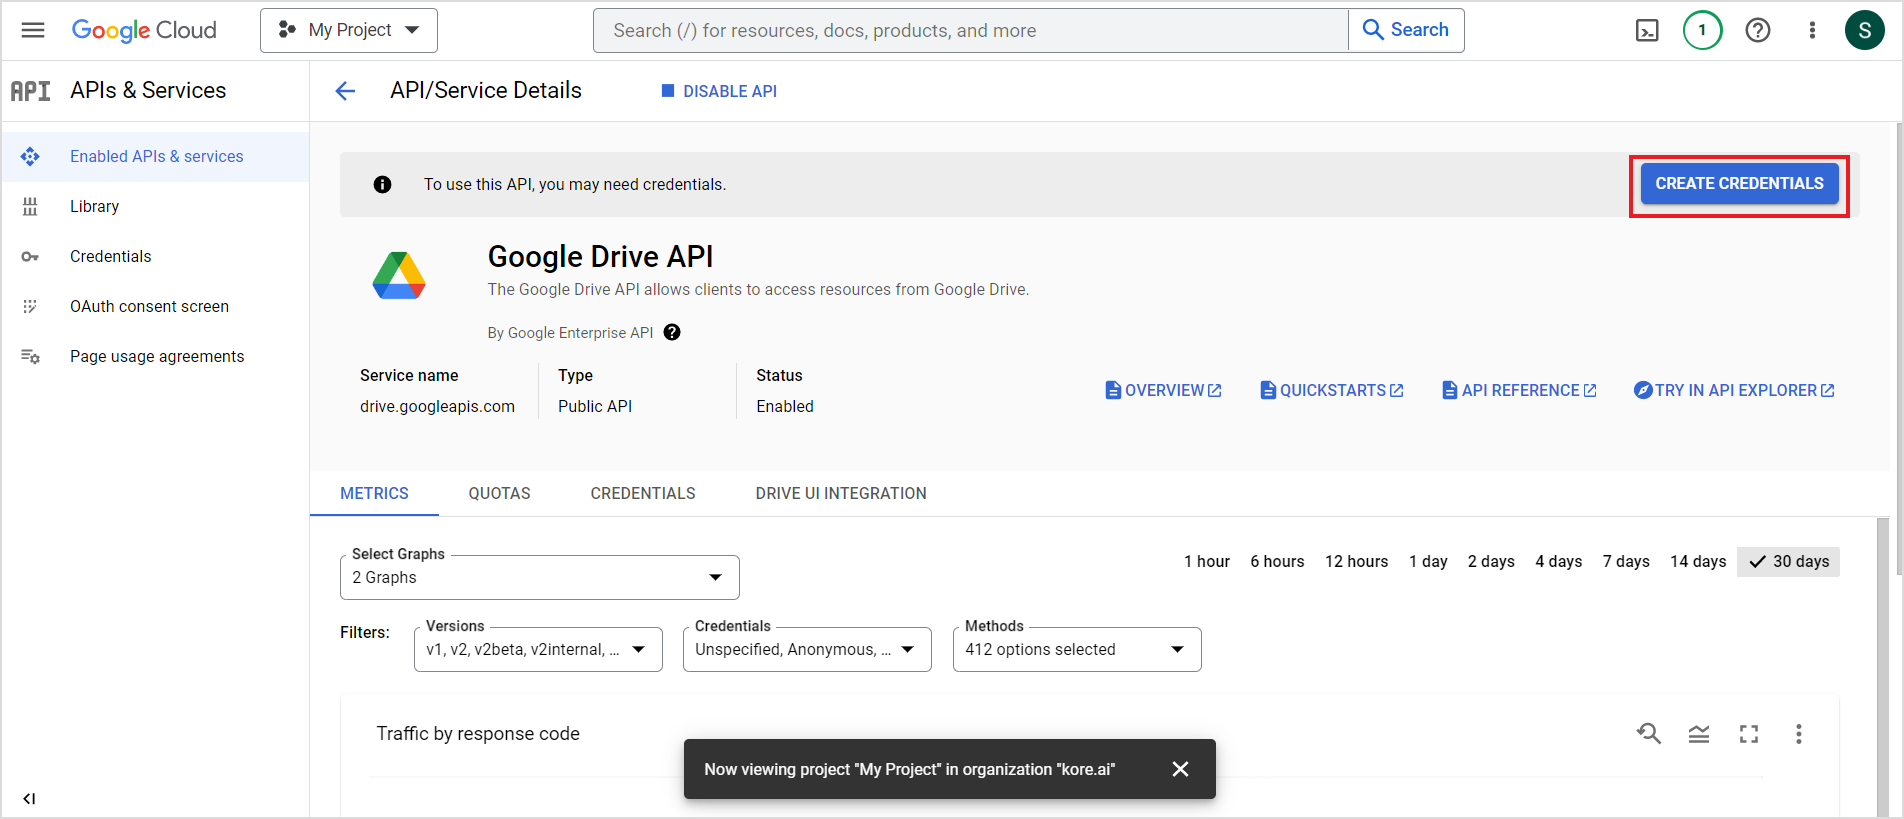
Under Select an API drop-down, select Google Drive API and select the User Data radio button to indicate that the project requires access to the user data via Google Drive APIs. Click Next. 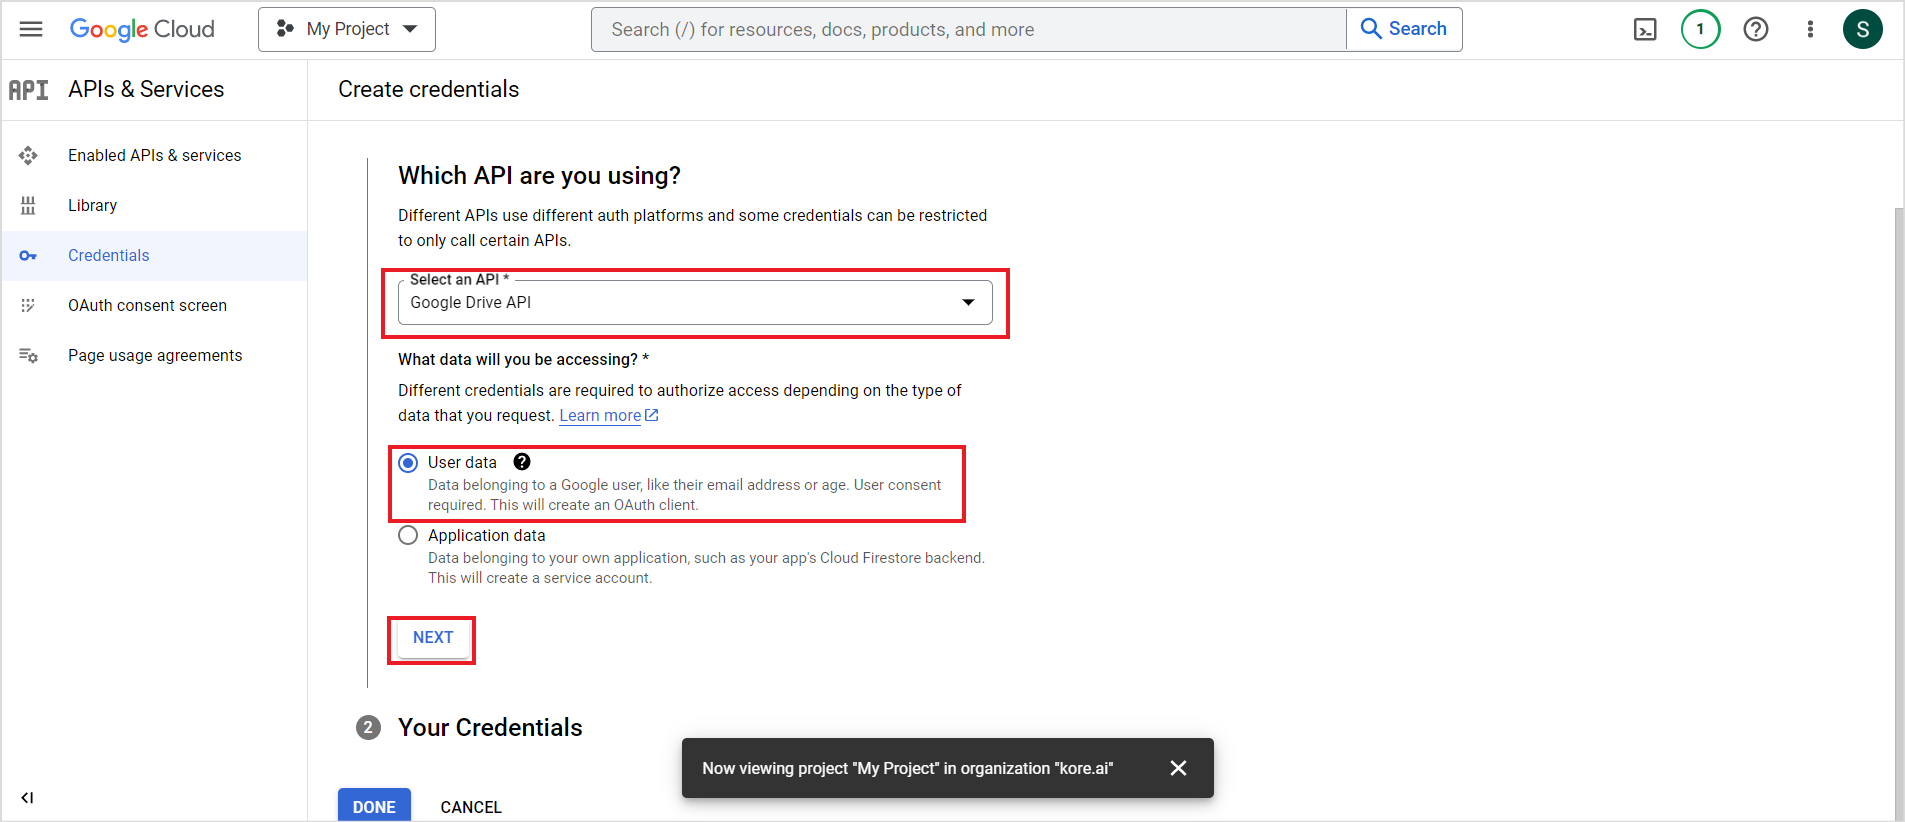
Next, set up the consent screen. Provide the name of the application, email address, app logo, and developer contact information. 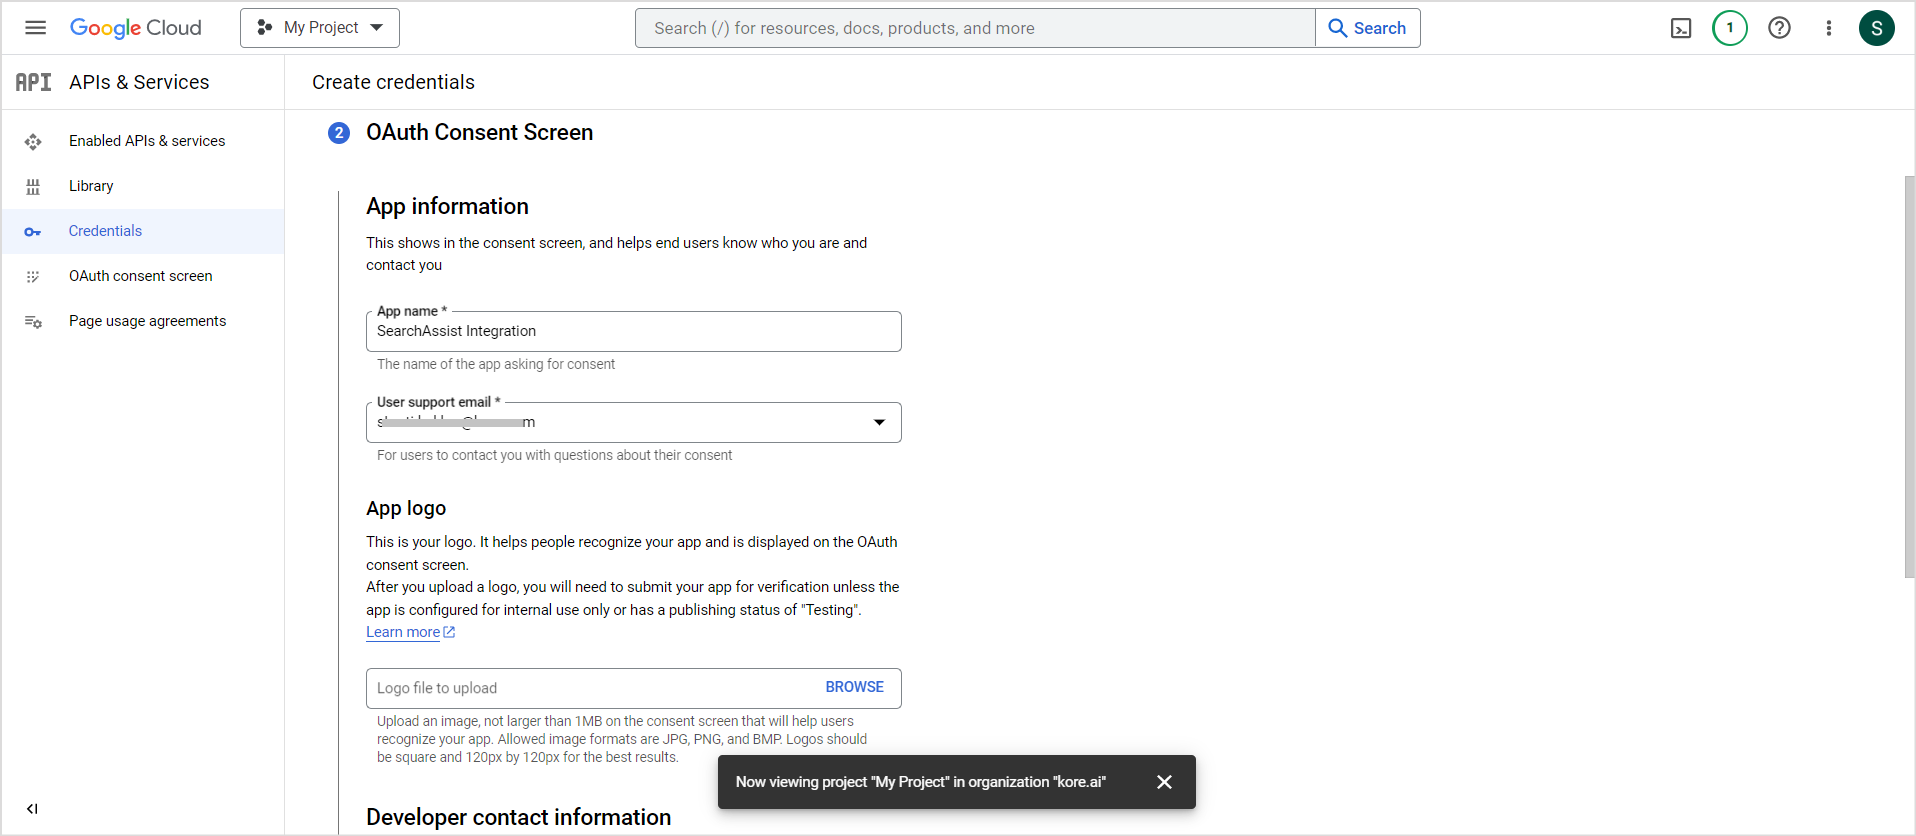
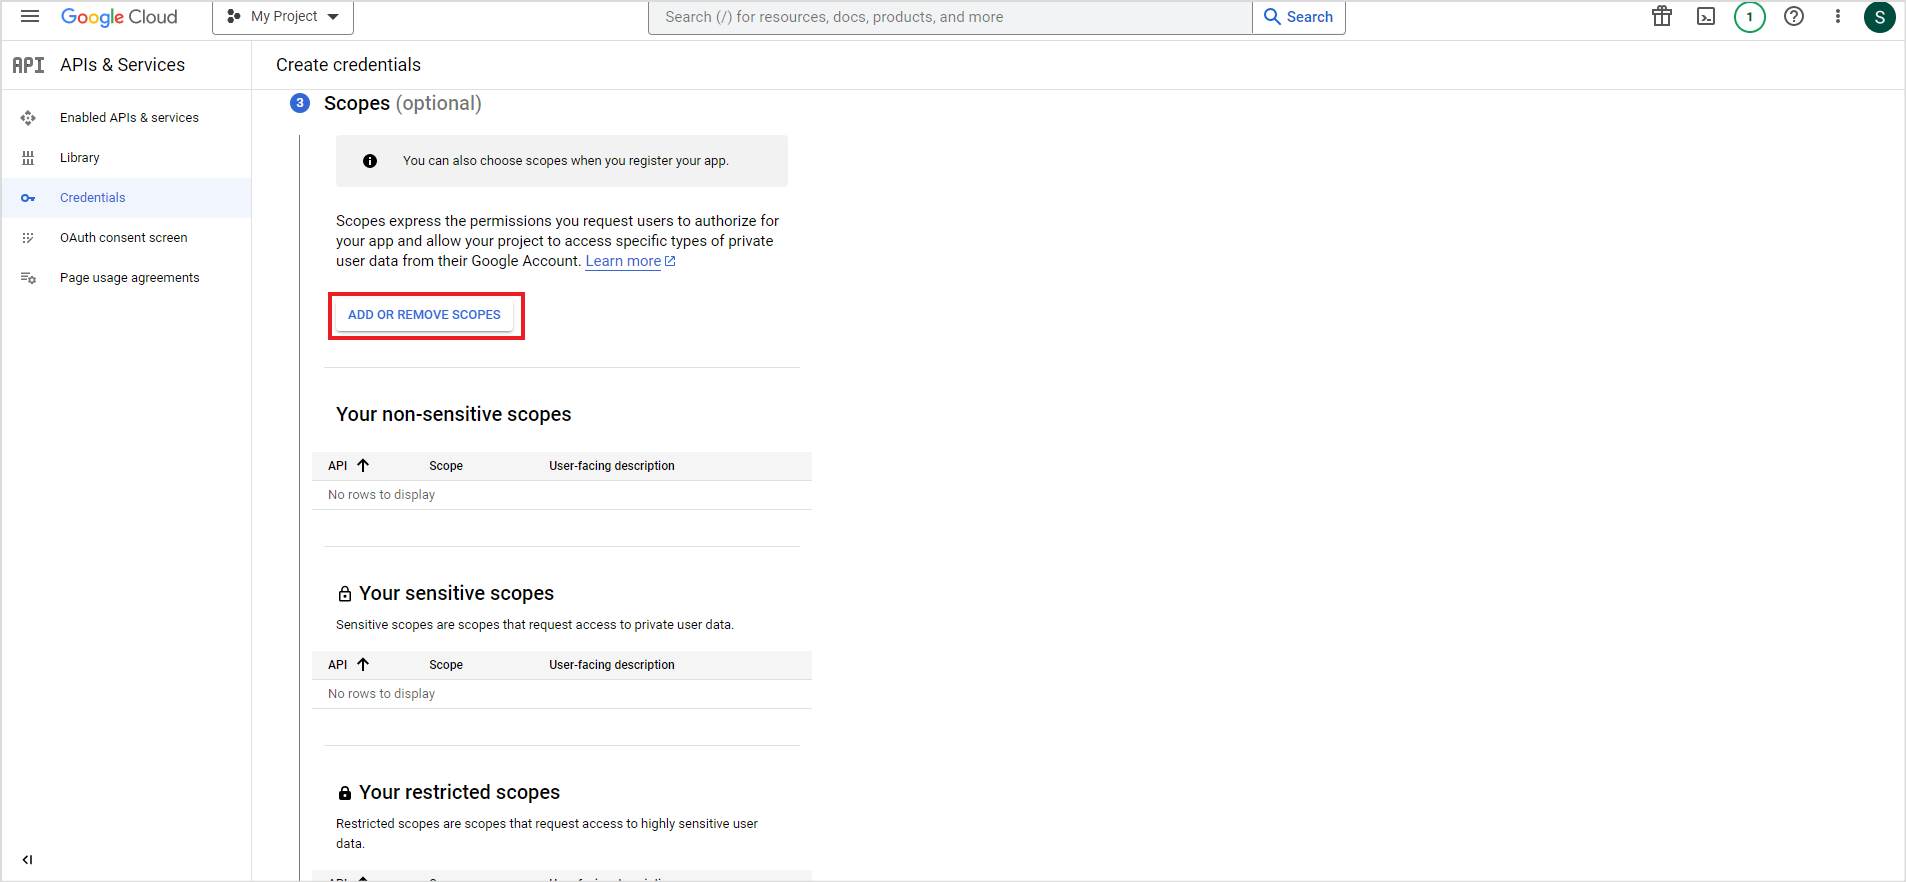
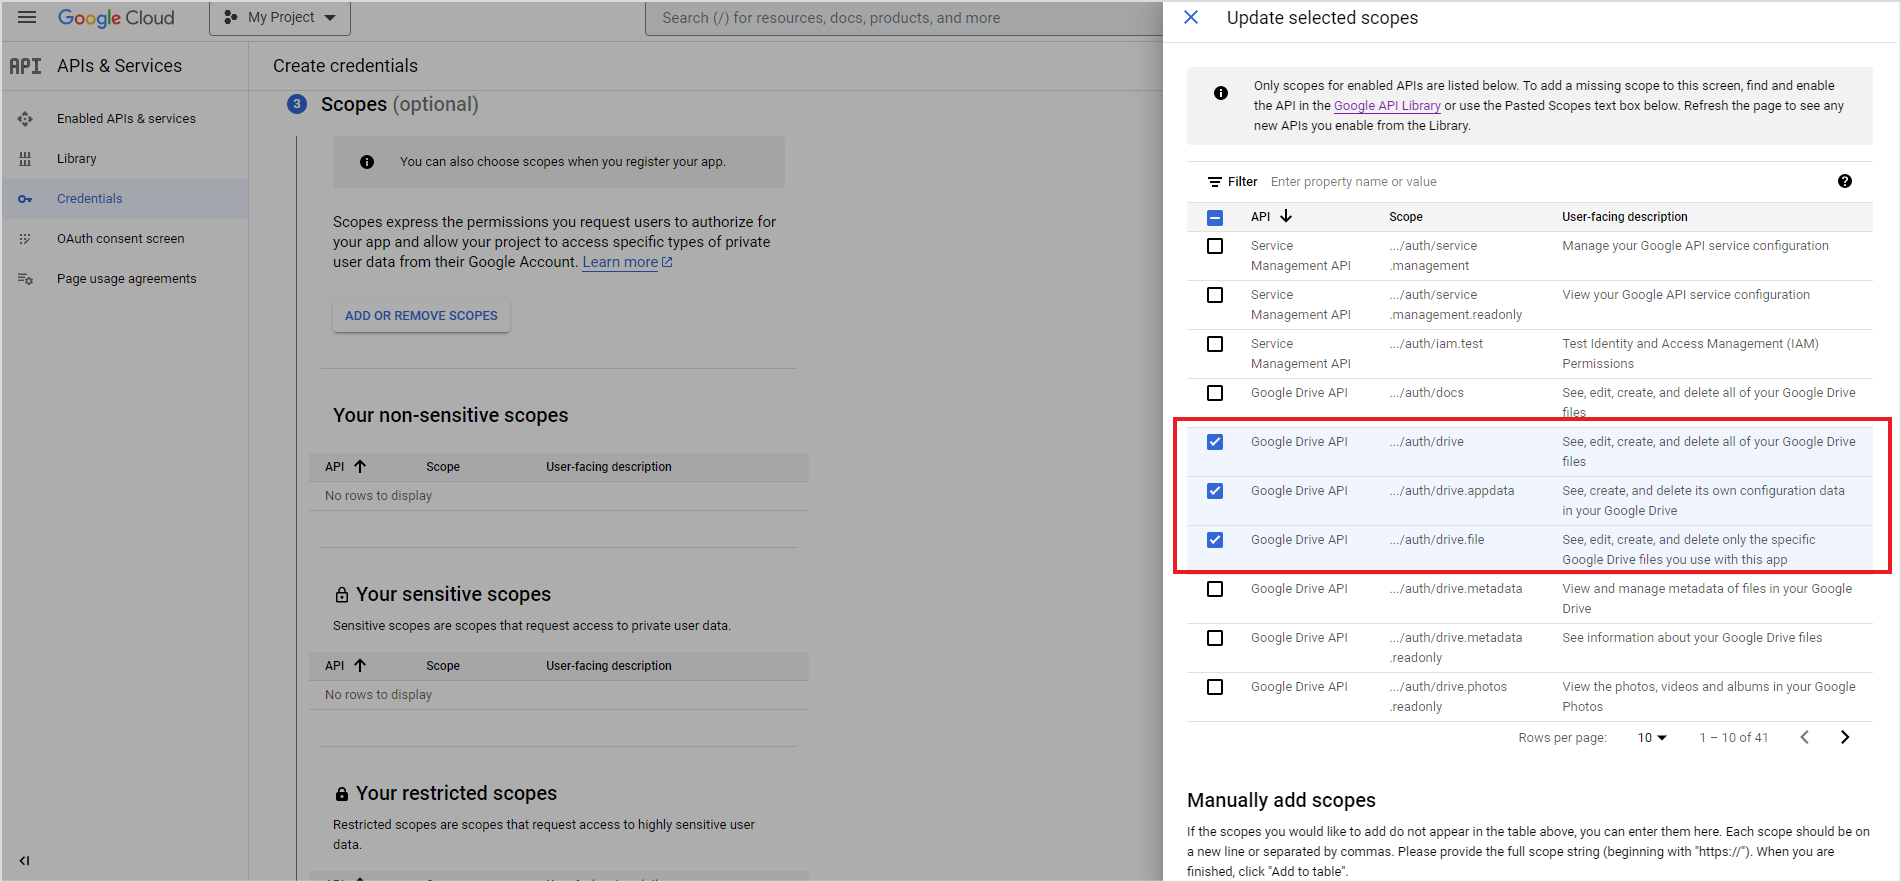
Set up permissions for the application in the next step. Under Scopes, click on ADD OR REMOVE SCOPES. Select the following scopes for Google Drive API and click on UPDATE at the bottom of the page.
- …/auth/drive.file
- …/auth/drive.appdata
- …/auth/drive
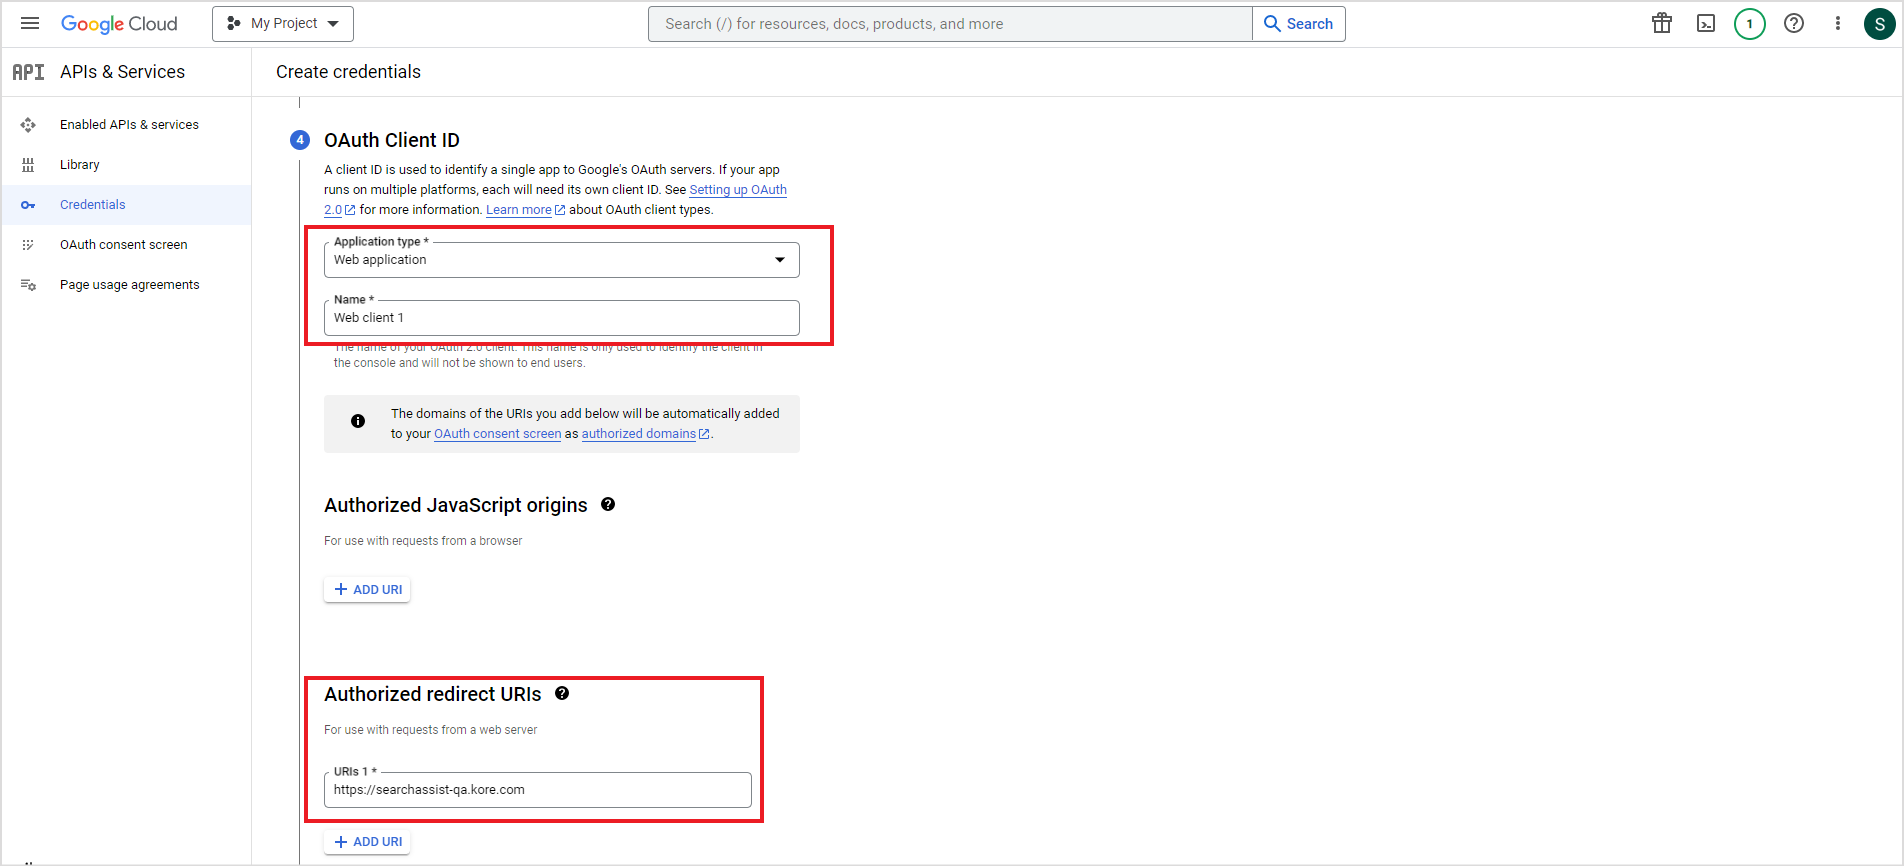
In the next step, generate the client ID for the application. Enter the Application type as Web Application and give it a name. Add the URL of your SearchAssist deployment as Authorized redirect URIs and click CREATE.
You can use one of the following URLs as per your region.
- JP Region Callback URL: https://jp-bots-idp.kore.ai/workflows/callback
- DE Region Callback URL: https://de-bots-idp.kore.ai/workflows/callback
- Prod Region Callback URL: https://idp.kore.com/workflows/callback
This will generate the client ID. Download your credentials and click DONE. The downloaded file is in JSON format and has client id and client secret amongst other fields. 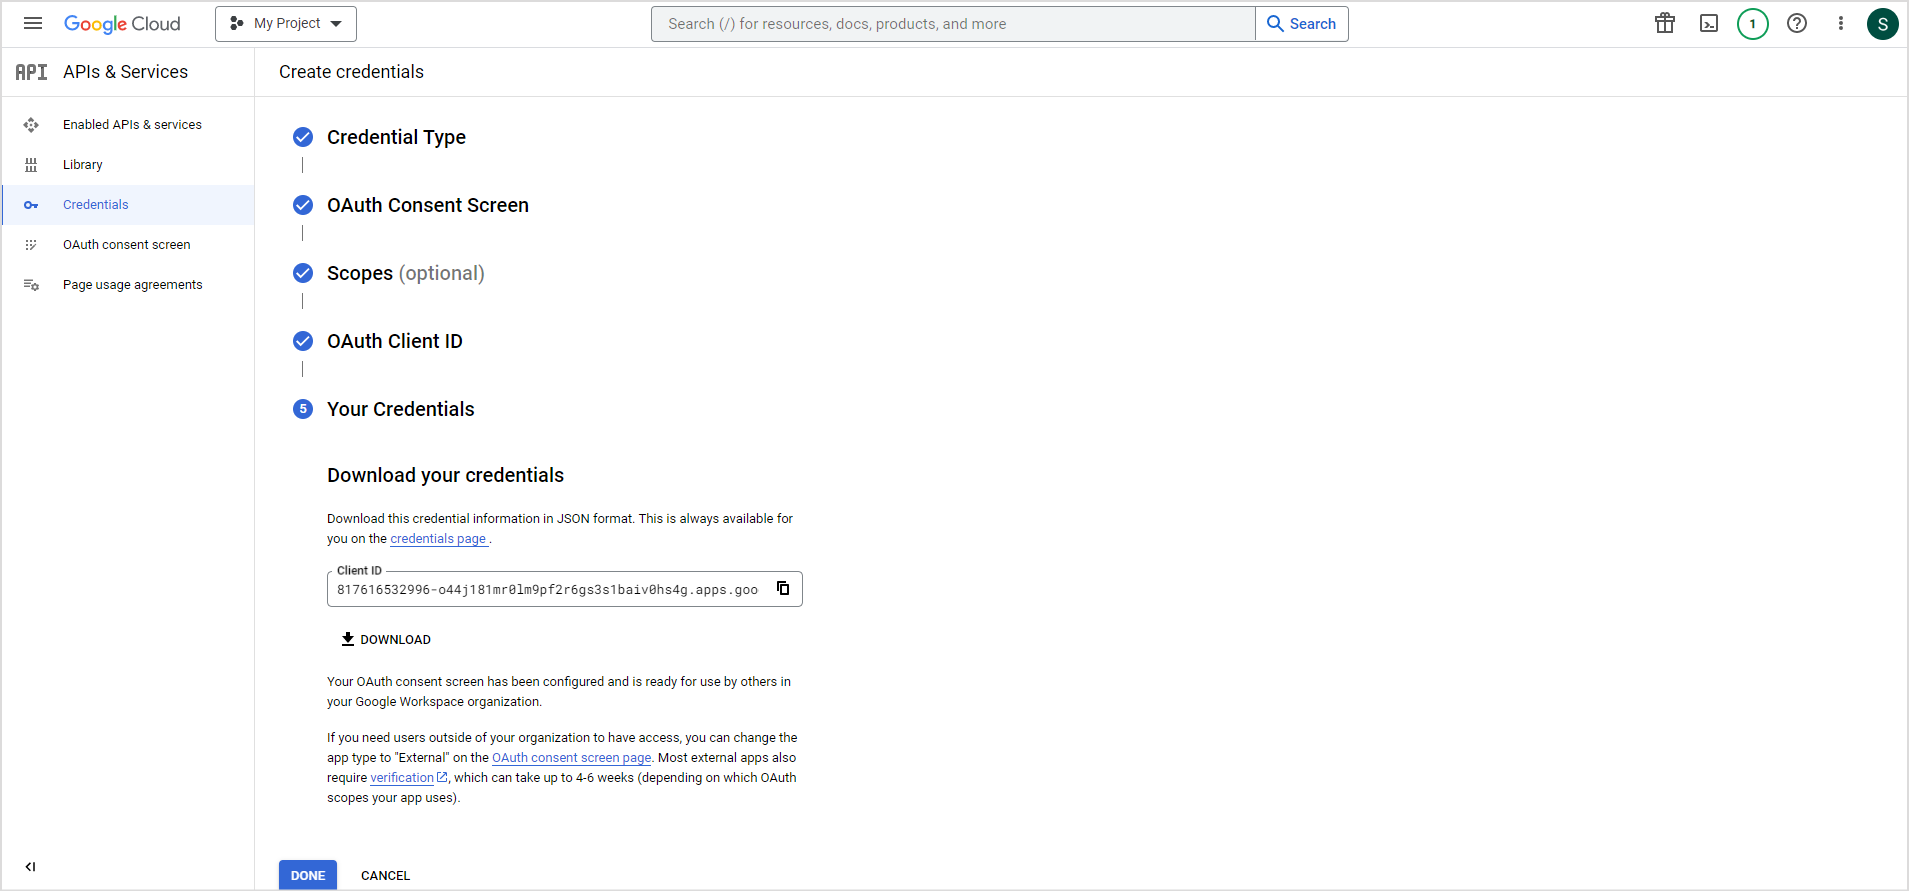
Next, set the user type for the application as external. Go to the OAuth Consent screen and click on MAKE EXTERNAL to change the user type to External. 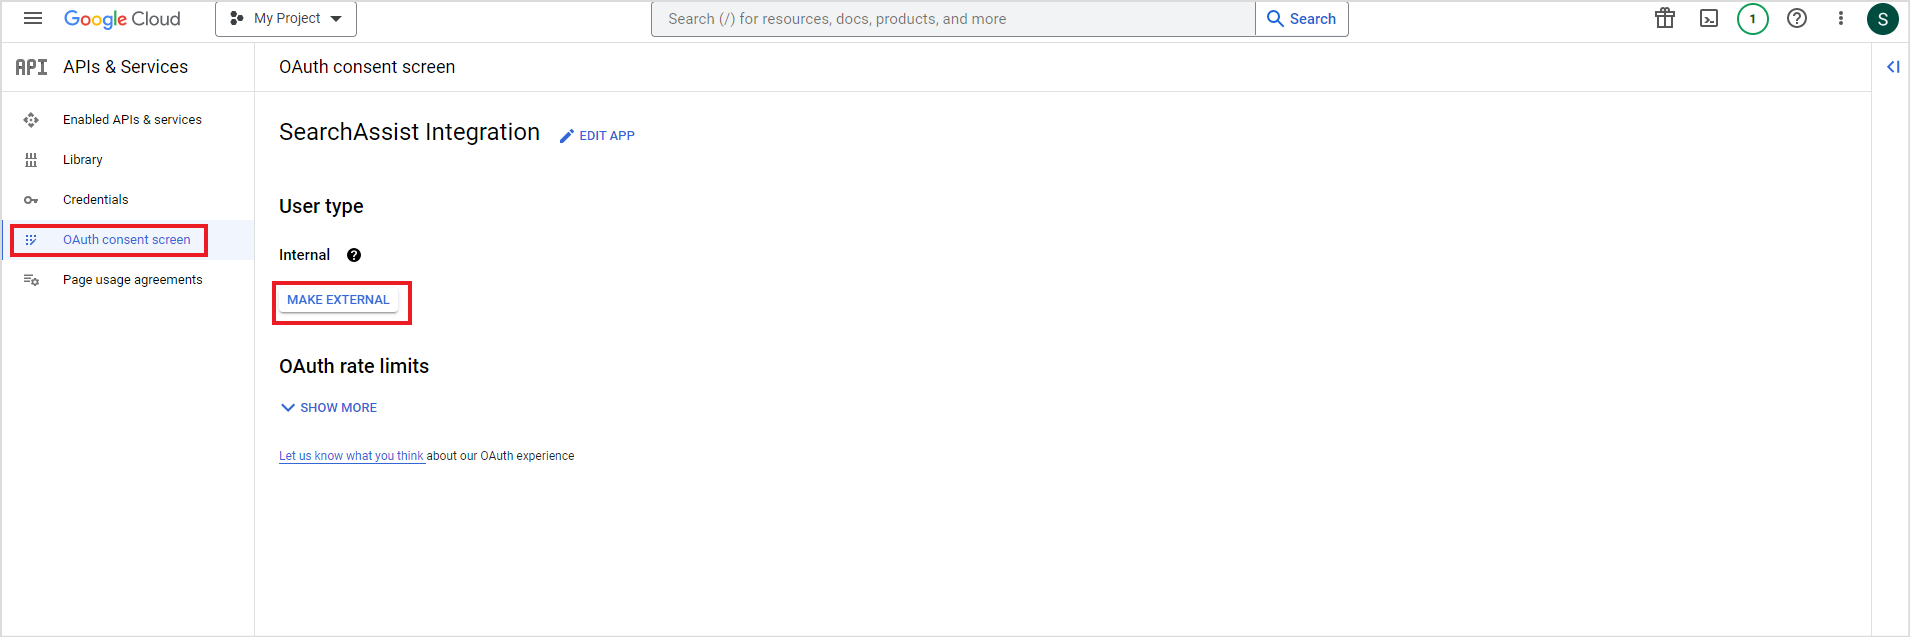
While you are still in development or testing mode, you can set the publishing status of the application to Testing. In testing mode, only the users added can access the application while in production mode, the application is available publicly to everyone with a Google account. 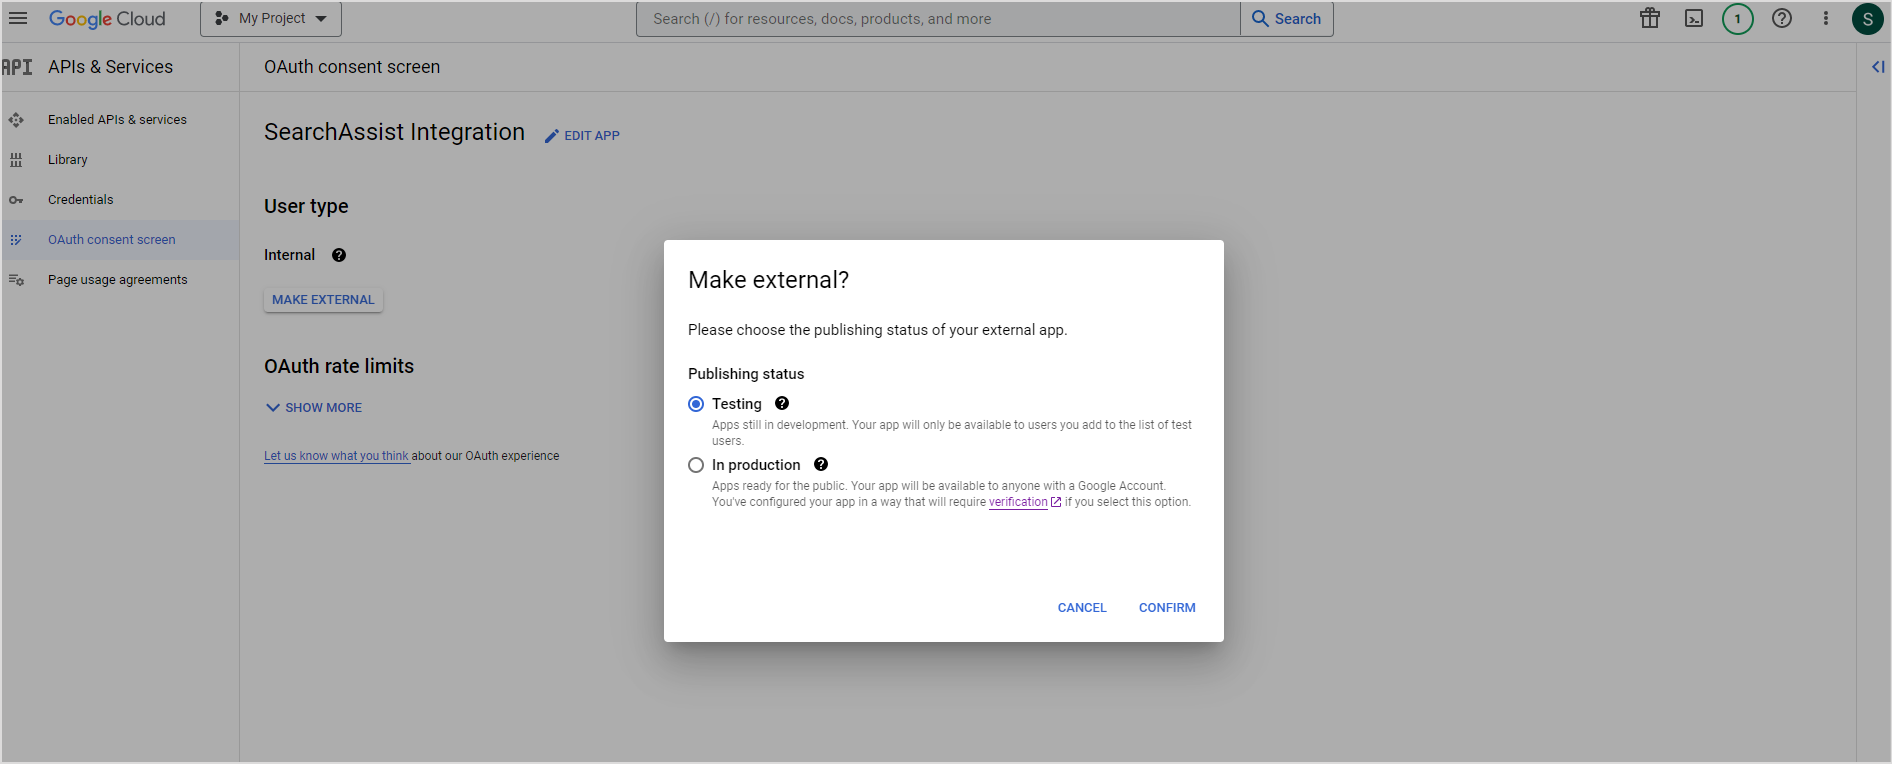
Once the user type is set to external and the publishing status is set to Testing, you can add your test users by clicking on ADD USERS on the same page. 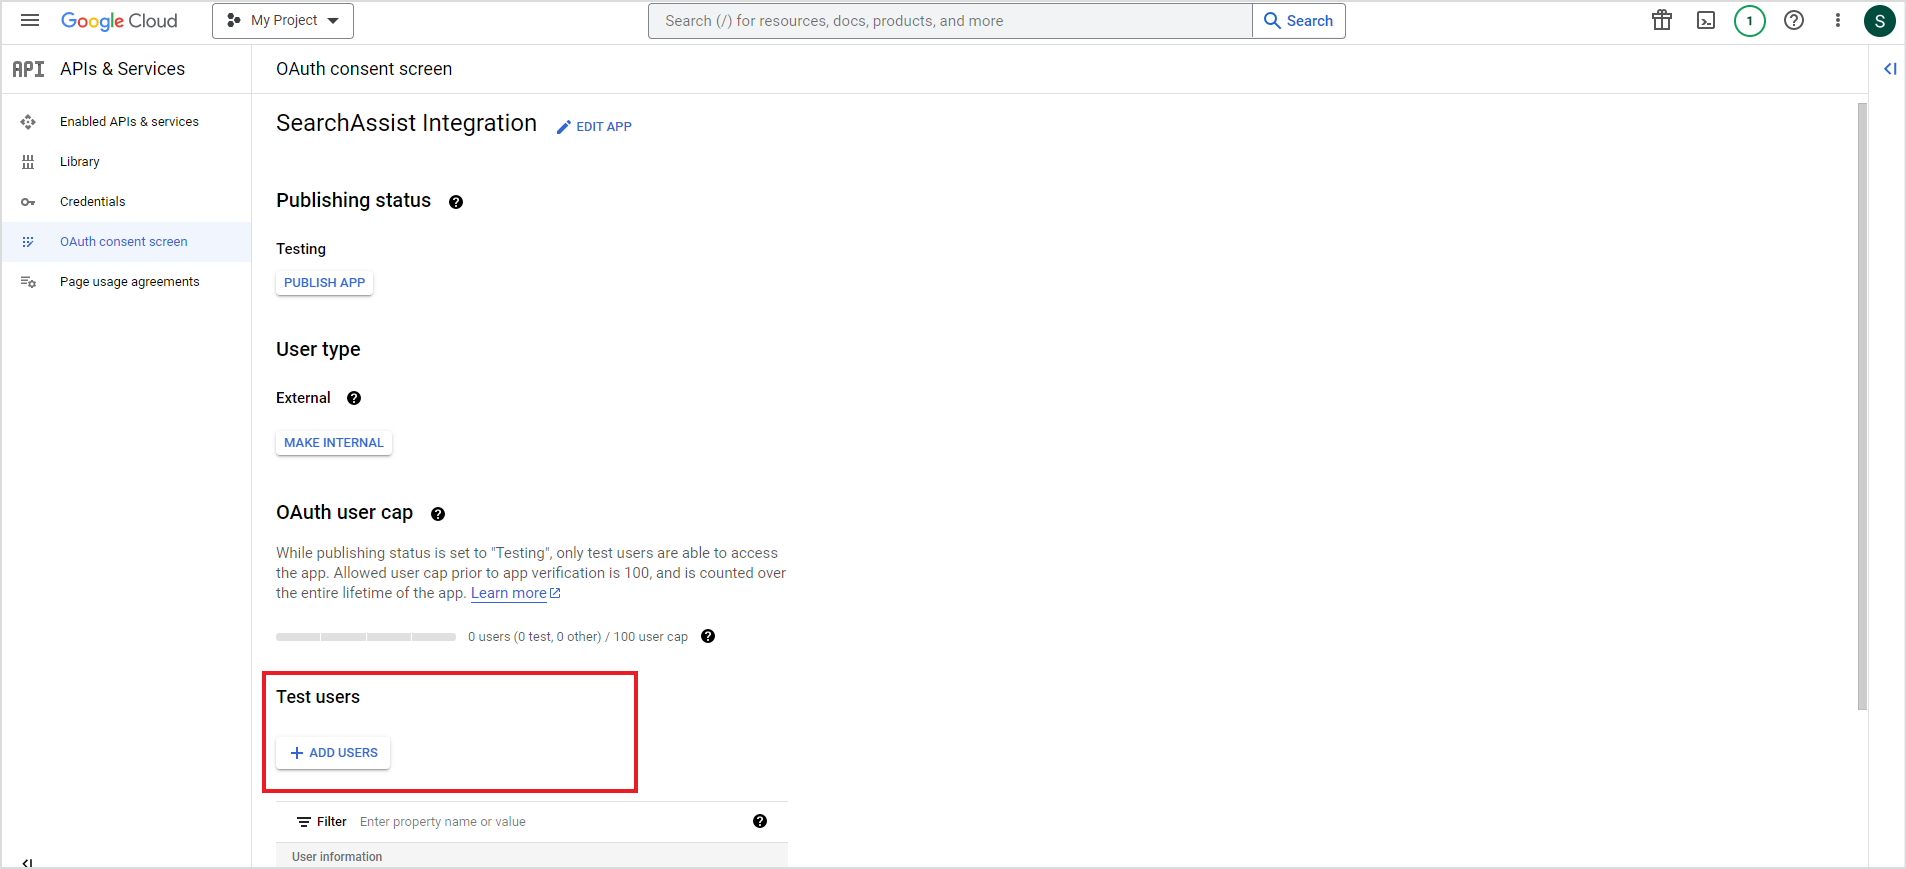
Step 2: Configuring the Google Drive connector in SearchAssist
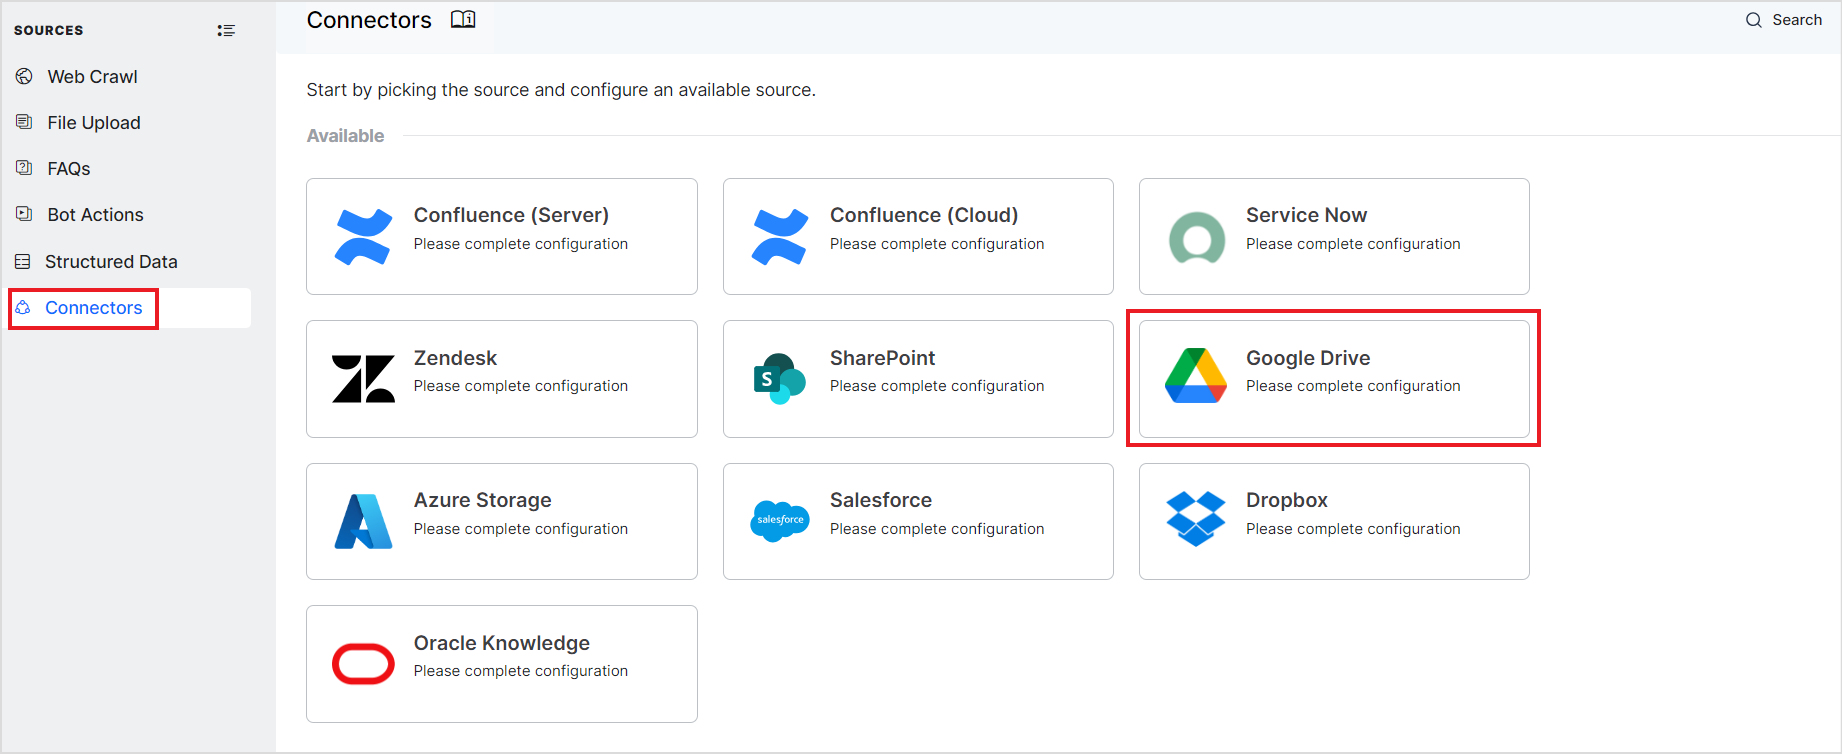
- To configure the Google Drive connector in SearchAssist, go to the Connectors under Sources tab and select Google Drive.
 The following page displays the instructions to configure the project and permissions in the Google account. Click Proceed.
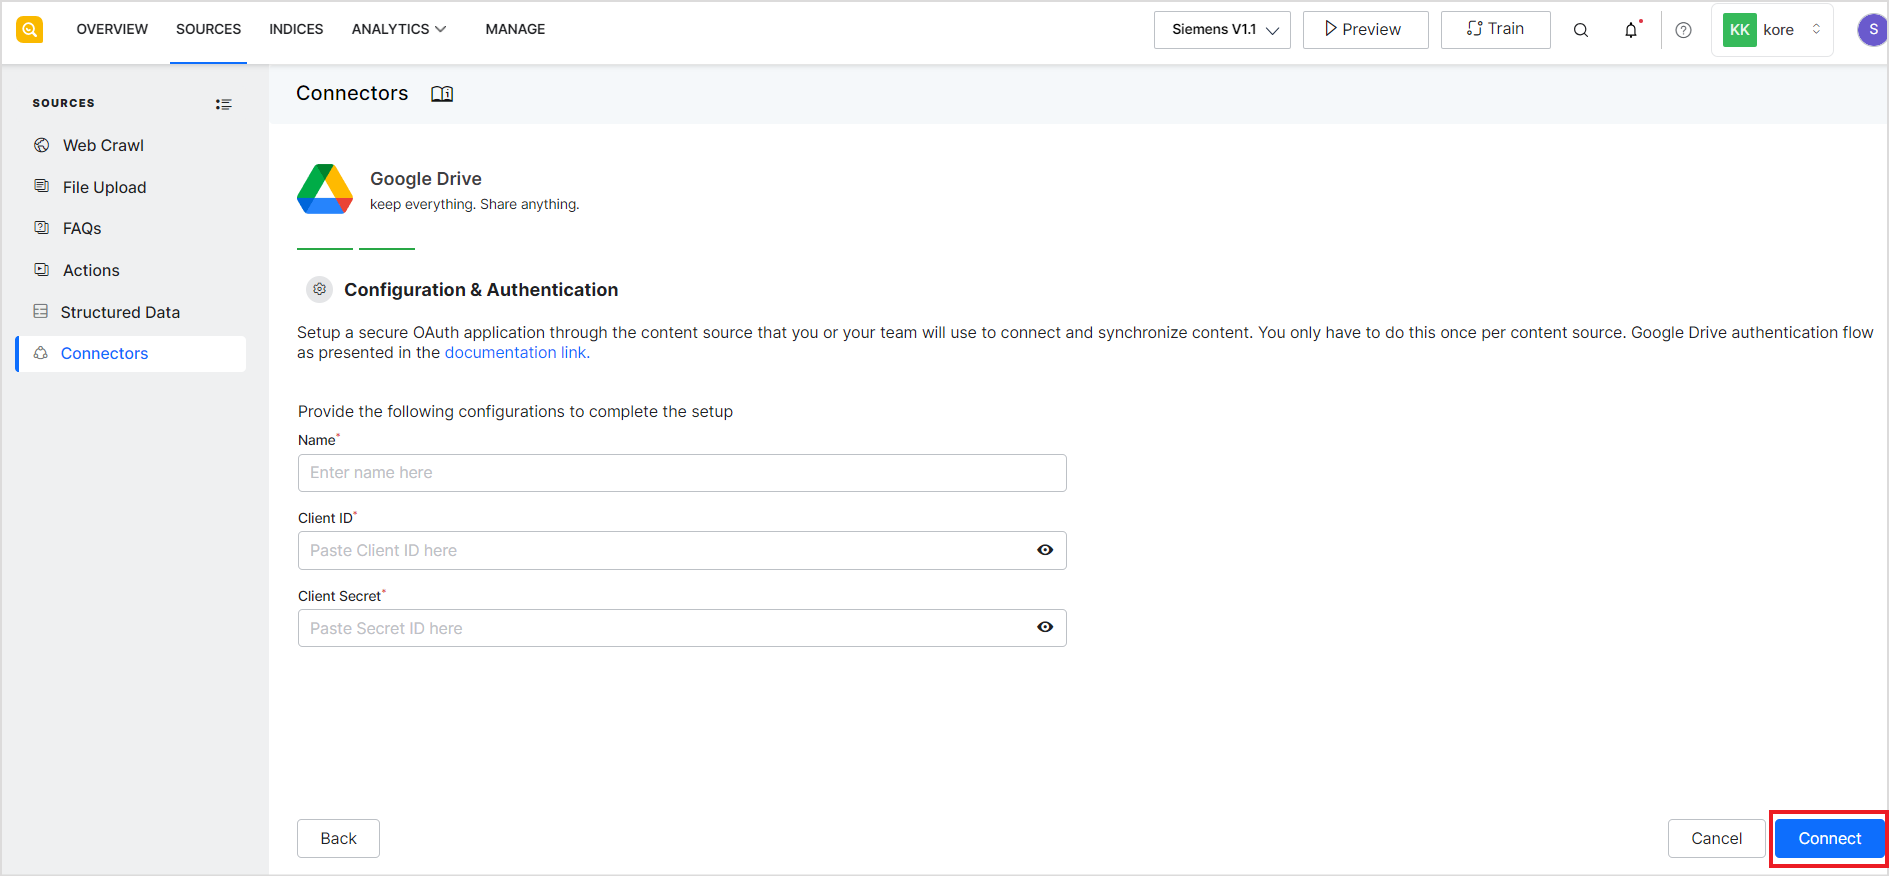
 - Next, provide a name for the connector. You can use any name as a unique identifier of the connector. Enter the credentials generated while creating the Google project – client ID and secret and click Connect. You can find both the client ID and secret in the JSON file downloaded in the Create Credentials step above.
- After successfully connecting to Google Drive, the next step is to do the Synchronization configuration. This allows the connector to know what content is to be ingested from the drive. To do so, go to the Sync Settings tab and do the following configuration.

Scheduler – Enable this option if you want to set up a scheduler to automatically sync content with Google Drive at regular intervals. When enabled, set the time and frequency of the sync operation. Synchronization – This field allows you to select the content to be ingested from the drive. You can choose to:- Sync All Content – This option ingests all the data from Google Drive.
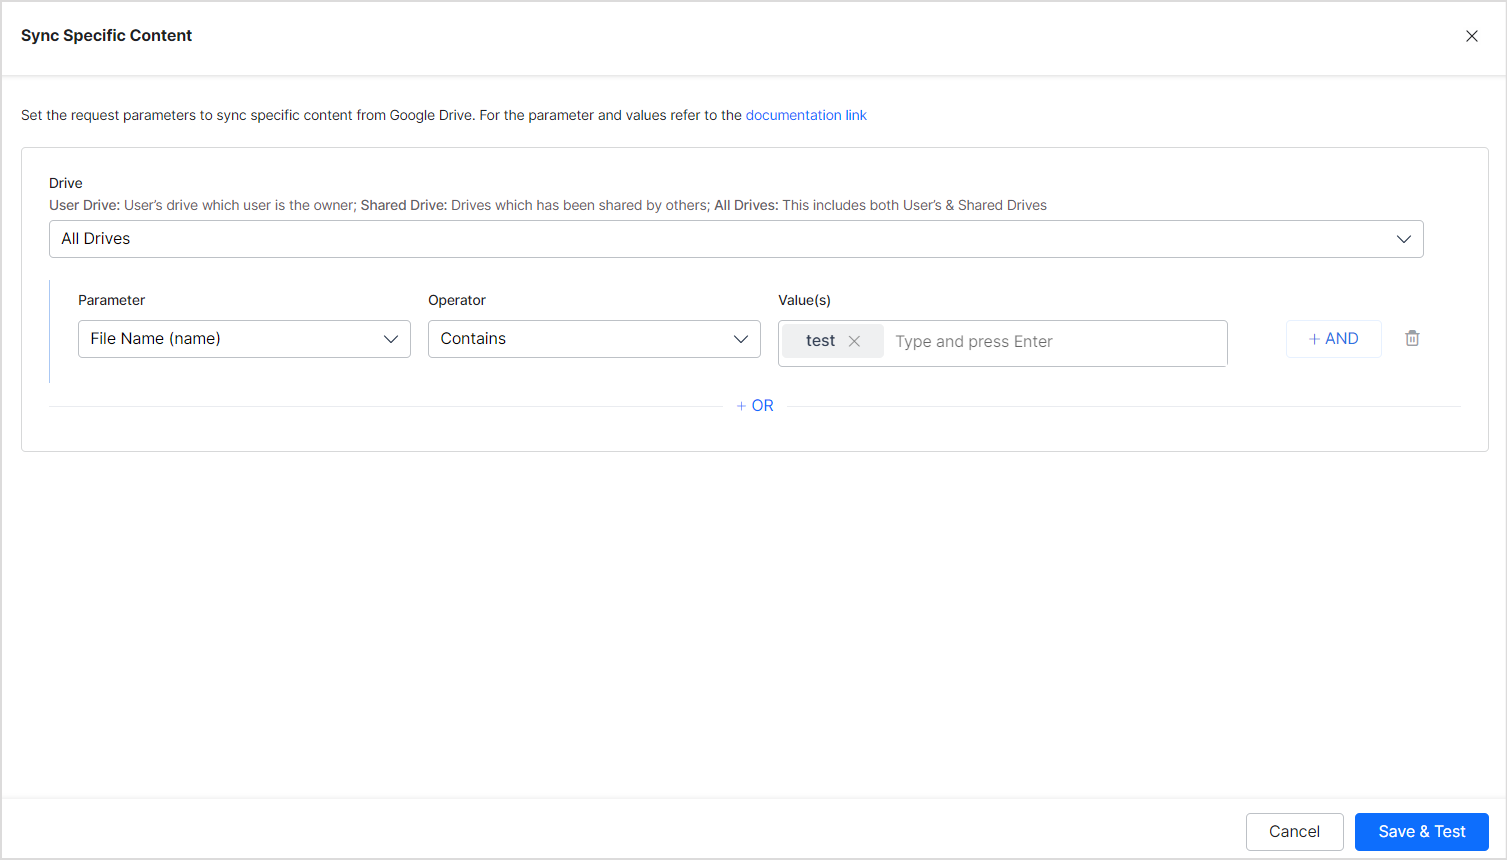
- Sync Specific Content – This option allows you to select the content to be ingested to the SearchAssist application. Click on the Configure option. The following widget allows you to set up rules for filtering content. Set up rules and click Save and Test.
 Note that you have to either manually trigger a synchronization operation or set up a scheduler for the same. Google Drive Connector will not perform an automatic synchronization after setting up the connection.
Defining a Rule
Each rule gives you the option to choose the location on the drive from where the content is to be ingested. It can take the following values:
- User Drive includes only the locations owned by the account for which the Google Drive connector is configured.
- Shared Drive includes only the locations shared with the account for which the Google Drive connector is configured.
- All Drives include all the locations from the user drive as well as the shared drive.
- User Domain
Next, define conditions to choose the content from the selected location. To define a condition, specify a parameter, operator and the value for the parameter. For example, if you want to ingest all the files in a given folder set up a filter as shown below:
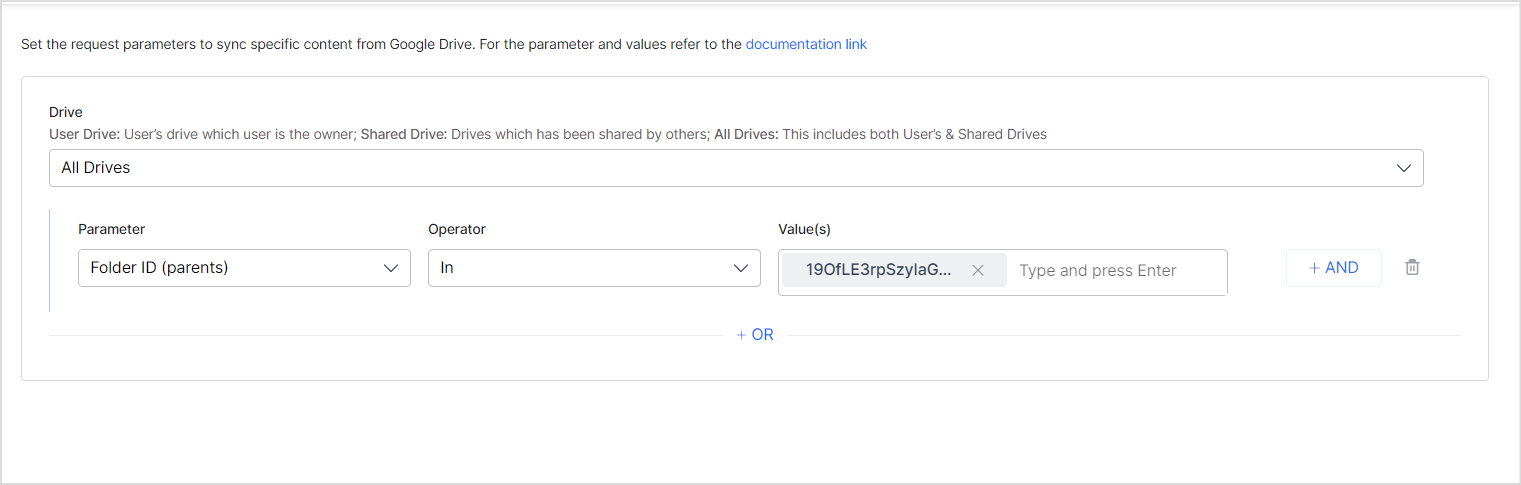
You can define conditions based on the following parameters or add your parameters too.
Folder Id – Ingest data specifically from one or more folders. Provide the folder IDs as value.
Mime Type – Ingest a specific type of data. For example, use ‘application/pdf’ to ingest only pdf files from the drive. Supported MIME types include:
- application/msword
- application/pdf
- text/plain
- application/vnd.google-apps.document
- application/vnd.google-apps.presentation
File Name – Ingest files with given file names.
You can also add custom fields to select the content from the drive. For example, if the drive supports
Points to note
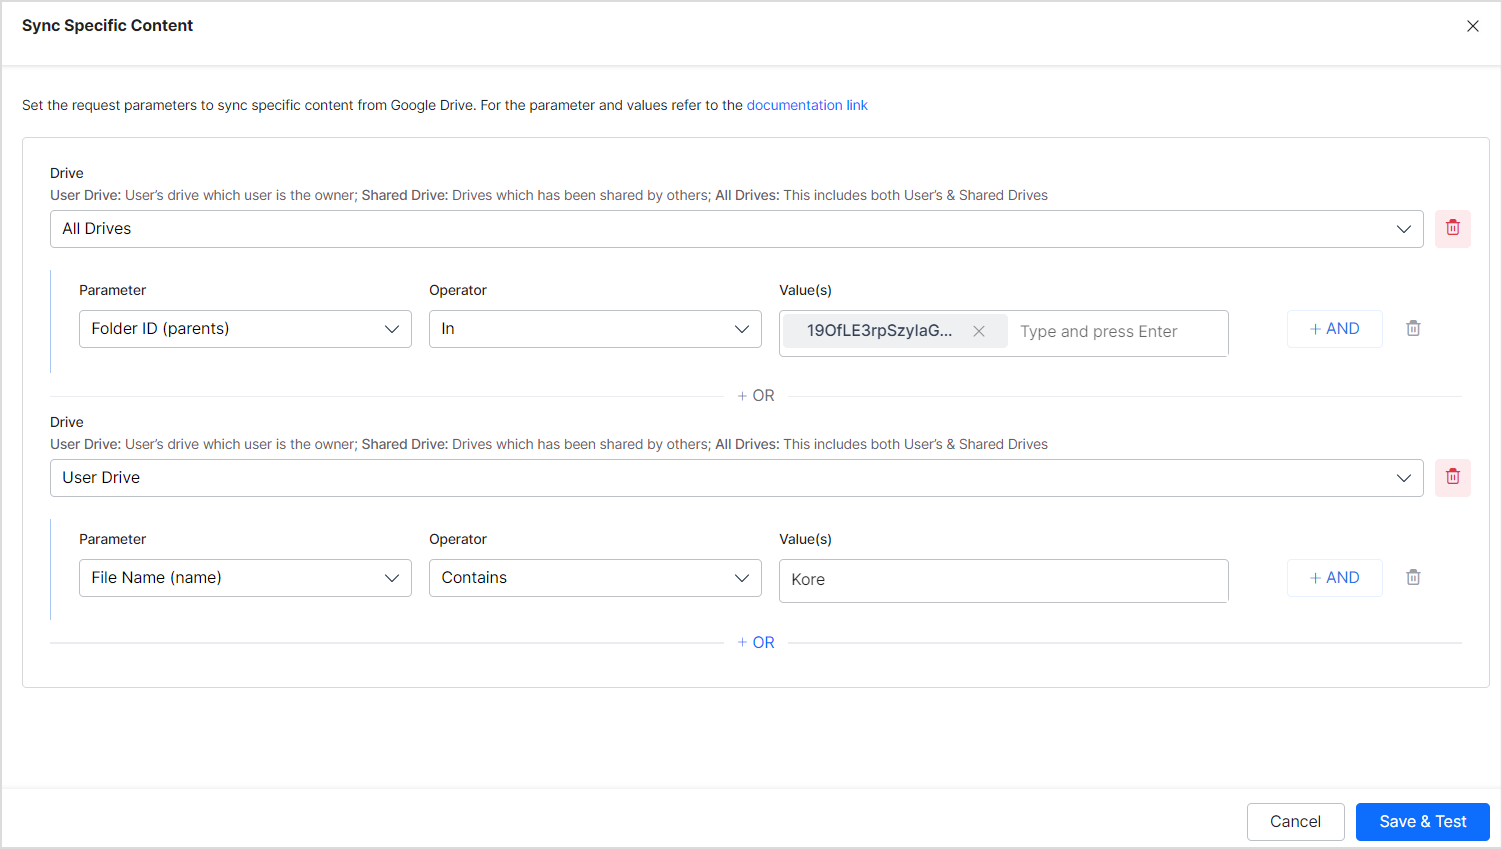
- You can have any number of rules in a filter. For example, to include all the files from a specific folder and all the files with a keyword in the filename, you can set up a filter as:
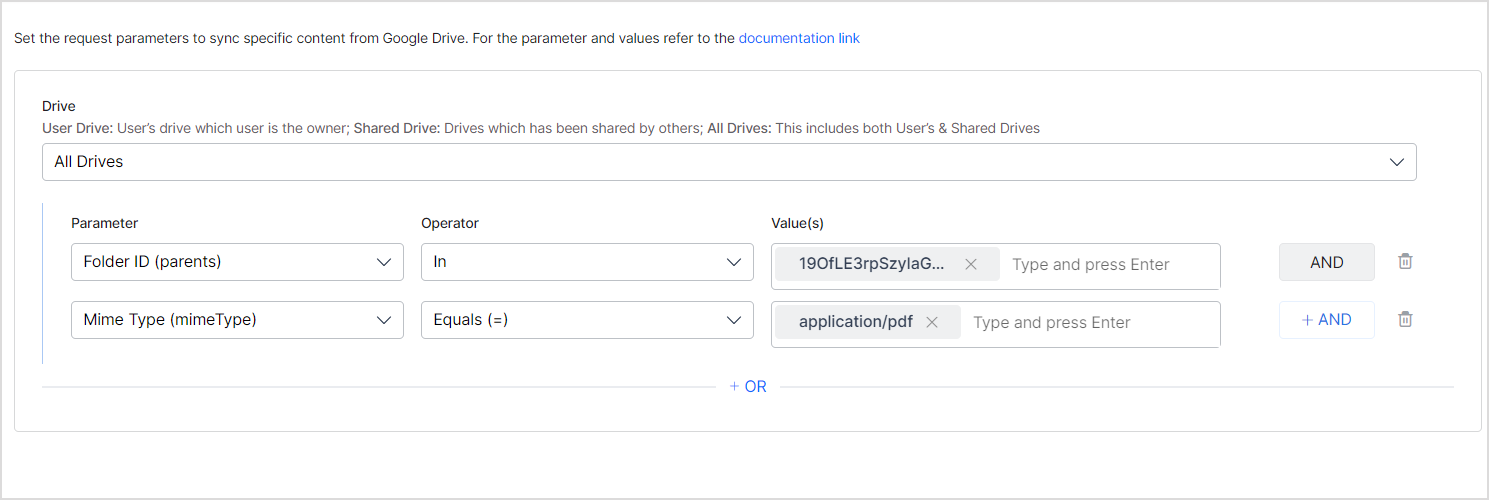
- You can define more than one condition to a rule to filter specific content. For example, to ingest only pdf files from a given folder, you can set up a filter as:
Applying RACL to Google Content
Role-Based Access Control List(RACL) is a method of controlling access to specific resources or information based on the roles of individual users within the organization. To learn more about how SearchAssist implements RACL, refer to this.
Google Drive Connector allows you to import user permissions and access lists from the GDrive repository along with the content and other metadata for the content and present the search results and answers according to the users’ access rights. For instance, you will only see answers and search results generated from a Google Drive file if you can access that file.
Handling Google Drive File Permissions
SearchAssist supports file-level permissions through Google Drive Connector. SearchAssist supports the following access types in GDrive.
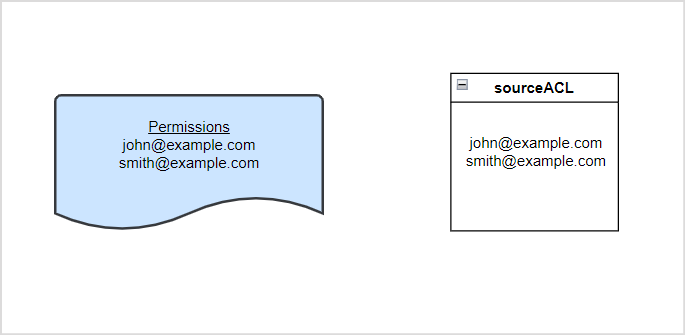
- People with access: SearchAssist reads user information for the files and allows users to view the file if they have the permission to access. Any user who has view or read access on the file can view search results and answers generated from the file in SearchAI.
For instance, if two users have read access to a file in Google as shown below, corresponding indexed content will have the user information as shown below.
 Similarly, if the files are accessible to a user and a user group in Google Drive, the corresponding content will have the information like as shown below.
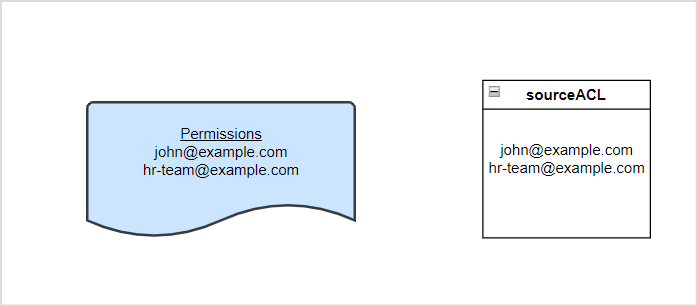
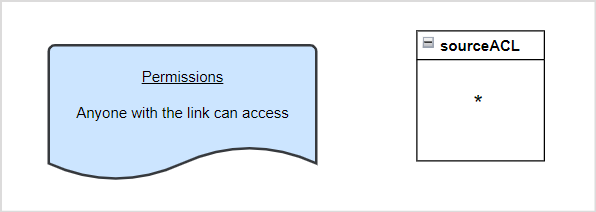
- Anyone with Link: This is treated as a public access. All the users can access a file with this type of access permission.
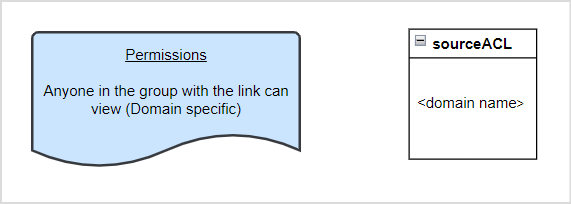
- Domain Specific Access: SearchAssist supports this type of access and verifies the user identity against the specified domain name.
Handling User Groups or Domain level access in GoogleDrive
When a file access is given to a user group or a domain, the group name or domain name is stored as a Permission Entity in SearchAssist. In this case, SearchAssist requires additional information to identity and resolve user identities. You need to associate individual users within the group or the domain to the Permission Entity to enable those users access to the file.
To correctly associate users with the relevant permission entity, use the Permission Entity APIs.
Example
Suppose a file is shared with a user group, hr-kore@example.com. This group is stored as a permission entity within SearchAssist. If the HR team consists of five members who need access to this file, you should use the Permission Entity API to add the user IDs of these five team members to the corresponding permission entity.
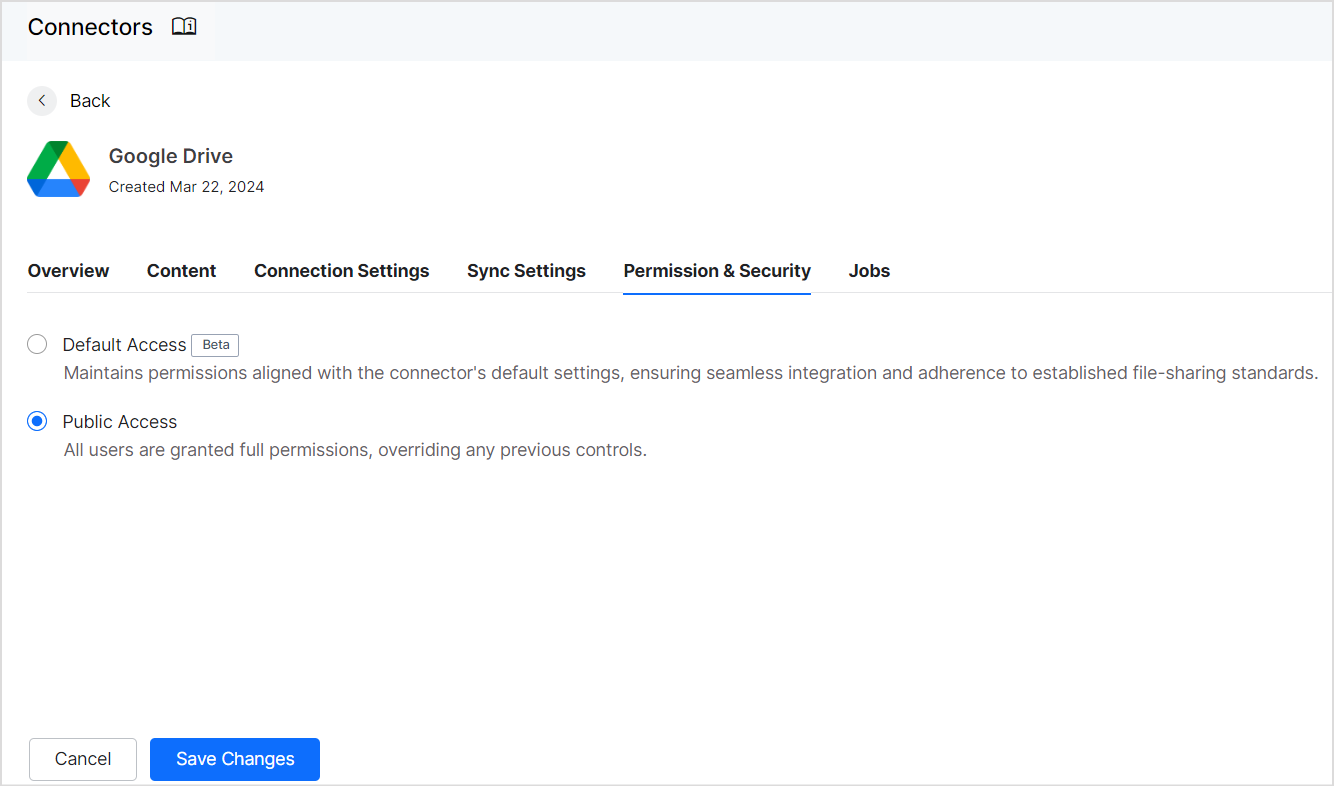
Enabling RACL in SearchAssist
SearchAssist provides the following options to enable or disable RACL for any content ingested from Google Drive.
- Default Access: This option maintains the default permissions for users associated with the content in Google Drive.
- Public Access: This option overrides the permissions associated with the content in Google Drive and allows all users to access the content.
You can configure this while connecting to Google Drive for the first time. To update the permissions at any time, go to the Permissions & Security tab and modify them. The updated permissions apply to the content ingested during the next sync activity.