
The Workbench transforms available content into objects for effective indexing. An Indexing Pipeline is a series of stages that convert content into a document ready for indexing. Each stage performs a specific set of data transformations before passing the content onto the next stage in the pipeline. Each stage has a stage-specific configuration. Rearrange or sequence the stages in the order of your preferred flow with a simple drag and drop action.
For example, extract entity values before processing trait properties or vice versa. SearchAssist allows you to develop a custom pipeline for each Workbench configuration to suit your business requirements.
An indexing stage has properties like stage type, stage name, and applicable conditions. Define the conditions to choose the documents that must be transformed. For example, you can write a condition to consider only the FAQs.
For best results, click the Train your App icon each time you change an indexing configuration. This ensures the indexing is based on the latest configuration.
To test the SearchAssist app for select stages, render the other stages inactive with the toggle switch in the top right corner of the page. This will retain those stages but at the same time, they won’t be considered in the indexing configuration. You can enable those inactivated stages at a later time as required.
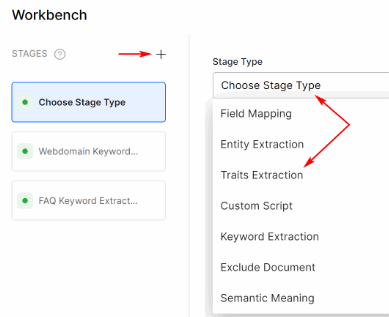
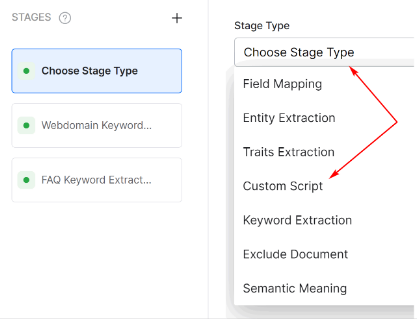
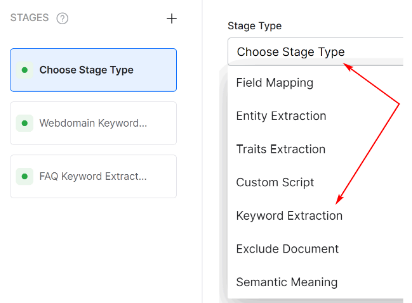
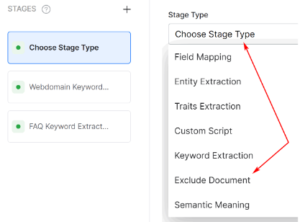
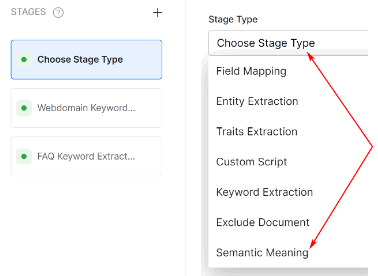
Indexing pipeline stages are listed here:
- Field Mapping maps fields in an indexing pipeline document to a target field, sets values, copies values, removes fields, and more.
- Entity Extraction uses NLP techniques to identify named entities from the source field.
- Traits Extraction extracts specific attributes that search users might express in their conversations.
- Custom Script stage allows you to enter customized scripts to perform any field mapping tasks like deleting or renaming fields.
- Keyword Extraction automatically detects important words stored in a field.
- Exclude Document stage drops all the documents that match the specified condition.
- Semantic Meaning is a technique to understand the meaning and interpretation of words, signs, and sentence structure. This stage currently supports web page-related sources only.
Field Mapping
The Field Mapping stage maps fields in an index pipeline document to a target field. SearchAssist allows you to:
- Set a field value, rename a field, copy one field to another, or remove a field.
- Define a condition for the field mapping stage. The field mapping actions occur on the documents that satisfy the given condition.
- Re-order or delete a Field Mapping.
- Simulate to test changes before saving.
Training
Click the Train your App icon each time you change an index configuration. This builds the index based on the updated configurations.
 Configuring Field Mapping

Follow these steps:
- Click the Indices menu tab.
- In the left pane, click Workbench.
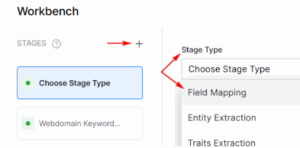
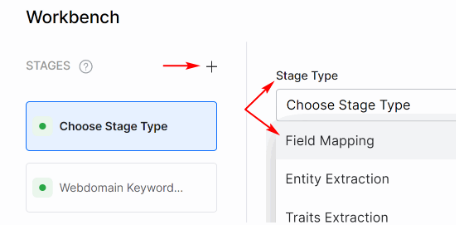
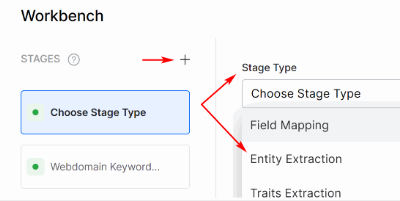
- On the Workbench page, click the + icon.
- Click the Stage Type field and select Field Mapping.
- Enter a unique stage name.
- Change the Condition (Basic or Script) if required. The default setting is Basic.
- Click Choose field and select an item on the drop-down menu.
- Click Select Operator and choose an item on the drop-down menu.
- Click + AND to insert another condition. (optional) SearchAssist considers the documents that satisfy the condition(s) as part of the stage.
- Click the Action field and select an option on the drop-down menu.
- Set a value for the Field Name
- Rename to a change a label of a Field Name
- Copy the Source Field to the Target Field
- Remove to delete a Field Name
- Click Field Name and select an item.
- Click Save Configuration in the top-right corner.
Running a Simulation
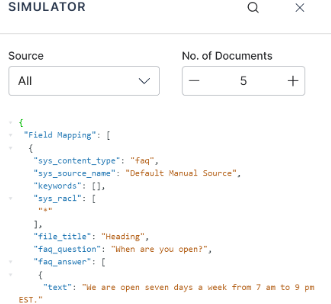
Click Simulate to verify configurations. The simulator opens a side panel and displays the source, the number of documents with mapping applied, and the result. You can change the source and number of documents if there is no mention in the conditions. (see below)
Simulation Example
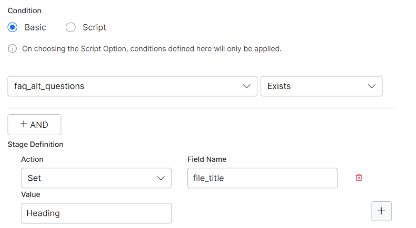
- Select Set on the Actions drop-down menu.
- Enter Title in the Field Name field.
- Enter Heading in the Value field.

- Click Simulate to verify if the field value is changed.

Conditions for Mapping Fields
The condition is specified in the following format:
- ctx.fieldtype==value or ctx.fieldtype!=value.
For example, ctx.sys_content_type==“web” to restrict the mapping to content from a web source.
Entity Extraction
Entity Extraction is the identification of required information expected from the user as input to accomplish the task. SearchAssist uses NLP techniques to find named entities from the source field.
The Entity Extraction stage in Indexing Pipeline identifies a set of entities from a source field and saves them in a target field. SearchAssist uses the target field to identify the intention of the search user more accurately.
SearchAssist allows you to:
- Add multiple entities to be extracted from the source field.
- Define a condition for the entity extraction stage and the entities are extracted only from the documents that satisfy the given condition.
- Re-order or delete entity extraction rules.
- Simulate changes before saving.
Training
Click the Train your App icon each time you change an index configuration. This builds the index based on the updated configurations.
Configuring Entity Extraction
Follow these steps:
-
- Click the Indices menu tab
- In the left pane, click Workbench.
- On the Workbench, click the + icon.
- Click the Stage Type field and select Entity Extraction.

- Enter a unique stage name.
- Change the Condition (Basic or Script) if required. The default setting is Basic.
- Click Choose field and select an item on the drop-down menu.
- Click Select Operator and choose an item on the drop-down menu.
- Click + AND to insert another condition. (optional) SearchAssist considers the documents that satisfy the condition(s) as part of the stage.
Naming an Entity
- Click Source Field and select the field you want to extract the entity from.
- Click the Target Field and choose where to store the extracted entity. The application creates the target field.
- Click the Add Entities field and select an option. These are the entity types that need to be identified from the source field. The supported entities are Date, Time, Date-Time, Date Period, URL, Email, Location, City, Country, Color, Company Name, Currency, Person Name, Number, Percentage, Phone Number, Zip Code, Quantity, Address, and Airport.
- Click Save Configuration in the top-right corner.
Running a Simulation
Click Simulate to verify configurations. The simulator opens a side panel and displays the source, the number of documents with mapping applied, and the result. You can change the source and number of documents if there is no mention in the conditions. (see below)
Conditions to Extract Entities
The condition is specified in the following format:
- ctx.fieldtype==value or ctx.fieldtype!=value. Obtain the field_name from the Fields table under Index Configuration.
For example, ctx.sys_content_type==”web” to restrict the extraction to the content from a web source.
Traits Extraction
The Traits Extraction stage in Indexing Pipeline extracts specific attributes or details that search users express in their conversations. SearchAssist allows you to identify traits from a source field and save them in a target field. The target field is used to better detect user intentions.
SearchAssist allows you to:
- Add multiple trait groups to be identified from the source field.
- Define a condition for the trait extraction stage. SearchAssist extracts traits only from the documents that satisfy the given conditions.
- Re-order or delete trait extractions.
- Simulate the changes before saving.
Training
Click the Train your App icon each time you change an index configuration. This builds the index based on the updated configurations.
Configuring Traits Extraction
Follow these steps:
- Click the Indices menu tab.
- In the left pane, click Workbench.
- On the Workbench, click the + icon.
- Click the Stage Type field and select Traits Extraction.

- Enter a unique stage name.
- Change the Condition (Basic or Script) if required. The default setting is Basic.
- Click Choose field and select an item on the drop-down menu.
- Click Select Operator and choose an item on the drop-down menu.
- Click + AND to insert another condition. (optional) SearchAssist considers the documents that satisfy the condition(s) as part of the stage. To learn more, see Conditions in Extraction.
Naming a Trait
- Click Source Field and select the field you want to extract the entity from.
- Click the Add Trait Groups field, enter an option and click Enter.
- Click the Target Field and choose where to store the extracted entity. SearchAssist creates the target field.
- Click Save Configuration in the top-right corner.
Running a Simulation
Click Simulate to verify configurations. The simulator opens a side panel and displays the source, the number of documents with mapping applied, and the result. You can change the source and number of documents if there is no mention in the conditions.
Conditions in Extracting Traits
The condition is specified in the following format:
- ctx.fieldtype==value or ctx.fieldtype!=value. Obtain the field_name from the Fields table under Index Configuration.
For example, ctx.sys_content_type==”web” to restrict the extraction to the content from a web source.
Custom Script
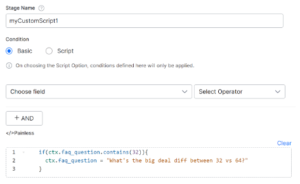
The Custom Script stage in Indexing Pipeline allows code custom processing. You can write a painless script to perform actions such as adding a new field, deleting a field, setting/resetting values to a field, copying fields, etc.
Training
Click the Train your App icon each time you change an index configuration. This builds the index based on the updated configurations.
Configuring a Custom Script
Follow these steps:
- Click the Indices menu tab.
- In the left pane, click Workbench.
- On the Workbench, click the + icon.
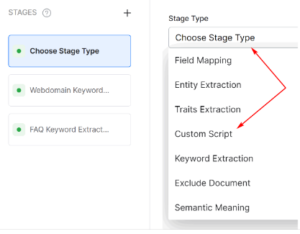
- Click the Stage Type field and select Custom Script.
- Enter a unique stage name.
- Change the Condition (Basic or Script) if required. The default setting is Basic.
- Click Choose field and select an item on the drop-down menu.
- Click Select Operator and choose an item on the drop-down menu.
- Click + AND to insert another condition. (optional) SearchAssist considers the documents that satisfy the condition(s) as part of the stage. See below, “Conditions for Running Scripts.”
- In the </>Painless field, enter the custom script.
- Click Save Configuration in the top-right corner.

Running a Simulation
Click Simulate to verify configurations. The simulator opens a side panel and displays the source, number of documents with mapping applied, and the result. You can change the source and number of documents if there is no mention in the conditions. (see below)
Conditions for Running Scripts
The condition is specified in the following format: ctx.fieldtype==value or ctx.fieldtype!=value. The field_name can be obtained from the Fields table under Index Configuration.
For example, ctx.sys_content_type==”web” to restrict the extraction to the content from a web source.
Keyword Extraction
Keyword Extraction is a technique to automatically detect important and relevant words from the text stored in a field.
The Keyword Extraction stage in Indexing Pipeline identifies a set of keywords from a source field and saves them in a target field. Use the target field to identify the intention of the search user. SearchAssist applies various NLP algorithms to extract keywords.
SearchAssist allows you to:
- Define a condition for the keyword extraction stage. SearchAssist extracts keywords only from the documents that satisfy the given condition.
- Re-order or delete keyword extractions.
- Simulate changes before saving.
Training
Click the Train your App icon each time you change an index configuration. This builds the index based on the updated configurations.
Configuring Keyword Extraction
Follow these steps:
- Click the Indices menu tab.
- In the left pane, click Workbench.
- On the Workbench, click the + icon.
- Click the Stage Type field and select Keyword Extraction.

- Enter a unique stage name.
- Change the Condition (Basic or Script) if required. The default setting is Basic.
- Click Choose field and select an item on the drop-down menu.
- Click Select Operator and choose an item on the drop-down menu.
- Click + AND to insert another condition. (optional) SearchAssist considers the documents that satisfy the condition(s) as part of the stage. See below, “Conditions for Keyword Extraction.”
- Select the field you want to extract keywords from as Source Field.
- Name the Target Field where you want to store the extracted keywords. The application creates this field.
- Click Save Configuration in the top-right corner.
Running a Simulation
Click Simulate to verify configurations. The simulator opens a side panel and displays the source, the number of documents with mapping applied, and the result. You can change the source and number of documents if there is no mention in the conditions. (see below)
Conditions for Keyword Extraction
The condition is specified in the following format:
- ctx.field_name==value or ctx.field_name!=value.
Obtain the field_name from the Fields table under Index Configuration. For example, ctx.sys_content_type==”web” to restrict the extraction from the content from a web source.
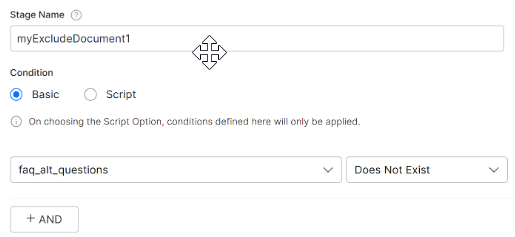
Exclude Documents
The Exclude Document stage in Indexing Pipeline drops all the documents that match the specified conditions. SearchAssist ignores documents in the subsequent stages of the indexing pipeline and leaves them without indexing.
Training
Click the Train your App icon each time you change an index configuration. This builds the index based on the updated configurations.
Configuring an Exclusion
Follow these steps:
- Click the Indices menu tab.
- In the left pane, click Workbench.
- On the Workbench, click the + icon.
- Click the Stage Type field and select Exclude Document.
- Enter a unique stage name.
- Change the Condition (Basic or Script) if required. The default setting is Basic.
- Click Choose field and select an item on the drop-down menu.
- Click Select Operator and choose an item on the drop-down menu.
- Click + AND to insert another condition. (optional) SearchAssist excludes documents that satisfy the condition(s). See below, “Conditions for Excluding Docs.”
- Click Save Configuration in the top-right corner.

Note: You must add at least one condition at this stage.
Running a Simulation
Click Simulate to verify configurations. The simulator opens a side panel and displays the source, the number of documents with mapping applied, and the result. You can change the source and number of documents if there is no mention in the conditions. (see below)
Conditions for Excluding Docs
The condition is specified in the following format: ctx.fieldtype==value or ctx.fieldtype!=value. i.e., the condition can be a certain field type equals a certain value or not equal to a certain value.
The value here being file types: FAQs, web. The field_name can be obtained from the Fields table under Index Configuration.
For example, ctx.sys_content_type==”web” to restrict the extraction to the content from a web source.
Semantic Meaning
Semantic analysis is the technique to understand the meaning and interpretation of words, signs, and sentence structure.
SearchAssist’s Indexing Pipeline supports a Semantic Meaning stage. This stage uses Deep Neural Network algorithms to create inserts of free text and saves them in a dense vector field. SearchAssist uses these embeddings to rank the documents by semantic relevance. The dense vectors are then indexed in the search and similarity is obtained between the user’s query vector and the indexed content vector.
Currently, you can apply semantic meanings only on the content from websites. When SearchAssist semantically interprets the source from a natural language perspective, the relevant results get priority over others.
SearchAssist allows you to:
- Add multiple semantics to be analyzed from the source field.
- Define a condition for the semantic meaning stage. The semantics from only the documents that satisfy the given condition are analyzed.
- Re-order or delete semantic meaning rules.
- Simulate the changes before saving them.
Training
Click the Train your App icon each time you change an index configuration. This builds the index based on the updated configurations.
Configuring Semantic Meaning
Follow these steps:
- Click the Indices menu tab.
- In the left pane, click Workbench.
- On the Workbench, click the + icon.
- Click the Stage Type field and select Semantic Meaning.

- Enter a unique stage name.
- Change the Condition (Basic or Script) if required. The default setting is Basic.
- Click Choose field and select an item on the drop-down menu.
- Click Select Operator and choose an item on the drop-down menu.
- Click + AND to insert another condition. (optional) SearchAssist considers the documents that satisfy the condition(s) as part of the stage. See below, “Conditions for Applying Semantic Meanings.”
- Select the field you want to extract Semantic Meaning from as Source Field.
- Define where to store the extracted Semantic Meaning as Target Field. The application creates this field.
- Click Save Configuration in the top-right corner
Running a Simulation
Click Simulate to verify configurations. The simulator opens a side panel and displays the source, the number of documents with mapping applied, and the result. You can change the source and number of documents if there is no mention in the conditions. (see below)
Conditions for Semantic Analysis
The condition is specified in the following format:
- ctx.fieldtype==value or ctx.fieldtype!=value. The field_name can be obtained from the Fields table under Index Configuration.
For example, ctx.sys_content_type==”web” to restrict the extraction to the content from a web source.