
Add, delete, and manage fields to customize index configurations. Field properties created here are used to create the search index schema. You can change field properties for multiple purposes such as assigning weights and creating facets.
When you extract a web page, document, or add an FAQ manually, SearchAssist automatically generates the corresponding fields and adds them to the Fields page. You can also add custom fields to this default list.
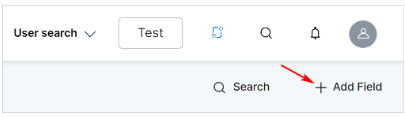
Adding Fields
Follow these steps:
- Click the Indices menu tab.
- In the left pane, click Fields.
- Go to the top right corner of the page and click + Add Field button.
- In the Add Field dialog box, enter a unique field name.
- Select one field type on the drop-down menu: String, Number, Trait, Dense Vector, Entity, Keyword, Array, Object.
- Under the Select ones that apply section, select one or more applicable conditions.
- Multi-Valued to indicate a document can contain multiple values for this field type. The default setting is enabled.
- Required makes the field mandatory. If checked, documents with a blank field are not indexed. The default setting is disenabled.
- Stored to make this field value accessible by a search query. The default setting is enabled.
- Indexed to use the field value in a search query to find documents. Only these fields can be used in Manage Relevance. The default setting is enabled.
- Click Add
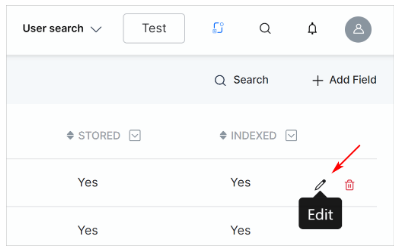
Editing Fields
Follow these steps:
- Click the Indices menu tab.
- In the left pane, click Fields.
- On the Fields page, locate a field row.
- Go to the right side of the row.
- Hover the mouse and click the pencil icon.
- In the Edit Field dialog box, make changes as required.
- Click Save.
Note: System fields (with the prefix sys_) cannot be edited or deleted.