Personalize search outcomes based on user requirements, business priorities, and search contexts. You can personalize search results with these features:
- Tuning Results
- Business Rules
- Dynamic Facets
Traditional search cannot identify search user contexts. In personalization, the same query can give different outcomes based on the user profiles or contexts which are more relevant to the user and related to the context.
SearchAssist personalization uses the NLP approach in identifying the user’s context, detecting facets, intent, localization needs, and objective behind the query. The machine learning (ML) capabilities of SearchAssist can adapt to the priorities and preferences of the end-user prompt with ready queries and position results.
Tuning Results Ranking
As a business user, you might need to promote certain products based on a context or a mandate. Perhaps you prefer to position results in a particular order. SearchAssist allows you to fine-tune the search results based on your business priorities. You can hide/unhide, boost or lower the position of certain results.
For example, in an e-commerce scenario, you can push marketing offers like combo deals, quantity discounts, or time-bound offers. SearchAssist allows you to prioritize and position required results relative to others in order to focus customer attention. You can also choose to hide/unhide a product page depending on availability.
In an enterprise scenario where users search for knowledge, specific notifications can be placed at the top of the results page to ensure proper visibility for specific queries. One example might be a new government COVID protocol for public places.
Results Ranking is an interactive and visual way to customize ranking order on the search results page. SearchAssist allows you to fine-tune results using the test-as-you-build feature without the need to deploy the SearchAssist app and visualize results. You can both preview and customize the search results as you build. Click the Test button in the top-right corner of the page.
Add a result from the repository if it is missed by the search. See all the customizations performed on search queries on the results ranking page.
Follow these steps to access Results Ranking:
- Click the Indices menu tab.
- In the left pane, click Results Ranking.
- On the Results Ranking page, click Test in the top-right corner.
- Enter a query and hit Enter. A list of matched pages appears in the search window.
- Click Customize.
- Click Query Analytics to see the number of views and clicks for the matched page.
Adding Personalizations
Hover over the right side of a matched page and perform any of the following actions:
- Hide/Unhide the particular search result
- Pin certain results in the top/desired position
- Boost the relevance score
- Lower the relevance score
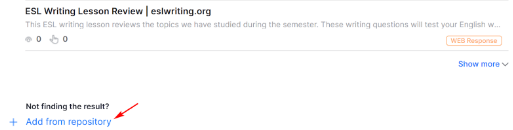
Adding Missing Results
If a search result is missing from the display, you can add an item using the +Add from repository link at the bottom. This allows you to choose a result based on the type of source.
- Go to the bottom of the results page.
- Click Add from repository.
- In the new panel, click the field and select a result type.
- Enter a search term.
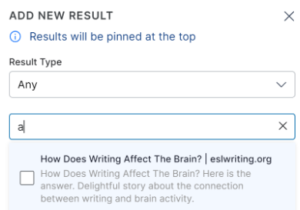
- Check the box for each item to add.
- Click the Pin Results button.

SearchAssist adds the result to the top of the results page.

After you perform any of the preceding actions on the respective search results, close the search window. The changes are saved automatically.
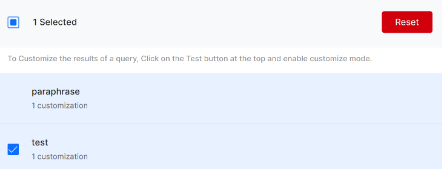
On the Results Ranking page, a list of search customizations displays in the left column. Click customization and the search result, along with the number of customizations, displays in the right column. To remove a search result customization, hover over the search result and click Remove.
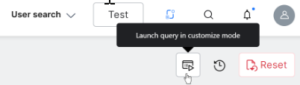
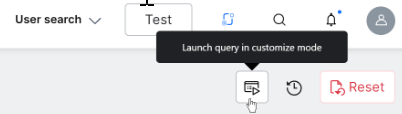
From the top-right corner of the search result window, you can
- click the play icon to launch the search in customize mode
- check the logs
- reset the customization
 Reset Customization
To undo customizations and revert to default settings:
- Go to the Results Ranking page.
- Locate the customization you want to change.
- Check the box next to the name.
- Click Reset at the top of the page.
- Click Reset in the confirmation pop-up window.
Configuring Business Rules
Business Rules allow you to define rules that personalize and fine-tune the search results based on various business requirements and user contexts.
Rules, for example, can also be used in merchandising scenarios to launch promotions and offers with quantity discounts or time-bound festive offers. Rules are based on user context, search context, page context, or a combination of contexts. Rules can define how results are promoted, positioned, or filtered.
For example, on an e-commerce site, based on the geographical location availability of certain products or their variants can be hidden, or if the user is logged in from a mobile device the number of search results displayed needs to be reduced due to limited screen space.
More About Business Rules
SearchAssist lets you define the cause and effect dimensions of Business Rules: conditions (cause) and outcomes (effect).
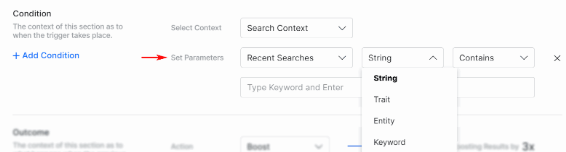
Conditions
Conditions define the trigger, based on the context and parameter values. Context can be:
- Search context Based on user search history, it has predefined attributes such as Recent Searches, Current Search, Traits, Entities, Keywords, Semantic meanings identified
- Page context Based on predefined attributes such as Device, Browser, Current page, Recent pages, and Location and other required attributes of a page, it can be passed from the website through the SDK.
- User Context Based on user information that a website can pass through SDK.
Parameters include setting the preceding context to contain/not contain/equals/not equals to a given keyword
Outcome
Define what happens when there is a condition match. The outcome can be an action and response. Action can be one of the following:
- Boost a particular response set to promote the results to display at the top.
- Lower a particular response set to demote the results from displaying at the top.
- Hide a particular response set to prevent certain results from showing to the search user.
- Filter a particular response set to screen certain search results by default.
Response enables a predefined field filter when a condition is met. The trigger that enables a response can be a static keyword, or a dynamic keyword taken from the context. For example, the end-user enters a query, “show me car insurance FAQs.” SearchAssist searches the index and only displays FAQs with relevant car insurance content.
Scenarios
The following scenarios demonstrate how a user could apply business rules.
Banking scenario
Present premium customers with a credit card offer. Define a rule as follows:
- CONDITION: “Search Context: RecentSearches” Contains “Credit” OR “Card”
AND “User Context: CustomerType” Contains “Premium” - OUTCOME: “Boost Results” Containing “Title: Card Offers” OR “Title: Card Rewards”
If the user is not creditworthy, you do not want to show them loan offers. Define a business rule as follows:
- CONDITION: “Search Context: RecentSearches” Contains “Loan” OR “Credit”
AND “User Context.CustomerInfo.CreditWorthy” Contains “Poor” - OUTCOME: “Hide Results” Containing “Loans: Loan” OR “Loans: Credit”
If the user has only a savings account and is searching for account-related information, you do not want to show information related to other types of accounts (e.g. checking accounts). Define a business rule as follows:
- CONDITION: “User Context.AccountType” Contains “Savings”
AND “User Context: AccountType” Doesn’t Contain “Checking”
AND “Page Context: PageName” Contains “Account” OR “Banking”
AND “Search Context: CurrentSearch” Contains “Information” OR “Details” - OUTCOME: “Filter Results” Containing “Title: Savings”
Applying Business Rules
Follow these steps:
- Click the Indices menu tab.
- In the left pane, click Business Rules.
- On the Business Rules page, click Add Rules.
- In the Add Rule dialog box, enter a unique name.
Adding Conditions
Under the Conditions section:
- Search Context Optimize results based on search context. For example, recent searches, current search, and traits.
- Page Context Assign data specifically to a page. For example, context-based on the current page, recent page, browser, or device.
- User Context Assign data specifically to a search user. For example, User Type (e.g. Premium User, Normal User, User Profile, Age).
- Click Select Context and select an option on the drop-down menu.

- Search Context Optimize results based on search context. For example, recent searches, current search, and traits.
- Page Context Assign data specifically to a page. For example, context-based on the current page, recent page, browser, or device.
- User Context Assign data specifically to a search user. For example, User Type (e.g. Premium User, Normal User, User Profile, Age).
- Configure the parameters.
- Select the parameters available for the corresponding context from the Set Parameters dropdown lists.
- Set the Data Type expected for the parameter.
- Set the condition to Contains/Does not Contain/Equals to/Not Equals to.
- Set the keyword to be compared with, add multiple keywords by hitting enter after each entry.
- To add more conditions, click +Add Condition.
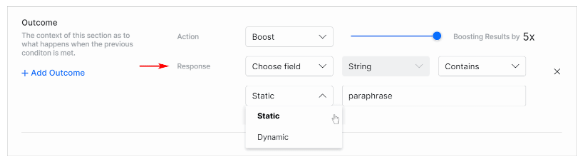
Setting Outcomes
In the Outcome, section:
- Click the Action field and select an option.
- Boost the results by x times (max 5x times).
- Lower the results by x times (max 5x times).
- Hide the results based on the preceding conditions.
- Filter the results based on the preceding conditions.
- Select the parameters from the Response drop-down list:
- Choose the field to be considered for the response.
- Review the Data Type field auto-populated by the SearchAssist.
- Set the condition to Contains/Does not Contain Equals to/Not Equals to.
- Choose Static or Dynamic keyword based on the context values.
- Set the keyword to be compared with; add multiple keywords by hitting enter after each entry.
- To add more outcomes, click +Add Outcome.
- Click Add.

Once added, you can perform the following actions on the rules:
- Search for a given business rule by name.
- Edit or Delete a business rule using the edit/delete icons. You can also delete business rules in bulk with the Bulk Select option.