GETTING STARTED
SearchAssist Overview
SearchAssist Introduction
Onboarding SearchAssist
Build your first App
Glossary
Release Notes
What's new in SearchAssist
Previous Versions

CONCEPTS
Managing Sources
Introduction
Files
Web Pages
FAQs
Structured Data 
Connectors
Introduction to Connectors
Azure Storage Connector
Confluence Cloud Connector
Confluence Server Connector
Custom Connector
DotCMS Connector
Dropbox Connector
Google Drive Connector
Oracle Knowledge Connector
Salesforce Connector
ServiceNow Connector
SharePoint Connector
Zendesk Connector
RACL
Virtual Assistants
Managing Indices
Introduction
Index Fields
Traits
Workbench
Introduction to Workbench
Field Mapping
Entity Extraction
Traits Extraction
Keyword Extraction
Exclude Document
Semantic Meaning
Snippet Extraction
Custom LLM Prompts
Index Settings
Index Languages
Managing Chunks
Chunk Browser
Managing Relevance
Introduction
Weights
Highlighting
Presentable
Synonyms
Stop Words
Search Relevance
Spell Correction
Prefix Search
Custom Configurations
Personalizing Results
Introduction
Answer Snippets
Introduction
Extractive Model
Generative Model
Enabling Both Models
Simulation and Testing
Debugging
Best Practices and Points to Remember
Troubleshooting Answers
Answer Snippets Support Across Content Sources
Result Ranking
Facets
Business Rules
Introduction
Contextual Rules
NLP Rules
Engagement
Small Talk
Bot Actions
Designing Search Experience
Introduction
Search Interface
Result Templates
Testing
Preview and Test
Debug Tool
Running Experiments
Introduction
Experiments
Analyzing Search Performance
Overview
Dashboard
User Engagement
Search Insights
Result Insights
Answer Insights

ADMINISTRATION
General Settings
Credentials
Channels
Team
Collaboration
Integrations
OpenAI Integration
Azure OpenAI Integration
Custom Integration
Billing and Usage
Plan Details
Usage Logs
Order and Invoices
Smart Hibernation

SearchAssist APIs
API Introduction
API List

SearchAssist SDK

HOW TOs
Use Custom Fields to Filter Search Results and Answers
Add Custom Metadata to Ingested Content
Write Painless Scripts
Configure Business Rules for Generative Answers

Preparing Your Virtual Assistant For a SearchAssist App

On the SearchAssist platform, you can link an existing live virtual assistant built on the Kore.ai platform with your SearchAssist app. To make that link, complete the following steps in sequence:

  1. Build a virtual assistant catering to your needs. To learn more, see  Kore.ai Virtual Assistant Builder Assistant.
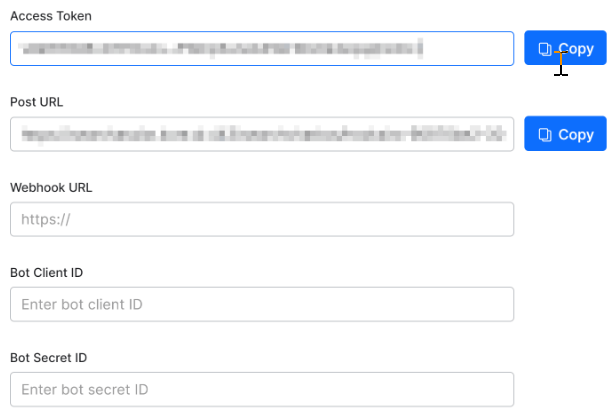
  2. Enable the Webhook channel for the Virtual Assistant using the access token and post URL as shown in the How to Link the following section. To learn more, see  Adding Webhook as a Channel.
  3. The SearchAssist app can interface and interact with the selected Virtual Assistant only after the webhook channel is published or live.
  4. Make a note of the Client ID and Secret ID from the Kore.ai Virtual Assistant, after enabling the Webhook channel.


Note: A SearchAssist app can be linked to only one live Virtual Assistant at a time.

Integrating Virtual Assistant With Your SearchAssist App

To access the journeys and actions done by a virtual assistant from your SearchAssist app, you need to link both tools.

Follow these steps to link a Virtual Assistant from the SearchAssist Actions menu tab:

  1. Click the Sources menu tab.
  2. Click Actions in the left pane.
  3. On the Bot Actions page, click Link a Bot.
  4. On the next page, locate the bot you want to integrate.
  5. Click Link Bot.


Copying and pasting

  1. Open the Kore.ai bot in a new browser tab.
  2. Open the bot and go to the Webhook page.
  3. Scroll down to WEBHOOK URL (For V2 API).
  4. Click Copy.
  5. Return the SearchAssist page.
  6. Paste the URL into the correct field.
  7. Repeat steps for Bot Client ID and Bot Secret ID.
  8. Click Link.


Note: You can link only one virtual assistant with one SearchAssist app.


Managing Virtual Assistant Actions

Once you have linked a virtual assistant to your SearchAssist app, you can:

  • View the virtual assistant and the associated tasks it’s capable of handling.
  • Open the virtual assistant in the Kore.ai’s Experience Optimization (XO) or bot platform.
  • Click Edit Configuration to capture any changes from the Kore.ai’s Experience Optimization (XO) or bot platform.
  • Click Unlink bot to link a new bot or virtual assistant Unlink the currently linked virtual assistant.

Preparing Your Virtual Assistant For a SearchAssist App

On the SearchAssist platform, you can link an existing live virtual assistant built on the Kore.ai platform with your SearchAssist app. To make that link, complete the following steps in sequence:

  1. Build a virtual assistant catering to your needs. To learn more, see  Kore.ai Virtual Assistant Builder Assistant.
  2. Enable the Webhook channel for the Virtual Assistant using the access token and post URL as shown in the How to Link the following section. To learn more, see  Adding Webhook as a Channel.
  3. The SearchAssist app can interface and interact with the selected Virtual Assistant only after the webhook channel is published or live.
  4. Make a note of the Client ID and Secret ID from the Kore.ai Virtual Assistant, after enabling the Webhook channel.


Note: A SearchAssist app can be linked to only one live Virtual Assistant at a time.

Integrating Virtual Assistant With Your SearchAssist App

To access the journeys and actions done by a virtual assistant from your SearchAssist app, you need to link both tools.

Follow these steps to link a Virtual Assistant from the SearchAssist Actions menu tab:

  1. Click the Sources menu tab.
  2. Click Actions in the left pane.
  3. On the Bot Actions page, click Link a Bot.
  4. On the next page, locate the bot you want to integrate.
  5. Click Link Bot.


Copying and pasting

  1. Open the Kore.ai bot in a new browser tab.
  2. Open the bot and go to the Webhook page.
  3. Scroll down to WEBHOOK URL (For V2 API).
  4. Click Copy.
  5. Return the SearchAssist page.
  6. Paste the URL into the correct field.
  7. Repeat steps for Bot Client ID and Bot Secret ID.
  8. Click Link.


Note: You can link only one virtual assistant with one SearchAssist app.


Managing Virtual Assistant Actions

Once you have linked a virtual assistant to your SearchAssist app, you can:

  • View the virtual assistant and the associated tasks it’s capable of handling.
  • Open the virtual assistant in the Kore.ai’s Experience Optimization (XO) or bot platform.
  • Click Edit Configuration to capture any changes from the Kore.ai’s Experience Optimization (XO) or bot platform.
  • Click Unlink bot to link a new bot or virtual assistant Unlink the currently linked virtual assistant.