GETTING STARTED
SearchAssist Overview
SearchAssist Introduction
Onboarding SearchAssist
Build your first App
Glossary
Release Notes
What's new in SearchAssist
Previous Versions

CONCEPTS
Managing Sources
Introduction
Files
Web Pages
FAQs
Structured Data 
Connectors
Introduction to Connectors
Azure Storage Connector
Confluence Cloud Connector
Confluence Server Connector
Custom Connector
DotCMS Connector
Dropbox Connector
Google Drive Connector
Oracle Knowledge Connector
Salesforce Connector
ServiceNow Connector
SharePoint Connector
Zendesk Connector
RACL
Virtual Assistants
Managing Indices
Introduction
Index Fields
Traits
Workbench
Introduction to Workbench
Field Mapping
Entity Extraction
Traits Extraction
Keyword Extraction
Exclude Document
Semantic Meaning
Snippet Extraction
Custom LLM Prompts
Index Settings
Index Languages
Managing Chunks
Chunk Browser
Managing Relevance
Introduction
Weights
Highlighting
Presentable
Synonyms
Stop Words
Search Relevance
Spell Correction
Prefix Search
Custom Configurations
Personalizing Results
Introduction
Answer Snippets
Introduction
Extractive Model
Generative Model
Enabling Both Models
Simulation and Testing
Debugging
Best Practices and Points to Remember
Troubleshooting Answers
Answer Snippets Support Across Content Sources
Result Ranking
Facets
Business Rules
Introduction
Contextual Rules
NLP Rules
Engagement
Small Talk
Bot Actions
Designing Search Experience
Introduction
Search Interface
Result Templates
Testing
Preview and Test
Debug Tool
Running Experiments
Introduction
Experiments
Analyzing Search Performance
Overview
Dashboard
User Engagement
Search Insights
Result Insights
Answer Insights

ADMINISTRATION
General Settings
Credentials
Channels
Team
Collaboration
Integrations
OpenAI Integration
Azure OpenAI Integration
Custom Integration
Billing and Usage
Plan Details
Usage Logs
Order and Invoices
Smart Hibernation

SearchAssist APIs
API Introduction
API List

SearchAssist SDK

HOW TOs
Use Custom Fields to Filter Search Results and Answers
Add Custom Metadata to Ingested Content
Write Painless Scripts
Configure Business Rules for Generative Answers

Field Management

SearchAssist’s Field Management allows you to add, delete and manage the properties of the fields. Field properties created here are used in creating the search index schema.

When you extract a web page, document, or add an FAQ manually, corresponding fields are automatically added to the Fields table. You can add to this default list. All the derived and custom fields can be viewed on the Fields page under selected Index Configuration. Also, make changes in field properties for custom fields to use the field for multiple purposes such as weights, facets, etc.

Adding

To add a field, follow the below steps:

  1. Click the Indices tab on the top.
  2. On the left pane, under the Index Configuration section, click Fields.
  3. On the Fields page, click + Add Field on the top-right.
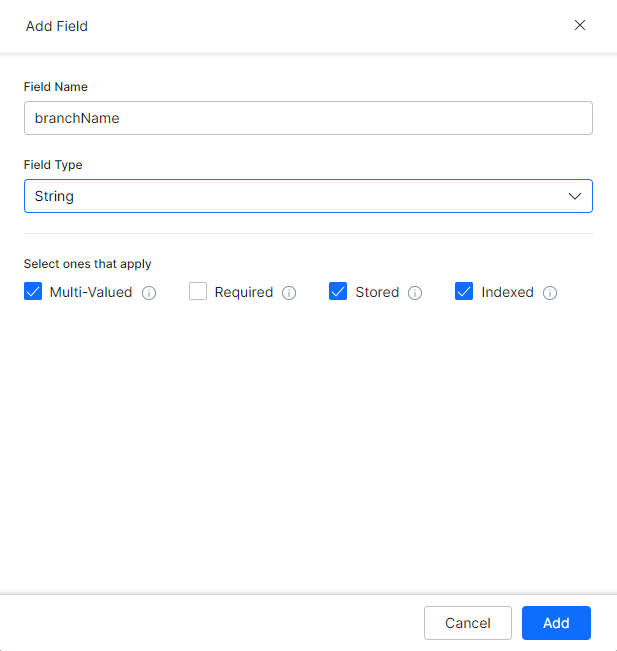
  4. On the Add Field dialog box, enter a name in the Field Name field.
  5. Select a field type from the Field Type drop-down list. It can be
    • String
    • Number
    • Trait
    • Dense Vector
    • Entity
    • Keyword  
    • Array
    • Object
  6. Under the Select ones that apply section, select: Multi-Valued, Required, Stored, or Indexed.
    • Multi-Valued – When enabled, indicates that a document can contain multiple values for this field type. Enabled by default.
    • Required – When enabled, a document that does not have a value for this field would not be considered by the index pipeline. Disabled by default.
    • Stored – When enabled, the actual value of the field is retrieved by queries. Enabled by default.
    • Indexed – When enabled, the value of the field is used in queries to retrieve matching documents. Only these fields can be used in Search Configuration to optimize search results. Enabled by default.
  7. Click Add.

Actions

Note: System fields (with prefix sys_) cannot be edited or deleted. 

To edit a custom field, follow the below steps:

  1. On the left pane, under the Index Configuration section, click Fields.
  2. On the Fields page, hover over the corresponding field to see the edit/delete options
  3. Click the edit icon of the field you want to edit.
  4. On the Edit Field dialog box, make the required changes.
  5. Click Save.
  6. You can delete the field using the delete icon.

On this Page

Field Management

SearchAssist’s Field Management allows you to add, delete and manage the properties of the fields. Field properties created here are used in creating the search index schema.

When you extract a web page, document, or add an FAQ manually, corresponding fields are automatically added to the Fields table. You can add to this default list. All the derived and custom fields can be viewed on the Fields page under selected Index Configuration. Also, make changes in field properties for custom fields to use the field for multiple purposes such as weights, facets, etc.

Adding

To add a field, follow the below steps:

  1. Click the Indices tab on the top.
  2. On the left pane, under the Index Configuration section, click Fields.
  3. On the Fields page, click + Add Field on the top-right.
  4. On the Add Field dialog box, enter a name in the Field Name field.
  5. Select a field type from the Field Type drop-down list. It can be
    • String
    • Number
    • Trait
    • Dense Vector
    • Entity
    • Keyword  
    • Array
    • Object
  6. Under the Select ones that apply section, select: Multi-Valued, Required, Stored, or Indexed.
    • Multi-Valued – When enabled, indicates that a document can contain multiple values for this field type. Enabled by default.
    • Required – When enabled, a document that does not have a value for this field would not be considered by the index pipeline. Disabled by default.
    • Stored – When enabled, the actual value of the field is retrieved by queries. Enabled by default.
    • Indexed – When enabled, the value of the field is used in queries to retrieve matching documents. Only these fields can be used in Search Configuration to optimize search results. Enabled by default.
  7. Click Add.

Actions

Note: System fields (with prefix sys_) cannot be edited or deleted. 

To edit a custom field, follow the below steps:

  1. On the left pane, under the Index Configuration section, click Fields.
  2. On the Fields page, hover over the corresponding field to see the edit/delete options
  3. Click the edit icon of the field you want to edit.
  4. On the Edit Field dialog box, make the required changes.
  5. Click Save.
  6. You can delete the field using the delete icon.