List Management
List Management section consist of essential contact details for the campaigns. There are two subsections:
- Contact Lists: Contact lists contain vital information about individuals, enabling targeted and effective communication. It is a collection of names, and contact numbers necessary for running a campaign.
- DNC (Do Not Contact) Lists: These are contacts who have opted for "Do Not Contact" (DNC) or have registered on the national DNC facility, indicating their preference not to receive unsolicited calls. The DNC Lists Contacts count comprises contacts from both uploaded CSV files and contacts added directly through the bot or agent.
You can view the lists by going to Contact Center > Campaigns > List Management.

Contact Lists
To view the Contact Lists, click the Contact Lists tab.
The following details are displayed in Contact Lists:
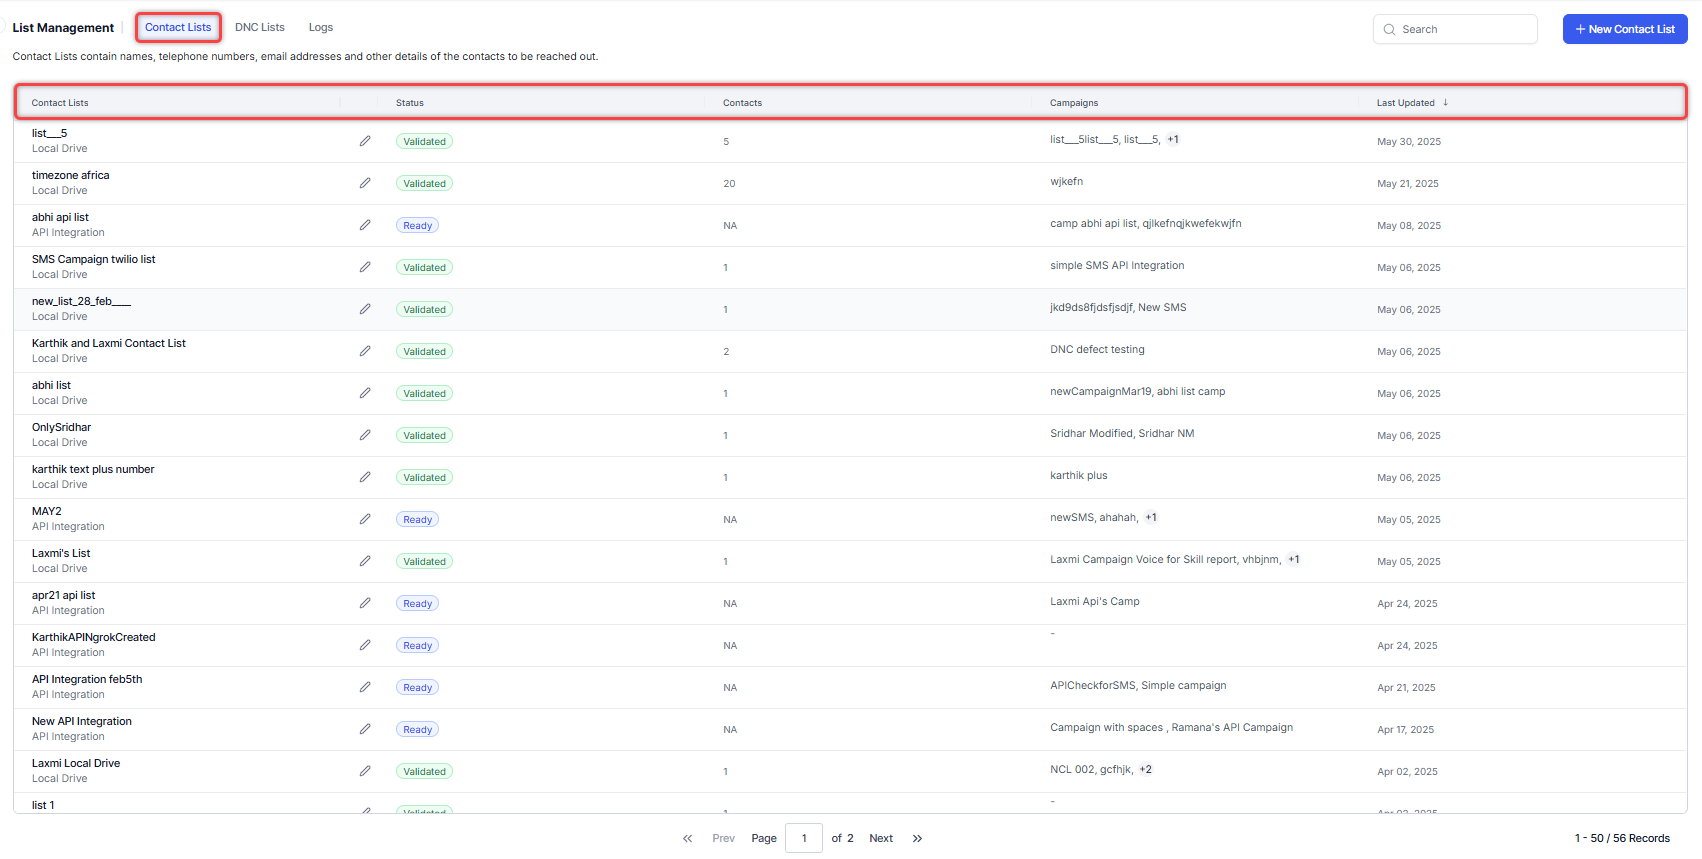
- Contact Lists - Name of the list. For example, Contact List 1.
- Actions - Edit and Delete lists.
- Status - Shows the status of the list. For example, Validating, Validated, and Invalid.
- Contacts - Shows the total count of contacts in the list. For example, 288.
- Campaigns - Name of the Campaign. For example, Post Sales Survey.
- Last Updated - The date when the contact list was last updated. Default sorting is based on the last updated date.
Create a Contact List
Contacts can be uploaded in two ways:
- Local Drive
- API Integration
Local Drive
Steps to add a contact list from the local drive:
-
On the New Contact List pop-up window, enter the Name, Description and select Local Drive from the Source dropdown.

-
Select a CSV file from the local drive and upload the CSV file.
Note
Phone numbers in the CSV should be in E.164 format with Country Code, Area Code, Subscriber Number and within double inverted quotes.
-
Select the Mapping Fields and click Save.
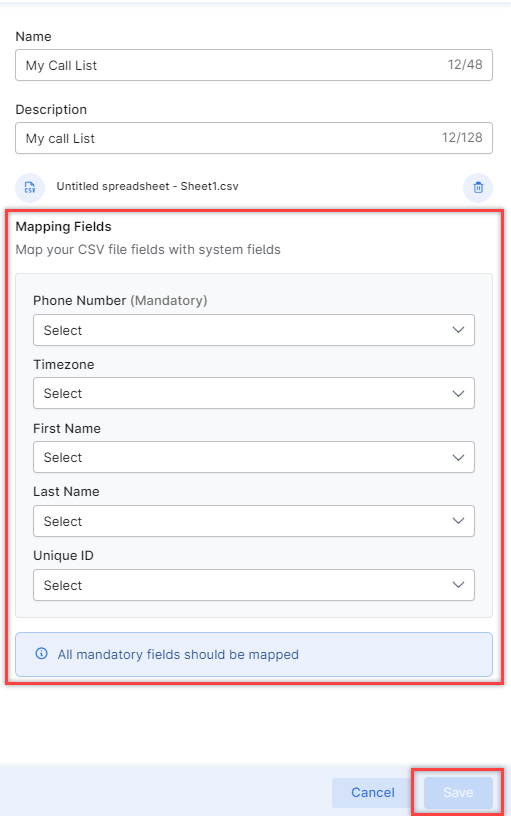
Note
Phone Number is mandatory for voice campaigns.
The Contact List is created.
Dynamic Retrieval and Reflection of CSV Column Values
Campaign managers can read, fetch, and display column and corresponding field values from a CSV file whenever required. This can be done within the message node in the start flow or by sending the necessary values to the Agent Console during an agent transfer ensuring these values are reflected in the voice campaign call.
- Mapped fields in the uploaded CSV file are readable and can be used within the start flow. These fields can be configured in the message node of the experience flow.
- When a field is configured in the experience flow, the system recognizes it and fetches the corresponding value during outbound campaigns. For example, if the
{{First Name}}field is configured in a message node, the system retrieves and speaks the relevant value during a voice campaign call. - The system reads data from the CSV file and transmits necessary information/values to the agent console corresponding to the Customer/Phone number. This applies to both agent transfers in an Agentless Campaign and Auto Dialers on the agent console.
- Non-mapped fields are saved in the data table for additional queries. For example, if there is a column named "Account Num" in the contact, this "Account Num" will be part of the contact data table and can be called as part of the start flow.
To retrieve user information from the context, specifically the user details from the uploaded CSV, we need to extract all the fields present in the CSV. This requires configuring the script node to capture the data from the context and store it in a variable. This allows us to use and modify the data throughout the entire workflow.
Note
The table supports up to 150 columns, with a maximum of 300 characters per column.
Steps to query the CSV fields in the start flow-node:
-
Use the following code to retrieve the data from the context.
let userInfo = context?.campaignUserInfo;
setCallFlowVariable('userInfo', userInfo);
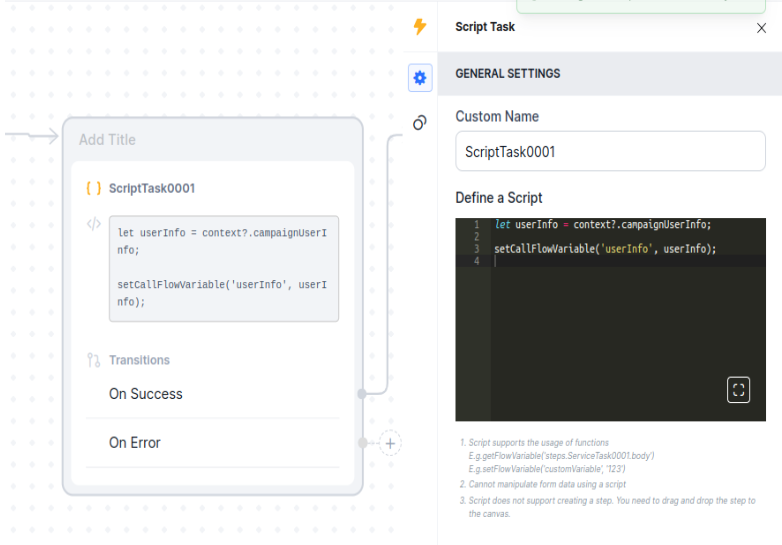
The user information is stored in the userInfo variable and saved in thecallFlowVariablefor future use. -
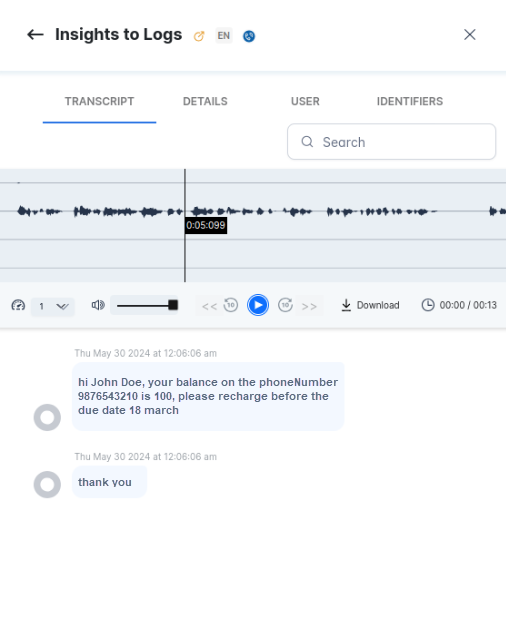
The userInfo data can be used depending on the use case. For example, if we want to create a message to play when calling a customer, we can add the following in a message node:
hi {{context.userInfo.firstName}} {{context.userInfo.lastName}}, your balance on the phoneNumber {{context.userInfo.phoneNumber}} is {{context.userInfo.balance}}, please recharge before the due date {{context.userInfo.dueDate}} {{context.userInfo.month}}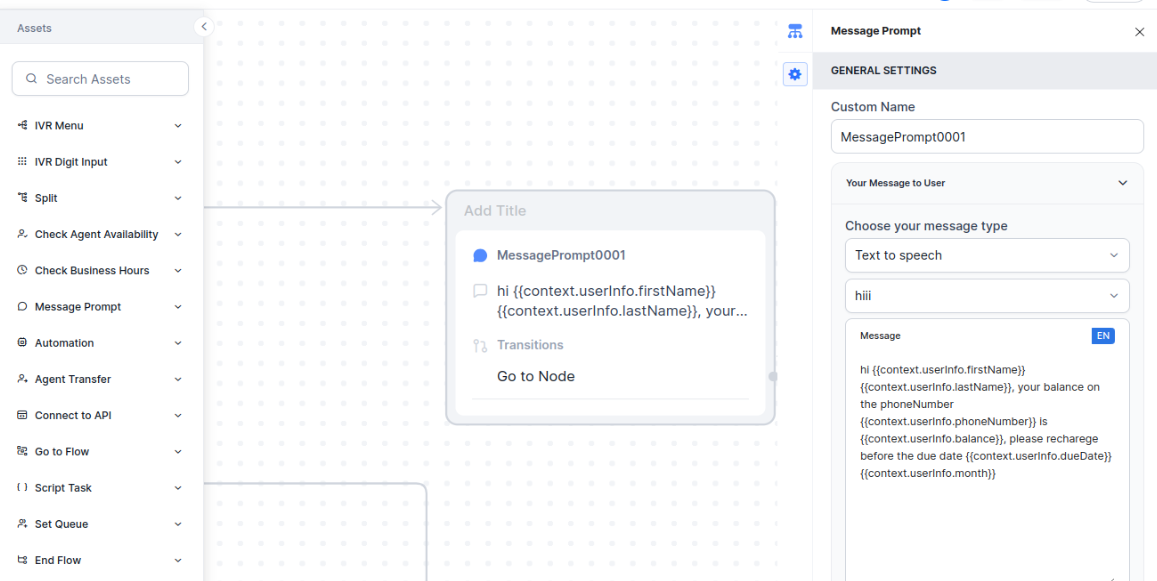
-
The user details provided in the CSV are fetched as
context.userInfo.firstName(wherefirstNameis the header in the CSV). Similarly, all the other fields can be accessed.
Time Zone
- The "Timezone" field of the CSV is validated against the Calling Hours Timezone.
- The time zone mentioned against a contact in the CSV is given preference over Calling Hours.
- When setting up the time zones for an Outbound campaign's contact list or specifying contactable timings, use the format mentioned in the Tz database. Tz Identifiers.
- Each location is identified in the Tz database by its continent or ocean, followed by the largest city in that area. For example,
- America/Phoenix
- Asia/Hong_Kong
- Pacific/Fiji
- If a contact has a timezone mentioned, the timezone will be validated or converted before dialing. If the contact’s timezone doesn’t fall under calling hours then the contact will be skipped.
- If a contact is skipped, then it is considered a check and the Campaign is "Completed" once all other contacts are dialed successfully.
- Contacts skipped due to timezone mismatch will appear as "Unconnected Calls" on the Campaign Dashboard.
API Integration
Steps to pull the contacts using API Integration:
-
On the New Contact List pop-up window, enter the Name, Description, and select API Integration from the Source dropdown.

-
Click API Integration to select to configure the API and add records to the contact list.

-
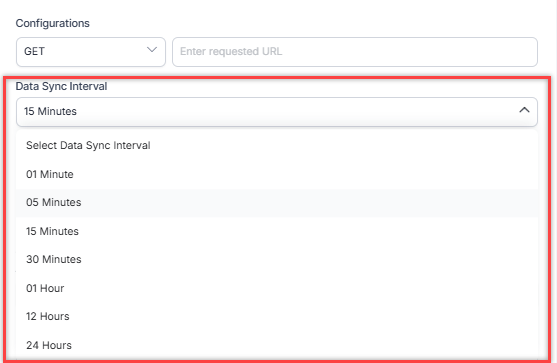
Select the Data Sync Interval from the dropdown. Sync intervals ensure that updates in the database are reflected in the contact lists without a manual refresh. You can select an interval of up to 24 hours.
-
Select the Data Sync Mode. You can choose from the following options:
-
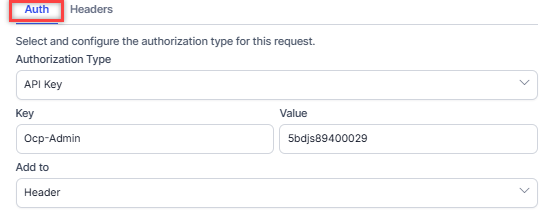
If the header is selected in the Add to field, click the Headers tab and click the box “Click here to add headers”.

-
Select the Mapping Fields. For each field you want to map (First Name, Last Name, etc.), identify the corresponding key name in the API response:
- If the data is at the root level of the JSON, simply use the key name as is. For example, if the JSON contains "firstName":"John", you would enter "firstName" in the field mapping.
- If the data is nested, specify the full path to traverse the JSON hierarchy. Use dot notation to drill down into nested objects. For example, if the name data is located like:
You would enter "contact.name.first" and "contact.name.last" in the First Name and Last Name fields.

- Ensure that the phone numbers are in E.164 format with Country Code, Area Code, Subscriber Number, and within double inverted quotes.
Note
You can get the API key value from environment variables (plain or encrypted) when adding contacts.
-
Click Save. The contact list is fetched from the third-party database.
Accessing Contact List Field Labels and Values
Advanced SMS and Agentless Dialer Campaigns can use mapped and unmapped contact fields for enhanced personalization. The UserSession context object provides access to all mapped and unmapped fields from Contact List records within Dialog Tasks and Experience Flows, ensuring seamless integration across workflows. Campaign managers can use these fields to build more effective SMS campaigns.
Extracting Contact List Field Labels
Steps to retrieve the label names of all available fields in a contact record:
- Go to an Experience Flow or Dialog Task.
-
Enter the following function in the Message Node.
{{JSON.stringify(context.session.UserSession.campaignUserInfo)}}- You can get the labels from the Transcripts tab of the Interactions Dashboard.
- You can also use the same function in the Script Node to access the data.
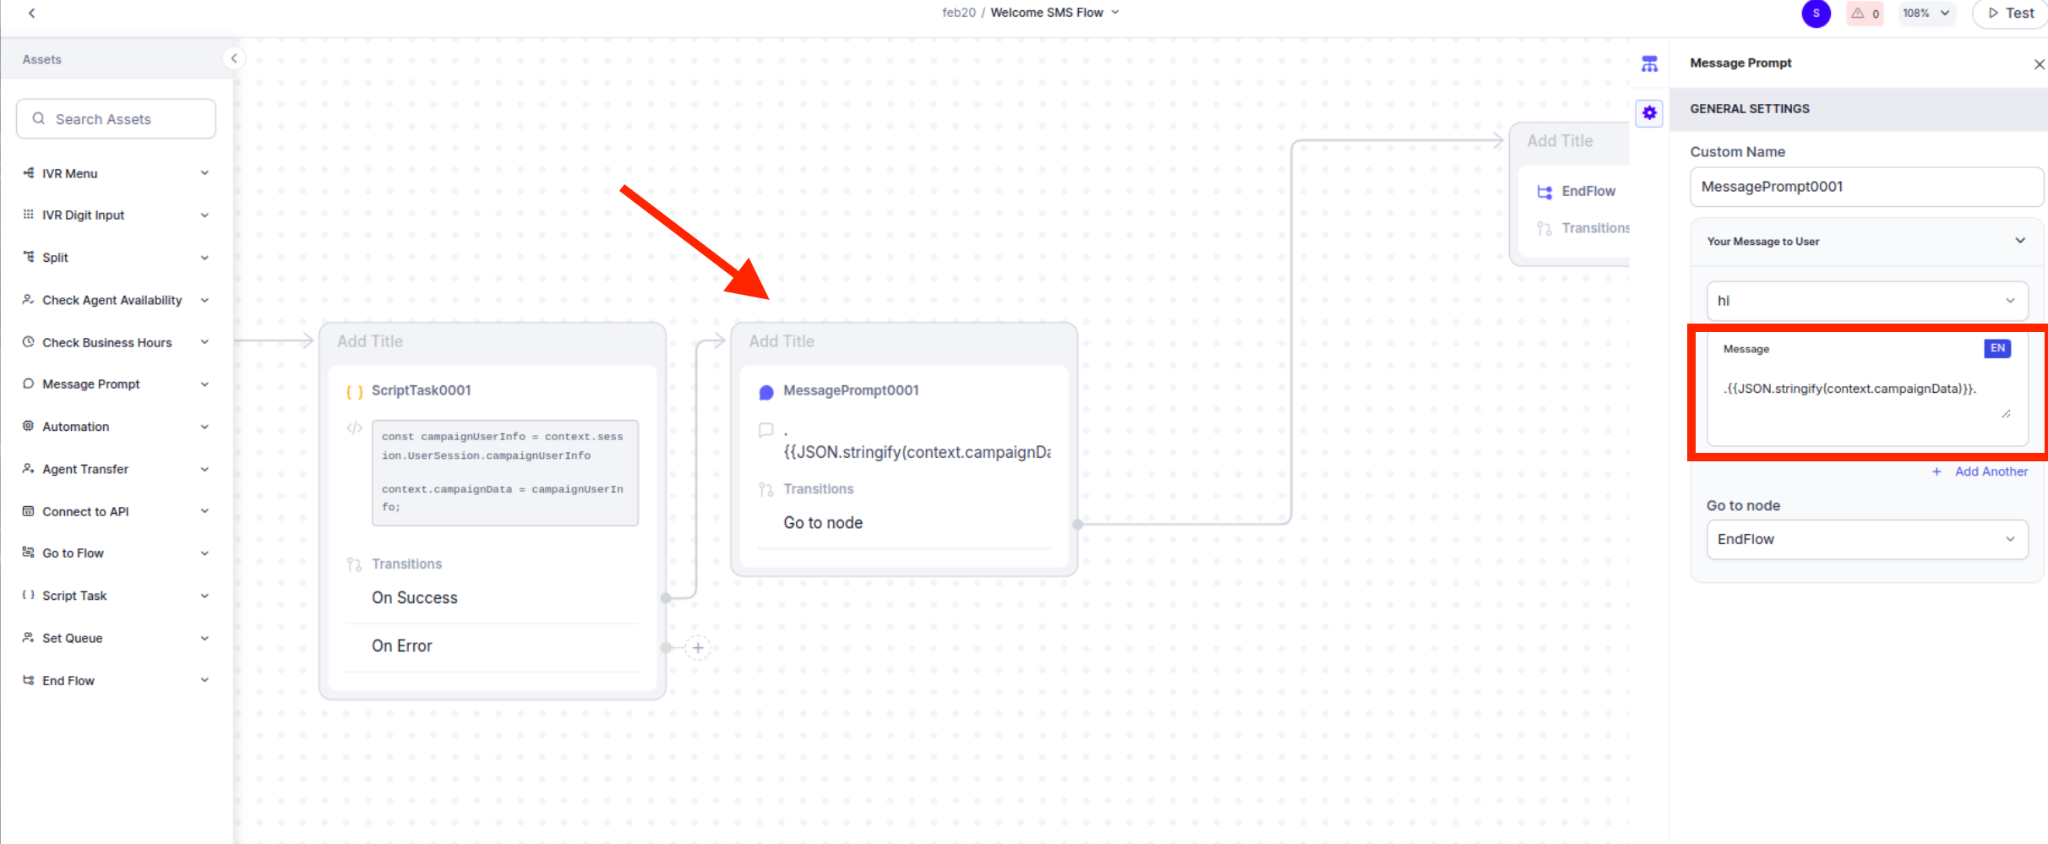
-
Publish the bot to apply the changes. Learn more.
-
Run the campaign associated with the contact list for which you need the field label names.
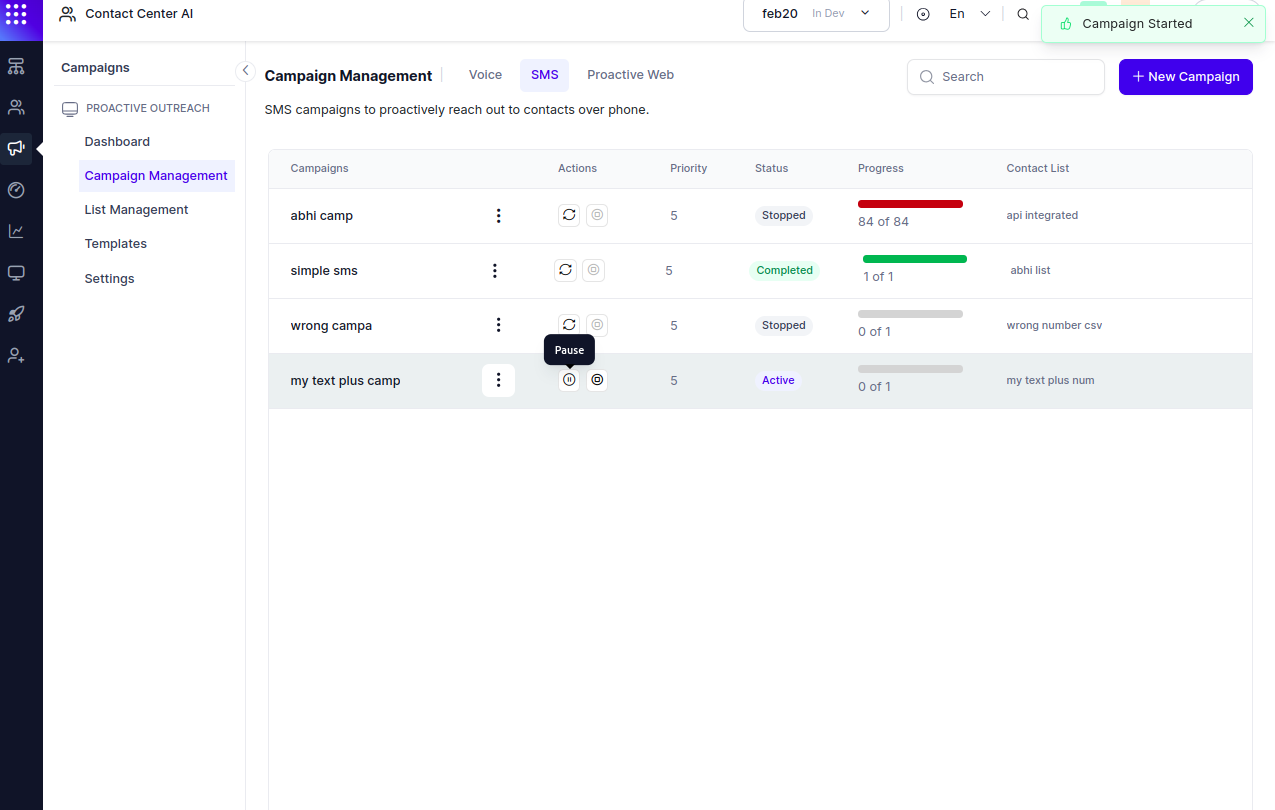
-
On the Interactions page, click the desired Campaign's record to view transcriptions and access the string representation of all fields.
.png)
Accessing the Contact List Fields Through Their Labels
You can use the extracted labels to access specific contact list fields within your flow.
Example 1: Using a Script Node (Experience Flow & Dialog Task)
- Go to an Experience Flow or Dialog Task.
-
In the Message Node or Script Node, add the following JavaScript function to retrieve campaign user details:
// Accessing all fields, including mapped and unmapped ones -
After retrieving the user information, implement custom logic as needed. In this example, the script extracts the user’s phone number and stores it in the context for use in future flows.
// Extracting the user’s phone number and assigning to a variable
// Storing the number in context for later use
    if (number === "+919876543210") {
     context.testingNumberValue="John"
} else
    {
    context.testingNumberValue="other"
    }
Example 2: Accessing Fields in a Confirmation Node (Dialog Task)
- Go to an Experience Flow or Dialog Task.
- Use the extracted field labels to define logic in a Confirmation Node. For example, you can validate the user’s response based on a specific contact field.
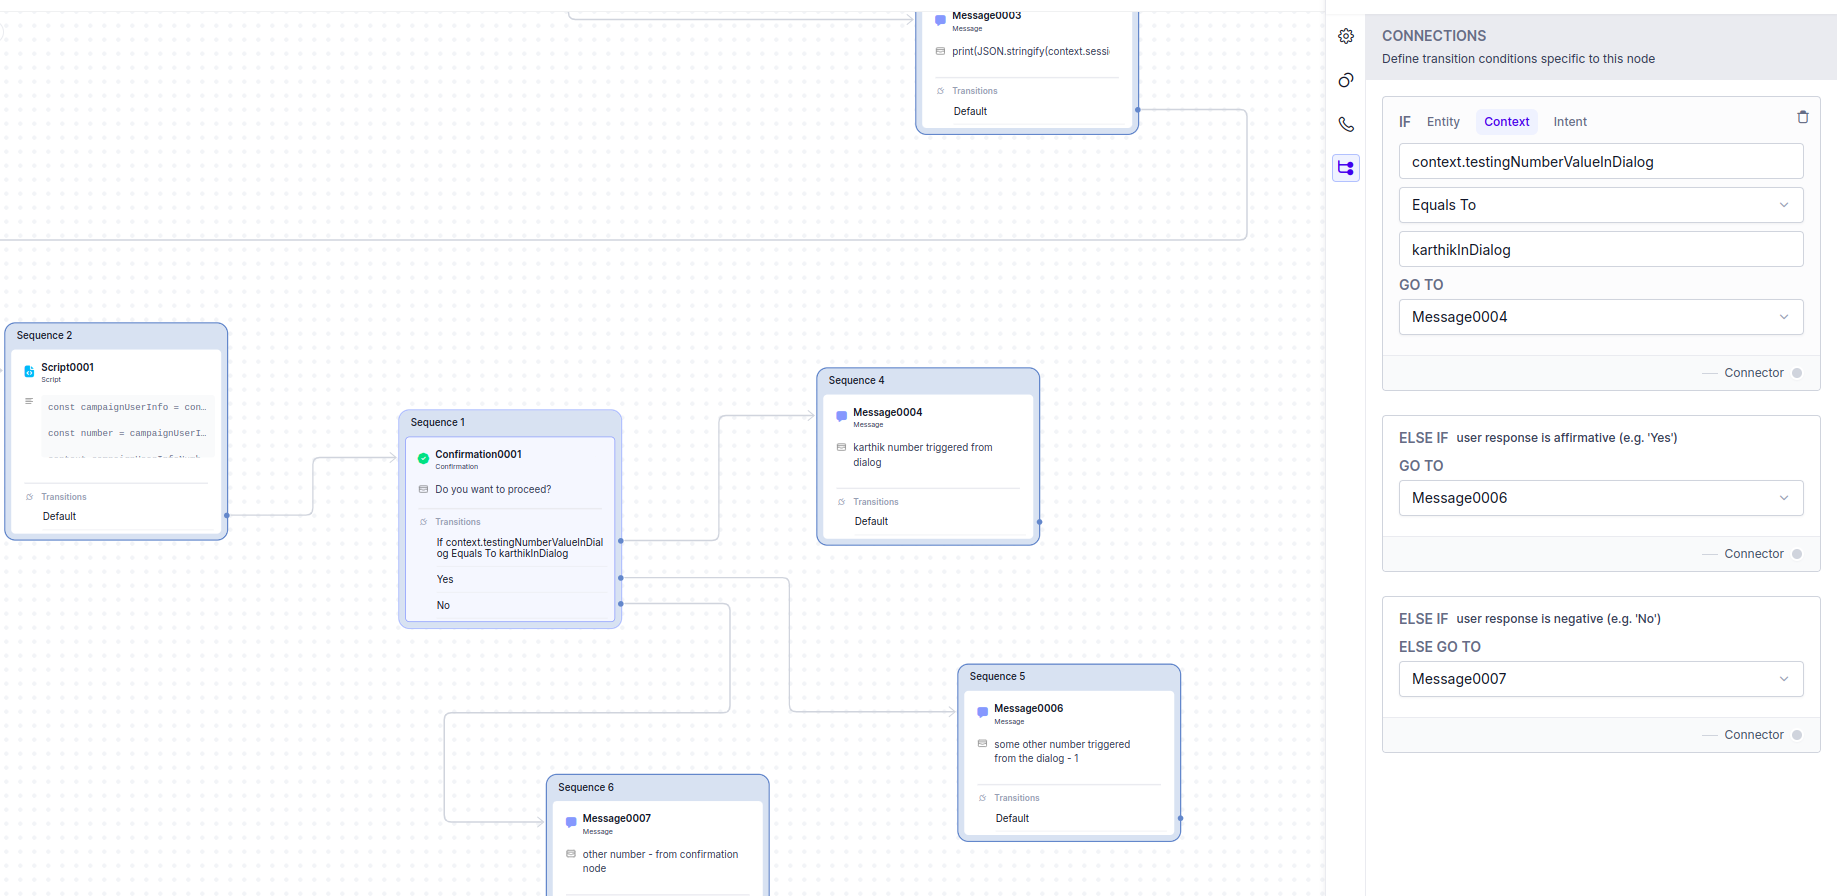
Edit a Contact List
Local Drive
Steps to edit a contact list from the local drive:
-
Upload the call list and click Save when the list is appended.
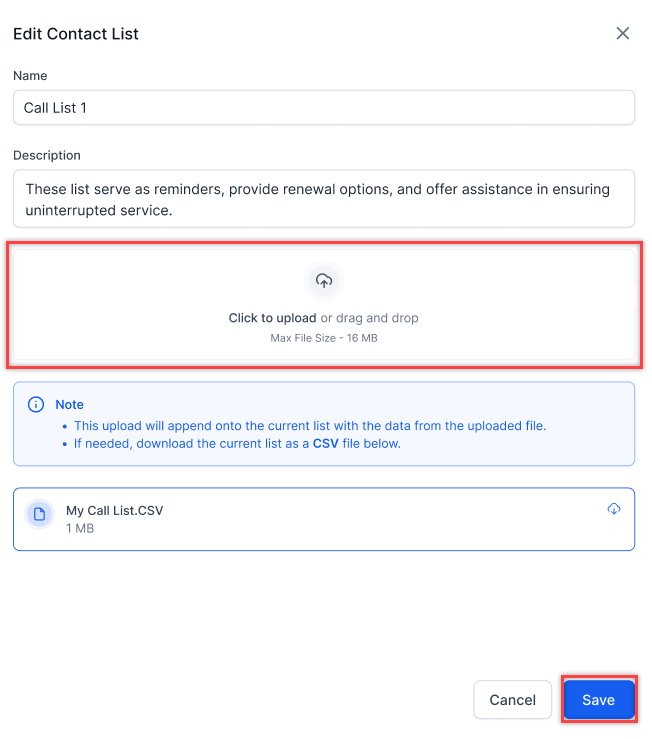
Note
You can only append a contact list; you cannot edit an existing contact list.
API Integration
Steps to edit an API-integrated contact list:
Delete a Contact List
Local Drive
Steps to delete a contact list from the local drive:
-
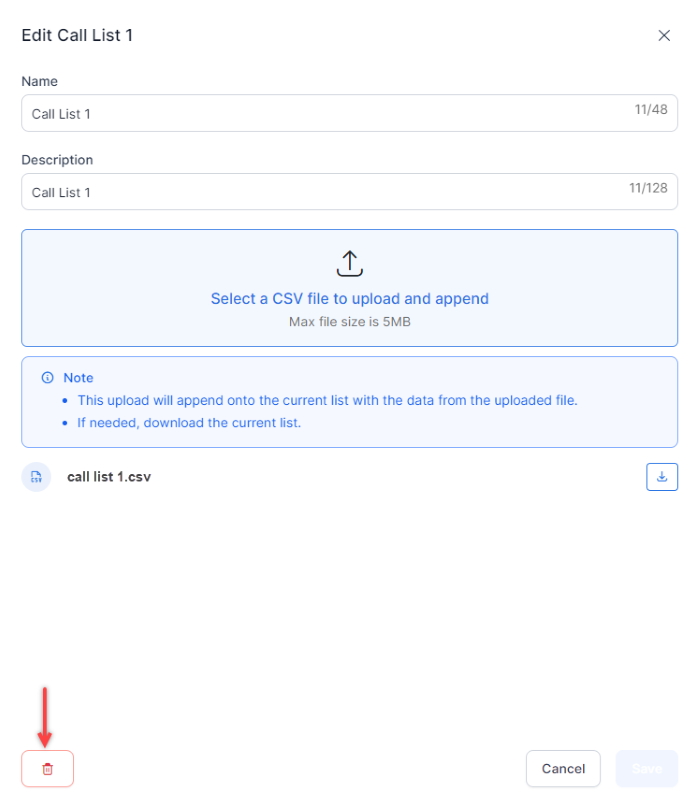
Click the Edit icon beside the contact list name and click the Delete icon at the bottom left corner of the edit window.
Note
You cannot delete a contact list if it is associated with any campaign.
-
A confirmation message is displayed. Click Delete.
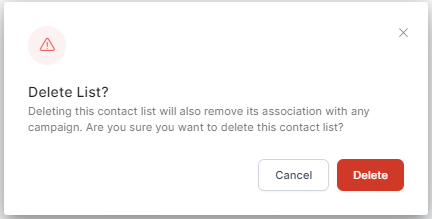
The contact list is deleted.
API Integration
Steps to delete an API-integrated contact list:
-
Click the Edit icon beside the contact list name and click the Delete icon at the bottom left corner of the edit window.

-
A confirmation message is displayed. Click Delete.

The contact list is deleted.
DNC Lists
To view the DNC Lists, click the DNC Lists tab.
The following details are displayed in DNC Lists:
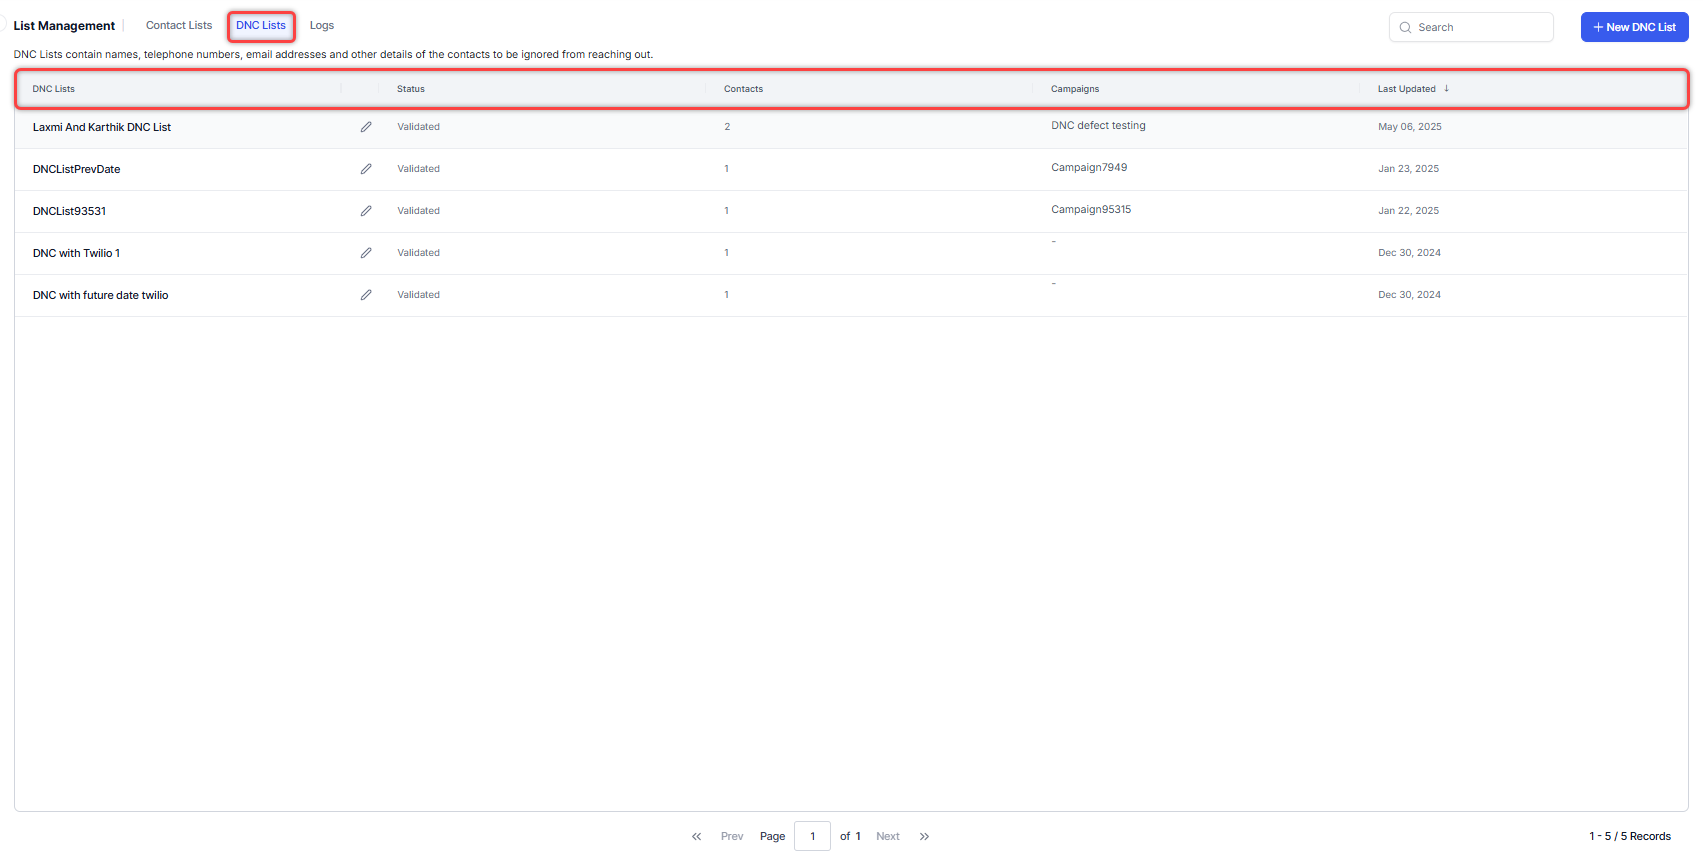
- DNC Lists - Name of the list. For example, DNC List 1.
- Actions - Edit and Delete lists.
- Status - Shows the status of the list. For example, Validating, Validated, and Invalid.
- Contacts - Shows the total count of contacts in the list. For example, 288.
- Campaigns - Name of the Campaign. For example, Post Sales Survey.
- Last Updated - The date when the contact list was last updated. Default sorting is based on the last updated date.
Create a DNC List
Steps to create a new DNC list:
-
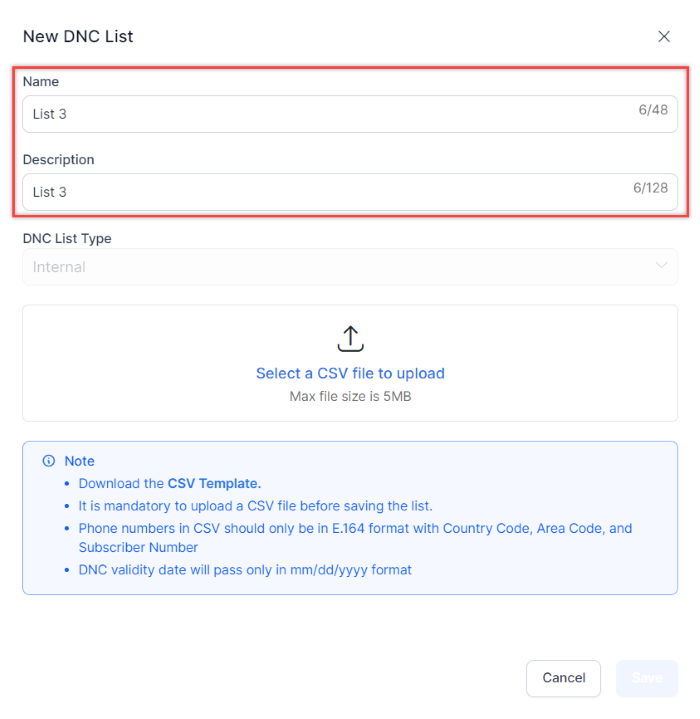
On the New DNC List pop-up window, enter the Name and Description of the list.
Note
As of now, the default DNC List Type is Internal.
-
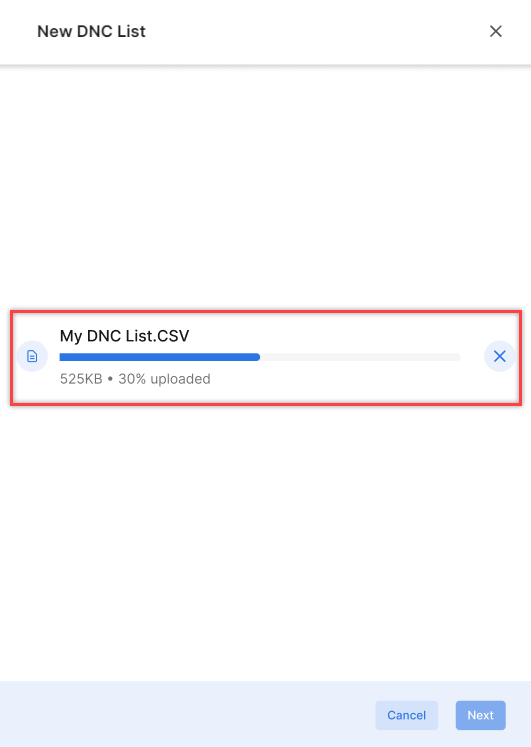
Click Select a CSV file to upload a CSV file.
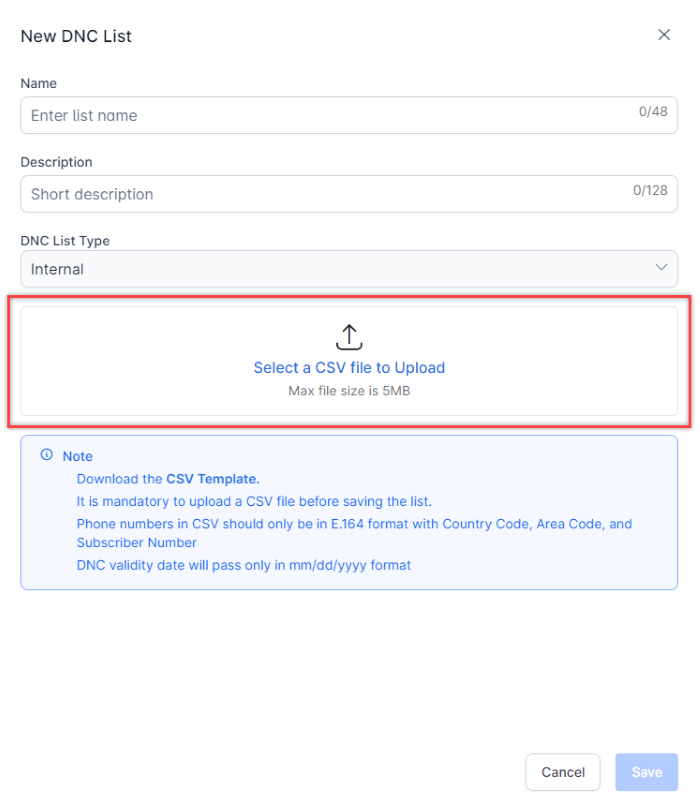
Note
You can download the template for the CSV file by clicking the CSV Template.
-
Select the Mapping Fields and click Next.
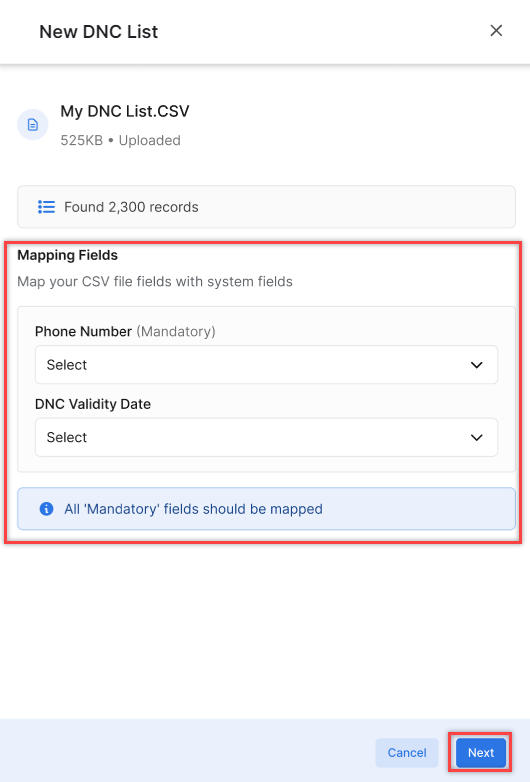
The DNC List is created.
Edit a DNC List
Steps to edit a DNC list:
-
Note
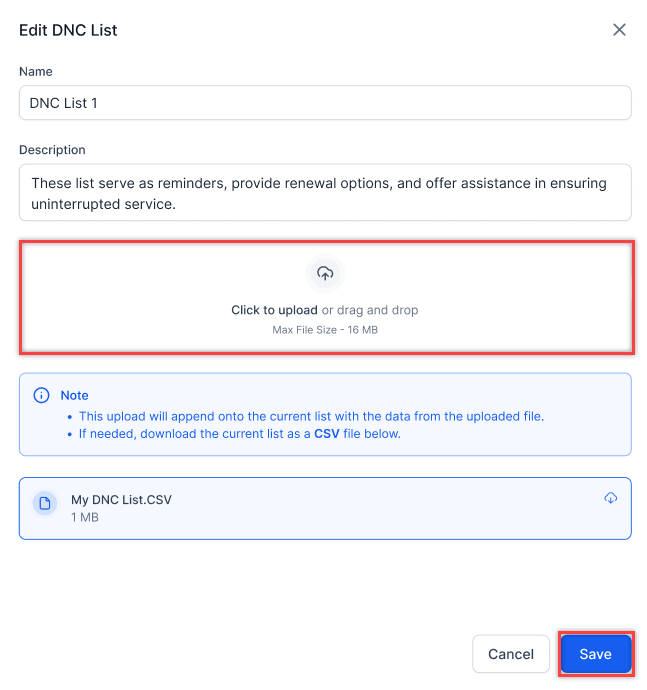
You cannot delete a DNC list when it is "In use".
-
Upload the DNC list and click Save when the list is appended.
Delete a DNC List
Steps to delete a DNC list:
-
Click the Edit icon beside the DNC list name and click the Delete icon at the bottom left corner of the edit window.
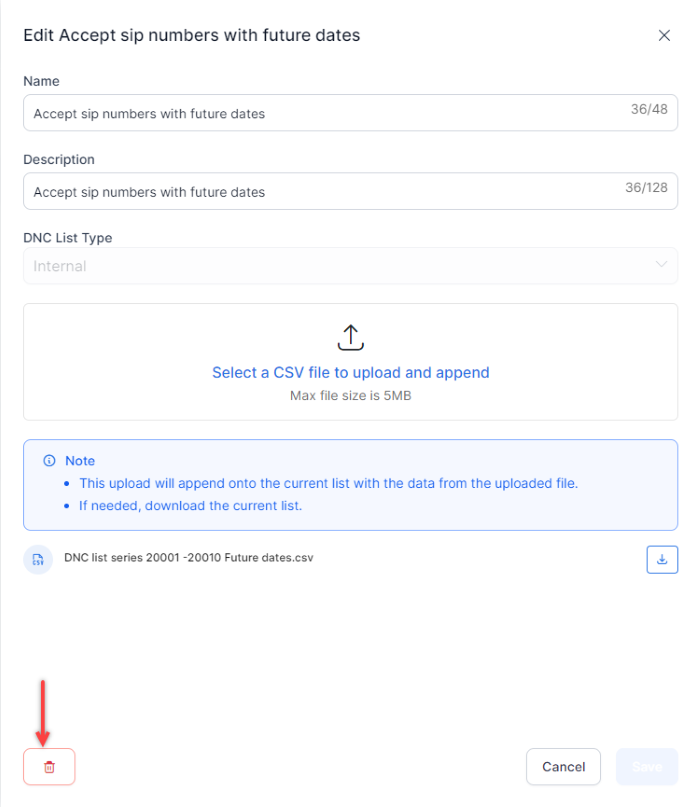
Note
You cannot delete a DNC list when it is "In use".
-
A confirmation message is displayed. Click Delete.
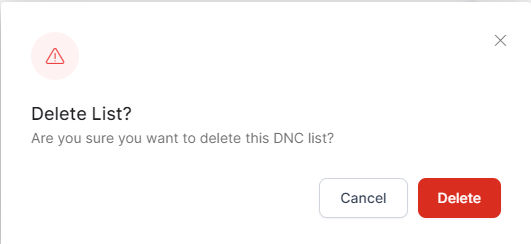
The DNC list is deleted.
Logs
When contact logs are fetched using API, the information is stored in the logs.
Accessing the Logs
Campaign Managers can access the logs by going to:
Contact Center AI > Campaigns > List Management > Logs.
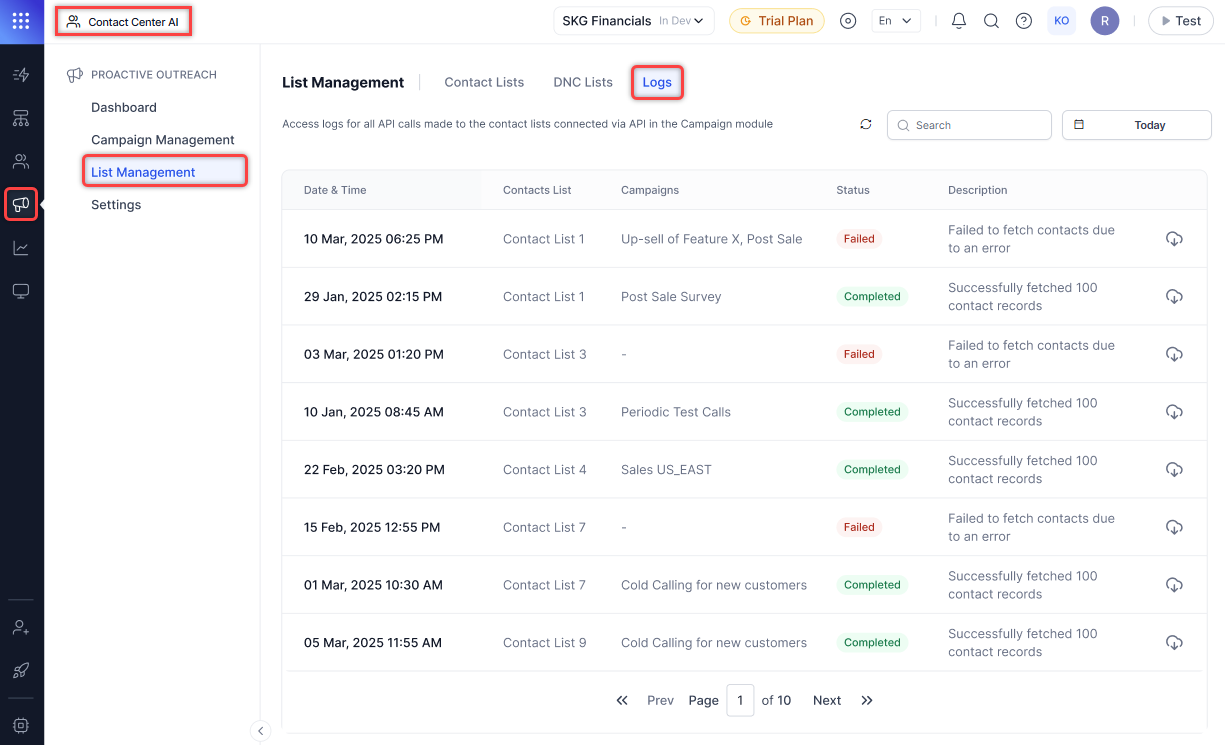
The following information is available on the logs page:
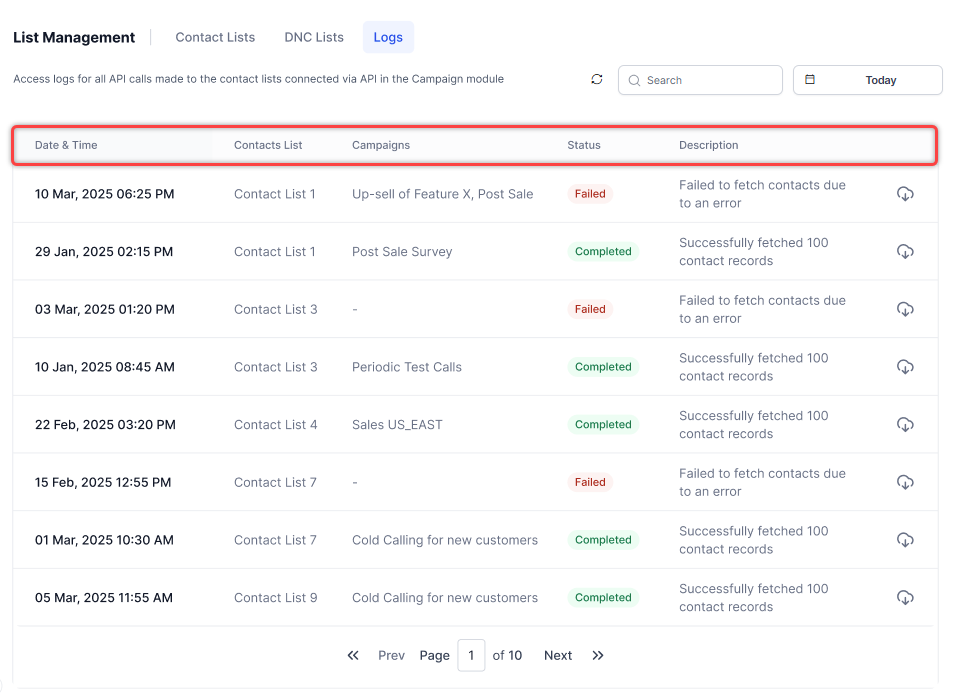
- Date & Time - The date and time when the API call was made to the contact lists. For example, 30 Mar, 2025 10:54 AM.
- Contact Lists - Names of the contact lists. For example, Credit card customers.
- Campaigns - Names of the campaigns. For example, Premium card holders.
- Status - The status of the campaign (Completed/Failed).
- Description - Description of the campaign status. For example, Successfully fetched 100 contact records.
- Export - Export the contacts fetched through API as a JSON text file.
Search and Date Filter
Users can search for records using the following:

- Contact List Name
- Campaign Name
- Description
- Status
The date filter enables users to filter the logs based on the selected dates and time. The following options are available:

- Today (default selection)
- Yesterday
- Last 7 Days
- Last 28 Days
- Last 90 Days
- Custom Range
You can set a time duration filter for the selected dates to retrieve records within the specified period.
Refresh Logs
When you click the refresh button, the data updates based on the current search phrase and time filters.


