This document provides detailed step-by-step instructions of the setup process to integrate the Kore AgentAssist widget in the Genesys environment.
Prerequisites
- Genesys Cloud account with sufficient admin rights.
- Kore.ai AgentAssist instance.
- Familiarity with creating a Group in Genesys.
Manual Steps
After setting up the Genesys Cloud account, you must have proper permission to use the following Genesys components:
- OAuth Credentials
- Interaction Widget (Integration)
- Audiohook (Integration) – optional, if using Kore-managed Transcriptions.
- Data Table
Step 1: OAuth Credential
An OAuth credential with proper permissions is required for the connection between the Kore.ai AgentAssist interaction widget and the Kore.ai platform.
A Genesys OAuth ID is required to complete the URL formation for the Genesys interaction widget.
Steps to get Genesys OAuth ID:
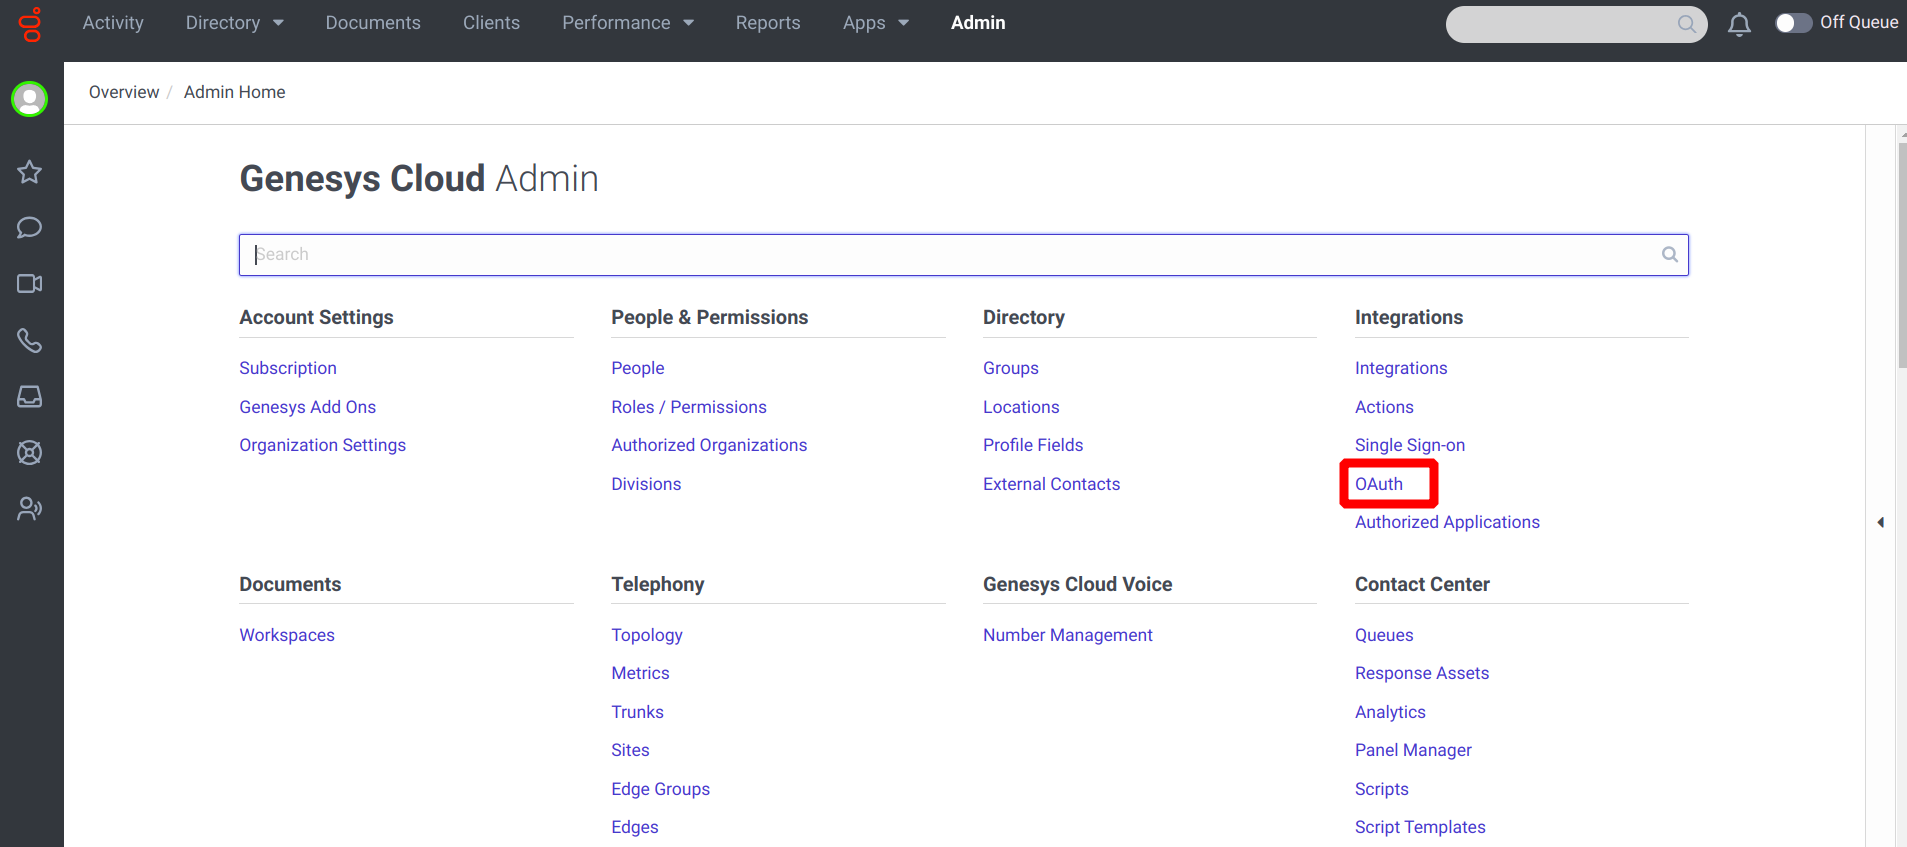
- Sign in to Genesys Cloud.
- Go to Admin > Integrations > OAuth.
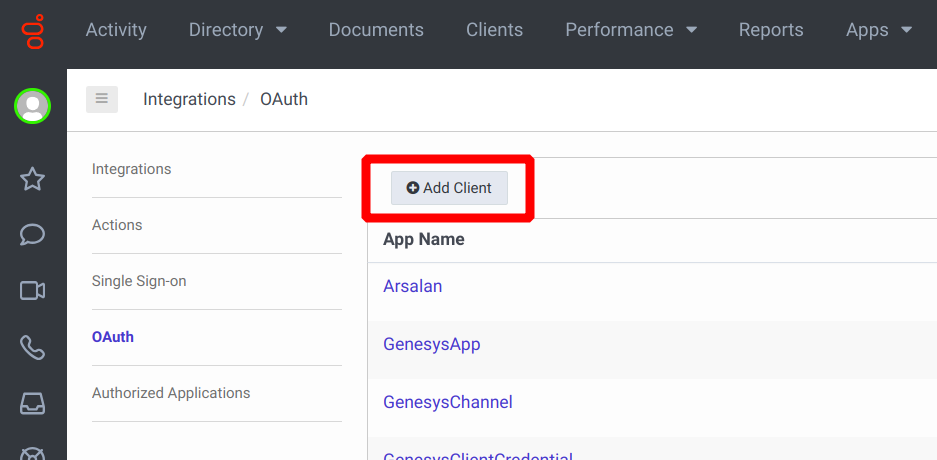
- Click Add Client.
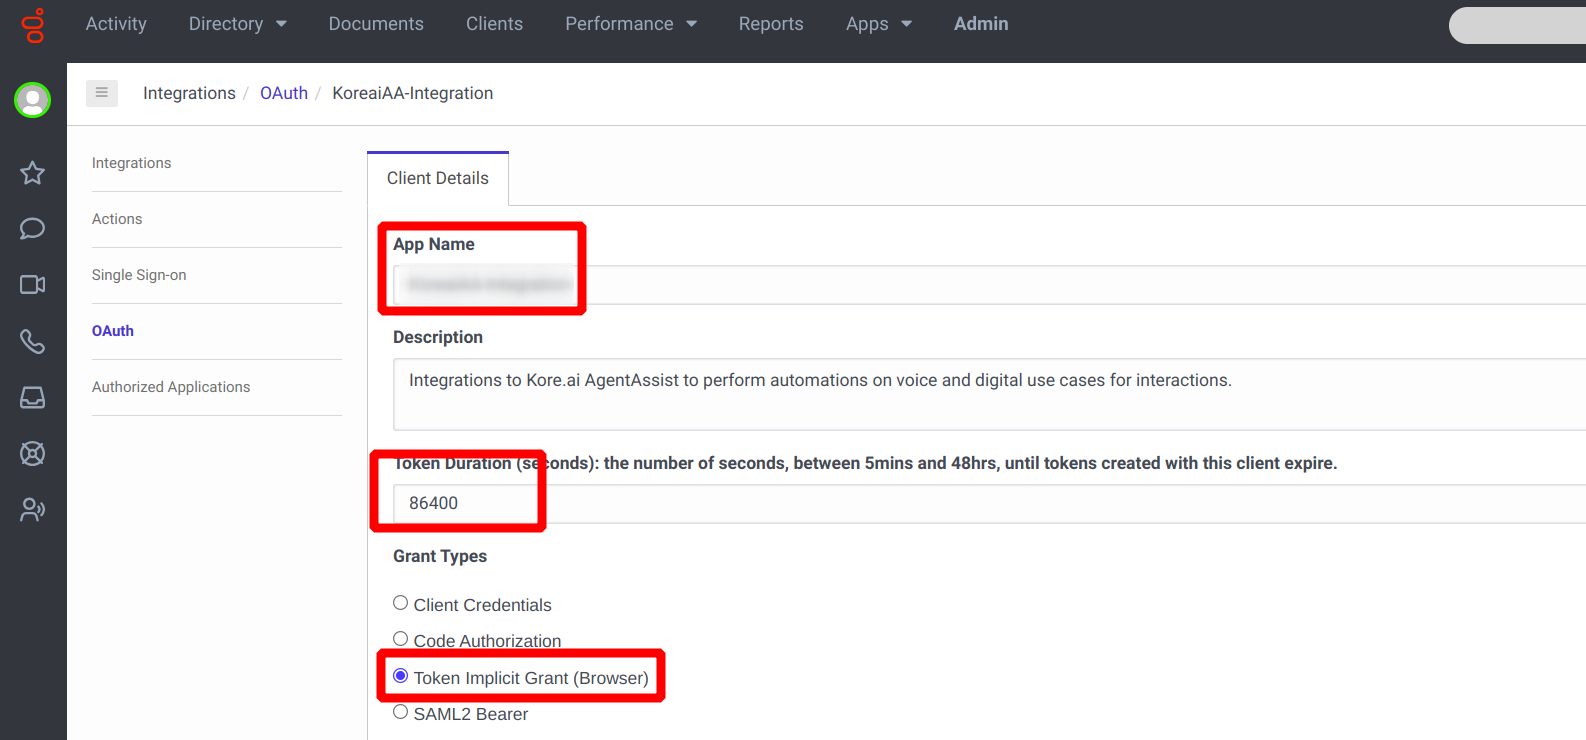
- Enter the app name, description, and token duration in the App Name, Description, and Token Duration fields.
- Select Token Implicit Grant (Browser) in the Grant Types fields.
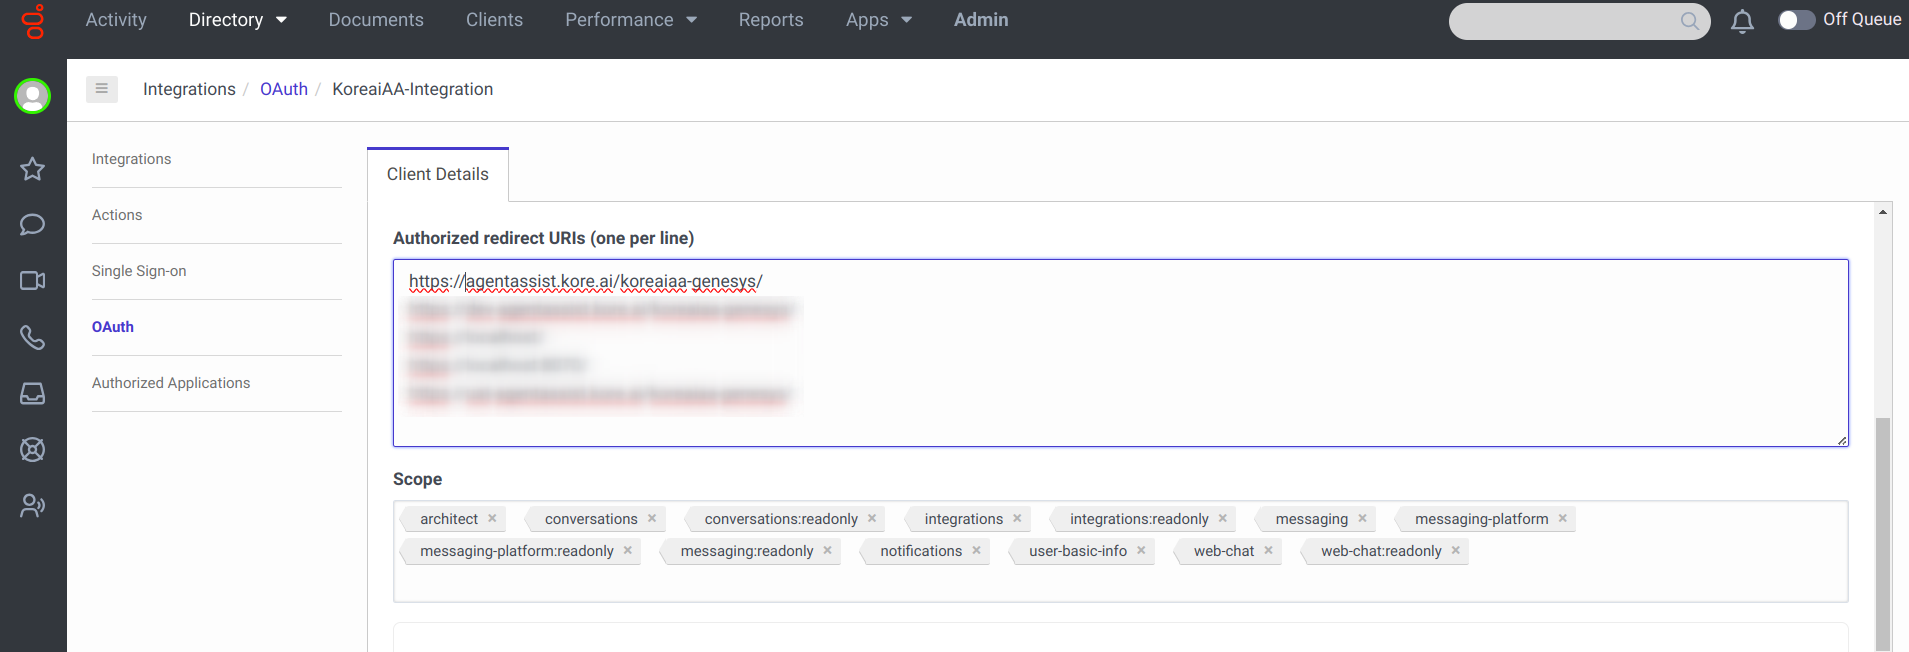
- Add https://agentassist.kore.ai/koreaiaa-genesys/ in the Authorized redirect URIs (one per line) section.
- Add the following list of scopes in the Scope section:
- architect
- conversations
- conversations:readonly
- integrations
- integrations:readonly
- messaging
- messaging-platform
- messaging-platform:readonly
- messaging:readonly
- notifications
- user-basic-info
- web-chat
- web-chat:readonly
After saving the configuration, you will get the Client Id of the created OAuth client. Copy the ID and have it available for Step 2.
Step 2: Interaction Widget
Create a new Interaction Widget. This widget is hosted in the Genesys agent desktop and provides the AgentAssist solution features to agents.
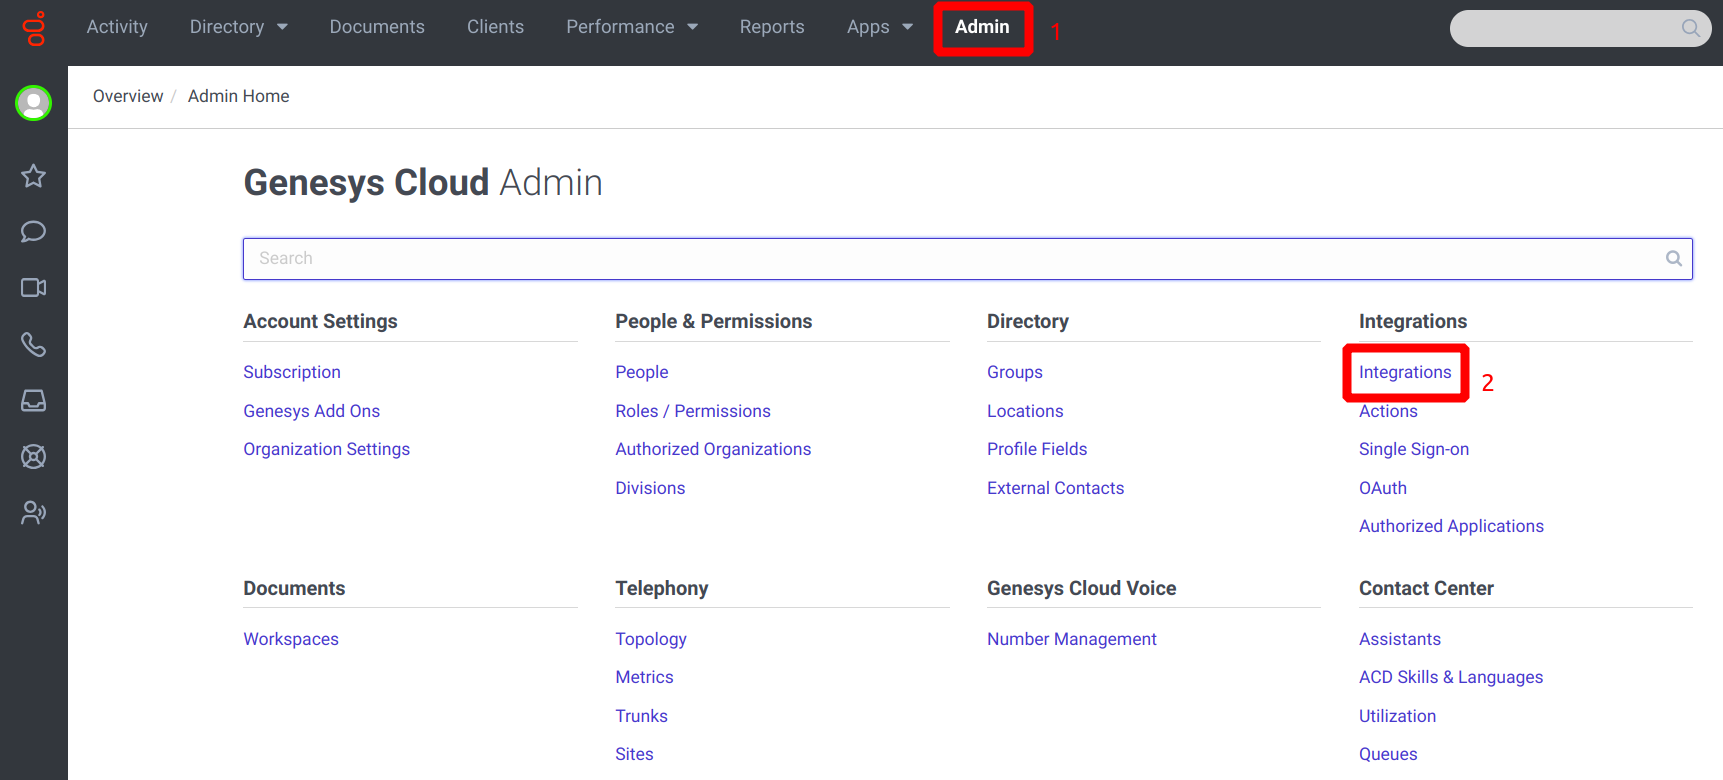
- Sign in to Genesys Cloud.
- Click Admin > Integrations.
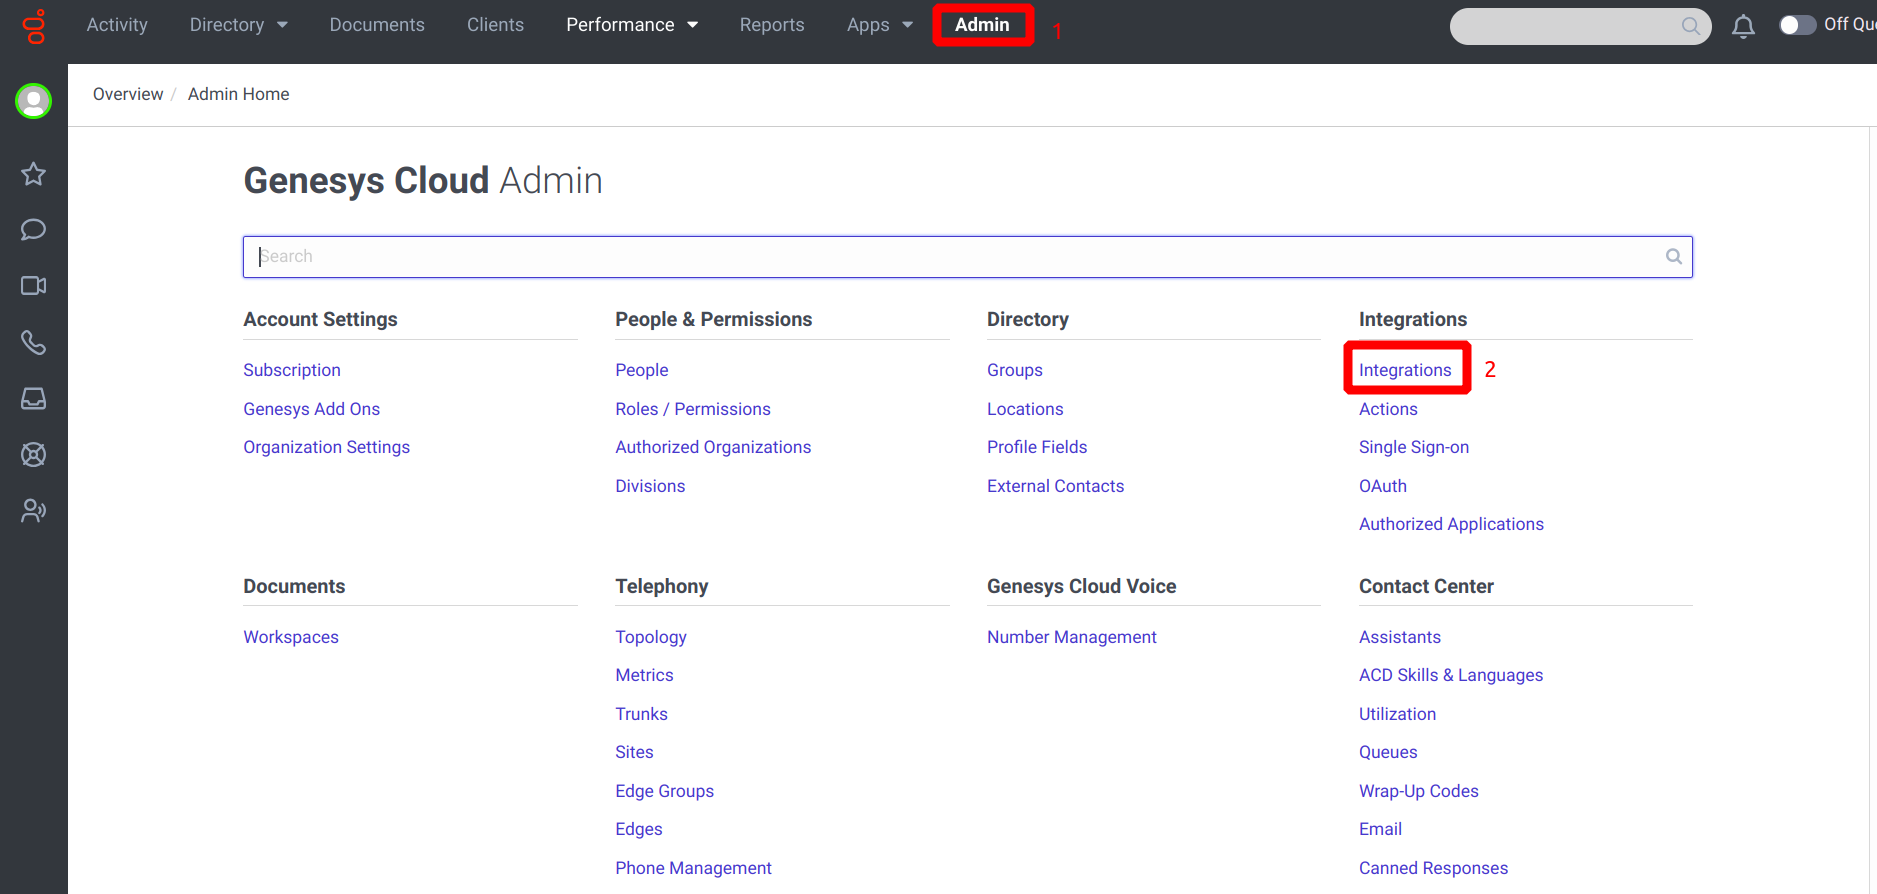
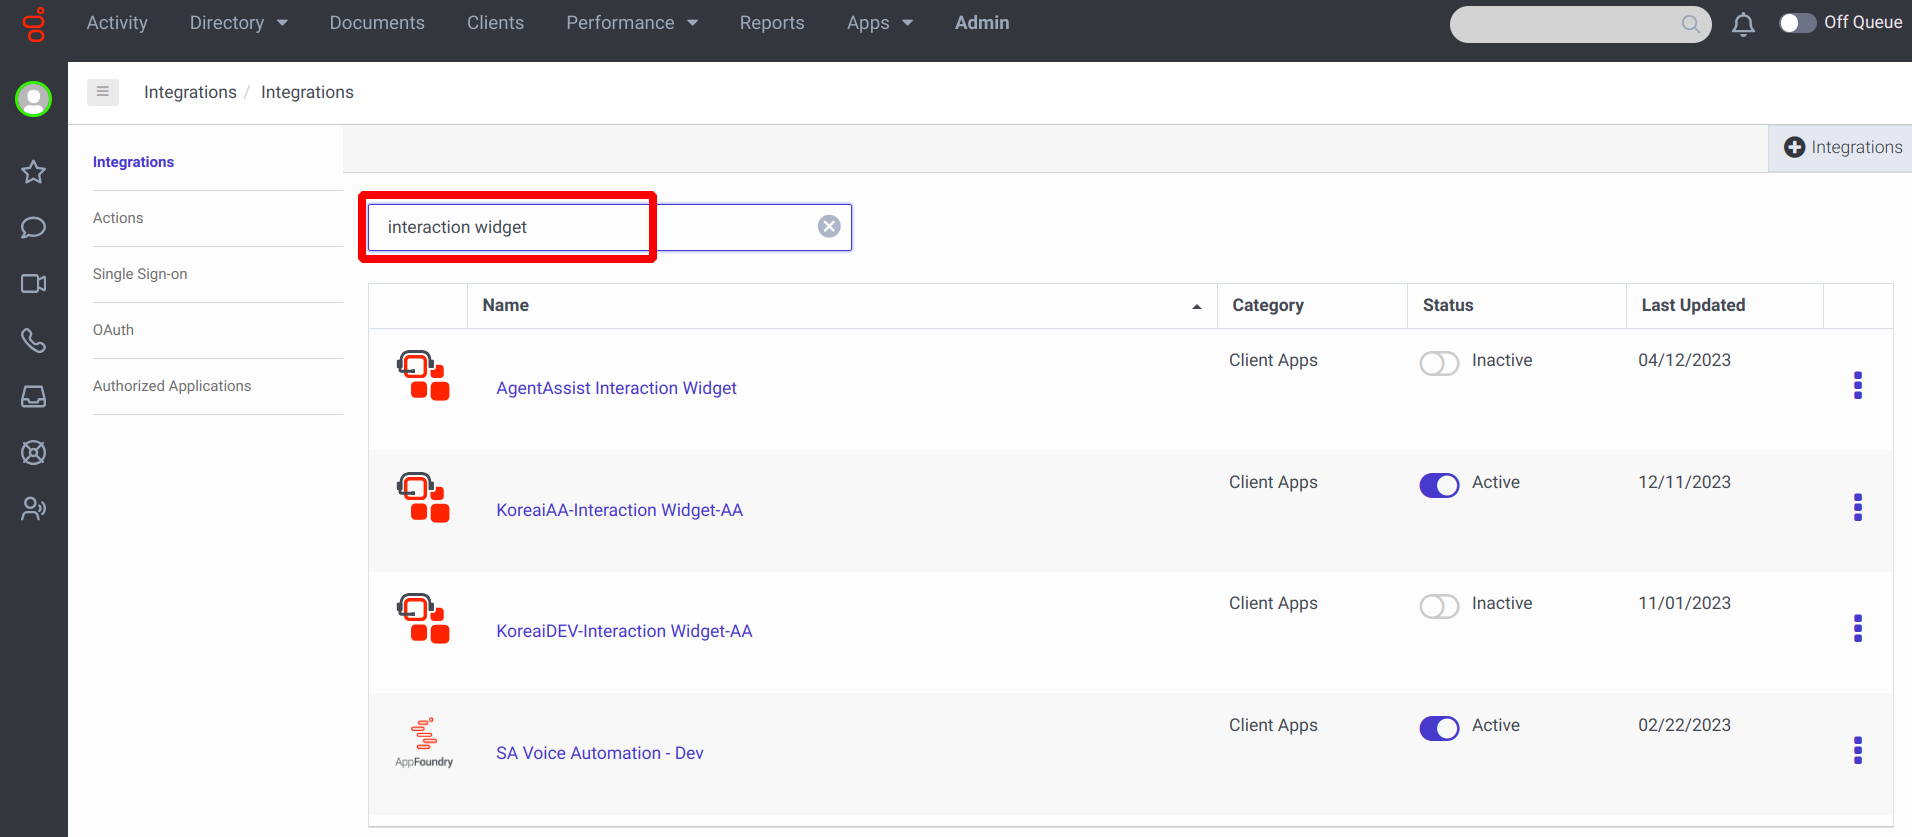
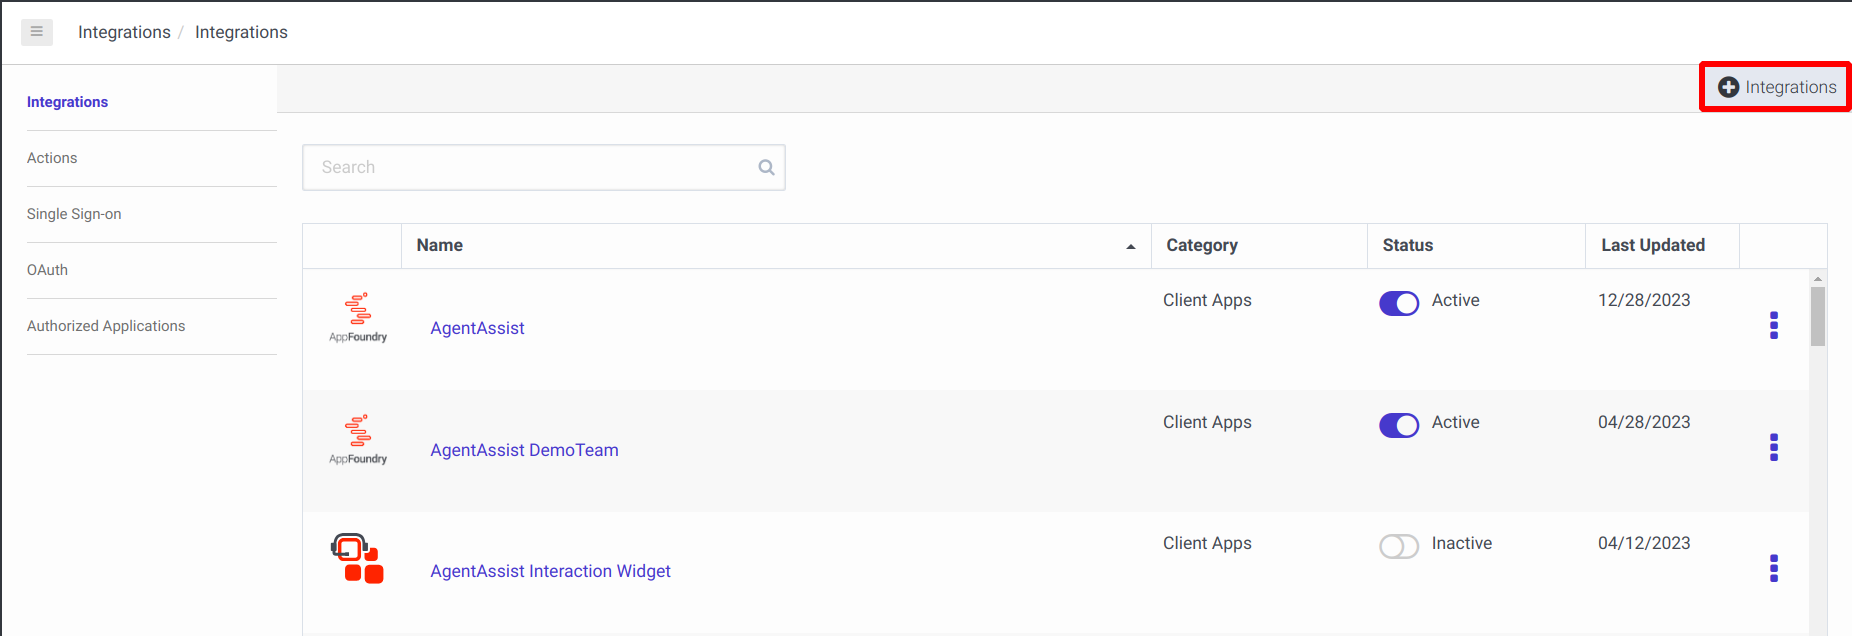
- If you have not created an Interaction Widget for AgentAssist, install a new Interaction Widget by clicking the Integrations tab on the right side of the page.
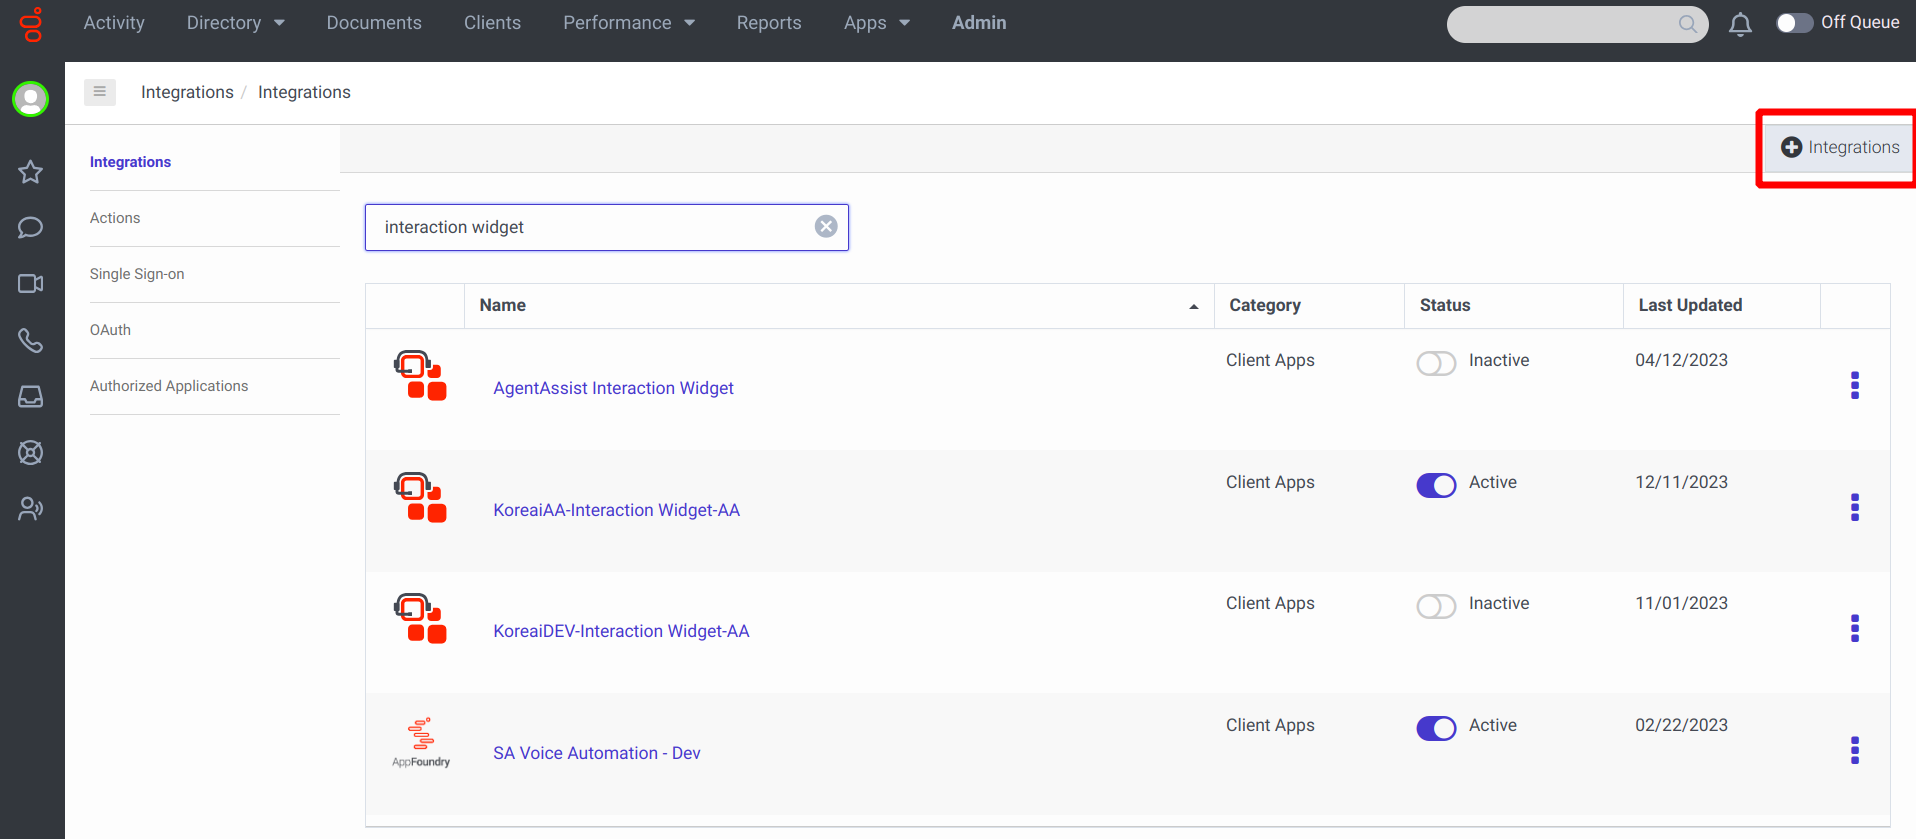

- Name the Interaction Widget with a meaningful name, such as KoreaiAA Interaction Widget.
- Open the Interaction Widget by clicking the name.
- Go to the Configuration tab of the Interaction Widget.
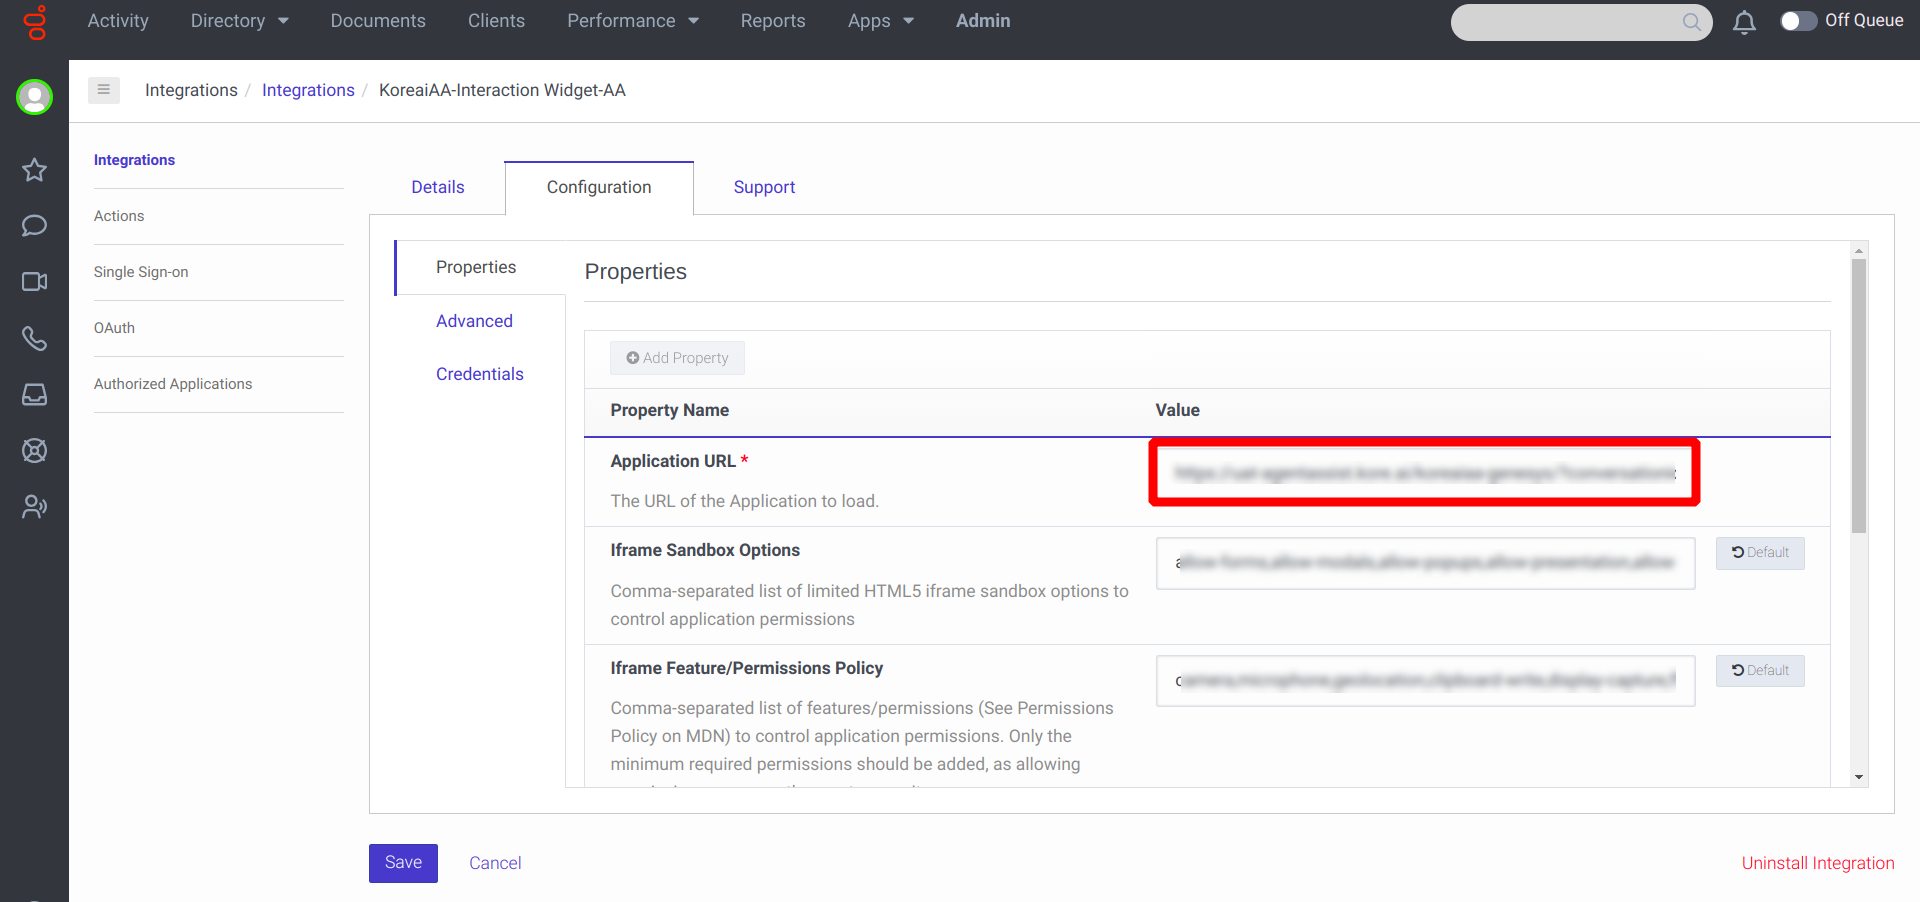
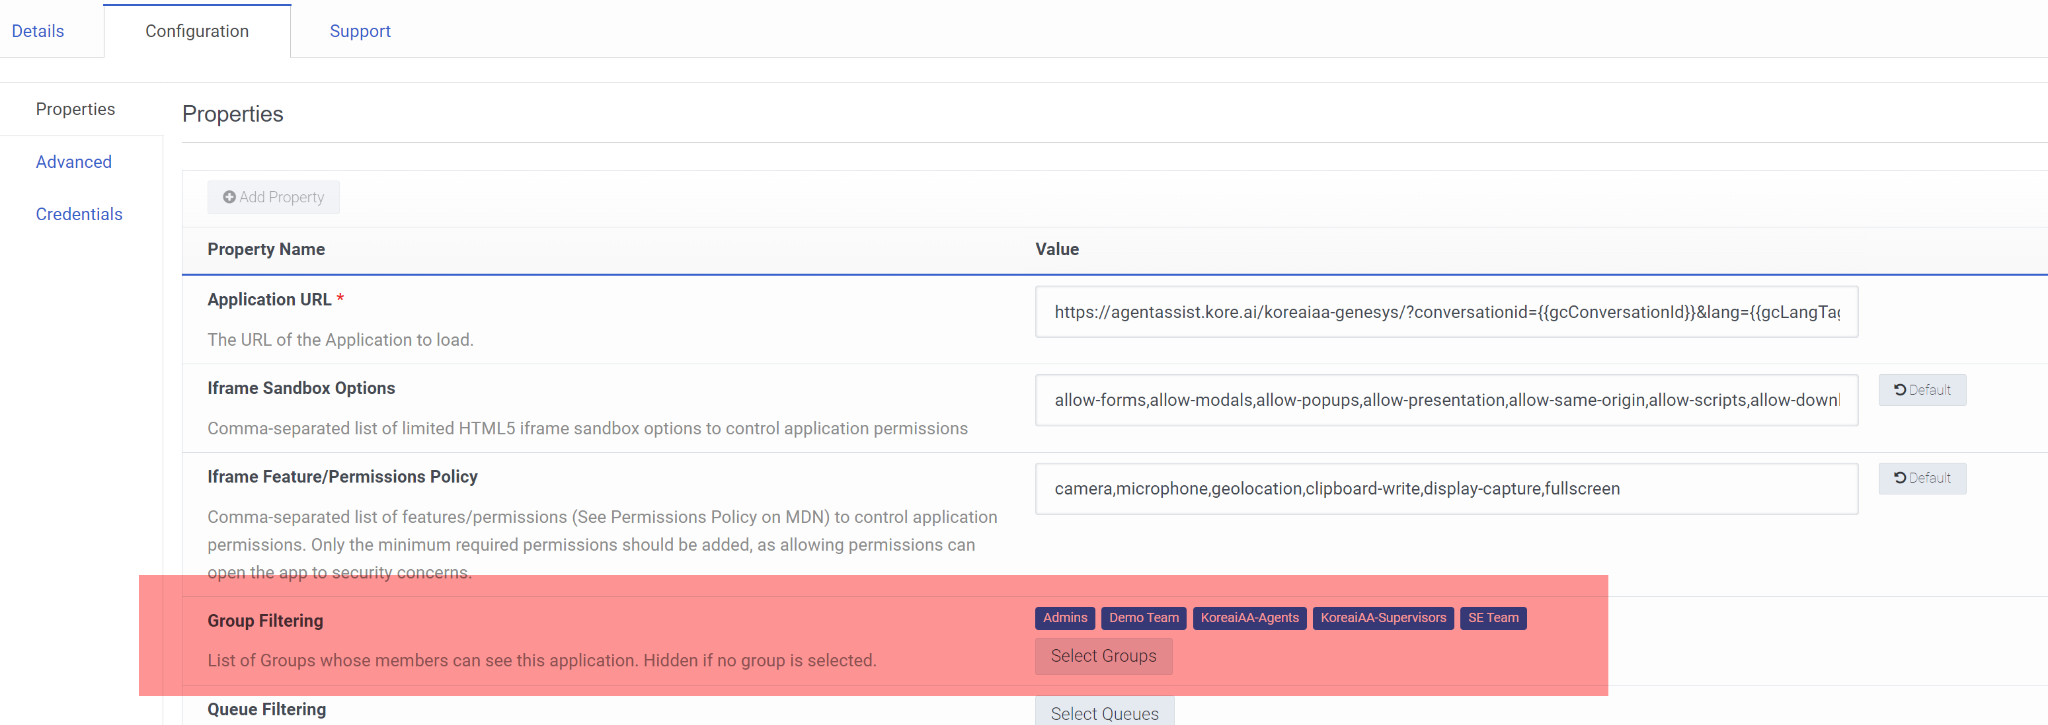
- In the Application URL field, enter the following structure; use the OAuth ID from Step 1.
https://agentassist.kore.ai/koreaiaa-genesys/?conversationid={{gcConversationId}}&lang={{gcLangTag}}&environment={{gcHostOrigin}}&genesysid=<genesys-oauth-Id> - Allow all permissions in iFrame Sandbox Options and iFrame Feature/Permission Policy.
iFrame Sandbox Options: allow-forms,allow-modals,allow-popups,allow-presentation,allow-same-origin,allow-scripts,allow-downloads.
iFrame Feature/Permission Policy: camera,microphone,geolocation,clipboard-write,display-capture,fullscreen.
Communication Type Filtering: chat, call, callback, email, sms, line, facebook, instagram, twitter, open, webmessaging, whatsapp.
Step 3: Agent Access
To view the Interaction Widget, agents must have the following accesses:
Group Membership
An Interaction Widget uses Group Membership to determine who can view it on the agent desktop.
- Use an existing Group, if your agents are already part of it. Otherwise, create a new Group for AgentAssist permission.
- Name the Group as KoreAA-Agents or similar to distinguish it.
- Add any agent to allow them to use the AgentAssist functionality. You can utilize more than one Group, if required.
- Go back to the Integrations section and open the Interaction Widget created in Step 2.
- On the Configuration tab, add access using the Group you identified or created for AgentAssist in the Group Filtering option.
You may also utilize Queue Filtering (optional).
Custom Role/Permission
By default, most agents don’t have access to read from a Data Table. You must grant them explicit permission to read from the Data Table for loading the Interaction Widget.
- Sign in to Genesys Cloud.
- Go to Admin > People & Permissions > Roles / Permissions.
- Click Add Role to create a new Role.
- Give a distinctive name to the Role; for example, KoreaiAA Agent.
- On the Permission tab, search for the following and add (select the box):
Architect > DataTable > View
Conversation > Transcription > View
Note: The Conversation permission is available only in CX3 license. - Once finished, the Assigned Permissions view should look like this:

- Once the Role is created, click the three dots at the right end of the Permission role and select Change Membership. Add the appropriate agents to the role.
Step 4: Data Table Configuration
This step includes creation of a Data Table with AgentAssist bot details.
Note: The configuration data is stored directly in the Custom Fields of the Data Table, not in a Data Table row. A single Data Table represents a configuration of AgentAssist. In other words, the Default Values of the Custom Fields contain the necessary configuration data to load the AgentAssist widget.
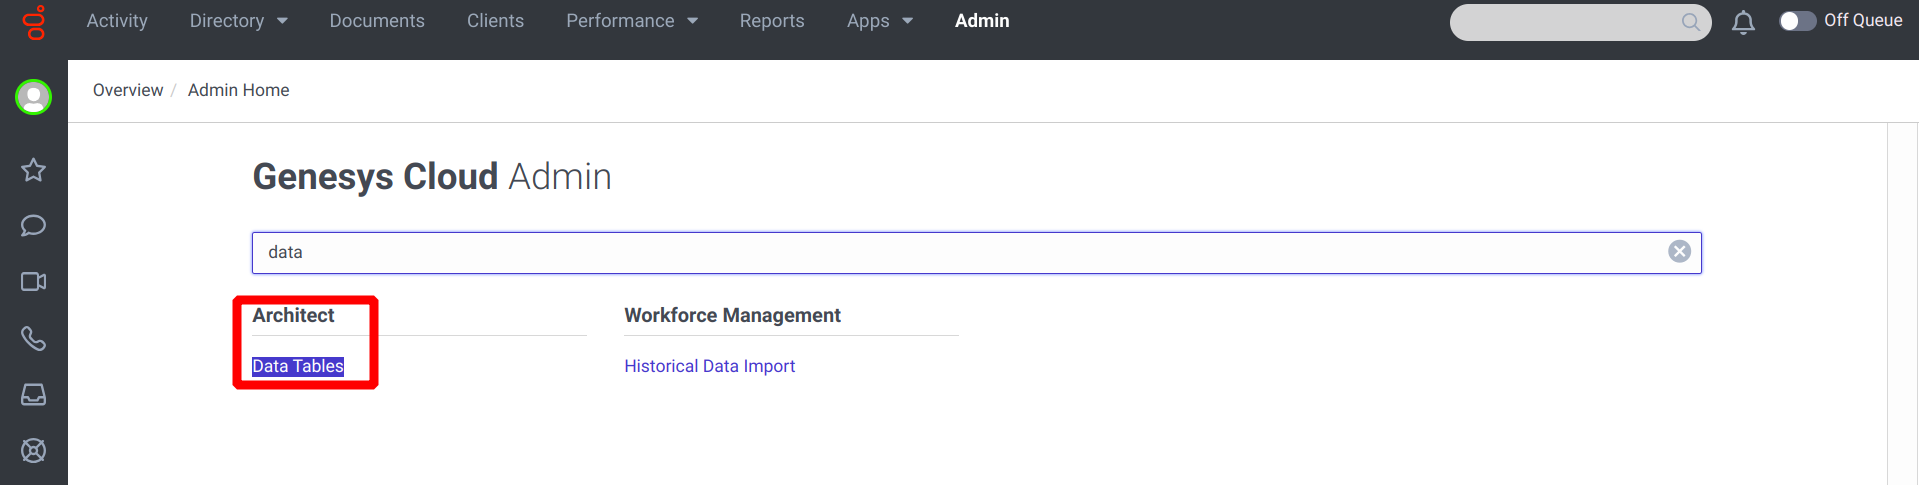
- Sign in to Genesys Cloud.
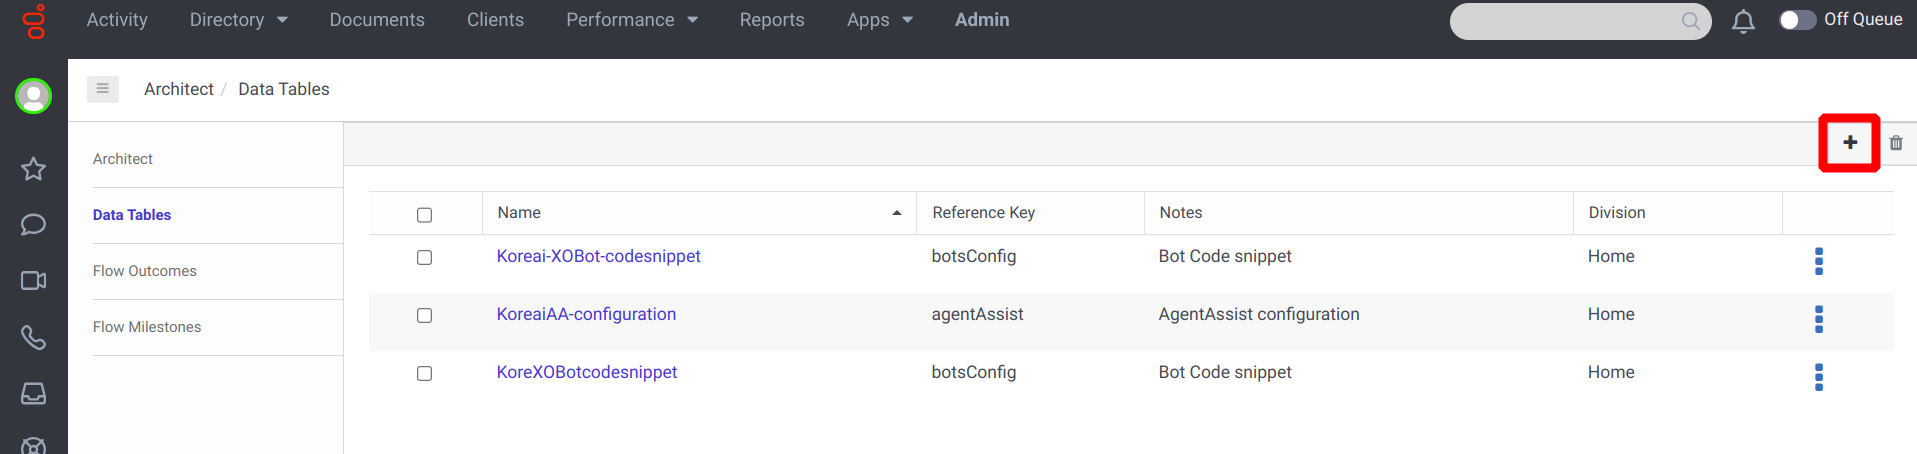
- Go to Admin > Architect > Data Tables.
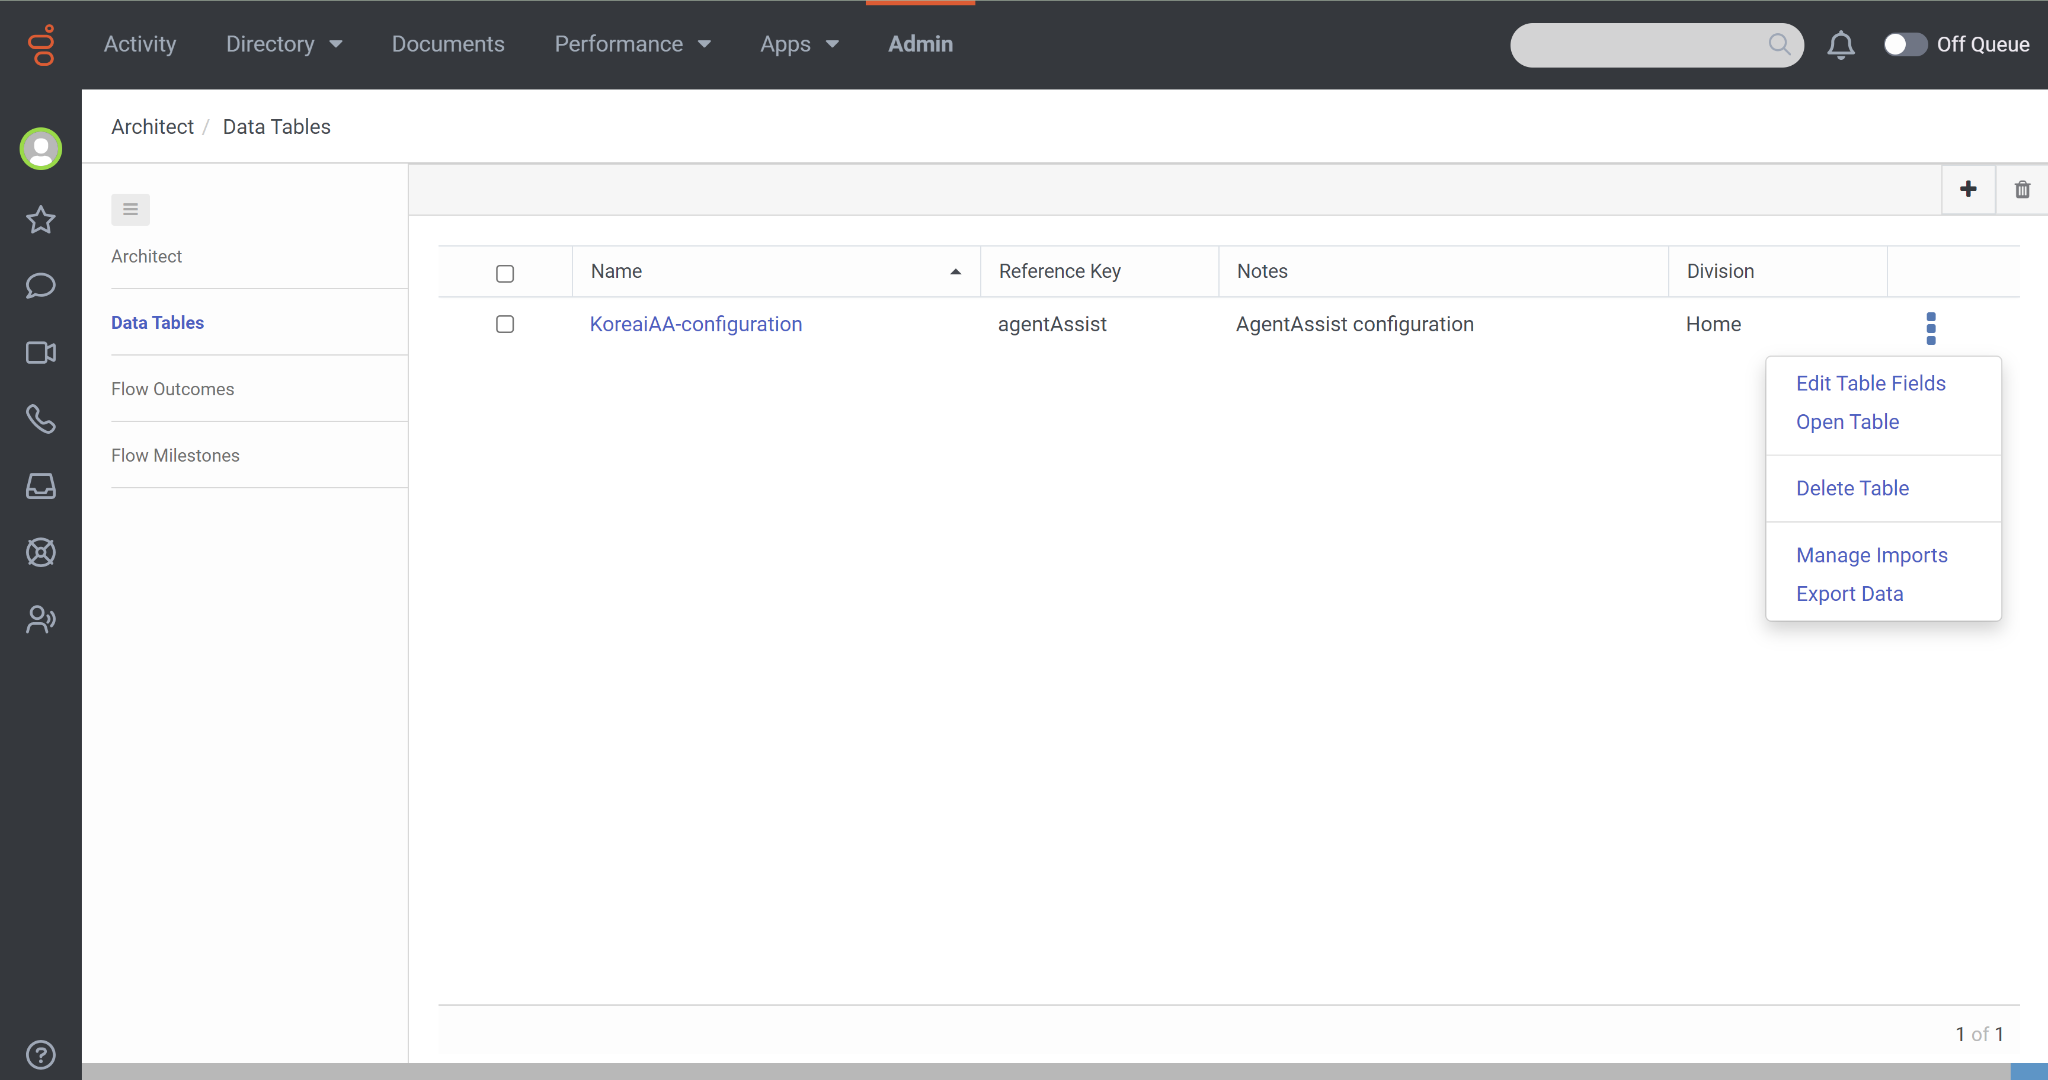
- Create a new Data Table by clicking on the plus icon and provide a relevant name, such as KoreaiAA-configuration.
- Click the “three dots” and select Edit Table Fields from the list.
Note: Reference Key label must be set to “agentAssist”. This is the value used by the Interaction Widget to load the configuration data. - Click Add Field to create five custom fields to provide the AgentAssist configuration.

- Click the Add Field button under Custom Fields.
Set the data type for all custom fields as String while adding.

- Add the custom fields with Bot details.
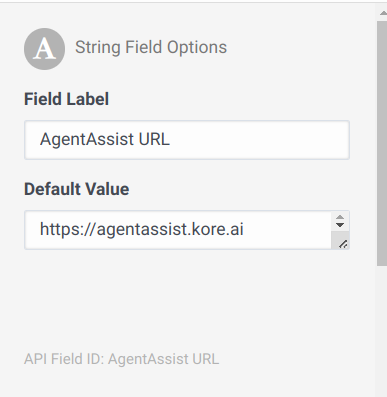
- Follow the below conventions for other custom fields. Use the exact names, including upper/lower case.
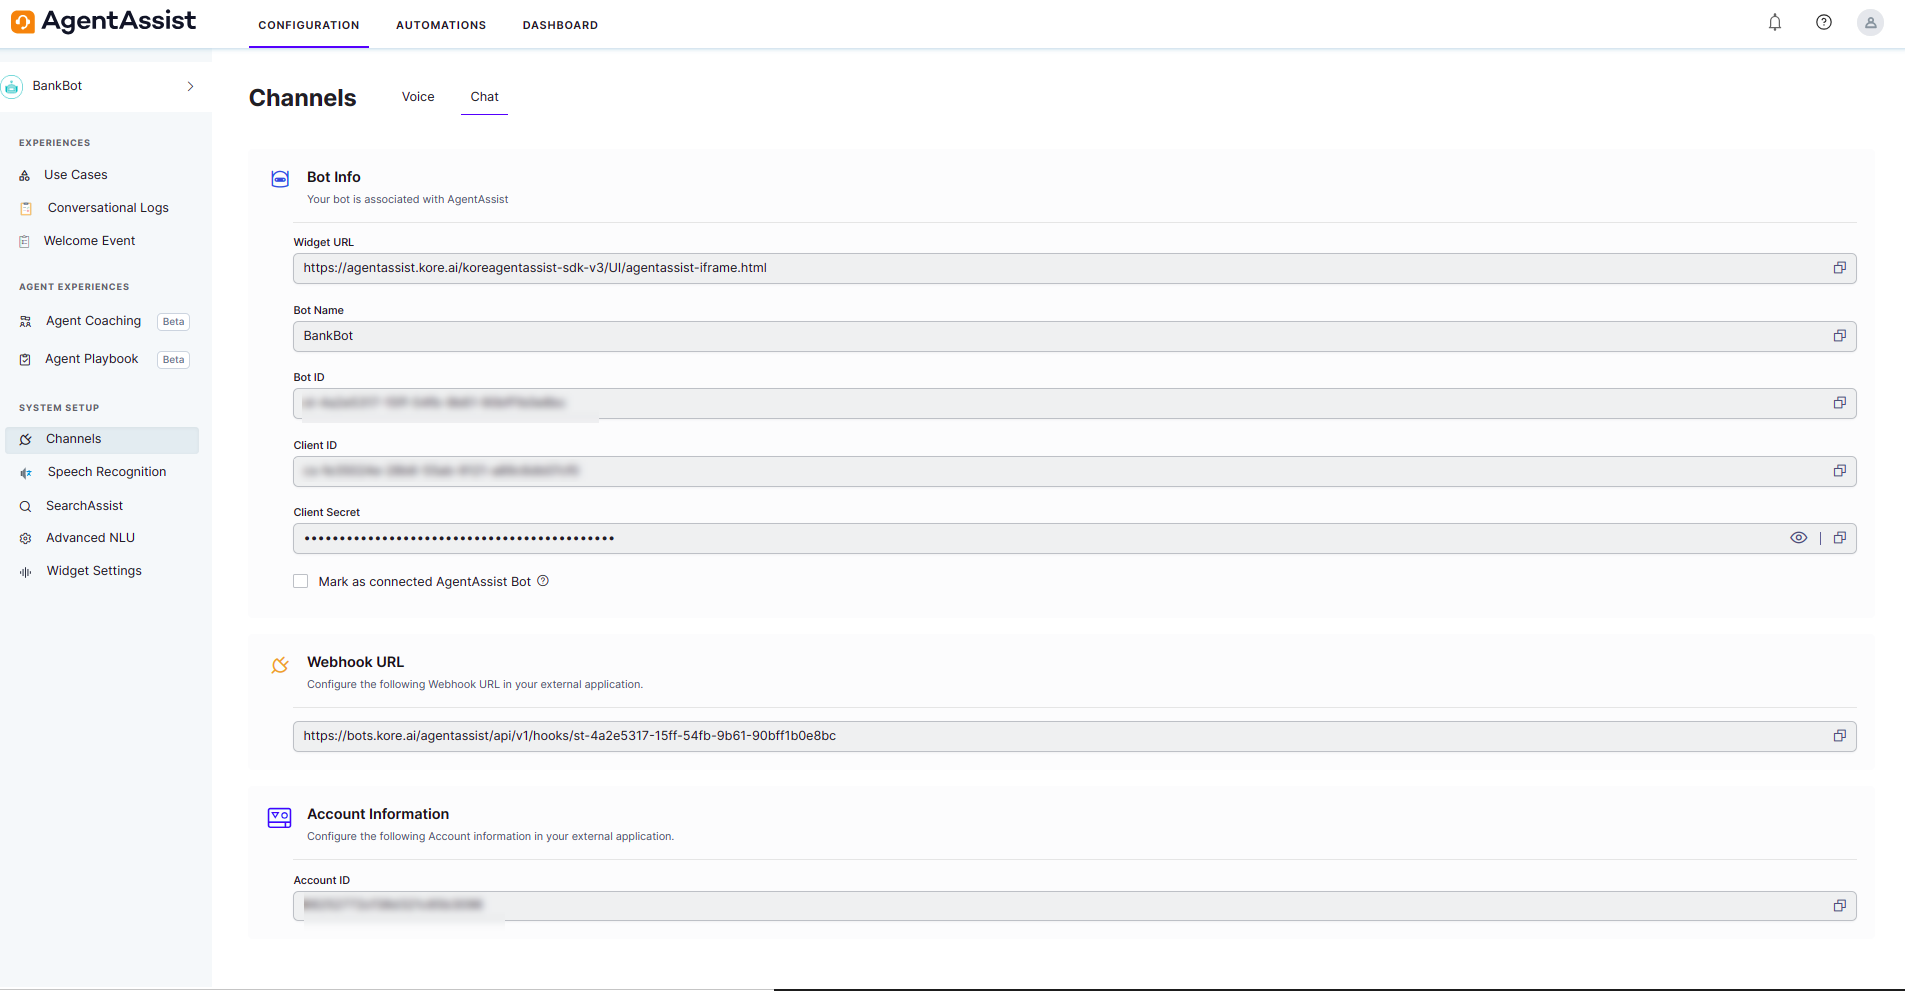
These values are found in the Channels section of the AgentAssist configuration portal.
| Field Label | Default Value |
| AgentAssist URL | https://agentassist.kore.ai |
| Bot Id | st-8cb94691-xxxx-xxxx-xxxx-xxxxxxxx |
| Client Id | cs-b60f544d-xxxx-xxxx-xxxx-xxxxxxxxxxxx |
| Client Secret | <secret-key from AgentAssist> |
| is Audiohook Enabled | true / false |
Note:
- All the custom fields should be of the string type.
- If the is Audiohook Enabled option is false, the application tries to utilize the Genesys native transcriptions using the Transcriptions API.
To change the values, you must click the gray box surrounding each Custom Field, not directly on the textbox.

Step 5 (Optional): Audiohook Integration
The final step is to install Audiohook for voice streaming, if using Kore-managed Transcriptions.
- Sign in to Genesys Cloud.
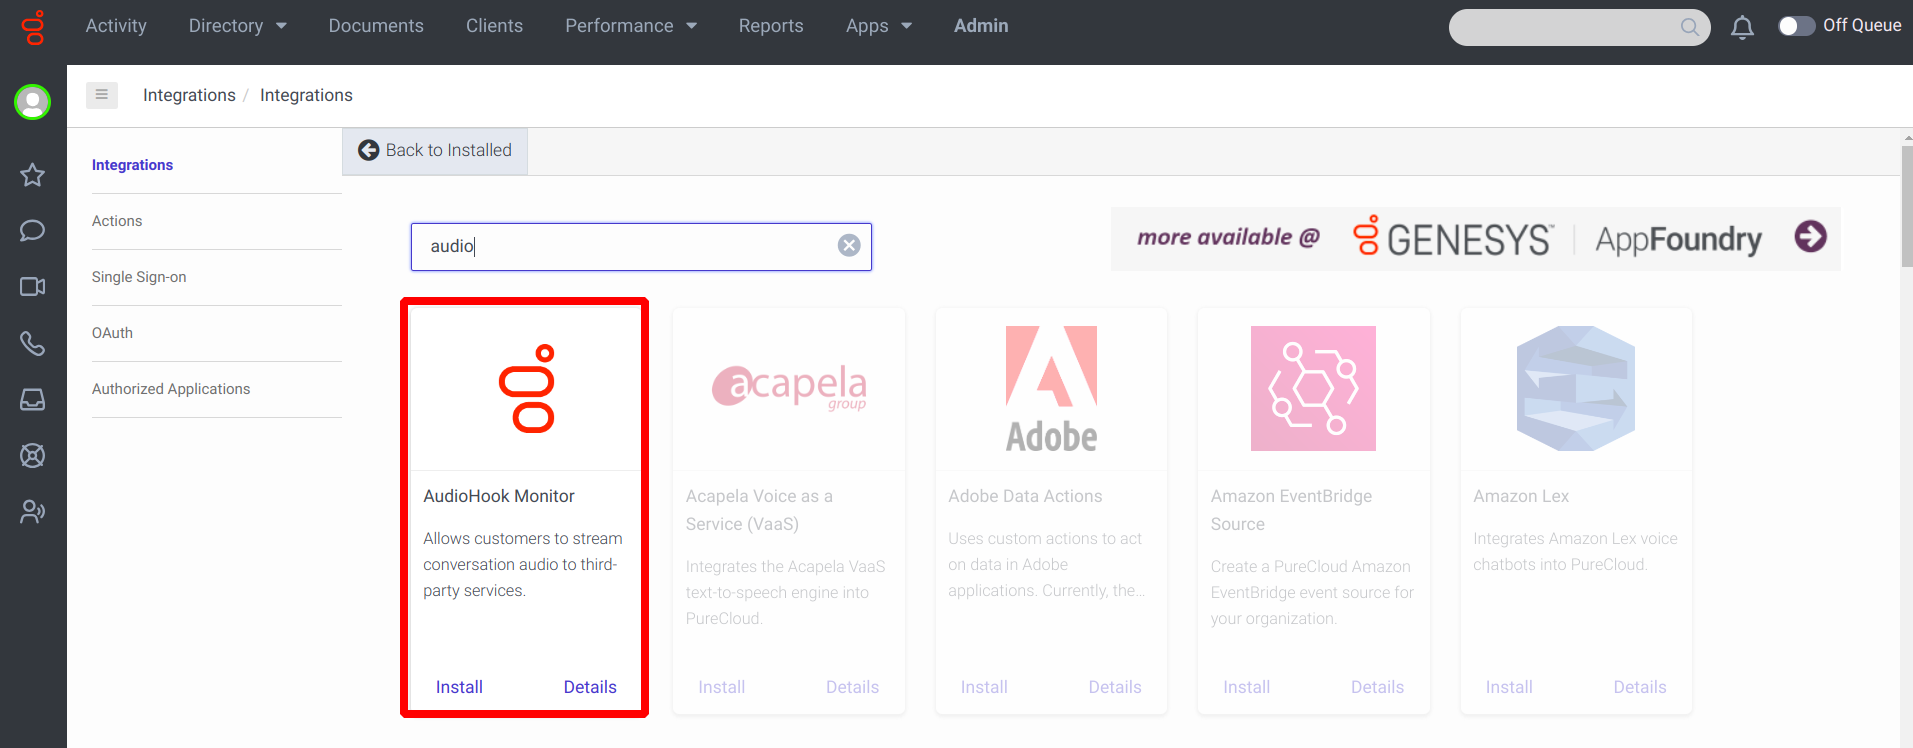
- Go to Admin > Integrations > Integrations.

The Audiohook integration requires specific configuration values to support AgentAssist configuration. - Install a new audiohook app by clicking the Integrations button on the top-right corner.
- Open the Audiohook and go to the Configuration tab.
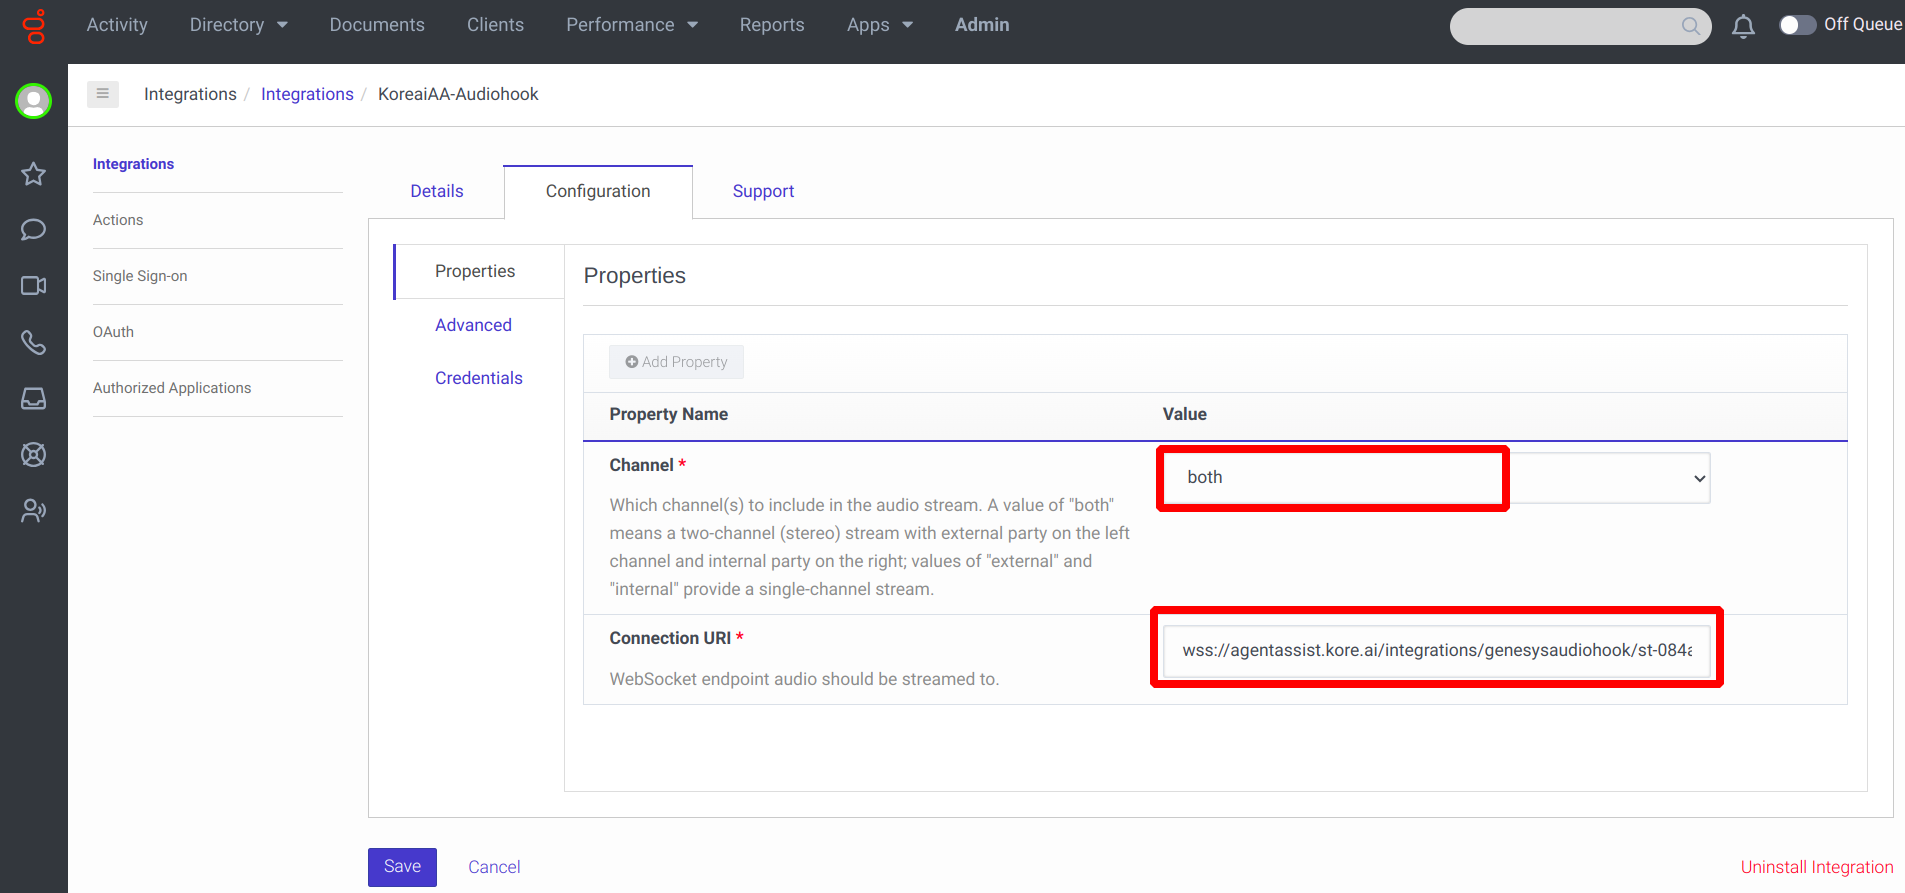
- Channel value should be both.
- The Connection URI format should be similar to the following:
wss://savg-webserver.kore.ai/audiosocket/genesys/?sipuri=xxx&token=xxx&botId=xxx&accountId=xxx&agentassist=true - Get sipuri=sip:<sip-string> from the AgentAssist Voice channel.
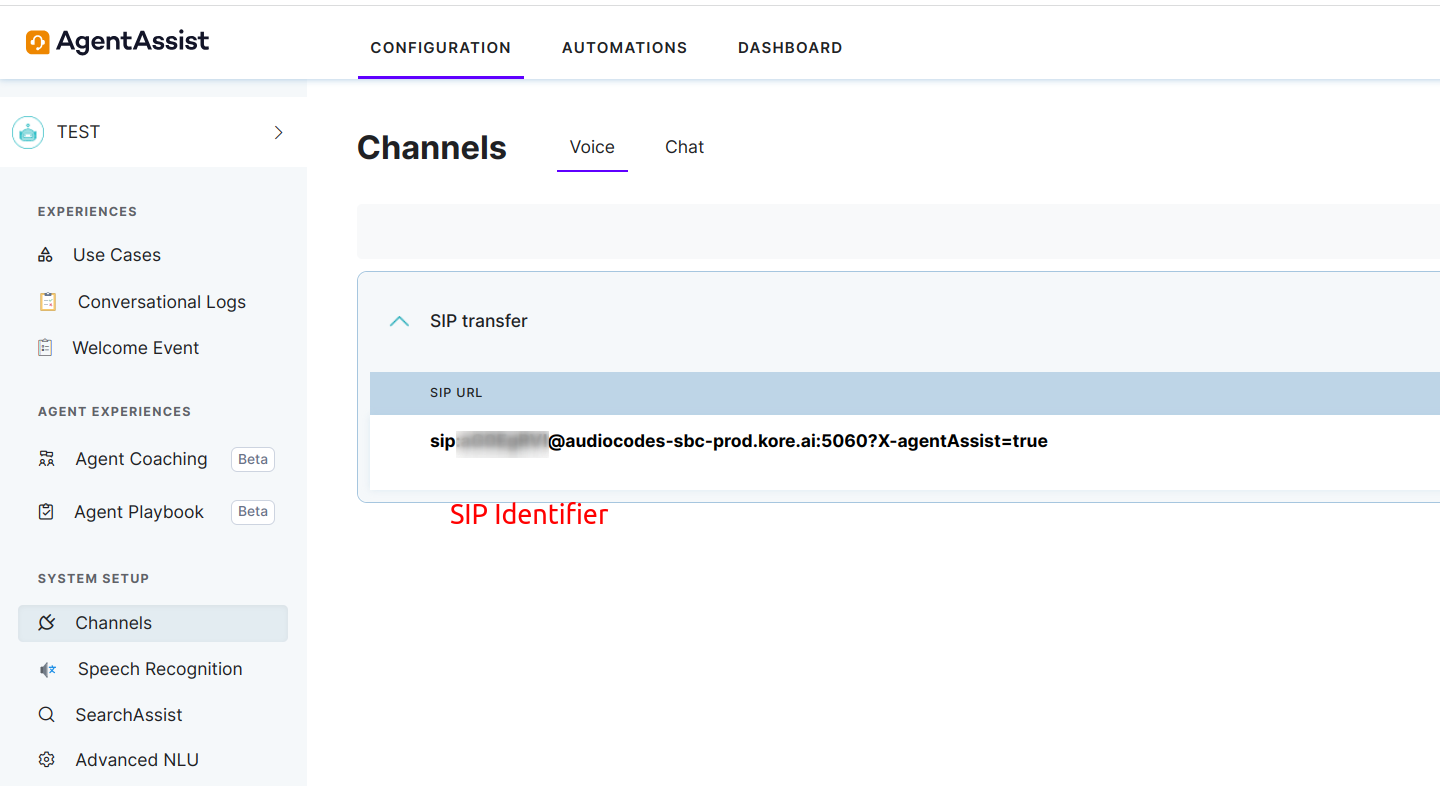
- Use the following reference from AgentAssist.kore.ai, Bot Channel configuration page to fetch Bot ID, Account ID, Client ID, and Client Secret (for token generation).
- Follow the steps of Using XO Platform APIs – Kore.ai Documentation to generate the token (token= <token>.)
- Add credentials in the Credentials tab.
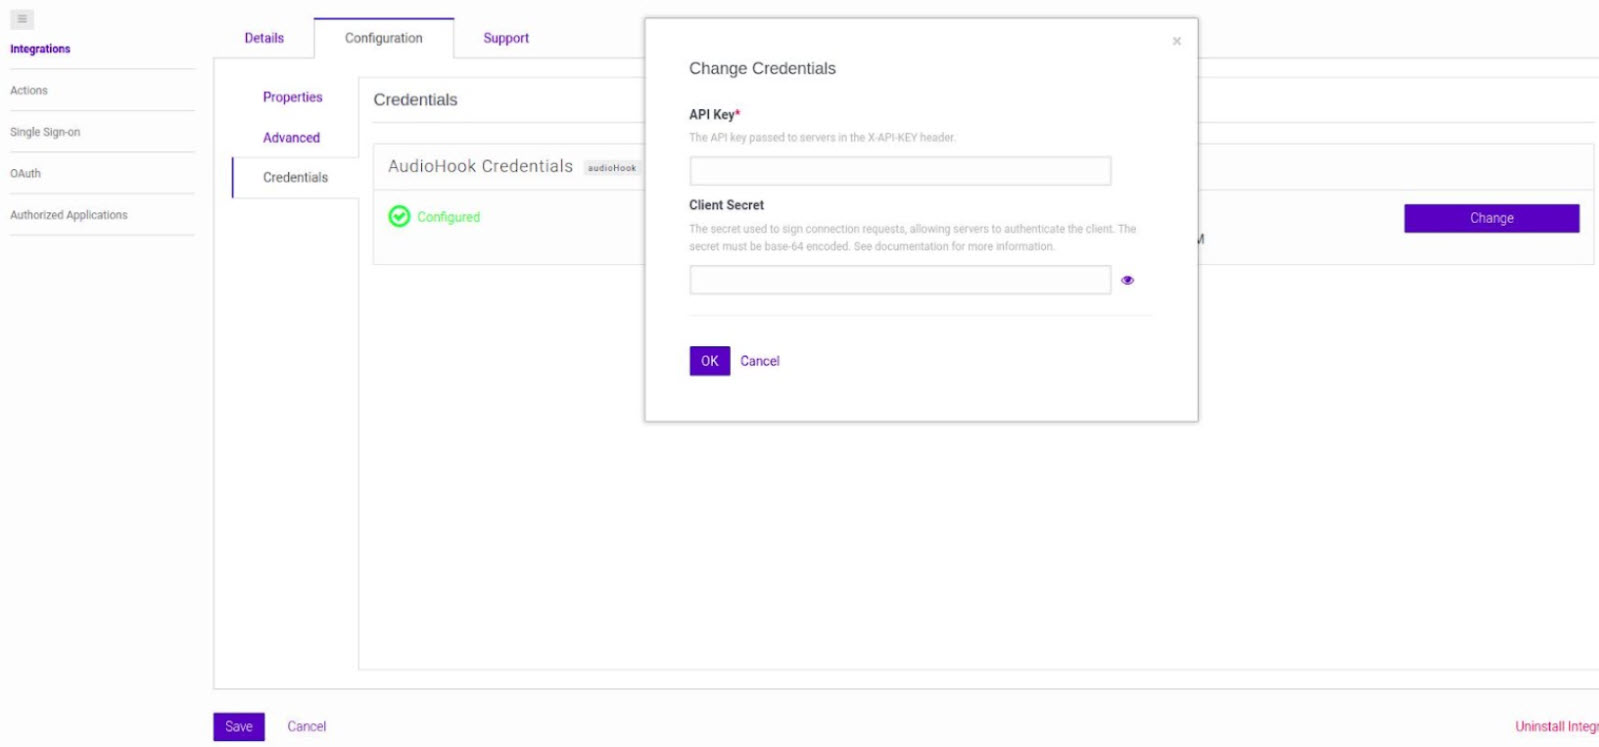
- Refer to Step-4 and use Bot Client ID and Client Secret as API Key and Client Secret respectively.
- These credentials are used to validate the audiostream signature by Kore.
- Click Save.