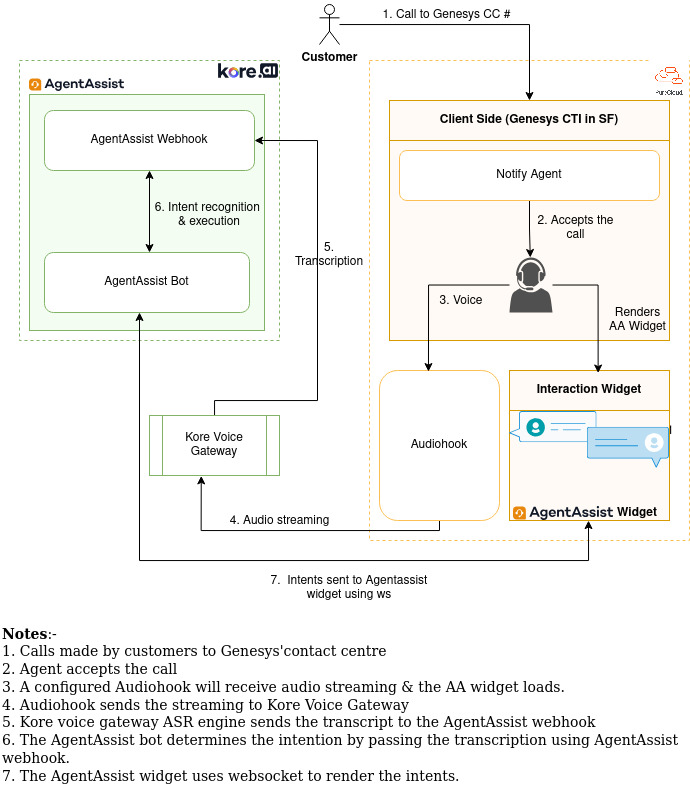
The Genesys computer telephony integration (CTI) software routes calls from customers through a computer. It enables contact center agents to handle conversations in multiple channels. It also gives the agent context that helps them address customer interaction in a personal and efficient way.
AgentAssist leverages generative AI and LLM capabilities to enhance agent productivity and elevate customer satisfaction. It uses features like real-time coaching, and seamless integration with popular CCaaS software and offers automated task streamlining, smart replies, sentiment tracking, automated guidance, summarized conversations, and deep integration with enterprise systems. To ensure consistency and accuracy, it has features like the Playbooks and Kore.ai’s advanced information retrieval system.
This document instructs Salesforce administrators on the setup and configuration of the Kore Agent AI solution, enabling agents to access the CTI functionality.
Prerequisites
Before integrating AgentAssist with Salesforce Genesys CTI, the following prerequisites must be met:
- In Salesforce
- Install Genesys Open CTI Salesforce package
- Install Kore AgentAssist Salesforce package
- In Genesys
- Install Genesys AudioHook from Appfoundry
Interaction between Genesys OpenCTI and Kore.ai AgentAssist
Install AgentAssist Package
The installation process of the Kore AgentAssist package is a simple, 3-step process. Follow these steps to install the package:
- Visit Salesforce AppExchange.
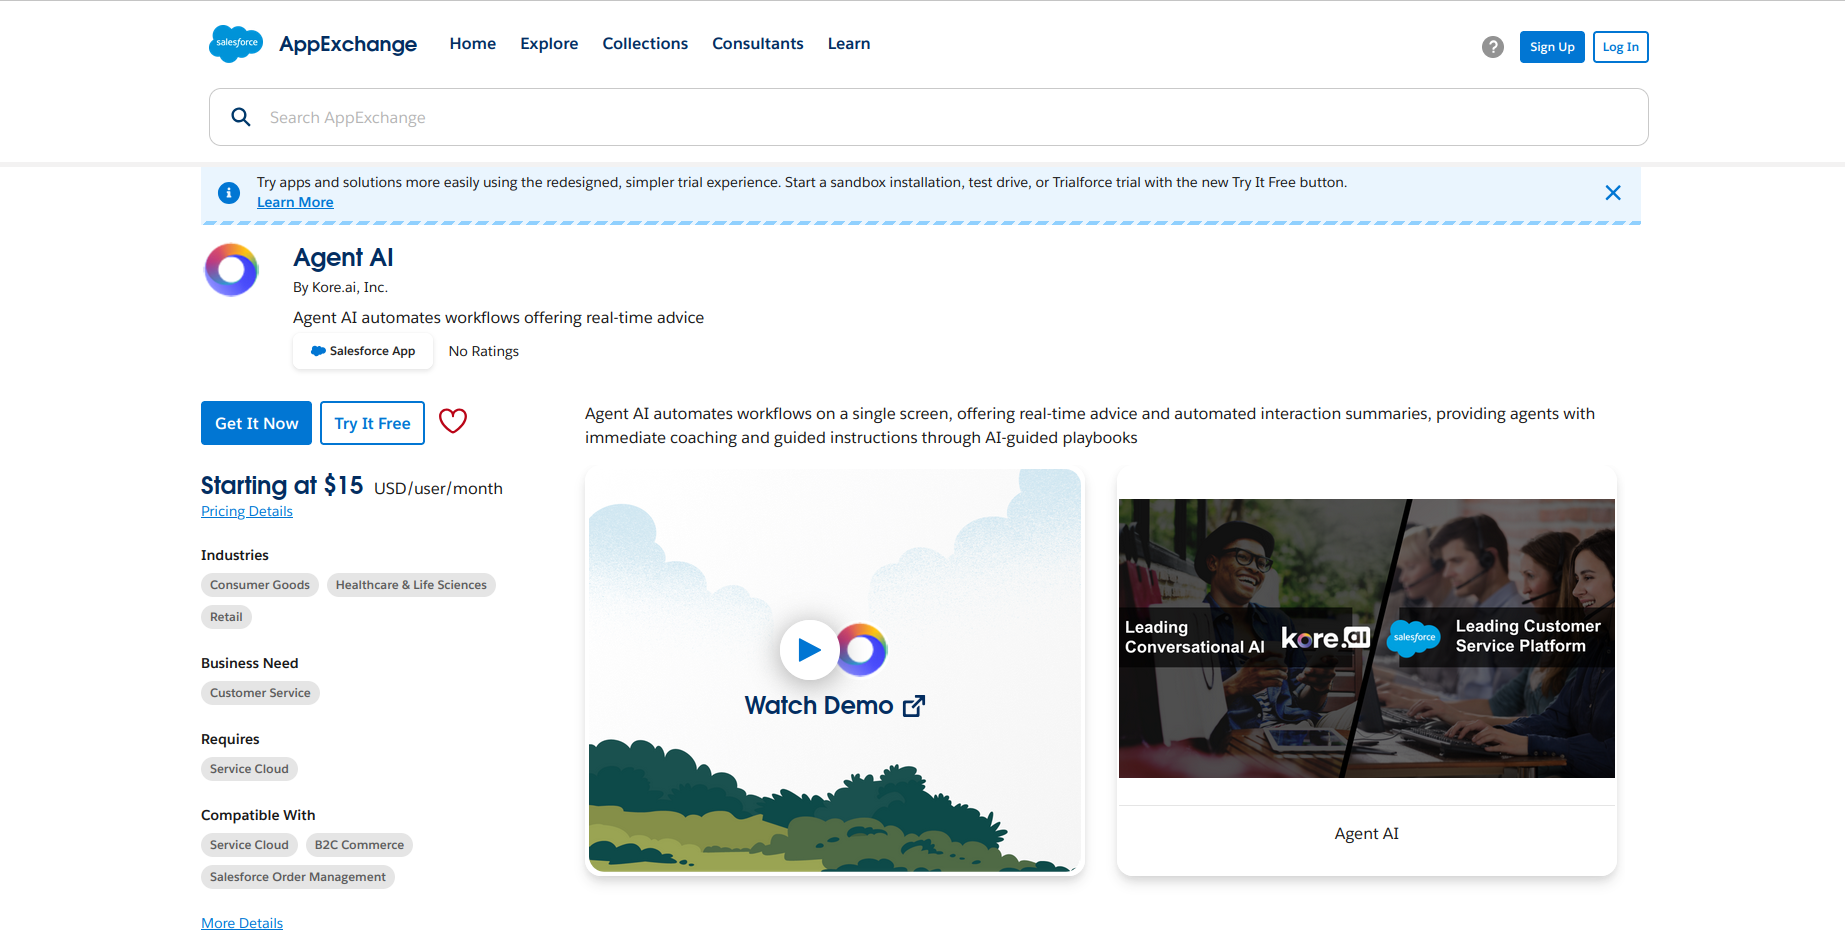
- Select one of the three available options–Install for admins only, Install for All Users, or Install for specific Profiles.
- Click Install.
Co
Configure AgentAssist for Salesforce
This section explains the post-installation steps of AgentAssist integration with Salesforce.
Enable AgentAssist Access to Administrators and Agents
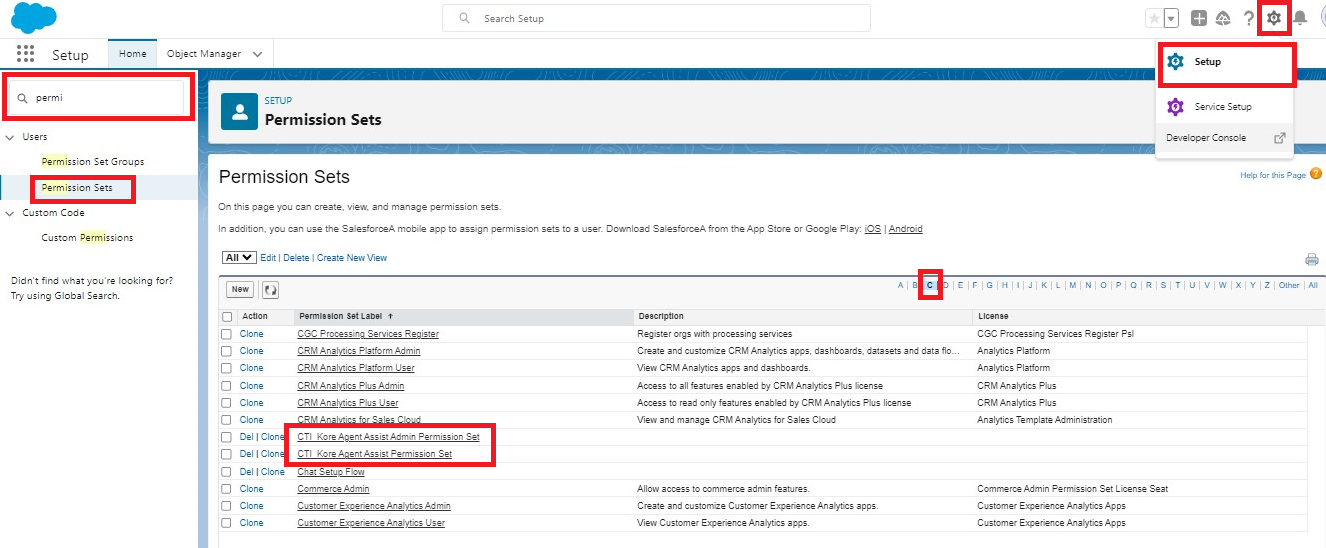
- Click the Gear icon > Setup.
- Enter the text Permission Sets in the search box.
- Click Permission Sets in suggestions, and select the alphabet C.

- Assign the permission set:
- For admins, assign both CTI_Kore Agent Assist Admin Permission Set and CTI_Kore Agent Assist Permission Set.
- For agents, assign CTI_Kore Agent Assist Permission Set.
Note: The admin role has higher permissions including write and delete on KoreAgentAssist Configuration Object, KoreAgentAssist Feature Configuration Object, and view access for AgentAssistApexLCController Apex. Call Summary is unavailable on the CTI_Kore Agent Assist Admin Permission Set. - CTI_Kore Agent Assist Admin Permission Set: Provide full access to Kore AgentAssist objects
- CTI_Kore Agent Assist Permission Set: Provide read/write access to Kore AgentAssist objects
- Call Summary is unavailable on the CTI_Kore Agent Assist Admin Permission Set.
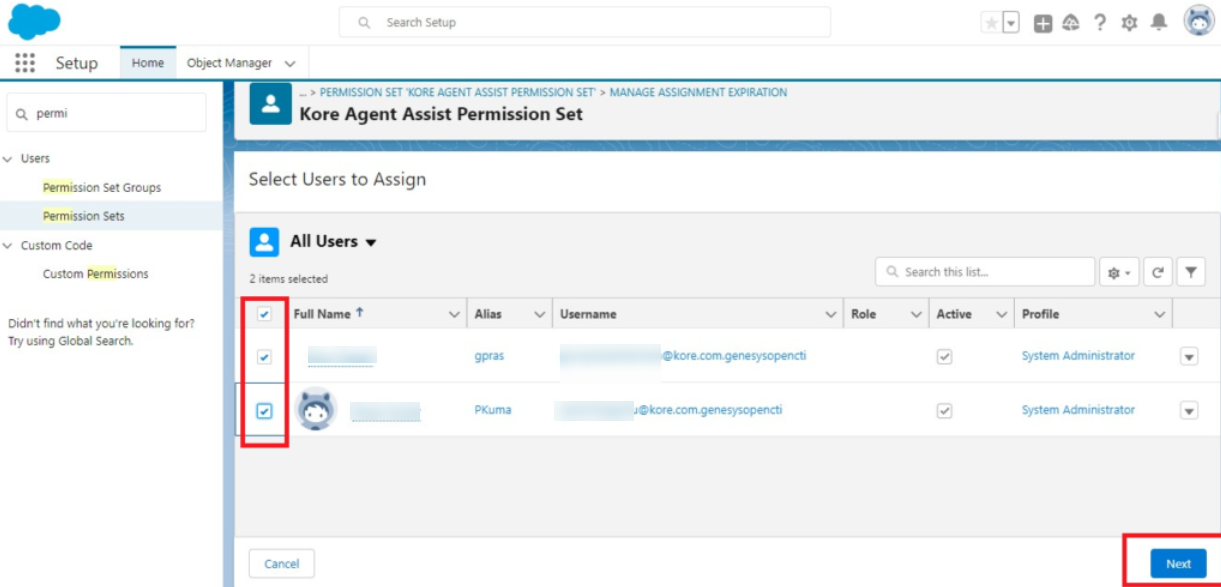
- Click the required permission set and then click Manage Assignments.

- Select the agent/users or profiles needing access to this package.
- Click Next > Assign, and on the next screen, click Done.

Enable Kore AgentAssist Package Features
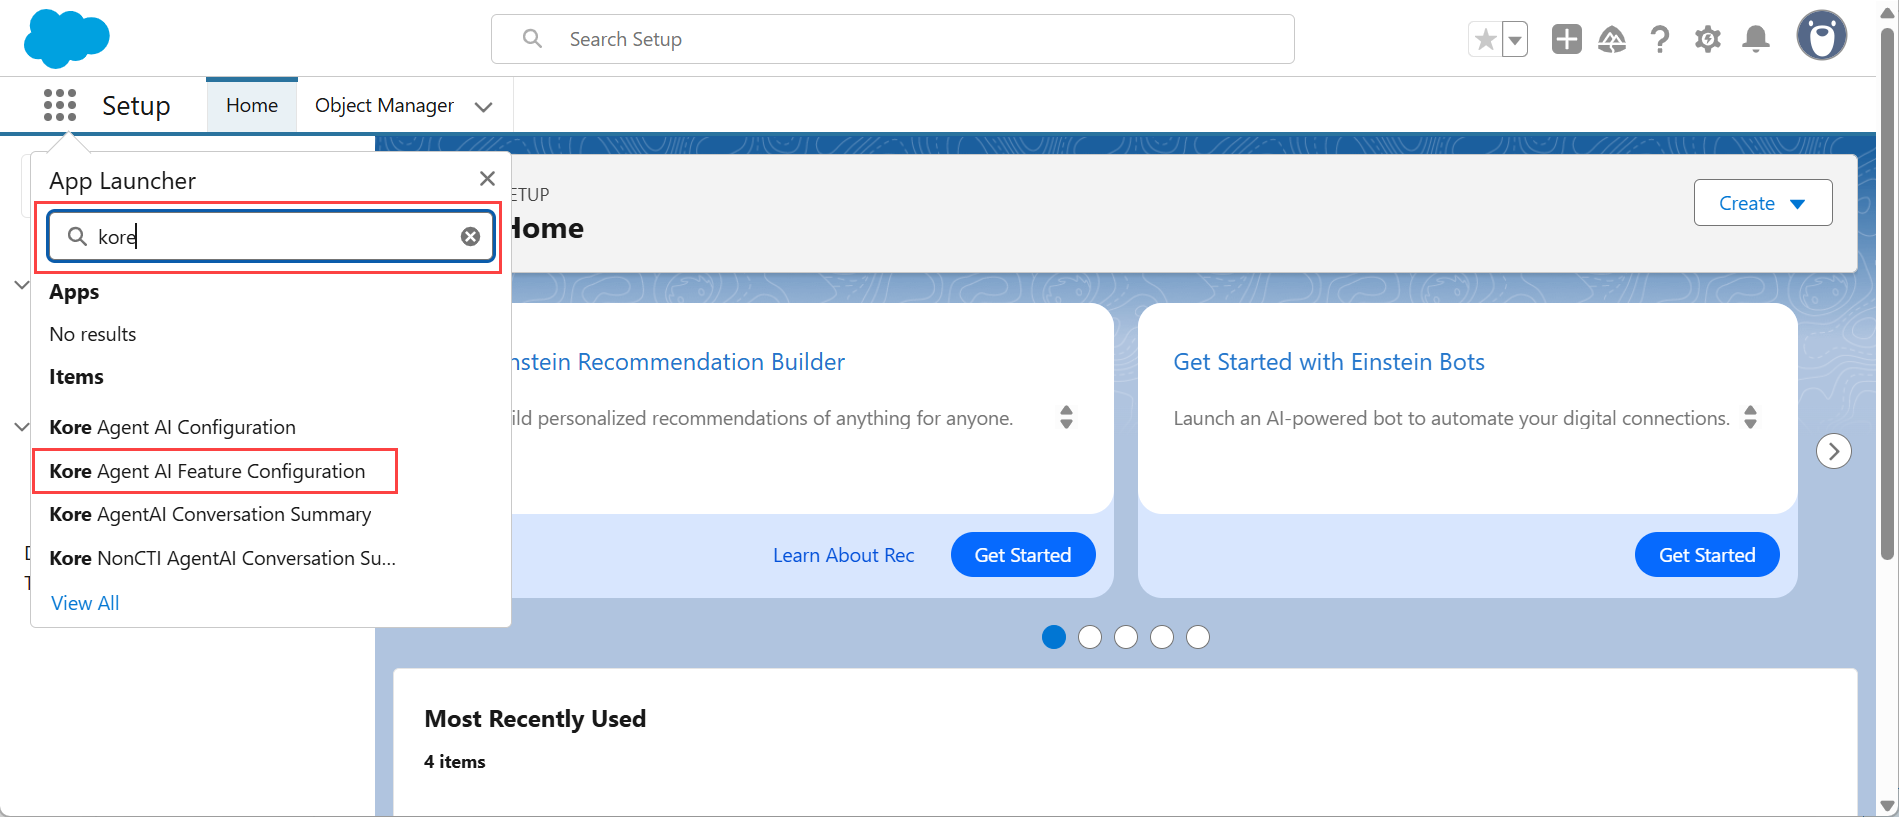
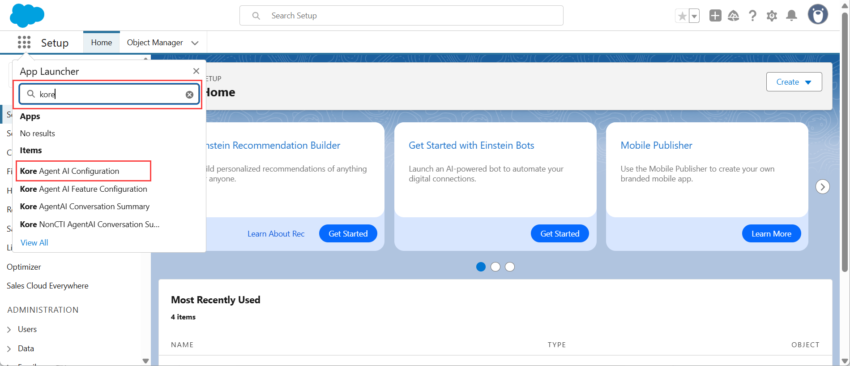
- Click the app launcher and type Kore.
- Click Kore Agent AI Feature Configuration from the suggestions.

- Click the New button on the top-right, and select the features in the package you want to use.

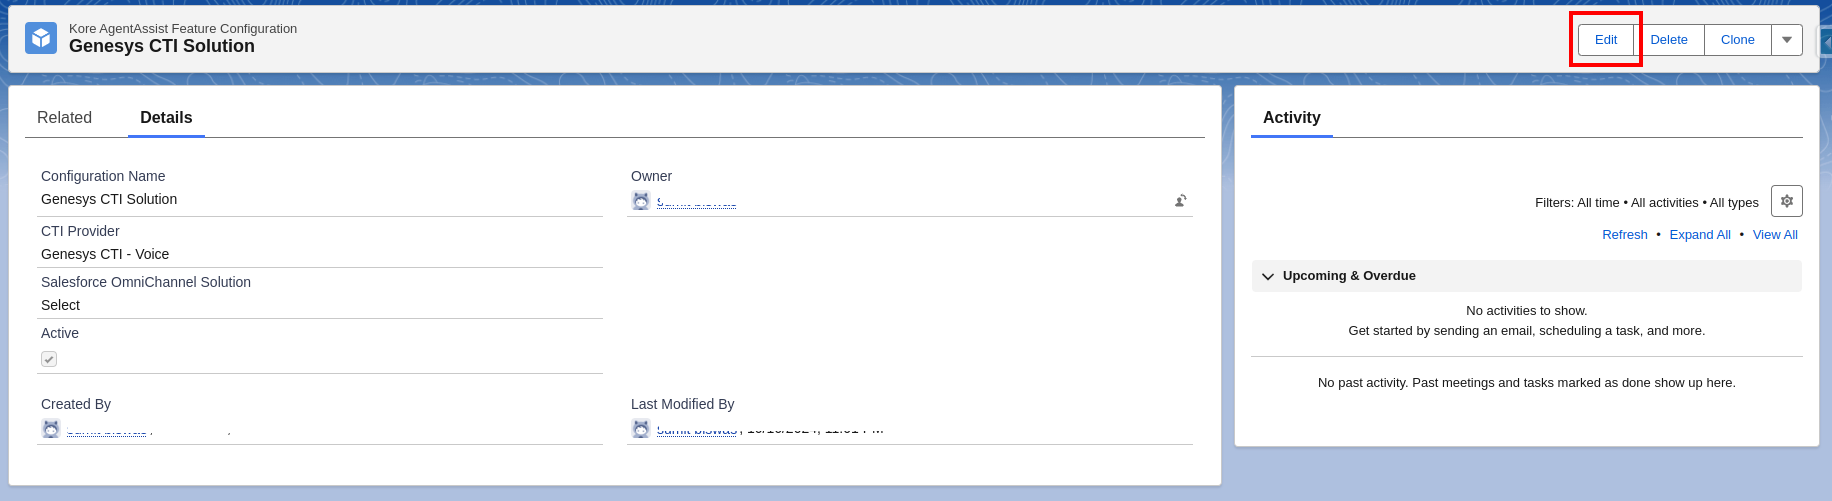
- Configuration Name: Provide a name for the configuration you are creating.
- CTI Provider: Select the Genesys CTI – Voice option.
- Salesforce OmniChannel Solution: Select Chat.
- Active: Only one feature configuration will be Active, and the Active configuration will be considered at runtime.
- Click Save.
- Click the Edit button if you want to edit the existing feature configurations.

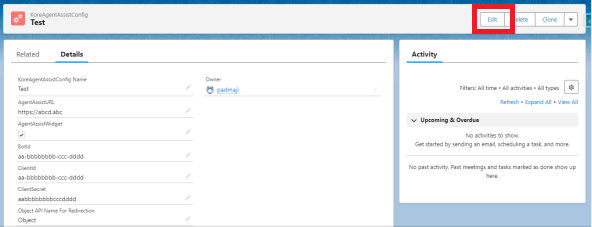
Configure Agent AI Package
- Click the Gear icon > Setup.
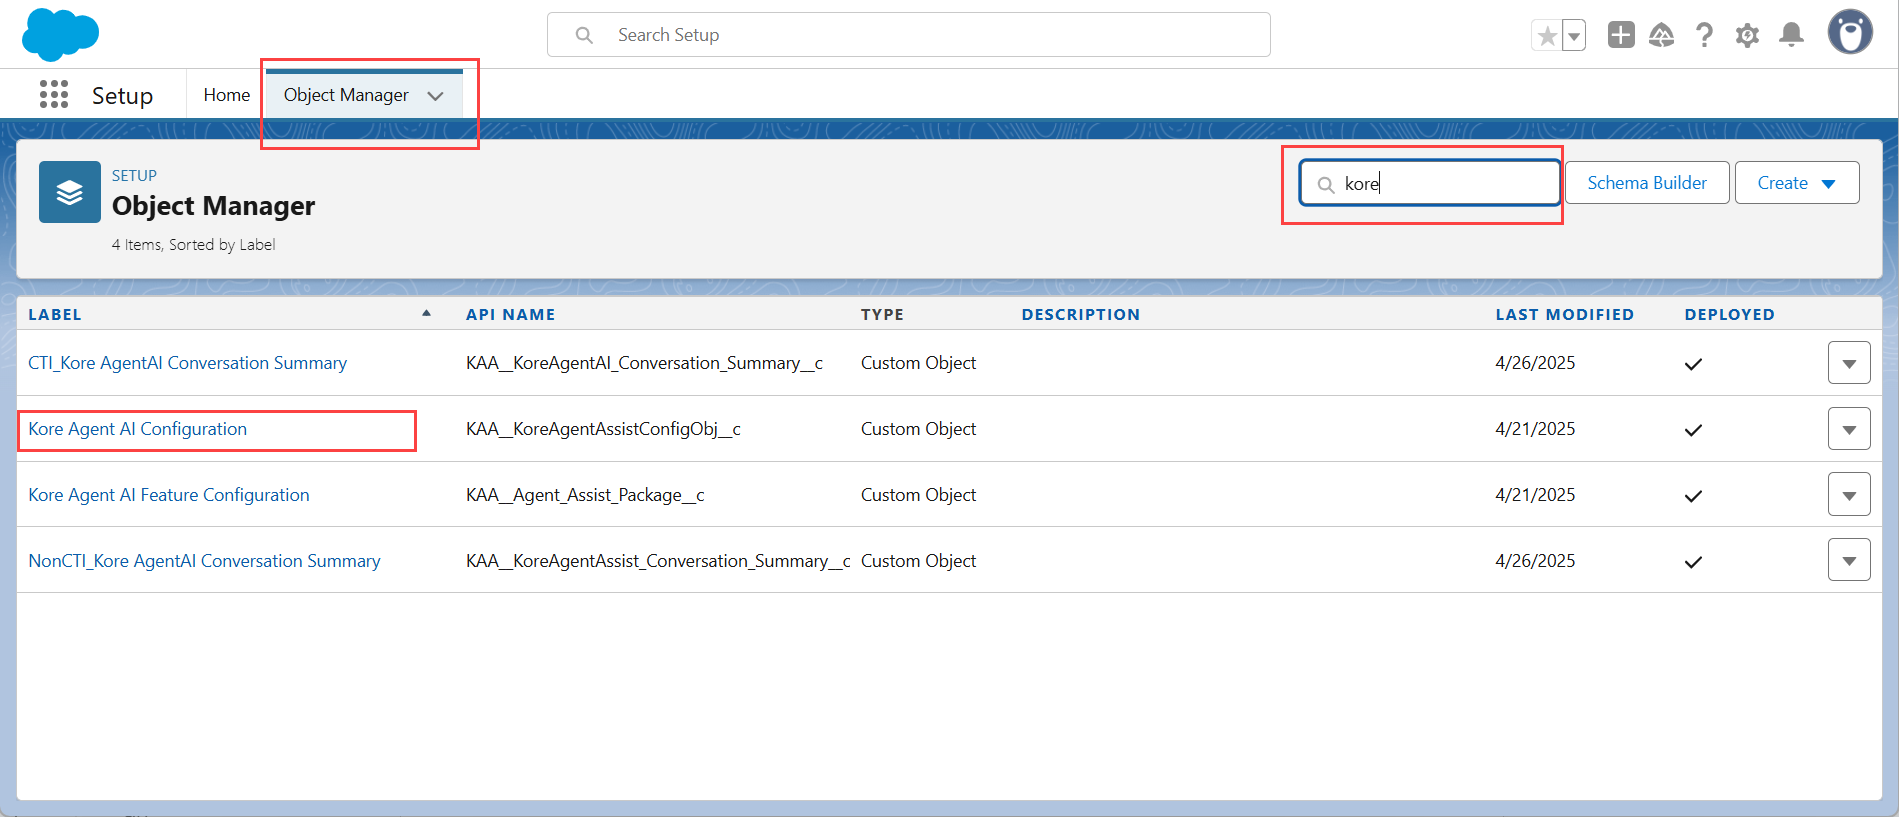
- Click Object Manager and search with Kore.
- Select Kore Agent AI Configuration or KAA__KoreAgentAssistConfigObj_c.

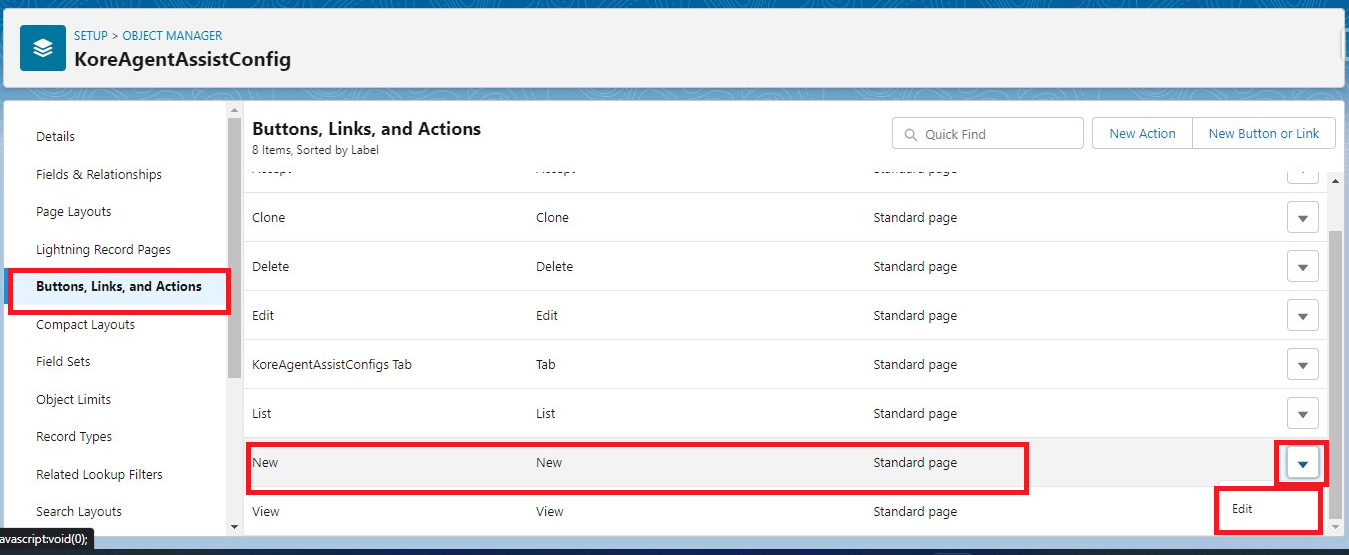
- Click Buttons, Links, and Actions.
- Select New and from its dropdown list, click Edit.
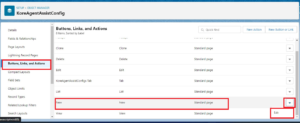
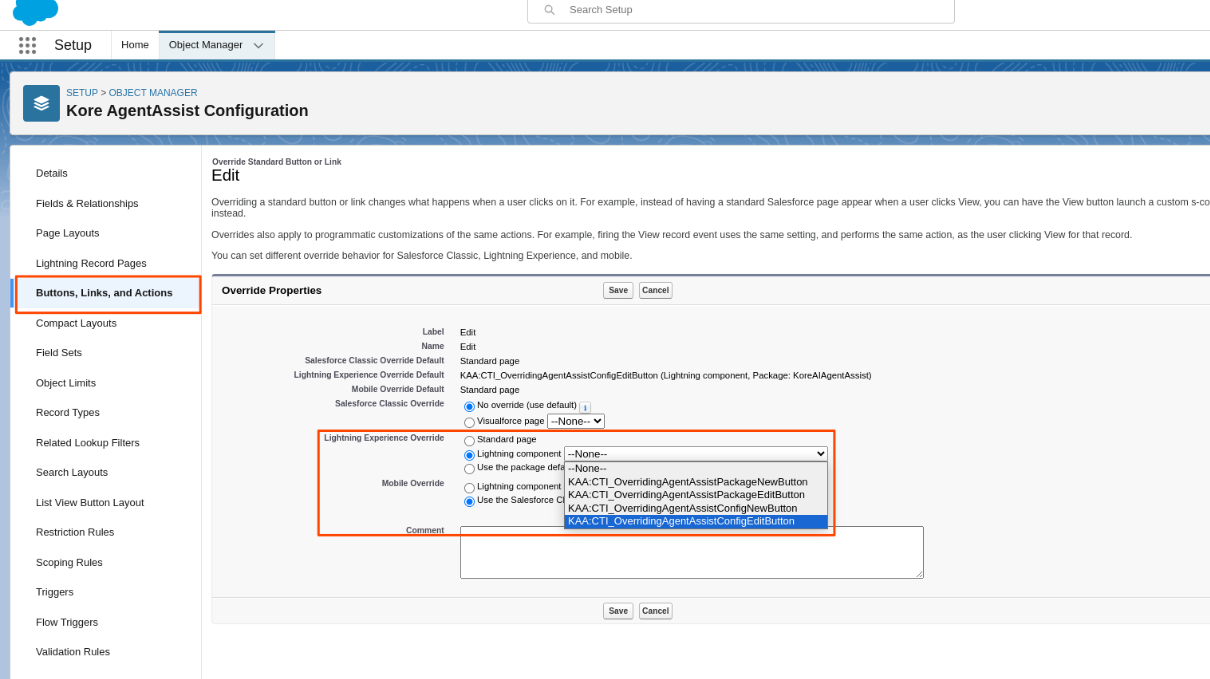
- Select Lightning Experience Override.
- Select the Lightning Component radio button and in the dropdown select KAA:CTI_OverridingAgentAssistConfigNewButton.
- Click Save.
- Select Edit and repeat the above steps except selecting KAA:CTI_OverridingAgentAssistConfigEditButton from the dropdown list.
- Click Save.
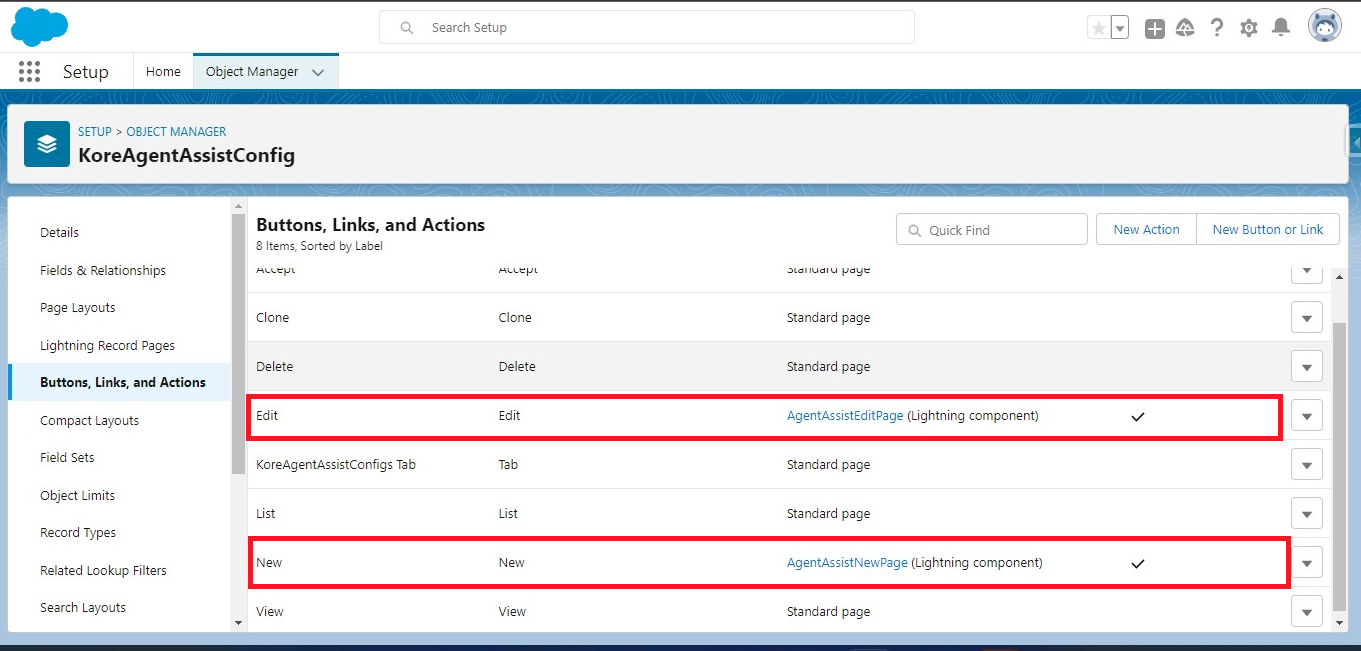
After overriding the buttons, the following screenshot appears:

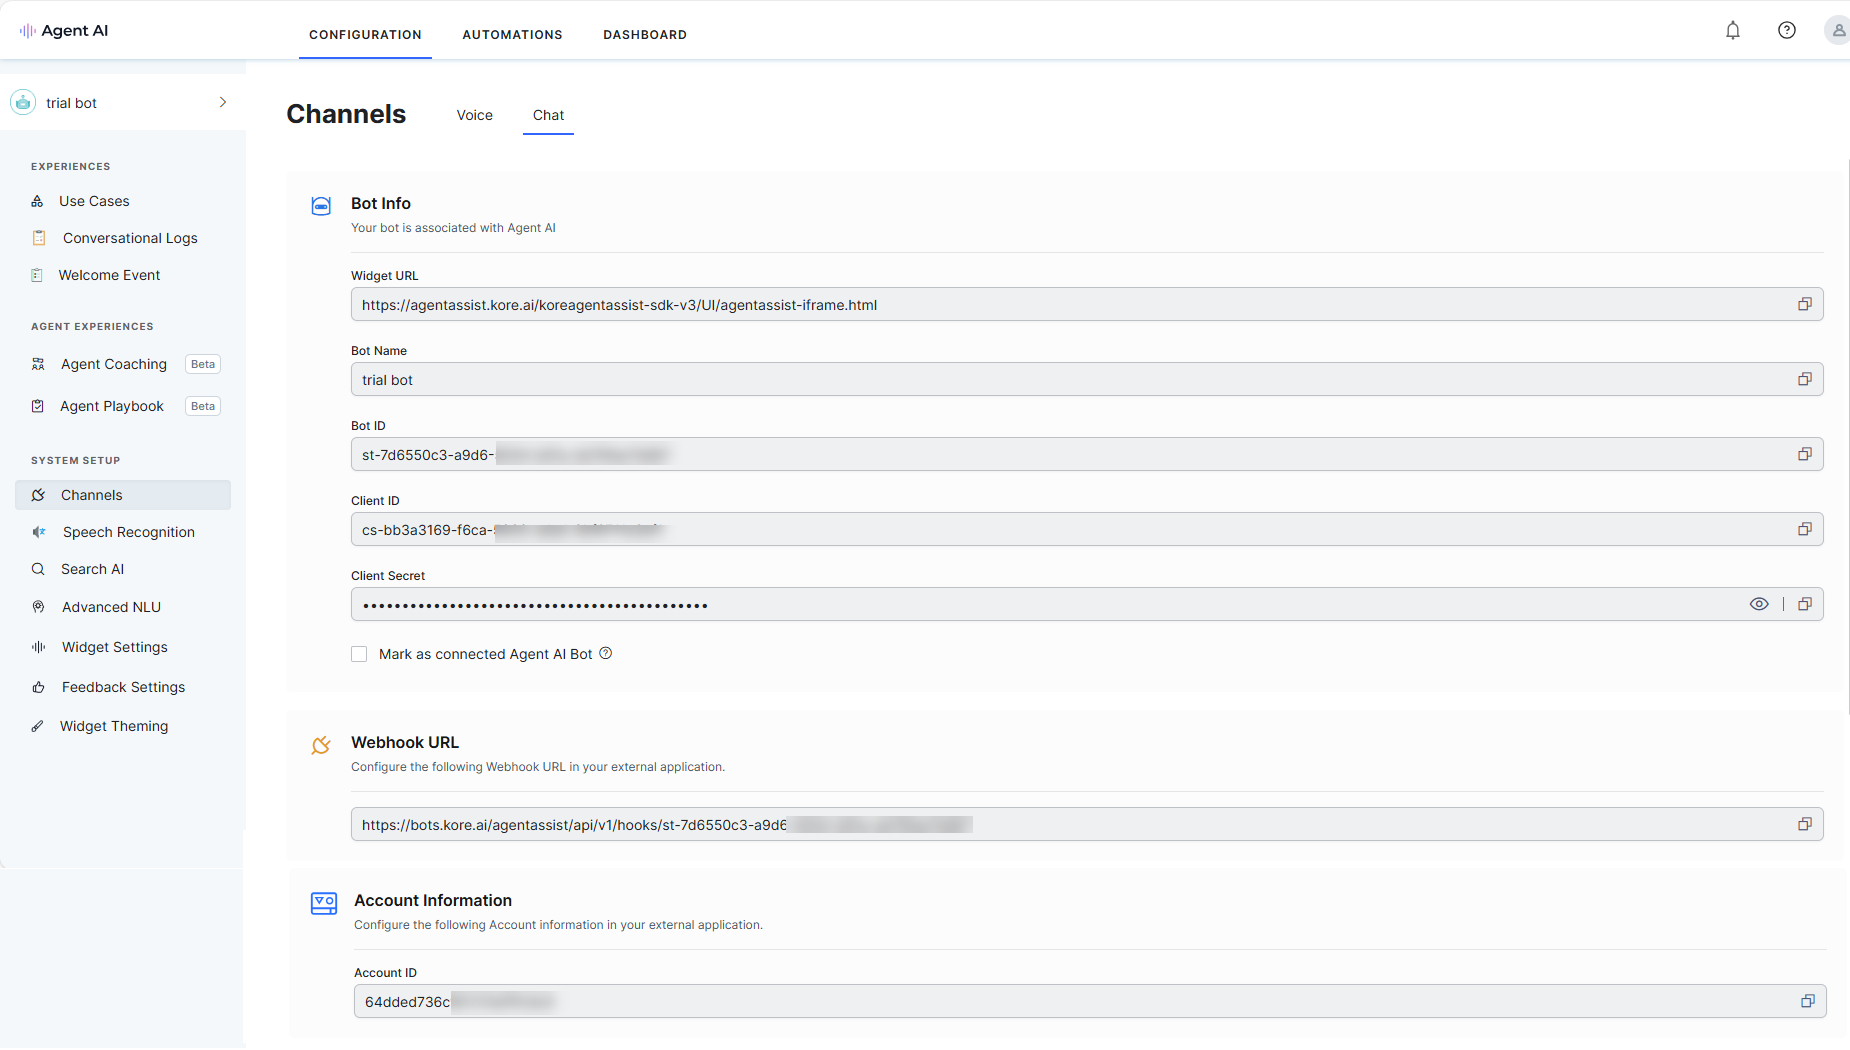
Set up Widget Configuration
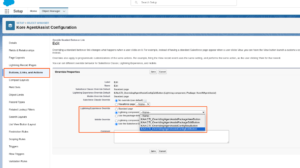
- Click the App Launcher, and search for Kore in the search bar.
- Click Kore Agent AI Configuration shown in the suggestions section.
- Click the New button for providing configurations.
- Provide all the details in the text boxes, and click Save.
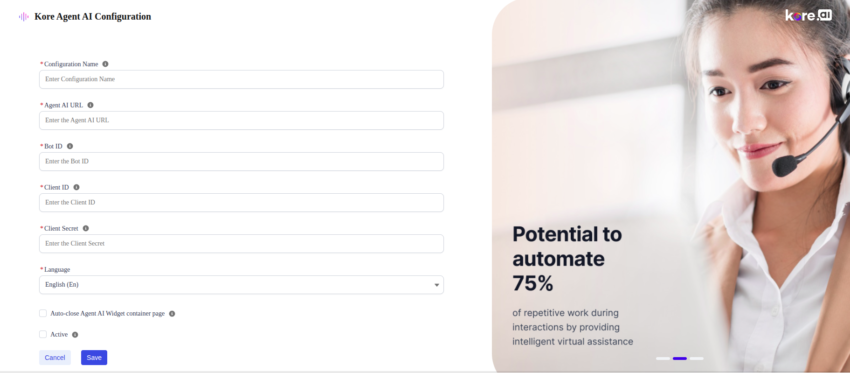
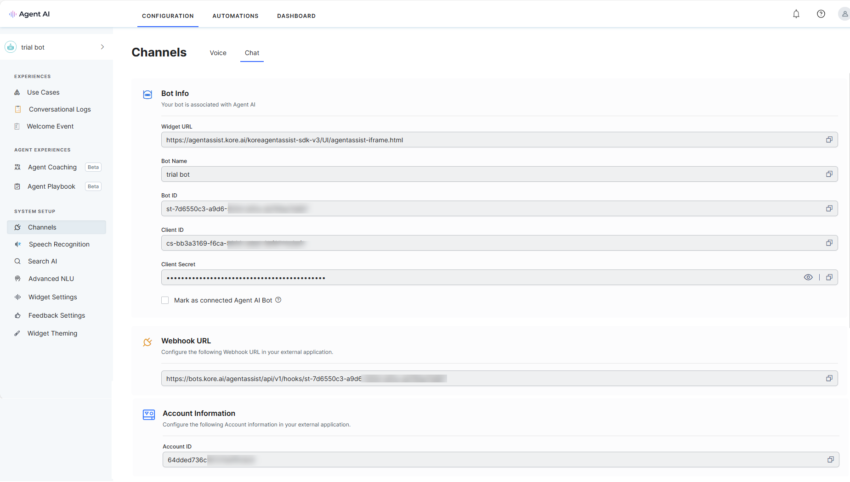
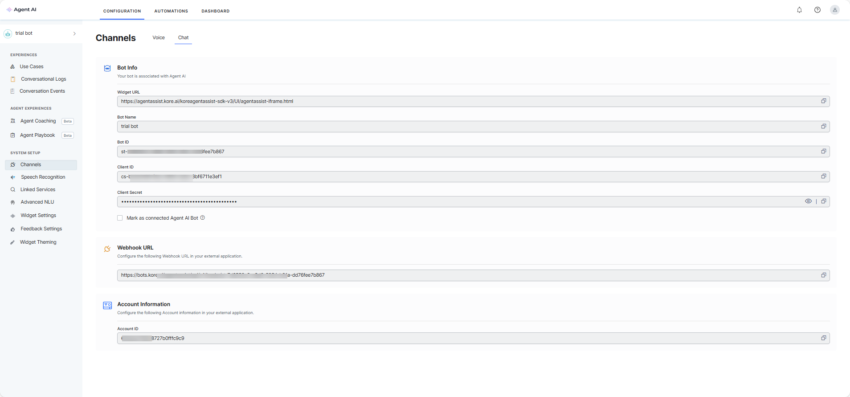
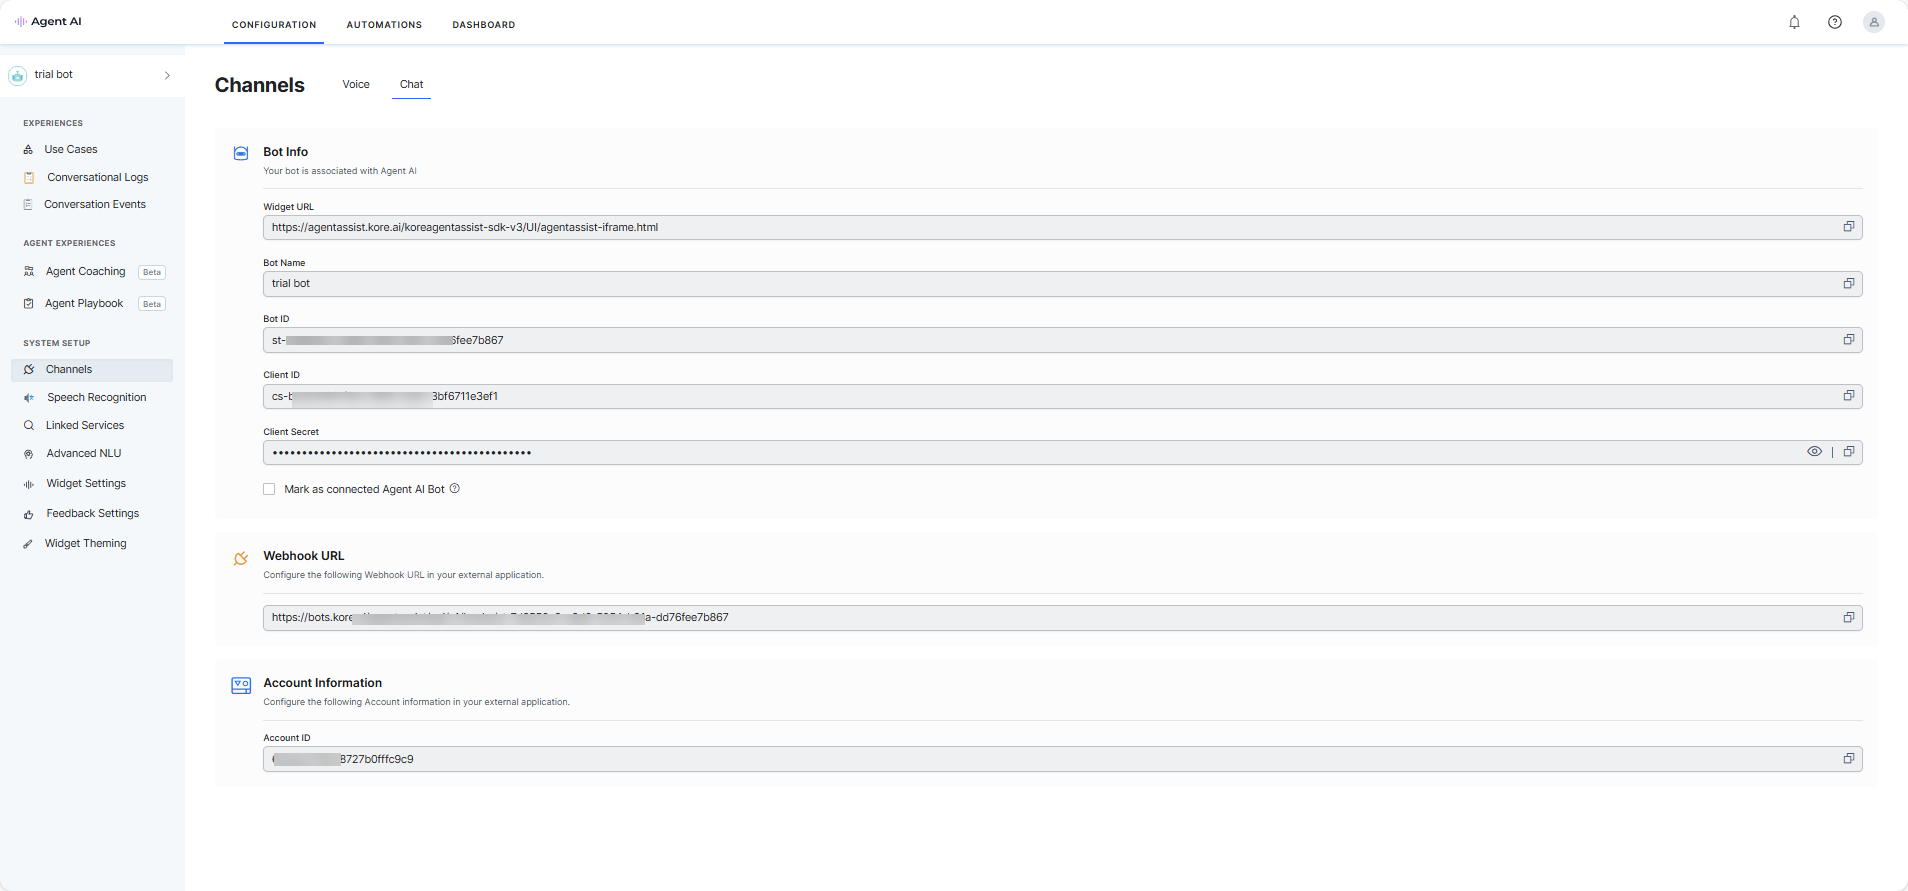
Note: In the Agent AI URL field, use the URL from Configuration > System Setup > Channels > Chat of your Agent AI instance.
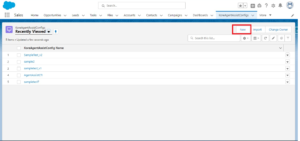
- Close the current Salesforce tab, and the records are shown.
Note: Only one configuration is active and that configuration is used at runtime. - Select one of the displayed records and click Edit, if any updates are required.


Configure Softphone Layout
- In the search box, type Softphone Layouts, and click Softphone Layouts in suggestions.
- Click New (if Softphone Layouts does not exist).

- Enter a name for the layout and select the checkbox Is Default Layout.
- Select Inbound for the Select Call Type field.
- Select the objects you want to match with the incoming payload (for example, Incoming Mobile Number) in the Display these salesforce.com objects section.
- In the Screen Pop Settings section, select the behavior when a match record is found, when no match record is found, and when multiple records are found for the selected objects.


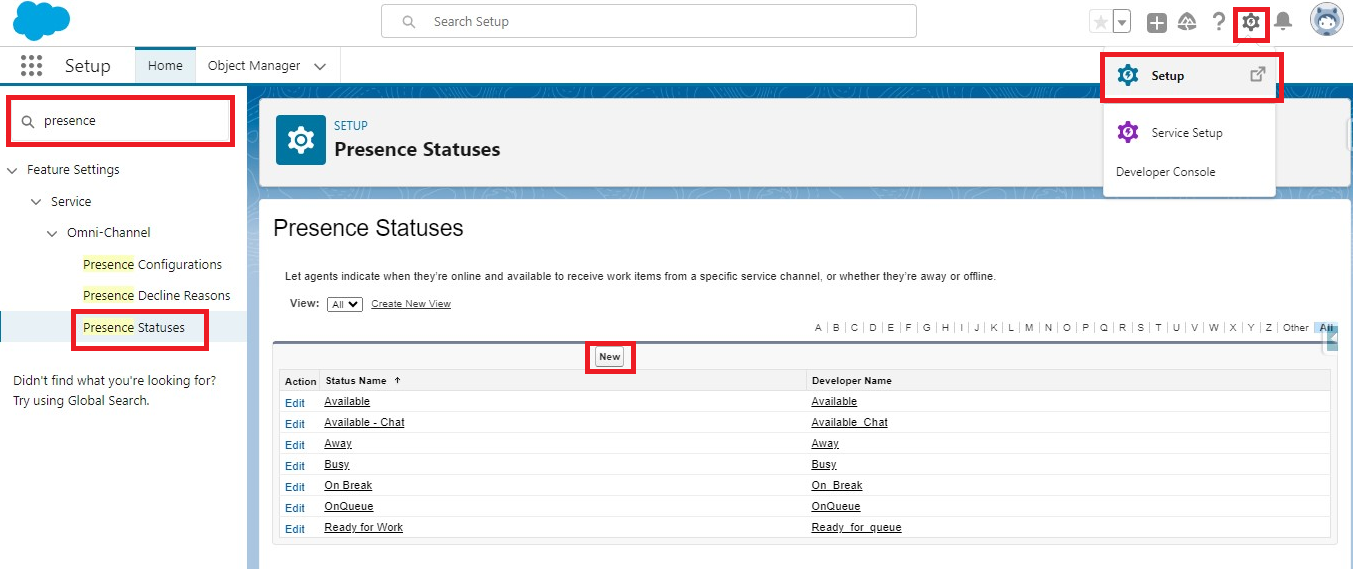
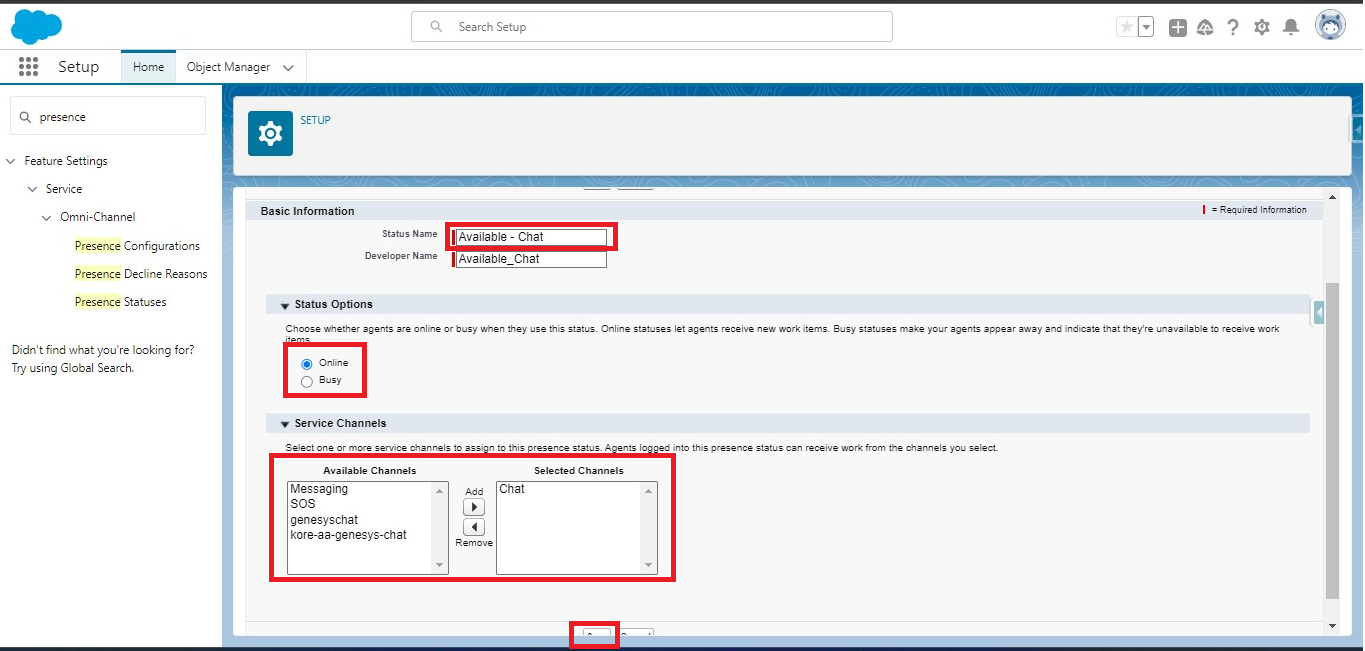
Create Agent Presence Status
- Click the Gear icon > Setup.
- Type Presence Statuses in the quick search box and then click Presence Statuses in suggestions.
- Click the New button.

- Enter the Status Name, and select Status Options.
- Select the Service Channels, and click Save.

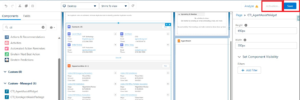
Place the Widget in the Record Detail page
- Open any record of the selected object in step-2 of Softphone layout configurations, and click the Gear icon.
- Click Edit Page.

- In the search box, search for GenesysCTI_AgentAssistVoice and Kore_AgentAssist_Conversation_Summary. Under the Custom-Managed section, components are visible.
- Drag both the components to the screen at the required location and adjust height and width, as required.
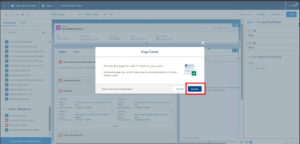
- Click Save.
- Click the Activate button next to the Save button.
- Click the Activate button on the pop-up window.
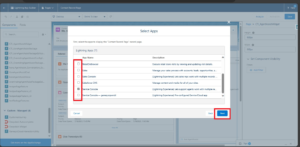
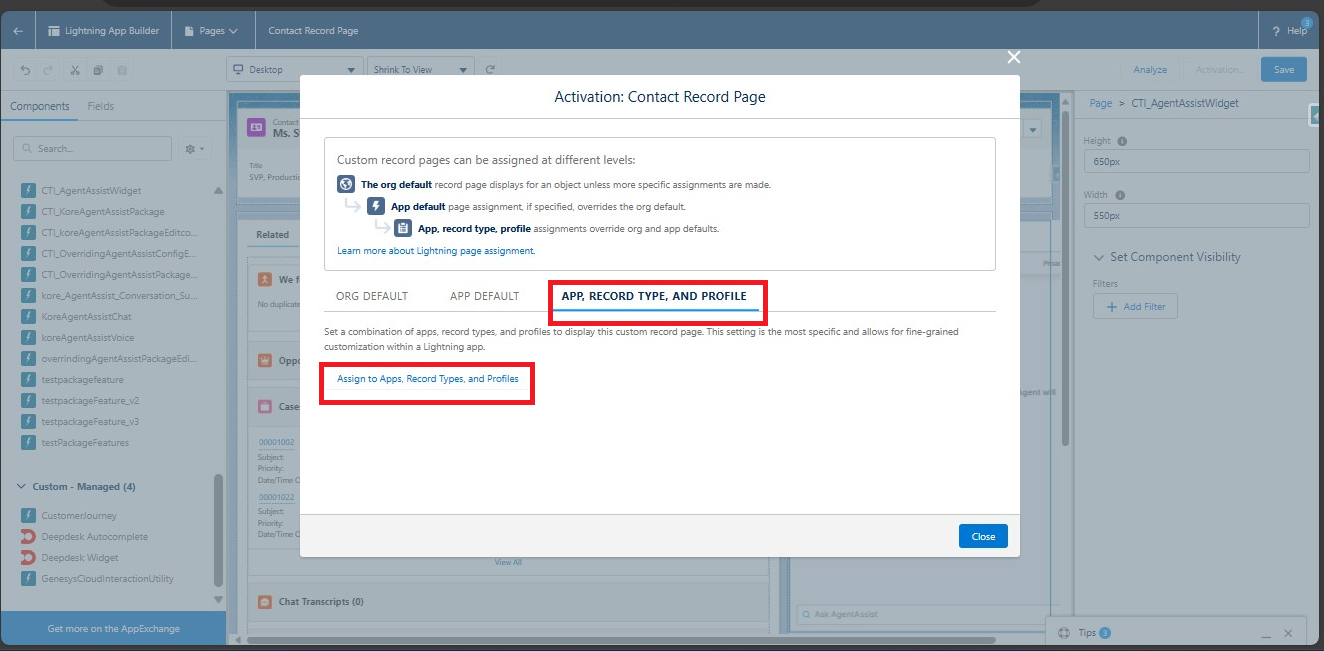
- Select APP, RECORD TYPE, AND PROFILE, and click Assign to Apps, Record Types, and Profiles.

- Select the apps for which you want the component to be visible and click the Next button.
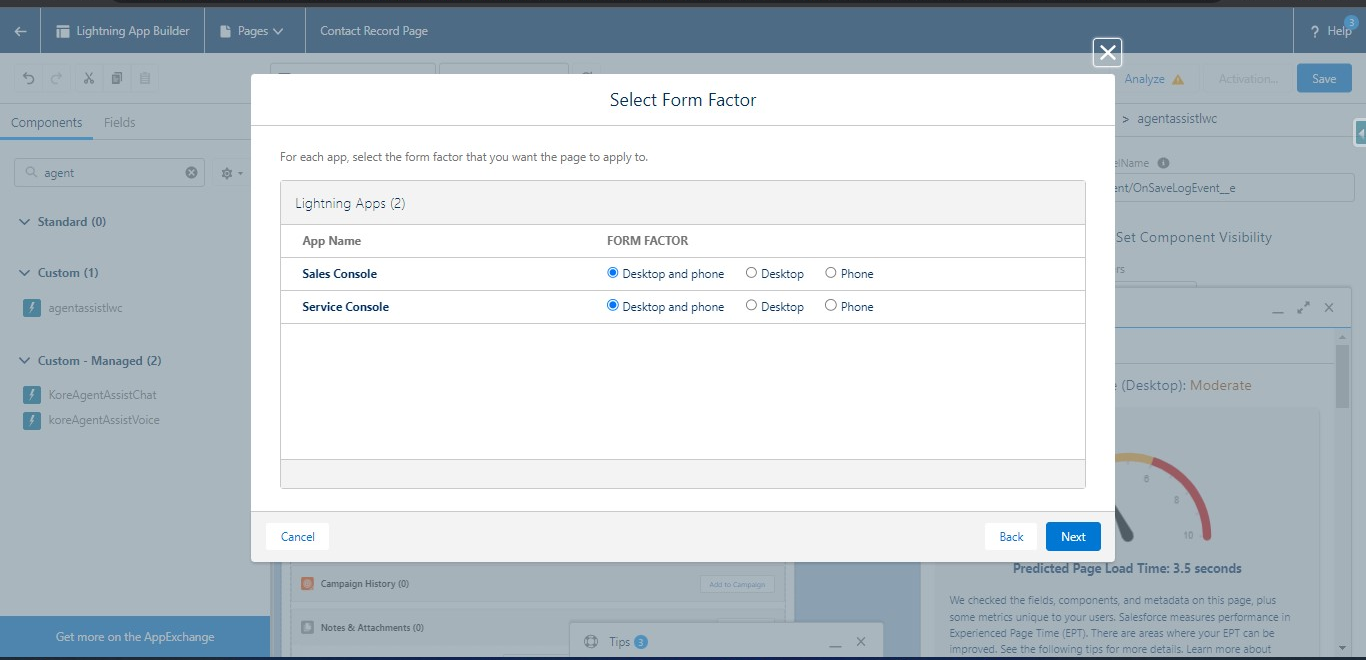
- Select the Form Factor and click the Next button.

- Select the Record Types and click the Next button.

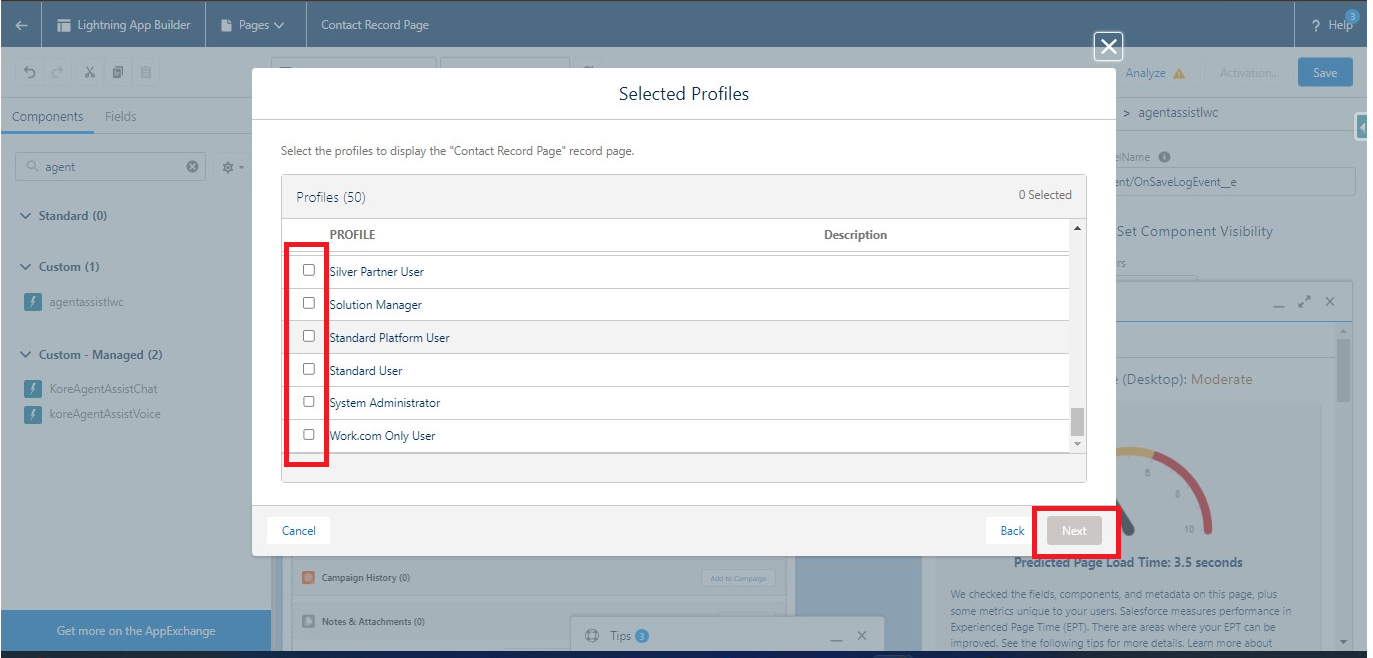
- Select the profiles, and click the Next button.

- Review all the configurations that you have selected and click the Save button.

- Click Save.


Configure Genesys CTI
Create and Configure Genesys Extension Class
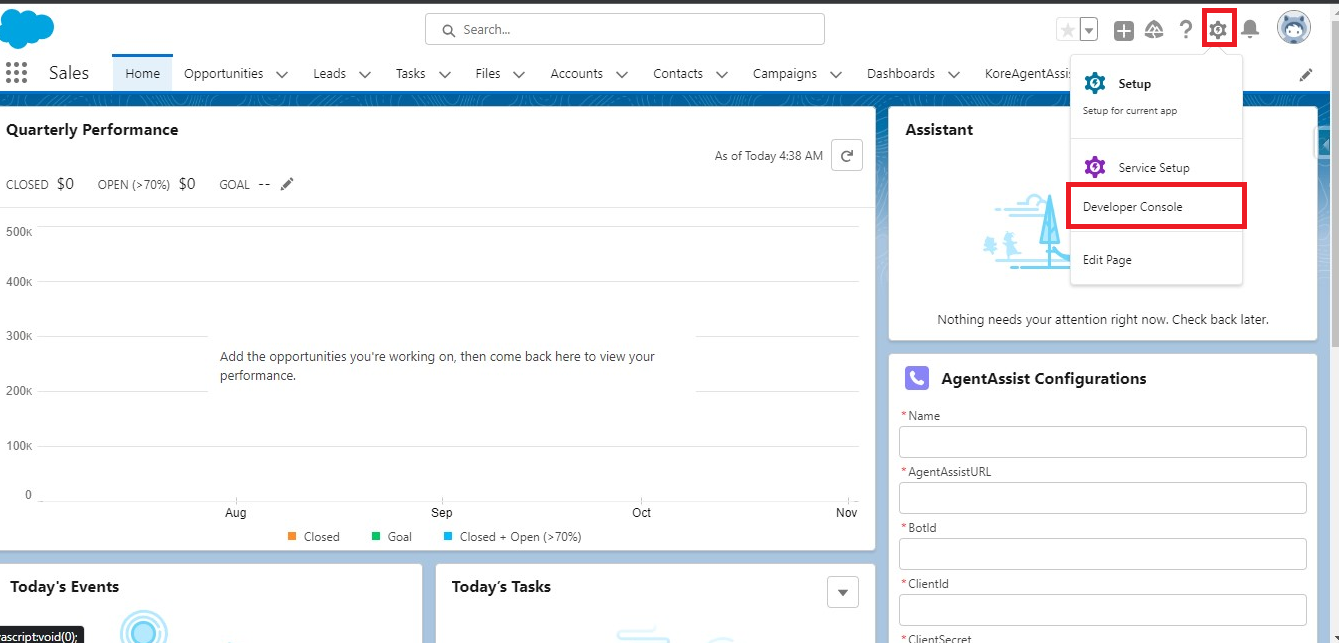
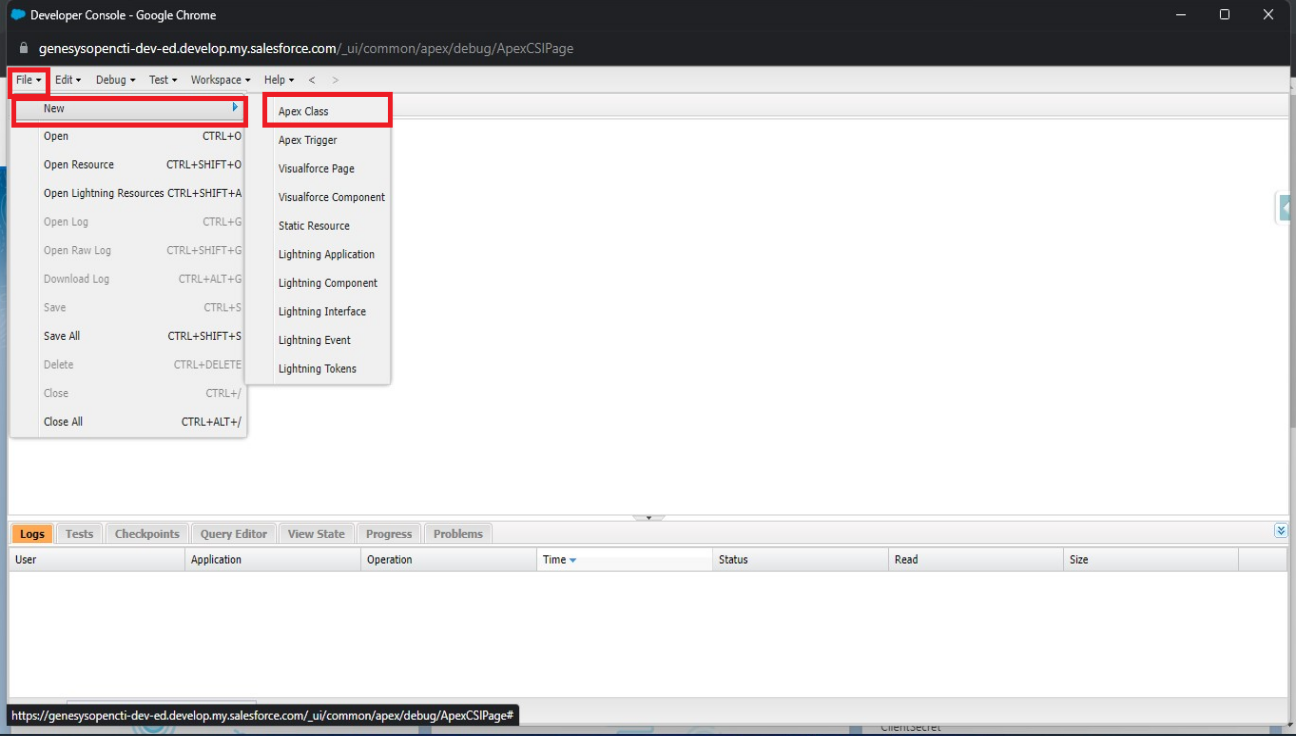
- Click the Gear icon and then click Developer Console.

- Click File > New > Apex Class.

- Create an apex class with the name CustomCTIExtensions and save it.
- Copy and paste this code in the Apex Class, and save it.

Configuring the Extension Class in Genesys
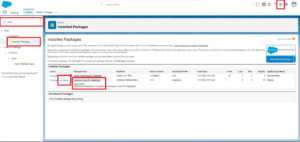
- Click the Gear icon and enter the text Installed Packages in the search box.
- Click Installed Packages in suggestions.
- Select Genesys Cloud for Salesforce and click Configure.

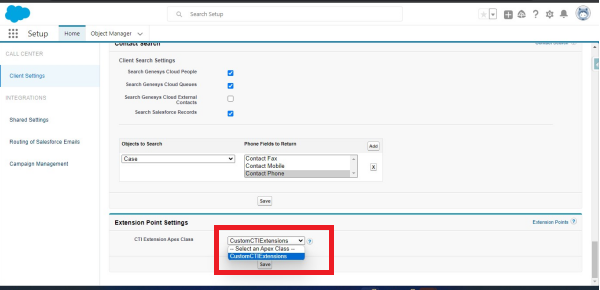
- Click Client Settings and from the Call Centers dropdown list.
- Select Genesys Cloud for Salesforce Lightning.

Note: Under the Client Event Settings section, keep the default setting as None for the Client Event Message Type field.
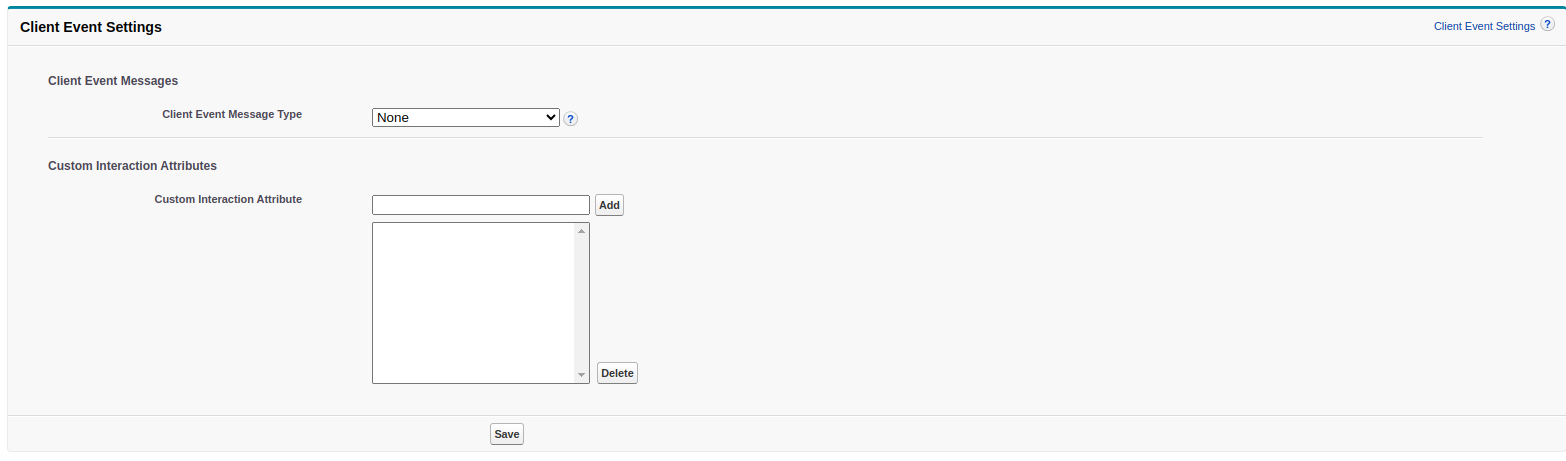
- Scroll down to the bottom of the page, click the dropdown list, and select the class that you created in step-3 of Create an Extension Class for Genesys and save it.


Generate Genesys oAuth Credentials
- Sign in to Genesys Cloud.
- Go to Admin > Integrations > OAuth.
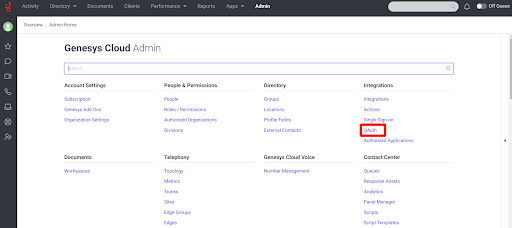
- Click Add Client.

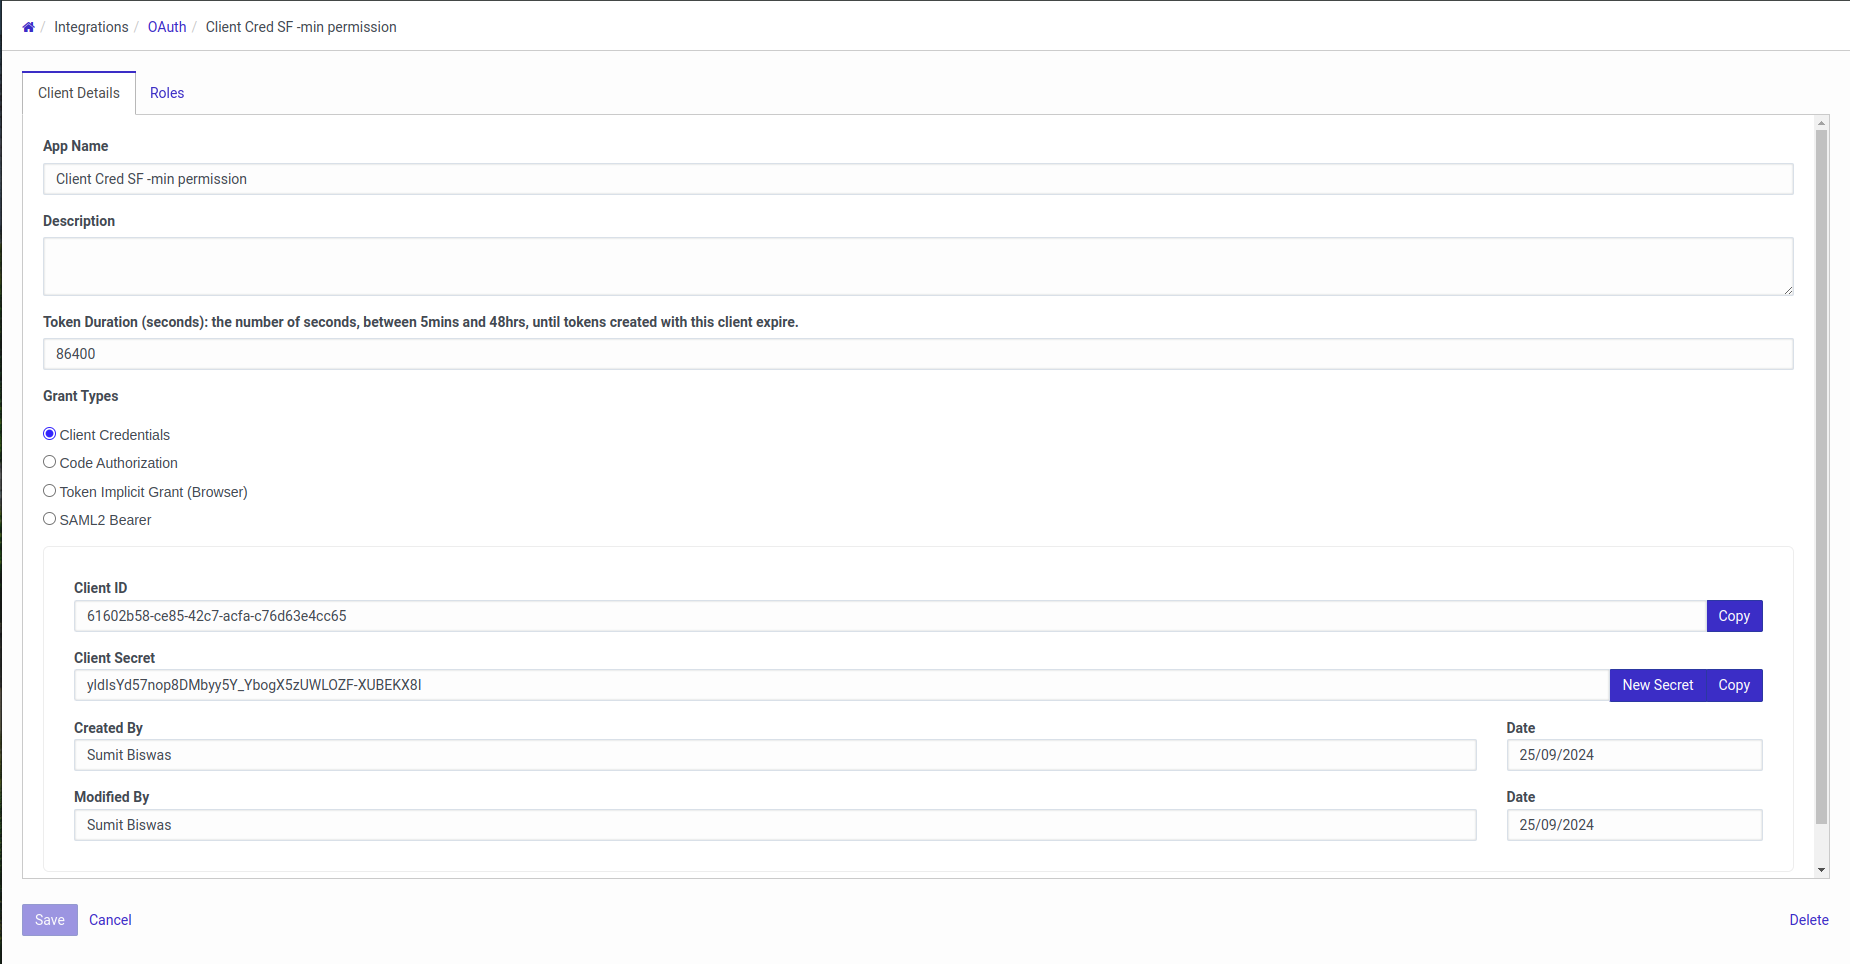
- Enter the app name, description, and token duration in the App Name, Description, and Token Duration fields.
- Select Client Credentials in the Grant Types field.
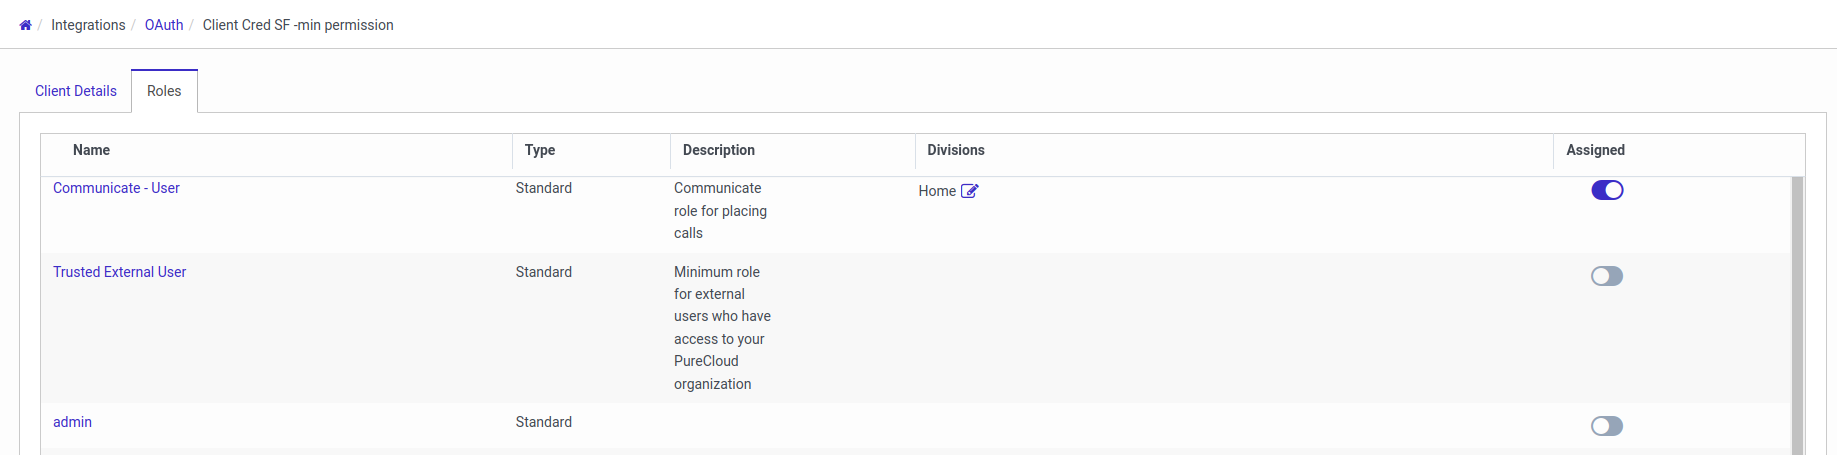
- In the Roles section, you can assign Communicate – User as the minimum role. Any other roles with higher permission will also work.
After saving the configuration, you will get the Client ID and Client Secret of the created OAuth client. - Save the Client ID and Client Secret to be used in the Configure Genesys CTI Package section.
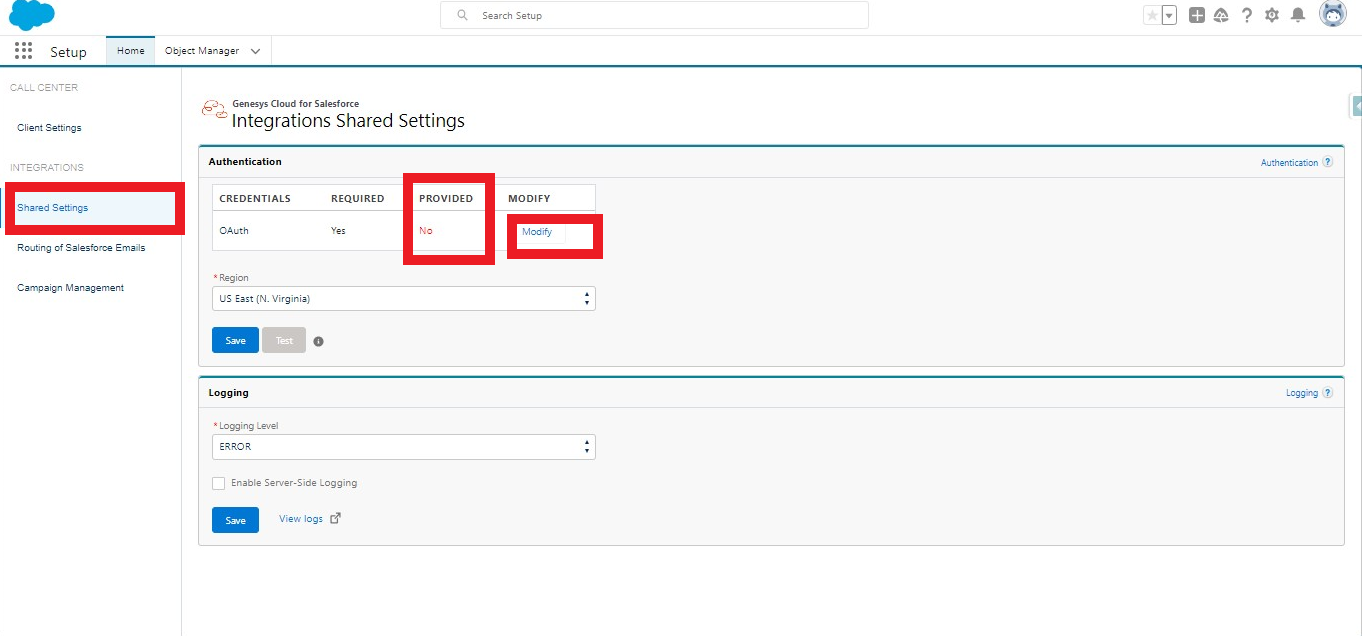
Configure Genesys CTI Package
- Click the Gear icon and search for Installed packages.
- Click Installed Packages in suggestions.
- Search for the Genesys package, and click Configure.
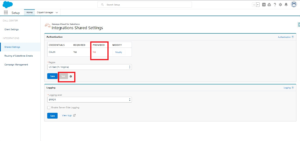
- Click Shared Settings. The Provided status is No. Click Modify.
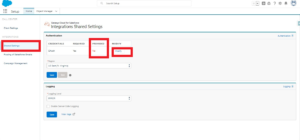
- On the pop-up window, enter Genesys Client ID and Client Secret and then click Save.

- The Test button gets enabled. Click the Test button. A success message is displayed, and the Provided status turns to Yes.


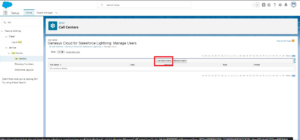
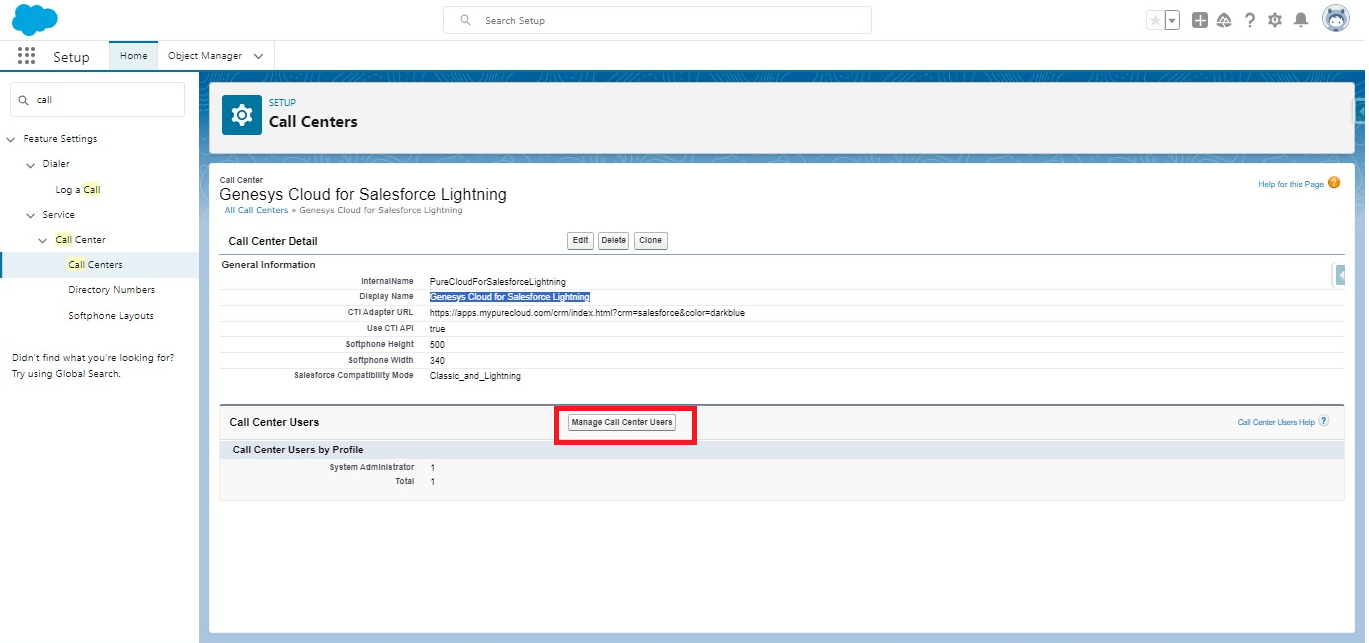
Add Users to Call Centers for Genesys
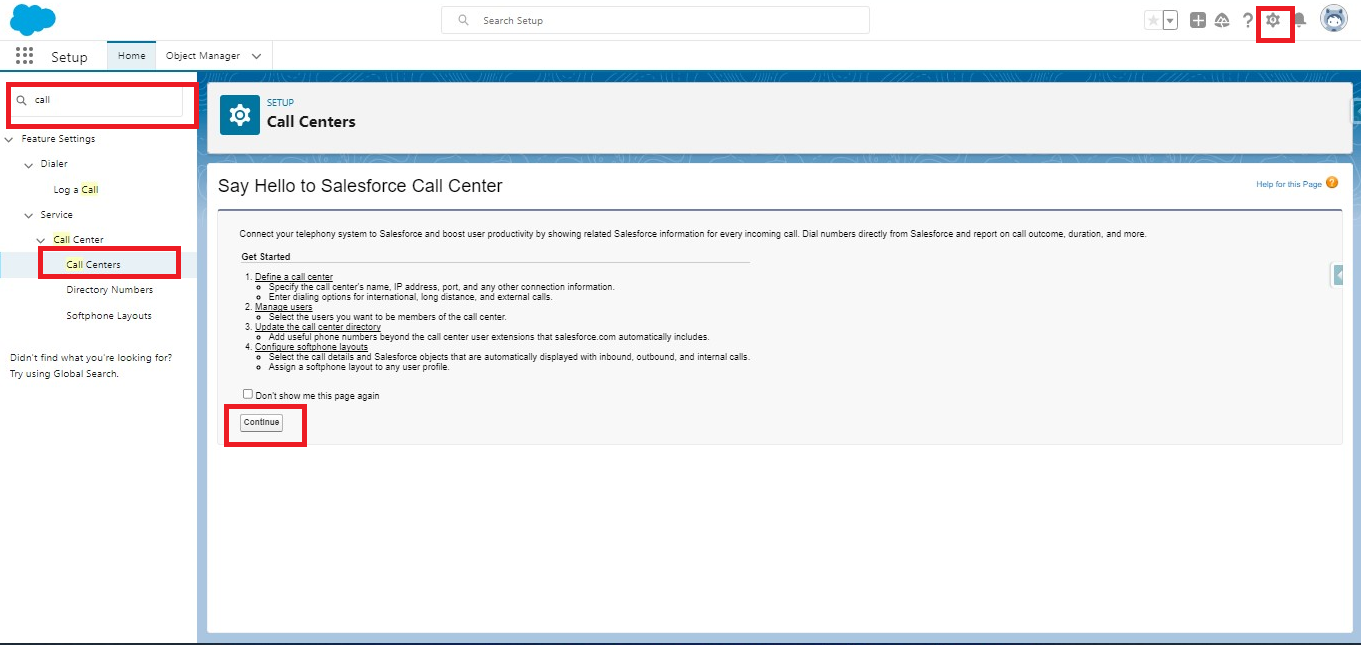
- Click the Gear icon and enter the text Call Centers in the search box.
- Click Call Centers in suggestion, and then click Continue.
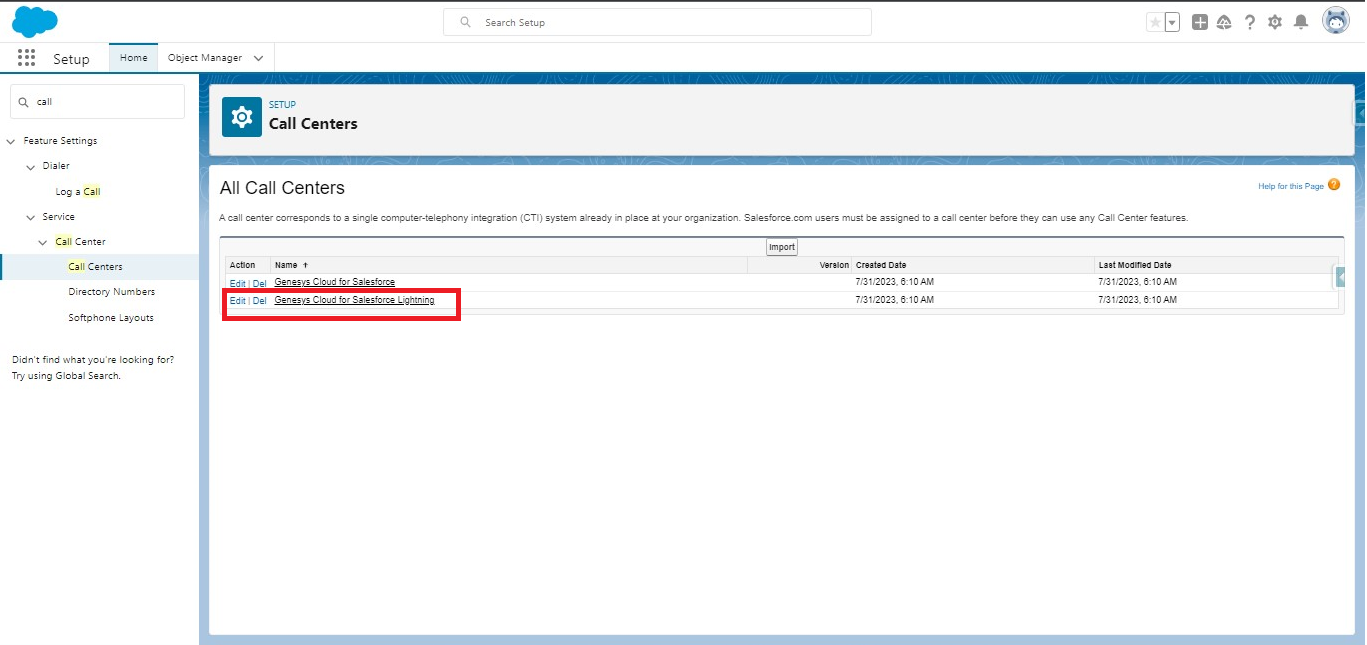
- Select the required option–If CTI was used for lightning, select Genesys Cloud for Salesforce Lightning.

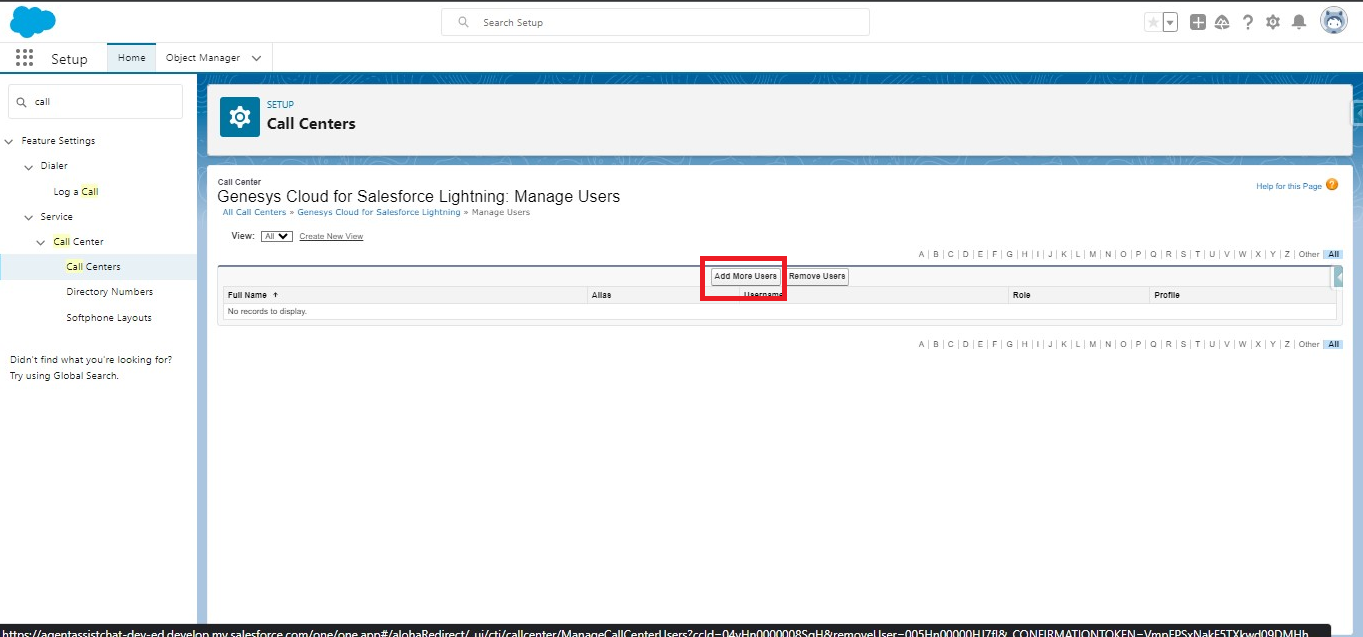
- Click Manage Call Center Users and assign users.

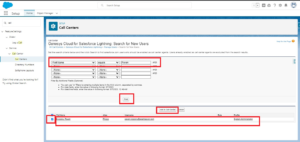
Note: To make the CTI visible, assigning users is mandatory in the Utility bar. - Click Add More Users.
- Set criteria for searching users.
- Click Find. A list of users will be displayed.
- Select the checkbox for the required users, and click Add to Call Center.

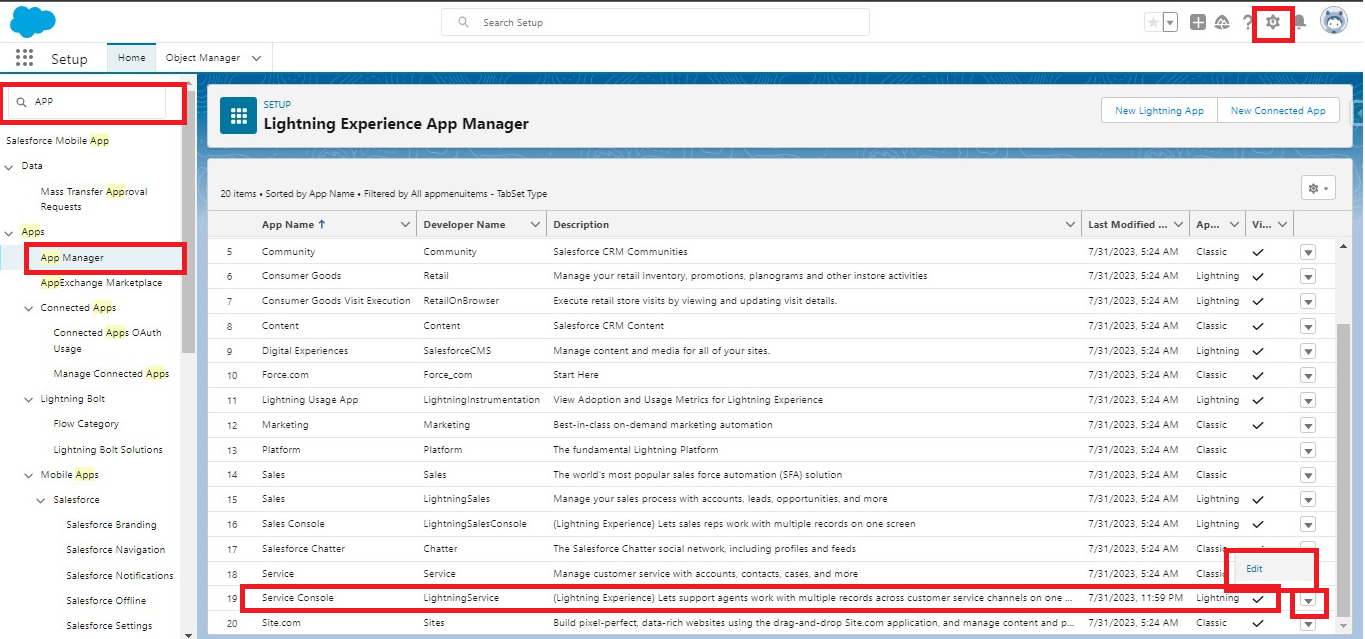
Add Genesys CTI to the Utility bar
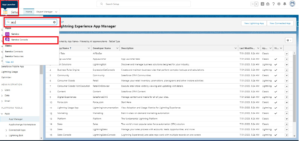
- Click the Gear icon and enter the text App Manager in the search box.
- Click APP Manager in suggestions.
- Search for Service Console and click the dropdown list against it.
- Click the Edit button.

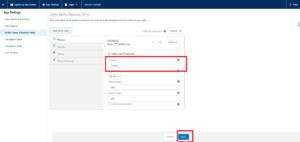
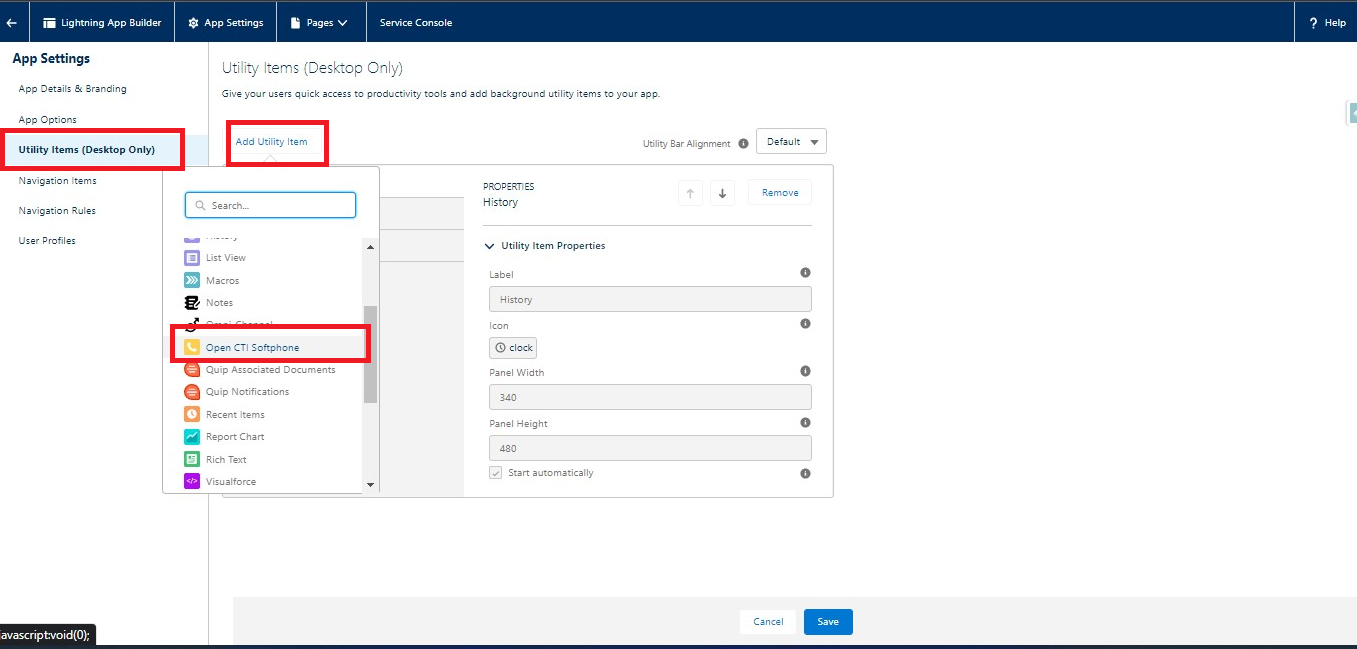
- Click Utility Items (Desktop Only) > Add Utility Item.
- Search for Open CTI Softphone and click Open CTI Softphone.

- Rename the label, if required, and then click Save.
- Check if CTI is added to the Utility Bar.
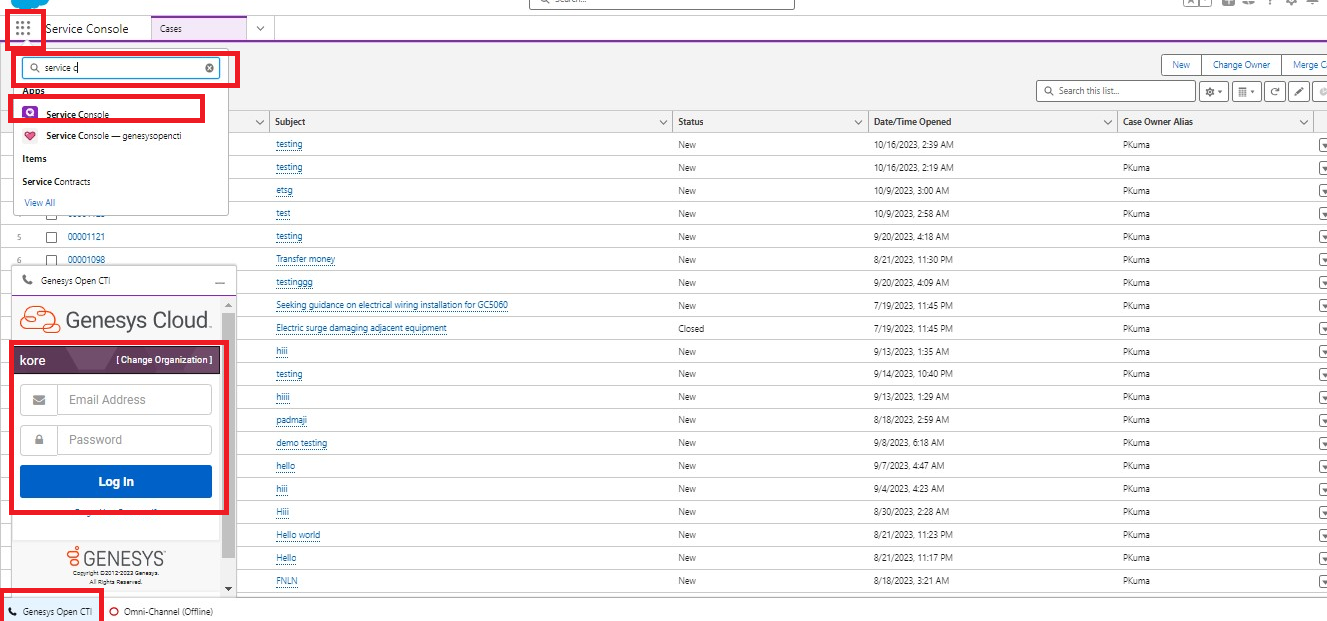
- Click the App Launcher (colored dots), enter the text Service Console in the search box, and click Service Console in suggestions.
- At the bottom of the page, you can find the CTI phone label name you gave in step-4 of Adding Users to Call Centers for Genesys.
- Click the label. A pop-up window appears asking for the Genesys Cloud credentials.


Configure Audiohook
If you are using Kore-managed Transcriptions, the final step is to install Audiohook for voice streaming. The Audiohook integration requires specific configuration values to support AgentAssist configuration.
- Sign in to Genesys Cloud.
- Go to Admin > Integrations > Integrations.
- Enter “audiohook” in the search box to check for any existing instances of audiohooks.

- Click the Integrations button on the top-right corner to install a new audiohook app.

- Enter “audio” in the search box.
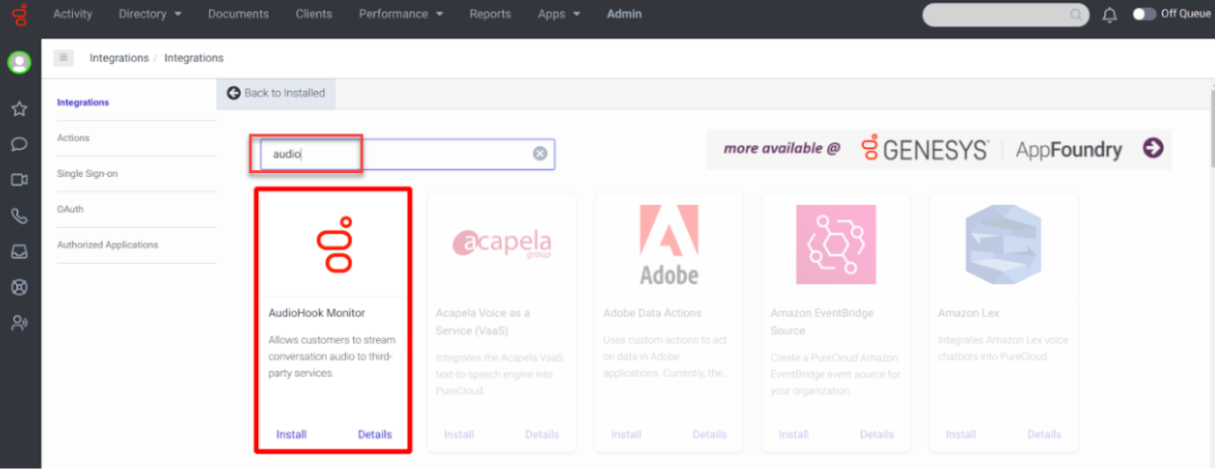
- Install Audiohook Monitor, and go to the Configuration tab.

- Channel value should be both.
- The Connection URI format should be similar to the following:
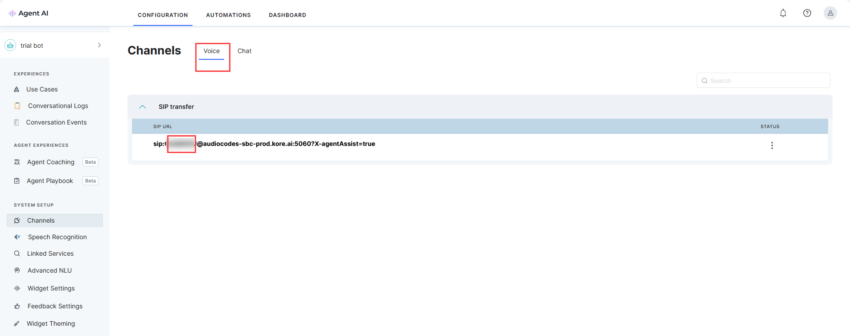
wss://savg-webserver.kore.ai/audiosocket/genesys/?sipuri=xxx&token=xxx&botId=xxx&accountId=xxx&agentassist=true- Get sipuri=sip:<sip-string> from the Agent AI Voice channel.
- Use the following references from Agent AI.kore.ai, Bot Channel configuration page to fetch Bot ID, Account ID, Client ID, and Client Secret (for token generation).
- Follow the steps of Using XO Platform APIs, Kore.ai Documentation, to generate the token (token= <token>.)
- Get sipuri=sip:<sip-string> from the Agent AI Voice channel.
- Add credentials in the Credentials tab.
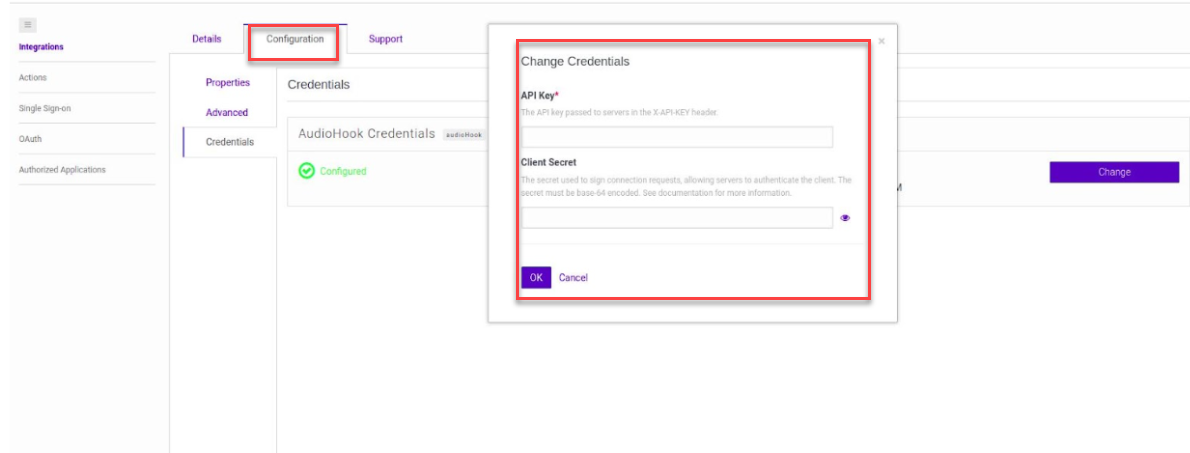
- Refer to Step-6 and use Bot Client ID and Client Secret as API Key and Client Secret respectively. These credentials are used to validate the audiostream signature by Kore.
- Click OK.
- Click Save.

Post-installation Validation
As an agent having CTI and AgentAssist permission enabled:
- Click App Launcher and type Service Console in the search bar.
- Select Service Console in the suggestions.
- At the bottom of the page, in the Utility Bar, you can find the CTI name you entered in step-7 of Adding the Genesys CTI to Utility bar. Click it and then sign in to Genesys.

- A pop-up window prompts; allow it and make sure that microphone access is also given.
- In the Genesys window, click the dropdown list symbol and select OnQueue.
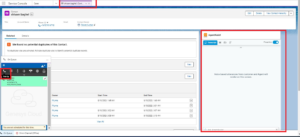
- When a user calls the agent, based on the Softphone layout settings a screen pops up automatically. The agent should receive the call by clicking the phone symbol, as highlighted in the following image:
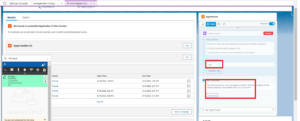
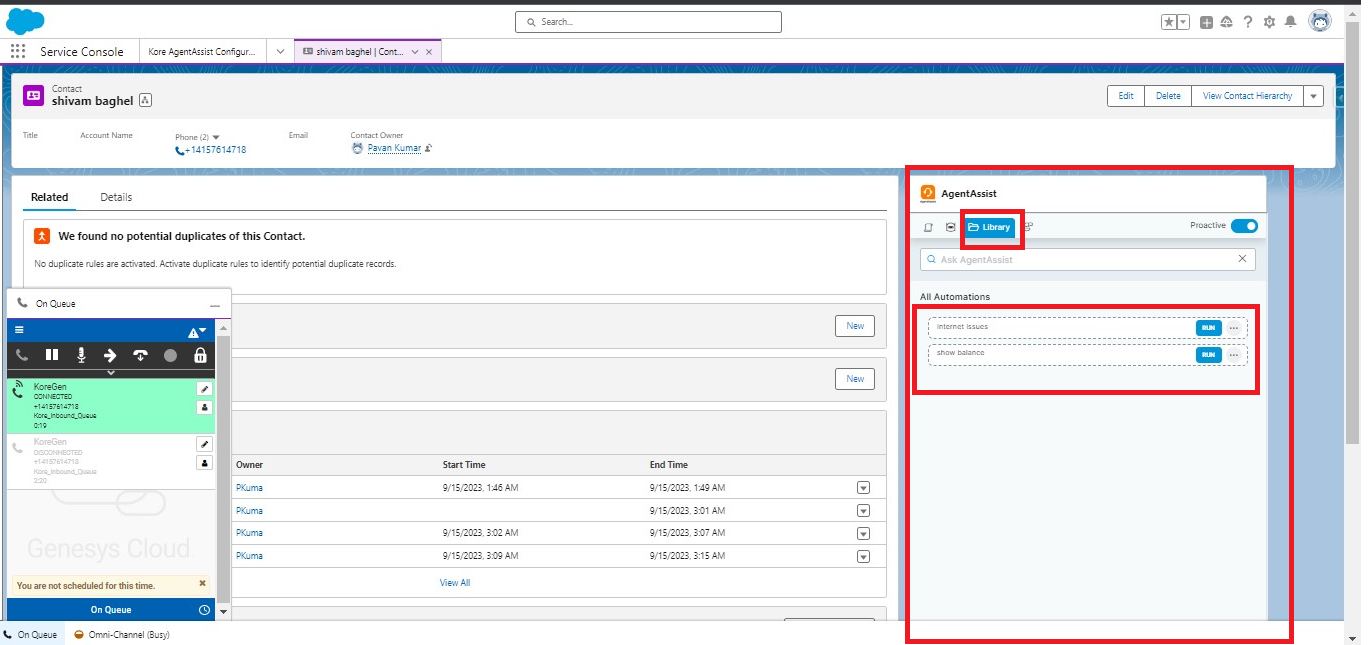
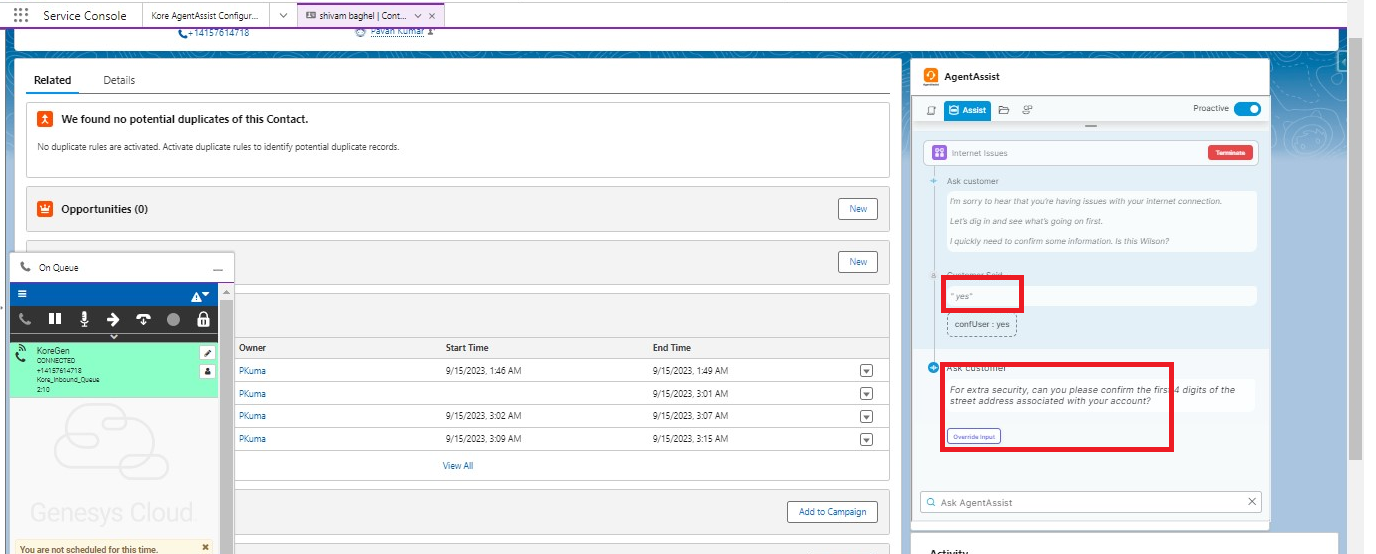
- The conversation between the agent and the user appears as transcripts in Agent AI. If any of the user’s words matches with the libraries, automations are displayed in Agent AI. Based on user response, Agent AI displays the next automations.


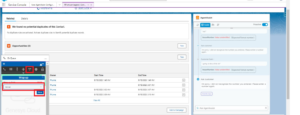
- Once the conversation is complete, disconnect the call, and in the wrap-up dropdown list, select Solved and click Done.
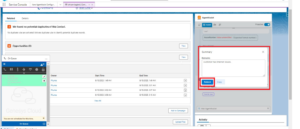
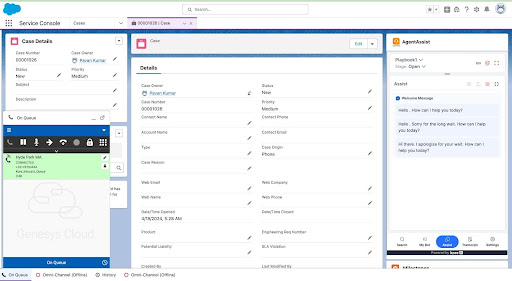
- A pop-up window shows the conversation summary. To save it in Salesforce, click the Submit button.


Appendix
Widget V2 Sample

Widget V3 Sample
Custom Objects Installed
- Agent_Assist_Package__c – Used for checking if proper licenses are available
- KoreAgentAssistConfigObj__c – Used to store Kore AgentAssist credentials
- KoreAgentSupportedPackage__mdt – Used to check supported integrations
- GenesysCX_Data__c – Intermediate for tracking conversation status
- KoreAgentAI_Conversation_Summary__c – For saving the conversation summary
- OnSaveLogEvent__e – For publishing end-conversation events.
Troubleshooting
- If you have installed a package that is a beta or an alpha release, go through this doc for updating.
- Ensure you have gone through the Prerequisites section and followed all the steps.
FAQ
Q: Why is the widget loading but appearing empty?
A: Ensure the correct assignment of the permission sets based on steps 4.1 and 4.2 of Enable Administrators and Agents access to AgentAssist and you have added the Apex Class for CustomCTIExtensions in Configuring the Extension Class in Genesys.