Introduction
Contact center agents are often under pressure to provide better customer experiences. Dealing with high call volumes and complex conversations can make it challenging for agents to meet or exceed customer expectations without sufficient support, guidance, and tools.
The Real-time Agent Coaching feature enables real-time coaching based on the analysis of agent utterances and speech. You can set up specific utterances and speech patterns for AgentAssist to take relevant actions, such as providing hints and nudges or emailing the manager when those patterns occur.
As a contact center supervisor, you can view triggered utterances, including the frequency of their occurrence, and evaluate how well agents follow the recommended actions within a specific time frame. You can also review speech patterns such as cross talks, dead air, and speech speed to help agents optimize their communication style.
This document is meant for the contact center supervisors and explains everything about the Real-time Agent Coaching feature, including rules, associated triggers, and actions.
Rules
Rules are a combination of triggers and actions to solve an issue. Each rule is an independent entity that you can edit, delete, tag, untag, enable, or disable. For easy identification, you can label all relevant rules with the same tag. You can use multiple tags for one rule and one tag for multiple rules. Real-time Agent Coaching has two types of rules:
- Pre-built: These are pre-existing coaching options that come with Agent Coaching.
- New rules: These are new rules you can create based on your requirements.
The pre-built rules section has two rules–None Intent and Price Objection.
None Intent
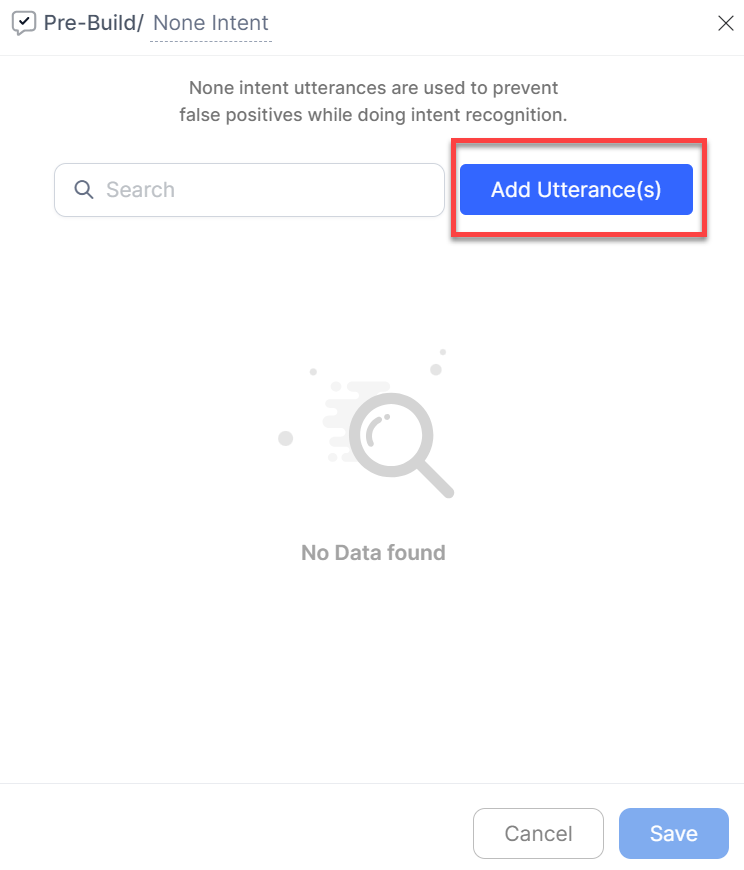
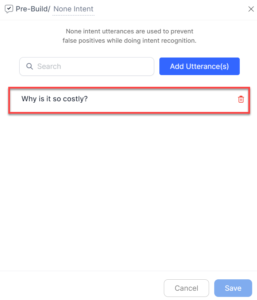
The None Intent rule contains utterances that are used to prevent false positives during intent identification. By using these utterances, you can train the system to differentiate between a positive (trained) and a false-positive (wrong, untrained, ambiguous) utterance. For example, an utterance “I need help with my account” is a positive intent and the system has to act accordingly, but the utterance “It is too expensive” is a false-positive intent wherein the system should not take any action.
This rule is enabled by default, and you can’t disable or delete it. You can, however, add more utterances to make this rule more effective.
Adding None Intent Utterances
You can add utterances in two ways:
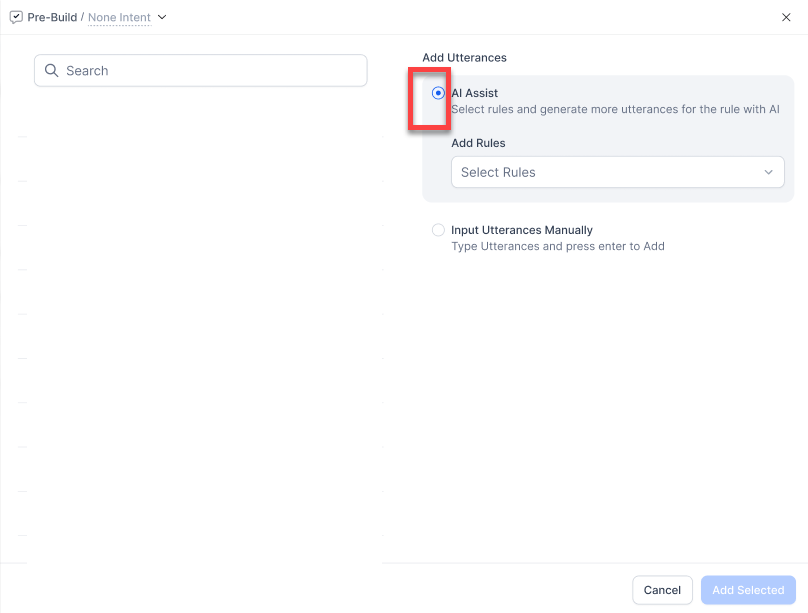
- AI Assist: You can take assistance from AI to generate and add more none intent utterances based on the utterances of your selected rules.
- Input Utterances Manually: You can manually enter and save none intent utterances.
Steps to add none intent utterances:
- Log in to https://agentassist.kore.ai/koreagentassist.
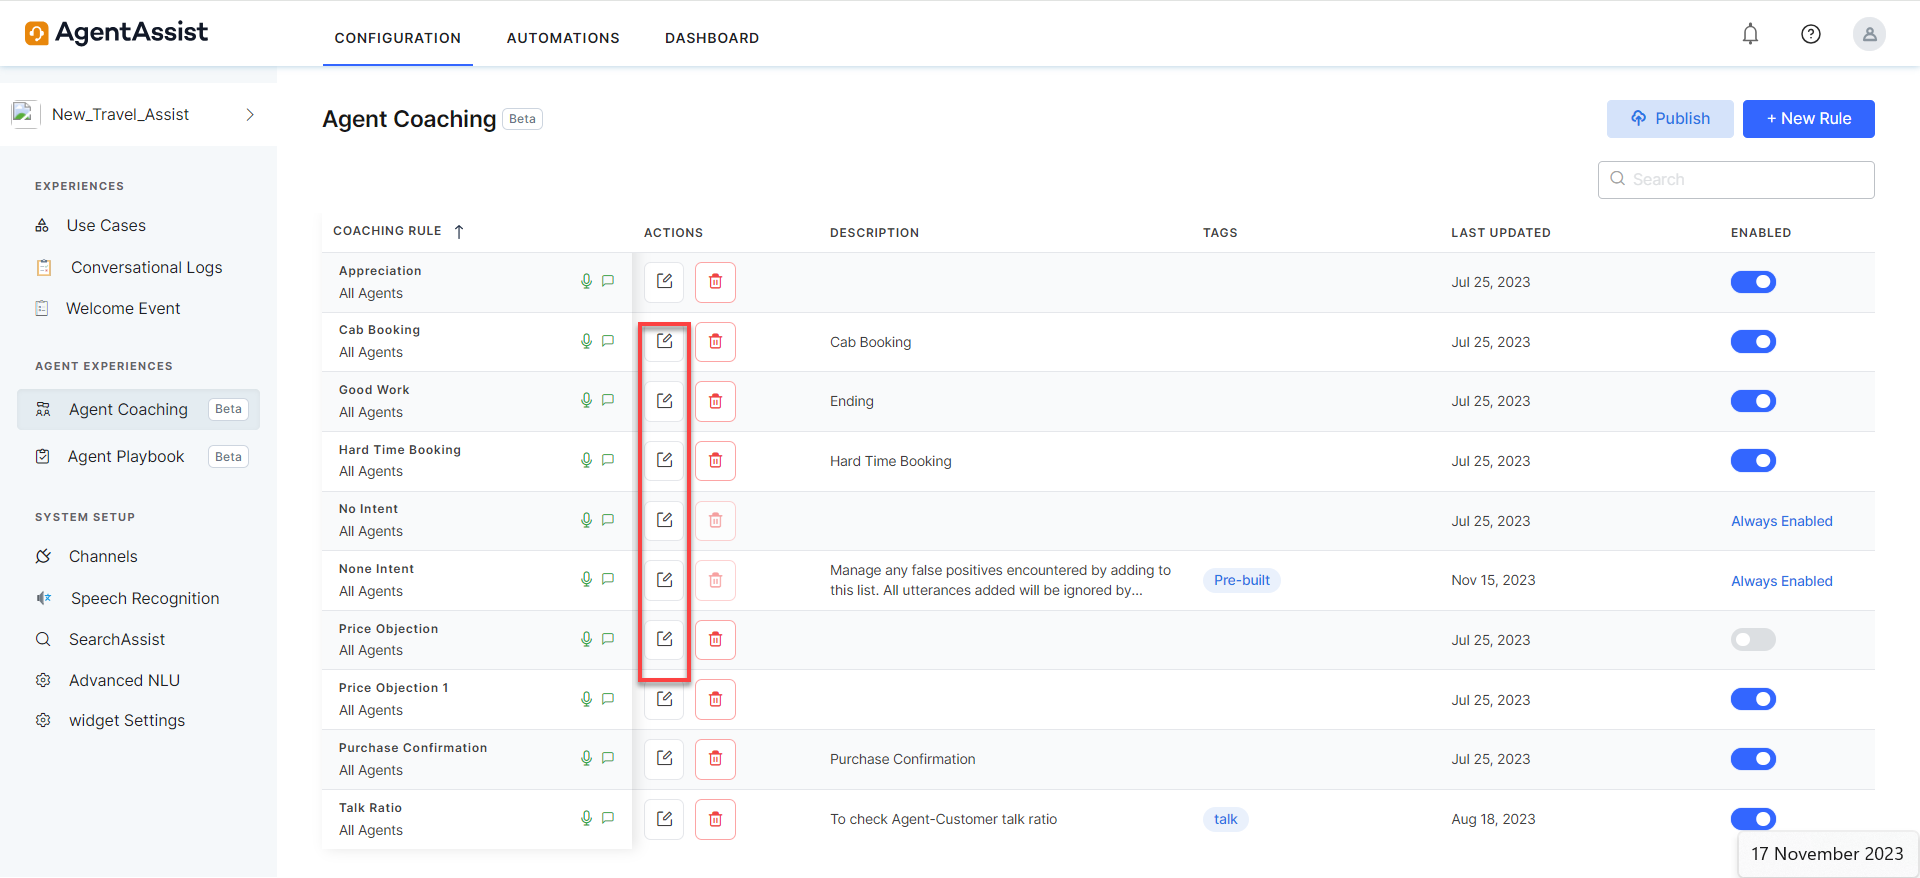
- Click Configuration > Agent Coaching.
- Click the edit button under Actions.
- Click Add Utterance(s).

- Select AI Assist or Input Utterances Manually.
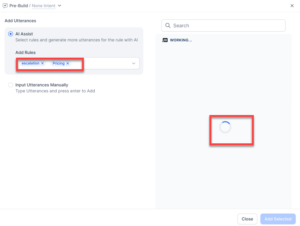
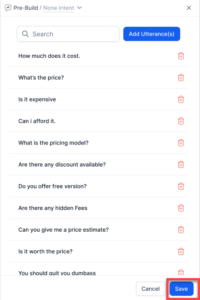
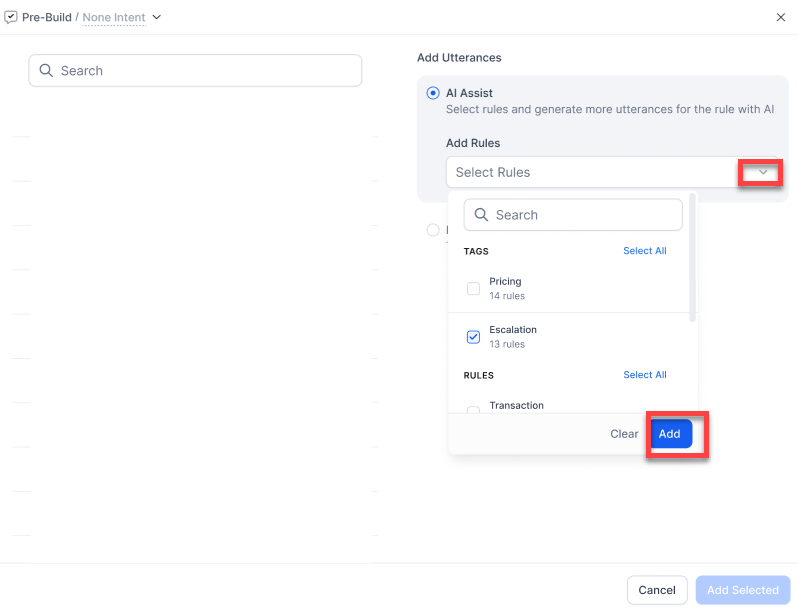
Follow these steps if you select AI Assist:- Select AI Assist.

- Select rules, as required, from the Add Rules list and click Add.

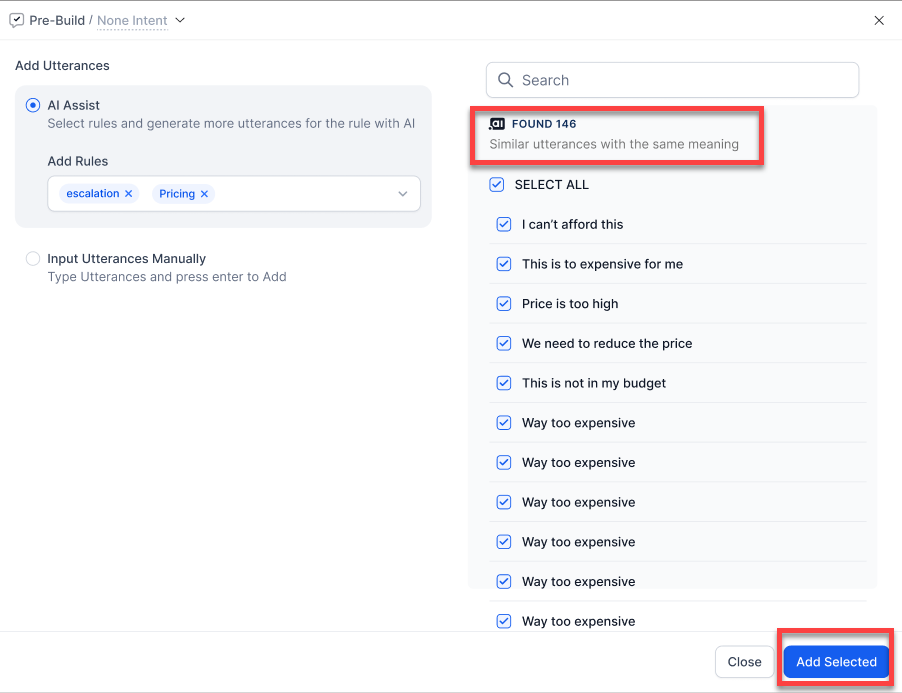
- All added rules are displayed on the left, and the AI starts searching for more utterances that are similar in meaning to the utterances of your selected rules.
- Select utterances, as required, and then click Add Selected.
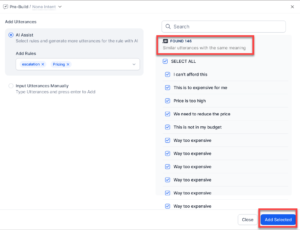
- Click Save to complete the process.
- Select AI Assist.


Follow the steps if you select Input Utterances Manually:
- Select Input Utterances Manually.
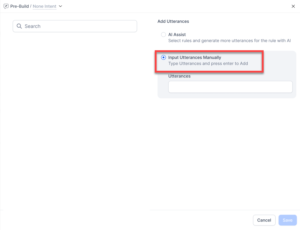
- Enter your utterance in the Utterances field and press the Enter key.

Following this step, you can add multiple utterances. - Click Save.
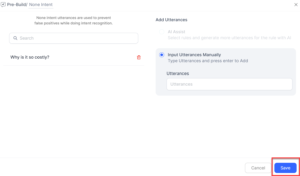
- The new utterance gets added to the list of utterances.
- The new utterance gets added to the list of utterances.


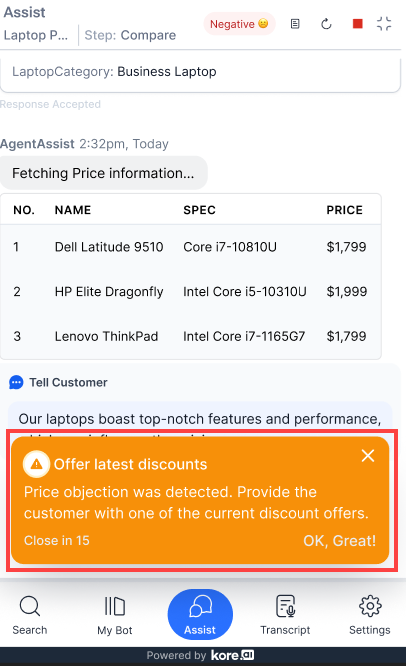
Price Objection
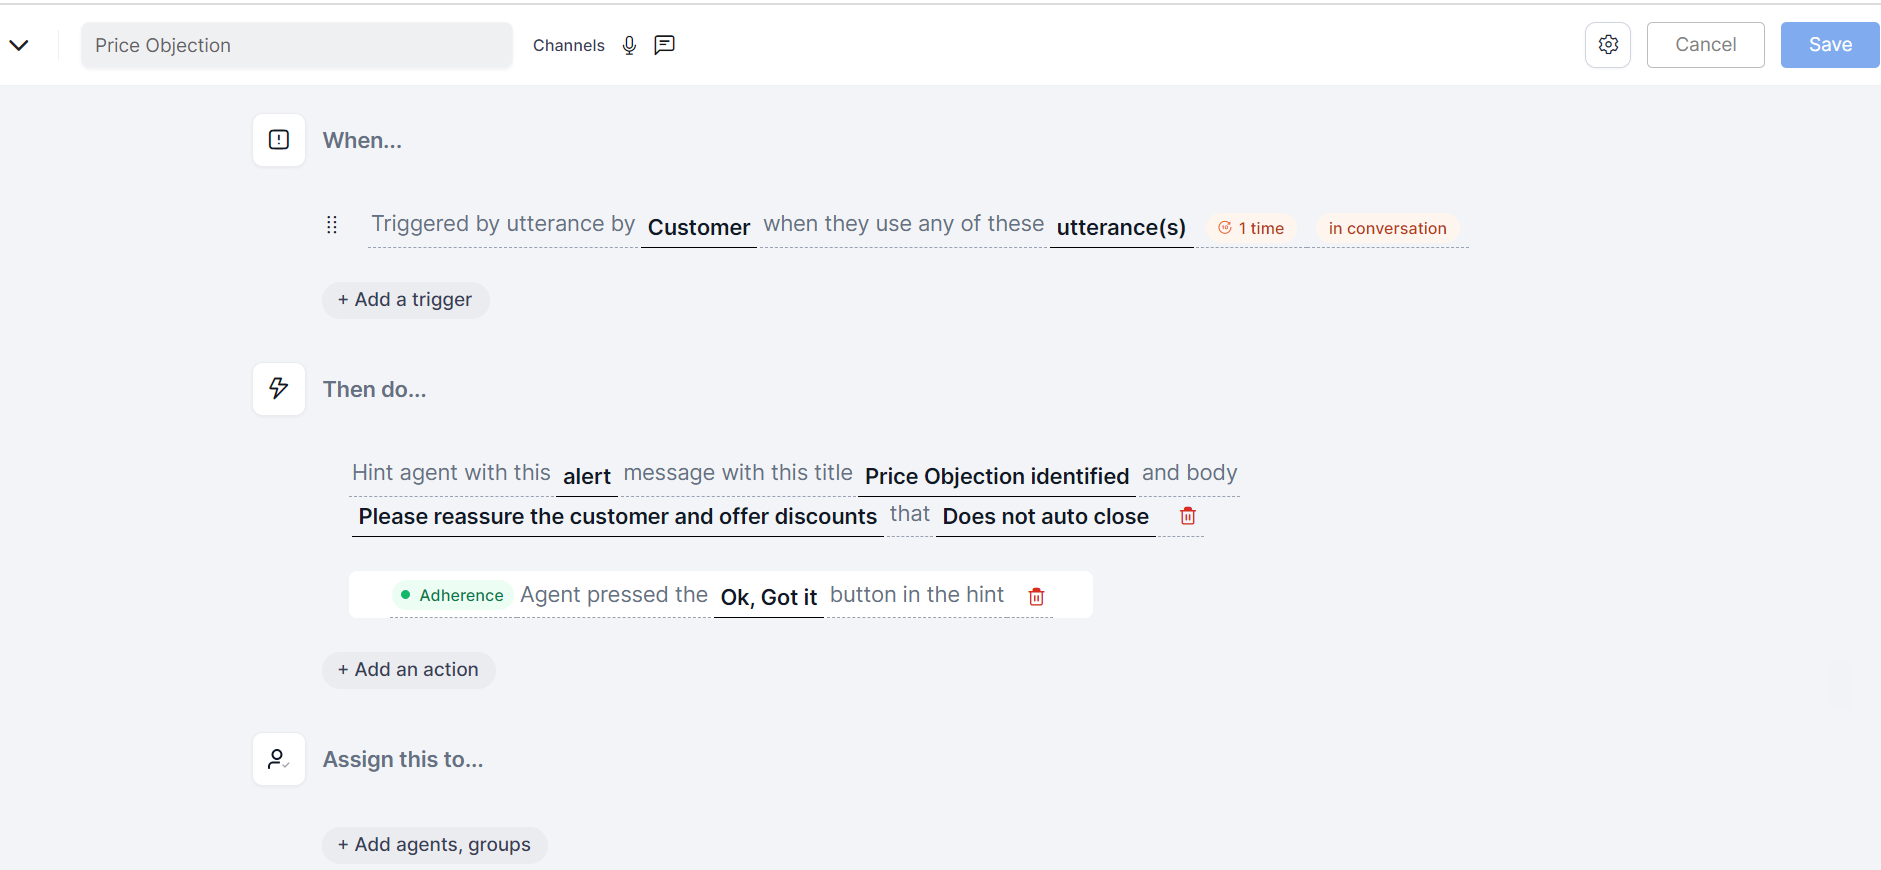
This is a predefined rule with conditions and actions that come with Agent Coaching. You can customize the conditions and actions, but can’t edit or delete the rule name. However, you can disable this rule, if needed. It contains a customer’s price objection utterance and defines the actions agents should take in response. The predefined conditions and actions are:
- Condition (When): Price objection utterance by customer
- Actions (Then do):
- Alert Type: Hint Agent
- Alert Title: Price Objection identified
- Alert Body: Please reassure the customer and offer discounts
- Alert Display: Doesn’t auto close
- Alert Adherence: “Ok, Got it”
- Assigned to: All Agents
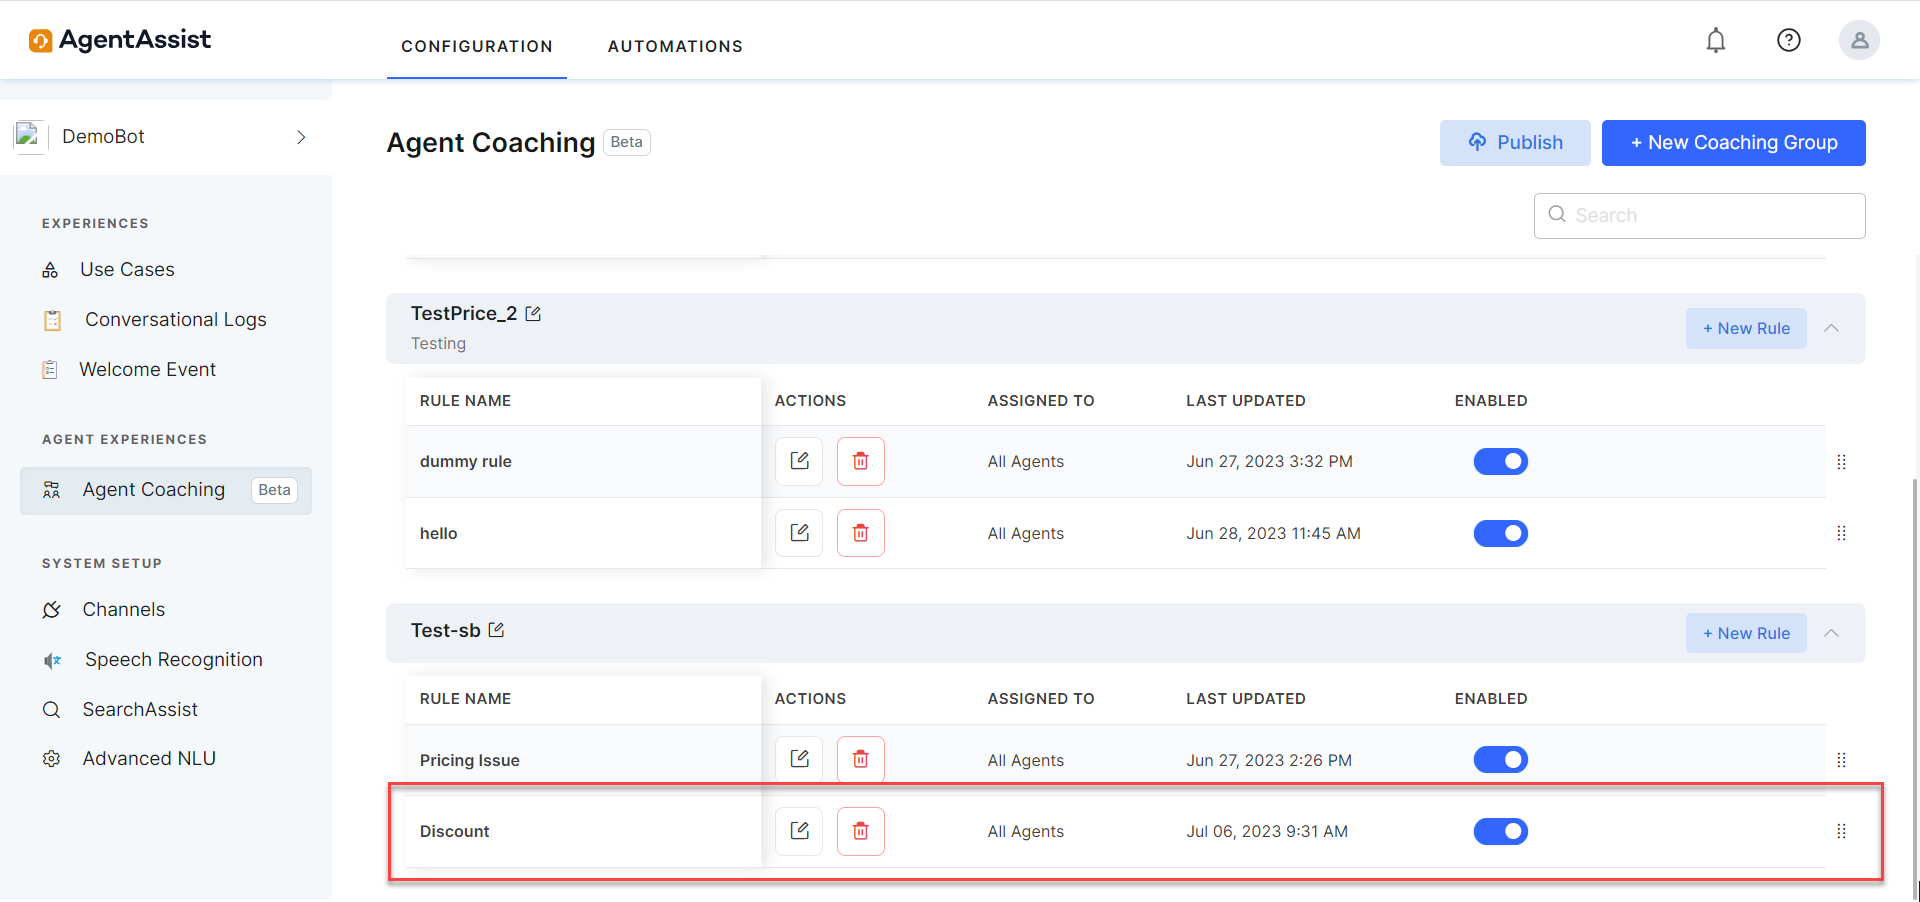
The following screenshot displays the Price Objection rule:
For information on rule functionalities, refer to the section Create, Publish, Edit, Delete, and Disable Rules.
Create, Publish, Edit, Delete, and Disable Rules
This section explains how to create, tag, publish, edit, delete, and disable rules.
Creating a New Rule
From time to time, depending on newer or different situations, you can create new rules to help agents with newer issues. This section explains the steps to create a new rule.
Steps to create a new rule:
- Log in to https://agentassist.kore.ai/koreagentassist.
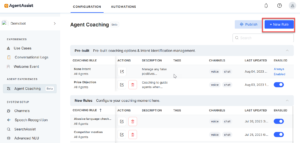
- Click Configuration > Agent Coaching.
- Click +New Rule.
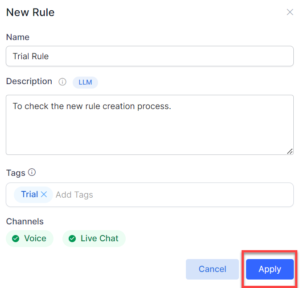
- Enter a name for the new rule in the Name field.

- Enter a short description about the rule in the Description field.
To read how to form a rule description, hover over the “i” button beside the Description field.
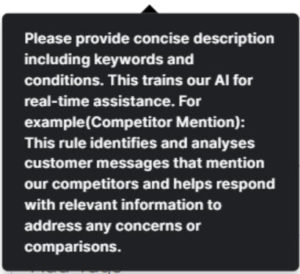
The rule description should be concise and include keywords and conditions. It trains our AI for real-time assistance. - Enter a tag in the Tag field and then press the Enter key to add the tag.
- Click Voice or Live Chat or both in the Channels field.
- Voice: Choose Voice if you want this rule to take input utterance only through the voice (voice calls) medium.
- Live Chat: Choose Live Chat if you want this rule to take input utterance only through the live chat (text messages) medium.
- Both: Choose both Voice and Live Chat if you want this rule to take input utterance through both these mediums.
- Click Apply to complete the rule creation process:
A message shows up to confirm new rule creation. - Click +Add a trigger under When… to add a trigger condition for the rule. For more information, refer to the Agent Coaching Rule Triggers section.
- Click +Add an action under Then do… to add an action for the rule. For more info, refer to the Agent Coaching Actions section.
- Click Add agents, groups under Assign this to… to add agents or groups you want to assign this rule to. For more info, refer to the Assign this to section.
- Click Save.


Publishing a Rule
After creating a new rule, you need to publish it to be available in the system. You can either publish a rule after it’s created or wait and publish multiple new rules at once.
Steps to publish a rule
- Log in to https://agentassist.kore.ai/koreagentassist.
- Click Configuration > Agent Coaching.
- Click the Publish button on the top right corner of the page.
- The Published Successfully confirmation message appears on the screen.
- The Published Successfully confirmation message appears on the screen.
Editing a Rule
You can add to or change an existing rule from time to time based on the requirements.
Steps to edit a rule
- Log in to https://agentassist.kore.ai/koreagentassist.
- Click Configuration > Agent Coaching.
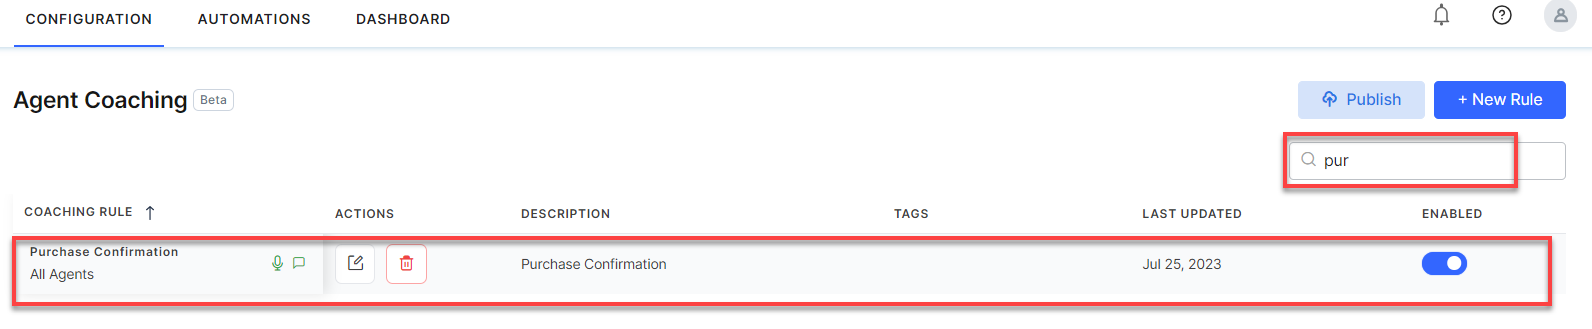
- Locate the rule you want to edit–either from the displayed list or by partially entering the rule name in the Search box.
- As you enter the rule name, matching rule names appear on the screen.

- As you enter the rule name, matching rule names appear on the screen.
- Click the edit button beside a rule name that you want to edit.
Note: Co-editing a rule is not allowed–if you edit a rule, it’s locked, and no one else can edit or delete it simultaneously. AgentAssist will notify you if you attempt to co-edit a rule. If a rule is locked for editing, but the user has not performed any editing for 15 minutes or left the Rules Configuration screen, AgentAssist unlocks the rule for editing by another user.
Deleting a Rule
You can delete a rule due to irrelevance or other reasons. AgentAssist lets you delete an existing rule with the click of a button.
Steps to delete a rule
- Go to the Configuration > Agent Coaching main page.
- Click the delete button beside a rule name that you want to delete.
- Click the Yes button in the confirmation popup window.
Disabling a Rule
If you don’t want to use a rule temporarily, you can disable it.
Steps to disable a rule
- Go to the Configuration > Agent Coaching main page.
- In the Enabled column, click the disable button corresponding to the rule you want to disable.
- The Configuration has been saved message appears on the screen.
- The Configuration has been saved message appears on the screen.
Agent Coaching Rule Triggers (When…)
Trigger setting is essential to rule creation. You can’t have a rule without a trigger. Triggers define the conditions for a rule to come into effect. This section explains how to set up triggers for new rules. The available triggers are:
- Utterance Triggers
- Speech Analysis Triggers
Utterance Triggers
Utterances are inputs from either the customers or the agents. In Utterance Triggers, you set up conditions like input from the customer or agent, the number of times the input came, and the time frame within which the input came to set off the trigger.
Steps to set up Utterance Triggers:
- Go to the rule trigger creation page. For help, refer to Steps to create a new rule.
- Under When, click the + Add a trigger button.
- Select Utterance.
- Click {select person}.
- Select either Agent or Customer.
- Click set utterances.
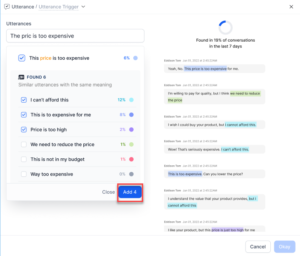
- Enter an utterance that the user (customer or agent) may use in the Utterances box.
- Select the utterance you have entered.
- There may be other matching utterances the AI suggests:
- There may be other matching utterances the AI suggests:
- Select the AI-suggested utterances, as required.
Note: AI suggests utterances that match with what you have entered based on conversation history. It also shows the appearance percentage of utterances. - Click Add. (The appearance of this button is based on the number of utterances entered by you plus the number of AI-suggested utterances you have selected. In this example, it’s 1+3. So, it’s displayed as Add 4.)
- Click Okay.
- Click Save.
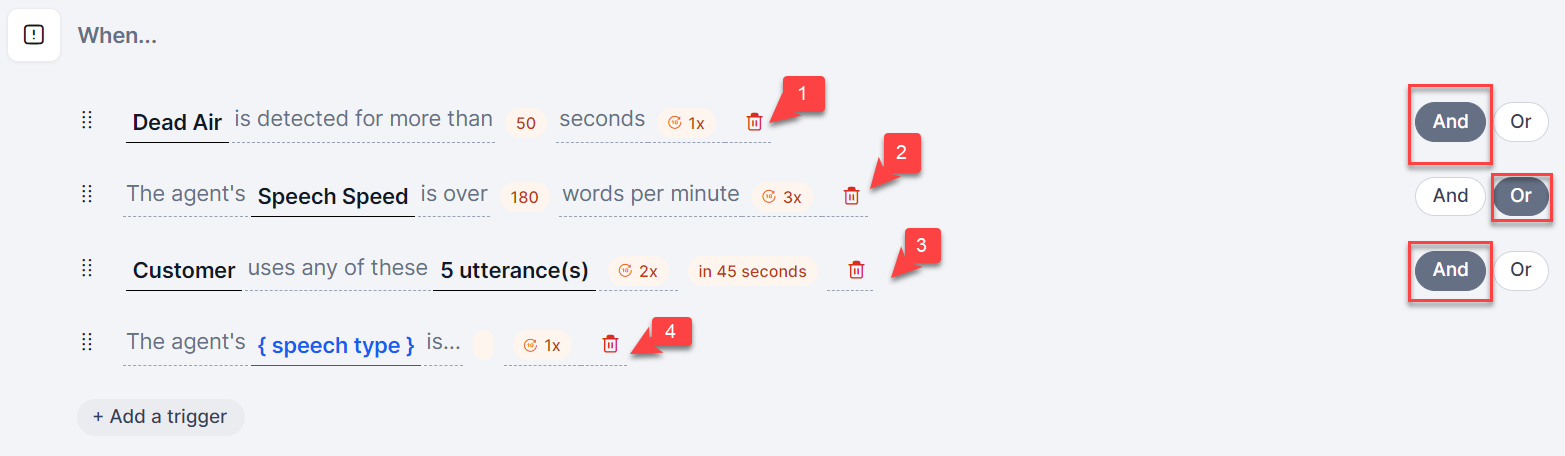
Note: Before clicking the Save button, you can delete any utterance you would have added by mistake or think is irrelevant.- The following screen appears:

- The following screen appears:
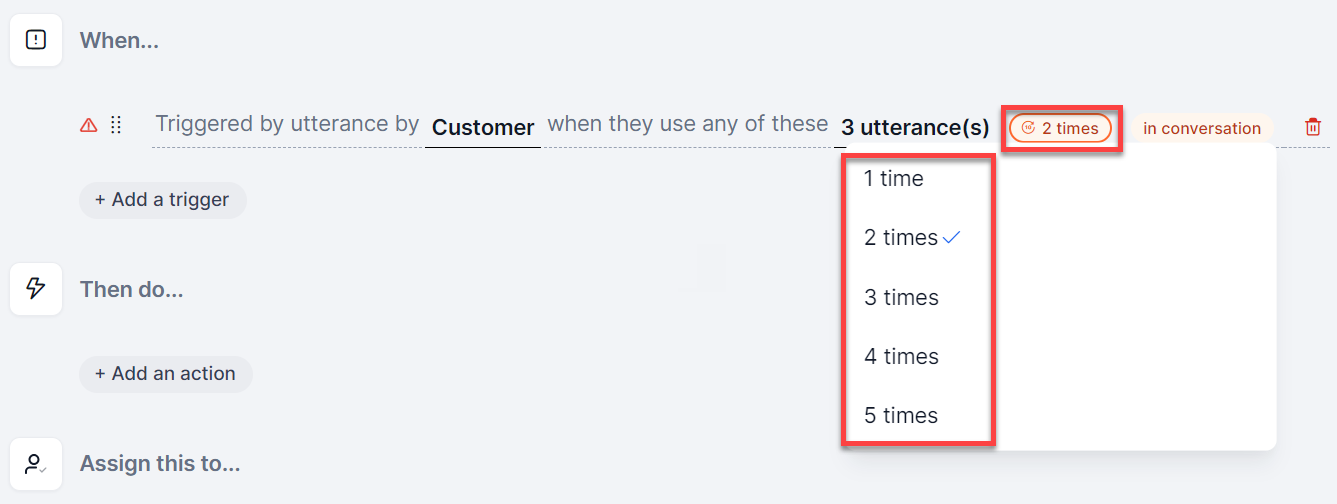
- Click 1 time to select the number of times any of these utterances appear. The default selection is 1 time. For example, a customer may use any of these utterances once by mistake and to be sure, you want the customer to use them twice or thrice. You need to select 2 times or 3 times for such situations.

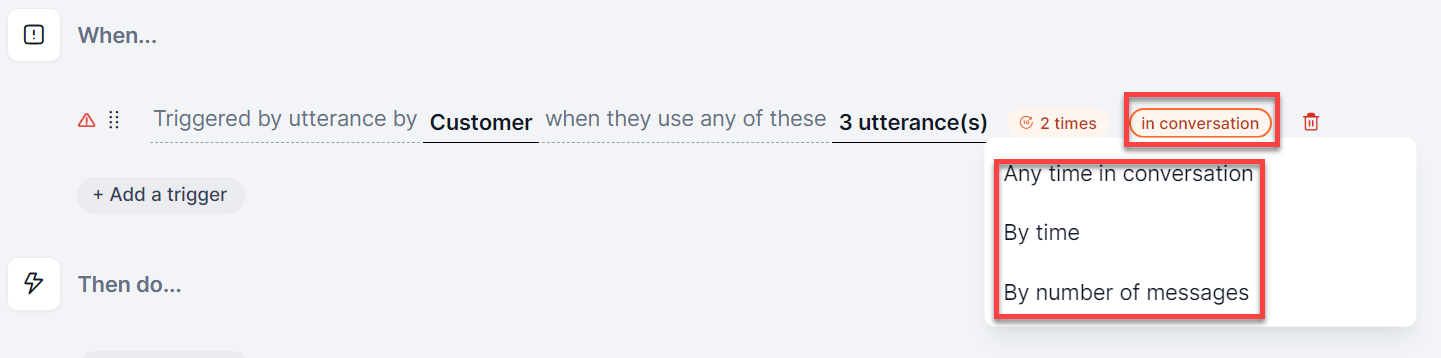
- Click the default time frame, in conversation, to change it if you want to select other options.
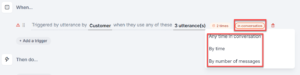
- If you select Anytime in conversation (default), the following screen appears:

- If you select By time, the following screen appears:
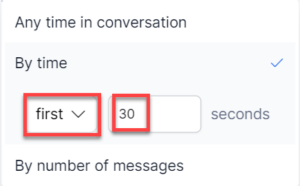
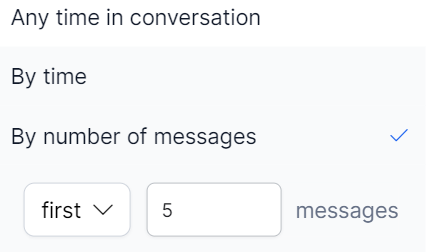
From the dropdown, select first or within and enter the time in seconds. - If you select By number of messages, the following screen appears:

From the dropdown, select first or within and enter a number in the messages field.
- If you select Anytime in conversation (default), the following screen appears:
- Press the Enter key to complete the process.


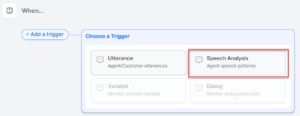
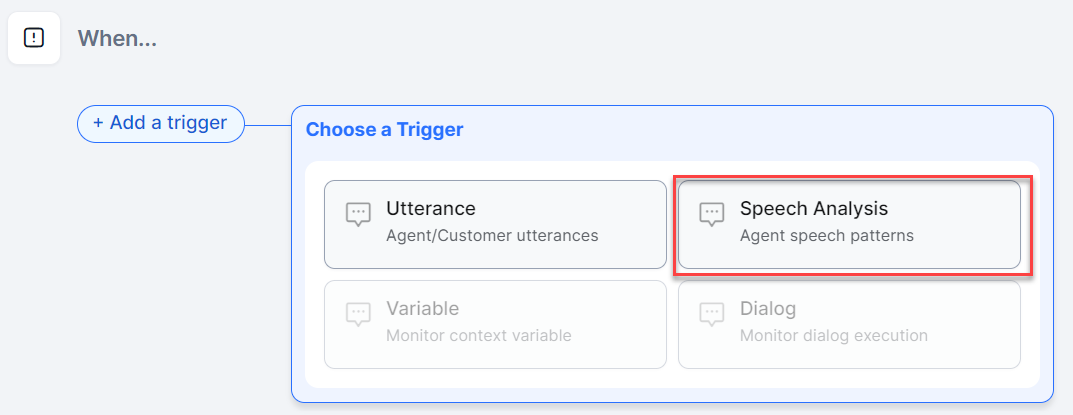
Speech Analysis Triggers
This feature analyzes the speech pattern or event of both the customer and the agent and provides real-time feedback and coaching to improve customer-agent conversation quality. This section explains the steps to set up the Speech Analysis Triggers feature.
Steps to set up Speech Analysis Triggers
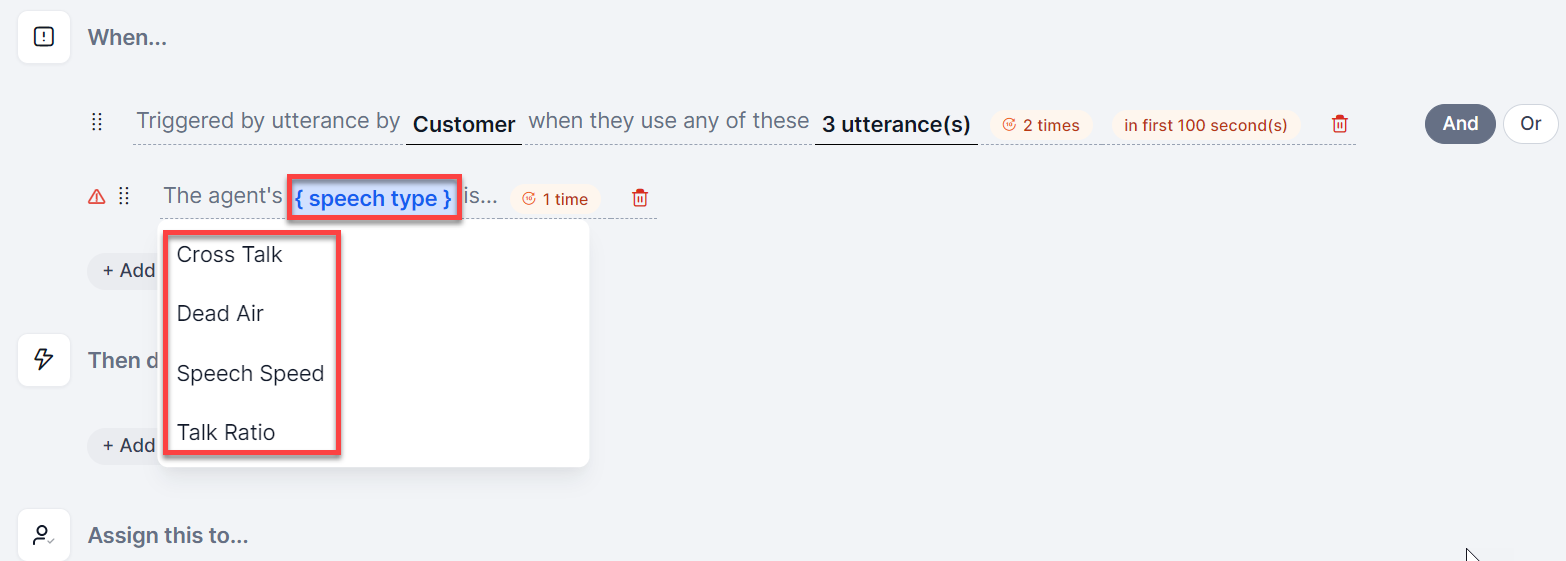
- Select Speech Analysis after clicking When > +Add a trigger.
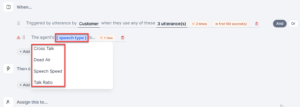
- Click {speech type} and select a type for analysis.
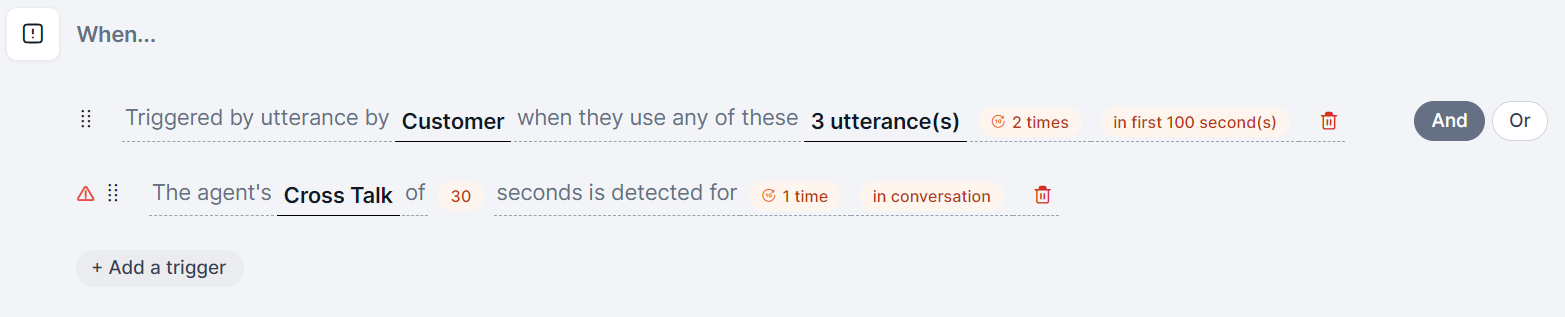
- If you select Cross Talk, the following screen appears:

- Click 30 to enter the duration in seconds–30 seconds is the default value.
- Enter the duration in seconds and then press the Enter key.

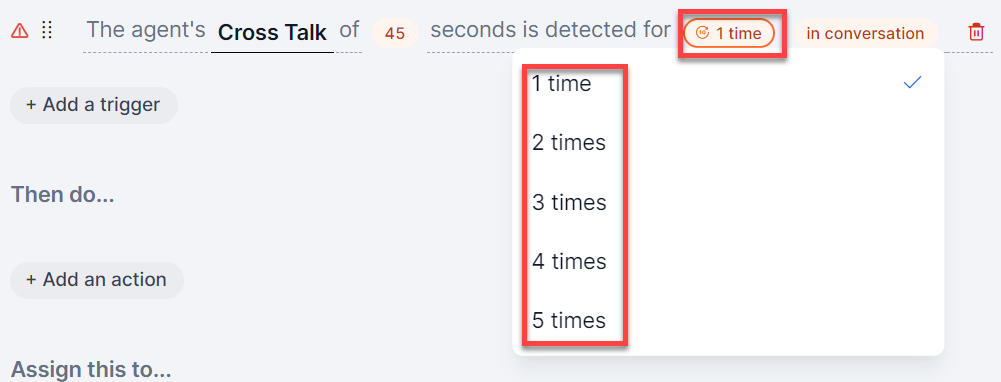
- Click 1 time to update the number of times crosstalk happened in a conversation.

- Click to select the number of times, as required.
- Click in conversation to update when crosstalk happened–in conversation is the default value.

- If you select Anytime in conversation, the following screen appears:

- If you select By time, the following screen appears:
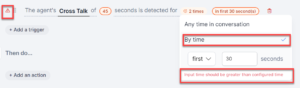
- From the dropdown, select first or within and enter the time in seconds.
- Press the Enter key to save the new values.
Note: If the configured crosstalk time duration is less than the selected conversation time period or if the trigger setup is incomplete, a validation error is displayed, as highlighted in the screenshot.
- If you select Anytime in conversation, the following screen appears:
- Click 30 to enter the duration in seconds–30 seconds is the default value.
- If you select Cross Talk, the following screen appears:


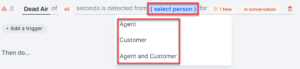
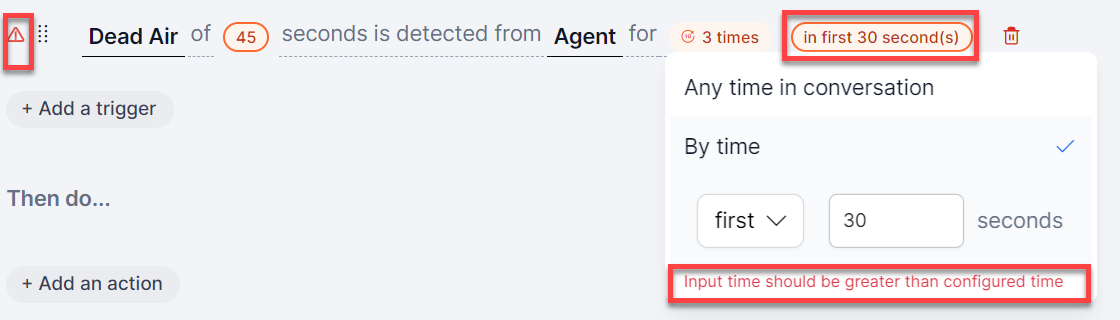
- If you select Dead Air, the following screen appears:

- Click 30 to enter the duration in seconds, and then press the Enter key to save it.

- Click {select person} to select the user.
- Click 1 time to select the frequency.
- Click In conversation to select a time frame.

- From the dropdown, select first or within and enter the time in seconds.
- Press the Enter key to save the new values.
Note: A validation error is displayed, as highlighted in the screenshot, either if the configured Dead Air duration is lesser than the selected conversation time period or if the trigger setup is incomplete.
- From the dropdown, select first or within and enter the time in seconds.
- Click 30 to enter the duration in seconds, and then press the Enter key to save it.
- If you select Speech Speed, the following screen appears:

- Click {select person} to select either Agent or Customer.

- Click 180 to enter words per minute–180 words per minute is the default value.
- Enter the number of words per minute and then press the Enter key to save it.
- Click 1 time to select the frequency.
- Click In conversation to select a time frame.
- Click {select person} to select either Agent or Customer.
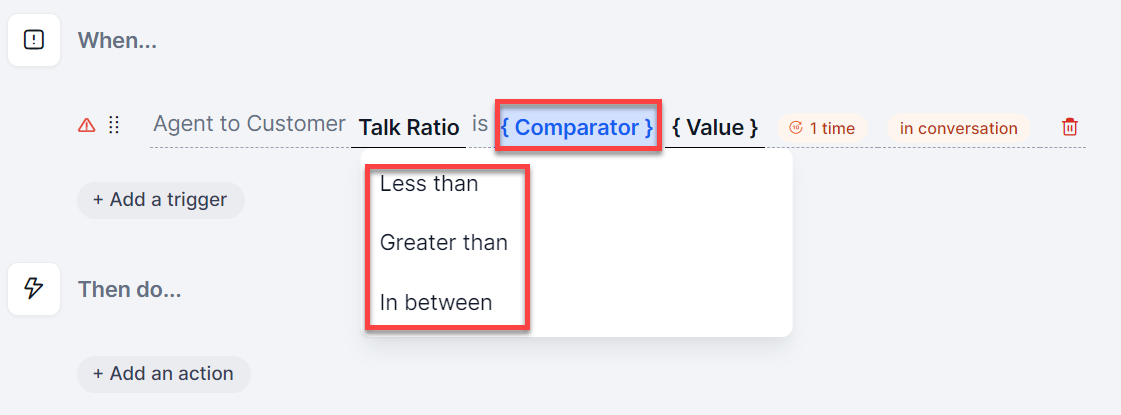
- If you select Talk Ratio, the following screen appears:
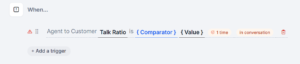
- Click {Comparator} to select a value comparison.

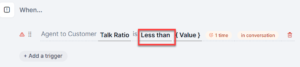
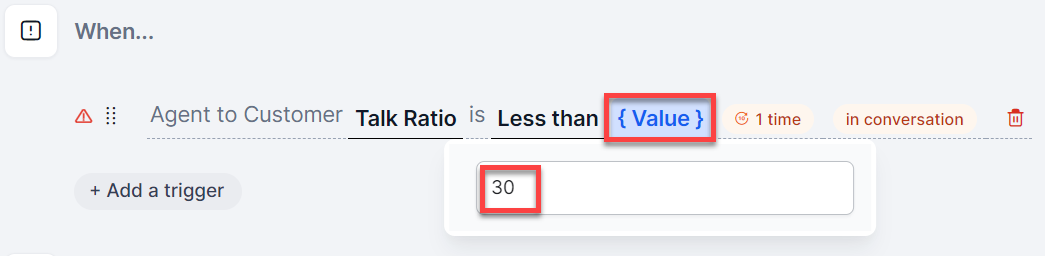
- If you select Less than or Greater than, a screen similar to the following appears:
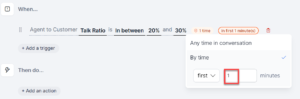
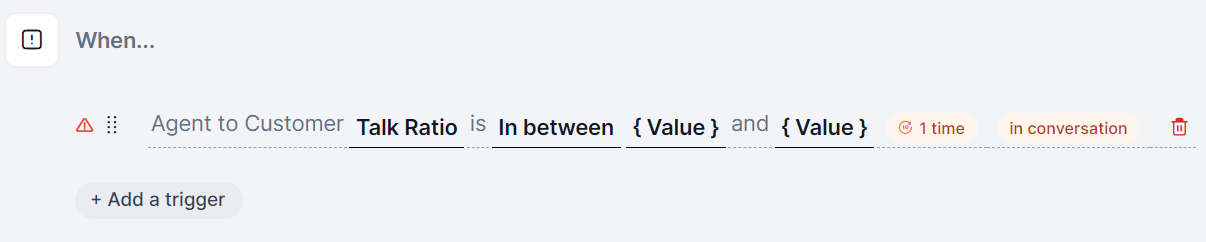
- If you select In between, the following screen appears:

- If you select Less than or Greater than, a screen similar to the following appears:
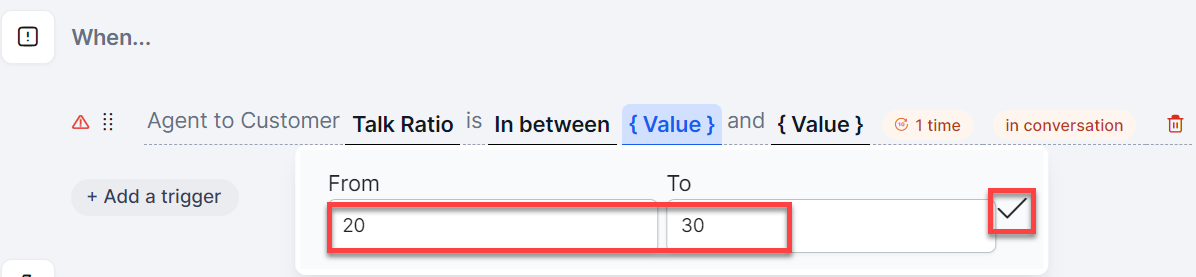
- Click {Value} to enter a percentage value.

If you have selected In between, you must enter the values twice and click the tick mark, as highlighted in the following screenshot:

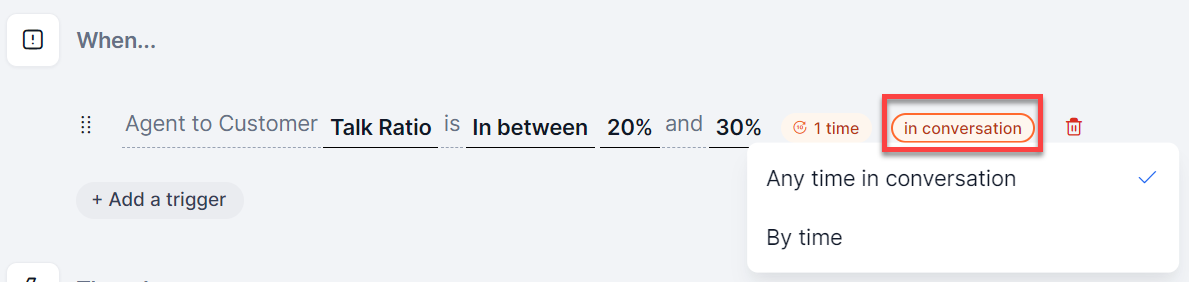
- Click in conversation to select a time duration. By default, Anytime in conversation is selected.

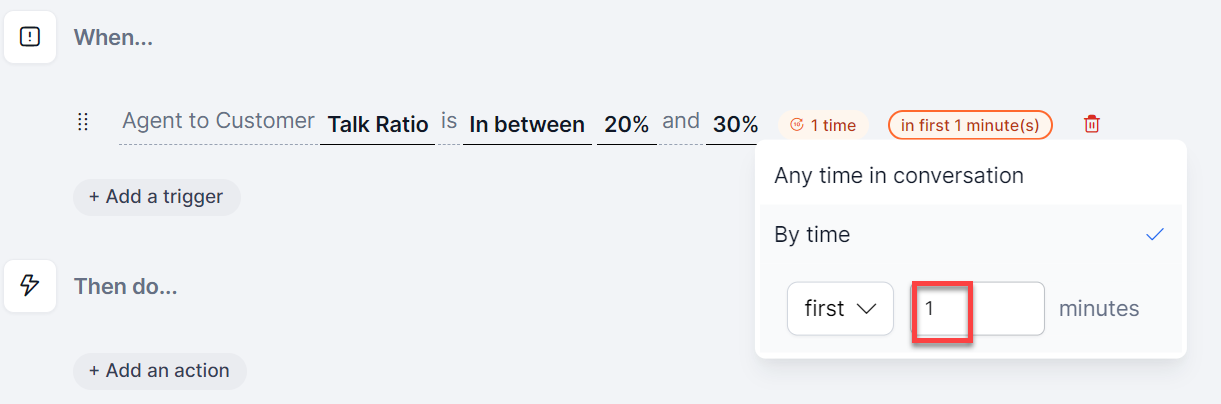
- Click By time to indicate a selected time frame for talk ratio measurement.
- Enter time in minutes and press the Enter key.
- Click {Comparator} to select a value comparison.


Coaching Rule:
| Field | Description |
| Rule Name | The name of the new rule and the users it has been assigned to. |
| Actions | Edit or delete a rule. |
| Description | A short description of the rule. |
| Tags | Name of the tags a rule has been tagged with. |
| Channels | Communication channels through which rules are applied. Valid values are:
|
| Last Updated | Time and date when a rule was last updated. |
| Status | Current status of a rule. Valid values are:
|
Speech Type:
| Field | Description |
| Cross Talk | When the talks between the agent and the customer cross each other. |
| Dead Air | No talk/silence either by the customer or the agent.
Valid values to choose from:
|
| Speech Speed | Number of words per minute during a session – either by the agent or the customer. |
| Talk Ratio | Agent to customer talk ratio – proportion of speaking time by an agent compared to a customer. By default, it can be identified only once. Here is a list of scenarios for different talk ratio ranges:
|
And/Or Condition
AgentAssist allows you to add multiple rule triggers. It lets you set different conditions like combining multiple rules or choosing one or a set of rules against another or a different set of rules. You can even choose or combine rules from different trigger types like Utterance and Speech Analysis triggers.
Steps to select And/Or condition
- Click +Add a trigger in the rule trigger creation page to create a new trigger.
- Click +Add a trigger again to create a new rule trigger.
- Select And or Or.
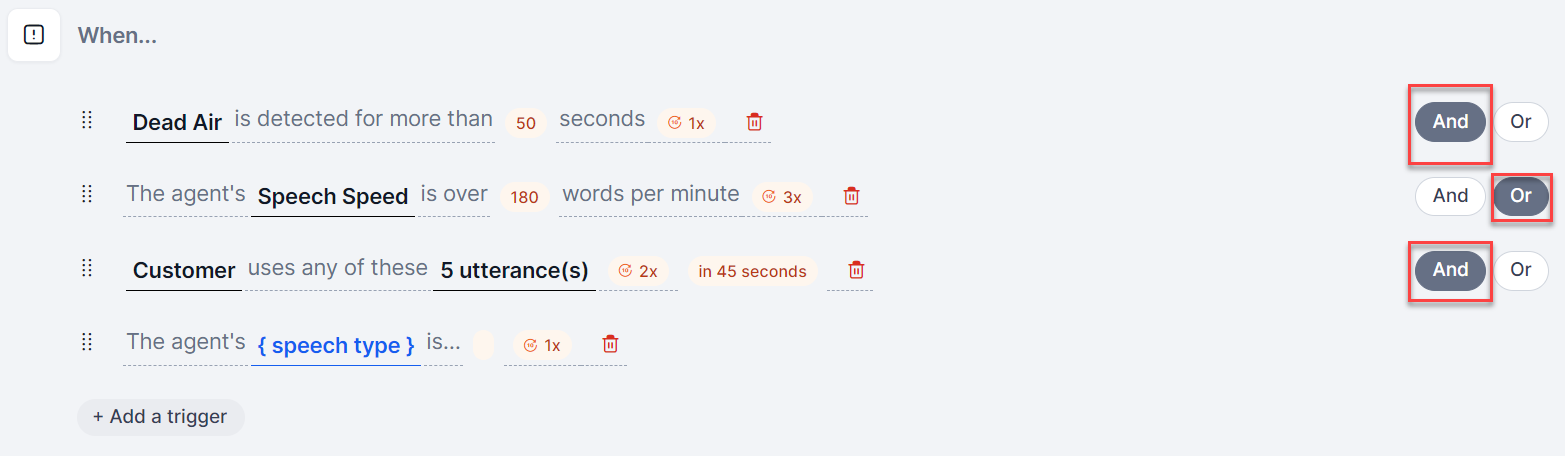
Note: For creating multiple rule triggers, it is mandatory to choose And or Or. When you choose “And,” the rule triggers add up. When you choose “Or,” the rule triggers set to either of the rules. Here’s an example of this functionality:
The And condition ensures that rule triggers 1 and 2 are combined, and the Or condition ensures that either the combination of the first two rule triggers (1+2) or the third rule trigger (3) becomes applicable.
Agent Real-time Coaching Actions (Then do…)
After setting up rule triggers, you must set up actions for those triggers. Here, you configure what actions AgentAssist should take if the conditions you set up are met. You can set up three different actions:
- Nudge Agent
- Hint Agent
- Email Manager
You can also set up adherence, which is like an acknowledgment, to ensure the agent has followed the instructions.
Add Adherence
The Add Adherence feature lets you know the agent’s adherence to the instructions in the form of nudges and hints. Later, you can use this acknowledgment to measure agent performance in the Dashboard. This feature is applicable only for the Nudge and Hint Agent actions.
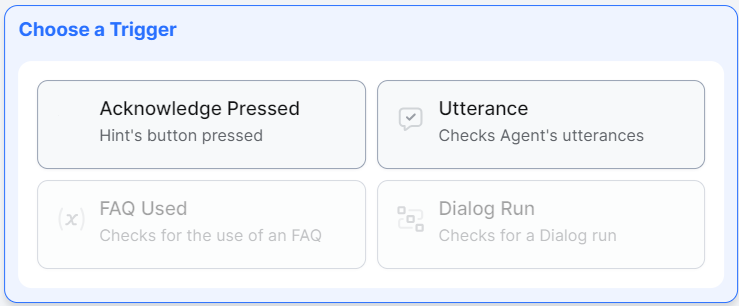
Add Adherence Types
You have two types of adherences to choose from:
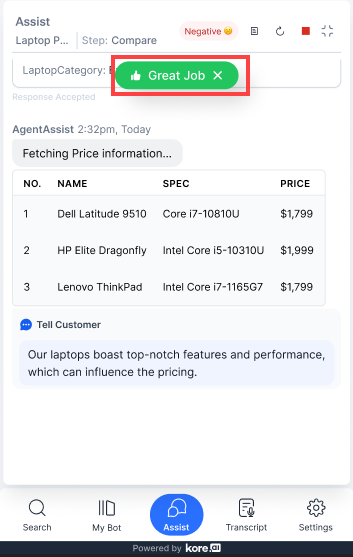
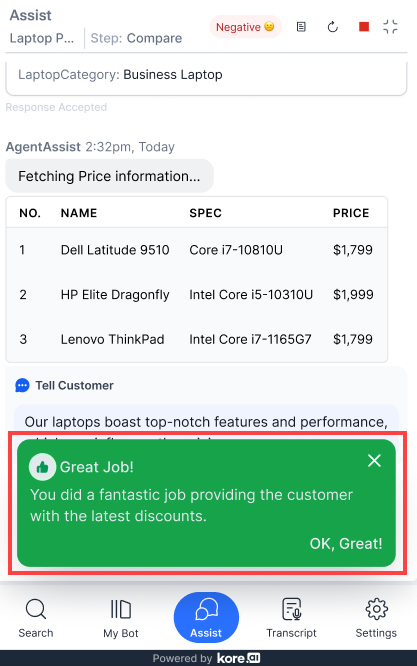
- Acknowledge Pressed: Choosing this option sends an acknowledgment that the agent understood your instructions. The agent doesn’t need to take any other action except acknowledging your message. An example would be a compliment to the agent for a job well done. The following screenshot is displayed when this option is used:

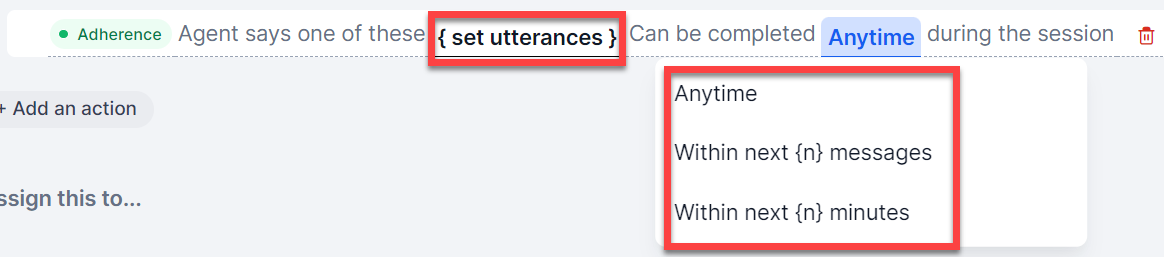
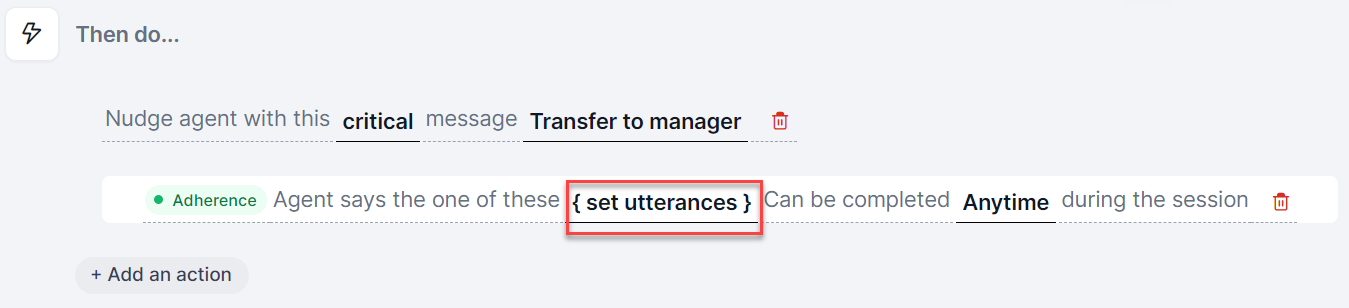
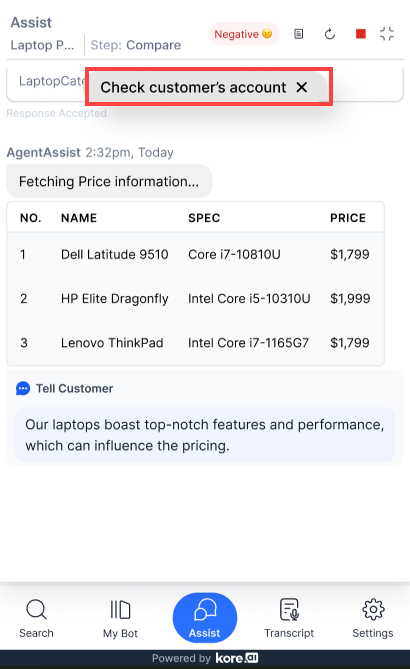
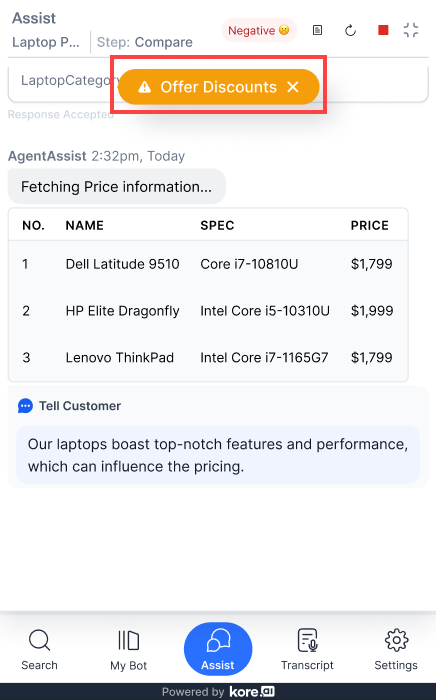
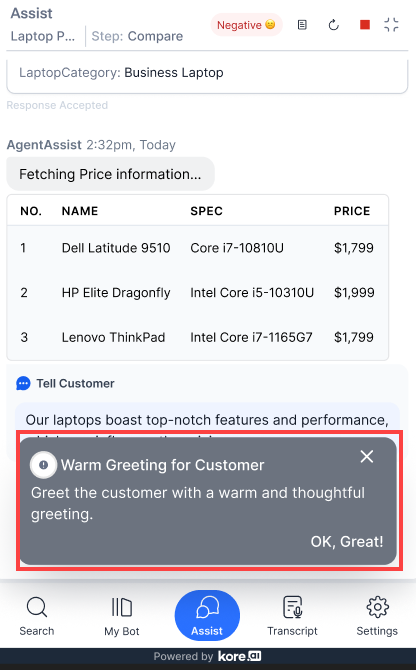
- Utterance: Choosing this option sends an acknowledgment that the agent will take further action within a specified timeframe during a session. An example would be when you ask the agent to offer a discount to the customer, and the agent acknowledges that they will perform this action within the next few messages, a few minutes, or anytime during the session. The following screenshot is displayed when this option is selected:
For practical examples of this feature, refer to steps 7-8 of Steps to set up the Nudge Agent actions.
Nudge Agent
The Nudge Agent actions are the small messages that pop up on the agent’s screen while communicating with the customers. They are disappearing messages, which stay on the agent’s screen for 5 seconds. The agent can close these messages anytime after their appearance. Through these messages, you either compliment the agents for a good job or direct them to take other appropriate actions to serve the customers in the best way possible. Here are the following four nudges that you can choose from:
- Positive
- Neutral
- Alert
- Critical
Steps to set up the Nudge Agent actions:
- Go to the rule action setup page.
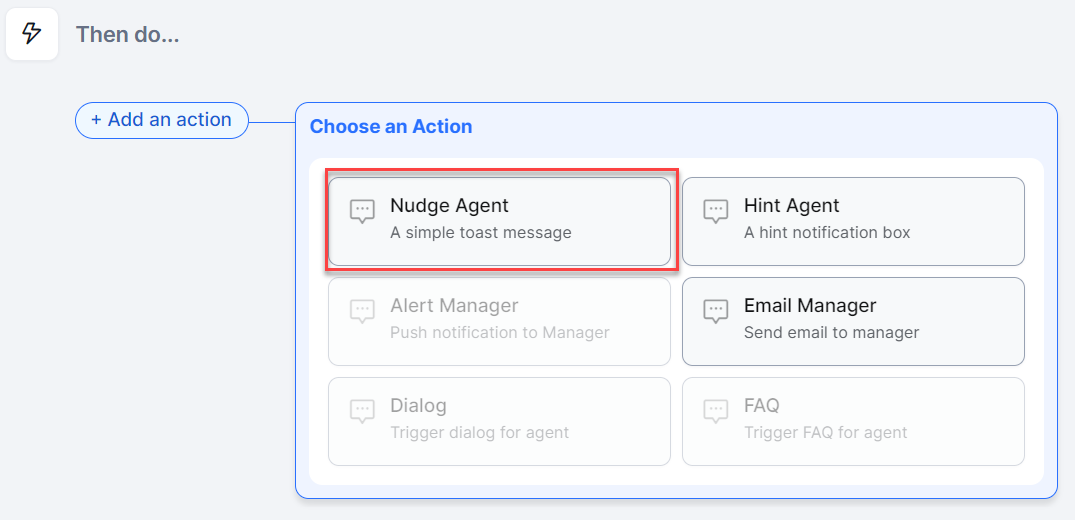
- Click + Add an action under the section, Then do…

- Click the Nudge Agent option in the Choose an Action window.
- Click {type} to select one of the sentiment messages.

- Click {Choose} to enter a message, as displayed in the following screen:
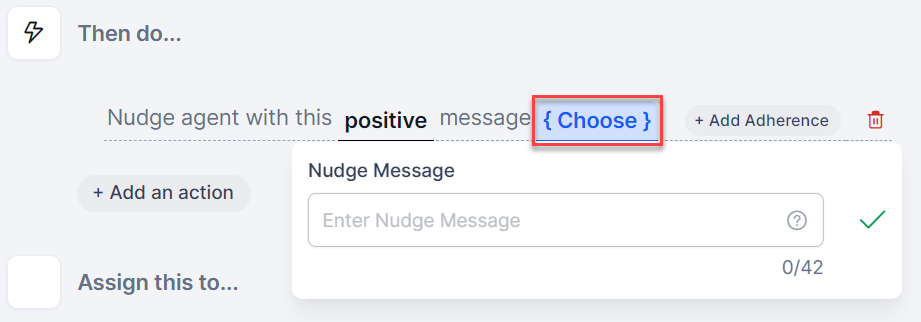
- Enter a message in the Nudge Message box, and then click the tick mark to save it.
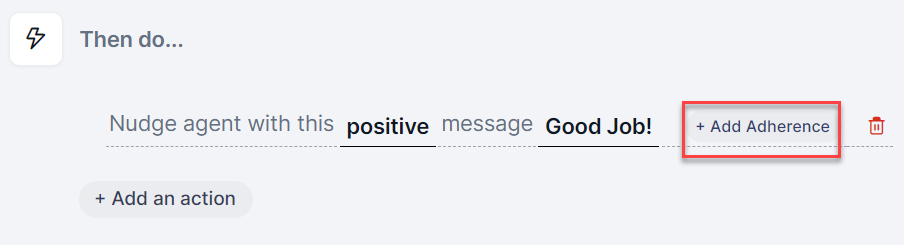
- Click +Add Adherence to set an adherence for the agent.
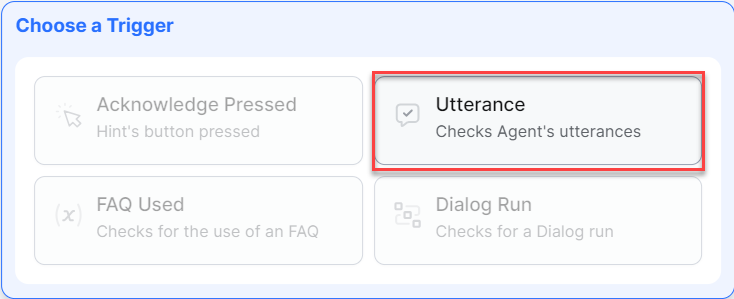
- Select Utterance in the Choose a Trigger window.
- Click {set utterances} to enter the agent’s utterance.
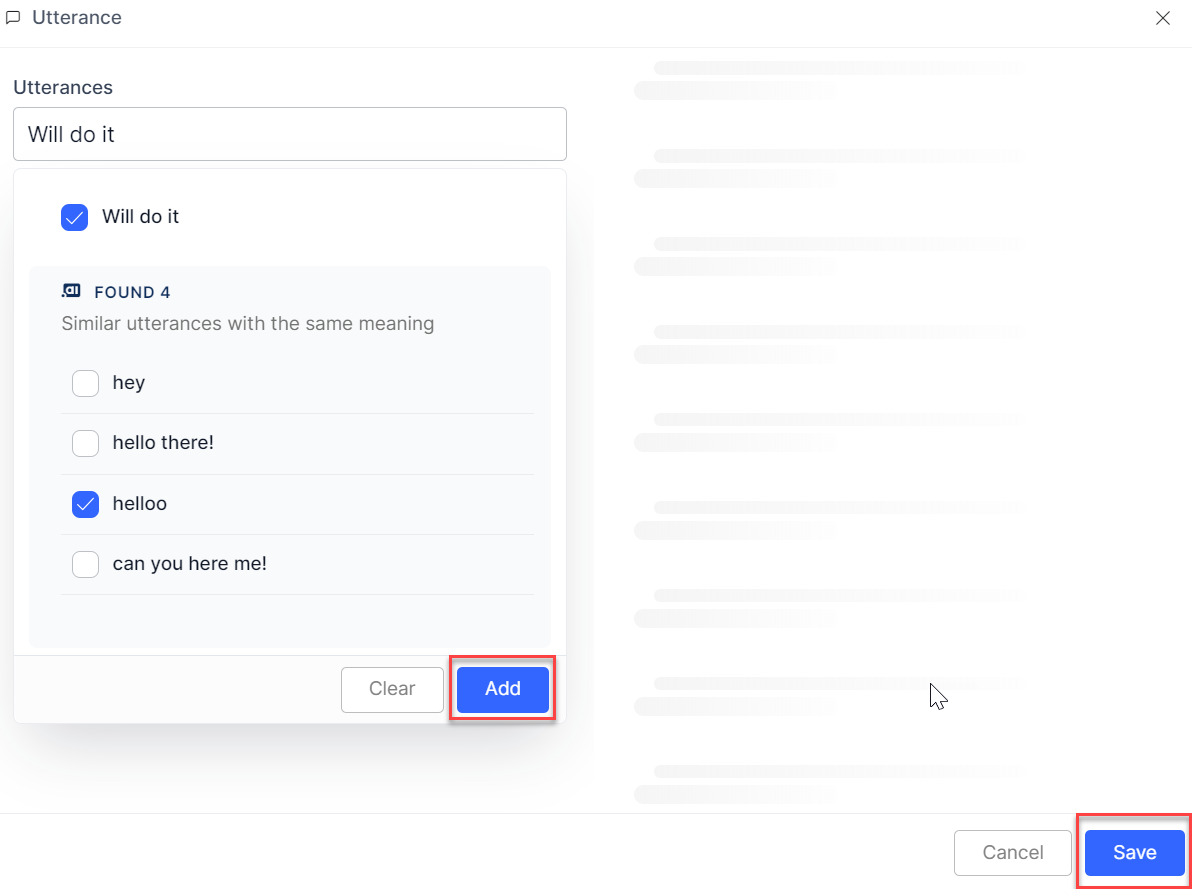
- Type and select the utterance. You can select similar utterances from the utterances list.

- Click Add, and then click Save.
- Click Anytime on the next screen to select one of the options.
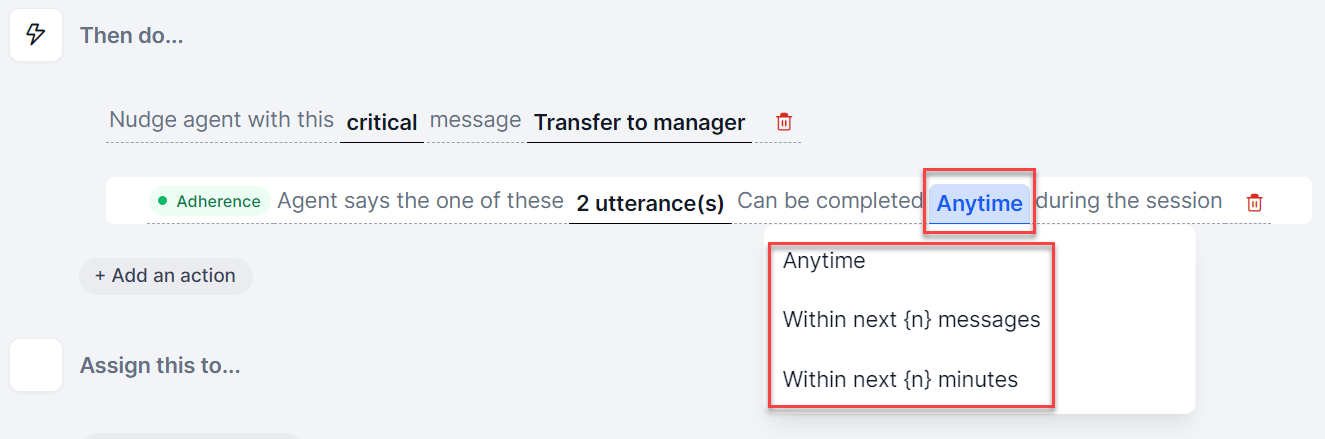
If you select Within next (n) messages, the following screen appears:
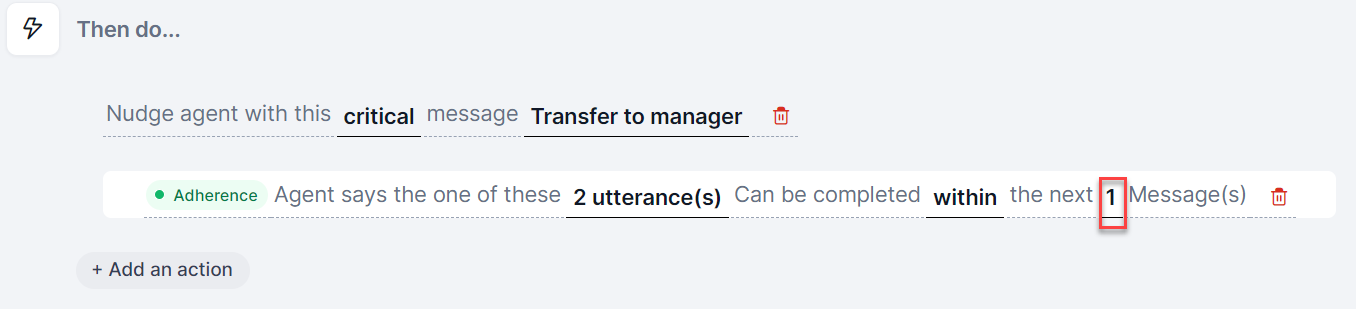 You can change the number of messages, as required, by clicking the highlighted area.If you select Within next (n) minutes, the following screen appears:
 You can change the time in minutes, as required, by clicking the highlighted area.
The agent gets screens similar to the following on their system for:- Positive Nudges
- Neutral Nudges
- Warning Nudges
- Critical Nudges
- Positive Nudges
Hint Agent
The Hint Agent actions are small pop-up messages that advise agents to take further action. They appear on the agent’s screen while communicating with the customers and may or may not auto-close based on how you set them. Through these messages, you also compliment the agents for a good job. Here are the four hint types that you can choose from:
- Positive
- Neutral
- Alert
- Critical
Steps to set up the Hint Agent actions:
- Go to the rule action setup page.
- Click + Add an action under the section Then do…
- Click the Hint Agent option in the Choose an Action window.

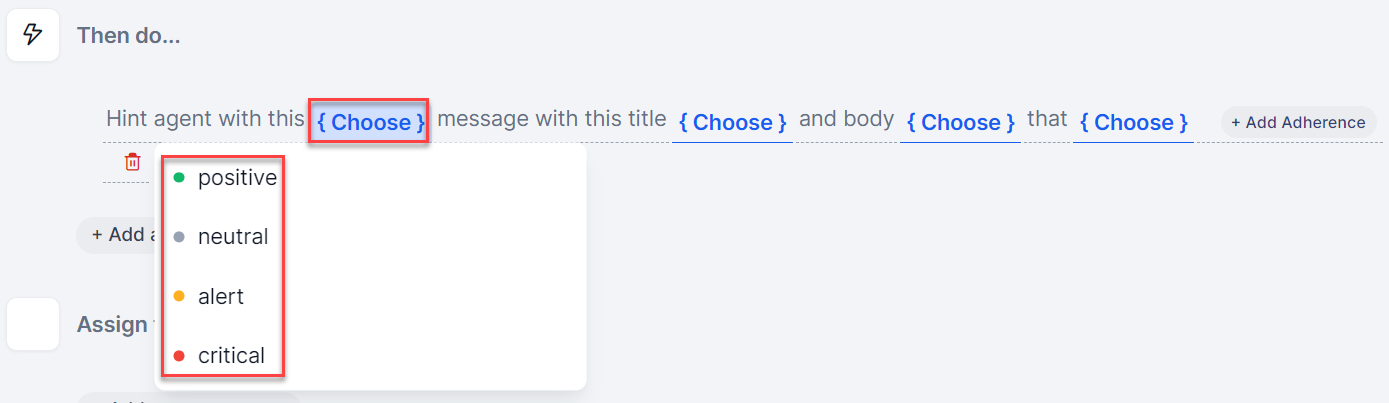
- Click {Choose} and select one of the message types, as highlighted in the following screenshot:
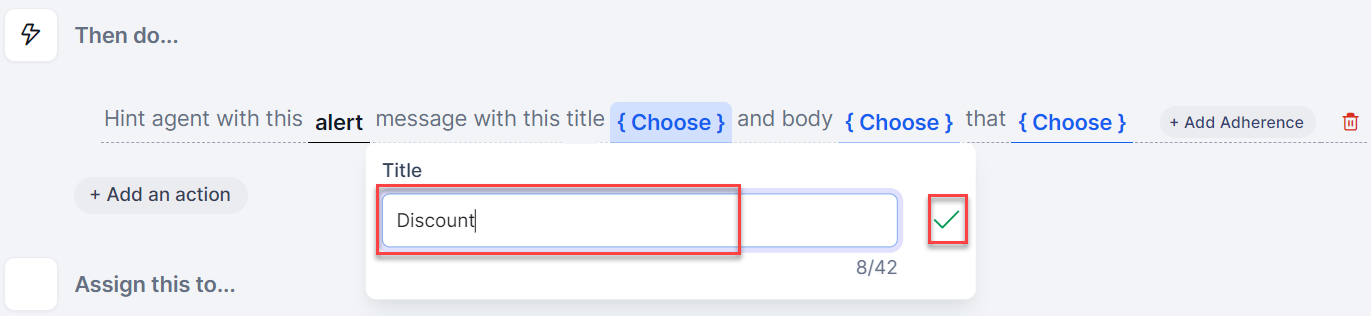
- Click {Choose} to enter the title of your message, as highlighted in the following screenshot:
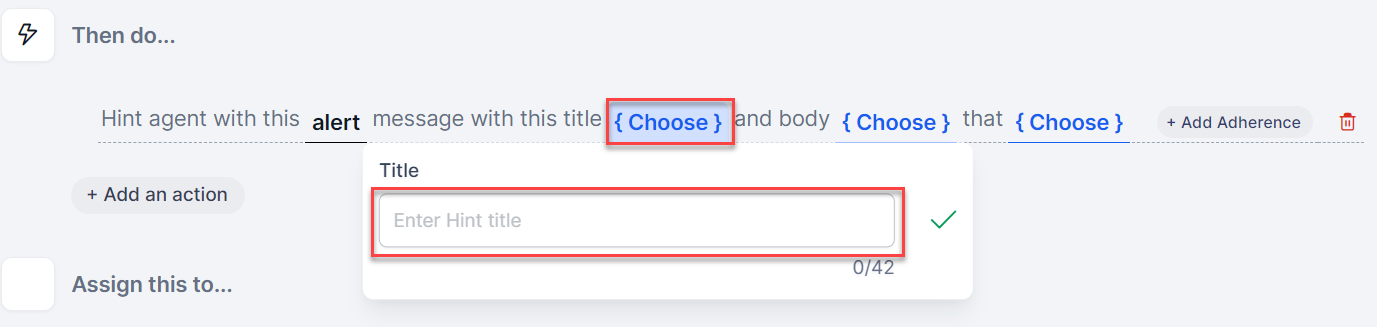
- Click the tick mark after entering the title.
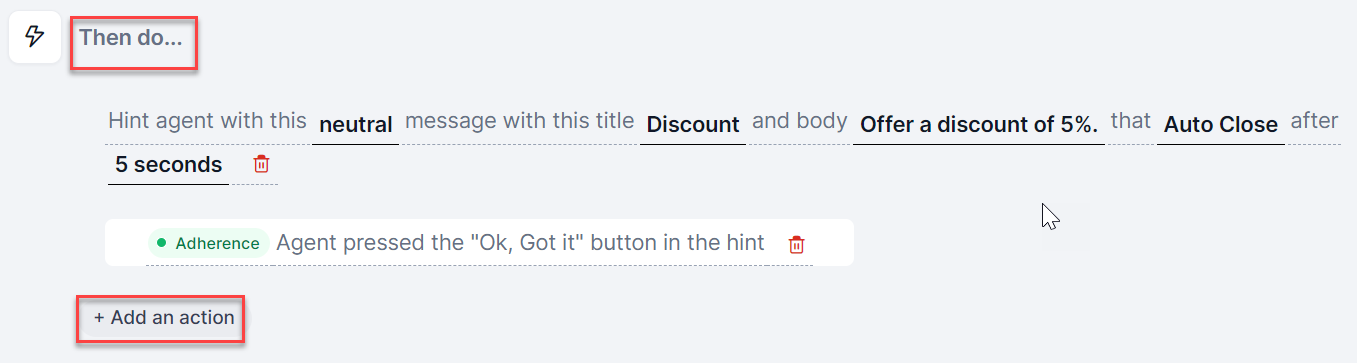
- Click {Choose} to enter the body of your message, as highlighted in the following screenshot:
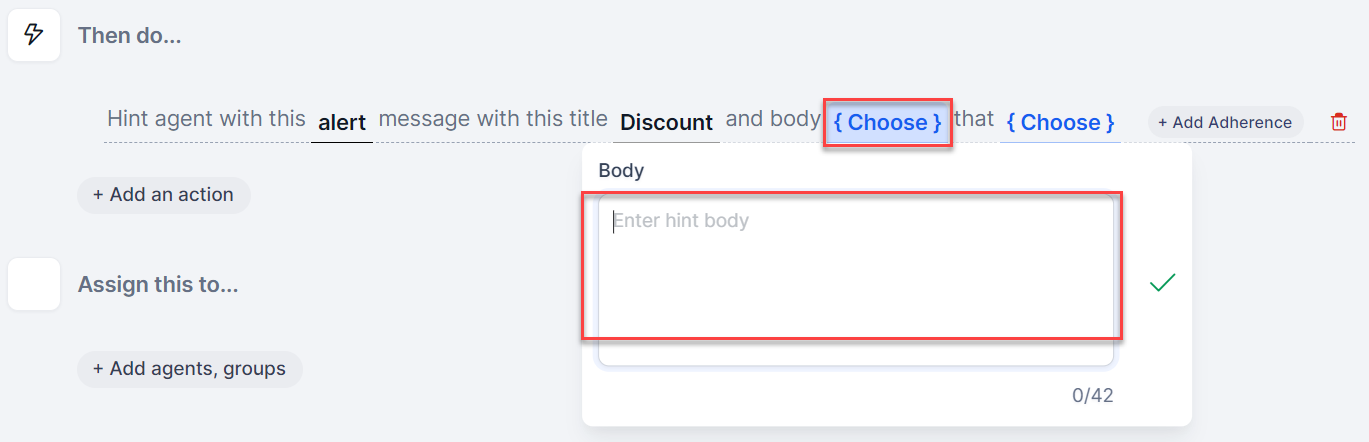
- Click the tick mark after entering the body of your message.

- Click {Choose} to select the display option of your message, as highlighted in the following screenshot:
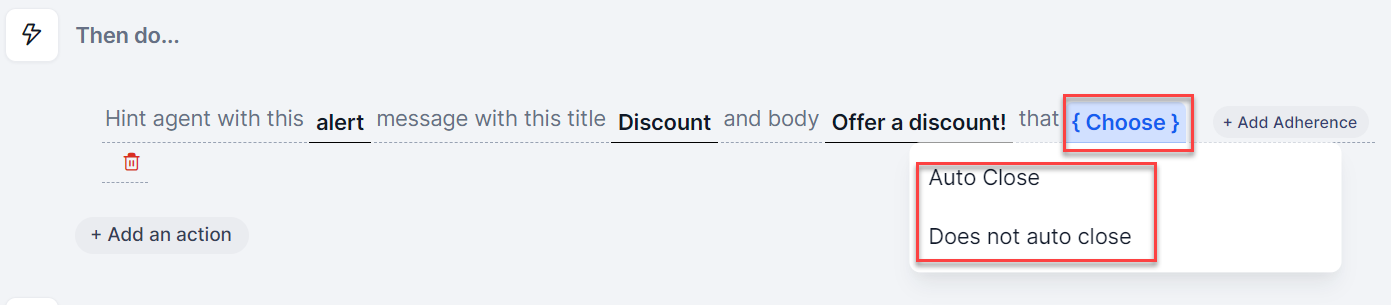
- If you select Auto Close, the following screen displays:
 Click the default value of 5 seconds to update it, as required. After entering the value, press the Enter key to update the new entry.
 - If you select Does not auto close, the following screen displays:

- If you select Auto Close, the following screen displays:
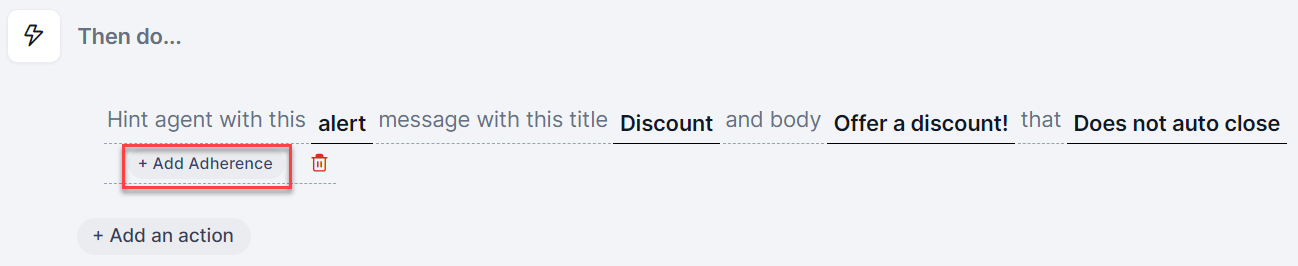
- Click +Add Adherence to set up agent adherence of the rule action.
- Select an adherence trigger:
- If you select Acknowledge Pressed, the following screen is displayed:

- If you select Utterance, follow steps 9-12 of Steps to set up the Nudge Agent actions to complete the process.
- If you select Acknowledge Pressed, the following screen is displayed:
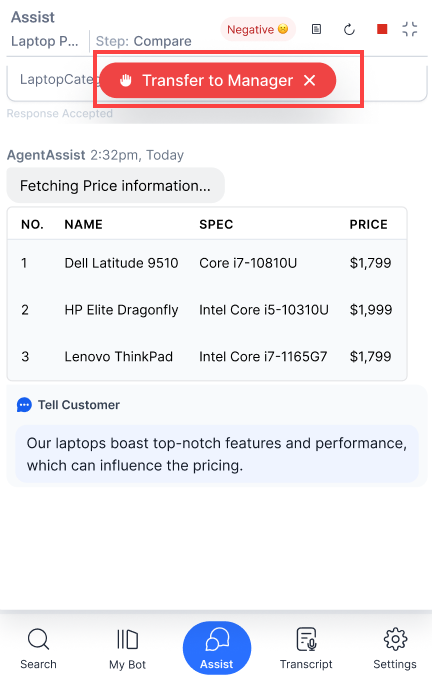
The agent gets screens similar to the following on their system for:
- Positive Hints
- Neutral Hints
- Alert Hints
- Critical Hints

Email Manager
This feature lets you set a push notification alert to the manager’s desktop. You can set who should receive this notification and customize the title and the body of the message. It applies to the customer’s actions, such as using profanity or too many cross-talks. Instead of nudges and hints, the system can send an alert notification to the manager in these situations.
Steps to set up the Email Manager action:
- Go to the rule action setup page.
- Click + Add an action under the section Then do…

- Click the Email Manager option in the Choose an Action window.

- Click {select people} to enter the email address of one or multiple managers who should receive the notification.

- Enter the email addresses, and then click the tick mark to save them.
 Note: Use commas to separate multiple email addresses.
 - Click {set subject} to enter a subject for your notification.
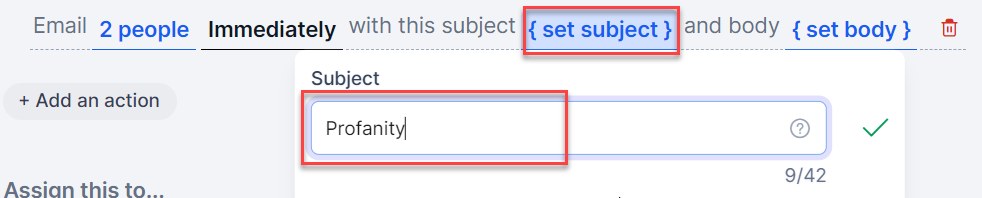
- Click the tick mark to save it.

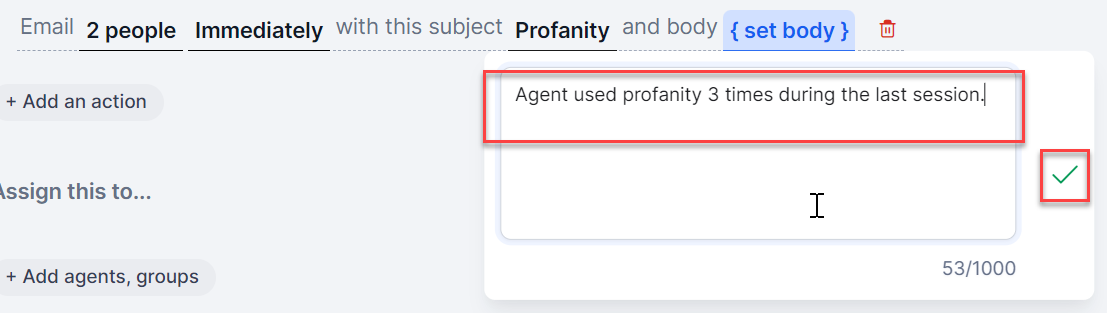
- Click {set body} to enter the body of the notification.
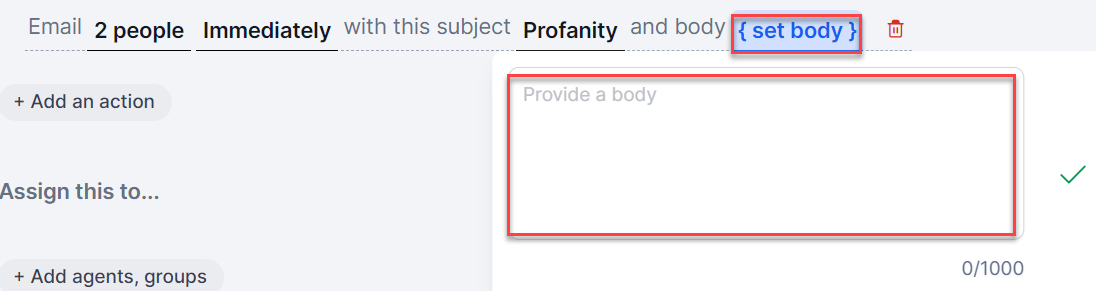
- Enter the notification content and then click the tick mark to save it.

Assign This To
This feature lets you assign the rule to the intended agents or groups. By default, this feature is assigned to all agents.
Steps to assign rules to agents or groups
- Go to the rule action setup page. For help, refer to steps 1 and 2 of Steps to create a new rule.
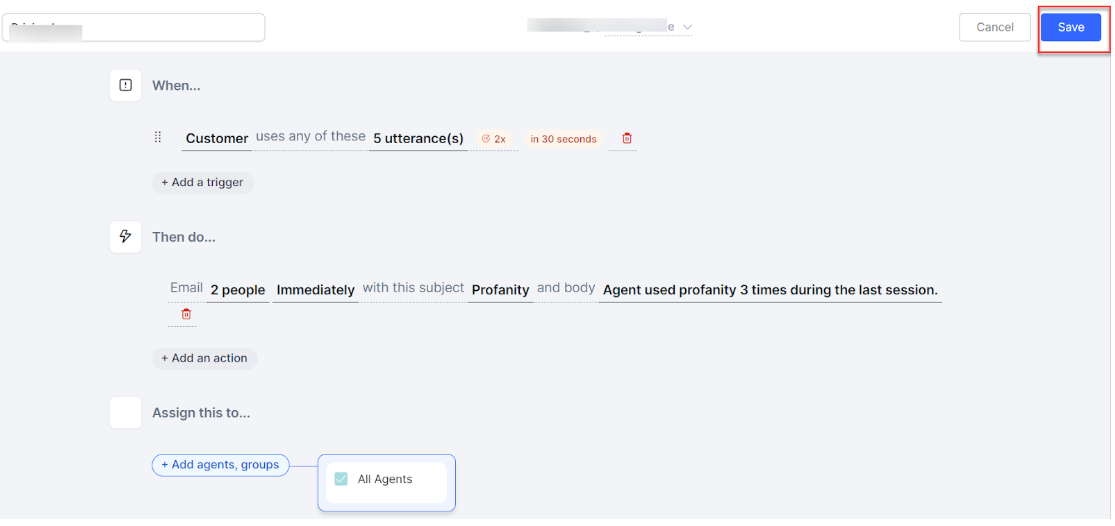
- Click +Add agents, groups under the section Assign this to…
The following screen shows the default selection of All Agents:

- Click Save from the top right corner of the screen.
The new rule appears under the group for which you created it.