GETTING STARTED
Introduction to AgentAssist
Architecture and Configuration
Glossary
FAQ
Release Notes
Recent Updates
Previous Versions

SET UP AgentAssist
AgentAssist Setup Guide
Sign Up for AgentAssist
Conversation Automation
Automations Board
Create a Bot
Add Multiple Bots
Create Use Cases
Overview
FAQs Setup
Create Dialog Tasks
Welcome Events
LLM and Generative AI
SearchAssist
Agent Coaching
Playbook
Customizing the AgentAssist Widget
Configure Auto Summarization with Custom Dialog Tasks
Feedback Settings
Widget Theming (Layout Customization)

INTEGRATIONS
AgentAssist Integration with Third-Party Applications
Amazon Connect
Amazon Connect with AgentAssist Voice Installation Guide
Amazon Connect with AgentAssist Chat Using Custom CCP
Amazon Connect with AgentAssist – Voice via AWS Third Party Applications
Channels
Voice
Configure Voice Channel
Configure Speech Recognition
Chat
SmartAssist
Configure AgentAssist
Demos
Voice Demo
Chat Demo
Salesforce
OmniChannel
Omni-Channel Configuration - Chat
AgentAssist Configuration - Chat
Genesys CTI
AgentAssist Voice Integration
NICE-CTI
AgentAssist Voice and Chat
AgentAssist Chat
Demos
Voice Demo
Chat Demo
Zendesk
Set up AgentAssist for Zendesk
Genesys
AgentAssist Integration with Genesys - Manual Setup Instructions
Agent AI Integration with Genesys Cloud CX
Set Up AgentAssist for Genesys
Change AgentAssist Bot in Genesys
Integrate Kore.ai Bot on Genesys Cloud CX Messaging
NICE MAX Desktop
Talkdesk
Twilio

AGENT EXPERIENCE
AgentAssist Widget
Bot Override and Automations

ANALYTICS
Conversation Logs
Dashboard
Agent AI ROI Analyzer (Beta)
APIs
Raw Data API v1
Raw Data API v2
Conversation Summary Trigger

Configure Voice Channel

Using the Voice channel, you can configure how SmartAssist handles automation for inbound voice calls. By going to Configuration > System Setup > Channels > Voice, you can set up SIP Transfer.
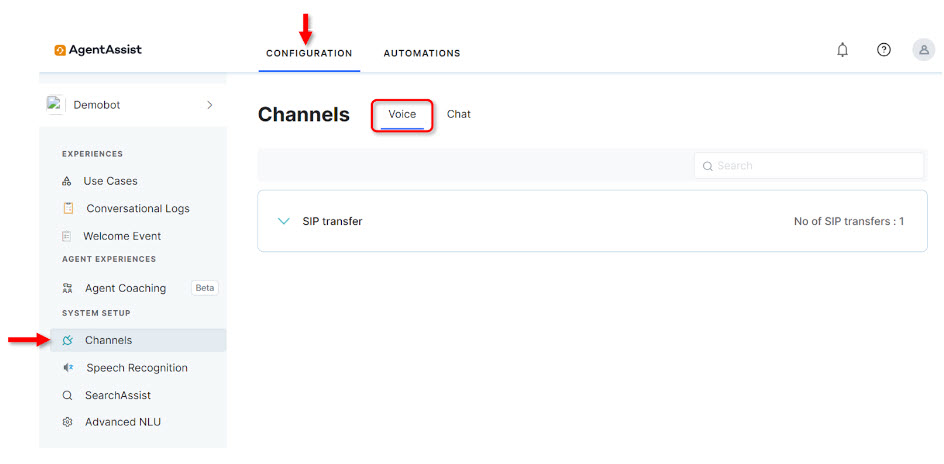
SIP Transfer Setup

This option is useful when transferring calls to SmartAssist from a toll-free or local phone number using the Session Initiation Protocol (SIP) in your IVR system.

Under Channels > Voice > SIP Transfer, you can configure the network IPs and domains, SIP transport protocol, and SIP credentials (optional) while the SIP URI is pre-configured.

To configure SIP Transfer, follow these steps:

  1. In the Voice channels section, select SIP Transfer.
  2. Click New.
  3. On the Transfer From IVR page, configure the following: 
    1. SIP URI: This is a preconfigured field.
      Note: This URL is connected to audiocodes. To connect to the Kore gateway and use Kore-managed or supported custom ASR, you must get it changed by a Kore specialist.
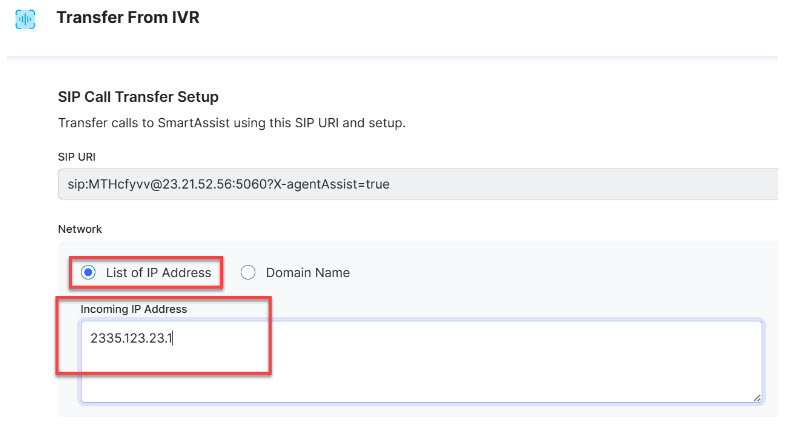
    2. Network: To configure the Network, you can select one of the following:
      1. Under List of IP Address, type the values for Incoming IP Address in the textbox.
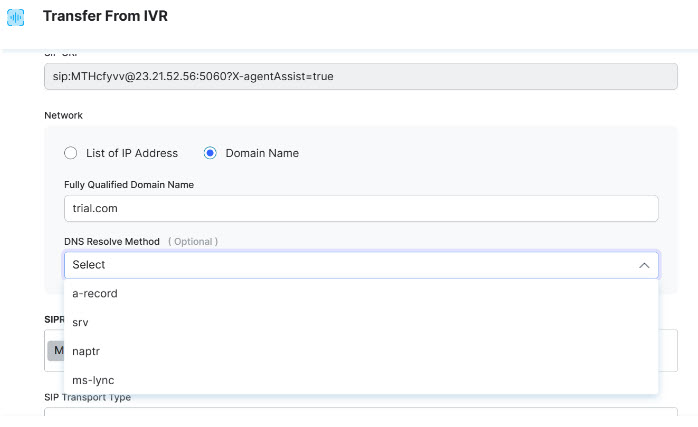
      2. Under Domain Name, provide the following:
        • Fully Qualified Domain Name: The domain name that specifies all domain levels, including the top-level domain and the root zone.
        • DNS Resolve Method (Optional): Select an option from the list to translate IP addresses to domain names for resolution when the hostname is associated with multiple IP addresses. You can choose A-record, SRV, NAPTR, or MS-LYNC.
    3. SIPREC Identifier: The field is pre-filled.
    4. SIP Transport Type: Select an option from the list. This field will set a protocol to route SIP traffic to servers and other endpoints. The available options are TCP, UDF, and TLS.
    5. (Optional) Set the SIP Credentials (User Name and Password) to access your SIP transfer setup account.
    6. Click Save.
  4. A success confirmation message is displayed once the Transfer from IVR setting is updated.

On this Page

Configure Voice Channel

Using the Voice channel, you can configure how SmartAssist handles automation for inbound voice calls. By going to Configuration > System Setup > Channels > Voice, you can set up SIP Transfer.

SIP Transfer Setup

This option is useful when transferring calls to SmartAssist from a toll-free or local phone number using the Session Initiation Protocol (SIP) in your IVR system.

Under Channels > Voice > SIP Transfer, you can configure the network IPs and domains, SIP transport protocol, and SIP credentials (optional) while the SIP URI is pre-configured.

To configure SIP Transfer, follow these steps:

  1. In the Voice channels section, select SIP Transfer.
  2. Click New.
  3. On the Transfer From IVR page, configure the following: 
    1. SIP URI: This is a preconfigured field.
      Note: This URL is connected to audiocodes. To connect to the Kore gateway and use Kore-managed or supported custom ASR, you must get it changed by a Kore specialist.
    2. Network: To configure the Network, you can select one of the following:
      1. Under List of IP Address, type the values for Incoming IP Address in the textbox.

      2. Under Domain Name, provide the following:
        • Fully Qualified Domain Name: The domain name that specifies all domain levels, including the top-level domain and the root zone.
        • DNS Resolve Method (Optional): Select an option from the list to translate IP addresses to domain names for resolution when the hostname is associated with multiple IP addresses. You can choose A-record, SRV, NAPTR, or MS-LYNC.

    3. SIPREC Identifier: The field is pre-filled.
    4. SIP Transport Type: Select an option from the list. This field will set a protocol to route SIP traffic to servers and other endpoints. The available options are TCP, UDF, and TLS.
    5. (Optional) Set the SIP Credentials (User Name and Password) to access your SIP transfer setup account.
    6. Click Save.
  4. A success confirmation message is displayed once the Transfer from IVR setting is updated.