GETTING STARTED
Introduction to AgentAssist
Architecture and Configuration
Glossary
FAQ
Release Notes
Recent Updates
Previous Versions

SET UP AgentAssist
AgentAssist Setup Guide
Sign Up for AgentAssist
Conversation Automation
Automations Board
Create a Bot
Add Multiple Bots
Create Use Cases
Overview
FAQs Setup
Create Dialog Tasks
Welcome Events
LLM and Generative AI
Search AI
Agent Coaching
Playbook
Customizing the AgentAssist Widget
Configure Auto Summarization with Custom Dialog Tasks
Feedback Settings
Widget Theming (Layout Customization)

INTEGRATIONS
AgentAssist Integration with Third-Party Applications
Amazon Connect
Amazon Connect with AgentAssist Voice Installation Guide
Amazon Connect with AgentAssist Chat Using Custom CCP
Amazon Connect with AgentAssist – Voice via AWS Third Party Applications
Channels
Voice
Configure Voice Channel
Configure Speech Recognition
Chat
SmartAssist
Configure AgentAssist
Demos
Voice Demo
Chat Demo
Kore Agent AI with Salesforce NICE CX-CTI
Salesforce
OmniChannel
Omni-Channel Configuration - Chat
AgentAssist Configuration - Chat
Genesys CTI
AgentAssist Voice Integration
NICE-CTI
AgentAssist Voice and Chat
AgentAssist Chat
Demos
Voice Demo
Chat Demo
Zendesk
Set up AgentAssist for Zendesk
Genesys
AgentAssist Integration with Genesys - Manual Setup Instructions
Agent AI Integration with Genesys Cloud CX
Set Up AgentAssist for Genesys
Change AgentAssist Bot in Genesys
Integrate Kore.ai Bot on Genesys Cloud CX Messaging
NICE MAX Desktop
Talkdesk
Twilio

AGENT EXPERIENCE
AgentAssist Widget
Bot Override and Automations

ANALYTICS
Conversation Logs
Dashboard
Agent AI ROI Analyzer (Beta)
APIs
Raw Data API v1
Raw Data API v2
Conversation Summary Trigger

AgentAssist Playbook

Overview

Contact center agents are expected to provide the best customer experience despite high call volumes and complex interactions. To empower agents in this endeavor, AgentAssist introduces the Playbook feature—a standard tool offering structured guidance for handling customer interactions.

Why Playbook?

For effective communication with customers, agents must follow a standard approach of greeting, validating, issue-handling, and closing the conversation. Supervisors may add more to these steps based on other factors. Also, at times, the agents have to follow a situation-specific approach that does not follow the standard structured steps. The Playbook lets supervisors create both standard and situation-specific guidance. On the AgentAssist widget, the standard guidance is always available, but the situation-specific guidance appears only when a configured situation occurs.

How does the Playbook Help?

The Playbook feature provides agents structured guidance and streamlines task management. Supervisors can define stages and steps to follow, choose step progression (sequential or random), mark whether the steps are completed manually or automatically, and set adherence notifications.

Supervisors can leverage this feature to gain valuable insights into agent adherence to specific playbook steps. They can use this data to enhance agents’ ability to handle interactions and significantly improve customer satisfaction.

This document is a comprehensive guide to the Playbook feature and meant for contact center supervisors.

Playbook Types

AgentAssist lets you create two types of playbooks:

  • Primary PlaybookThese are standard playbooks that are triggered for all assigned agents. Primary playbooks consist of Open and Close stages, with multiple steps within each stage. The step progression can be either sequential or random. For example, a primary playbook named “Greet the Customer” applies to all assigned agents, requiring them to initiate conversations with a customer greeting as the first step. Subsequent steps, such as validation or issue handling, can follow sequentially or randomly based on the setup.
  • Dynamic PlaybookThese are situation-specific playbooks that trigger based on specific configured scenarios. For example, a playbook named “Competitor Mention” triggers when a competitor is mentioned in a conversation. Dynamic playbooks have a single stage but can have multiple steps within the stage. A lightbulb icon appears on the AgentAssist widget to indicate that an utterance has matched an existing Dynamic playbook. The agent must click the icon to follow the playbook for that specific situation.

Steps to Create a Primary Playbook

  1. Sign in to Agent AI.
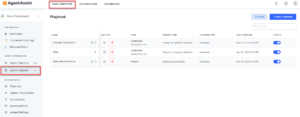
  2. Click Configuration > Playbook.
  3. Click +New Playbook.
  4. Enter and select the following details in the General Settings page:
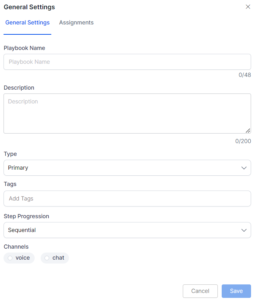
    1. Enter a name in the Playbook Name field.
    2. Enter a short description in the Description field.
    3. Select Primary in the Type field. By default, Primary is selected.
    4. Enter a tag name in the Tags field and then press the Enter key to save a new tag. For existing tags, click in the Tags field to select.
    5. Select an option about how the steps should progress in the Step Progression field.
    6. Select a channel under the Channels section.
      For help, refer to the Field Description section.
  5. Click Save. The new Primary playbook appears with the default creation of two stages (Open and Close) and a few steps under each stage.

  6. Click Done to complete the process.

Steps to Create a Dynamic Playbook

  1. Sign in to AgentAssist.
  2. Click Configuration > Playbook.
  3. Follow steps 3 and 4 of Steps to Create a Primary Playbook , but select Dynamic in the Type field. A new menu, Triggers, appears on the top-right of the General Settings page.

  4. Click the Assignments menu to select how you want to assign the playbook.
  5. Click the Triggers menu to select a trigger input. This lets you set up a trigger point for the playbook to appear on the AgentAssist widget.
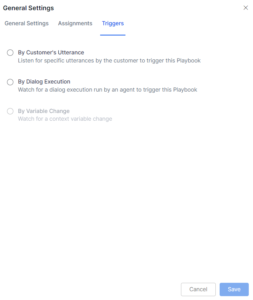
  6. Select either By Customer’s Utterance or By Dialog Execution.
    • If you select By Customer’s Utterance:
      1. Enter an utterance in the Utterances field. The AI generates utterances with similar meanings and lists them with the percentages of time that were found in conversation over a certain period.
      2. Select the utterances from the list, as required.
      3. Click Add.
    • If you select By Dialog Execution:
      1. Select an option from the Automation list. This list includes Dialog tasks specific to the selected channel in the playbook.
      2. Select an option under the Wait for Dialog Execution section.
        1. Initiated: Select Initiated to indicate the playbook should trigger once the Dialog task is initiated.
        2. Completed: Select Completed to indicate the playbook should trigger once the Dialog task is completed.
  7. Click Save.

Field Description – General Settings

Field Description
Playbook Name Name you have assigned to a playbook. Enter a name that represents the playbook’s purpose.
Description A short description about the playbook’s purpose.
Type Playbook type. Valid values to choose from are:

  • Primary
  • Dynamic
Tags Add a tag to the playbook for grouping and easier identification of similar playbooks. These tags will serve as centralized searching units in the future.
Step Progression Define how you would like the steps in the playgroup to progress. Valid values to choose from are:

  • Random: Agents can move to any step in no particular order.
  • Sequential: Agents must complete the steps in a sequential manner.
Channels Valid values to choose are:

  • Voice
  • Chat

Playbook Configuration

The Playbook Configuration section explains the setup process of a playbook. A playbook has two main categories–Stages and Steps–with Stages as the primary and Steps as the secondary category. By default, Stages are available as Open and Close. There can be multiple steps inside each stage, and you can choose how step progression (sequential or random) takes place.

Step Configuration

Steps are the secondary categories that reside under Stages. By default, the Primary playbooks have three steps under the Open stage and two steps under the Close stage. You can add more steps based on the requirement.

Creating a Step in Primary Playbooks

  1. Create a Primary playbook. For help, refer to Steps to create a Primary Playbook.
  2. Click + Add Step. The Step Configuration page appears.
  3. Enter a title for the new step in the Step Title field.
  4. Enter a description of the step in the Step Body field.
  5. Select the Enable send/copy button if you want to send the content of the Step Body field to the customer.
    Note: The Enable send/copy button appears only if the Channel is selected as Voice during playbook creation.
  6. Click Add Buttons to select the confirmation button.
  7. Select Confirmation: Yes/No in the Buttons field.
    1. Select Yes to indicate a step completion.
    2. Select No to indicate an incomplete step.
  8. Select the color ring against Yes or No to change their color.
  9. Select the Delete button against Yes or No to delete them.
  10. Click Save to complete the process.

Creating a Step in Dynamic Playbooks

  1. Create a Dynamic playbook. For help, refer to the Steps to Create a Dynamic Playbook section.
  2. Click + Add Stage.
  3. Enter a name for the stage.
  4. Click the tick mark to save the updates.
  5. Click + Add Step.
  6. For further steps, follow step-3 onwards of the Creating a Step in Primary Playbooks section.

Step Adherence

You can set up how you want to determine an agent’s adherence to a step completion (manual/automatic). For manual setup, skip the Step Adherence section during a playbook creation, and the agent has to manually click the step completion button in the AgentAssist widget. For automatic setup, the system determines step completion based on the input you have set up. This section explains how to set up automatic step adherence.

The system dynamically determines an agent’s step adherence through one of the selected inputs. Available inputs for selection are:

  • By Utterance: The system determines an agent’s compliance/adherence to a step completion by listening to some specific utterances from the agent or the customer that indicate completion of a step. Utterances can be of two types:
    • Agent Utterance: Agent’s utterances that indicate completion of a step.
    • Customer Utterance: Customer’s utterances that indicate completion of a step.
  • By Dialog Execution: The system determines an agent’s compliance/adherence to a step by watching a Dialog Task execution run by the agent in the AgentAssist widget. To learn more about Dialog Tasks, refer to https://docs.kore.ai/agentassist/use-cases/dialogues-creation/.

Steps to set up Step Adherence

  1. Create a playbook. For help, refer to Steps to create a Primary Playbook.
  2. Click + Add Step. The Step Configuration page appears.
  3. Click the Step Adherence button.
  4. Select either By Utterance or By Dialog Execution.
    1. If you select By Utterance:
      1. Select Agent Utterance or Customer Utterance.
      2. Enter an utterance in the Utterances field. The AI generates utterances with similar meanings and lists them with the percentages of time that were found in conversation over a certain period.
      3. Select the utterances from the list, as required.
      4. Click Apply.
    2. If you select By Dialog Execution:
      1. Select an option from the Automation list. This list displays dialog tasks specific to the selected channel in the playbook.
      2. Select an option under the Wait for Dialog Execution for… section.
        • Initiated: Select Initiated to indicate step completion once the Dialog task is initiated.
        • Completed: Select Completed to indicate step completion once the Dialog task is completed.

       5. Click Apply.

After you select Step Adherence, the selected options appear as follows:
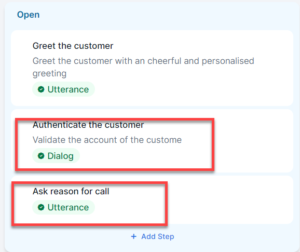
Assigning a Playbook

This section deals with the process of assigning the playbooks. Here, you can choose the intended agents who can see the playbook. The following options are available:

  • Trigger for all Interactions: The Playbook will be visible for all interactions and all agents.
  • Trigger for Selected Agents: The Playbook will only be visible to the selected agents or groups.

Steps to Assign a Playbook

  1. Create a playbook. For help, refer to Steps to create a Primary Playbook.
  2. In the General Settings page, click the Assign button.
  3. Select whom you want to assign the playbook.
  4. Click Save.

Edit or Delete a Playbook

This section explains the process of editing and deleting an existing playbook. This process is the same for both Primary and Dynamic playbooks.

Steps to Edit a Playbook

  1. Sign in to https://agentassist.kore.ai/koreagentassist/.
  2. Click Configuration > Playbook.
  3. Click the Edit button against the playbook you want to edit.
  4. Click the Settings button.
  5. Make changes as required.
  6. Click the Update button to complete the process.

Steps to Delete a Playbook

  1. Sign in to https://agentassist.kore.ai/koreagentassist/.
  2. Click Configuration > Playbook.
  3. Click the Delete button against the playbook you want to delete.
  4. Click Yes in the confirmation window.

Edit or Delete a Step

You can edit and delete an existing step, as required. This process is the same for both Primary and Dynamic playbooks.

Editing a Step

  1. Sign in to https://agentassist.kore.ai/koreagentassist/.
  2. Click Configuration > Playbook.
  3. Click the Edit button against the playbook for which you want to edit a step.
  4. Click the step you want to edit.
  5. Make your updates on the Step Configuration page.
  6. Click Update to complete the process.

Deleting a Step

  1. Sign in to https://agentassist.kore.ai/koreagentassist/.
  2. Click Configuration > Playbook.
  3. Click the Edit button against the playbook for which you want to delete a step.
  4. Go to the step you want to delete and click the Delete button against it.
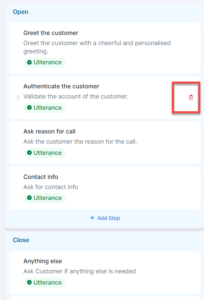
  5. Click Yes in the Delete Step confirmation window.