
For a given use case flow, you can select the voice and chat agents to whom outgoing calls are transferred.
You can configure the following options for this setup:
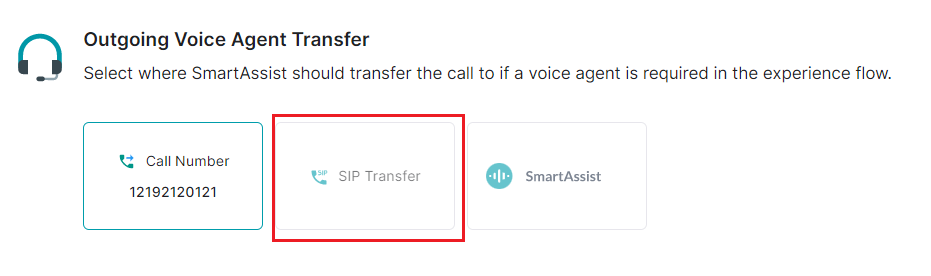
Outgoing Voice Agent Transfer
This feature helps set up a dedicated number or SIP to transfer calls to a voice agent. To configure the transfer, follow these steps:
- Go to System Setup > Agent Transfer.
- Select one of the following options:
a. SmartAssist, to route all the calls to the SmartAssist Desktop.
b. Call Number to set a phone number to which calls are transferred. To configure this option, follow these steps:
- Click the Call Number tile.

- In the Call Number to Voice Agent window, type the number along with country code in the Transfer to Phone Number textbox, and click Done.

- A success confirmation message is displayed when the call number is updated.
Set up SIP Transfer
- SIP Transfer: Lets you configure the SIP settings for call transfers. To configure this option, follow these steps:
- Click the SIP Transfer tile under Agent Transfer.
- In the SIP Transfer Settings window, click Configuration, and follow these steps:
- Provide the SIP Transfer URI.

- For SIP Header Settings, provide the SIP header name and URL under Additional Context.
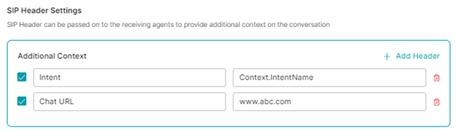
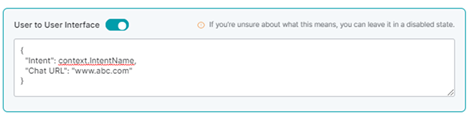
- (Optional) Enable User to User Interface to set the intent and user interface URL for SIP transfer.
- Click Done.

- Provide the SIP Transfer URI.
- Click the Instruction tab to view the Custom Voice SIP live agent support steps, and click Done.

- Click the SIP Transfer tile under Agent Transfer.
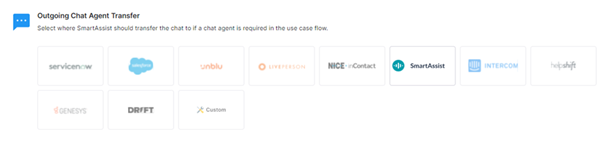
Outgoing Chat Agent Transfer
This feature helps transfer outgoing chat flows from SmartAssist to a chat agent on the selected third-party platform or a custom application.
To configure this option, follow these steps:
1. Select the desired third-party service provider from the following options:
-
- ServiceNow
- Salesforce
- Unblu
- LivePerson
- NICE inContact
- SmartAssist
- Intercom
- HelpShift
- Genesys
- Drift
- Custom
2. In the Configuration window, provide the values for the given fields, and click Done.
ServiceNow
-
- Host: The company’s URL hosted on ServiceNow.
- User Name: The username of your ServiceNow account.
- Password: The password of your ServiceNow account.
- Queue ID: The unique queue identification number.
- Webhook URL: The web URL for custom application function callbacks.

Salesforce
-
- Live Agent URL: Set the URL for the Live Agent service on Salesforce.
- Organization ID: The unique organization ID provided by Salesforce.
- Deployment ID: The unique Salesforce deployment ID.
- Button ID: The unique ID of the button component that helps interact with Salesforce data.

Unblu
-
- Unblu Host URL: The company’s URL that is hosted on Unblu.
- Unblu Account Username: The username for your Unblu account.
- Unblu Account Password: Your Unblu account password.
- Unblu Bot Name: The name of your Unblu bot to which the live chat agent is mapped.
- Unblu Bot Description: A description for the Unblu bot.
- Bot Person: The name of the human agent to whom the bot redirects the chat.
- Secret Key: The secret key for authentication.
- Named Area: The name given to the Named Area feature that helps create Unblu-specific quasi-domains.
- API Key: The API key string value to identify the app or the user.

LivePerson
-
- Liveperson Host URL: The company’s URL hosted on LivePerson.
- Account Id: The identifier of your LivePerson account.
- ClientId: The client ID generated when the live chat agent application was created.
- Secret Key: The secret key generated when the live chat agent application was created.
- Webhook URL: The web URL for custom application function callbacks.

NICE inContact
-
- Application Name: The application name given when registering the application.
- Vendor Name: The Vendor Name given when registering the application.
- Application Secret: The client secret generated when registering the application.
- Point of Contact: The name given to the entry point that an inbound contact uses to initiate an interaction.

SmartAssist
-
- Select either Live Chat or Messaging for Conversation Type. This setting is only applicable for the Web/Mobile Client channel and is used to determine the conversation behavior when there is an agent transfer.
- Live Chat – Live Chat conversations are ‘real-time’ in nature and expect customers to respond immediately to agent responses and wherever end-user identity is not available. This is typically the case when you typically expect unauthenticated visitors. Use this setting if you plan on using the Web/Mobile channel primarily for users that will not sign in to your website. Live Chat Conversations are auto-closed after 15 minutes of inactivity.
- Select either Live Chat or Messaging for Conversation Type. This setting is only applicable for the Web/Mobile Client channel and is used to determine the conversation behavior when there is an agent transfer.
-
-
- Messaging – Messaging conversations are asynchronous in nature. These interactions are similar to interactions you have over mediums like WhatsApp, Telegram etc. If you have a signed-in user logging on to your website/mobile app, you should use this mode. Messaging conversations are auto-closed after 48 hours of inactivity.
- Select either Yes or No for Agent Auto Suggestion. This setting is used to decide if AgentAssist will be enabled for a given account by default.
-

Intercom
-
- Access Token: The name of the access token generated for accessing your workspace’s data via API.
- Webhook URL: The web URL for custom application function callbacks.

HelpShift
-
- Domain: The domain name to set up the HelpShift channel.
- Webhook URL: The web URL for custom application function callbacks.
- Platform Id: The platform ID to integrate with HelpShift available under Settings.
- API Key: The default API key available in the HelpShift platform’s API section.

Genesys
-
- Organization Id: Your organization ID registered on Genesys.
- Deployment Id: The widget deployment ID available on Genesys.
- Queue Name: The name of the contact center queue.

Drift
-
-
- Drift Host URL: Your organization’s Drift account URL.
- Access Token: The non-expiring access token generated when your app is published.
- Verification Token: The verification token available under App Credentials.
- Integration Source Message: Message used at the app integration source.
- Webhook URL: The web URL for custom application function callbacks.

-
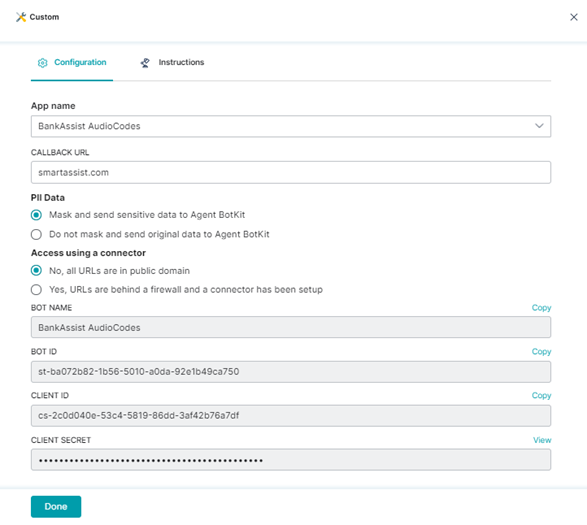
- Custom – This option is used to configure a custom application.
- App Name: Select an application name from the list.
- CALLBACK URL: The URL used for function callback.
- PII Data: Select one of the following options:
- Mask and send sensitive data to Agent BotKit – Masks the data being transferred.
- Do not mask and send original data to Agent BotKit: Transfers data without masking.
- Access using a connector: Select one of the following options:
-
- No, all URLs are in public domain.
- Yes, URLs are behind a firewall and a connector has been set up.
-
- The following values are auto-generated and have to be copied and pasted during your custom app integration:
-
- BOT NAME: The value selected for App Name is auto-filled here.
- BOT ID: The unique Bot identifier number.
- CLIENT ID: The client ID generated when the application is created.
- CLIENT SECRET: This is a view-only value and represents the application’s client secret key.
-
3. A success confirmation message is displayed once the configuration is saved.