
Experience Flows
An experience flow helps customers define the end-to-end customer experience at a contact center for each of their customer channels.
Experience Flow Designer
The Flow Designer allows users to quickly set up experience flows to support basic as well as advanced customer experiences. It is a drag-and-drop work surface that enables you to link together blocks of actions or nodes. For example, when a customer first enters your contact center, you can ask for some input and then play a prompt such as “Welcome to ABC Corp, how may I assist you today?”
Based on the customer intent, you can achieve the following with this feature:
- Build experiences based on whether you want something to happen to a Bot, or need an agent transfer, or voice to chat deflection.
- Set up a certain experience like a contact waiting for an agent to accept the conversation request.
- Design default flows to define how the application behaves for scenarios that happen regularly.
Why use the Flow Designer?
- Flow Designer provides visibility on how the use cases, waiting experience, default, and the other contact flow modules are stitched together and work implicitly.
- It allows the user to view the end-to-end experience flow in one place.
- This open visual canvas lets you drag in elements, tie them together, and create customer experience flows explicitly, in a no-code manner.
Adding a New Flow
The user can build custom experience flows by adding a new inbound experience flow with the following steps:
- Log in to your SmartAssist instance, and navigate to CONFIGURATION > Experiences > Flows.
- Click + New Flow in the Experience Flows window.

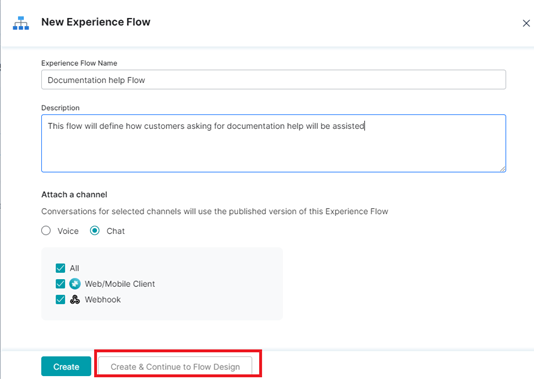
- In the New Experience Flow window, provide inputs for the following fields:
- Experience Flow Name: This name will help identify the flow you’ve added.
- Description: Input text to describe what the experience flow does or its purpose.

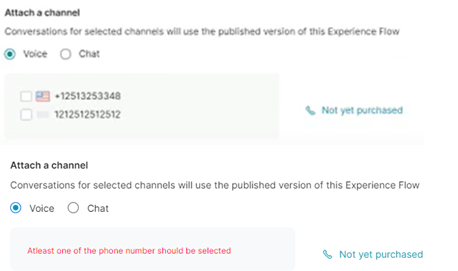
- Attach a Channel: Select one of the following channels to integrate this flow:
Voice
- Selecting this option displays the list of phone numbers that have been added to your account. You can select the number to be mapped to the flow.
- If you have not added any number to your account, click the Not yet Purchased
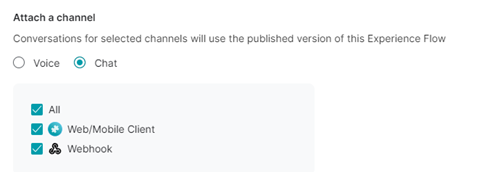
Chat
- Selecting chat will display all the chat channels that have been configured in the channels section of the SmartAssist platform. The options Webhook, and Web/Mobile Client are enabled by default. The displayed values include:
- All: Selects Webhooks, Web/Mobile clients, and all the other services available for the chat experience flow.
- Web/mobile client: The web client is the front-end component of the SmartAssist application that communicates with a server and is accessed by the end-user on a desktop or mobile.
- Webhooks: Used to trigger automated messages during the chat contact flow when an event occurs.
- Click Create to add the new flow design, or Create & Continue to Flow Design to add the new flow and continue designing it further.
- A success message is displayed.
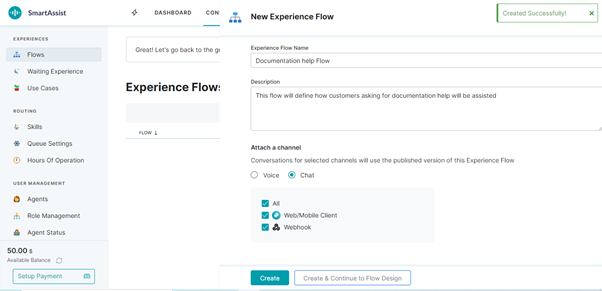
- Once your flow design is created, a flow design canvas is displayed with the following elements:
- Experience Flow Name you’ve provided.

- The Last saved timestamp (date and time of creating the flow).

- The Publishing status.

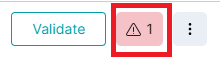
- On clicking the Validate button a chat window is displayed for chat channel and a Softphone dialer pad is displayed for voice channel, where the flow you have created is internally validated.
- Experience Flow Name you’ve provided.
-
- The Error status button that displays the number of errors. Click this button to view the errors in your flow.
- The three ellipses icon clicking which the following options appear:
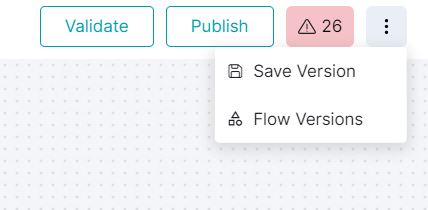
- Save Version: Click to save the current version of the contact flow created.
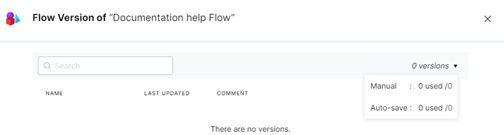
- Flow Versions: Click to view the Flow Version of “Experience Flow Name” window. Select the Manual or Auto-saved version you want to view. The Name, Last Updated (timestamp), and Comment (you’ve added for the contact flow) values are displayed in this window.
- Publish: Click to publish the flow you’ve created to the production environment.
- The Error status button that displays the number of errors. Click this button to view the errors in your flow.
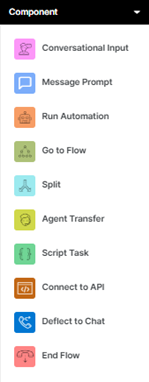
- The Component selection menu where you can click the node you want to insert to the flow design canvas.
Working on the Flow Designer Canvas
The flow design canvas lets you drag and drop various components of the experience in the design flow, and set its properties.
The components listed on the menu are also called nodes and can be interlinked to each other.
The Start node is the starting point of any contact flow on the Flow Designer and is available by default. You can drag and place the Start node icon on the node from which you want to initiate an inbound contact flow.

You can click the “+” icon and tap the node you want to insert from the pop-up menu.

The sample for building a simple IVR-Based flow:
