
IVR Menu
An IVR menu node allows creation of a standard IVR menu that can be presented to customers during inbound calls. Adding this node helps route the customer to the relevant call experience based on the key they input.
For example, pressing ‘1’ will route the customer to the order update flow, pressing ‘2’ will execute the order cancellation flow, and so on.
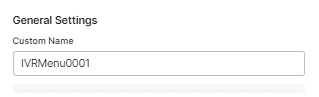
- Click the General Settings icon and provide the custom name.
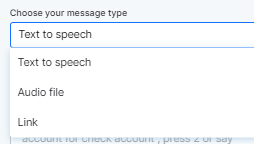
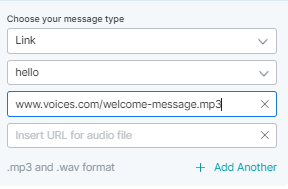
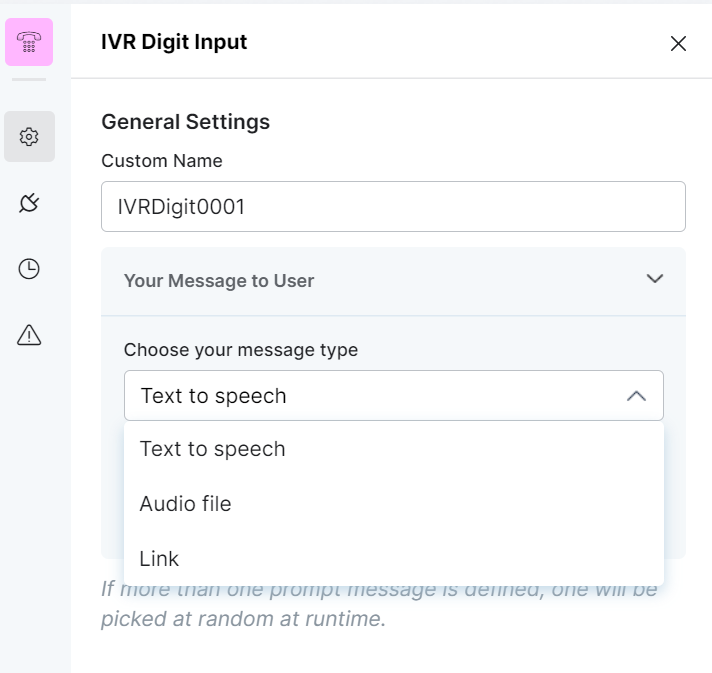
- Set up the message that will be played to the customer. Select one of the following options for choose your message type:
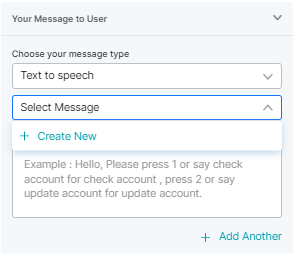
- Text to speech: To transcribe from text to speech. You need to type the text to be transcribed in the textbox or select an already configured message.
- Audio: To upload an audio file with your message recorded.
Note: .mp3 and .wav formats are only supported for audio files.
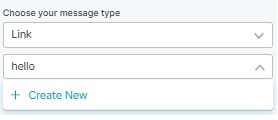
- Link: To provide a link to an audio file that will be played.
- Create a new prompt message to be played out for the Text to Speech message type by clicking + Create New.
- Define multiple message types for the prompt message to be played to the customer by clicking + Add Another. In this case, one message will be randomly selected and played during runtime.
- When you select Audio File, you can type a new message to be played to the customer in the text field or click + Upload New to upload an audio file (.mp3 or .wav format) with the message to be played.

- When you select Link, click + Create New to add the text of the message you want to play to the customer and insert the URL of the audio message.
- Click + Add Another to add another message URL.
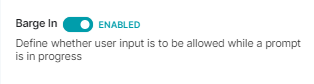
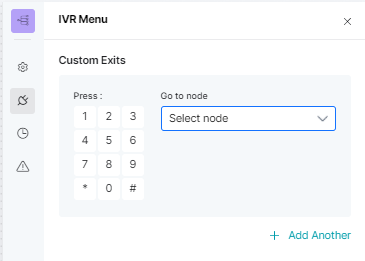
- Enable or disable Barge In.
- Enabling Barge In lets the customer provide their input before the prompt has finished playing.
- Disabling the Barge In option prevents the customer from keying in their input before the prompt has finished playing.
- Enabling Barge In lets the customer provide their input before the prompt has finished playing.
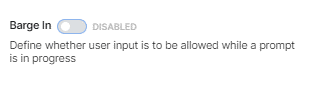
- Click the Custom Exits icon to add one or more custom exit points for the contact flow.
 For this, select the digit/key and the node from the dropdown to which it needs to be mapped. For example, when you select ‘1’ and ‘Run Automation’, this will redirect to the Run automation node when the input ‘1′ is keyed in.
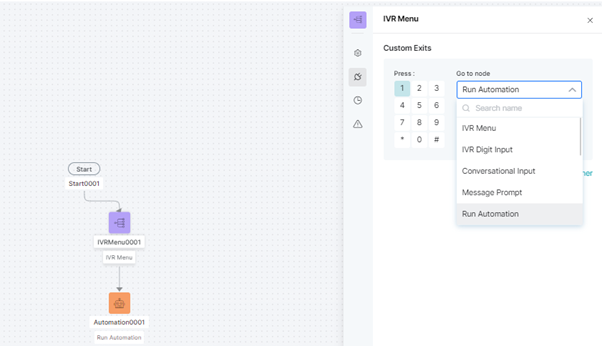
- You can add multiple custom exits by clicking + Add Another and selecting the required digit and the node.

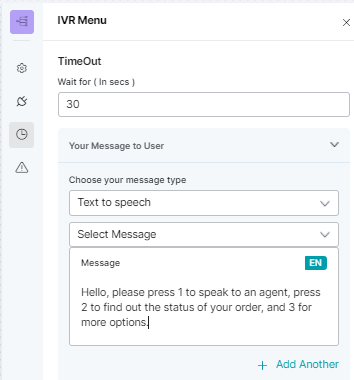
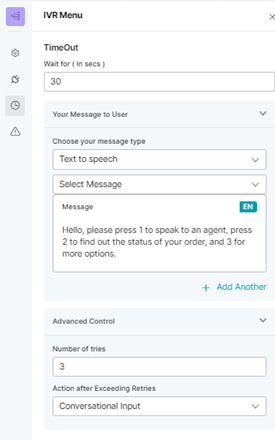
- Click the Timeout icon to set up the timeout flow with the following fields:
- TimeOut: Type the wait time in seconds after which a timeout event will occur.
- Your Message to User: For Choose your message type select an option from Text to Speech, Link, or audio; then, type the message, upload an audio file (.mp3 and .wav formats are only supported for audio files), or provide a URL to the error message to be played out to the customer when a timeout event occurs.
- Set the value for Advanced Control > Number of Tries by typing the maximum number of retries or the allowed limit for a customer to key in the input.
- Set the value for Advanced Control > Action after Exceeding Retries by selecting the node to direct the flow after a timeout has occurred.
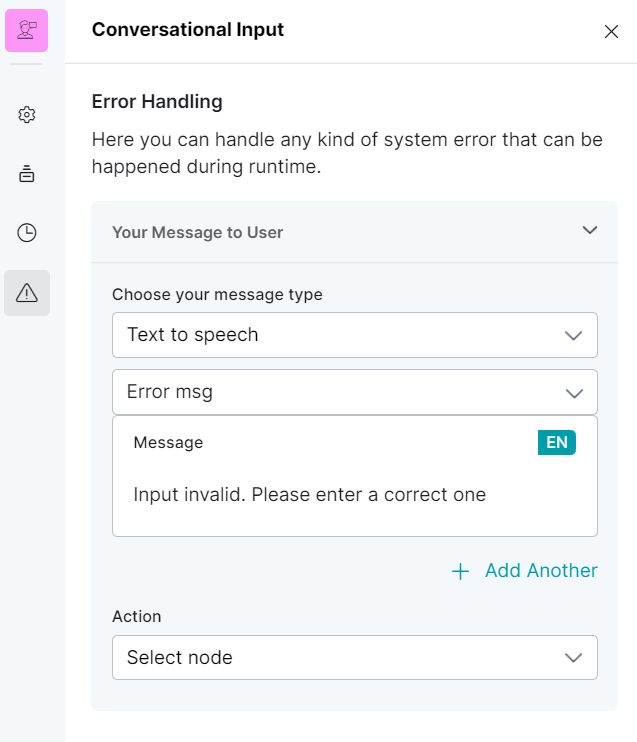
Configure Error Handling
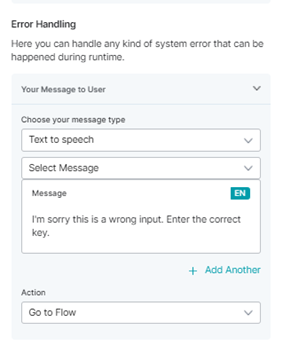
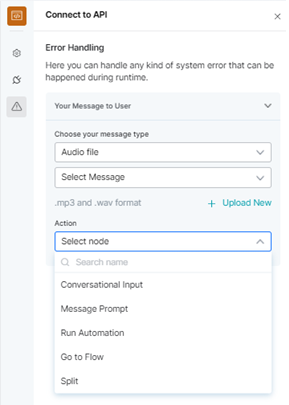
Click the Error Handling icon and define the following fields that determine how system errors will be handled during runtime:
- Your Message to User: Choose the message type from Text to Speech, Link, or audio; then, type the message, upload an audio file (mp3 and .wav formats are only supported for audio files), or provide a URL to the error message that will be played out to the customer when a system error occurs.
- Action: Select the node to which you want to direct the error handling flow and define the system behavior.
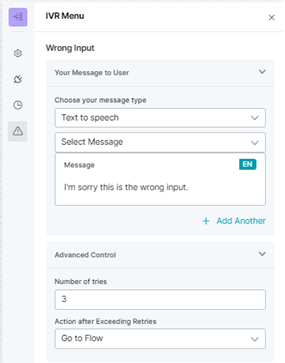
Configure Wrong Input Flow
- Define the error handling flow for Wrong Input where the customer types in the wrong input during the IVR. The following field can be configured:
- Under Advanced Control > Number of Tries, type the maximum number of retries or the allowed limit for a customer to key in the correct input.
- Under Advanced Control > Action after Exceeding Retries, select the node to direct the flow after the wrong input retries have exceeded.
IVR Digit Input
IVR Digit Input node records a non-menu interaction. It is used during dynamic interactions where a contact needs to provide the input like a phone number to proceed further. You can configure the condition for receiving the input, the action if the condition is satisfied (success flow), the timeout value in seconds for the contact’s response/input, and the error-handling use cases.
To configure this node, follow these steps:
1. Click the General Settings icon and provide the custom name.
2. Set up the message that will be played out to the customer with the same steps as IVR Menu.
3. Click the Condition icon to define the input conditions, by providing values for the following fields:
- Maximum length of digit: Define the limit for the number of digits a customer can input after which the conditional message is played out.
- Ending Keypress: Define the key to delimit or indicate the end of the customer’s input. For e.g., when “#” is pressed, it indicates the customer has completed keying in their input.

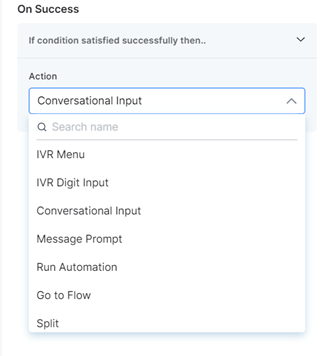
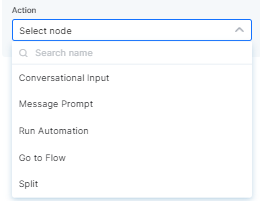
4. Define the On success flow by selecting a node from the Action dropdown list. The flow is directed to the selected node from the current node if a condition is satisfied.
5. Set up the Timeout flow by defining the following fields:
- TimeOut: Type the wait time in seconds after which a timeout event will occur.
- Your Message to User: For Choose your message type select an option from Text to Speech, Link, or audio; then, type the message, upload an audio file ( .mp3 and .wav formats are only supported for audio files), or provide a URL to the error message to be played out to the customer when a timeout event occurs.
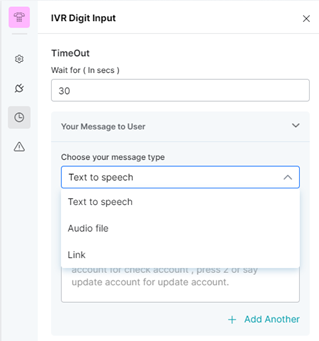
- Your Message to User: For Choose your message type select an option from Text to Speech, Link, or audio; then, type the message, upload an audio file ( .mp3 and .wav formats are only supported for audio files), or provide a URL to the error message to be played out to the customer when a timeout event occurs.
6. Under Advanced Control > Number of Tries, type the limit for maximum number of retries allowed for a customer to key in the input.
7. Under Advanced Control > Action after Exceeding Retries, select the node to direct the flow after a timeout has occurred.

8. To see the configurations for error handling and Wrong input flow, see Configure Wrong Input Flow and Configure Error Handling of IVR Menu. These configurations determine how system errors will be handled during runtime.
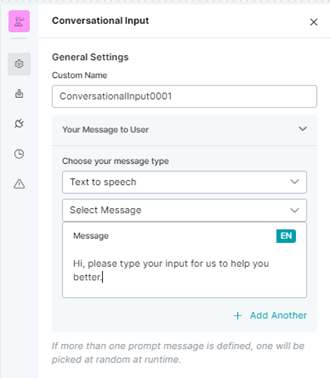
Conversational Input
This node is an equivalent of a bot automation interaction for an IVR key input. Based on the open-ended input provided by the customer for a welcome message or prompt from a Bot, and the use cases defined for the Bot, the interaction flow is handled.
To configure this node, follow these steps:
1. Click the General Settings icon and provide the custom name.
2. Set up the message that will be played out to the customer by following the steps in IVR Menu.
3. Under Choose your Bot, select an option from the dropdown list to link the conversational input to a Virtual Assistant that has the intent-based use cases configured for the experience.

4. Under Usecase Collection, select Yes, I want to override configuration option to override the (call experience/chat experience) flow for an existing use case that has been configured on SmartAssist.
5. Type the use case you want in the Search Use case to Override text field.
6. Intent branches : Based on user utterance you can configure a node in the Add Intent branch drop-down.

7. Set up the Timeout flow by defining the following fields:
- TimeOut: Type the wait time in seconds after which a timeout event will occur.
- Your Message to User: For Choose your message type select an option from Text to Speech, Link, or audio; then, type the message, upload an audio file (.mp3 and .wav formats are only supported for audio files), or provide a URL to the error message to be played out to the customer when a timeout event occurs.

- Your Message to User: For Choose your message type select an option from Text to Speech, Link, or audio; then, type the message, upload an audio file (.mp3 and .wav formats are only supported for audio files), or provide a URL to the error message to be played out to the customer when a timeout event occurs.
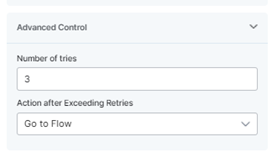
8. Under Advanced Control > Number of Tries, type the limit for maximum number of retries allowed for a customer to key in the input.
9. Under Advanced Control > Action after Exceeding Retries, select the node to direct the flow after a timeout has occurred.
10. Click the Error Handling icon and follow the steps to define the fields that will determine how system errors will be handled during runtime.
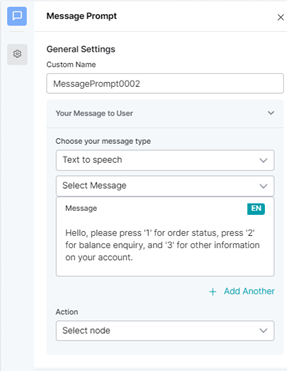
Message Prompt
It effectively plays out a message you’ve set up during the message configuration. This could be used in multiple use cases like an automated response to the contact, filler message while the contact is waiting for an agent, and more.
To configure this node, follow these steps:
1. Click the General Settings icon and provide the custom name.
2. Set up the message to be played out to the customer with same steps as IVR Menu.
- Choose your message type: Select Text to Speech and type the text to be converted to speech.
- Choose your message type: Select Audio File and upload the audio file with the message to be played.
Note: .mp3 and .wav formats are only supported for audio files.

- Choose your message type: Select Link and provide the URL of the audio message to be played.
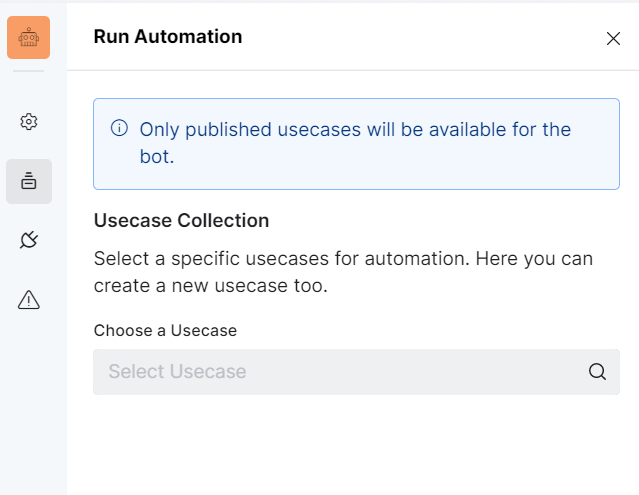
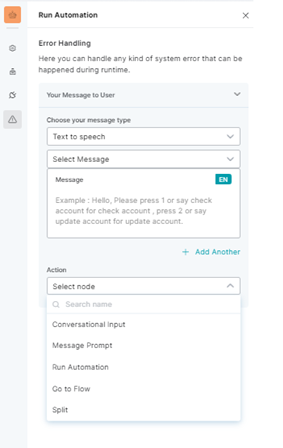
Run Automation
This node is a subset of the conversation input node and helps run a specific dialog that you have built out on your Bot.
To configure Run Automation, follow these steps:
1. Click the General Settings icon and provide the custom name.

2. Select an option from the dropdown list for Choose your Bot to enable the automation functionality for a specific use case configured in the Bot.
3. Click the Use case Collection icon and select a value for Choose a Usecase to run the automation based on the use case definition.
4. Click the On Success/On Failure Settings icon and select the action from the dropdown list for the following:
- On success to define how the Virtual Assistant will handle the success interaction scenario from the backend.
- On Failure to define how the Virtual Assistant will handle the failure interaction scenario from the backend.

5. Click the Error Handling icon and follow these steps to configure error handling flows during runtime for Run Automation.
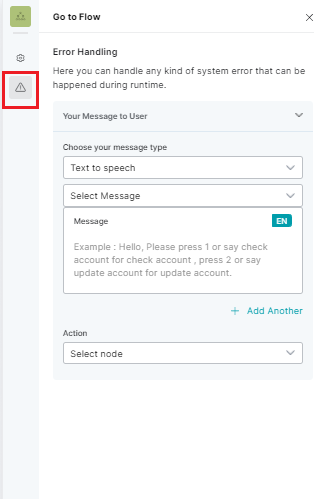
Go To Flow
This node helps navigate from the parent to a target flow that is already built in a specific part of the customer interaction.
To configure this node, follow these steps:
1. Click the General Settings icon and provide the Custom Name.
2. In the Transfer To section, select the target flow name from the dropdown list under Choose a flow to transfer the conversation to this flow.

3. Click the Error Handling icon and follow these steps for system runtime error handling for the Go to Flow.
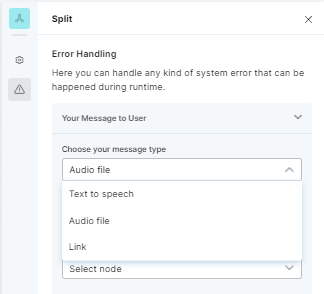
Split
This component enables you to split your incoming calls based on the defined conditions to reduce inbound traffic. These conditions use context variables that define the scope of usage in the dialog task and intent transition conditions.
The syntax for defining a context variable is:
context.contextvariable.<< context variable name >>
For example, intent is a context variable that defines the customer’s intent for a dialog. This variable can be defined in the condition as:
context.intent.<< intent name >>
Learn more about context variables here.
To configure this node, follow these steps:
1. Click the General Settings icon and provide the custom name.
2. Define the IF/IF-ELSE conditions using context variables, and the AND/OR operator under Execute those branches where condition matches.
3. Select an option for Action and type the Branch Name value in the text field to route the customer logic to this branch.


4. Click the Error Handling icon and follow the steps for system runtime error handling for Split.
Check Business Hours
This node is used to select the working hours and decide the next Action node in case of Inside working hours and Outside working hours. You can also handle any system errors.
To configure Check Business Hours, follow these steps:
1. Click the General Settings icon and provide the custom name.
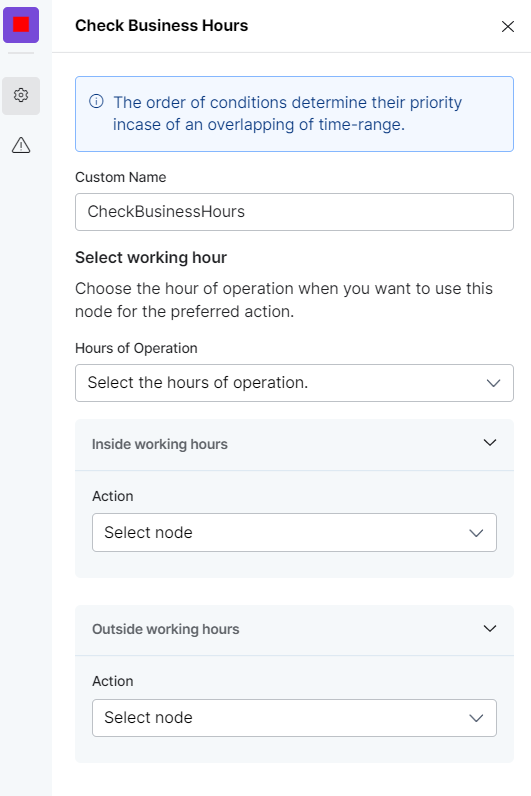
2. Under Hours of Operation, select the hours of operation from the drop-down. Default Hours of Operation is auto created.
3. For Inside working hours, you can define success path by selecting a node from the Action dropdown list. The flow is directed to the selected node from the current node if a condition is satisfied. Similarly for Outside working hours, you can define the path by selecting a node from Action dropdown.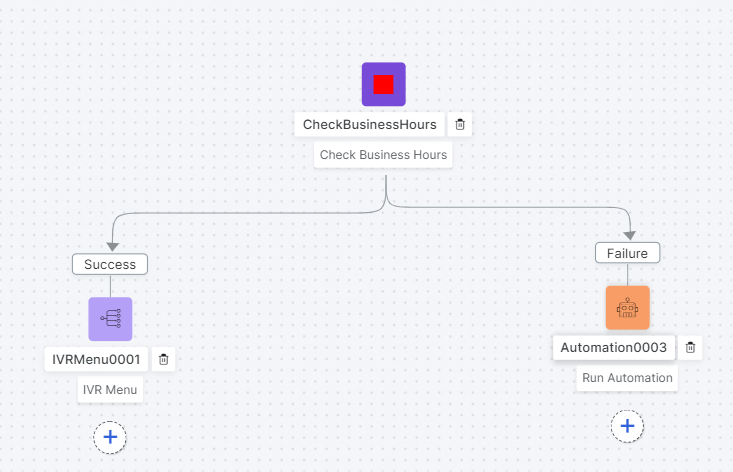
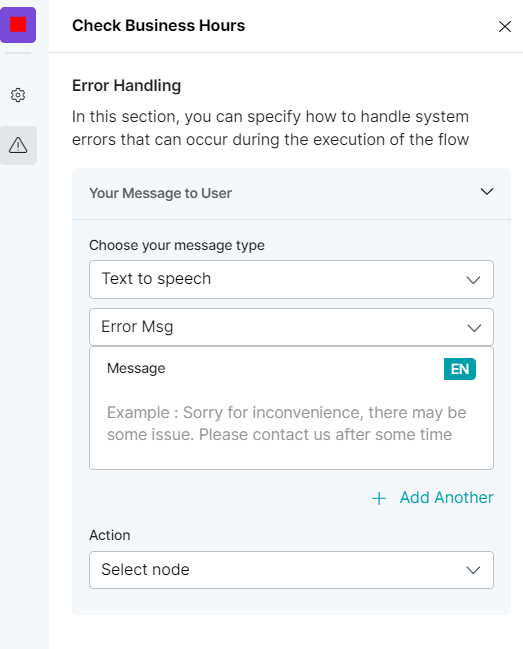
4. Click the Error Handling icon and follow these steps to define how system errors for CheckBusinessHours will be handled during runtime.
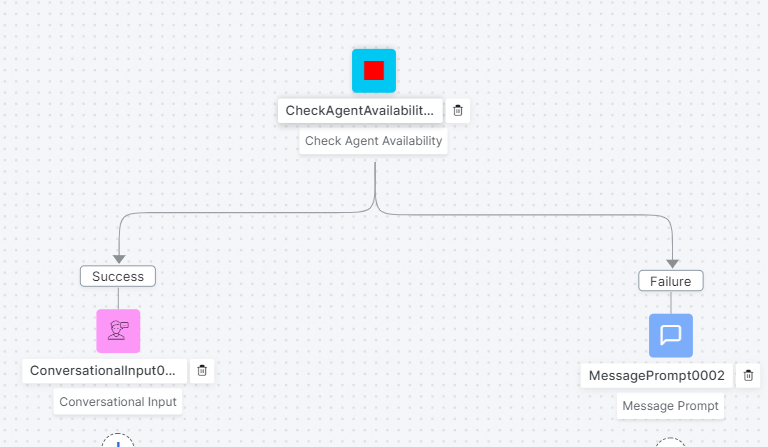
Check Agent Availability
This node is used to check agent availability based on the skillset and decide the next Action node in case of available agent and unavailable agent. You can also handle any system errors.
1. Click the General Settings icon and provide the Custom Name.
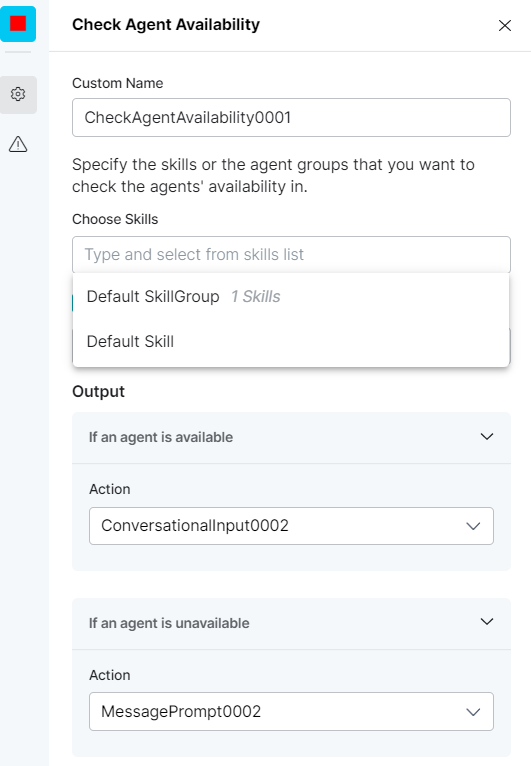
2. In Choose Skills drop-down, select the specific skills for the agent.

3. Select he check box , Check for specific agent or agent groups to search for specific agents or groups in the text field.
4. Under Output, you can define success path by selecting a node in Action drop-down for ‘if an agent is available’ option. The flow is directed to the selected node from the current node if the condition is satisfied. Similarly for ‘if an agent is unavailable’, you can define the path by selecting a node from Action dropdown.

5. Click the Error Handling icon and follow these steps to define how system errors for CheckAgentAvailability will be handled during runtime.

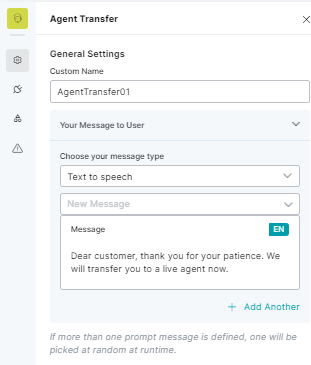
Agent Transfer
This node is used to explicitly transfer control from an existing contact flow to a live agent based on the trigger defined by the user.
To configure this node, follow these steps:
1. Click the General Settings icon and provide the value for the custom name.
2. Configure the message to be played to the customer with the same steps as IVR Menu.
![]()
- Choose your message type: Select Text to Speech and type the message to be converted to speech.
- Choose your message type: Select Audio File and upload the required file to be played.
 Note: .mp3 and .wav formats are only supported for Audio files.
 - Choose your message type: Select Link and provide the URL of the audio to be played.

3. In the Transfer to Agents section, select the Skills from the list to define the routing logic that directs the customer to a specific agent with the skill(s).
![]()
4. Select “No, I want to override with adding specific Agents or Agent Groups” option to route the transfer to a specific agent/agent group by overriding the existing skills. For this, type the Agent/Agent Group in the text field or select an option from the suggested list.
![]()
5. Click the Waiting Experience icon to configure.
- The customer’s Waiting Experience for the current Agent Transfer flow. You have a Default Waiting Experience or click the Override icon to replace the default value.

6. Click the Error Handling icon and follow these steps to define how system errors for agent transfer will be handled during runtime.
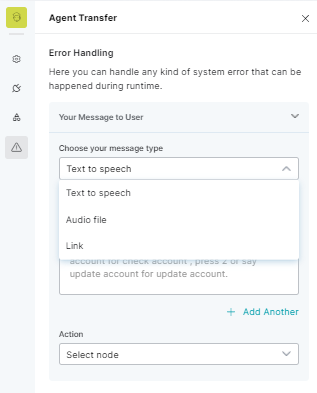
- Choose your message type: Select Text to Speech and type the text to be converted.
- Select Audio file and select the audio file to be played.
Note: .mp3 and .wav formats are only supported for audio files. - Select Link and provide the URL of the audio message to be played.
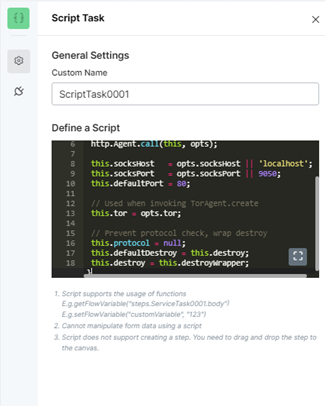
Script Task
This node allows the user to define a script for processing any context variables or other variables that are used in building the contact flow. The user can use the JavaScript editor to develop the script.
Important Note:
-
-
- Form data cannot be manipulated using a script.
- The script node does not support creating a step in the flow. This has to be explicitly designed on the canvas.
-
To configure this node, follow these steps:
1. Click the General Settings icon and provide a value for Custom Name.
2. Under Define a Script, input the script you want to run in the JavaScript window.
3. Click the Action icon below General Settings and set up the On Success and On Failure options.
-
-
- For On Success, select an option for Action (to define how the Bot entity will handle the scenario from the backend) and the designated node for that action if the script provided by the user runs successfully.
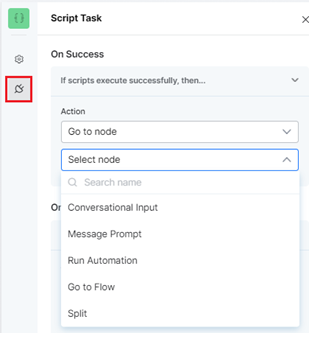
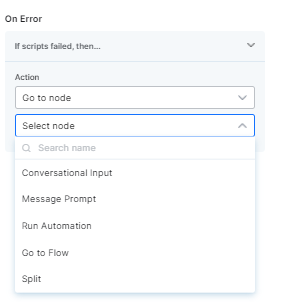
- For On Error, select an option for Action (to define how the Bot entity will handle the scenario from the backend) and the designated node for that action if the script provided by the user fails during execution.
- For On Success, select an option for Action (to define how the Bot entity will handle the scenario from the backend) and the designated node for that action if the script provided by the user runs successfully.
-
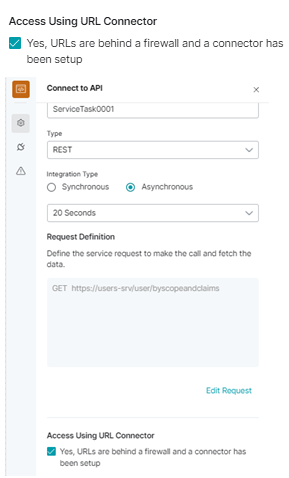
Connect to API
This node lets the user make synchronous or asynchronous requests using the SOAP or REST API calls.
The user can query or get information from an external system by defining the service request that includes defining the APIs and passing the parameters.
To configure this node, follow these steps:
1. Provide a custom name in the General Settings section.
2. Select a value for Type from the following options:
-
-
- REST: A REST API conforms to the constraints of REST architectural style and allows for interaction with RESTful web services.
- SOAP: A SOAP API uses the Simple Object Access Protocol (SOAP) which is a messaging protocol for interchanging data in a decentralized and distributed environment.

-
3. Select a value for Integration Type from the following options:
-
-
- Synchronous: The API returns resources, data, or services for a request immediately.
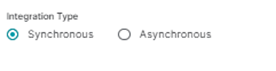
- Asynchronous: The API returns resources, data, or services for a request at a later time based on the number of seconds you select (default selection is 20 seconds).
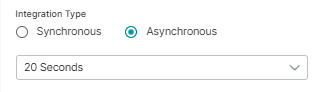

- Synchronous: The API returns resources, data, or services for a request immediately.
-
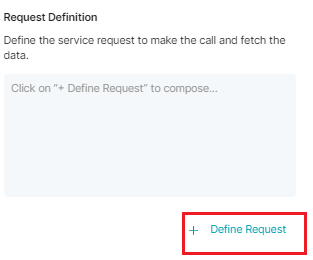
4. Under Request Definition, define the GET, PUT, POST, or DELETE service request with the API call and parameters you want to pass to make the call and fetch the data. To create a new request, click + Define Request.
The following window appears where you can define your API call.
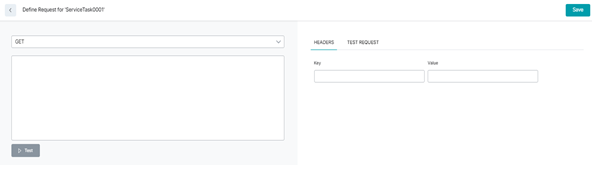
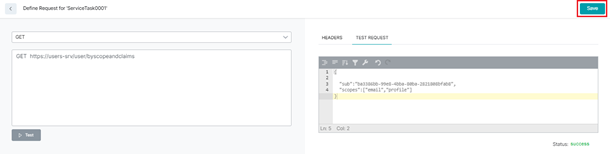
To test your API call, follow these steps:
- Select the GET, POST, PUT, PATCH or DELETE call from the list.

- Paste your API call URL in the text field and click Test.

- Your API call runs successfully if all the inputs provided are valid. Otherwise, an error message is displayed.
- Provide the details for the Header Key and Value pair.

- Click Test Request and paste the request body code in the text field.

- Click Save after you’ve tested the API successfully.
5. For the Access Using URL Connector option, select “Yes, URLs are behind a firewall and a connector has been setup” if the API has to be accessed using a URL connector that has been set up.
6. Click the action icon and select an option from the dropdown list for the On success and On failure conditions.
- For On Success, the selected action defines how the Bot entity will handle the success scenario for an API call from the backend.

- For On Failure, the selected action defines how the Bot entity will handle the failure scenario for an API call from the backend.

7. Click the Error Handling icon and follow these steps to configure error handling during runtime.
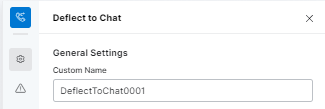
Deflect to Chat
This node facilitates a contact flow that transfers the current conversation from the call to the chat channel where the customer is provided a link to connect and interact with an agent.
To configure this node, follow these steps:
1. Click the General Settings icon and provide the input for the custom name.
2. Define the deflection flow the callers will experience for this use case under Deflection Setting by selecting one of the following options:
- Chat Automation to route the customer to a chat automation assistant.

- Live Chat Agent to connect the customer to a human agent.
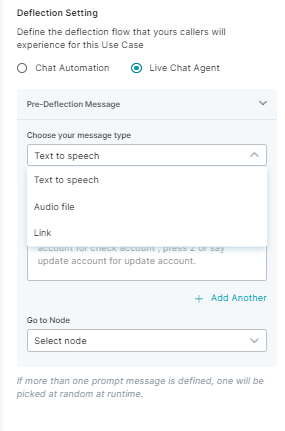
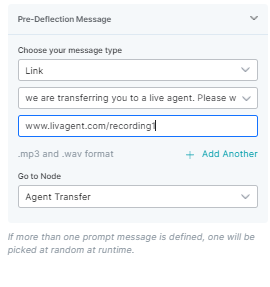
3. In the Pre-Deflection Message section, choose the message to be played to the customer with the same steps as IVR Menu.
-
-
-
- Choose your message type: Select Text to Speech and type the text to be converted.
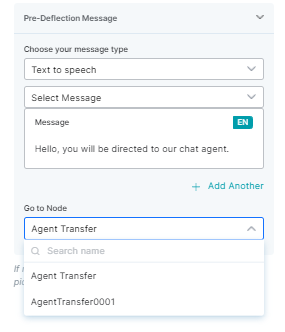
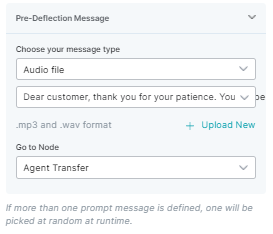
- Choose your message type: Select Audio File and upload the audio of the message to be played.
Note: .mp3 and .wav formats are only supported for audio files.
- Choose your message type: Select Text to Speech and type the text to be converted.
-
-

- Choose your message type: Select Link and provide the URL of the audio message to be played.
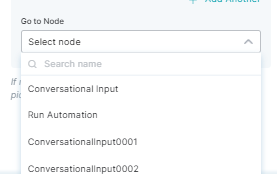
4. For Go to Node, select the node from the dropdown list to direct the flow to it after the call deflection happens.
5. Click the Error Handling icon and follow these steps to define the error handling flow for Deflect to Chat during runtime.

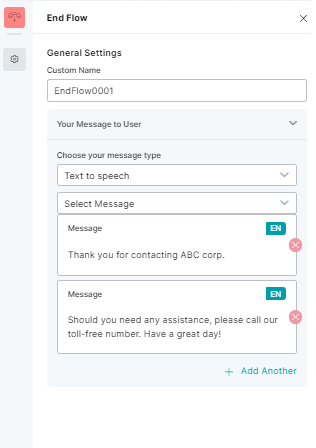
End Flow
This node allows the user to define what message will be played to the customer when the contact flow ends.
To configure this node, follow these steps:
1. Click the General Settings icon and provide the input for the custom name.
2. Set up the message that will be played to the customer with the same steps as IVR Menu.
Publishing a Flow
On publishing the Experience Flow, it becomes available to end-users.
- Click Publish button.
- The following pop-up is displayed.
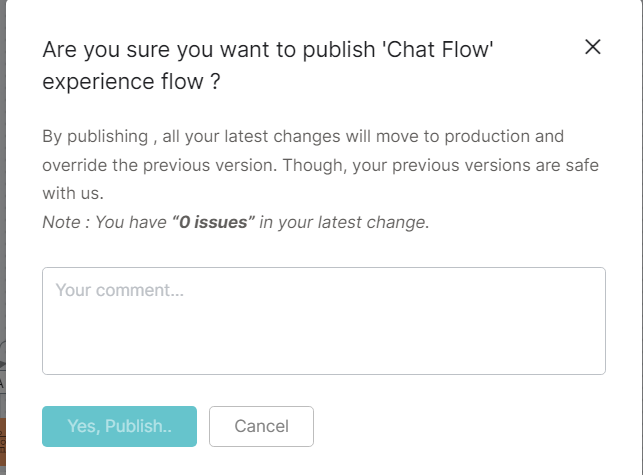
3. Enter comments and click Yes, Publish. The following success message is displayed.
![]()
Restore a Flow
To use a previous version of the experience flow that was created you can use the Restore option. To restore the previous version, perform the following steps:
- Click on the ellipsis next to Publish button. The options Save Version and Flow Versions are listed.
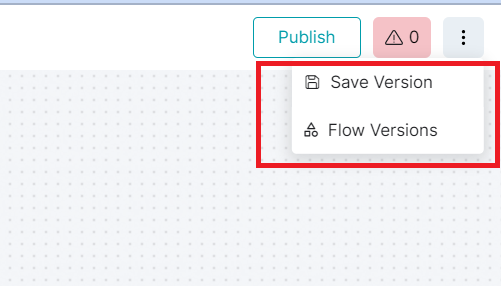
- On clicking Save Version, the following pop-up window is displayed, where you can enter the name of the version, comments and click Save. The version gets saved.

- On clicking Flow Versions, all the available versions of the flow are listed.
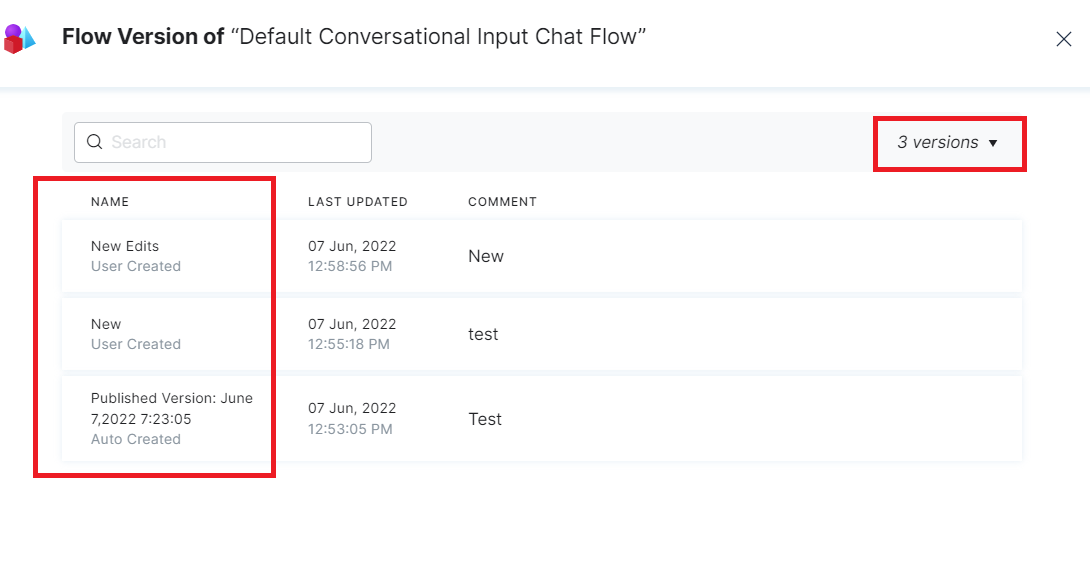
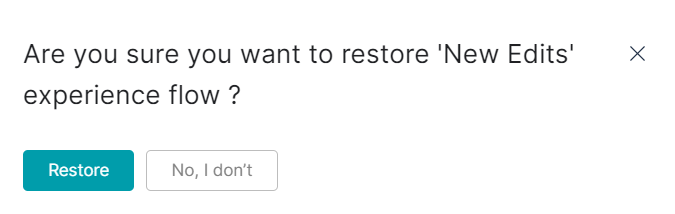
- To restore the version you want, click on Restore icon which appears across that version on hovering.

- On clicking the icon, the following confirmation pop-up is displayed. Click Restore button.
6. The flow gets successfully restored and would be in an Unpublished state.
If required. the flow versions can be deleted too using the Delete icon.