Agent AI now enables channel-specific widget customization, letting users modify the widget’s layout as required. As you customize the widget, you can preview the changes on the right-half of the page.
Steps to customize the widget’s layout
- Sign in to Agent AI.
- Go to Configuration > System Setup > Widget Theming.
- Click Layout Customization.
- Click to select a Channel – Chat, Voice, or Email.
- Select a language in the language dropdown list.
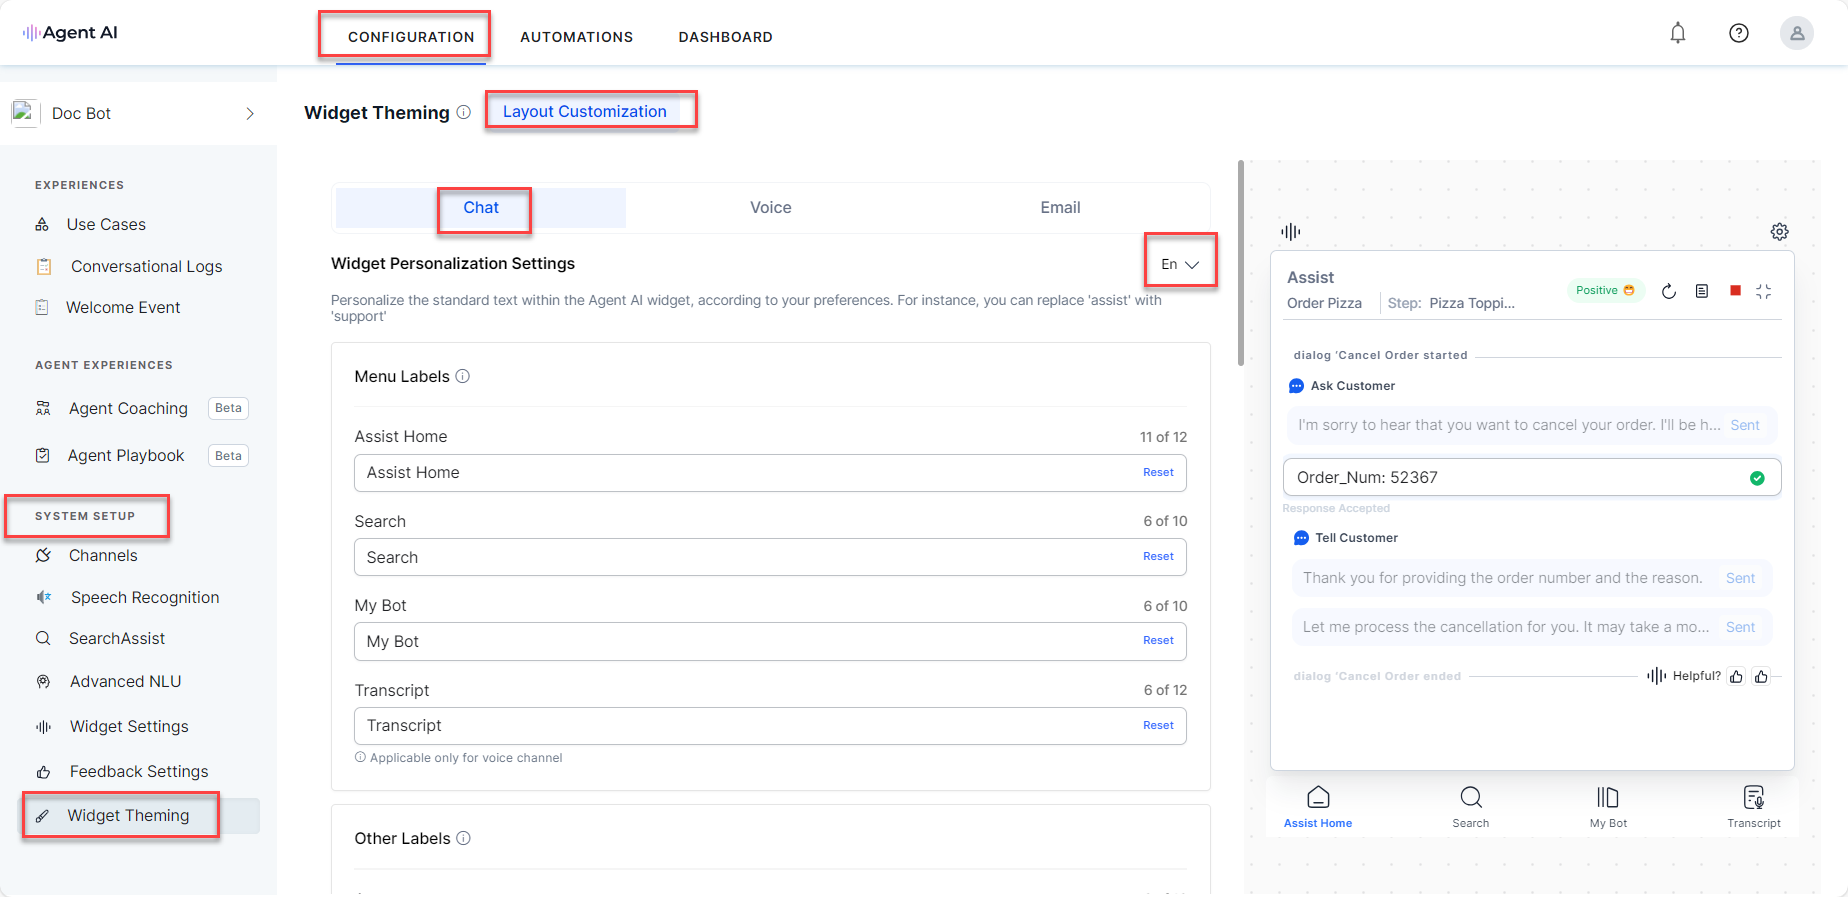
- Customize the layout as required:
- Menu Labels
- Other Labels
- Dialog Task Labels
- Assist Message Type
- Visibility Controls for Sent/Copied Messages
- Widget Menu Layout
- Assist Action Menu Layout
- Dialog Task Layout
- Click Save to save all the customization.
Menu Labels
In this section, you can customize all the widget menu names. The standard menu names are Assist Home, Search, My Bot, and Transcript (for Voice channels). As you modify the menu names on the left side of the page, you can preview your changes on the right side. In the following screenshot, Assist Home has been modified to My Assist:
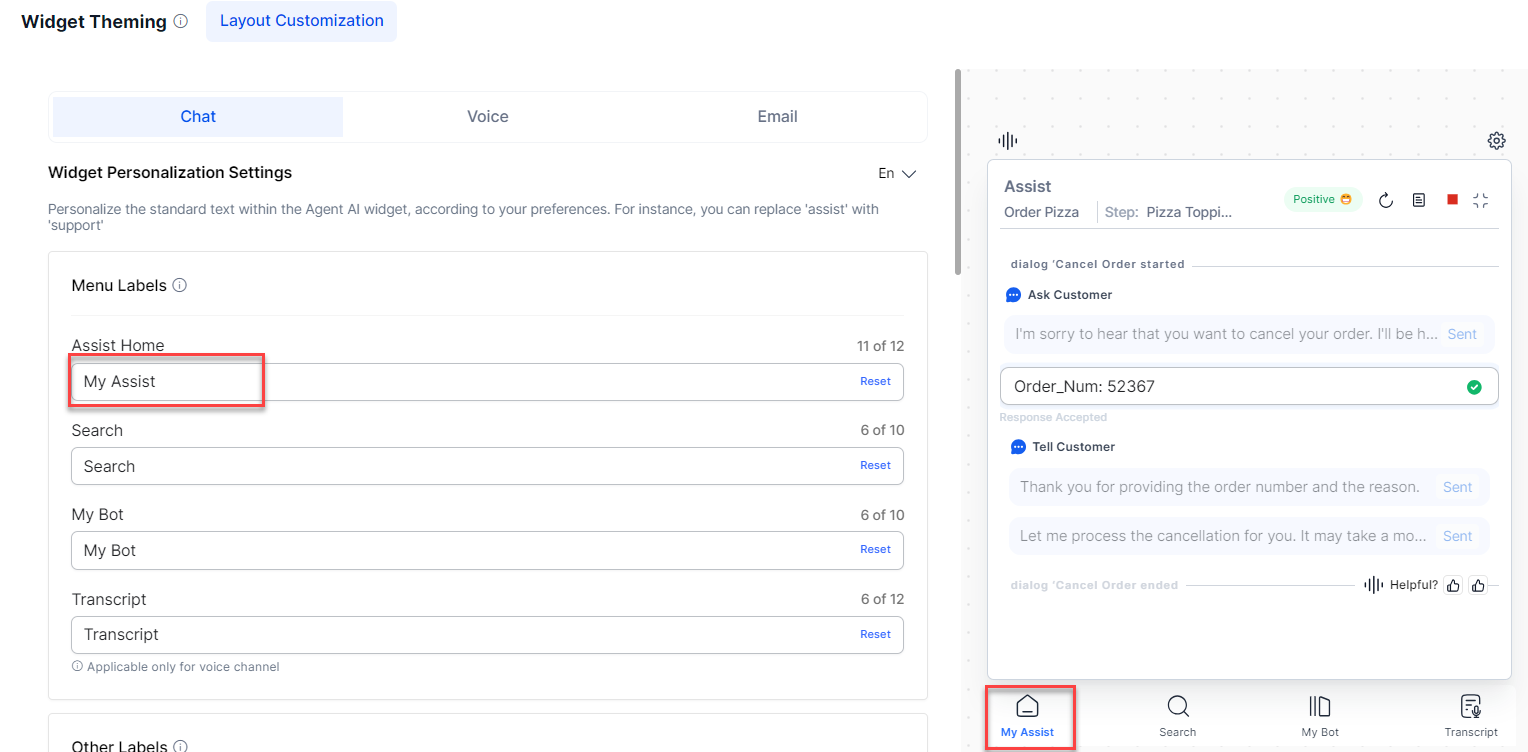
Similarly, you can modify the other menu names, such as Search, My Bot, and Transcript (for Voice channels), as required. Note that the Assist Home menu has a limit of 12 characters, and the other menus have a limit of 10 characters only. Click Reset to return to the default menu name.
Other Labels
This section lets you customize the labels related to dialog tasks. You can’t preview the changes as the dialog task runs in the background. In the following screenshot, the Answers label has been renamed as Articles:
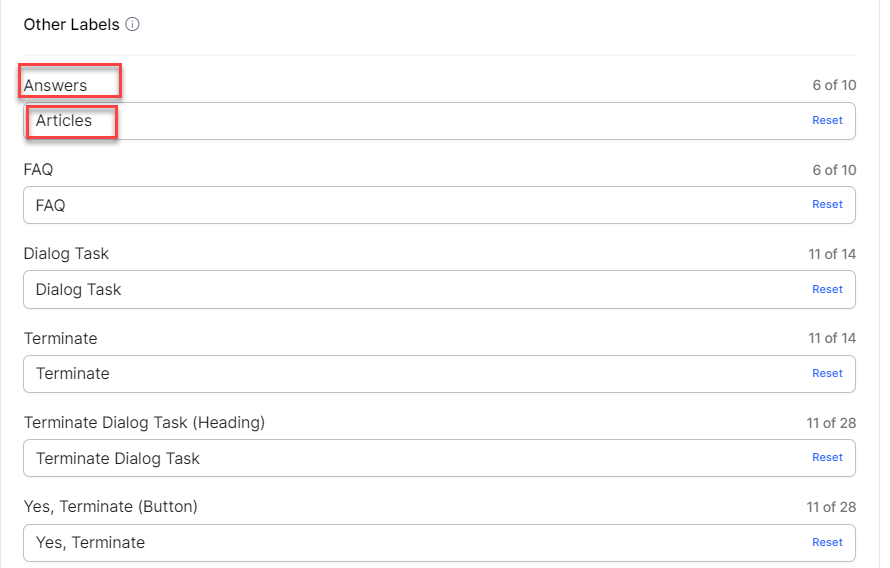
Similarly, you can modify the other labels like FAQ, Dialog Task, Terminate, Terminate Dialog Task (Heading), and Yes, Terminate (Button). Note that the Answers and FAQ labels have a limit of 10 characters, Dialog Task and Terminate have 14, and Terminate Dialog Task (Heading) and Yes, Terminate (Button) have 28. Click Reset to go back to the default label name.
Dialog Task Labels
Here, you can customize dialog task timeline, display, and labels. You can use {{Task}} as a placeholder for dynamic dialog names. You can disable this entire section by using the “toggle” button at the top and enable or disable either or both the labels (Dialog Started and Dialog Ended). In the following screenshot, Dialog {{Task}} started label has been renamed as Dialog {{Task}} began.
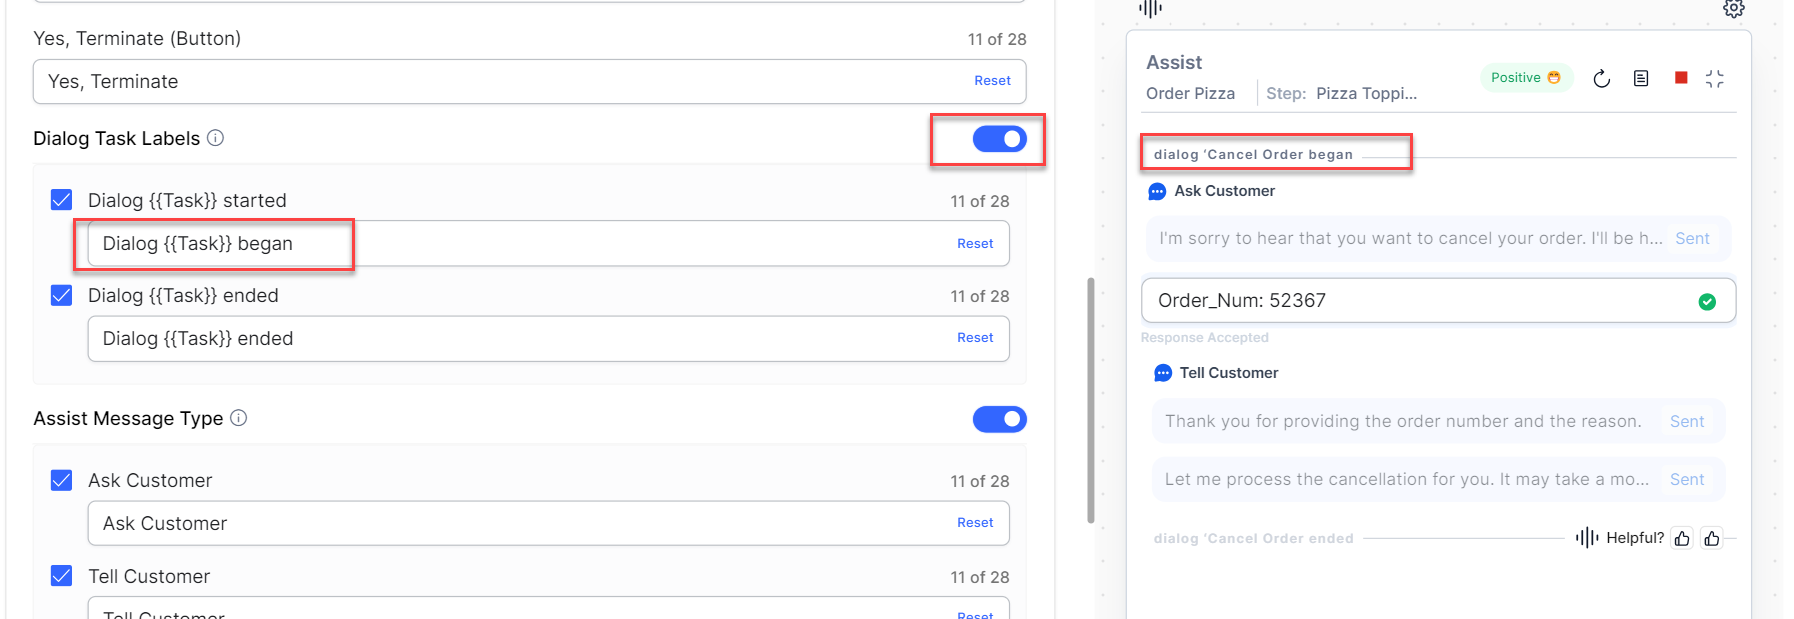
Note that both the Dialog {{Task}} started and Dialog {{Task}} ended labels have a limit of 28 characters each. Click Reset to go back to the default label names.
Assist Message Type
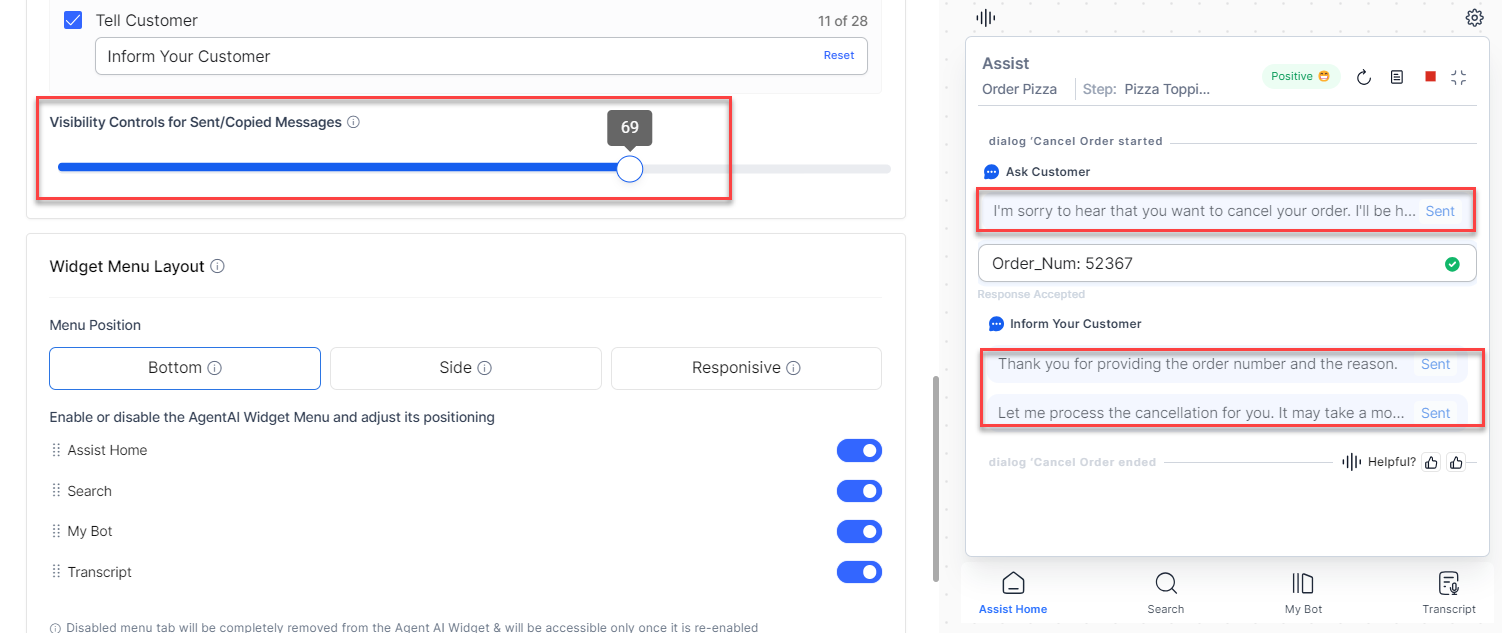
Here, you can customize the Assist message type displays and labels. You can disable this entire section by using the “toggle” button at the top, or enable or disable either or both the Ask Customer or Tell Customer labels. In the following screenshot, the Tell Customer label has been renamed as Inform Your Customer.
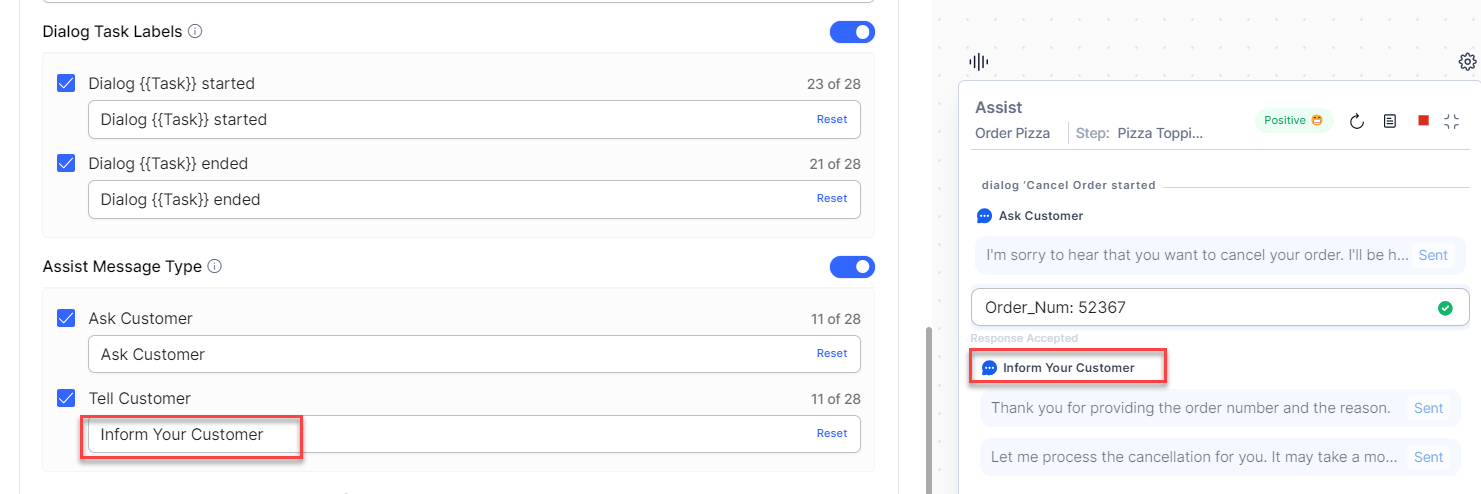
Note that the Ask Customer and Tell Customer fields are each limited to 28 characters. Click Reset to return to the default label names.
Visibility Controls for Sent/Copied Messages
This slider lets you control the opacity (visibility) of the Sent and Copied messages’ backgrounds. Using this slider, you can view the opacity percentage and preview the messages’ background visibility. By default, the opacity percentage is set to 50%.
Widget Menu Layout
This section lets you enable or disable the Agent AI widget menus – Assist Home, Search, My Bot, and Transcript (for the Voice channel). The disabled menus appear on the widget, only if you enable them back. It also lets you select a landing tab and create a custom tab (+ Add Custom Tab). You can position the menus at the bottom or the side by clicking the Bottom or Side options at the top or shuffle the menus with the drag-and-drop action. To automatically position the menus based on the pixel level, select the Responsive option; If the pixel size is less than 600, the menus move to the bottom, and for more than 600, the menus move to the left. The following screenshot shows a disabled Search menu, Side positioning of the enabled menus, My Bot tab marked as the landing tab, shuffled Assist Home menu with the My Bot menu, and the + Add Custom Tab button:
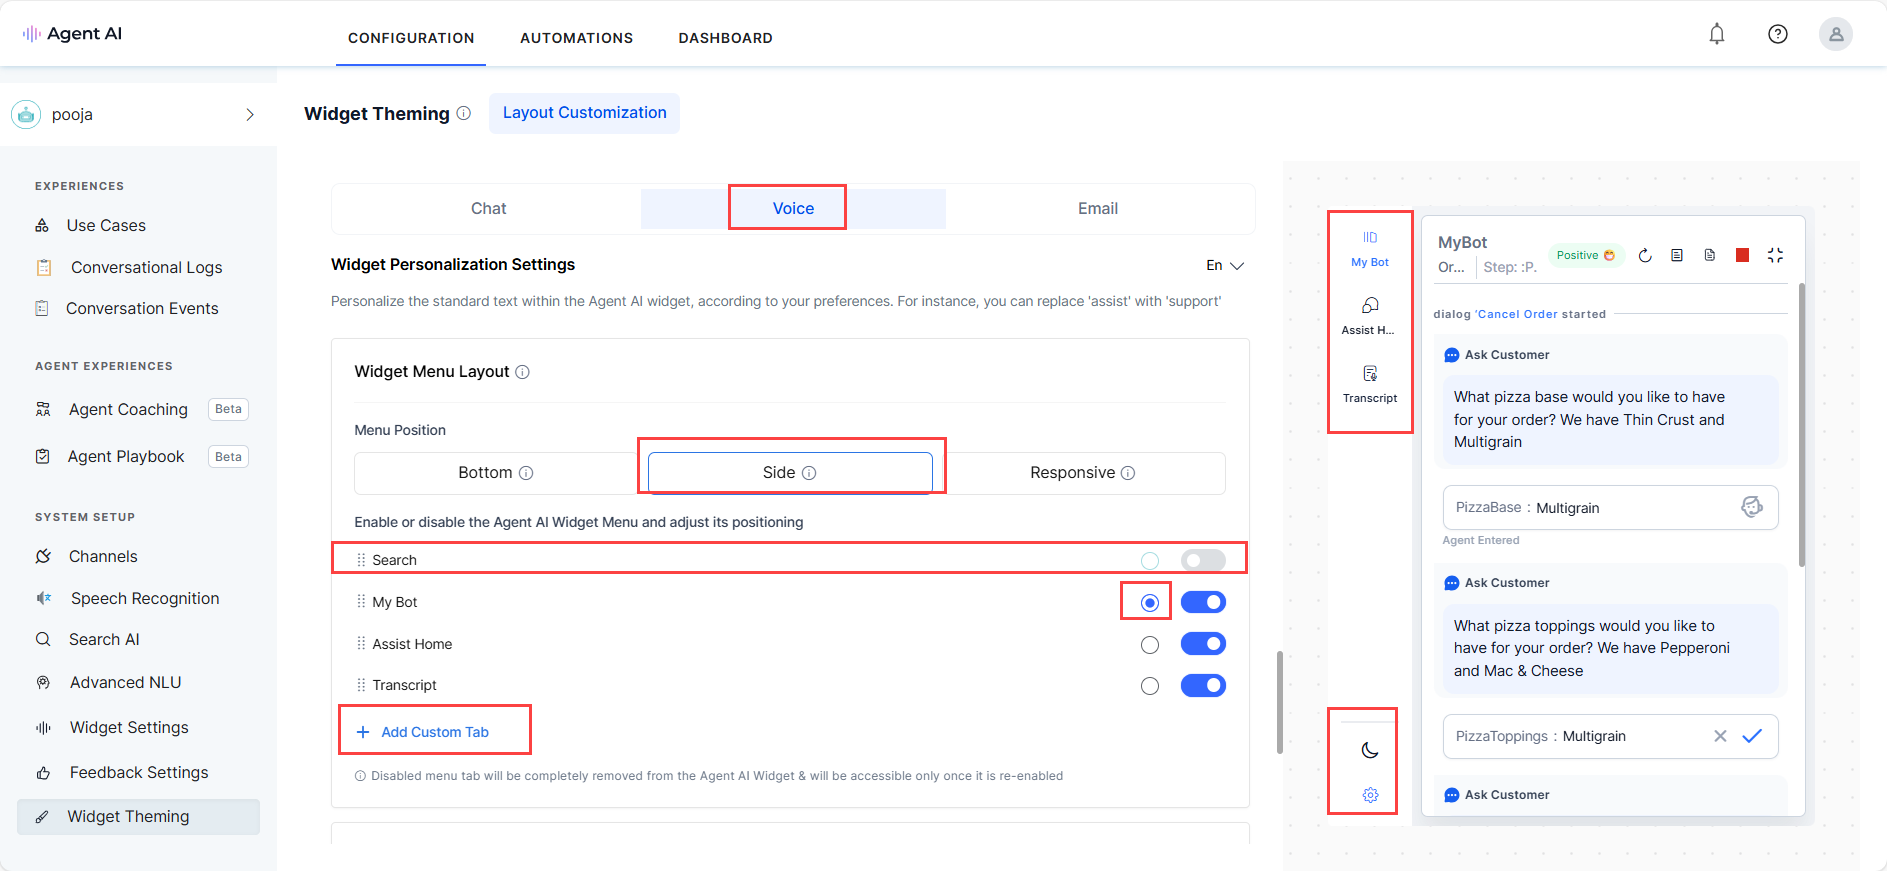
Note: The Dark Mode and Settings menu symbols are not customizable, and the Dark Mode is the only functional button even in the preview mode of the widget.
Add a Custom Tab
The + Add Custom Tab feature lets you create a custom tab within the Agent AI widget. You can configure the tab to either run a dialog task automatically based on selected events or highlight a task for agents to view and execute, as needed. Once named, you can rename, edit, and mark it as the landing tab. Follow these steps to add a new custom tab:
- Sign in to Agent AI.
- Go to Widget Theming > Layout Customization.
- Click + Add Custom Tab under the Widget Menu Layout section.
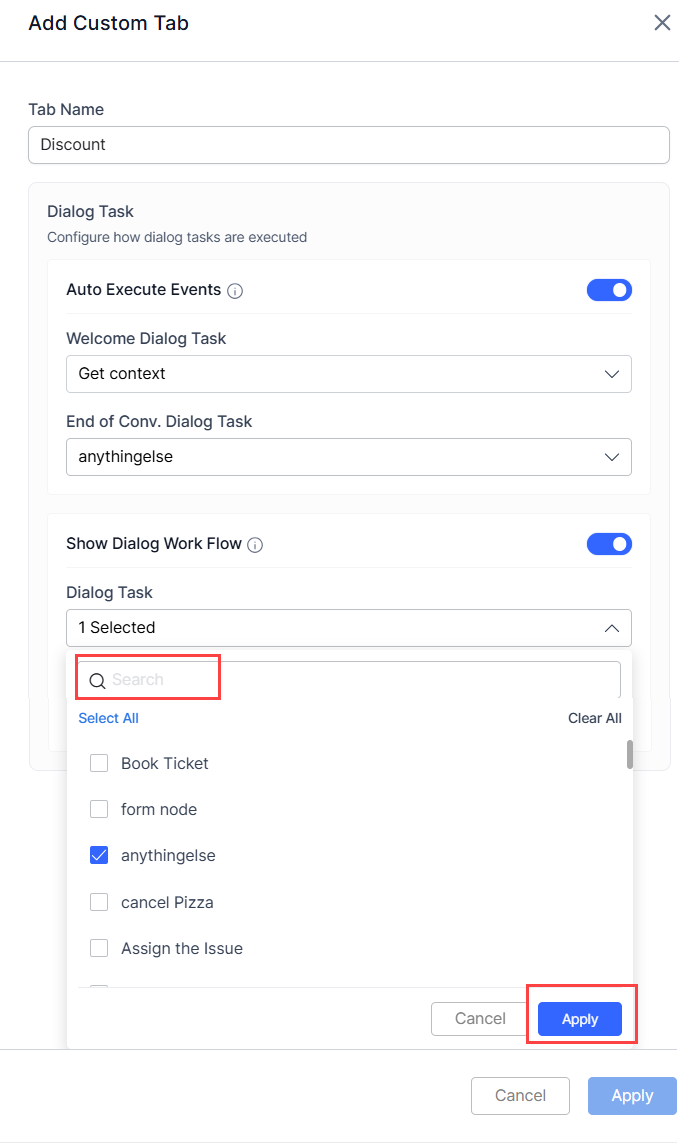
- Enter a name in the Tab Name field.
- Select how you want to execute the dialog task:
- To execute dialog tasks automatically based on events:
- Select the Auto Execute Events toggle.
- Select a dialog task from the Welcome Dialog Task and End of Conv. Dialog Task dropdown lists.
- To view dialog tasks and execute them manually:
- Select the Show Dialog Workflow toggle.
- Select dialog tasks from the Dialog Task dropdown list. You can also search for dialog tasks by entering dialog task names in the search field.
- Click Apply.
- To execute dialog tasks automatically based on events:
- Click Apply. The custom tab is created, as highlighted in the following screenshot:

Edit and Delete a Custom Tab
To modify or delete an existing Custom Tab:
- Sign in to Agent AI.
- Go to Widget Theming > Layout Customization.
- Click the “edit” button against the custom tab, under the Widget Menu Layout section.
- Make all the updates, as required, and then click the Update button.
- Click Delete to delete the custom tab.
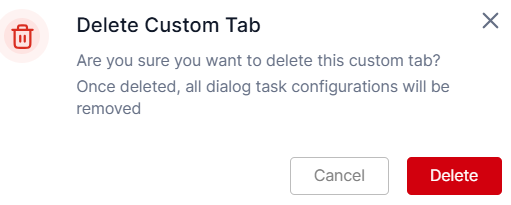
- Click Delete on the confirmation window.
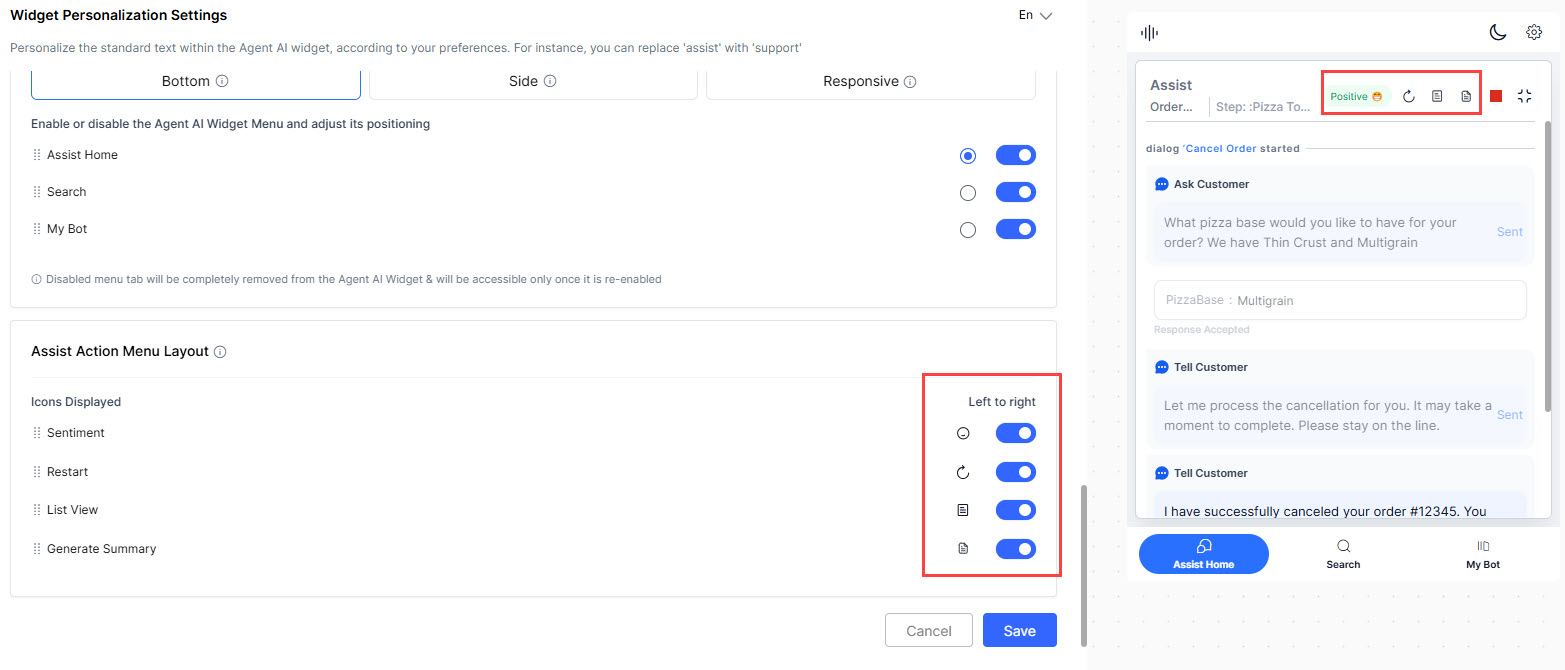
Assist Action Menu Layout
This section lets you enable, disable, and customize the placement of the action buttons in the Assist tab. You can use the toggles to enable or disable the buttons and the drag-and-drop action to shuffle their positions. The following screenshot shows all enabled action buttons:
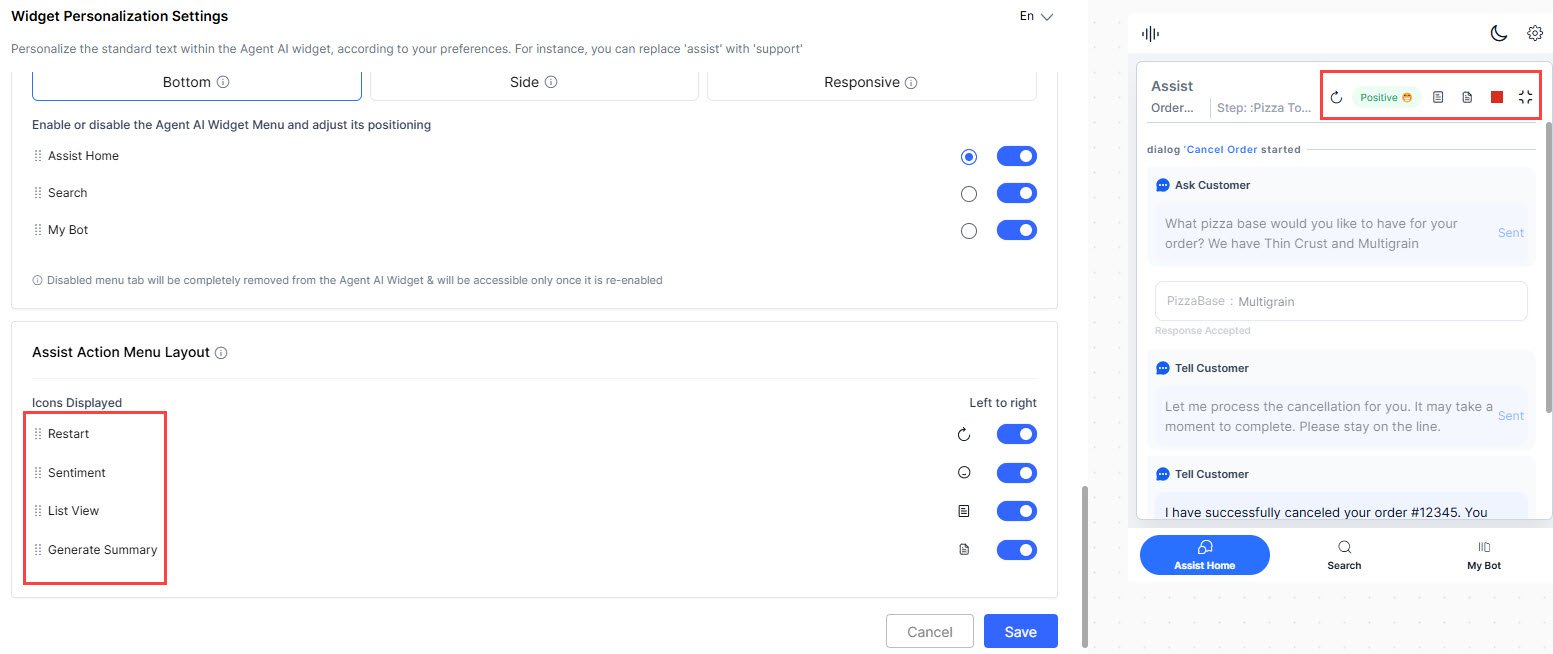
To shuffle these action buttons, drag-and-drop their names under the Assist Action Menu Layout > Icons Displayed section. The following screenshot shows shuffling of the Sentiment button with the Restart button:
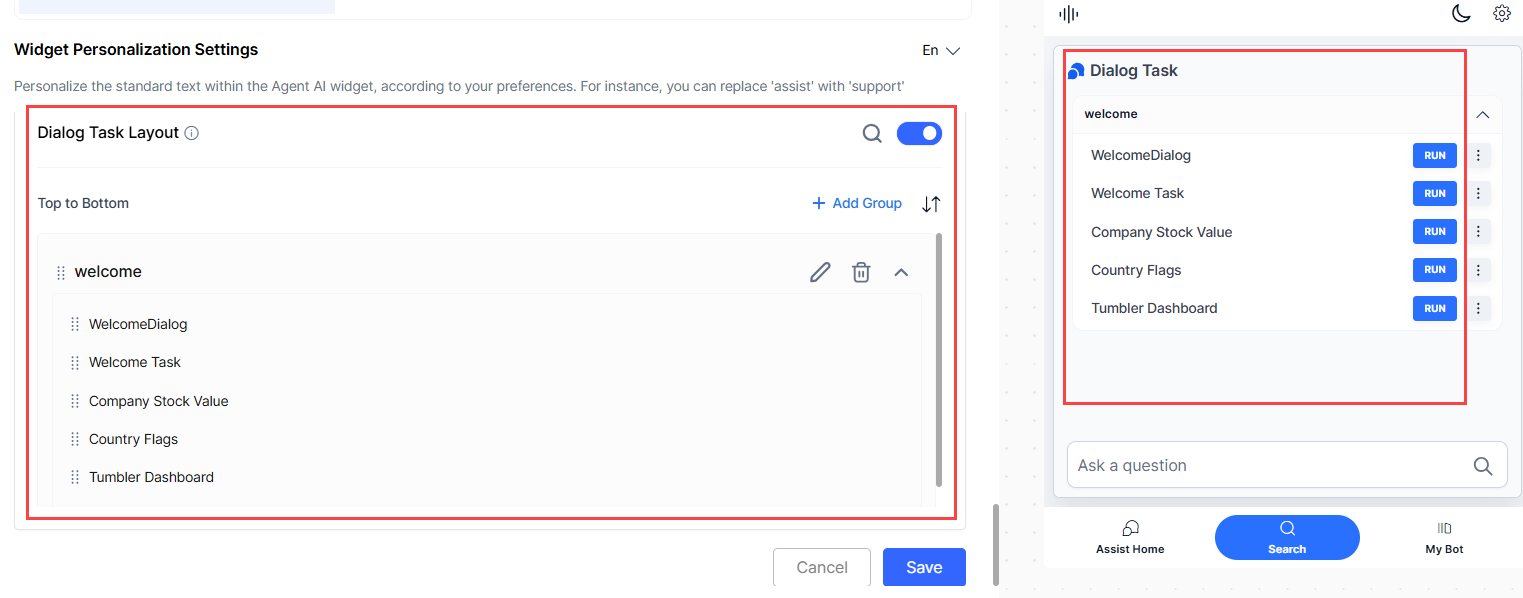
Dialog Task Layout
The Dialog Task Layout section enables you to enhance the management and customization of dialog tasks within the widget. Here, you can arrange and group dialog tasks to display in the Library during runtime. Dialog tasks not added to a group don’t appear at runtime. The key features of this section are:
- Dialog Task Search
- Dialog Task Sorting
- Dialog Task Grouping
Dialog Task Search
This feature lets you easily search for dialog tasks, like searching a word within a web page. To search for a dialog task:
- Click the “search” button on the top-right corner of the Dialog Task Layout section.
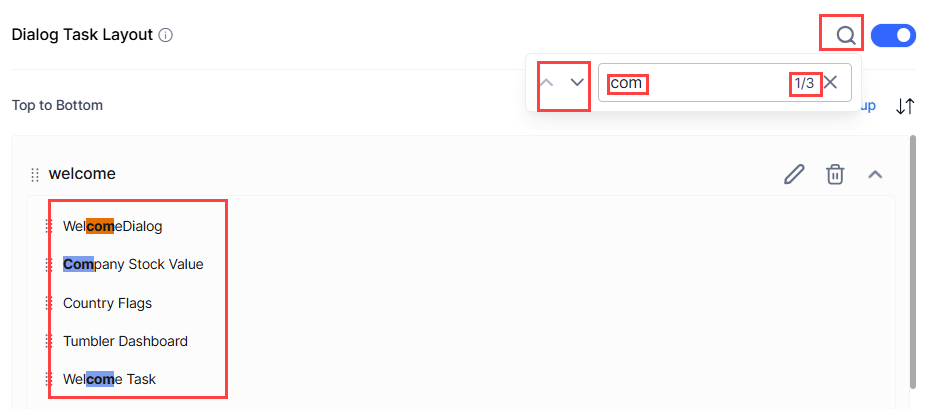
- Enter a few letters of the dialog task name. As you enter the letters, matching letters in the existing dialog tasks are highlighted, with the number of occurrences. Up and down arrows also appear to let you easily navigate to the intended dialog task. The following screenshot shows the search result of the letters “com,” along with the occurrence count and navigation arrows:
Dialog Task Sorting
This feature allows you to sort dialog tasks for improved accessibility. You can sort them alphabetically and reorder them by moving any dialog task up or down the list.
- To sort dialog tasks alphabetically, click the up or down arrow at the top of the dialog task list:

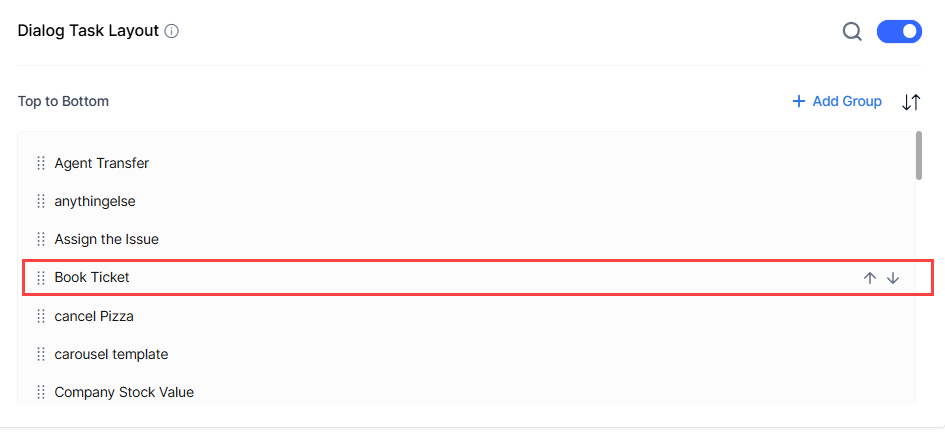
- To reorder the list by moving a dialog task to the top or bottom, click the up or down arrow against a dialog task:
Dialog Task Grouping
This feature allows you to organize dialog tasks into groups. During group creation, up to five selected dialog tasks are displayed, with additional dialog tasks visible if “Show All” is clicked. Group names must be unique. A single dialog task can be associated with multiple groups. You can add, edit, and delete groups, as well as add, sort, and remove dialog tasks within a group.
Note: Dialog tasks not added to a group don’t show up during runtime.
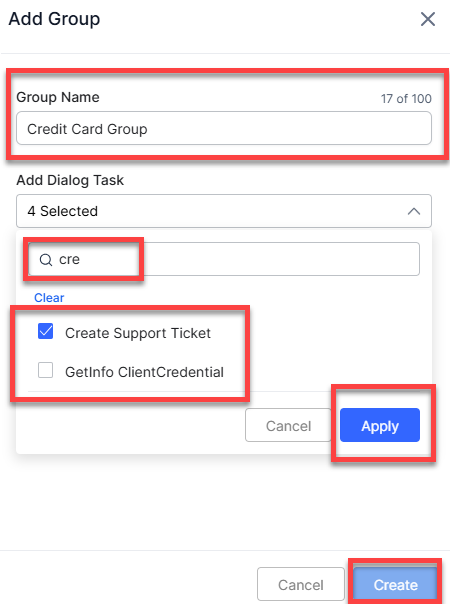
Adding a Dialog Task Group
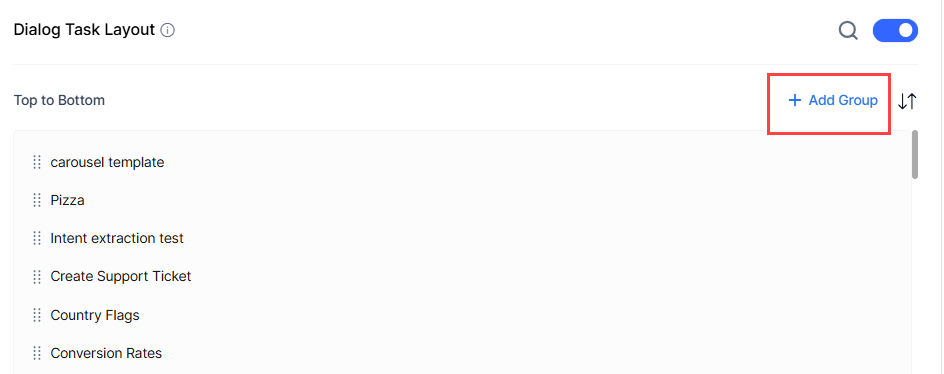
- Click + Add Group at the top-right corner of the Dialog Task Layout section.
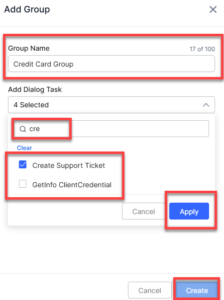
- Enter a unique name in the Group Name field. You can add up to 100 characters.
- Click the Add Dialog Task field to display all the existing dialog tasks.
- Click to select the dialog task names. You can also click the “search” button to find a dialog task.
- Click Apply to complete the dialog tasks selection process.
- Click Create.
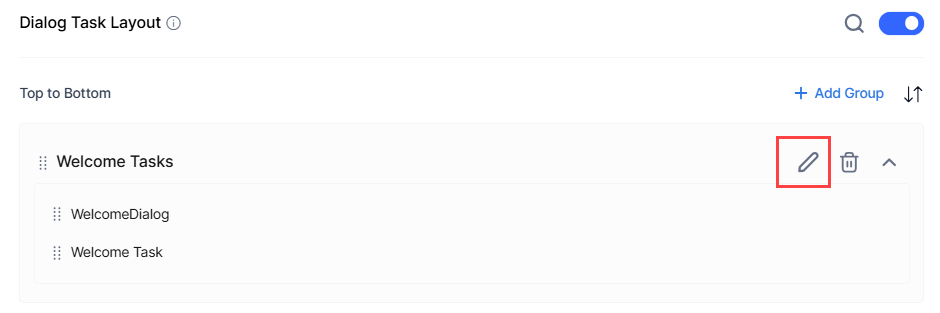
Edit, Expand, Collapse, or Delete a Dialog Task Group
Use this section to rename a dialog task group, manage its dialog tasks, or expand, collapse, or delete the group.
- To edit a Dialog Task Group, click the “edit” button against the Dialog Task Group name:
- Make all the required changes, and click Save.
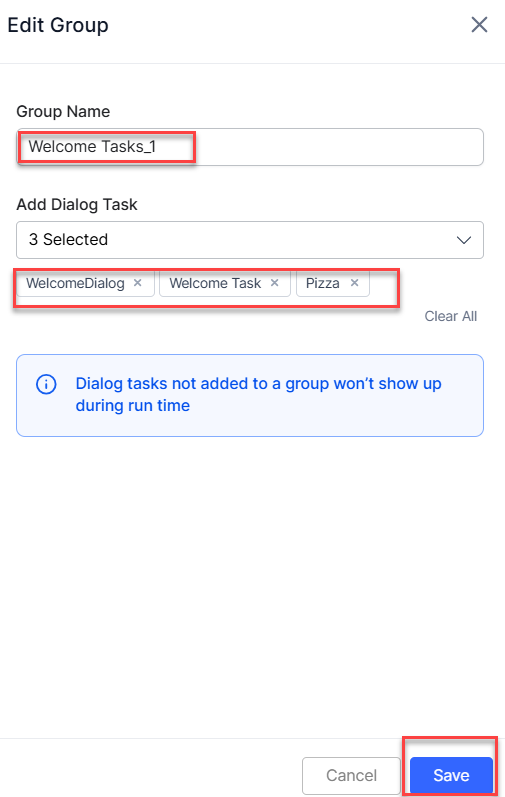
- Make all the required changes, and click Save.
- To delete a Dialog Task Group, click the “delete” button against it:
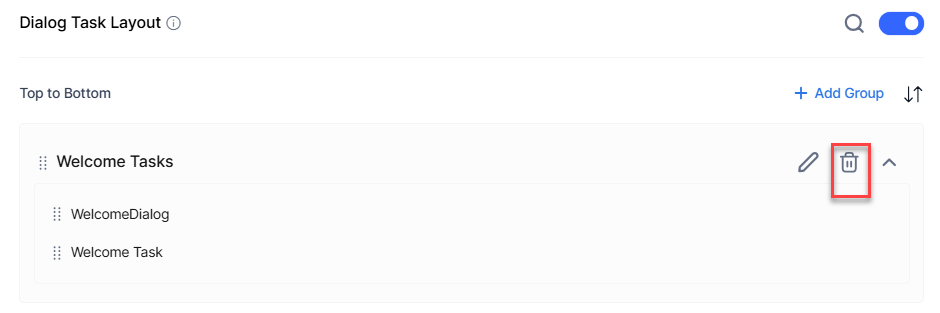
- Click Delete in the confirmation window.
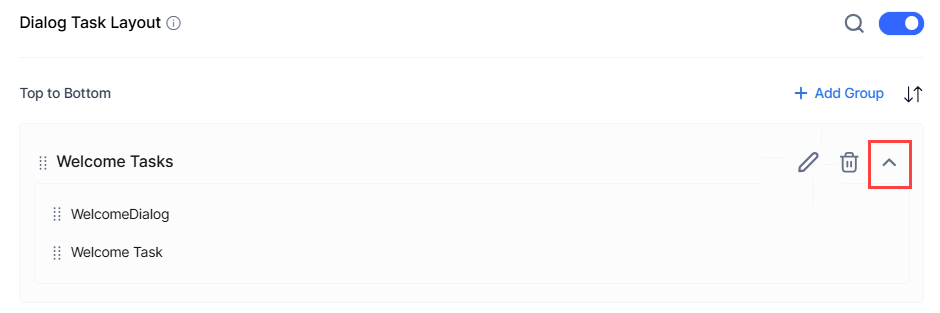
- To expand or collapse, click the expand/collapse button:

Note: The widget retains the expanded or collapsed state of a group, as configured during the last save.
Add, Sort, and Delete dialog tasks from a Dialog Task Group
This section explains the process of adding, removing, and sorting dialog tasks within a Dialog Task Group:
- To sort the dialog tasks alphabetically or reorder them, click the up and down arrows at the right-top corner of the Dialog Task Layout page and the arrows against the dialog task.
- To add or remove dialog tasks, click the “edit” button against the Dialog Task Group:
- To add dialog tasks, click the Add Dialog Task dropdown list, and click to select the dialog tasks from the list.
- To remove a dialog task, click the “cross” mark against it. You can also click Clear All to remove all the dialog tasks from the Dialog Task Group.
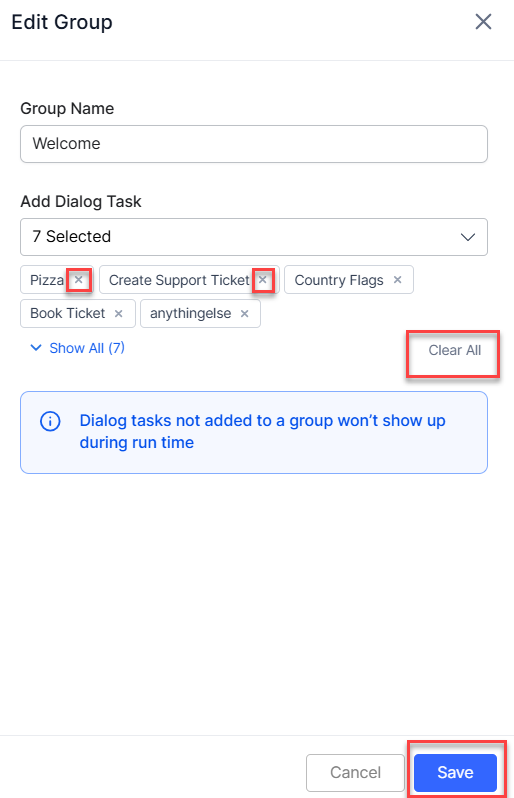
- Click Save to end the process.