This document provides an overview of the setup and configuration process of the Kore Agent AI widget with NICE CX Telephony using the Salesforce NICE CX CTI package.
Use Case: Display voice transcripts and suggest next best actions from a configured bot on the Kore Agent AI widget when agents place customer calls.
When agents place customer calls, based on the customer’s phone number CTI rule matches the corresponding Salesforce object (such as Account/Contact/Case) and displays to the agents. The voice stream is shared with Kore Voice Gateway, which in turn generates transcripts of the voice stream and displays on the Agent AI widget embedded into the matched Salesforce object.
Prerequisites
- The NICE CX Salesforce package installed in your Salesforce org.
- NICE CX account set up and can initiate outbound calls on the Salesforce Service Console softphone.
- NICE CX Studio installed on your device.
- Agent Assist Hub enabled for your NICE CX account.
- Kore AgentAssist for Salesforce installed on your Salesforce account. (Salesforce AppExchange > Search for “Agent AI By Kore.ai, Inc.”)
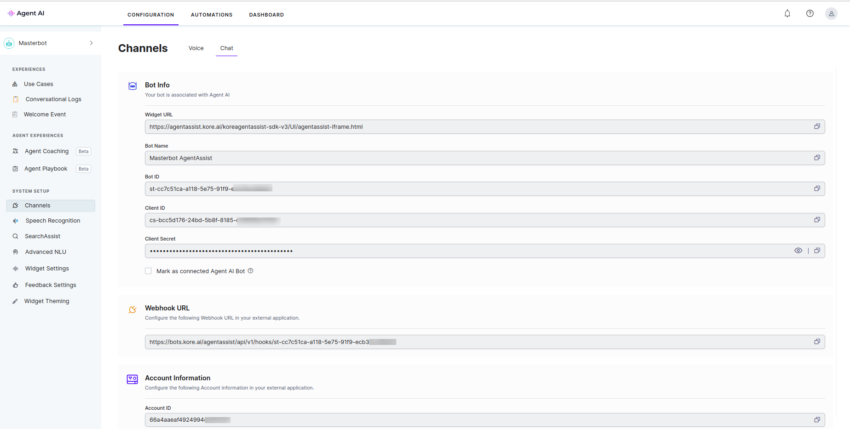
- Have the AgentAssist bot credentials saved separately. You need the Widget URL, Bot ID, Client ID, Client Secret, Account ID, and SIP URI. Read Configure Voice Channel and Chat Channel for a walkthrough.
- Ensure that Voice Interaction Streams are enabled via NICE.
Shared Responsibilities
| Activity | Responsibility | |
| CXOne Customer | Kore.ai | |
| NICE One Platform | ||
| ACD Configuration |
|
|
| CXOne Studio Script |
|
|
| Agent Assist Hub |
|
|
| Kore Agent AI Bot Configuration |
|
|
| Kore Bot Configuration | Bot creation
Bot Credentials generation |
|
| Salesforce Org | ||
| Voice Configuration |
|
|
| Installing Kore Agent AI Package |
|
|
| Configuring Kore Agent AI Package |
|
|
| NICE CX | Configure Salesforce Agent Settings, select Salesforce Object to embed Kore Agent AI widget. | |
Definitions
| Section | Key | Definition | Reference |
| Set up NICE AgentAssist Hub to stream voice to Kore Agent AI | Agent AI URL | The domain of the Agent AI. |
|
| Kore Agent AI package setup and configuration | AgentAssist Widget URL | URL that points to the Agent AI widget.
For example, https://agentassist.kore.ai/koreagentassist-sdk-v3/UI/agentassist-iframe.html |
Channels > Chat section of the Agent AI configuration portal. |
| Kore Agent AI package setup and configuration | BotId | A unique identifier assigned to a bot. | Channels > Chat section of the Agent AI configuration portal. |
| Kore Agent AI package setup and configuration | ClientId | An identifier provided to a client application. | Channels > Chat section of the Agent AI configuration portal. |
| Kore Agent AI package setup and configuration | ClientSecret | A secret key or password associated with the ClientId. | Channels > Chat section of the Agent AI configuration portal. |
| Set up NICE AgentAssist Hub to stream voice to Kore Agent AI | AccountID | A unique identifier assigned to an account. | Channels > Chat section of the Agent AI configuration portal. |
| Set up NICE AgentAssist Hub to stream voice to Kore Agent AI | Kore Voice Gateway(KVG) | For Saas in US region, value is savg-webserver.kore.ai
For on-prem, refer to the corresponding host. |
Region-Specific URLs
| Region | Agent AI URL | UXO URL | WSS URL | DNS |
| US | https://agentassist.kore.ai | https://platform.kore.ai | wss://savg-webserver.kore.ai | @savg-us-prod-sbc-in-nlb-0d9a4c651955ff47.elb.us-east-1.amazonaws.com |
| JP | https://agentassist-jp.kore.ai | https://jp-platform.kore.ai | wss://jp-savg-audiosocket.kore.ai | @savg-jp-prod-int-nlb-3989d946fc1ced3b.elb.ap-northeast-1.amazonaws.com |
Set up Salesforce-NICE CTI package
Follow this article to install and configure the NICE CTI package on your Salesforce account.
Topics included in the above article:
- Install Salesforce Agent
- Install the Salesforce Agent Package
- Assign Users to Your License
- Enable Salesforce Agent in Lightning Experience
- Configure Permission Sets For a Single User
- Configure Permission Sets For Multiple Users
- Configure the NICE CXone Call Center
- Assign Users to the NICE CXone Call Center
- Configure Softphone Layout
- Assign Profiles to the Softphone Layout
- Enable Click2Jack
Set up NICE AgentAssist Hub to stream voice to Kore Agent AI
This app will be used in studio script.
- Sign in to your NICE account with the username and password provided by the NICE customer support.
- Click the applications launcher button. A menu opens from the left side of the page.

- Click OTHERS > Automation & AI.

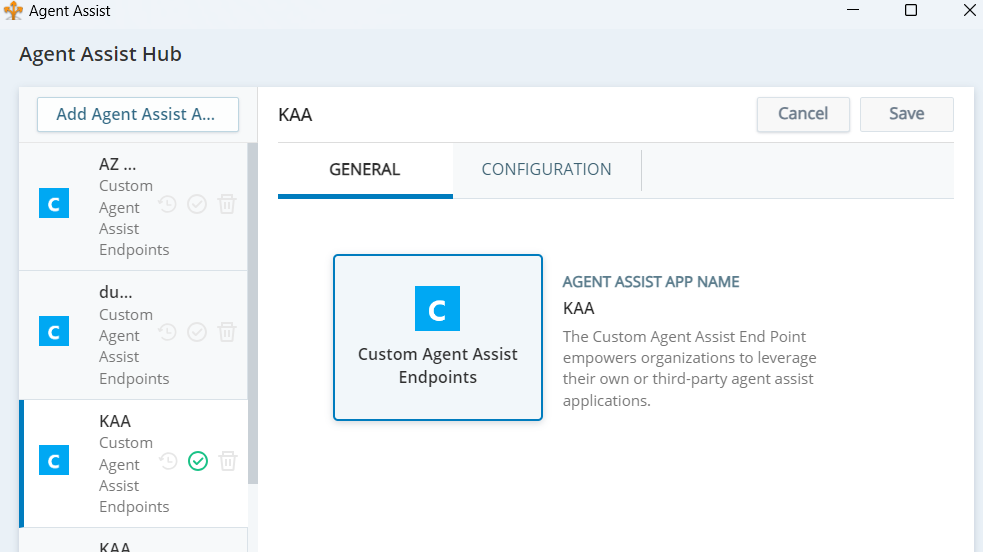
- Click Agent Assist Hub > Add Agent Assist App.

- Enter the name of the Agent Assist App in the AGENT ASSIST APP NAME field.
- Select Custom Agent Assist Endpoints.
- Click Next.

- Add the following settings with config parameters provided by the Kore.ai representative:
- Agent UI Option: Available by default
- App URL: {Agent AI URL}/integrations/nice/iframe/?params={scriptparams}
- App Title: Kore Agent AI (change as needed)
- Participants: Both

- Audio Relay Endpoint: {Kore Voice Gateway(KVG)}/audiosocket/nice?sipuri=<Bot SIP URI>&token=<Token>&botId=<Bot ID>&accountId=<Account ID>&agentassist=true
- Bot SIP URI: Channels > Voice section of the Agent AI configuration portal.

- Bot ID and Account ID: Channels > Chat section of the Agent AI configuration portal.

- Token: Create a JSON Web Token on jwt.io with the following details.
- Payload: {“appId”: <Bot Client ID>}
- Header: {“alg”: “HS256″,”typ”: “JWT”}
- Secret: Your Kore.ai Client Secret.
- Bot SIP URI: Channels > Voice section of the Agent AI configuration portal.
- Click Create.
Kore Agent AI package setup and configuration
- Install Kore Agent AI on your Salesforce account.
Set up AgentAssist feature
- Click the app launcher.

- Type “kore” in the search box and select Kore AgentAssist Feature Configuration from the displayed list.

- Click New from the top-right corner of the page.

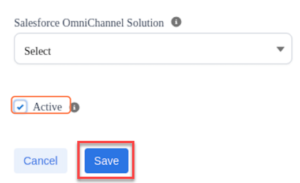
- Type Test Configuration in the Configuration Name field.

- Select NICE inContact in the CTI Provider list.

- Select Active, and click Save.
Set up AgentAssist Configuration
- Click the app launcher.
- Type “config” in the search box and select Kore AgentAssist Configuration from the displayed list.

- Click New from the right-top corner of the page.
- Enter the required details. Note that you can fetch the AgentAssist URL, Bot ID, Client ID, and Client Secret details from the Agent AI configuration portal.
- Select a language in the Language dropdown list. The selected language corresponds to the language configured in the bot.
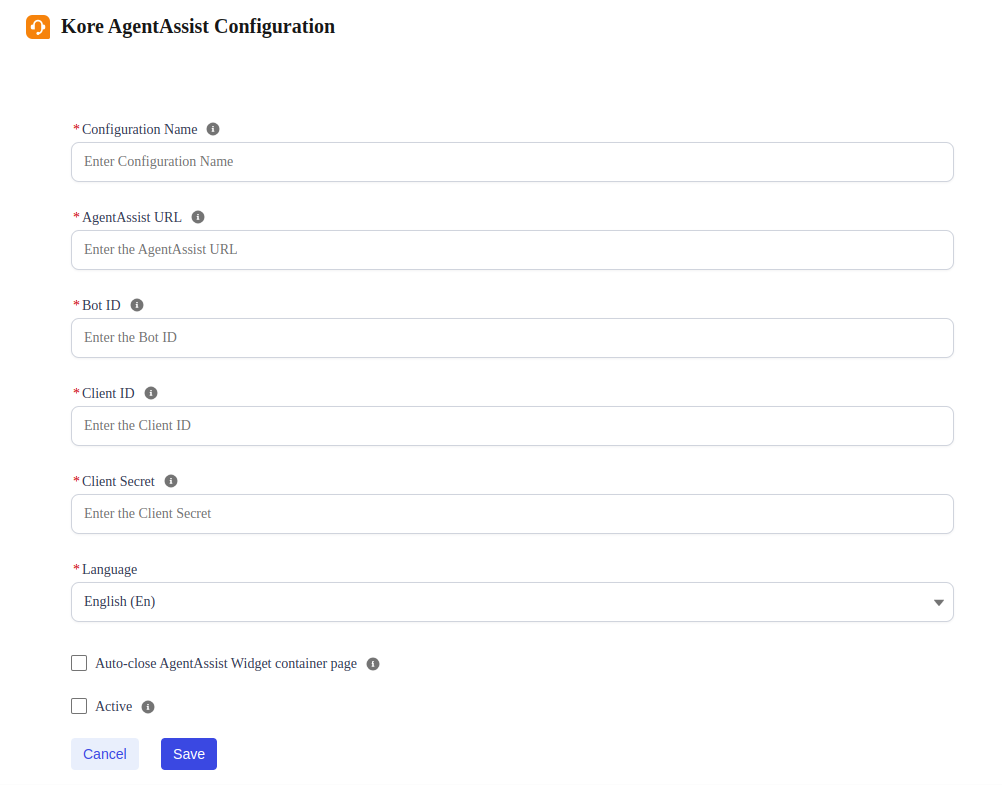
- Select a language in the Language dropdown list. The selected language corresponds to the language configured in the bot.
- Select Active, and click Save.
Note: If the language parameter is missing from the layout page after saving the configuration, either uninstall and reinstall the package or manually add the parameter by following these steps:- Go to the Salesforce Setup page > Object Manager.
- Search for and select the Kore AgentAssist Configuration object.
- On the left panel, click Page Layouts.
- Open KoreAgentAssistConfig Layout, and drag the Language parameter on to the layout screen.


Configure NICE CTI Data in Salesforce
- Click the app launcher in Salesforce, and then go to Salesforce Agent Settings.
- Sign in to your NICE CX account.
- Ensure the Store Salesforce Agent Script Variables setting is enabled in the Data Storage section.
- In the dropdown list, select a Salesforce object against which the Agent AI widget needs to be configured in its page layout.

Configure Page layout to embed Kore Agent AI Widget to Salesforce object
- Assuming the Account Object is mapped above, open the page layout for Account Object.
- In the filter field, type “NiceCTI” and drag and drop the object onto the Account Object layout page.

Configure a Visualforce Page to embed Kore Agent AI Widget (If Applicable)
Step-1: Create a Lightning Out App
Create a Lightning Out app, a special type of standalone Aura app:
- Open the Developer Console from your Salesforce org.
- Navigate to File > New > Lightning Application.
- Fill in the Name and Description fields, and then click Submit.
- Paste the following code into the editor, and save the Lightning Application:
<aura:application access="GLOBAL" extends="ltng:outApp">
    <!-- Lightning Web Component will be loaded here from Visualforce page -->
    <aura:dependency resource="KAA:niceCTIAgentAssistVoice" />
</aura:application>
Step-2: Create/Edit Visualforce Page
- Either create a new Visualforce Page or open an existing one.
- To create a new Visualforce Page, navigate to the Setup page > Visualforce Pages, and click New.
- In the Visualforce Markup code editor, add <apex:includeLightning /> at the beginning of your Visualforce page. This component loads the JavaScript file that Lightning Components for Visualforce uses.Paste the following code into the Visualforce Markup code editor at the desired location where you want the Agent AI widget to appear:<div id=”lwc-container”></div>
<script>
// Initialize Lightning Out with the app you created
$Lightning.use("c:LightningApplication", function() {
// Create the LWC component inside the div container
$Lightning.createComponent("KAA:niceCTIAgentAssistVoice", { height: '600px', width: '500px'}, "lwc-container");
});
</script>
Note: Replace “LightningApplication” with the name of the Lightning Out app you created in Step-1. Modify the height and width of the niceCTIAgentAssistVoice component according to your preference – these are the height and width of the Agent AI widget.
4. Click Save.
Sample Visualforce Page:
<apex:page >
<apex:includeLightning />
<h1>Hello !</h1>
<p>Welcome to Kore.ai Visualforce page.</p>
<div id="lwc-container"></div>
<script>
// Initialize Lightning Out with the app you created
$Lightning.use("c:Kore_Lightning_App", function() {
// Create the LWC component inside the div container
$Lightning.createComponent("KAA:niceCTIAgentAssistVoice", { height: '600px', width: '500px'}, "lwc-container");
});
</script>
</apex:page>
Set this Visualforce page as the screen pop in the Softphone layouts of your Salesforce org, or create a Visualforce tab by following the instructions in this document.
Configure an Aura Component to embed Kore Agent AI widget (If Applicable)
- Either create a new Aura Component or open an existing one.
- To create a new Aura Component, open Developer Console from your Salesforce org.
- In the Developer Console, navigate to File > New > LightningComponent.
- Fill in the Name and Description fields, and then click Submit.
- Paste the following code into the editor at the desired location where you want the Agent AI widget to appear, and save the Lightning Application:
<KAA:niceCTIAgentAssistVoice height="800px" width="500px" />
Note: Modify the height and width of the niceCTIAgentAssistVoice component according to your preference–these are the height and width of the Agent AI widget.
Sample Aura Component:
<aura:component implements="force:appHostable,flexipage:availableForAllPageTypes" access="global" >
    <h1>Hello! Kore Aura Component</h1>
    <KAA:niceCTIAgentAssistVoice height="800px" width="500px" />
    <h1>End of Aura Component</h1>
</aura:component>
Create a Lightning tab by following the instructions in this document.
Enabling OAuth
- Go to Setup > OAuth and OpenID Connect Settings and enable Allow OAuth Username-Password Flows.
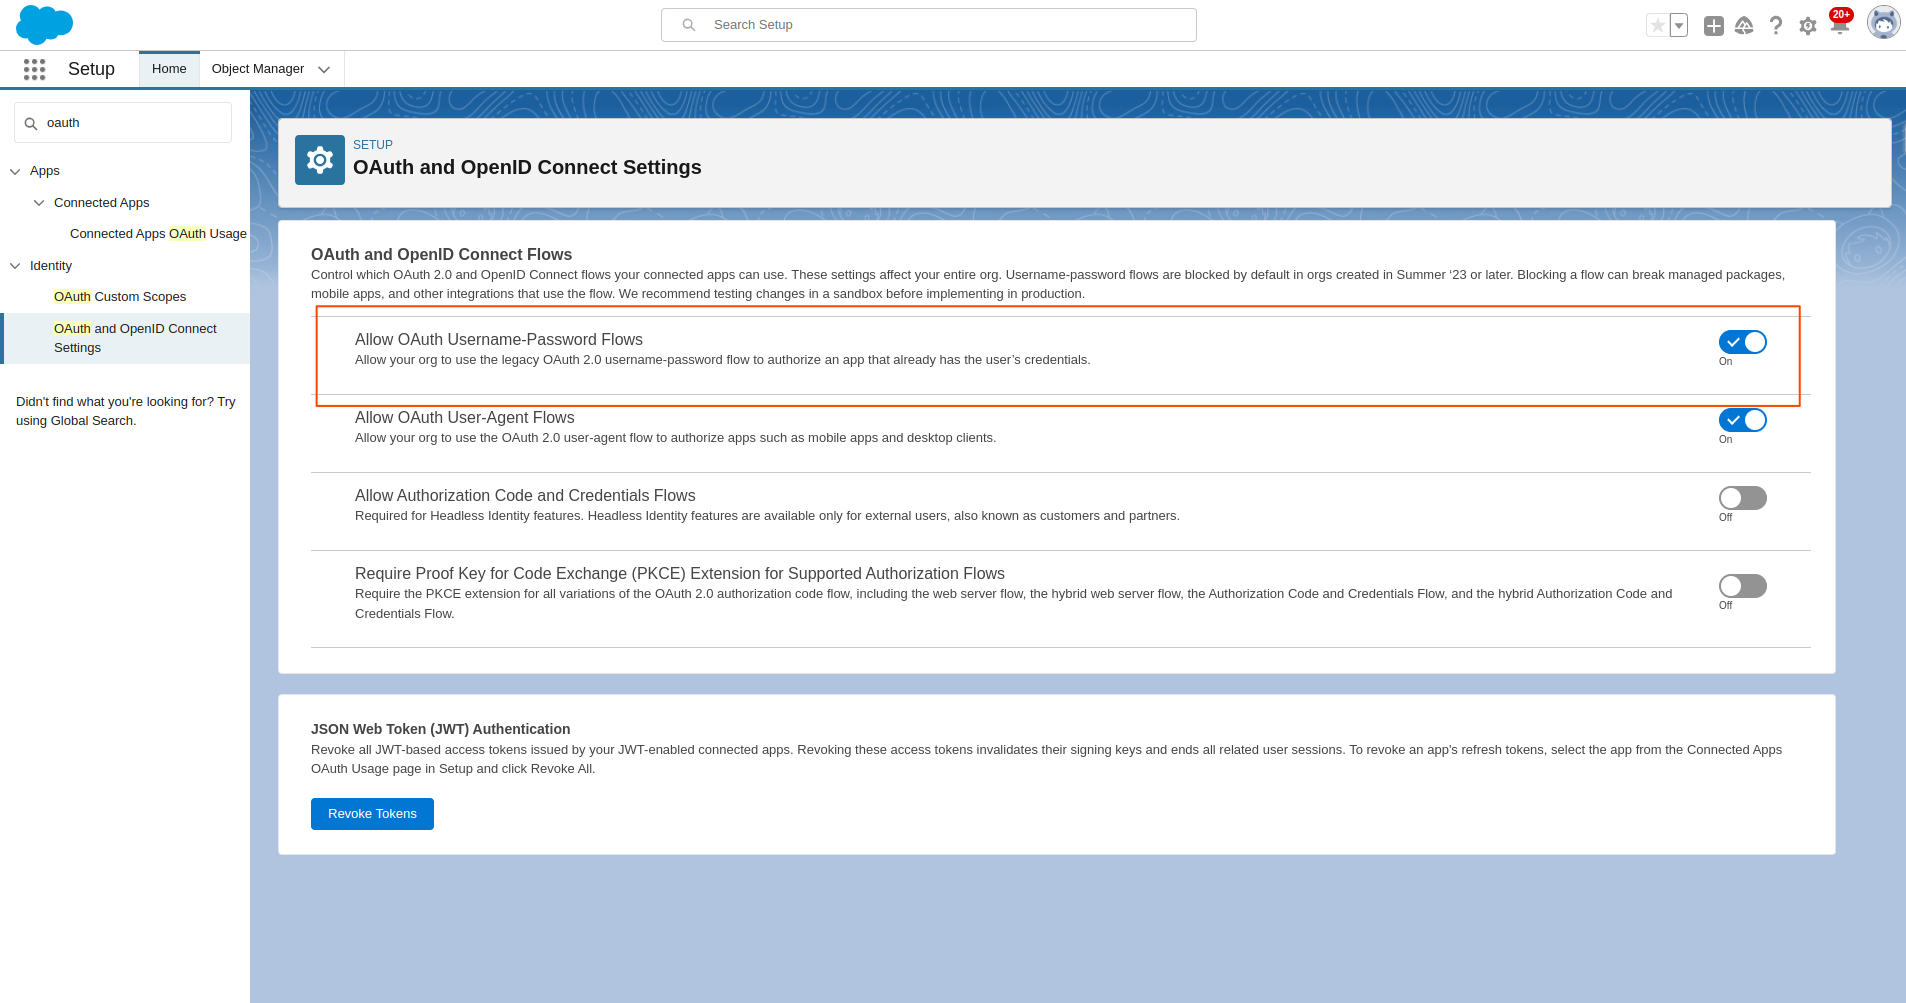
- Create a connected Salesforce app and get the Access Key and Access Token. Follow this guide for help.
NICE CTI Studio Script for Salesforce for Outbound Calls
Import and configure the NICE Studio Script for Salesforce Integration for Outbound Calls.
Download Script For Voice: kore.ai-nicecti_aa_sf_outbound.XML

Open the Studio, import the above script, and customize as per the following table definition:
| Node | Activity | Fields Updated |
| Set Credentials |
|
Include your data in the custom data object (one key-value pair per line). For example:
|
| User Auth | Configure Salesforce org credentials and generate oauth Token | salesforceBaseURI
Note: You can get it by running the following curl: curl –location –request POST ‘https://login.salesforce.com/services/oauth2/token?grant_type=password&client_id=<Salesforce Client ID>&client_secret=<Salesforce Client_Secret>&username=<Salesforce_Username>&password=<Salesforce Password + Salesforce Security Token>’ |
| ReqAgent | Update Skill for Agent Routing | Skill and other attributes as needed |
| AgentAssist | Map the AgentAssist Hub Instance | Select the AgentAssist Hub app created in the above step. |
AgentAssist Hub Reference:
Click the checkbox on the specific instance. Only one can be active.
After selecting the AgentAssist app, click the Close button on the bottom-right corner of the page.
Note: Do not click the “X” button to close the window as this will not save the changes.
Save the Studio Script and make sure there are no errors on Save.
NICE Account setup for Outbound Call
On the NICE Incontact home page, click the application launcher button and select ACD.
Create a Campaign
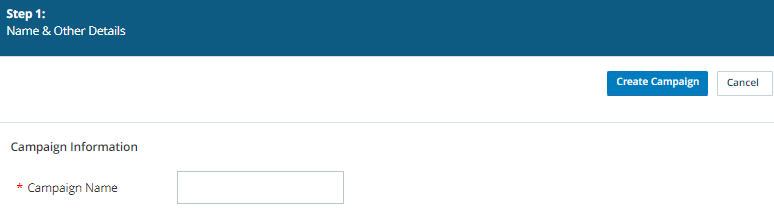
Create a Skill

For Custom Script, select the NICE Studio Script created in the previous step.
Create a Disposition

Important Notes
- If the Agent AI widget is embedded within the Salesforce popup page configured in Softphone Layout, Agent AI Initiated Transcription must be disabled for transcription to work correctly. This is because the widget loads before the customer accepts the call, and the audio stream is sent to Kore only after the call is accepted.
 However, if the Agent AI widget is embedded in a separate page that opens after the customer accepts the call, transcription will work even if Agent AI Initiated Transcription is disabled as the widget is being rendered after the customer accepts the call.
 - Custom Data configured in the NICE Studio Script will be passed to the Agent AI widget only if the widget is embedded in a separate page that opens after the customer accepts the call. This is because the NICE Studio Script is triggered only once the call is accepted. Therefore, Custom Data will not work if the Agent AI widget is embedded within the Salesforce popup page configured in the Softphone layout.
Test an Outbound Call
- Sign in to the Kore Agent AI account and prepare a bot to handle agents’ queries.
- Validate the bot credentials are correctly mapped in the above settings.
- Validate the AgentAssist URL is correctly mapped in the above settings.
- Sign in to the NICE-Incontact account, and check if the outbound skill is created properly.
- Sign in to your Salesforce org.
- From the app launcher, select Service Console.
- Sign in with NICE CX credentials for the agent.

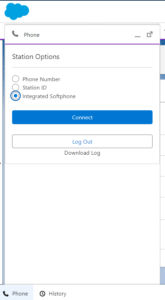
- Install the softphone: https://help.nice-incontact.com/content/agent/cxoneagent/addcxawebrtcext.htm

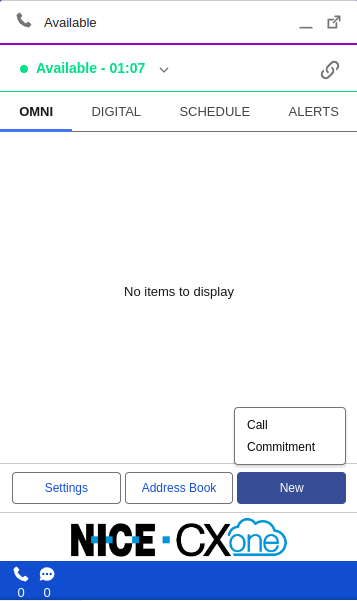
- Refresh the screen, and click the phone icon on the status bar.
- Select Integrated Softphone, and click Connect.
- Change the status to Available.
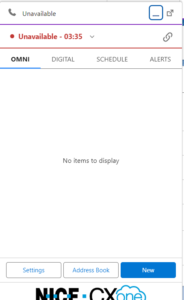

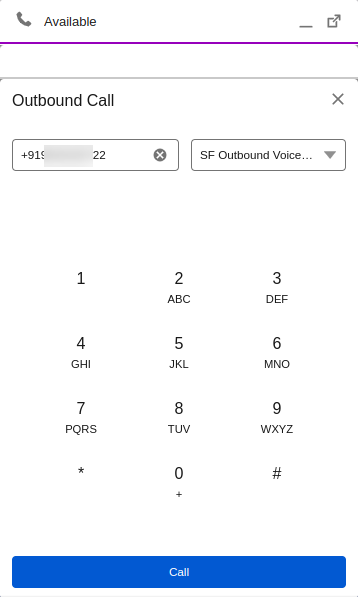
- Click New, and select Call.

- The NICE Studio Script configured for outbound calls will be selected by default. If needed, you can manually select a different script from the dropdown menu.
- Enter the phone number you wish to call, then click the Call button to initiate the call.
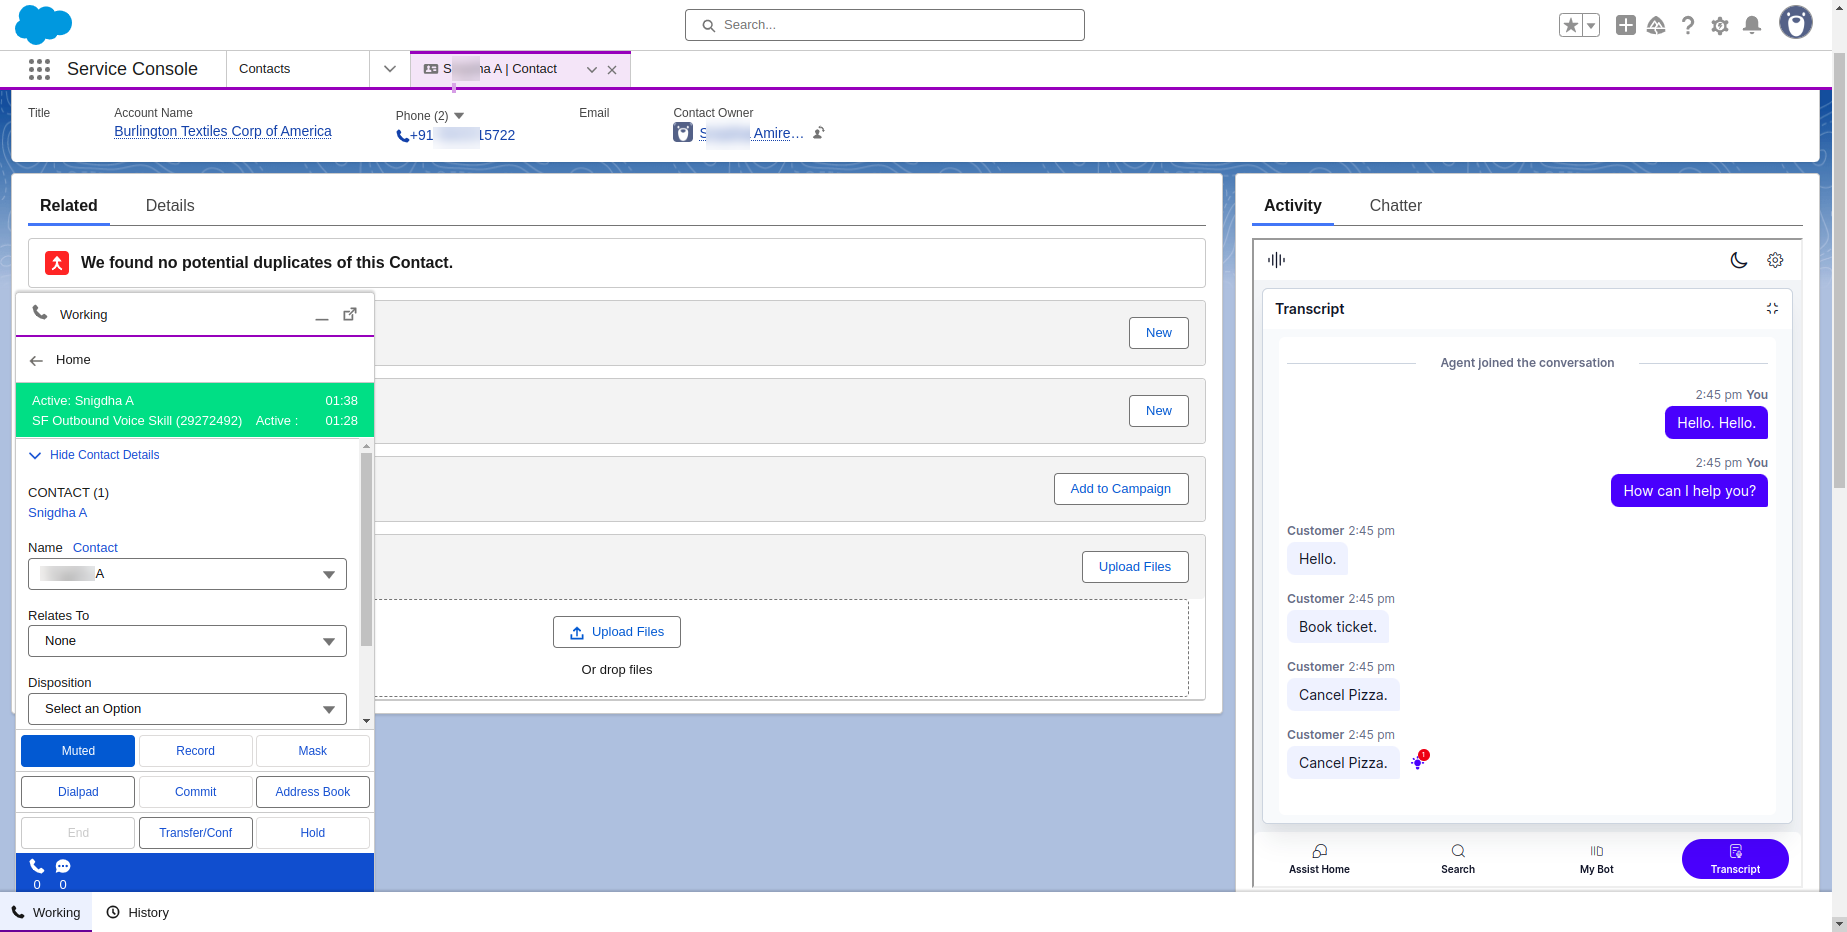
- The Salesforce popup page configured in the Softphone layout will open automatically—for example, a Contact page.
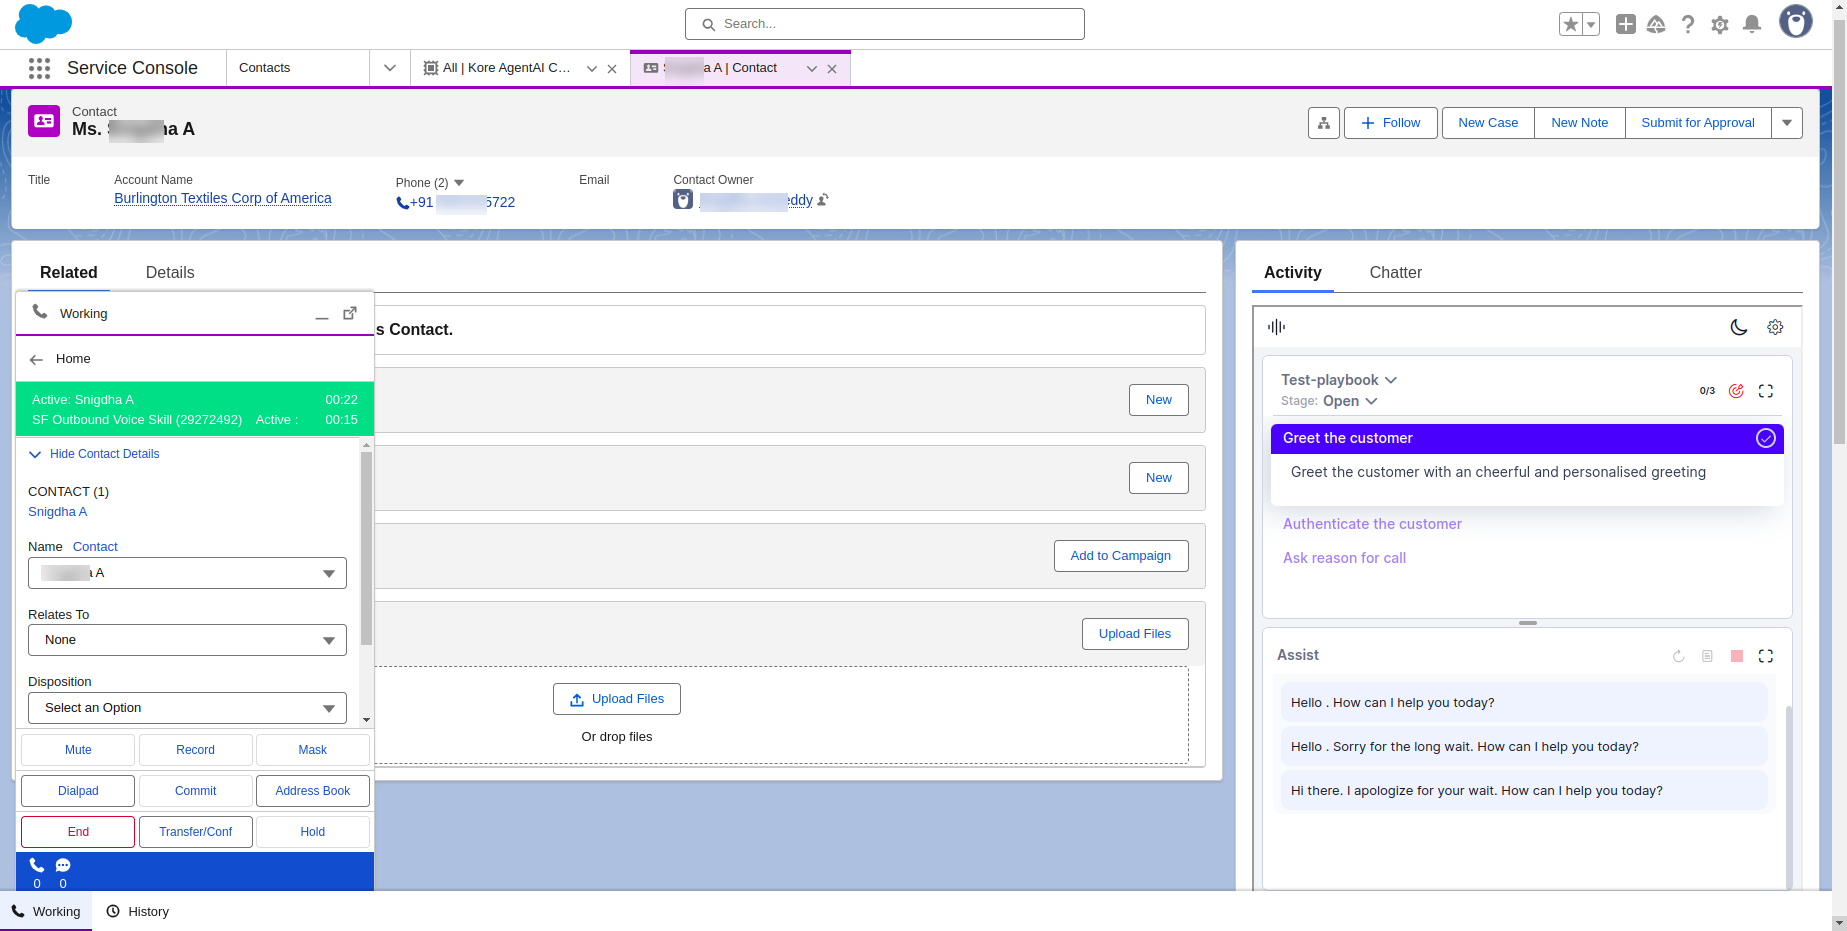
- Once the customer accepts the call, transcription will begin automatically and will be displayed under the Transcripts tab in the Agent AI widget.
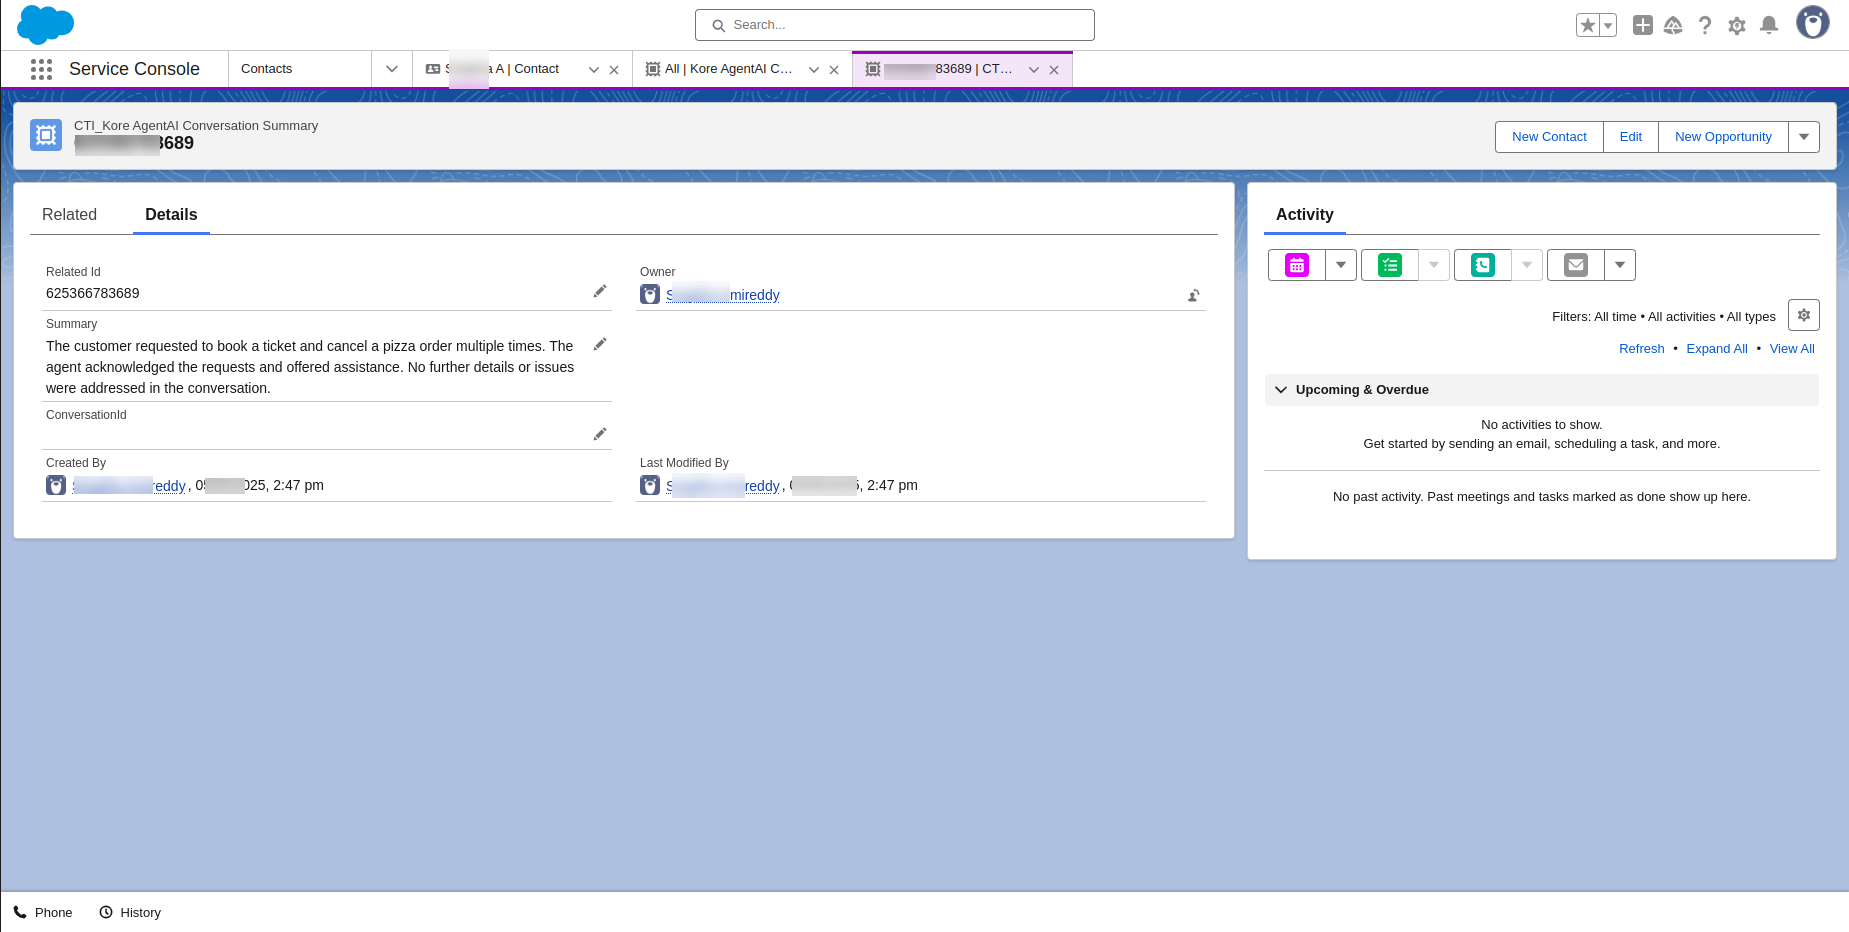
- When the End button is clicked, Summary is generated and displayed on the Agent AI widget.
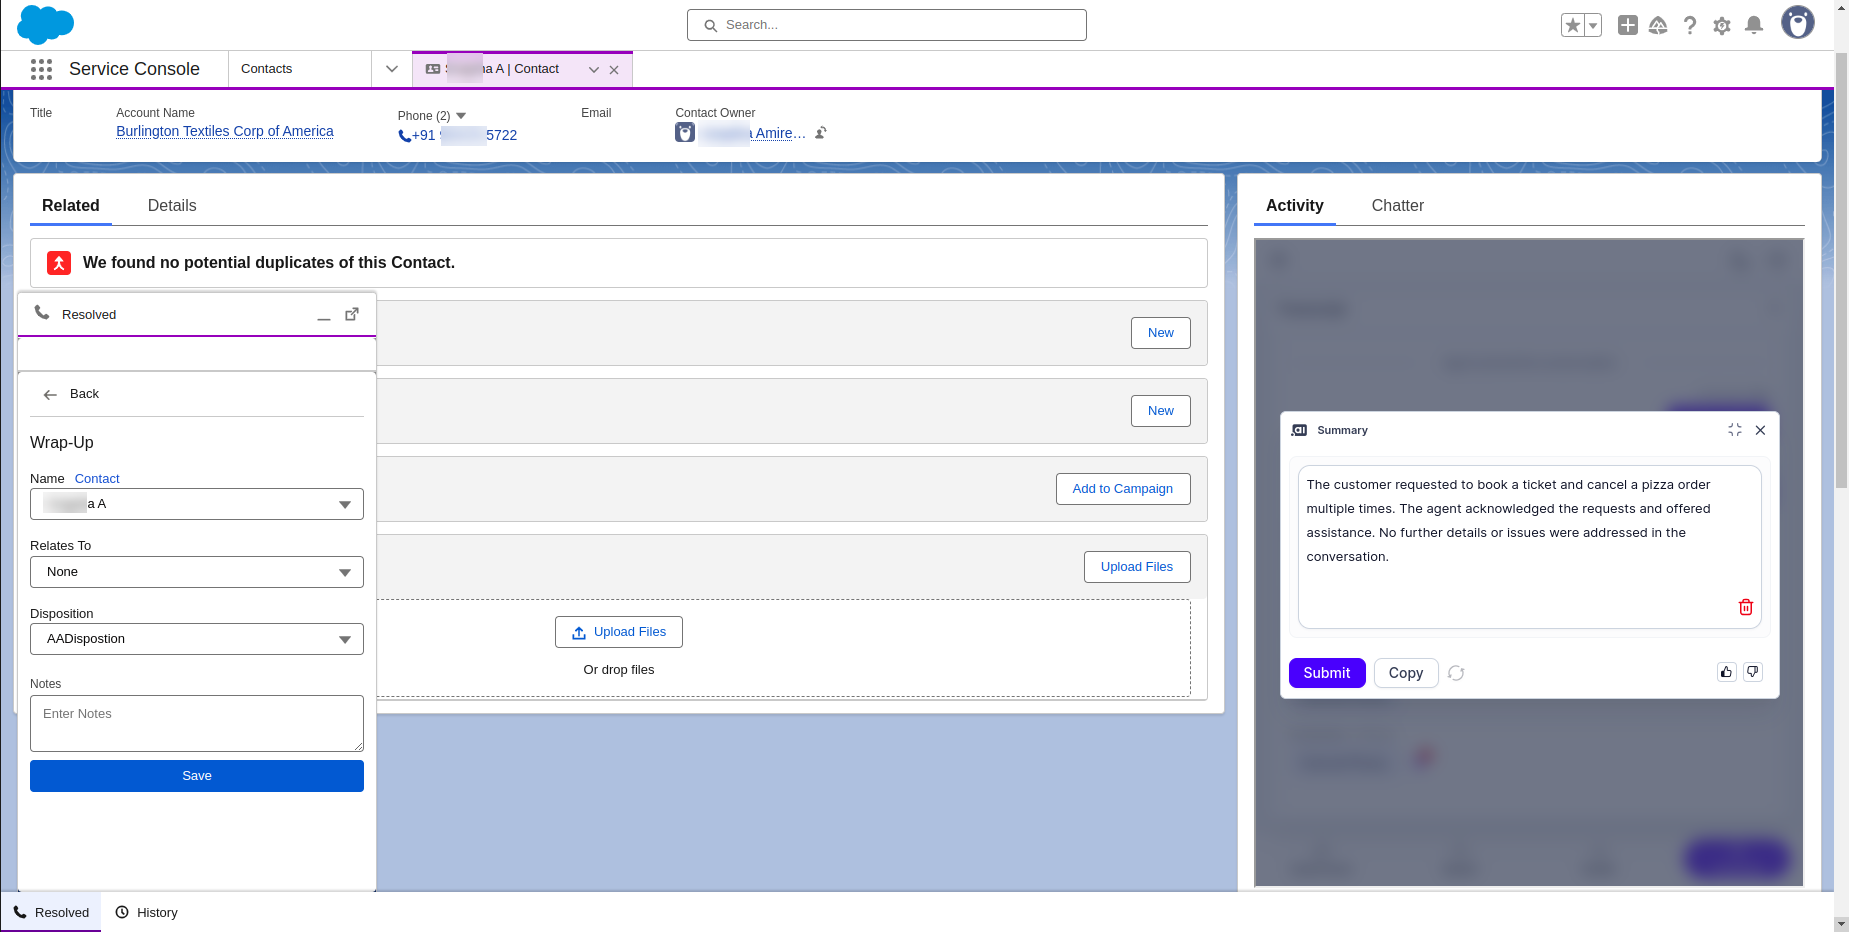
- Upon clicking the Submit button on the Agent AI widget, Summary is stored in the Kore Agent AI Conversation Summaries.
FAQ
Q: Why are the transcripts not working in Agent AI widget?
A: If the Agent AI widget is embedded within the Salesforce popup page configured in Softphone Layout, Agent AI Initiated Transcription must be disabled for transcription to work correctly.

Q: Why is the custom data passing not working?
A: Custom Data configured in the NICE Studio Script will be passed to the Agent AI widget only if the widget is embedded in a separate page that opens after the customer accepts the call. Custom Data will not work if the Agent AI widget is embedded within the Salesforce popup page configured in the Softphone layout.