

- Order processing
- Leave approval workflows
- Claims and underwriting processes
- Human approval tasks
Key Features
- Durable multi-step workflow orchestration across agents, integrations, APIs, and human tasks.
- Visual workflow builder with configurable workflow nodes and execution paths.
- Human-in-the-loop execution using Approval and Data Entry nodes with Inbox-based task handling.
- Trigger-based execution using webhooks, schedules, and external application events.
- Workflow execution monitoring with execution history, flow logs, runtime metrics, and execution details inspection.
The platform maintains a one-to-one mapping between the visual configuration interface and the DSL/ABL definition. You can configure workflows and tools using either the visual interface or the DSL/ABL definition. Changes made in one view are automatically reflected in the other.
Understand Workflows vs. Agent Flows
Use workflows and agent flows for different execution scenarios.
A workflow can also be exposed as a tool and invoked by an agent during runtime.
Create a Workflow
- From the Workflows page, select Create Workflow.
- In the creation dialog, enter Name and Description (optional).
- Select Create.
Workflow Overview Page
The workflow detail page provides a comprehensive view of the workflow’s configuration, execution steps, and run history.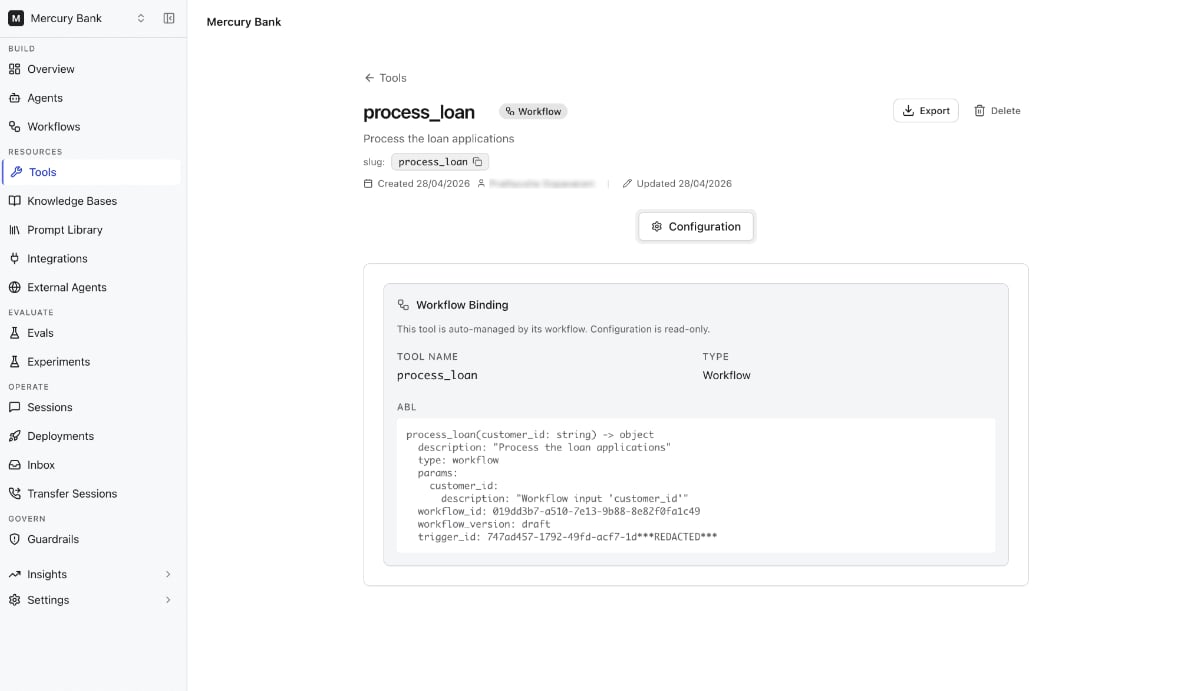
Flow Builder
Use the Flow tab to build and configure workflow steps. The workflow builder provides a visual canvas where you can add workflow nodes, configure execution logic, and define step relationships. Every workflow starts with a Start step and ends with an End step. Add workflow steps between the Start and End steps to define workflow execution logic. The workflow builder contains the following areas.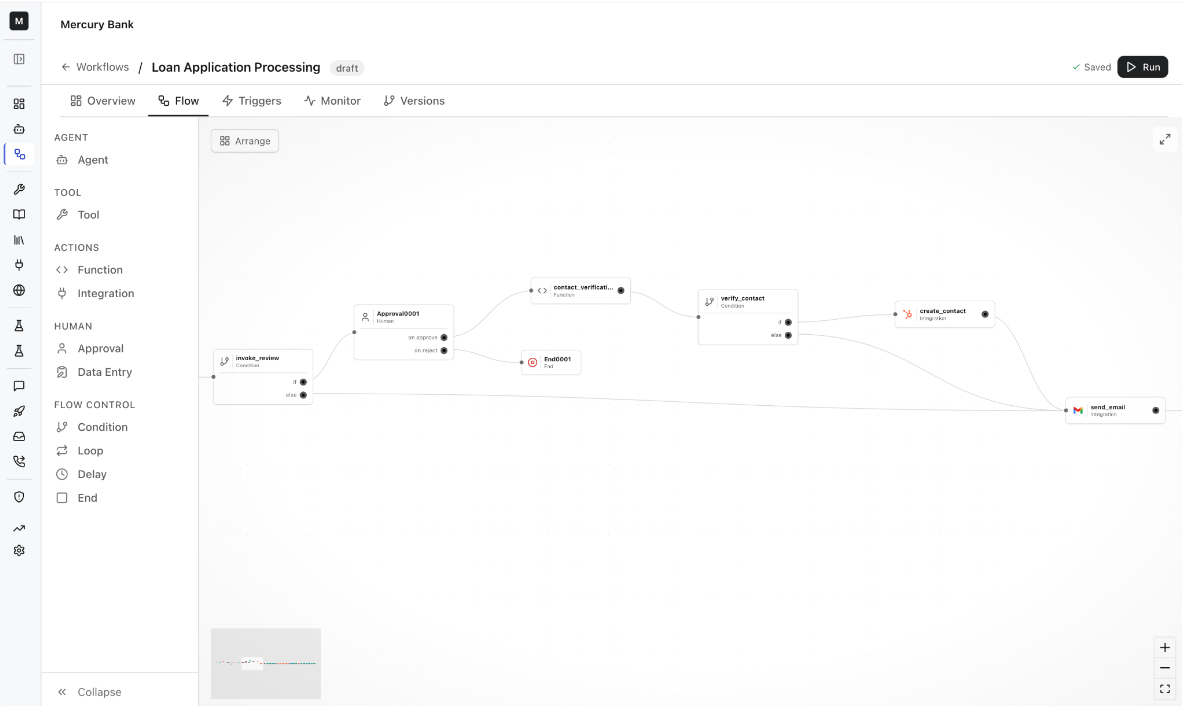
Add Workflow Steps
To add a workflow step:- Open the Flow tab.
- Select a node from the node panel. The node appears on the flow canvas.
- Configure the node settings.
- Connect the node to the workflow path.
Configure Workflow Steps
Select a workflow step to open its configuration panel. Configuration options vary by node type. Typical configuration options include:- Step name
- Input parameters
- Output mappings
- Timeout settings
- Approval assignments
- Integration settings
- Conditional expressions
Build Workflow Logic
Connect nodes visually on the canvas to define execution order. Workflows support:- Sequential execution
- Conditional branching
- Parallel execution patterns
Use Workflow Variables
Each node exposes configurable inputs and outputs. Workflow data is passed through the workflow context object. Use the following syntax patterns to reference workflow data between steps.Node Types
Start Node
Use the Start node to define workflow entry parameters.
Example
Agent Node
Use the Agent node to invoke an agent during workflow execution. Agent nodes are typically used when workflow execution requires AI-driven reasoning, classification, decision-making, or conversational processing before continuing to the next workflow step.Tool Node
Use the Tool node to execute a registered tool during workflow execution. Tool nodes are typically used to invoke reusable capabilities such as workflow tools, APIs, integrations, or external operations defined in the project.The timeout configured for a Tool node in a workflow overrides the timeout specified in the tool configuration.
Function Node
Use the Function node to execute custom JavaScript logic during workflow execution. Function nodes are typically used for data transformation, validation, formatting, filtering, enrichment, and intermediate processing between workflow steps.
Use Workflow Context in Function Nodes
Use the
context object to access workflow data.
Values written to the context object can be referenced in downstream workflow steps.
Integration Node
Use the Integration node to execute integration connector actions during workflow execution. Integration nodes allow workflows to execute actions using configured integrations such as Gmail, Slack, GitHub, Microsoft Teams, Salesforce, HubSpot, Twilio, OpenAI, and other available connectors.
For example, a Gmail integration may expose actions such as send or forward email, request approval in email, reply to email, and custom API calls.
Depending on the selected action, additional fields can include:
- Connection selection
- Recipient email addresses
- Subject and message content
- Approval request settings
- Search parameters
- API request details
Human-in-the-loop Nodes
Human-in-the-loop nodes pause workflow execution to collect input or approval from assigned users before execution continues. Two types of human-in-the-loop nodes are Data Entry and Approval. Assigned users can open Inbox tasks to review, approve, reject, or submit the requested information. For more information, see Inbox. When a workflow reaches a Data Entry or Approval node:- A pending task is created in Inbox.
- Assigned users receive notifications.
- Workflow execution pauses until the task is completed.
- The workflow resumes after approval, rejection, or data submission.
Approval Node
Use the Approval node to pause workflow execution until an approval or rejection response is received. Approval nodes support human-in-the-loop workflow scenarios such as review tasks, approval checkpoints, and business decision flows. When workflow execution reaches this node,- A human task is created.
- The task appears in the Inbox.
- Workflow execution pauses.
- A user reviews or completes the task.
- Workflow execution resumes after task completion.
The Approval node provides separate execution paths for on approve and on reject.
Data Entry Node
Use the Data Entry node to collect structured user input during workflow execution. Data Entry nodes support workflows that require users to manually provide information before execution can continue.
Available timeout actions include:
- Terminate workflow - Stops workflow execution when the timeout is reached.
- Skip this step - Continues workflow execution without waiting for the task response.
Condition Node
Use the Condition node to branch workflow execution based on conditional logic. Condition nodes evaluate expressions and route execution through different workflow paths depending on the evaluation result. The Condition node supportsif, else, and else if.
The Else (default path) executes when none of the configured conditions evaluate to true. Use Add Else If to configure additional conditional branches.
Condition expressions can reference workflow variables and outputs from previous workflow steps. For example,
{{context.steps.NodeName.output.field}}.
Use Condition nodes to:
- Route workflows based on API responses
- Branch execution based on approval outcomes
- Evaluate workflow variables
- Handle success and failure scenarios
- Create decision-based workflow paths
Loop Node
The Loop node repeats a set of workflow steps for each item in a list. Use it to automate repetitive tasks such as processing records, calling APIs, or performing batch operations. The Loop node supports both Sequential (Loop) and Parallel (Batch) execution modes. Configure the nodes inside the loop, choose how to handle errors, and collect the results in an output variable for use by downstream nodes.Sequential Execution
Processes one item at a time. Each iteration completes before the next iteration begins. Use this mode when:- Processing items that depend on one another or must be executed in order.
- Each iteration depends on the result of the previous iteration.
- External systems require sequential processing.
Parallel Execution
Processes multiple items simultaneously. Results are collected after all iterations complete. Some use cases of this mode are:- Iterations are independent.
- Processing large collections of items.
- Calling APIs or integrations that can run concurrently.
Configure Iteration Output
Use Iteration Output to map values from nodes inside the loop to the loop output. After the loop completes, the mapped values from all iterations are collected into the configured Output Variable, making them available to subsequent nodes in the workflow.
Example
Suppose an Integration node returns a list of customer IDs. Configure the Loop node to iterate through the list. During each iteration, invoke an API node to retrieve customer details, then use Iteration Output to capture the required values. After all iterations are complete, the aggregated customer details are stored in the configured output variable and passed to the next node in the workflow.
Delay Node
Use the Delay node to pause workflow execution for a specified duration before continuing to the next workflow step. Delay nodes support scheduled continuation, wait periods, retry delays, and time-based workflow orchestration.
Supported duration units depend on the configured delay range. The allowed range is 30 seconds to 24 hours.
Some use cases of Delay node are:
- Pause workflows before continuing execution
- Add retry wait periods
- Delay notifications or follow-up actions
- Coordinate scheduled workflow execution
End Node
Use the End node to complete workflow execution and define the workflow output structure. The End node declares the workflow outputs returned after workflow execution completes.
Output expressions can reference workflow variables and outputs from previous workflow steps. For example,
{{context.steps.NodeName.output}}
The End node generates the final workflow response returned after workflow execution completes.
Execute and Inspect Workflows
After configuring workflow nodes and triggers, run the workflow to validate workflow behavior and inspect execution details.Run a Workflow
- Open the workflow.
- Go to the Flow tab.
- Click Run.
- Workflow execution status is displayed.
- Human workflow nodes pause execution until user action is completed.
Execution Details Panel
When a workflow runs, the execution details panel opens on the right side of the canvas. The execution details panel displays:- Execution status
- Execution duration
- Flow log
- Node inputs and outputs
- Context data
- Final workflow output
Configure Triggers
Triggers define how workflows are started. Open the Triggers tab from the workflow toolbar to create and manage workflow triggers. The workflow builder currently supports the following trigger types:Webhook Trigger
Use webhook triggers to invoke workflows from external systems, applications, or APIs. When a webhook trigger is created:- A webhook endpoint URL is automatically generated.
- You can generate an API key for secure access.
- Quick-start request examples are displayed for testing and integration.
After a webhook trigger is created, a webhook URL is generated automatically. The Triggers page also displays the Webhook Quick Start section with the generated endpoint URL, supported execution modes, API key options, and sample requests.
Cron Schedule Trigger
Use cron schedule triggers to automatically execute workflows at configured intervals. Typical use cases include:- Daily processing jobs
- Weekly reporting
- Scheduled synchronization tasks
- Periodic maintenance workflows
App Triggers
Use app triggers to start workflows from external application events. App triggers allow workflows to respond automatically to supported integration events. Examples include:- New Google Drive file
- Incoming email
- CRM updates
- External system events
Monitor Workflow Execution
Use the Monitor tab to view workflow execution metrics and execution history. The Monitor view displays a history of workflow executions (runs), including execution status, start time, duration, and workflow progress details. The monitor displays:- Total workflow runs
- In-progress executions
- Response time metrics
- Failure rate statistics
- Execution ID
- Execution status
- Trigger type (Studio, Agent, Webhook, Cron, App trigger)
- Start time
- Execution duration
- Step completion progress
- Track workflow execution status
- Identify failed or long-running executions
- Monitor workflow performance trends
- Review workflow run history
- Verify workflow completion progress during execution
Workflow Versions
Workflows support version management through draft and published versions. Each workflow starts with a draft version, which is used for editing and configuration changes. When a workflow is published:- A new workflow version is created.
- The published version becomes available for execution.
- The draft can continue to be updated independently.
- View workflow versions
- View version status and publishing details
- Manage published workflow versions
- Version number or draft state
- Workflow status
- Environment
- Publishing information
- Version actions
Attach Workflows to Agents
Workflows can be attached to agents as reusable tools. This allows agents to invoke durable workflows during runtime interactions. Attached workflows allow agents to execute workflow logic during conversations and task execution.Register Workflow as a Tool
- Go to Tools > Workflow Tools.
- Click Register Workflow.
- Configure the workflow tool settings.
- Select the workflow and workflow version.
- Select the trigger and execution mode (sync or async).
- Click Register Workflow.
Workflow Tool Definition
After a workflow is registered, it can be attached to agents as a workflow tool. The platform automatically generates a DSL/ABL definition for the registered workflow tool. Workflow inputs are exposed as tool parameters in the generated definition. The generated definition includes:- Tool metadata
- Workflow and trigger identifiers
- Input parameters
- Tool description
The platform maintains a one-to-one mapping between the visual configuration interface and the DSL/ABL definition. Changes made in one view are reflected in the other. The UI configuration is derived from the DSL definition. Changes made in the UI are reflected in the DSL, and changes made in the DSL are reflected in the UI.
Attach Workflow Tools to Agents
After registering the workflow tool:- Open the agent.
- Go to Capabilities > Tools.
- Attach the workflow tool.
- Configure tool settings if required.
- Configure required input collection under Capabilities > Gather Fields.
- Save the agent.
Understand Gather and Workflow Inputs
Gather fields can be configured from: Capabilities > Gather Fields Workflow tools can collect inputs using:- Automatic parameter inference
- Gather fields
- Structured prompting
- Controlled input collection
- Required field enforcement
- Validation and extraction guidance
- More deterministic workflow execution