

Hours of Operation
Hours of Operation defines when agents are available-standard working hours, weekends, holidays, and special days by time zone. Contact Center AI uses this configuration to trigger Conditional Flows for out-of-hours and no-agents-available scenarios. To access, go to Contact Center AI > CONFIGURATIONS > Hours of Operation.Add Hours of Operation
- Select + Add New.
- In the panel, configure:
- Name-A label for the profile (for example, Official Working Hours).
- Time Zone-Select the applicable time zone.
- Work Days, Holidays, and Special Days-See below.
Standard Hours
Set hours per day or use the default (9 AM to 6 PM). Weekdays are open by default; weekends are closed. Use the toggle to enable or disable Saturday and Sunday.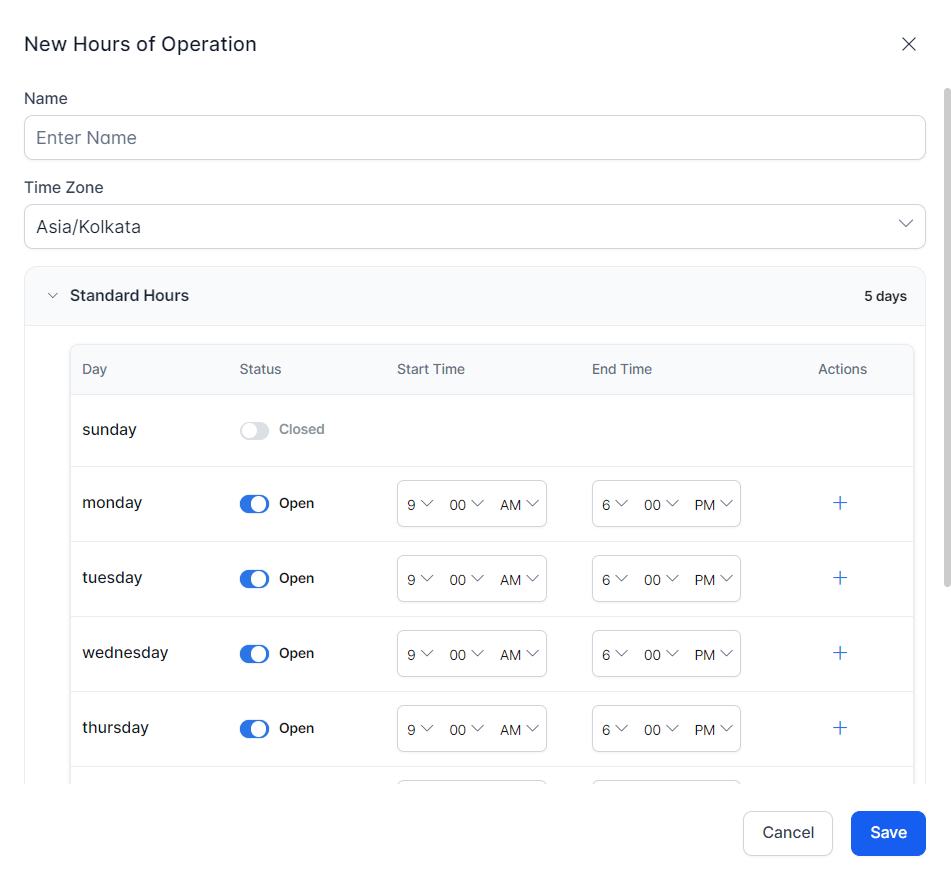
Holidays and Special Days
- Select + Add New to add an entry.
- Select + Add Another to add more time ranges within an entry.
- Select the Delete icon to remove an entry.
- Select Save when done.
Edit Hours of Operation
Select the Edit icon under Actions.Delete Hours of Operation
Select the Delete icon under Actions and confirm.Languages and Speech
This section manages the languages, hold audio, and voice authentication settings for your contact center. To access, go to Contact Center AI > CONFIGURATIONS > Languages & Speech.Language Management
Select Supported Languages to manage which languages the contact center supports.
Add a Language
- Select languages from the Language pane.
- Select Save.
Disable and Re-Enable a Language
- Disable: Uncheck the language and select Save. The language is deactivated in all access channels but not removed.
- Re-enable: Check the language again and select Save.
Supported Languages
The platform supports the following languages for AI Agents and Human Agents:Hold Audio
Hold audio plays to customers while they wait in queue or are on hold. To access, go to Languages & Speech > Hold Audio.Add Hold Audio
- Select Browse or drag a
.WAVfile into the panel. - Optionally rename the file in the Rename Audio field.
- Select Save. The file is added to the Hold Audio list and plays automatically.
Delete Hold Audio
- From the saved list: Select the Delete icon next to the file and confirm. Re-upload if you change your mind.
- Before saving: Select the Delete icon in the upper right of the upload panel.
Response Templates
Response Templates are predefined messages that agents send during customer interactions-greetings, closings, transfers, and more. Response Groups organize templates. You can filter them by skill, agent group, or queue. To access, go to Contact Center AI > CONFIGURATIONS > Response Templates. The section lets you search by name, browse groups, and add new groups. Default response groups:Create a Response Group
- Select + Response Group.
- In the Add New Response Group panel, configure:
- Group Name-For example, Greetings or Sales Responses.
- Shortcut Command-A
/keywordthat agents type in the chat box to display all responses in this group. This also serves as the group prefix for template-level shortcuts. For example, a group shortcut of/billinglets agents type/billingto browse the group, or/billing/refundpolicyto go directly to an individual response. - Shortcut Command-Agents type this in the chat box to pull up the group’s responses.
- Description-A brief summary of the group’s purpose.
- Skill Match (optional)-When turned on, responses appear only to agents with matching skills. Configure AND/OR conditions using the condition builder.
- Agent Group Match (optional)-When turned on, responses appear only to agents in the selected agent groups.
- Queue Match (optional)-When turned on, responses appear only to agents handling interactions from selected queues.
When Skill Match, Agent Group Match, and Queue Match are all turned on, a response appears only if the agent meets all three conditions.
Reorder Response Template Groups
Drag response groups into any order using the six-dot drag handle on the left side of each group row. The configured order persists across sessions and becomes the display order for all agents in the Agent Console. To reorder response groups:- Drag a group row up or down using the ⋮⋮ icon on the left.
- Release to place the group in the new position.
Edit a Response Group
- Select the response group name.
- Select the Edit icon next to the name.
- Make changes and select Save.
Delete a Response Group
- Select the response group name.
- Select the Edit icon, then Delete Response Group.
- Confirm deletion.
Deleted response groups and all responses within them can’t be restored. Agents will no longer see those responses in the console.
Create a Response
- Select a response group to open it.
- Select + New Response.
-
Set the Title and Auto Expire:
- Never-The response doesn’t expire.
- Custom Date-Set an end date and time.
-
Shortcut Command (optional)-A shortcut for this specific response. When configured, agents can invoke it directly using
/groupshortcut/templateshortcut.Shortcut names must be unique across the system and can only contain letters and numbers. The system doesn’t support special characters. If the shortcut name is available, the system saves the response and displays a success notification. -
Select a response type tab and add content:
- Chat Response: Type the message in the text editor. Select Done.
- Email Response: Write in plain text, using variables, or in HTML/CSS. Optionally select + Add Subject to add a subject line. Select Done.
- Select Create.
Using Response Template Shortcuts
Agents can invoke response templates directly in the chat editor using shortcuts, without browsing the full template library.
Typing either format in the chat editor triggers autocomplete, filtering results as you type.
To insert a response using a shortcut:
- In the chat editor, type
/followed by the group shortcut or the full template shortcut. - Use the arrow keys to navigate the filtered results and press Enter, or click the response.
The system doesn’t insert responses automatically. You must select a response from the filtered results.
Variables in Response Templates
Pull customer and agent details dynamically using these variables:
Variables are available in the message editor when adding or editing a response.
Edit a Response
- Select the response group name.
- Find the response and select the Edit icon under Actions.
- Make changes and select Save.
Delete a Response
- Select the response group name.
- Select the Edit icon for the response.
- Select the Delete icon and confirm.
Reorder Response Templates
Drag response templates within a group into any order using the six-dot drag handle on the left side of each template row. The configured order persists across sessions and becomes the display order for all agents in the Agent Console. To reorder response templates:- Open a response group.
- Drag a template row up or down using the ⋮⋮ icon on the left.
- Release to place the template in the new position.
Templates can only be reordered within their own group. Moving a template to a different group isn’t supported.
Export Response Templates
Administrators and supervisors can export all response templates as a CSV file for review and compliance purposes.- Select Download Response Templates.
- A notification confirms the download. The file saves as a CSV.
Surveys
Surveys collect customer satisfaction feedback after an interaction ends. You can configure surveys per channel-chat, call, and email-each with its own message, frequency, and conditions. To access, go to Contact Center AI > CONFIGURATIONS > Surveys. Supported survey types:
The survey list shows: Survey Name, Description, Experience Enabled For, Survey Type, Frequency, and Status.
Create a Survey
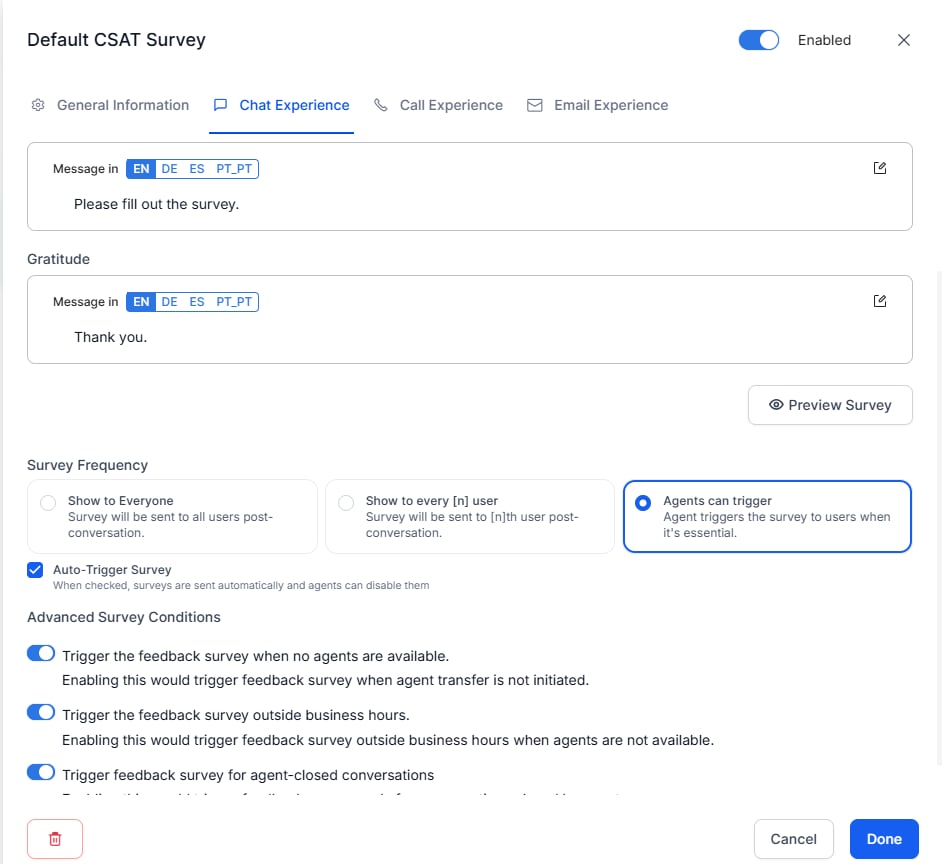
Step 1-General Information Enter the Survey Name and Description. Step 2-Configure channel experience- Select the Chat Experience, Call Experience, or Email Experience tab.
- Enable the toggle for that channel.
-
Configure the Request Message (shown before the survey) and the Gratitude Message (shown after). Select a language, enter the text, and select Done.
Email messages can be written in plain text or HTML/CSS.
-
Set the Survey Frequency:
-
Configure Advanced Survey Conditions (optional):
- Enable the survey toggle to activate it.
-
Select Done.
Edit a Survey
Select the survey name or the Edit icon, make changes, and select Done.Delete a Survey
- Select the survey name or the Edit icon.
- Select Delete in the bottom toolbar and confirm.
Agent Forms
Agent Forms are configurable input forms that agents use to capture customer information during interactions. To access, go to Contact Center AI > CONFIGURATIONS > Agent Forms. Form statuses:Create an Agent Form
- Select + New Form.
- Enter the Name, Display Name, and Description.
- Enable Agent Form Data (optional)-Redacts form input from logs, context objects, service calls, and agent transfers by replacing it with a system-generated alphanumeric value.
- Select an Assignment:
- Assign to Queues-Make the form available for all or selected queues.
- Assign to Agent Groups-Make the form available to specific agent groups.
- Select Save & Proceed.
Build an Agent Form
Add components to the form-text fields, checkboxes, radio buttons, date fields, and more-using the Form Builder.Edit an Agent Form
- Edit form fields: Select the form record to open the Form Builder and make changes directly.
- Edit form settings (Name, Description, Data Security, Assignments):
- From the live board: Select the Edit icon under Actions.
- From the Form Builder: Select More Options > Form Setting.
Publish an Agent Form
Publishing makes the form available for agents to send to customers from the Agent Console.- Select the More Options icon under Actions.
- Select Publish.
If you edit a published form, republish it for the changes to take effect.
Delete an Agent Form
- From the live board: Select More Options > Delete.
- From the Form Builder: Select More Options > Delete.
Widgets
Widgets embed external systems or web pages into the Agent Console. Agents access widgets within custom Agent Console Layouts.External applications may require permission configuration to load properly within the console.
Add a Widget
- Select External Widget, then + New External Widget.
-
Configure:
- Widget Name-A name to identify the widget.
- Load without conversation-Check this to display the widget on the agent desktop even when no conversation is active.
- Widget Icon-Upload a file or drag and drop.
-
Enter the Widget URL. Use a static URL or a dynamic URL with variables from the Variable dropdown:
For custom metadata variables, use:
{{context.metaInfo.<yourCustomVarName>}}Example:https://www.example.com/?id={{context.metaInfo.customerId}}resolves tohttps://www.example.com/?id=12345at runtime. - Enter a Failure URL (optional)-Displays if the main page fails to load. Supports the same variables.
- Select Save.
Edit a Widget
In the External Widgets list, select the widget. Update the name, icon, or URLs and save.Delete a Widget
In the External Widgets list, select the widget. Select Delete in the bottom toolbar and confirm.Add a Widget to an Agent Console Layout
- In the Agent Console, select Manage Layout.
- Select a layout and select the edit icon.
- Drag the widget from the left panel to the right panel.
- Select Save.
Remove a Widget from an Agent Console Layout
- In the Agent Console, select Manage Layout.
- Select a layout and select the edit icon.
- Select More Options on the widget and select Delete.
Removing a widget from a layout only hides it from agents-the widget configuration is preserved and can be re-added later.
Configure User Info Sections
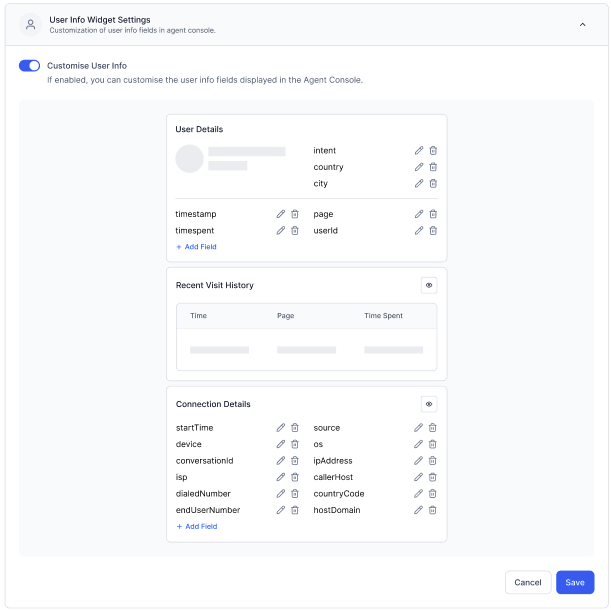
User Info displays customer information in the Additional Tools panel for agents. Administrators can configure which sections and fields are visible, their order, and how they map to Agent Utils attributes. User Info has three sections: User Details, Recent Visit History, and Connection Details. Steps to configure User Info:- Go to Contact Center AI > CONFIGURATIONS > Widgets > User Info Widget Settings.
- Turn on the Customize User Info toggle.
- Select Save.
- To add a field: Select + Add Field and choose from the available attributes.
- To remove a field: Select the delete icon next to the field.
Agent Utils attribute names are case-sensitive. The field mapping must match the exact attribute name and casing as configured in Agent Utils.
Connection Details displays technical session information. The following fields are available. To add or remove fields: Follow the same steps as User Details.
Wallboards
Wallboards display real-time contact center performance metrics across queues, giving administrators and supervisors a live view of operations as they develop throughout the day. To access, go to Contact Center AI > CONFIGURATIONS > Wallboards.The Wallboard under Analytics menu is visible only when the Contact Center Wallboards in Analytics permission is enabled. Learn more
Create a Wallboard
- Select + Add New Wallboard.
- Enter a Name and optional Description.
- Select the Wallboard Type and configure the settings.
Center Wide
Shows aggregated data across multiple queues.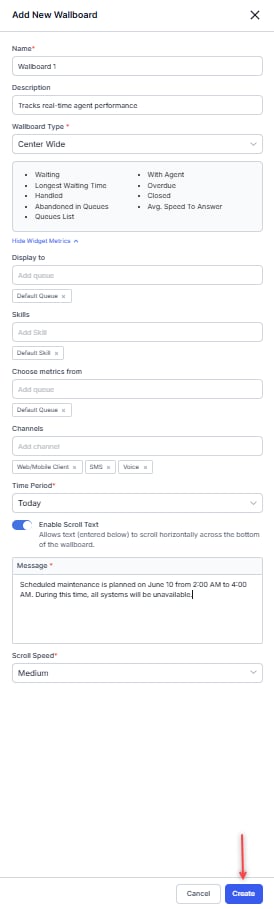
Queue Specific
Shows agent performance rankings for a specific queue.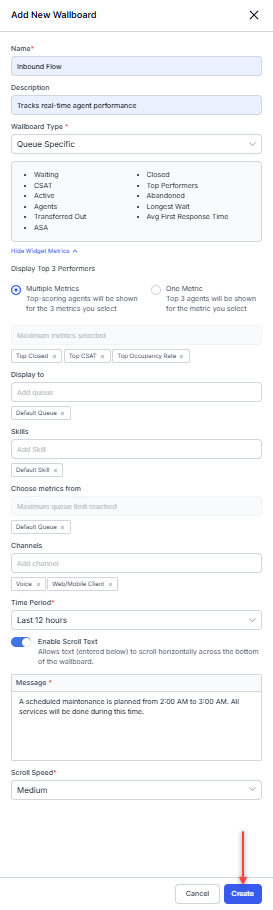
Center Wide Abandoned
Shows aggregated data across all queues. This wallboard is built in and not customizable.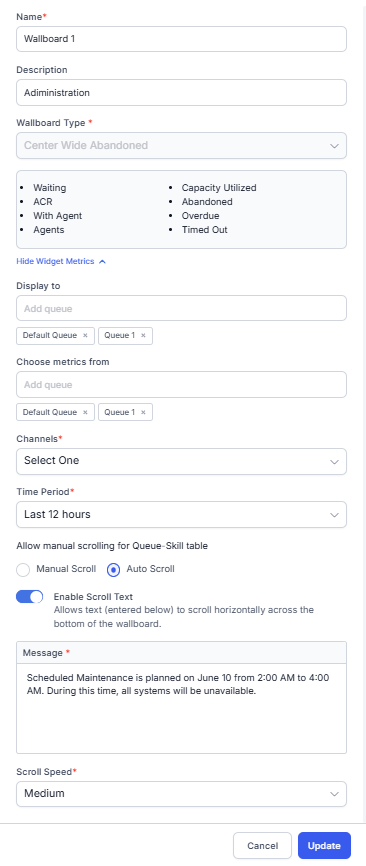
- Select Create.