Real-Time Monitor
To access the Monitor tab, you must be an App Owner, App Developer, App Tester, or Supervisor, or have the Monitor Console permission set to Yes. See Role Management for details.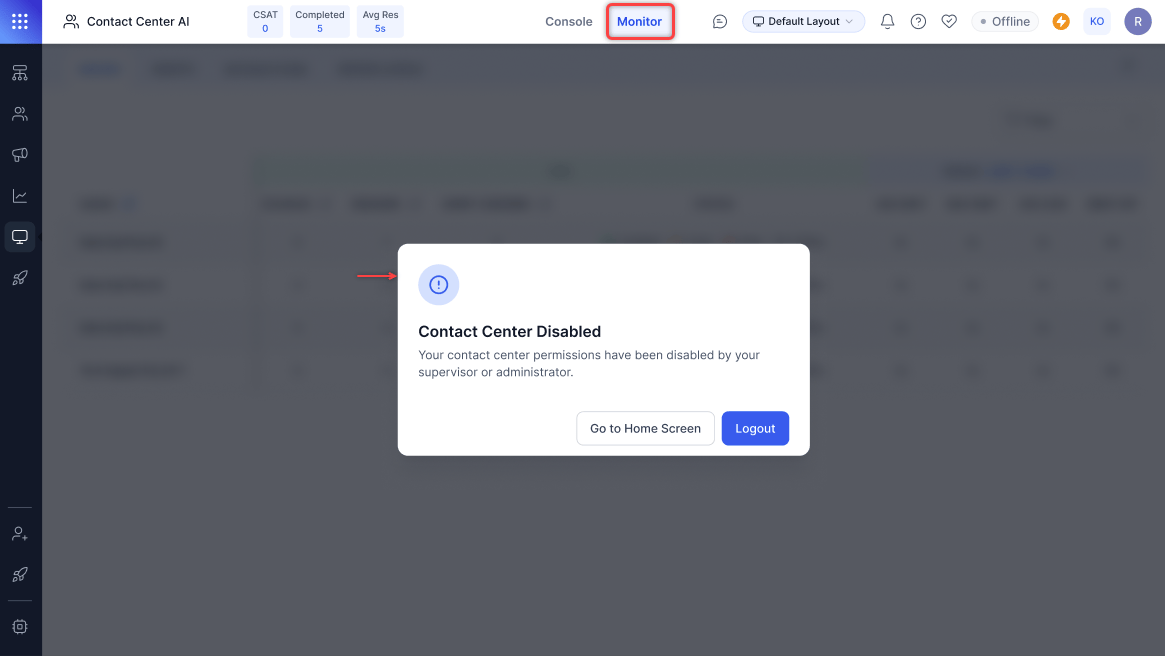
Queues
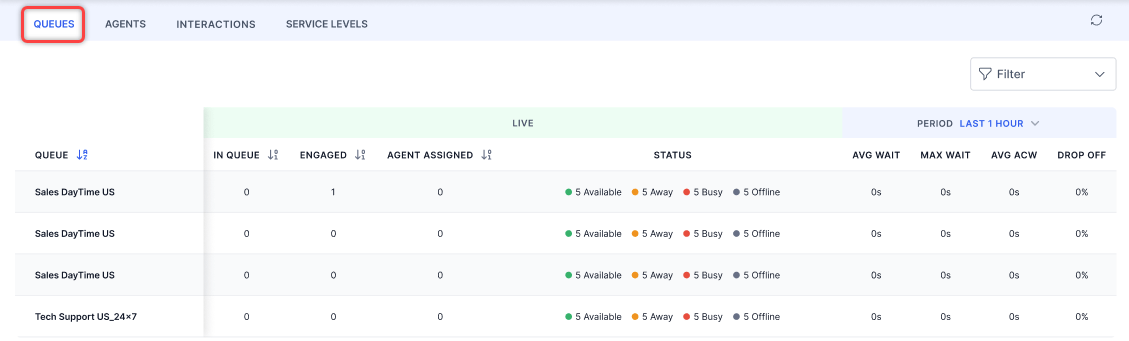
The Queues view shows all assigned queues with:- Conversations waiting and engaged
- Agent availability summary
- Average wait time, max wait time, and drop-off rate
-
Select the Queues tab.
-
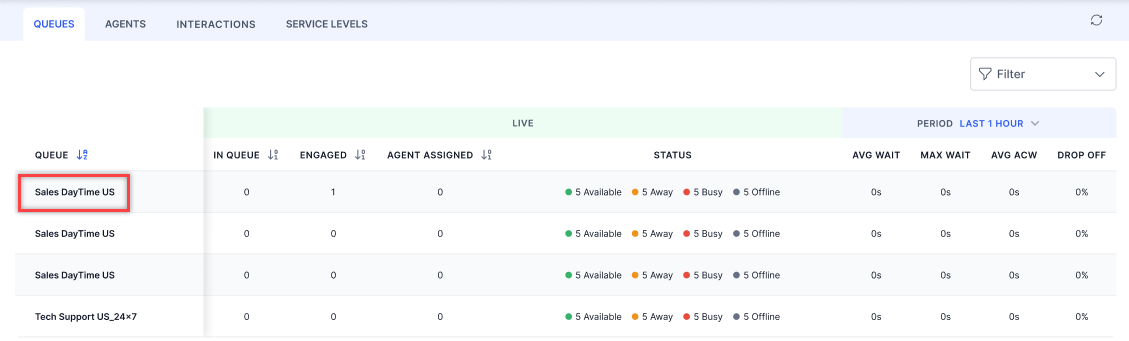
Select a queue from the left menu.
-
Select an agent name to view their conversation details (Chat, Email, and Call).
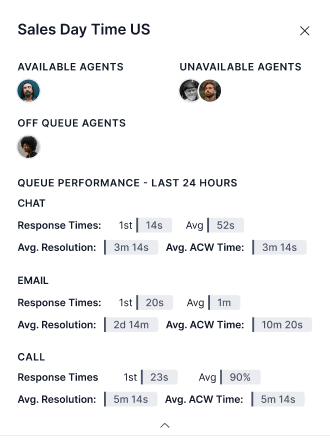
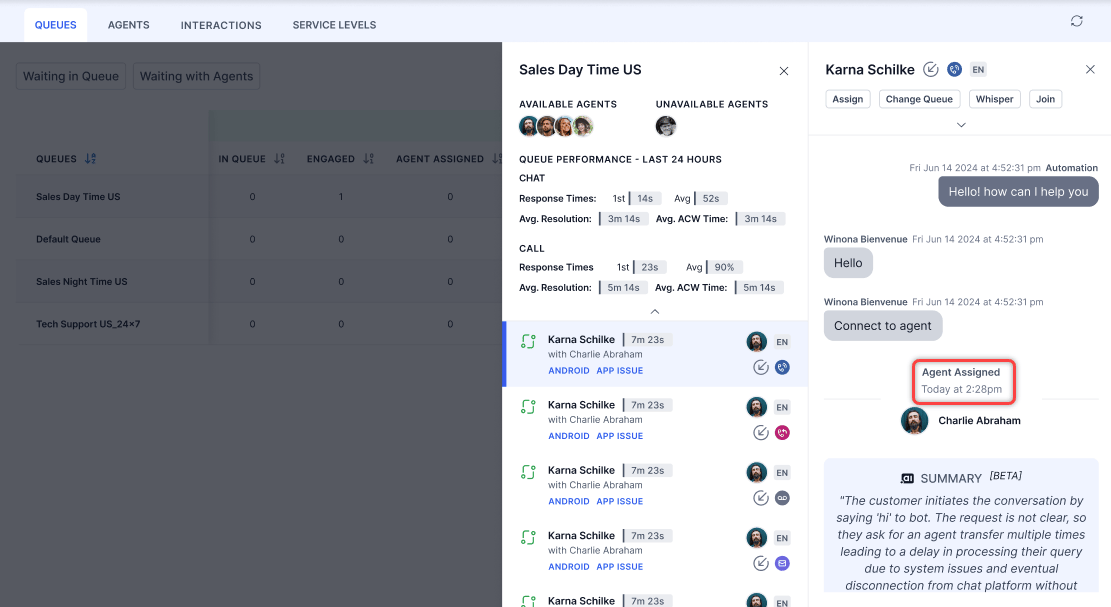
Supervisors can switch between conversations when the transcript slider is open. Selecting a different conversation automatically refreshes the slider content, without requiring the slider to be closed and reopened.
Filters
Create a filter:- Select Filter and then select New Filter.
-
Select Queues, Channels, Type, State, and Languages. You can also filter by agent groups or search for specific agents.
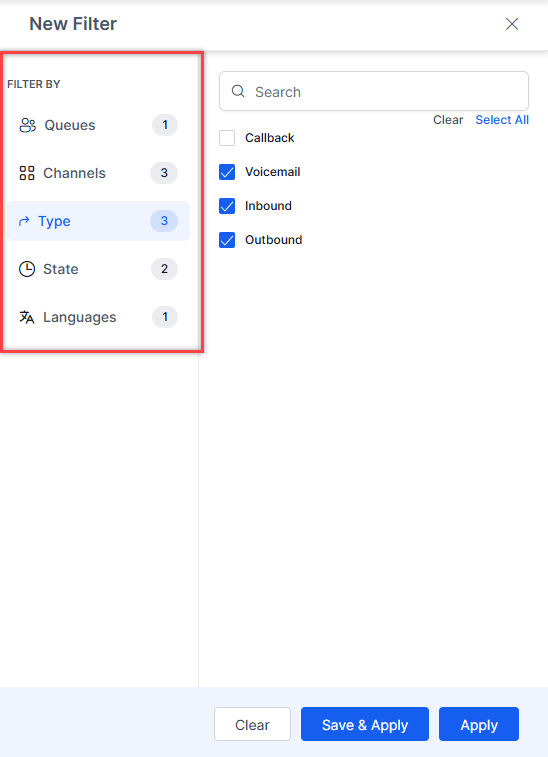
- Select Save & Apply, enter a name (up to 20 characters), and confirm.
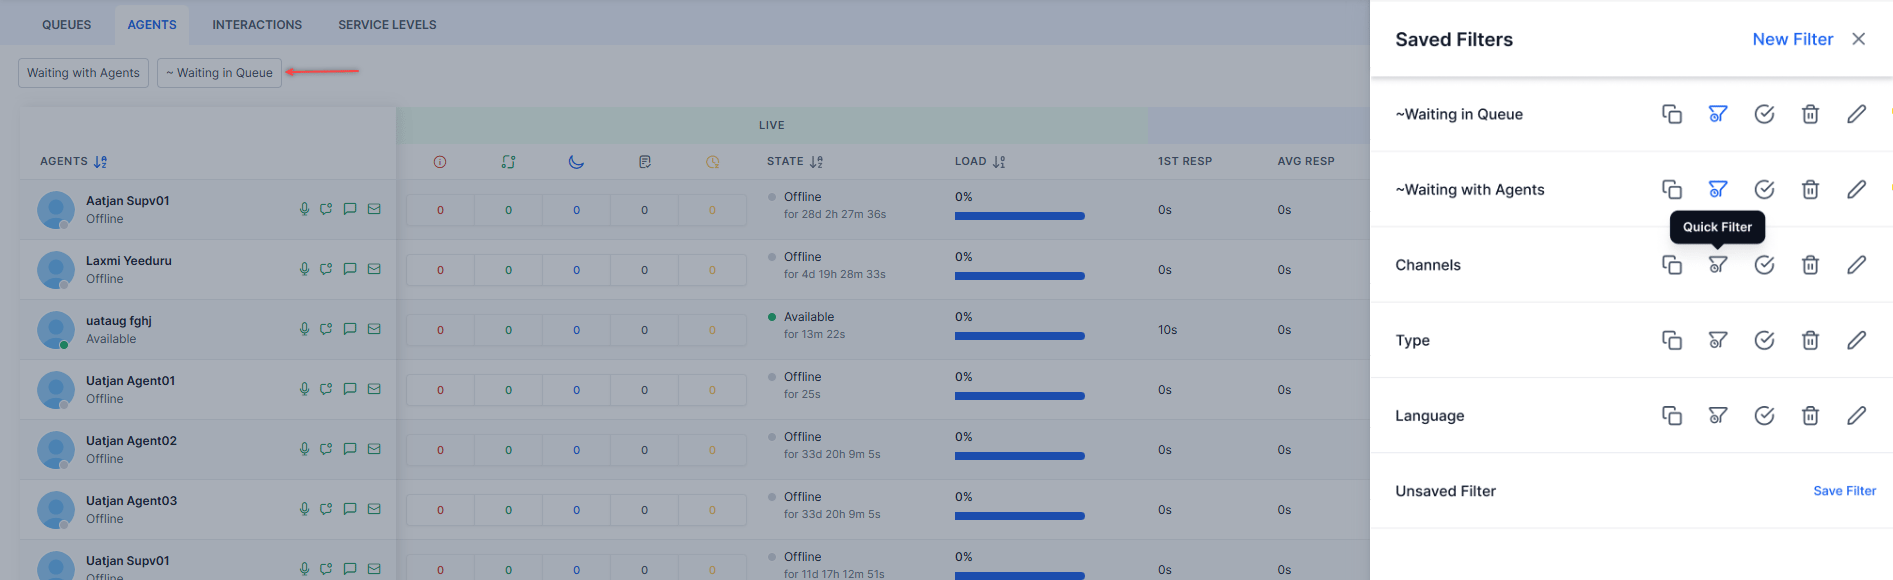
- Waiting with Agents and Waiting in Queue are pre-selected quick filters by default.
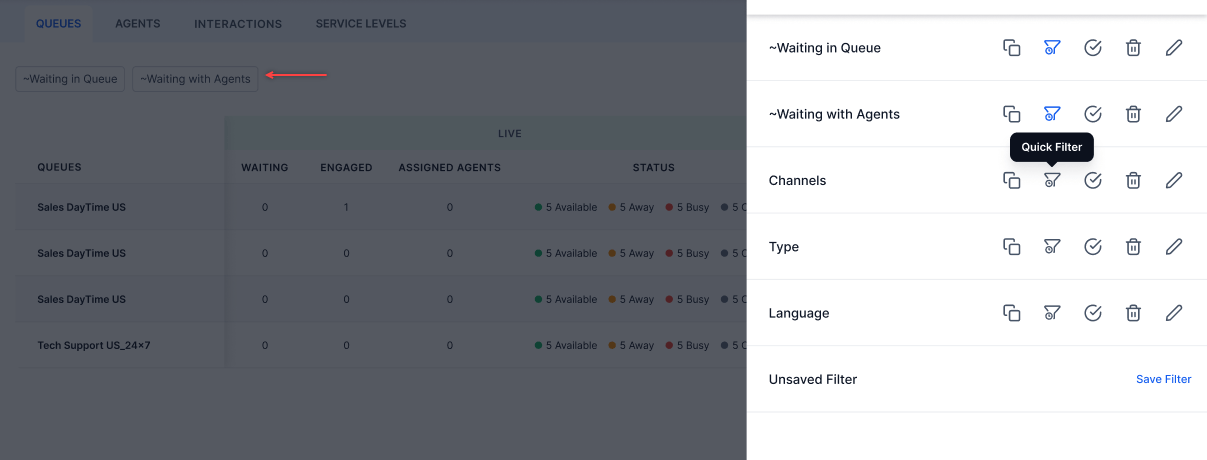
- You can select up to four quick filters.
- A default filter is treated as a quick filter if not explicitly selected as one.
- You can’t disable a quick filter while it’s set as the default. Remove the default first.
- Select the Filters tab.
- Select Edit.
- Make changes and select Save & Apply.
Agents
The Agents view shows all agents assigned to your queues with their current status and conversation metrics.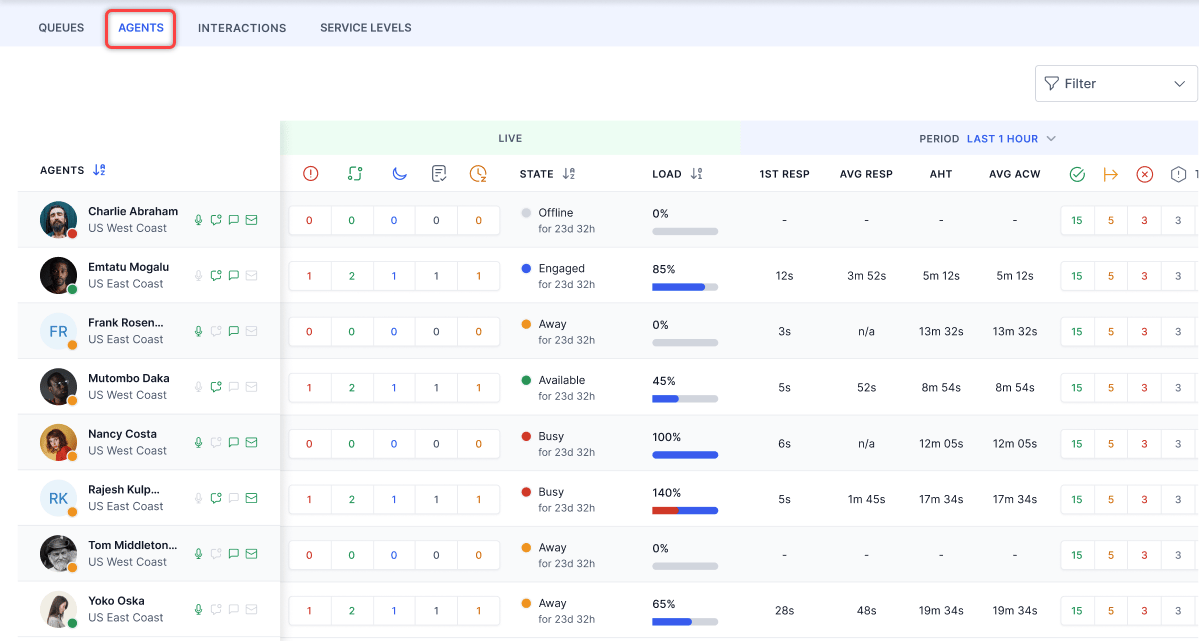
Active channels appear in green; disabled channels appear in gray. Previously selected channels persist when the agent starts a new session.
Agent details:
- Hover over an agent name to see their status, profile info, skills, queues, and agent groups.
- The load capacity indicator shows overall and channel-wise load (for example, Live Chat 2/3 slots engaged).
-
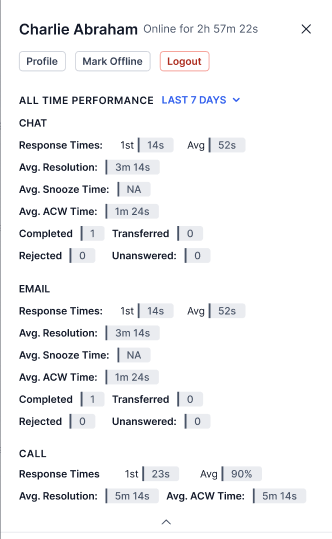
Select an agent to view their ongoing conversation and engagement metrics.
-
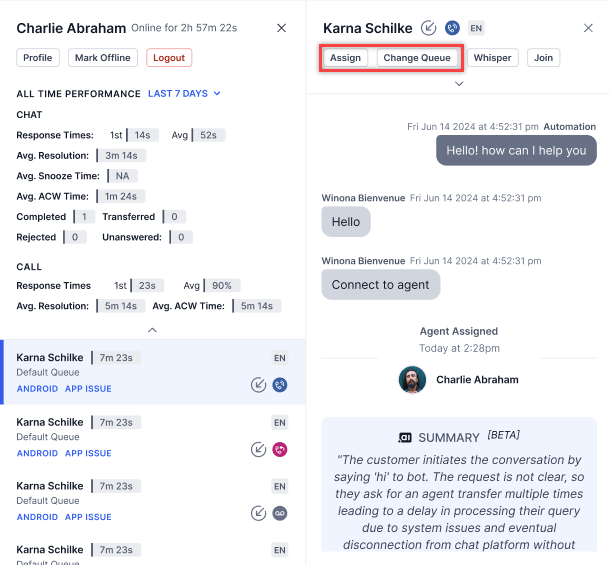
From the agent view, you can check the profile, chat with the agent, change the queue, and assign conversations.
- Sorting is unavailable for automation interactions. Removing offline agents improves performance when sorting by load.
- Supervisors can switch between conversations when the transcript slider is open. Selecting a different conversation automatically refreshes the slider content, without requiring the slider to be closed and reopened.
Filters
Filter the Agents view by Status, Agents, Skills, and Roles.
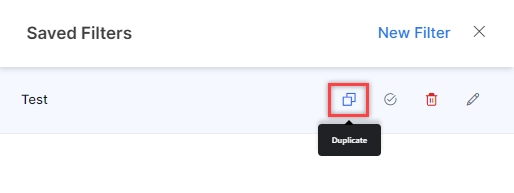
In the Queues and Agents tabs, historical metrics filtered by a specific duration don’t auto-refresh. Data updates only when the page is hard reloaded or the duration filter is changed.
Interactions
The Interactions view shows all live interactions assigned to agents. It includes only interactions that involve agent transfers.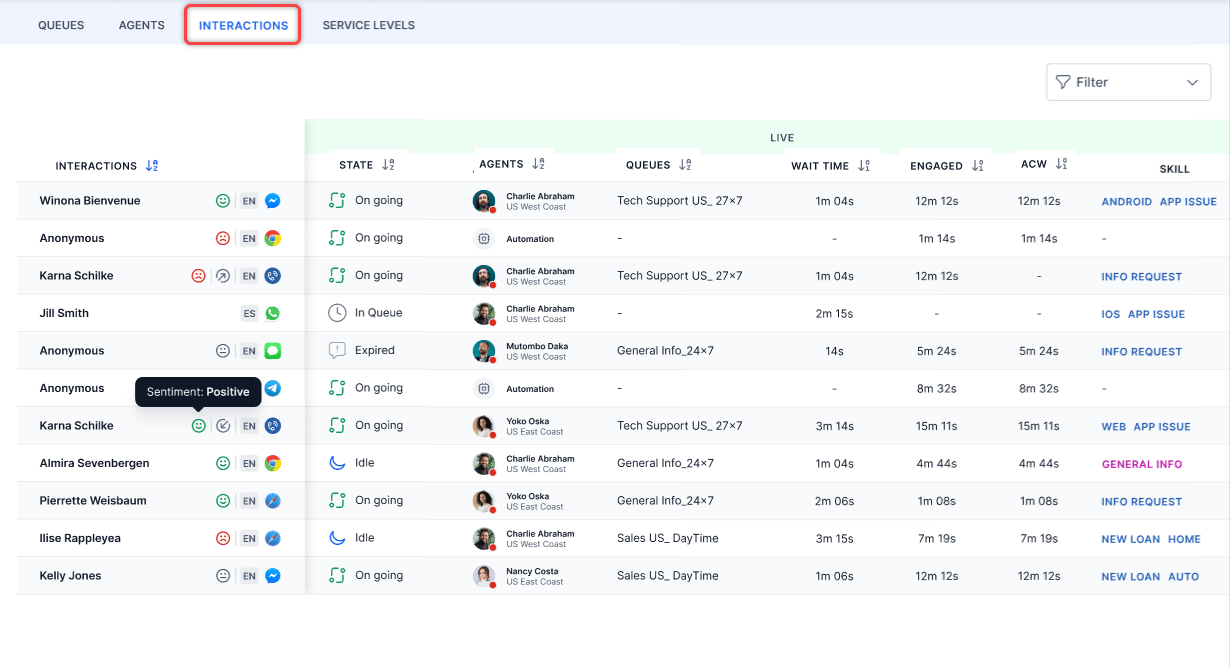
- Agents aren’t listed in Agent Transfers when Chat and Email channel slots are set to zero.
- For Work Bin conversations, the Interactions view displays the name of the last agent who handled the interaction before it was moved to Work Bin. This displays under the Last Handling Agent in the Participant column and is visible for the conversations in the workbin.
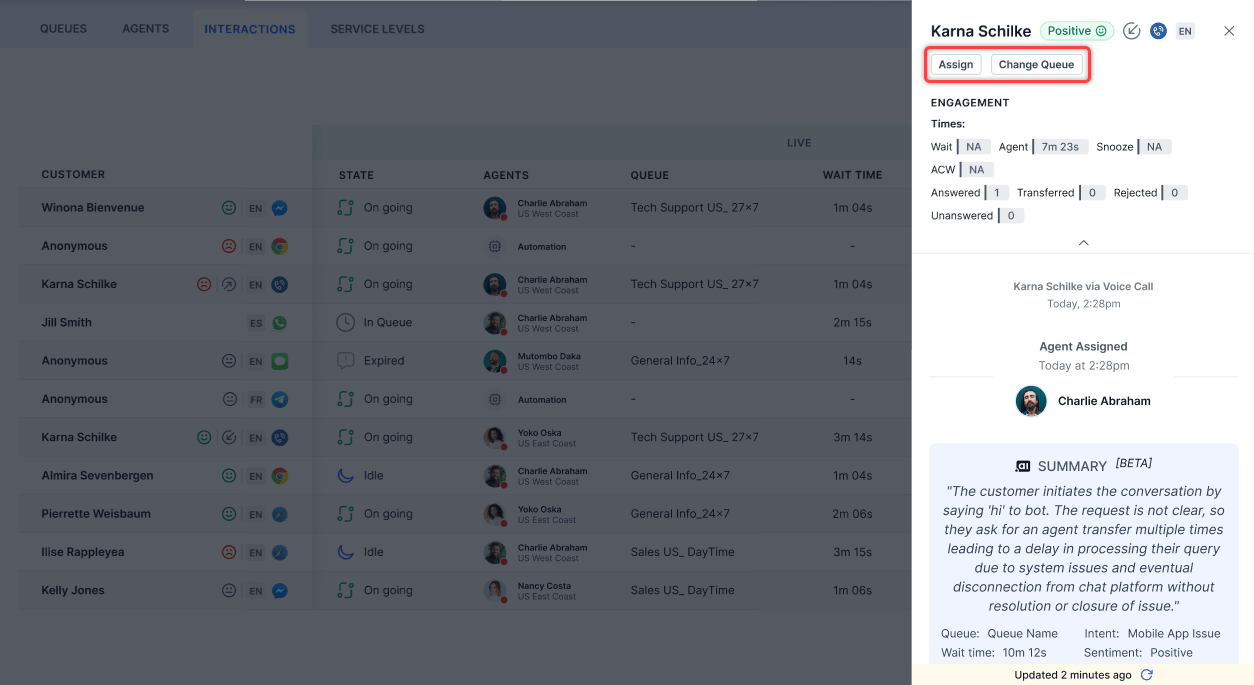
-
Select an ongoing conversation, then select Assign.
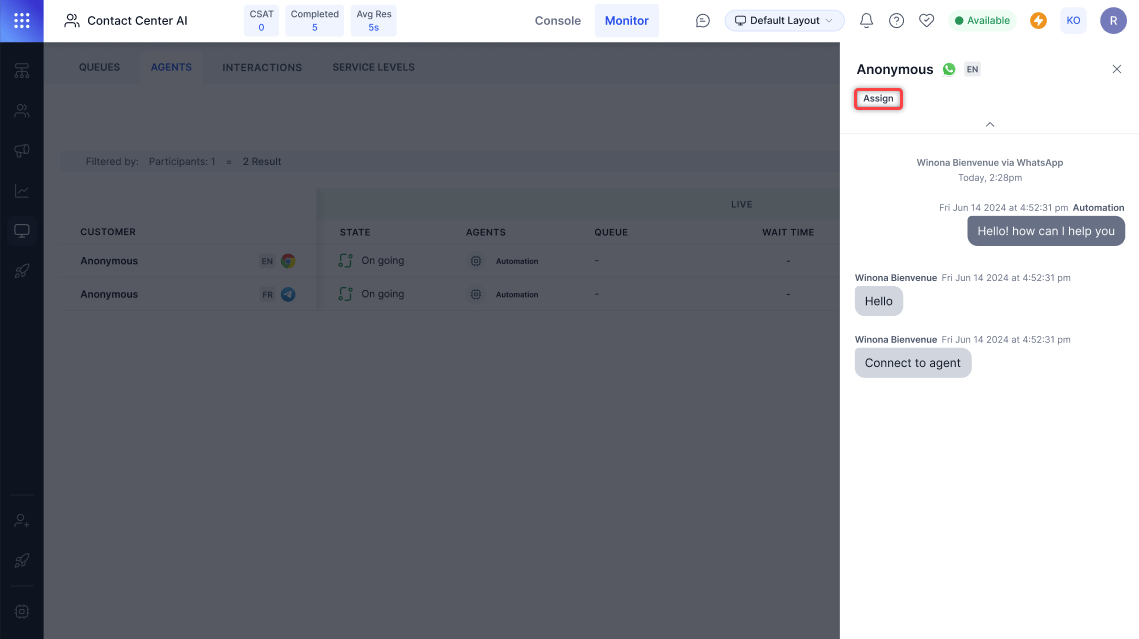
-
In the Assign Conversation pop-up, select Agent or Queue, choose from the dropdown, optionally mark as priority or send a message to the customer, then select Assign.
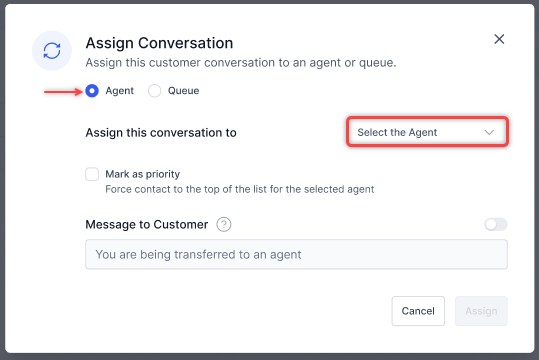
Supervisors can switch between conversations when the transcript slider is open. Selecting a different conversation automatically refreshes the slider content, without requiring the slider to be closed and reopened.
Filters
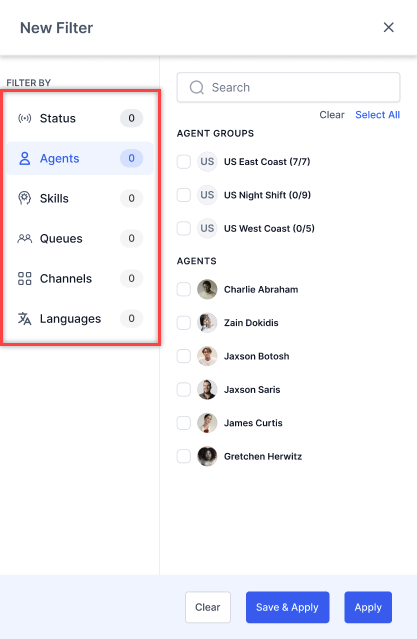
Filter by Status, Agents or Participants (when bot-led interactions are enabled), Skills, Queues, Channels, Type, and Language. Participant filter behavior
Selecting one or more participants displays interactions for each selected state.
Without bot-led interactions:
The following filter options are displayed when bot-led interactions are turned off or not available in the account.
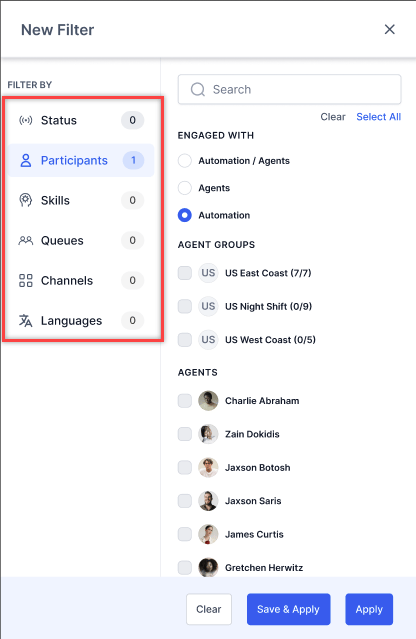
Bot-led interactions don’t appear by default. To view them, select Automation or Automation/Agents from the Participant filter. The default is Agent to prevent information overload.

Service Levels
The Service Levels view lets you monitor service-level targets by queue. Go to Console > Monitor > Service Levels.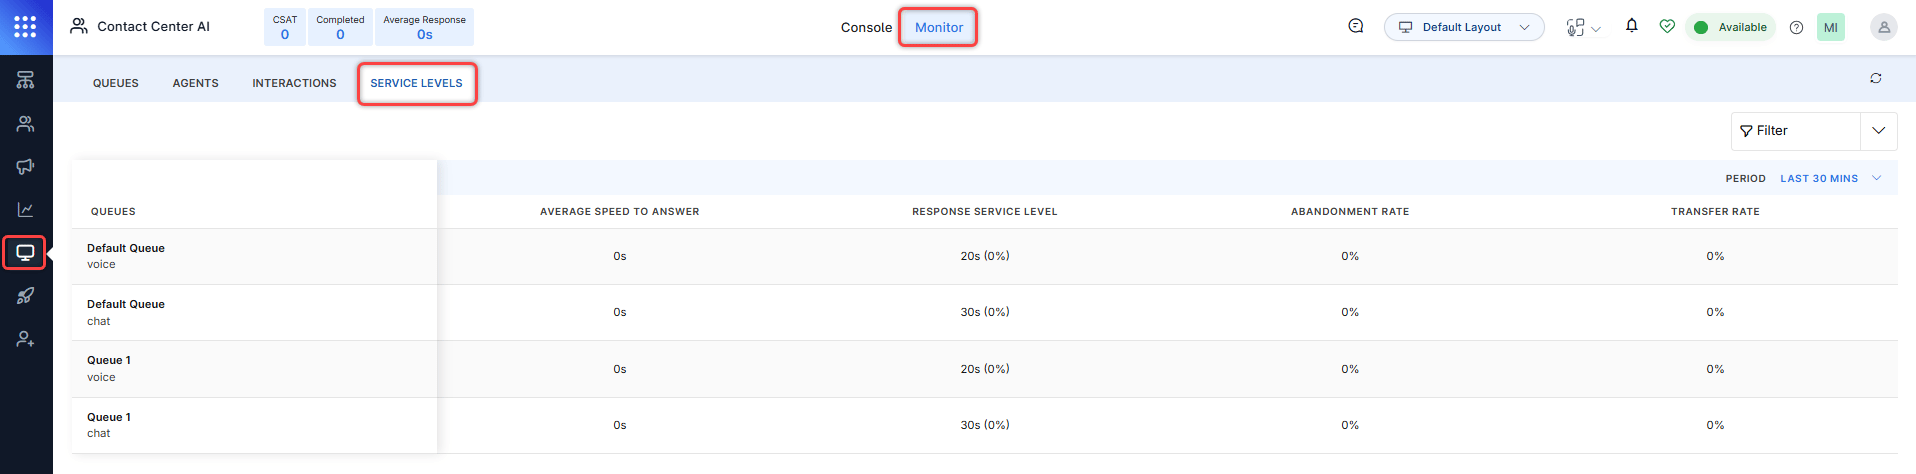
You can create, edit, copy, mark as default, and delete filters for service level metrics.
For configuring service levels, see SLAs & Alerts.
Monitor Channel Selection
Select a channel at the top of the Monitor tab to view channel-specific data. For Voice and Chat, the channel filter shows only Voice and Chat options; for Email, it shows only Email and limits the type filter to Inbound and Outbound.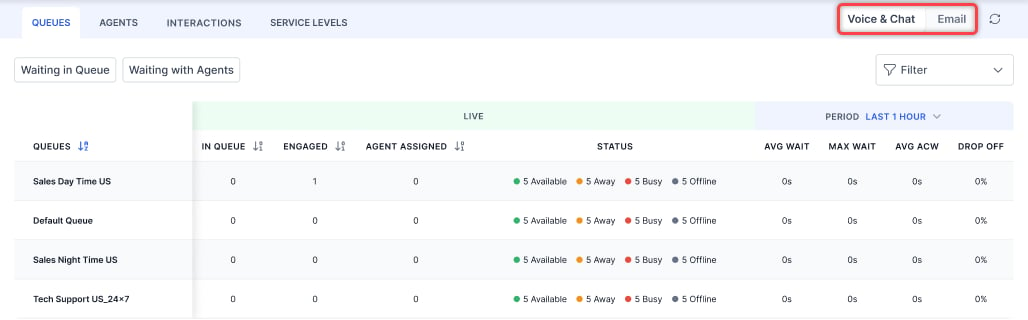
- Emails Offered-Total email conversations received.
- Emails Avg Resp Time-Average time to respond.
- Emails Queue Wait-Average queue wait time (excluding agent tray).
- Emails AHT-Average handling time.
- Email Transfer Rate-Rate of transferred conversations.
- Emails AHT-Average handling time per agent.
- Email Transfer Rate-Transfers by agent divided by emails handled.
Sort (Queues, Agents, and Interactions) and Transcript Slider
Sorting Conversations by Engaged Time Selecting the Engaged column header sorts conversations by how long each conversation was engaged with an agent, in ascending or descending order. When sorted in descending order, the sort order remains stable as new conversations arrive. Incoming conversations are placed in the correct position based on their engaged time and don’t move to the top of the list. This prevents list reordering or visual jitter during active queue monitoring. Sort behavior:
The sort order is re-evaluated consistently for all list updates, including state changes to existing conversations.
Switching Conversations When the Transcript Slider Is Open
When the transcript slider is open for a conversation, supervisors can select a different conversation without first closing the slider. The slider refreshes automatically and displays the transcript of the newly selected conversation.
This lets you move between conversations during live monitoring without interruption.
Transcript slider switching behavior:
The transcript slider refresh is seamless. No reload or manual close is required when switching between conversations.
Skill and Queue Subscription Visibility
The Monitor tab displays agent-level skill and queue de-selections. Supervisors can identify agents who have modified their skills or queues and take corrective action without leaving the Monitor view. Agents View The Agents view displays each agent’s current routing eligibility, including any skill or queue de-selections.
Supervisor Actions from the Agents View
From the agent detail panel in the Agents view, supervisors can:
- View the full list of assigned skills and queues.
-
See which skills and queues the agent has deselected.
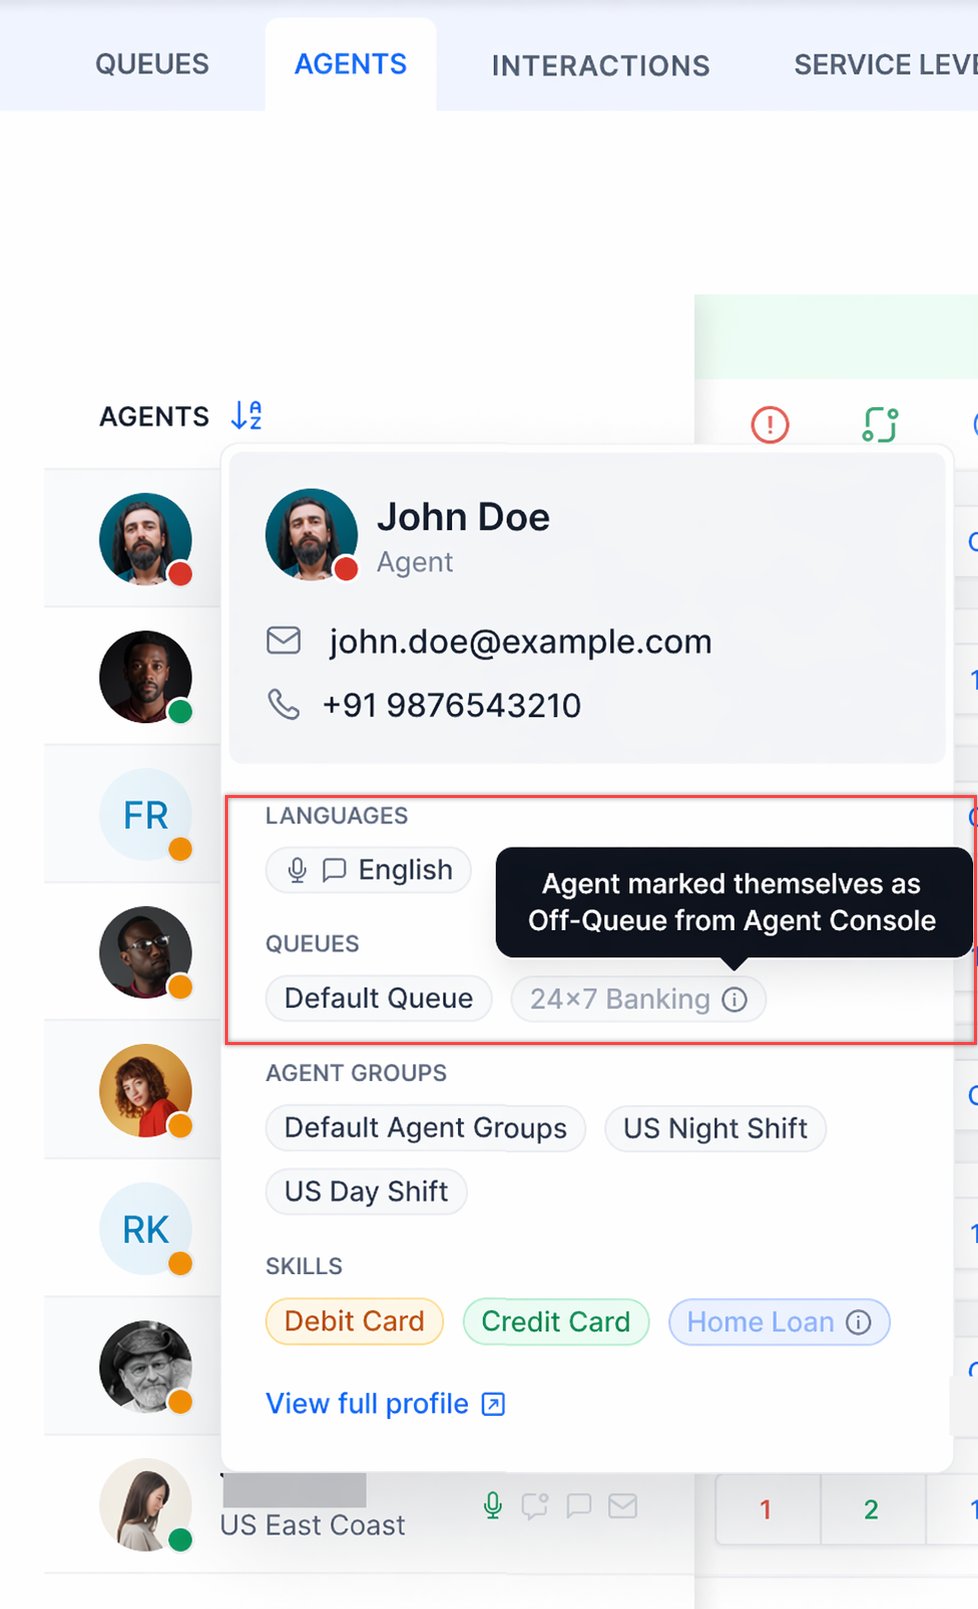
- Select Restore to override the agent’s deselection and reinstate their routing eligibility for a specific skill or queue.
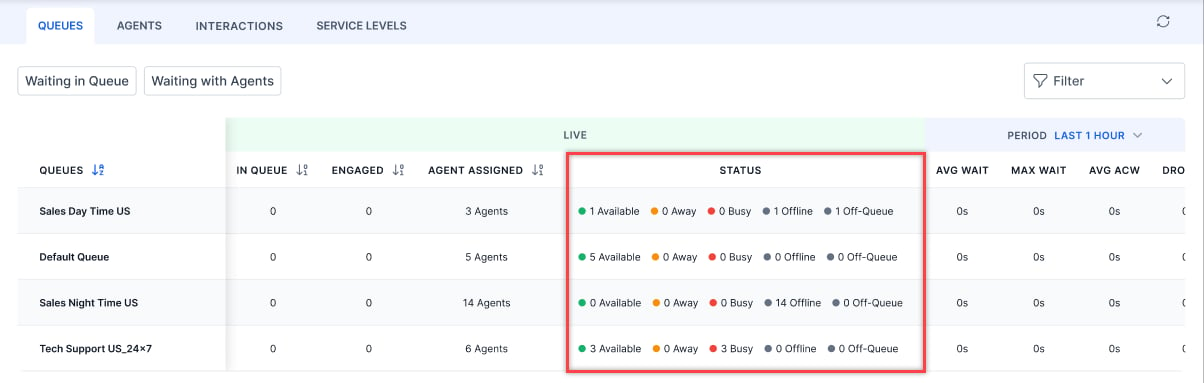
Agents in Off-Queue status are counted in the queue’s total agent assignments but are excluded from routing calculations.
Supervisor Actions from the Queues View
From within a queue in the Monitor view, supervisors can:
-
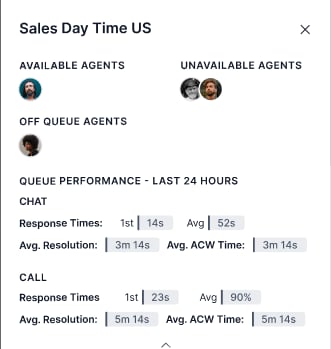
Identify all agents in Off-Queue status.
-
Select Restore for any Off-Queue agent to reinstate their routing eligibility for that queue.
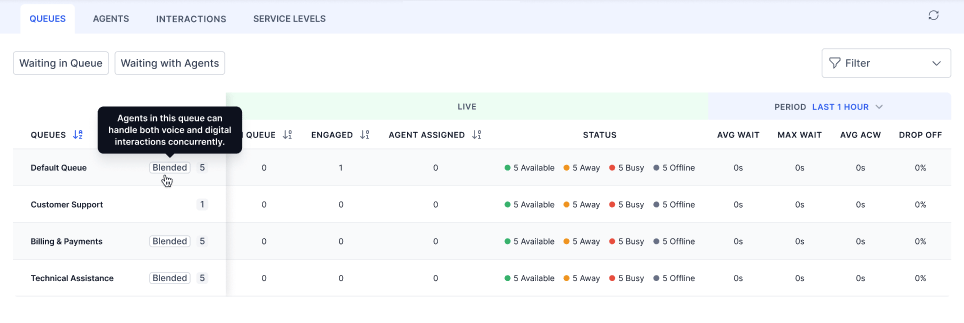
Blending Indicators
Blending status is visible in both the Agents and Queues views. Monitor > Agents- Indicates whether an agent is blending-enabled at the agent level.
- Indicates whether queue-level blending is influencing the agent’s current state.
Live Conversation Monitoring
Listen & Whisper (Voice)
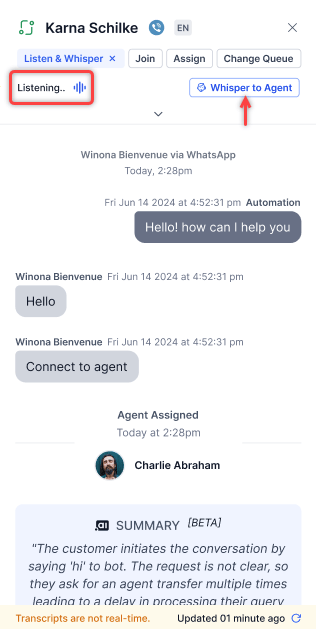
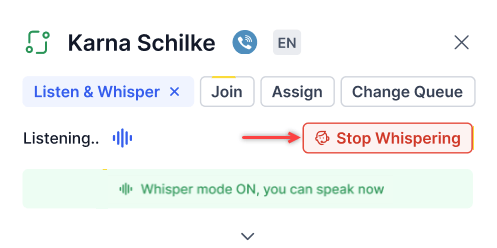
Listen and Whisper let you monitor and coach agents during live voice calls without the customer hearing.- Listen-Monitor a call silently.
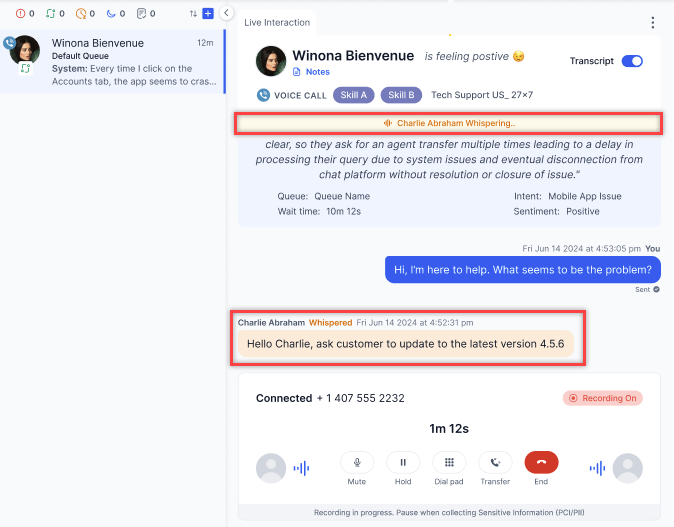
- Whisper-Speak to the agent only; the customer can’t hear.
-
Go to Monitor > Agents and select the conversation.
A conference icon indicates multiple participants on the call. Listen & Whisper and Join are disabled for conference calls.
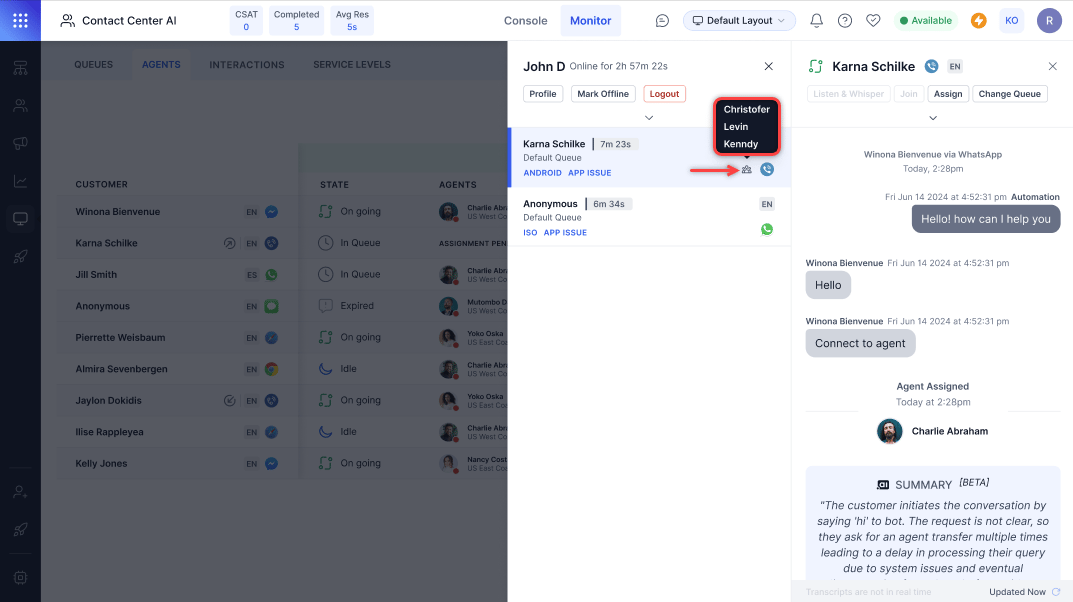
- Select Listen & Whisper.
-
To coach the agent, select Whisper to Agent.
-
Select Stop Whispering to end the session.
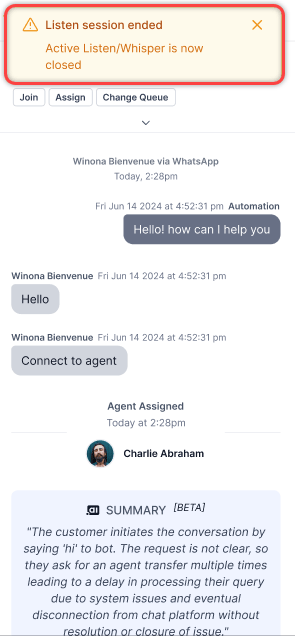
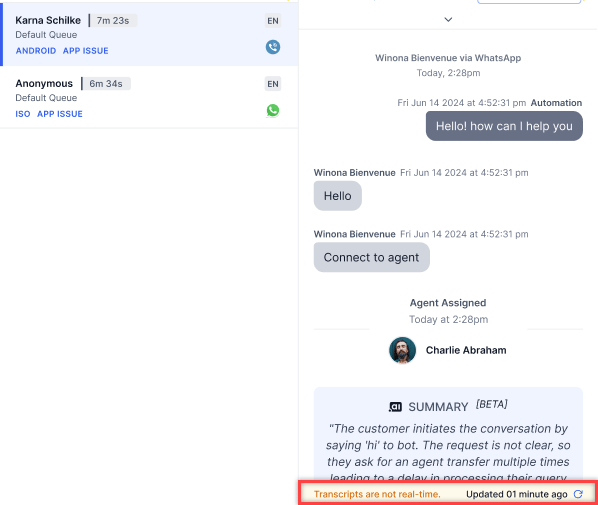
Transcripts aren’t real-time. Select the Refresh icon to update them.
Join a Conversation
Supervisors can join a live conversation (conference) to participate alongside the agent and customer. You can also view agent engagement metrics from this view. Steps:-
On the right pane, select Join Conversation.
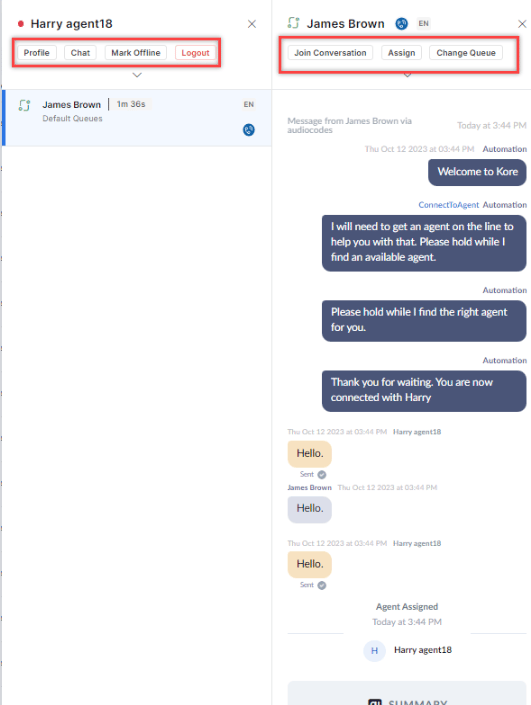
- In the confirmation pop-up, select Confirm.
Queue Actions
Manually Assign a Conversation
- Select the conversation in the Queue panel and select Assign.
-
Select an agent from the pop-up.
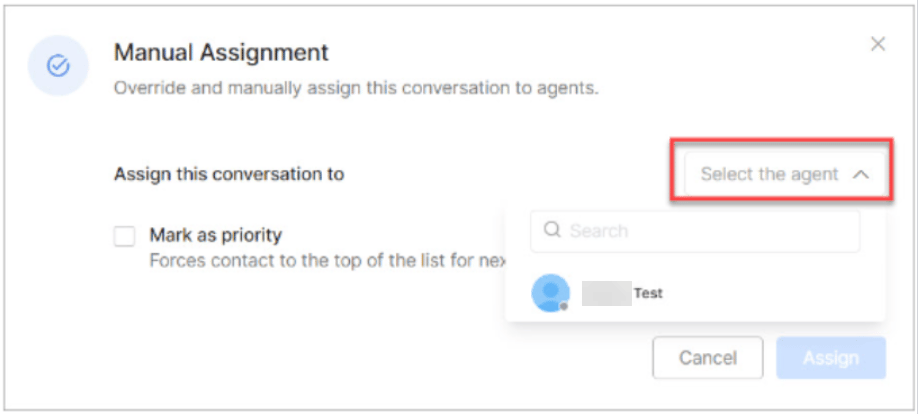
-
Optionally select Mark as priority, then select Assign.
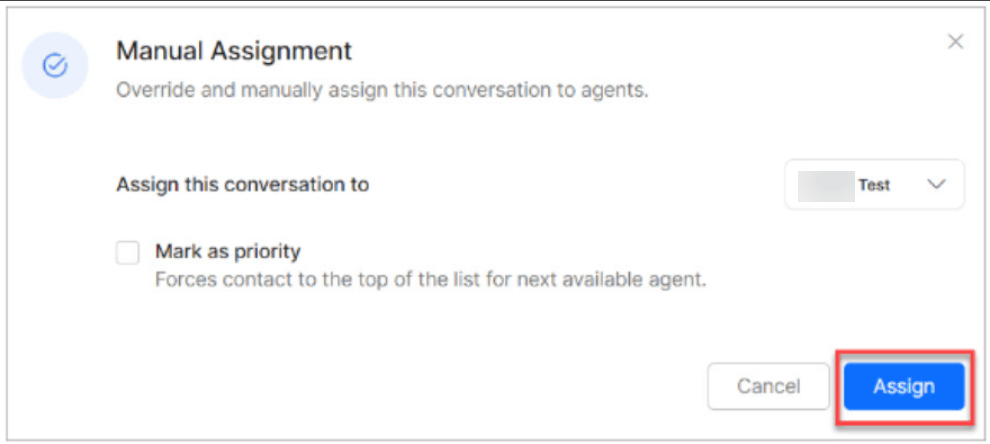
Manual assignments ignore skill-based routing and slot limits.
Change Queue
Move a conversation to a different queue and optionally prioritize it.- Go to Monitor > Queues.
-
Select the queue and then select the conversation.
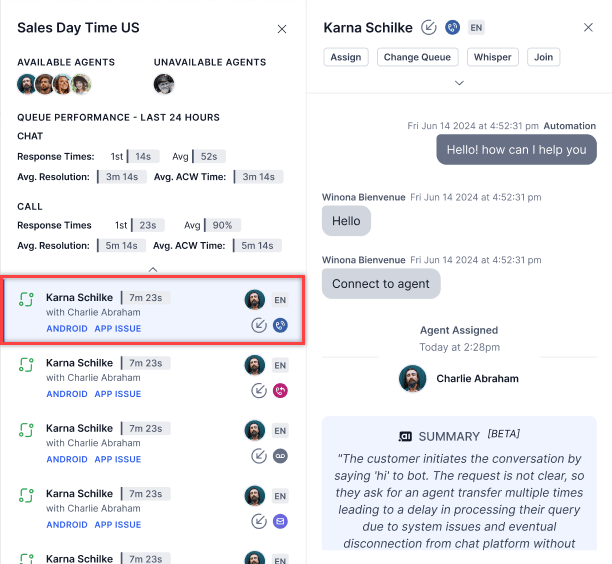
- Select Change Queue.
-
In the pop-up, select a destination queue. Optionally select Mark as priority to place the conversation at the top of the destination queue.
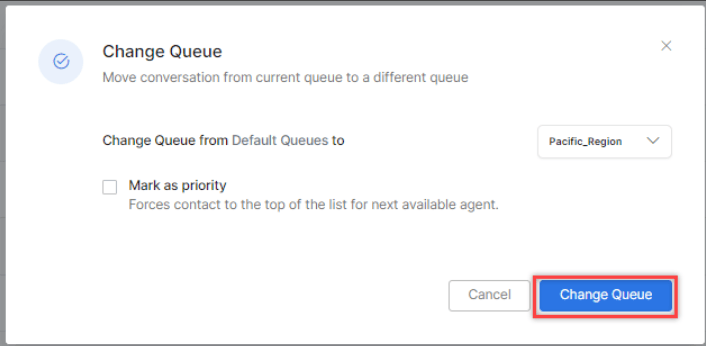
- Waiting conversation counts update in both queues after the transfer.
- The conversation’s position in the destination queue is based on its original arrival time.
- Queue transfers are recorded for reporting.
Queue Transfer Restriction Override
By default, queue-level transfer restrictions apply when you reassign a conversation from the Monitor tab. The destination queue list shows only the queues permitted by the source queue’s transfer rules. Users with the Override Queue Transfer Restrictions in Monitor permission can select any eligible destination queue when reassigning from the Monitor tab, regardless of the source queue’s transfer rules. Permission behavior:This permission doesn’t affect Agent Console transfers. Queue transfer restrictions are enforced in the Agent Console for all users.
Bulk Transfer and Force Close
Transfer or force-close multiple conversations at once across chat, email, and voice. By default, this option is disabled for Agents and Custom roles. Supervisors, Admins, Owners, and App Developers can access it when permissions are granted.From the Queues Tab
- Open the Monitor tab and select a queue.
- Select ⋮ in the top corner and choose Transfer Conversations or Force Close.
-
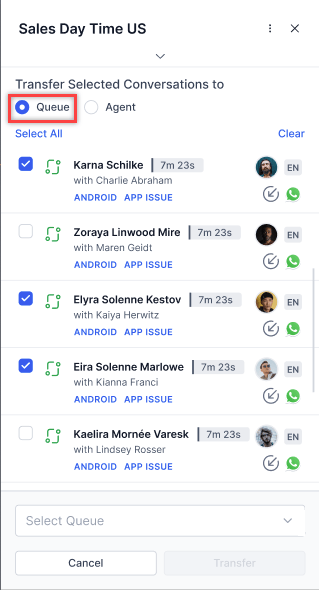
Select Queue and choose one or more conversations. Use Select All or Clear as needed.
-
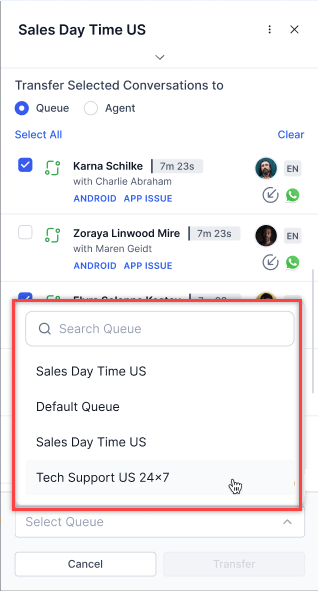
From the queue dropdown, choose a destination queue.
- Select Transfer.
Conversations that honor the agent wait time aren’t available for bulk transfer.
-
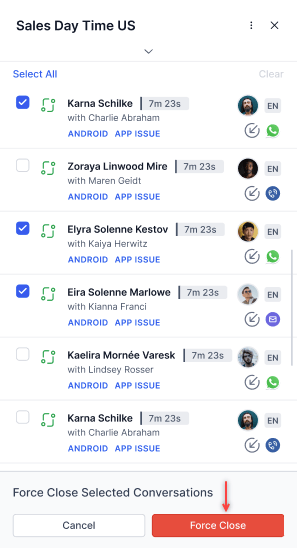
Select one or more conversations, then select Force Close from the action bar.
- In the confirmation pop-up, select Confirm.
- At least one conversation must be selected.
- Force-closing a conversation (individually or in bulk) automatically attaches a system-generated disposition. If an agent had already selected a disposition, it’s overwritten by the system-generated one.
From the Agents Tab
- Open the Monitor tab and select the Agents tab.
- Select ⋮ in the top corner and choose Transfer Conversations or Force Close.
-
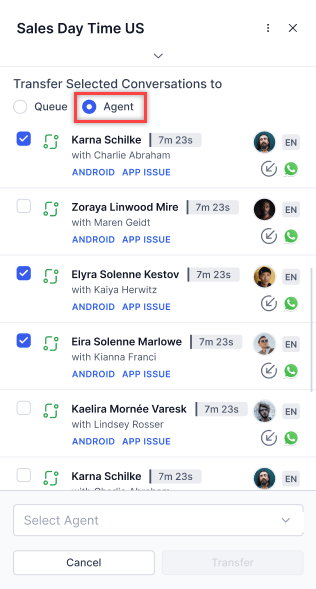
Select Agent and choose one or more conversations.
-
From the agent dropdown, choose an agent.
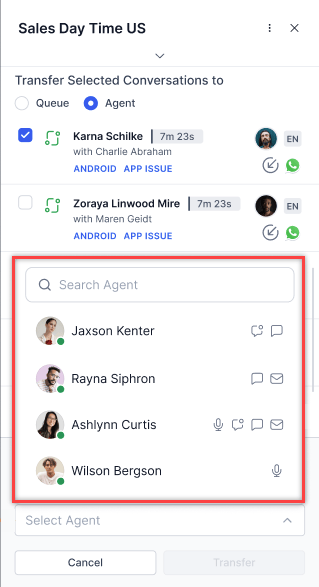
- Select Transfer.
- Conversations can’t be transferred when the agent is on a live call.
- Conversations can’t be transferred to offline agents.
- Blended agents must be configured to transfer digital and voice conversations together.
- A pop-up appears when transferring to an agent at full capacity. Select Transfer to proceed.
- Conversations in TERMINATED, TRANSIENT_DROPOFF, and TRANSIENT_CLOSED states can’t be transferred. they’re excluded when you use Select All.
Agent Actions
Chat with an Agent
Select the Chat option from the agent view. A pop-up chat window opens for sending messages to the agent.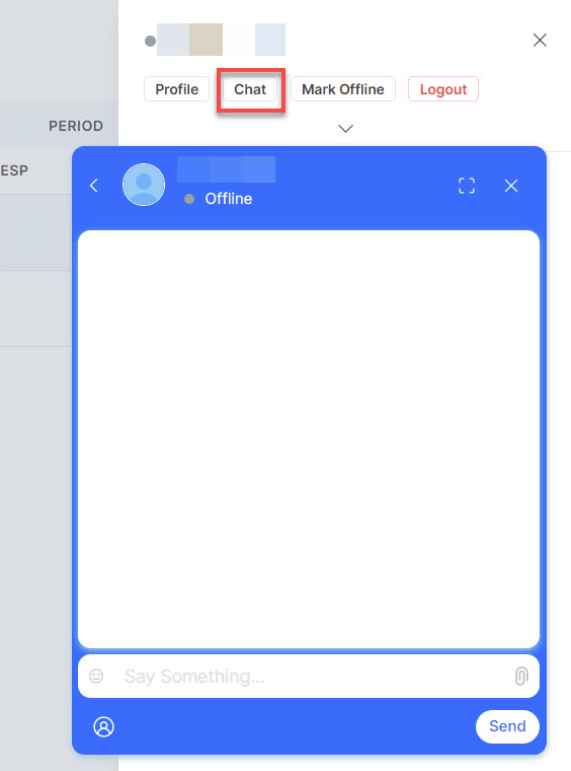
Mark Agent Offline
Mark an agent as offline to stop new conversations from being assigned to them.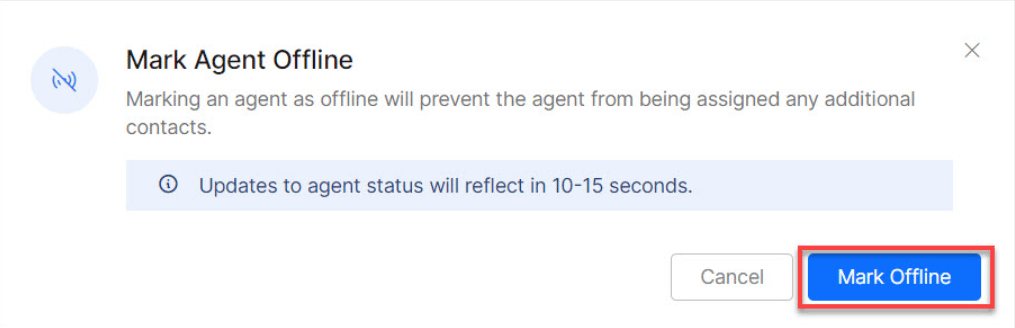
Force Logout
Force Logout frees up an agent so their ongoing customer conversations can be reassigned to other agents.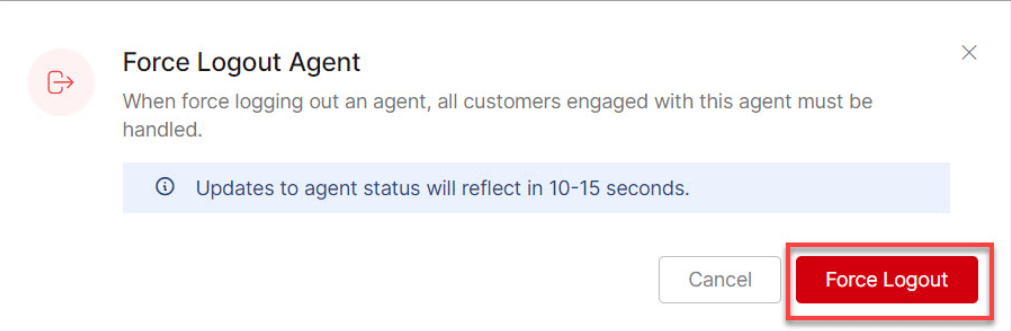
Agent Profile and Settings
Access an agent’s profile by selecting or hovering over the agent. Three tabs are available: Profile, Settings, and Queues & Skills.Profile Tab
View and edit the agent’s profile, then select Save.Settings Tab
Configure the agent’s chat and voice experience.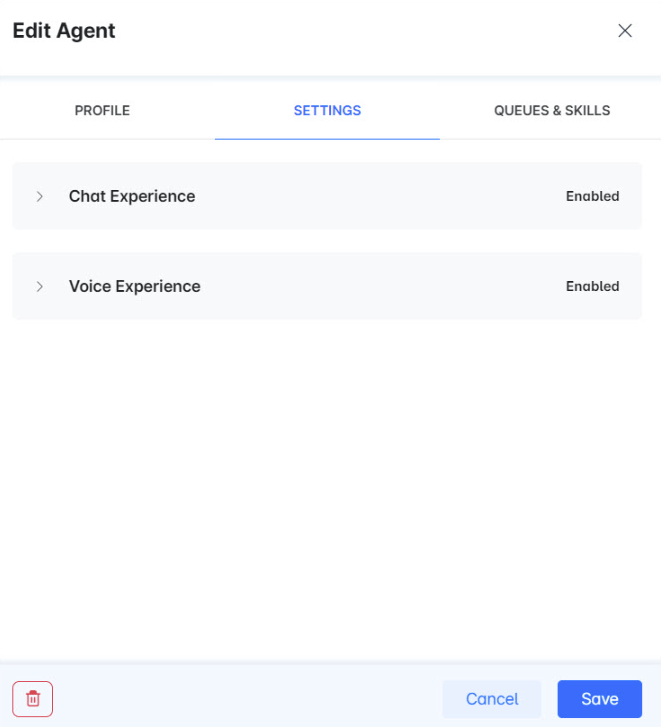
- Chat experience: Enable chat settings and define properties such as max chats, language, and proficiency level.
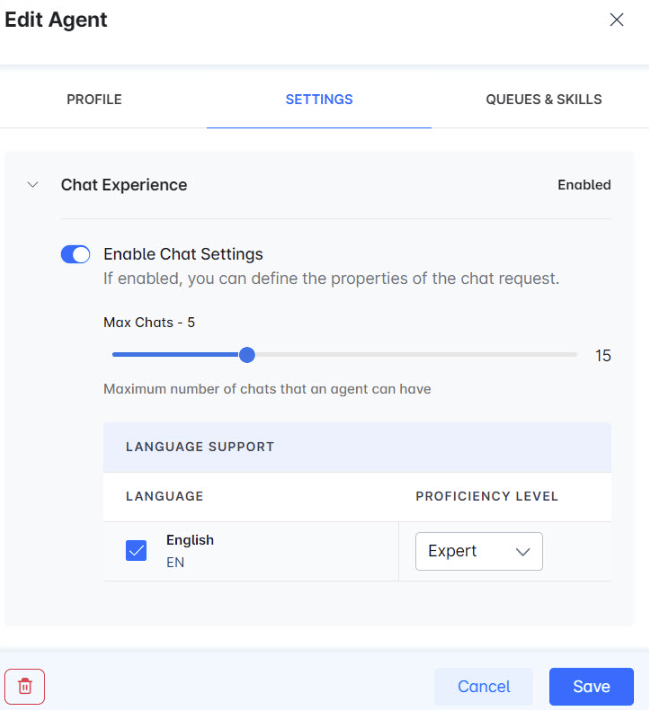
- Voice experience: Enable voice settings and define properties such as language and proficiency level.
Queues & Skills Tab
Configure queue and skill assignments for the agent.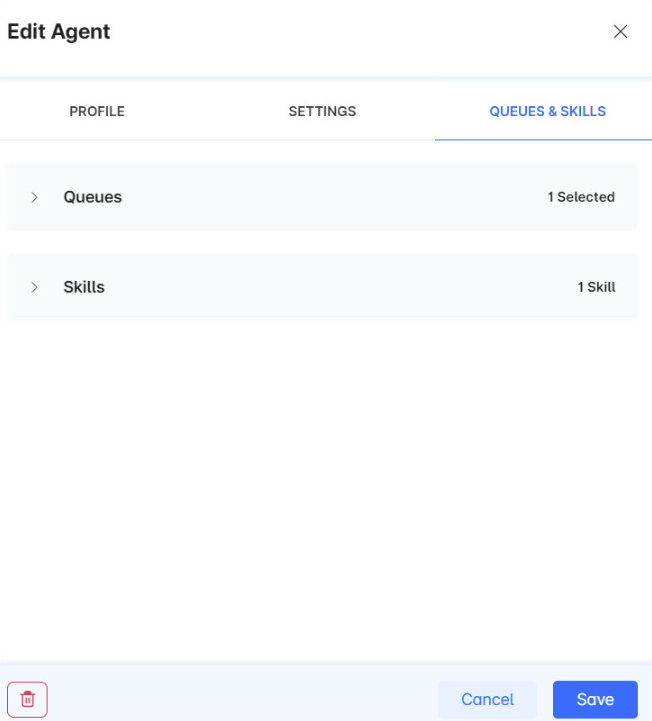
- Queues: Select the default and preferred queue.
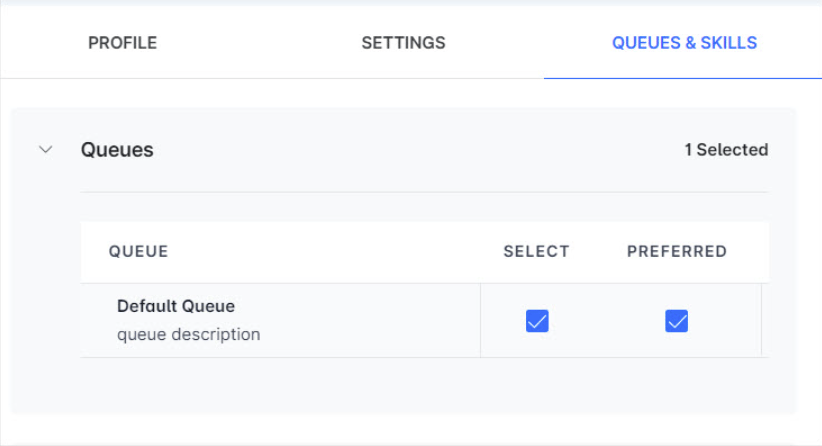
- Skills: Set the proficiency level for each skill.
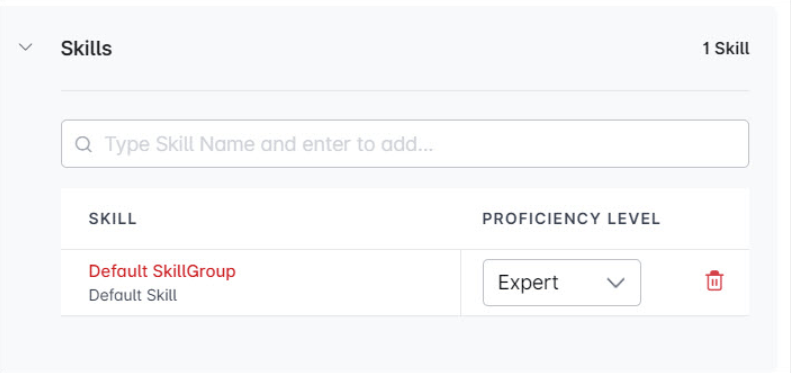
Agent Management
Go to Contact Center AI > Agent & Supervisors > Agent Management.Agent Groups
An Agent Group is a collection of agents organized by skills, roles, or other criteria. Groups are used to streamline routing and assign statuses and dispositions. The Agent Groups section shows each group’s name, description, and agent count. Select a group name to see its agents, along with their role and assigned skills and queues.Pre-configured Groups
Create an Agent Group
- Select Add Group.
- In the New Group window, enter the Group Name, Description, and Agent Status (optional). Statuses selected here appear to agents in this group alongside system-defined ones.
- Select Save.
Add Agents to a Group
- Go to Agents and create or edit an agent.
- On the agent profile, select the desired group.
- Save the agent record.
Edit an Agent Group
-
Hover over the group and select the Edit icon.

- Make changes and select Save.
You can’t rename the pre-configured groups: Unassigned and Default Group.
Delete an Agent Group
- Select the Edit icon next to the group.
- In the Edit Group window, select the Delete Agent Group icon.
Agent Status
Agent statuses show what agents are doing-Available, Offline, Busy, Away, and any custom statuses you create. Go to Contact Center > Agent Management > Agent & Supervisors to manage statuses. Each status entry shows its Name, Type (Available, Away, Busy, or Offline), and Description.System Busy Status
Without Blended Mode:- Digital interactions: triggers when concurrency reaches 100% of available slots.
- Voice interactions: triggers when the single voice slot is occupied.
- Agents on voice are marked System Busy for digital, and vice versa.
- The voice slot is occupied, OR
- Digital slots reach full capacity.
System Busy evaluation is based on the effective blending state after precedence resolution, not on individual queue isolation.
Load Capacity = (Occupied Voice or Max Voice) + (Occupied Digital or Max Digital)
Best practices:
- Configure slot allocations based on expected interaction volumes per queue.
- Train agents on blended handling and effective multitasking.
- Monitor load capacity indicators in the Agents view to optimize staffing.
- Use reporting to track the impact of blended mode on key performance indicators.
Create an Agent Status
- Select + New Status.
- Enter the Status Name, Status Type, Description, and Assign to Agent Groups (Required for custom statuses; makes the status available to agents in those groups).
- Select Add & Exit or Add & Stay.
Edit an Agent Status
- Select the Edit icon next to the status.
- Edit the Status Name, Type, or Description, then select Update.
Administrators can rename default statuses (Available, Away, Busy) to match business terminology. The underlying behavior is preserved and applied consistently across existing and historical data. Reserved labels that can’t be used for custom statuses: Available, Away, Busy, Offline, System Busy, System Away, and Login Prep.
Delete an Agent Status
- Default statuses (Available, Away, Busy, Offline) can’t be deleted.
- Deleted statuses can’t be restored.
- Select the Delete icon next to the status.
- Select Yes to confirm.
Configure Login Prep Status
Login Prep prevents agents from receiving interactions immediately after logging in, giving them time to prepare.- Select Edit next to Login Prep.
- Turn on the Enabled toggle.
- Customize the Status Name, Description, and Message to Agent.
- Select Update.
Agent Settings
Go to Contact Center AI > Agent & Supervisors > Agent Management > Agent Settings. Settings appear in collapsed groups. Select any group to expand it.Answer Mode
Explicit Reject: Adds an explicit reject option for incoming conversations (manual mode only). Off by default.
Honor Agent Wait Before Queue Timeout:
- Enabled: When a conversation enters the agent wait state, the queue wait timeout doesn’t trigger until after the agent wait timeout expires.
- Disabled (default): The queue wait timeout runs in parallel and may close the conversation while it’s in the agent wait state.
Conversation Status Control
Conversation statuses trigger messages to agents or customers at key moments. Watch the demo for an overview: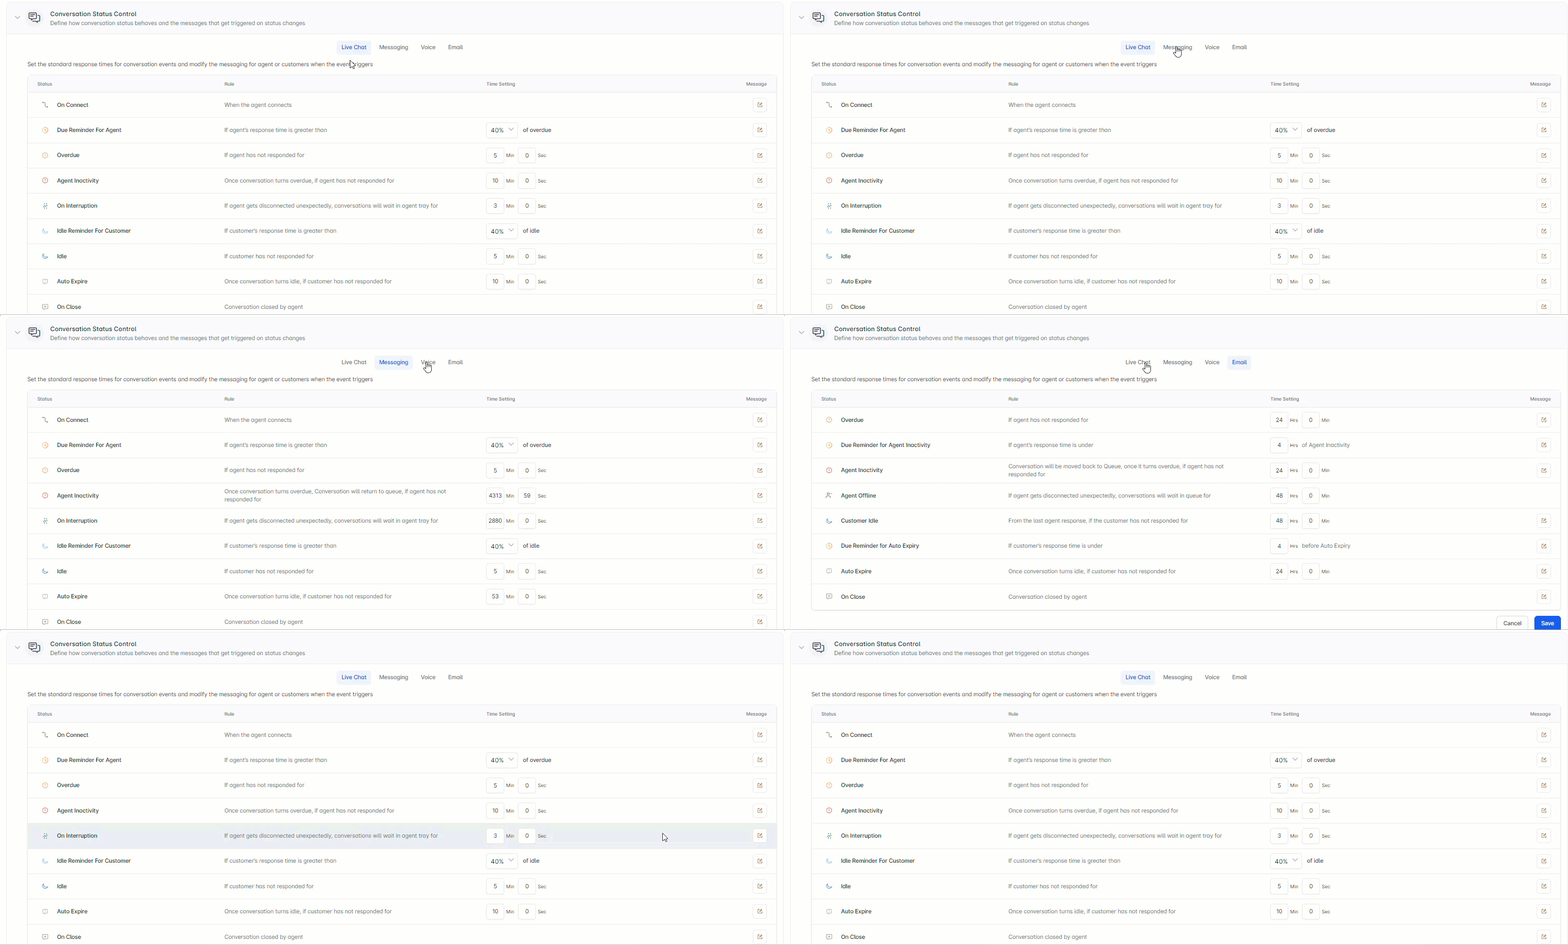
The Network Disconnection Notification Delay setting, under On Customer Interruption after Agent Transfer, defines how long the system waits before notifying agents of a customer disconnect. If the customer reconnects within this delay, the notification is suppressed. The supported range is 3 seconds to 1 minute (default: 3 seconds).
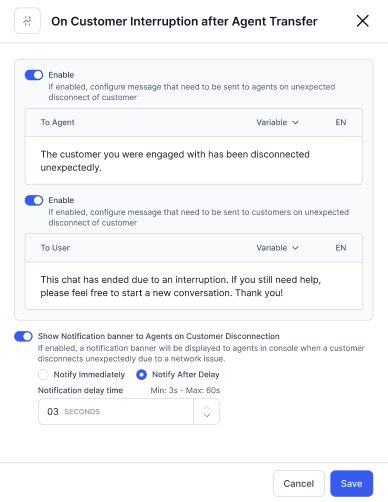
Configure a status:
-
Set the response time threshold (as a percentage value or in minutes and seconds; email uses hours and minutes).

- The system automatically closes a conversation when the customer remains inactive beyond the configured timeout. This behavior is expected when no response is received from the user. To prevent automatic closure, increase the customer interruption timer so the system waits longer for user input.
- Percentage-based thresholds apply to: Due Reminder For Agent, Idle Reminder For Customer.
- No time configuration needed for: On Connect, On Close.
- For email: Overdue, Agent Inactivity, and Auto Expire have a configurable limit of 30 days.
-
Edit the message text, add variables, and select the language.
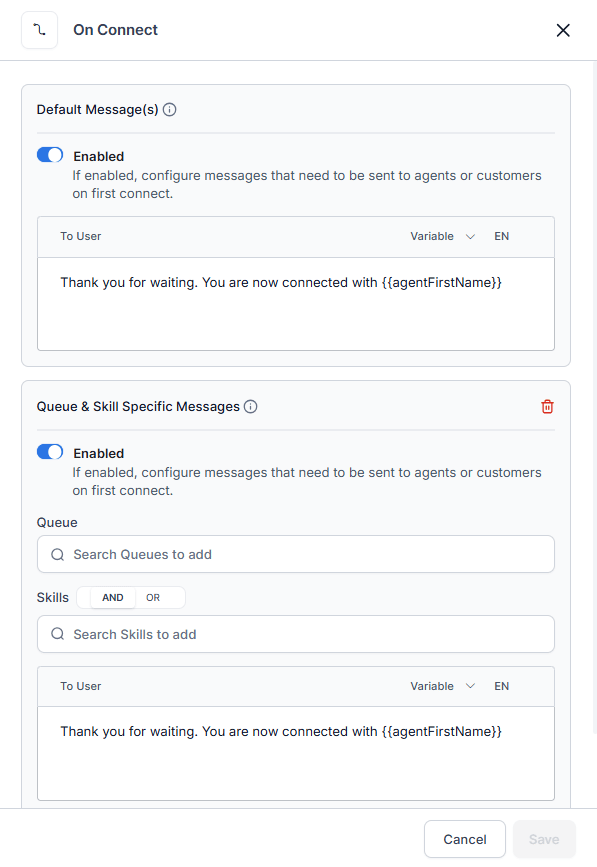
{{agentFirstName}}) is replaced with actual data when the message sends.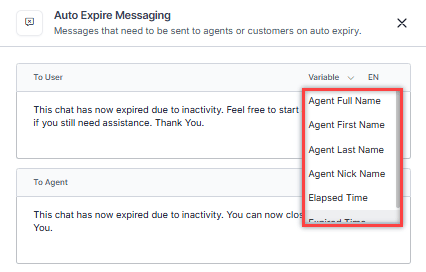
- Select Save.
Transfers
Transfer to External Contacts: When enabled, agents can transfer calls to the external contacts list via the Agent Console.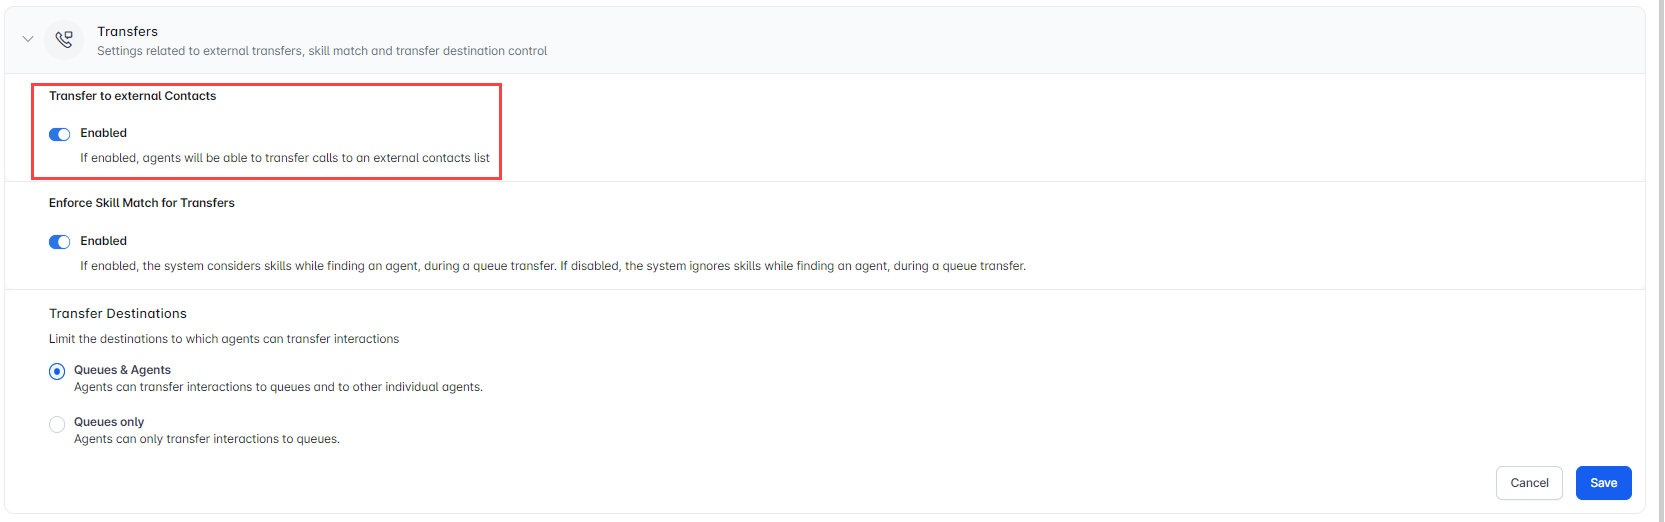
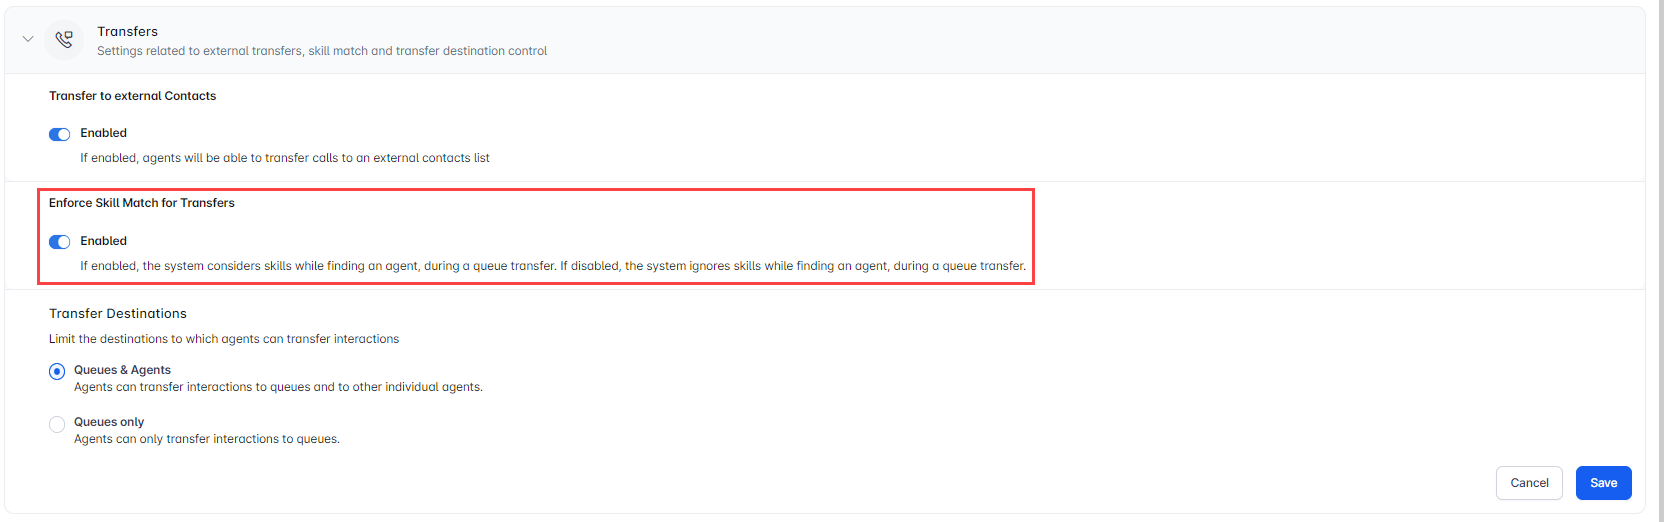
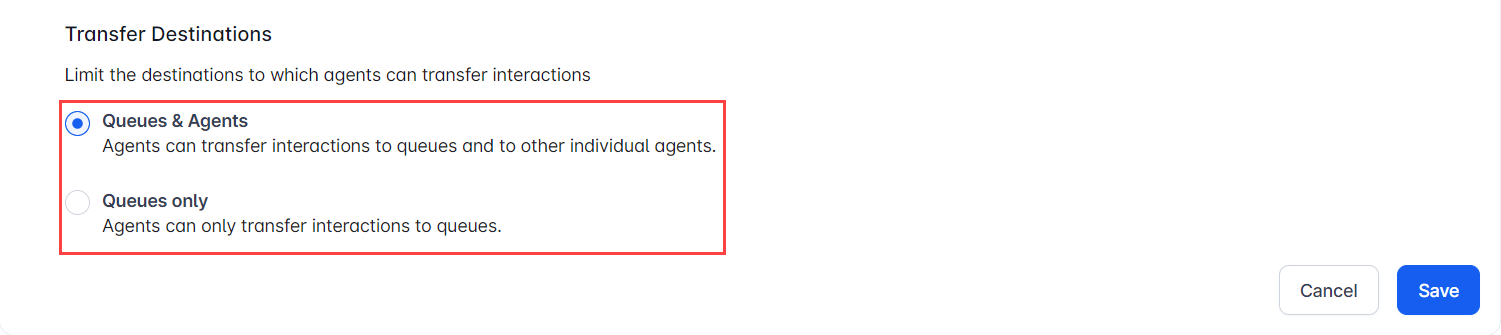
Skill Modification
When enabled, agents can modify skills attached to an interaction.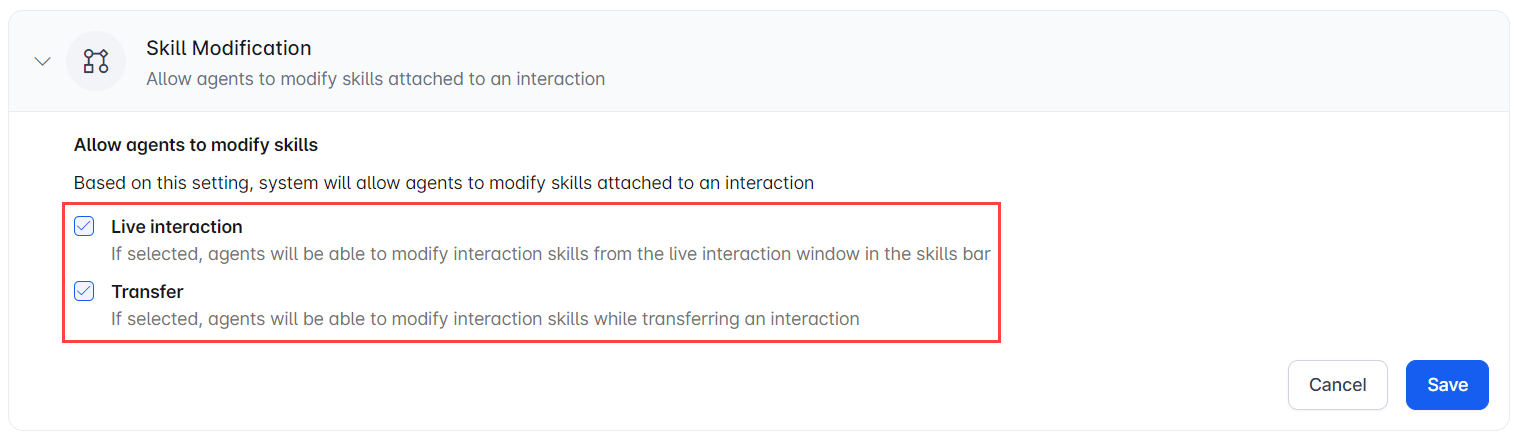
Auto Logout & Auto Close Conversation
Disabled by default. When enabled:
- Auto Logout-Period of inactivity before the system logs out the agent automatically. Default: 8 hours.
- Due Reminder for Auto Logout-Alert time shown to the agent before auto logout triggers.
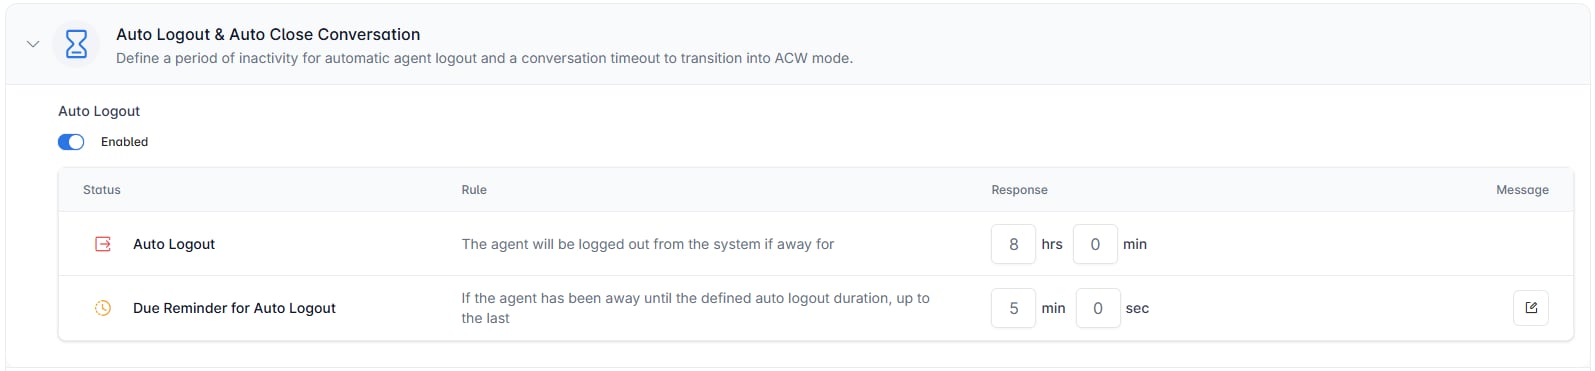
- Conversation Callback Timeout-When enabled, the conversation automatically moves to ACW mode after timeout if the agent is inactive on the callback screen. Default: 30 seconds; configurable between 10 seconds and 5 minutes.

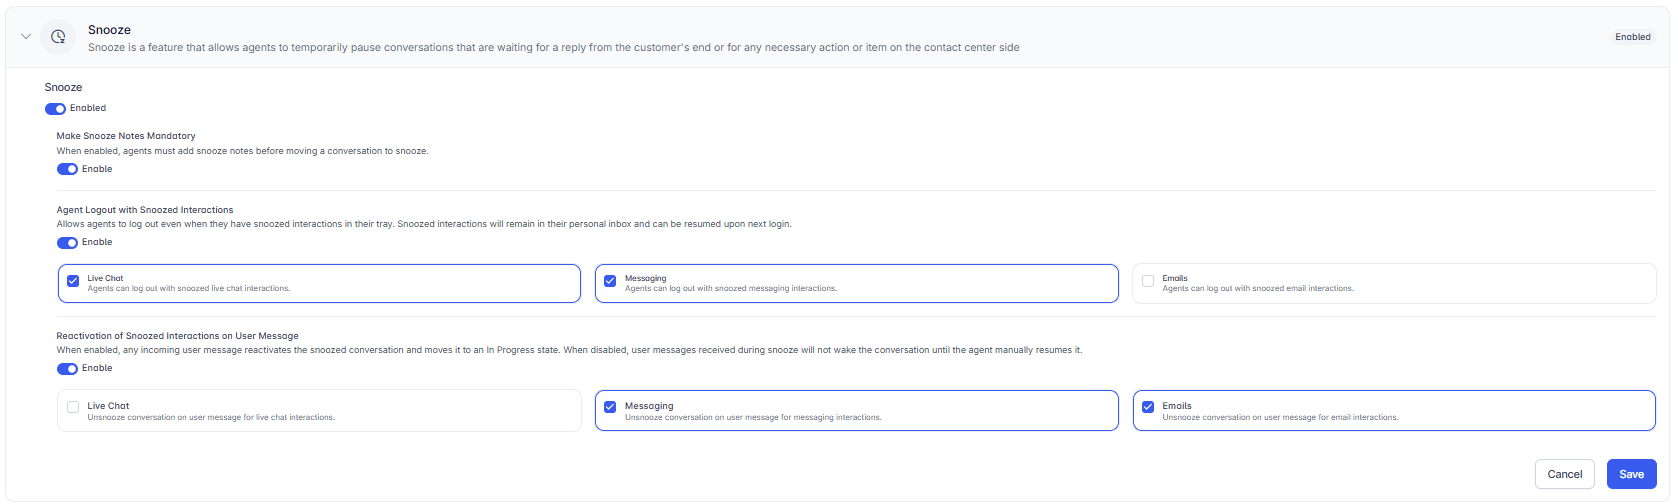
Snooze
Lets agents temporarily pause conversations that are waiting for a customer reply or a pending action. Disabled by default. When enabled, the following options are available:- Make Snooze Notes Mandatory-Agents must add notes before snoozing a conversation.
- Agent Logout with Snoozed Interactions-Agents can log out while conversations are snoozed. Snoozed conversations remain in the agent’s inbox and resume at next login. Applies to selected channels (Live Chat, Messaging, Email).
- Reactivation of Snoozed Interactions on User Message-When enabled, any incoming user message reactivates the snoozed conversation. When disabled, the conversation stays snoozed until the agent manually resumes it.
Blended Agents
When enabled, agents can handle voice and digital interactions simultaneously, optimizing capacity and efficiency. Disabled by default. Blended Agent configuration controls whether agents can receive voice and digital (chat, messaging, or email) interactions simultaneously. Configuration can be applied at three levels: the app, the queue, and the agent. Configuration Levels A three-tier hierarchy determines Blended Agent behavior. When no override exists at a lower level, the system falls back to the level above. App-Level(Default) The app-level setting acts as the base configuration. It applies when no queue-level or agent-level overrides are defined. To enable or disable blending at the app level, go to Contact Center AI > Agent & Supervisors > Agent Management > Agent Settings > Blended Agents. Queue-Level When enabled at the queue level, all interactions routed through that queue treat agents as blending-enabled, regardless of the app-level setting. You can search for and select specific queues to apply blending.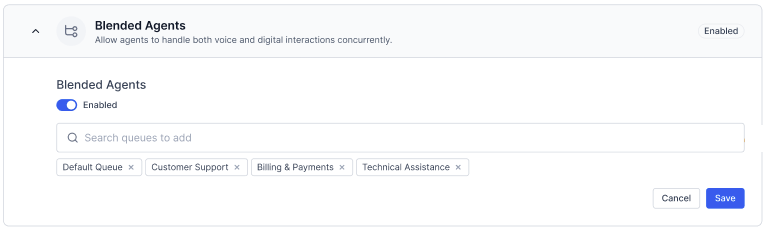
For existing accounts with app-level blending enabled, all queues default to blending enabled. Any new queue in such accounts is automatically included under the blended queue configuration.
Interaction Routing Behavior
The system determines the effective blending state before routing any interaction:
- Determine effective blending state by applying the precedence model (Agent > Queue > App).
- If blended: Apply slot-based and interruption logic per existing routing specifications.
- If non-blended: Apply channel selection logic, if enabled.
Additional Routing Configuration
The configurable limit for queue max timeout for the Email channel is 30 days.
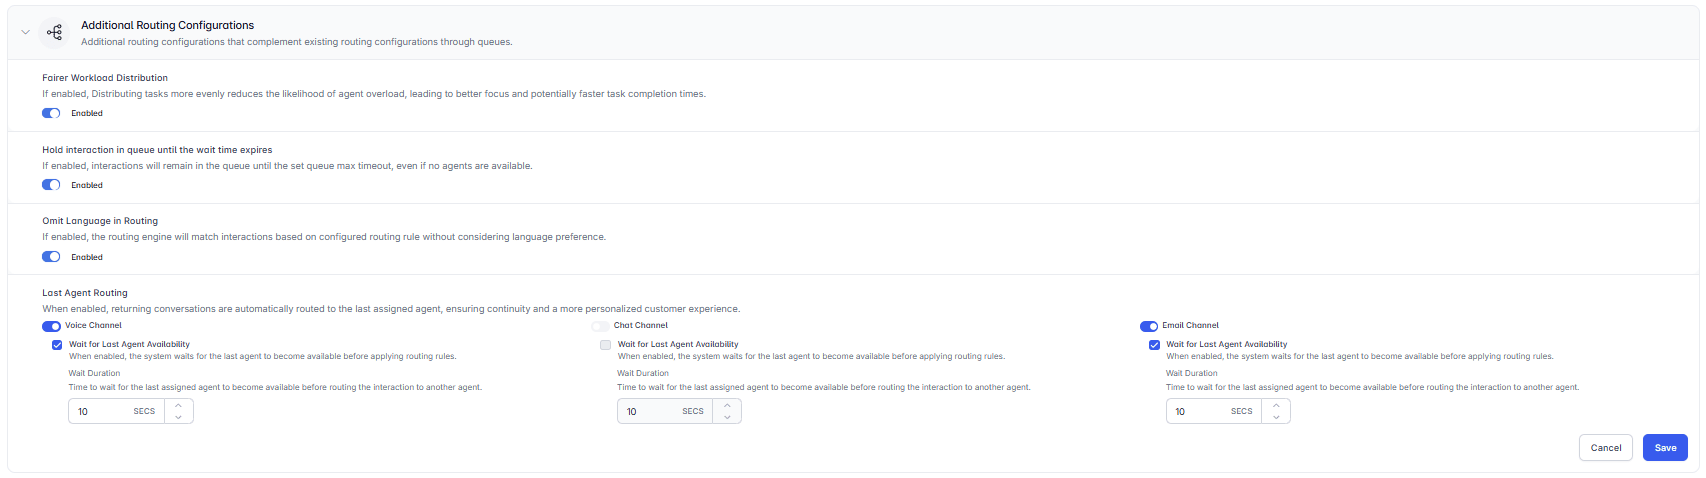
Enable Dial Tone Until Agent Connects
When enabled, a dial tone plays to the customer until the connection with the agent is established after the user hears a connected tone. Disabled by default.
Total Digital Conversation Limit
Limits the total number of active digital conversations across all channels for an agent. When the limit is reached, the agent moves to System Busy status. Disabled by default.Set the total conversation limit per user from the User section only. This setting isn’t available in the user profile under the Monitor tab.

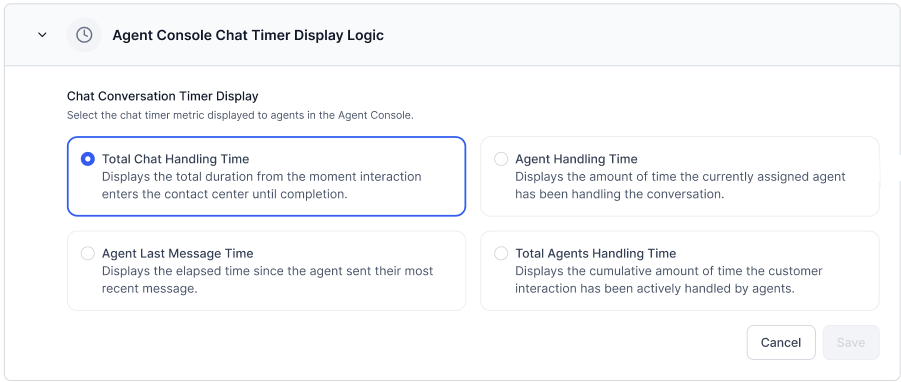
Conversation Timer Metric
The conversation timer displays in the Agent Console for each active interaction. Administrators can configure which timing metric the timer shows. The selected metric applies to all agents. Only one metric can be active at a time. To configure the timer metric:- Go to Contact Center AI > Agent & Supervisors > Agent Management > Agent Settings > Conversation Timer Metric.
- Select a metric from the available options.
-
Select Save.
Capture Disposition During Transfer
If enabled, agents can add dispositions while transferring conversations across voice and digital channels. Learn more.Dispositions
Dispositions are labels agents assign to the outcome of a conversation. You organize them into Disposition Sets containing Disposition Codes. Go to Contact Center AI > Agent & Supervisors > Dispositions.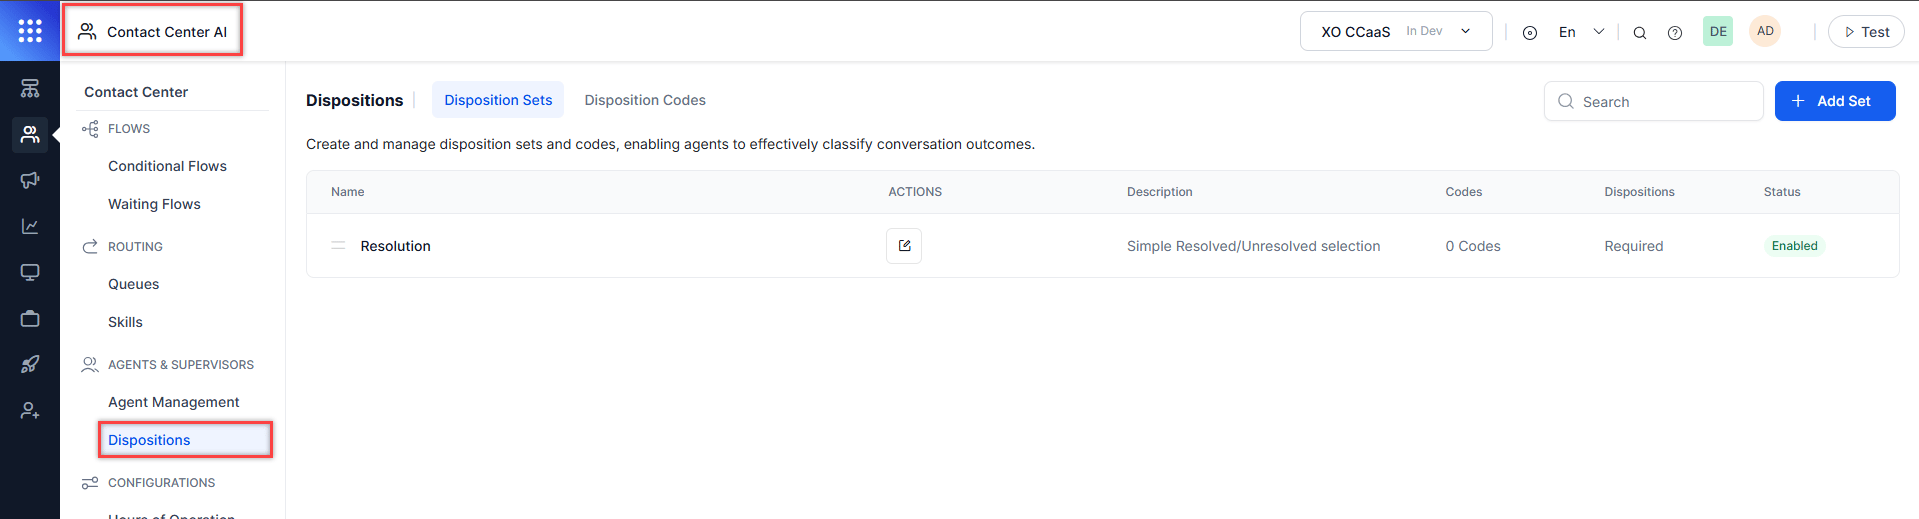
Disposition Sets
A Disposition Set groups related disposition codes and can be assigned to queues or agent groups. Agents see and complete disposition sets when ending conversations.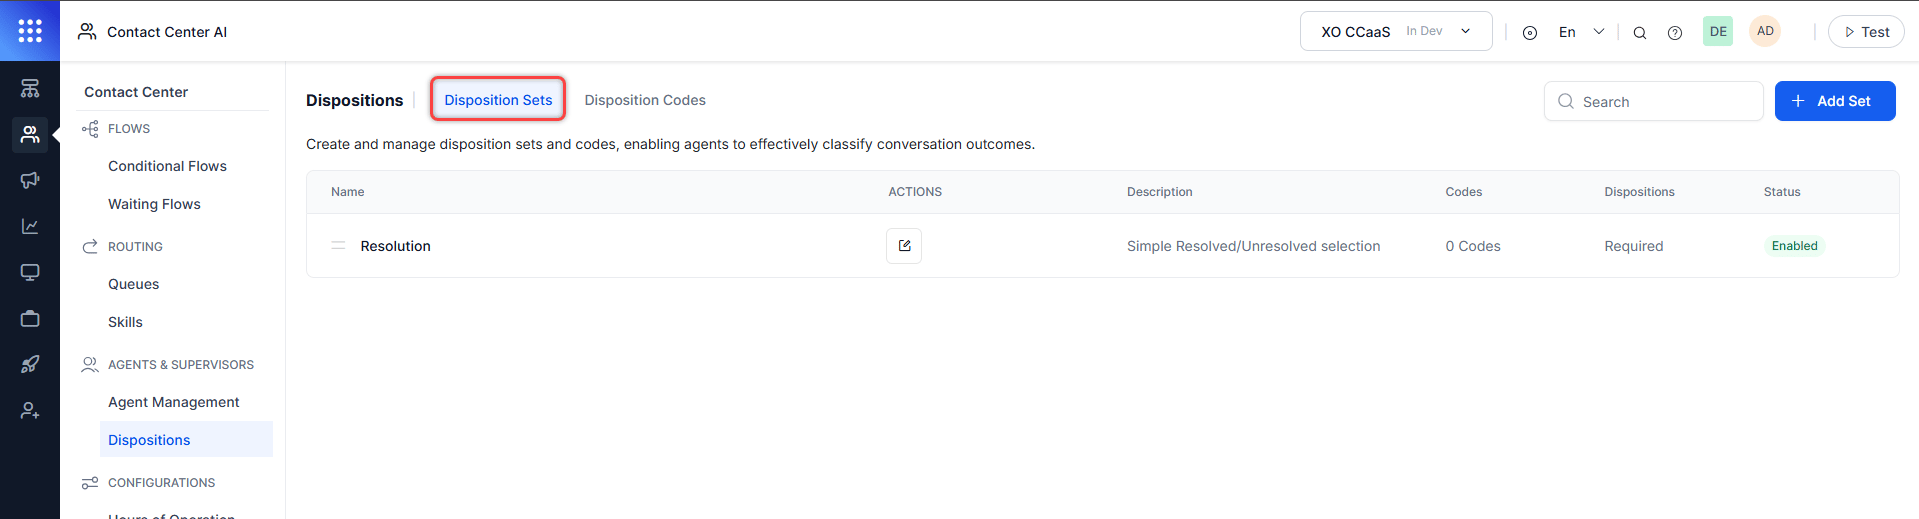
Each set shows: Name, Description, Codes (count), Dispositions (Required/Optional), Status (Enabled/Disabled).
Add a Disposition Set
- Select Add Set.
-
On the General tab, configure:
- Assign to Queues: Select Add Queue and search for queues.
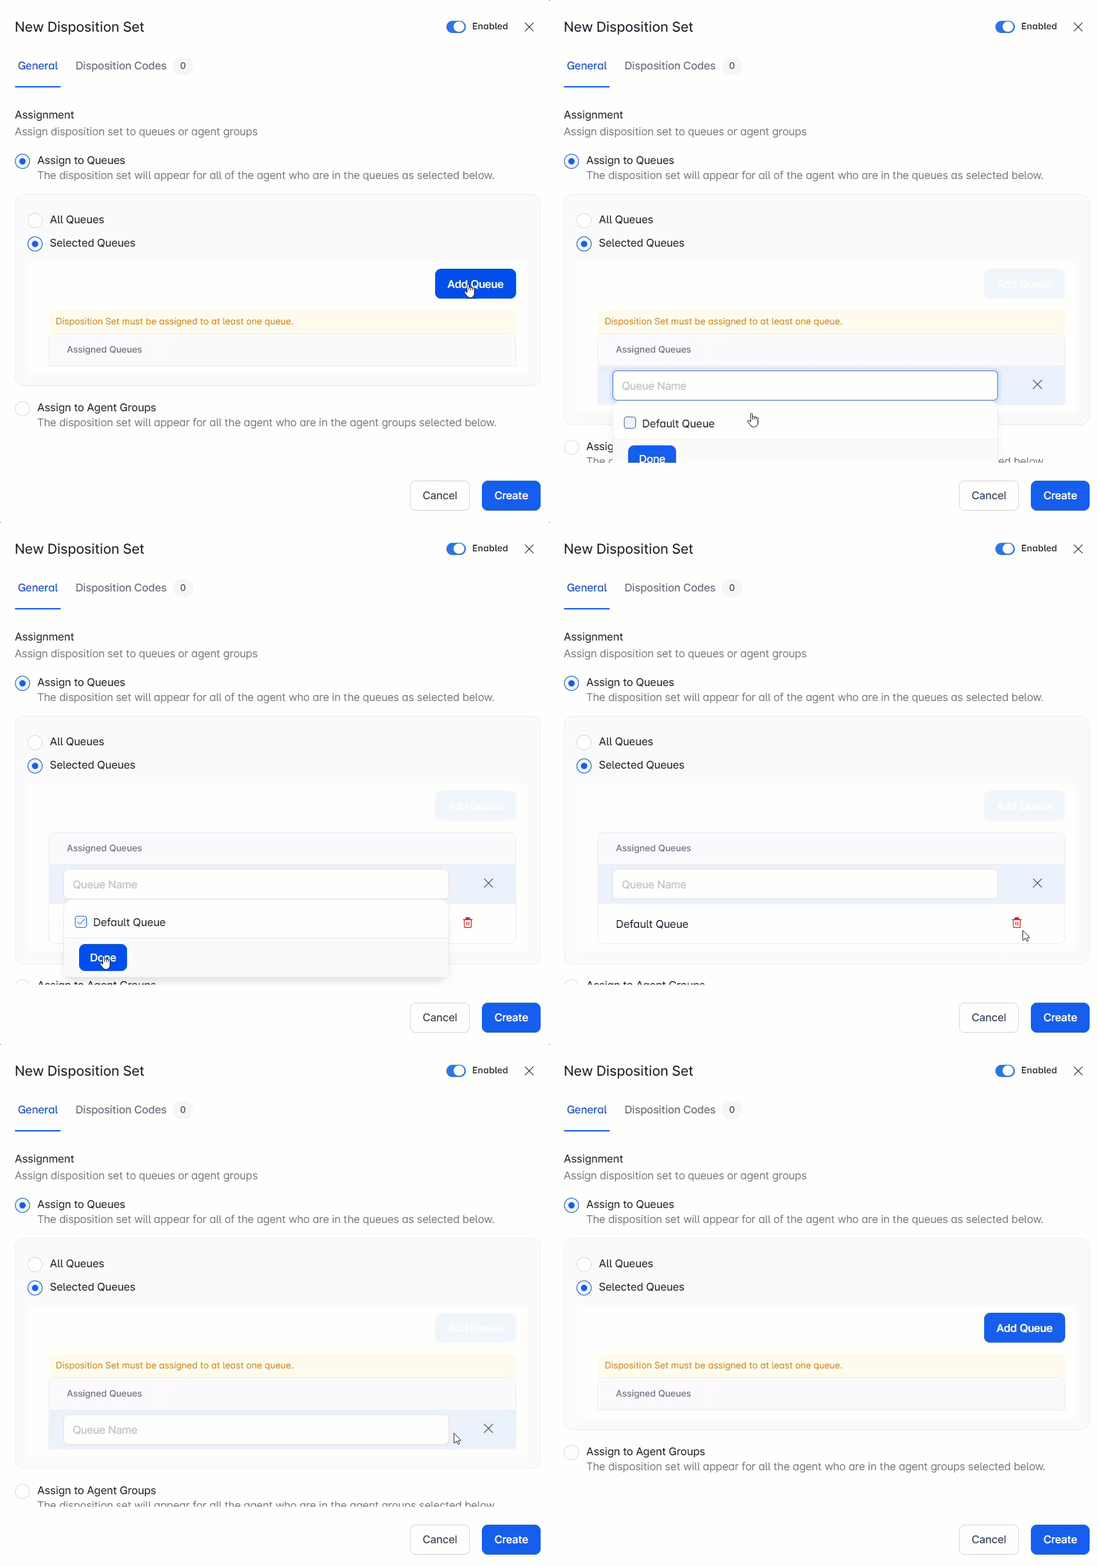
- Assign to Agent Groups: Same process as queue assignment.
- Assign to Queues: Select Add Queue and search for queues.
-
On the Disposition Codes tab:
- Select Add Code and search for a code. Codes must be created and enabled first.
- Select the bin icon to remove a code.
-
On the Notify tab (visible only when email/toast alerts are enabled):
- Select Add Supervisor and choose a supervisor from the list.
- Alert behavior:
- One code with alerts: a notification triggers when that code is tagged.
- Multiple codes with alerts: one notification is sent for one of the selected codes.
- A secondary email notification can also be enabled.
- Toggle the set enabled or disabled (enabled by default).
- Select Create.
Edit a Disposition Set
- Select the Edit icon for the set.
- Make changes and select Save.
Delete a Disposition Set
- Select the Edit icon for the set.
- Select the Delete icon at the lower left and confirm.
- Deleted sets are removed from the Agent Console immediately.
- Deleted sets can’t be restored.
- Requires Follow Up-Codes: Pending, Disconnected, Information Required
- Supervisor Required-Codes: Requires Approval, Customer Asked for Supervisor, Complex Case
Disposition Codes
A Disposition Code is a short label for a conversation outcome. Codes must belong to a Disposition Set before agents can use them. Default codes:
Go to Contact Center > Agent & Supervisors > Dispositions > Disposition Codes to manage codes.
Add a Disposition Code
- Select + Add Code.
- Select Enable to activate the code.
- Enter the Code Name and Description.
- Assign a color and preview it.
- Optionally turn on Show campaign-specific types to display campaign-associated dispositions.
- Select Create.
Edit a Disposition Code
- Find the code in the list and select Edit under Actions.
- Make changes and select Save.
Delete a Disposition Code
- Find the code in the list and select Delete under Actions.
- Confirm the deletion.
Deleted disposition codes can’t be restored and no longer appear to agents in the Agent Console.
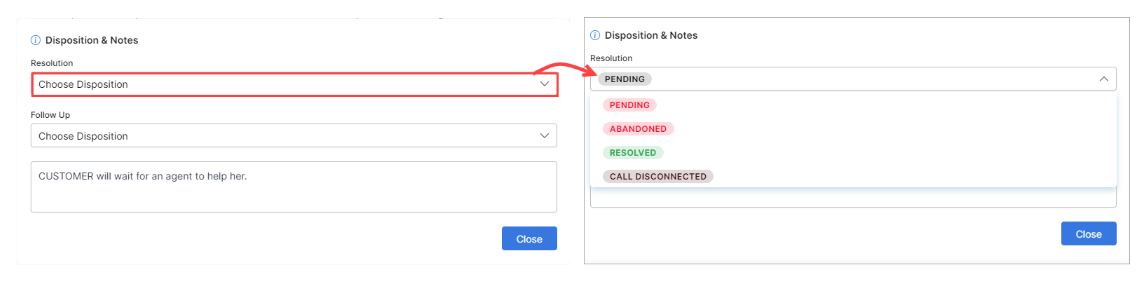
Agent Experience with Dispositions
Dispositions appear when agents end a conversation in the Agent Console. No code is pre-selected; agents must choose one. If more than one Disposition Set is assigned to a queue or agent group, agents see all sets and must complete all required ones.