The Agent AI widget gives agents real-time AI assistance during customer interactions.
It surfaces dialog tasks, playbooks, coaching prompts, sentiment data, transcriptions, and summaries from a single panel.
| Section | Description |
|---|
| Agent AI Widget Features | Overview of all capabilities available in the Agent AI widget. |
| Widget Tabs | Layout of the five tabs — Search, My AI Agent (Bot), Assist, Transcript, and More. |
| Search Tab | Search for Dialog Tasks, FAQs, and AI-generated answers from a single panel. |
| My AI Agent (Bot) Tab | Run automations independently using agent inputs without affecting the customer interaction. |
| Assist Tab | The primary workspace where Dialog Tasks, Playbooks, Agentic Copilot messages, and coaching prompts surface automatically. |
| Transcript Tab | Real-time voice call transcription with auto-scroll support. |
| More Tab | Submit overall widget feedback with ratings and optional comments. |
| Settings | Configure proactive mode, auto-scroll, and language, copy conversation metadata, and access help resources. |
| Agentic Copilot | Automates end-to-end conversations while keeping agents in full supervisory control. |
| Automation Controls | Override inputs, terminate tasks, analyze sentiment, and run automations with agent input. |
| Access Custom Data | Use third-party metadata in Welcome Events and Dialog Tasks via the customData context variable. |
| V2 vs V3 Differences | UI and feature comparison between Agent AI widget versions. |
| Feature | Description |
|---|
| Dialog Tasks | Pre-configured use cases that trigger when customer intent matches. Reduces manual typing. |
| Playbooks | Structured step-by-step guidance for handling customer interactions. |
| Real-time Agent Coaching | On-screen hints triggered by agent utterances and speech patterns. |
| Real-time Sentiment Analysis | Time-based graph showing customer emotional tone throughout the conversation. |
| Transcription | Live text transcription of voice calls. Agents can pause to exclude PII. |
| Auto Summarization | Automatic conversation summaries to speed up decision-making. |
| Generate Summary | On-demand summary generation (up to 2 times per agent per conversation), including during transfers. |
| PII Redaction | Removes personally identifiable information from the agent view and transcripts. |
| Feedback | Agents rate suggestions to improve AI recommendations over time. |
| Next Best Action | Suggests and runs Dialog Tasks for faster query resolution. |
| Multi-language Support | Agents can switch languages in real time. |
| Knowledge AI | Customizable search results and FAQ suggestions from the knowledge base. |
| File/Image Attachments | Supports uploads up to 25 MB during live conversations. |
| Theme Selection | Dark or light widget theme. |
| In-line Digital Forms | Collect customer data through forms embedded in the widget. |
| Agentic Copilot | Runs conversations autonomously. Agents can cancel, override, or edit responses. |
| Auto-Scroll | Scrolls to the latest message automatically. |
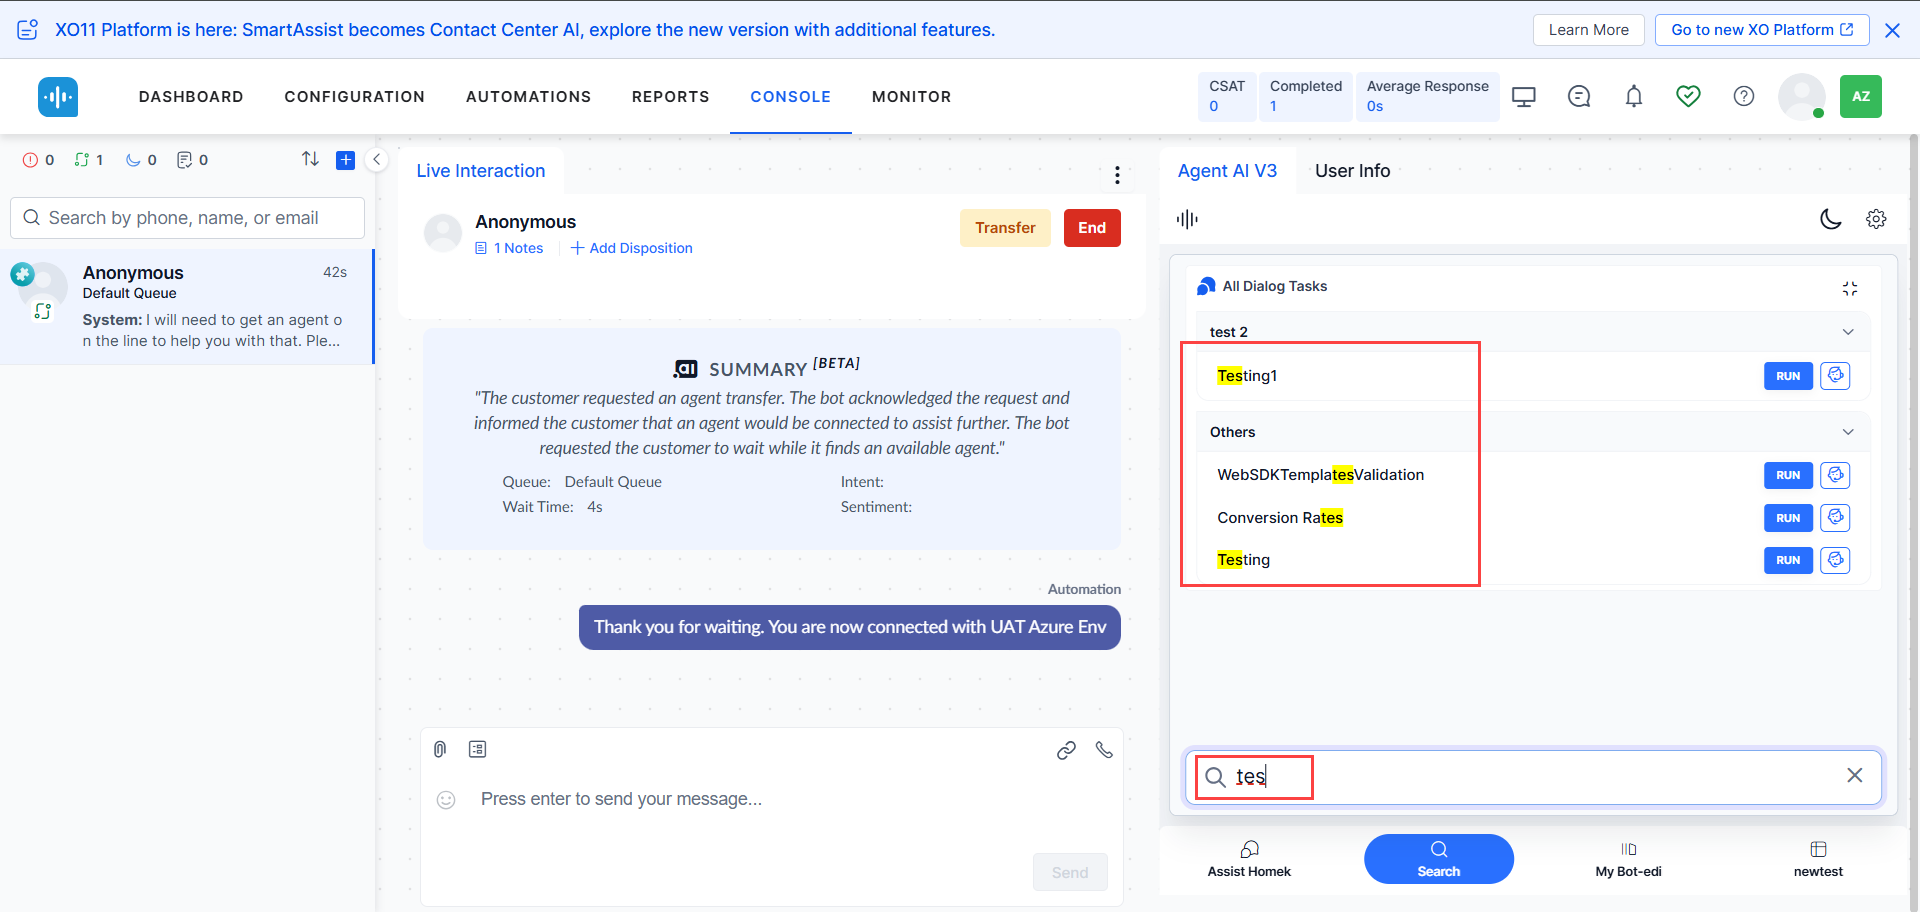
Search Tab
Shows all configured Dialog Tasks and supports searching for Dialog Tasks, FAQs, Generative AI answers, web pages, and files. Content updates automatically based on the conversation.
| Button | Action |
|---|
| Run | Runs a configured Dialog Task immediately. |
| Run with Agent’s Input | Runs a Dialog Task with agent-provided inputs and moves to the My AI Agent (Bot) tab. |
| Spyglass icon | Submits the search query (or press Enter). |
Error States
| Condition | Display |
|---|
| Timeout or dialog tasks not configured | 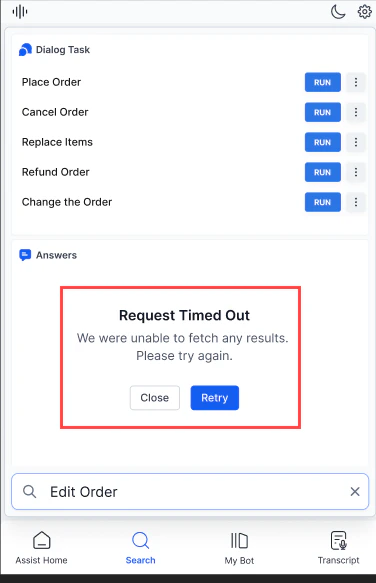 |
| Consecutive timeout |  |
| Server error |  |
| Dialog Tasks not found | 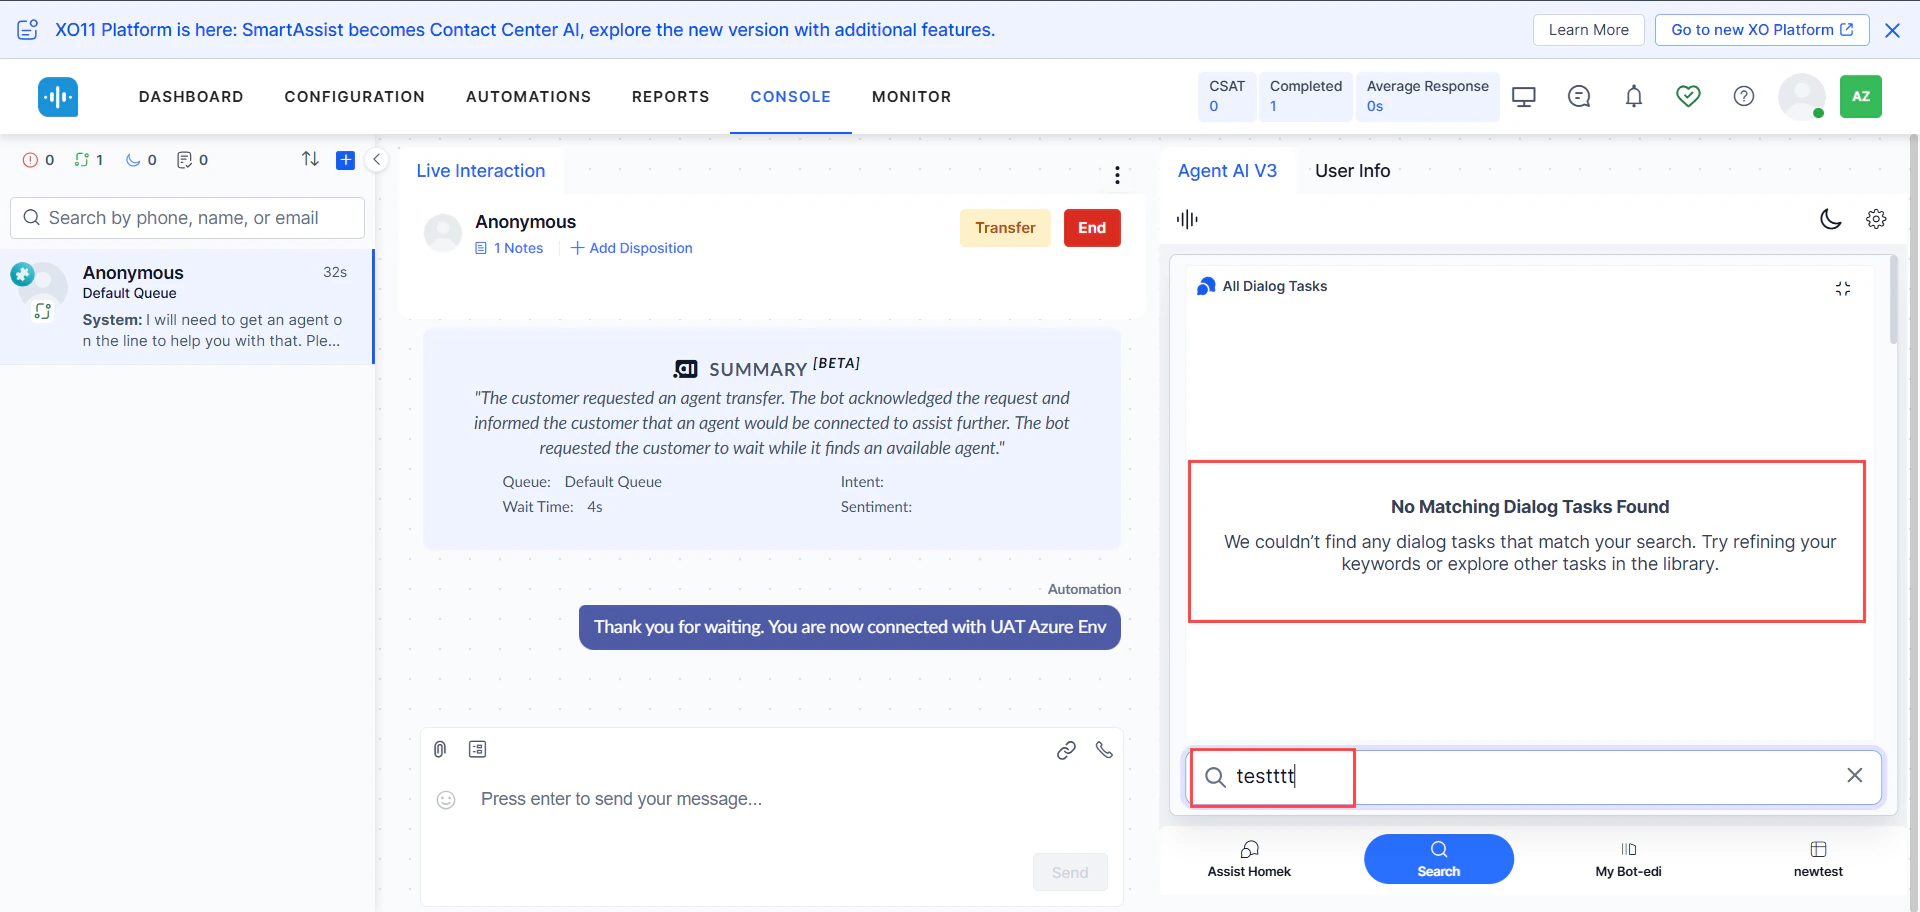 |
| No matching results | 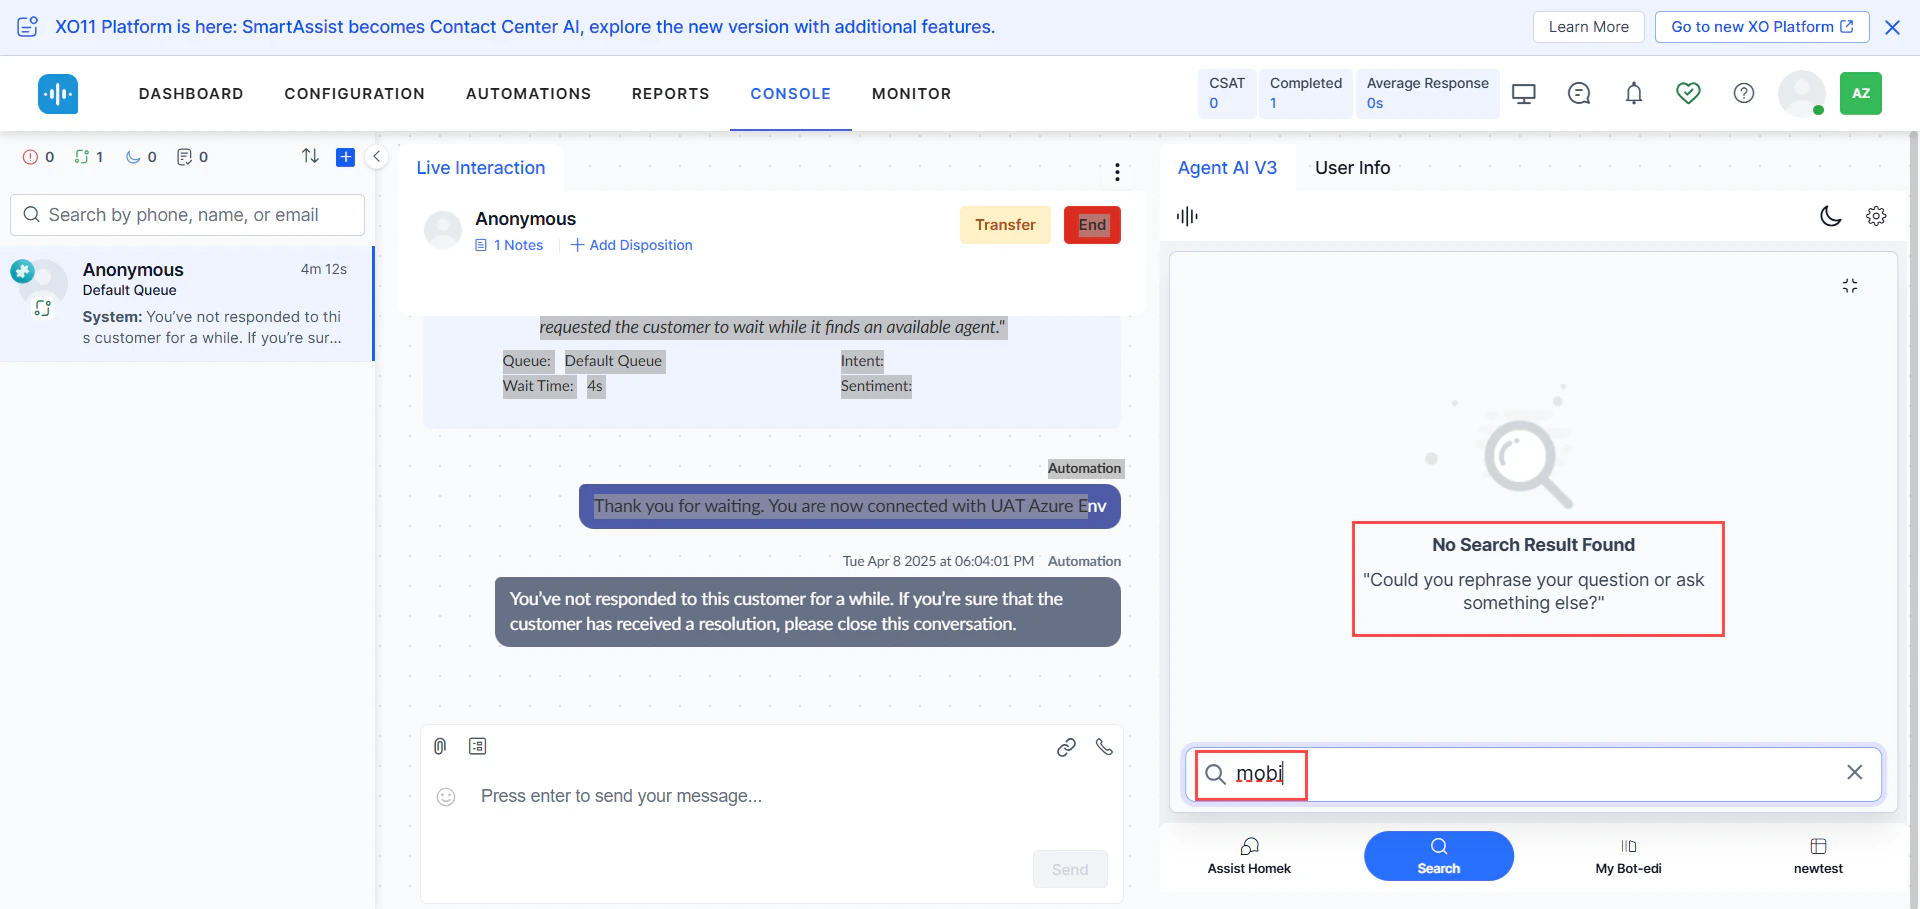 |
My AI Agent (Bot) Tab
Lets agents run automations independently using their own inputs. Use this when automation fails mid-conversation or when the agent needs to run parallel queries without affecting the customer interaction.
The tab displays Next Best Action suggestions based on the current conversation status.
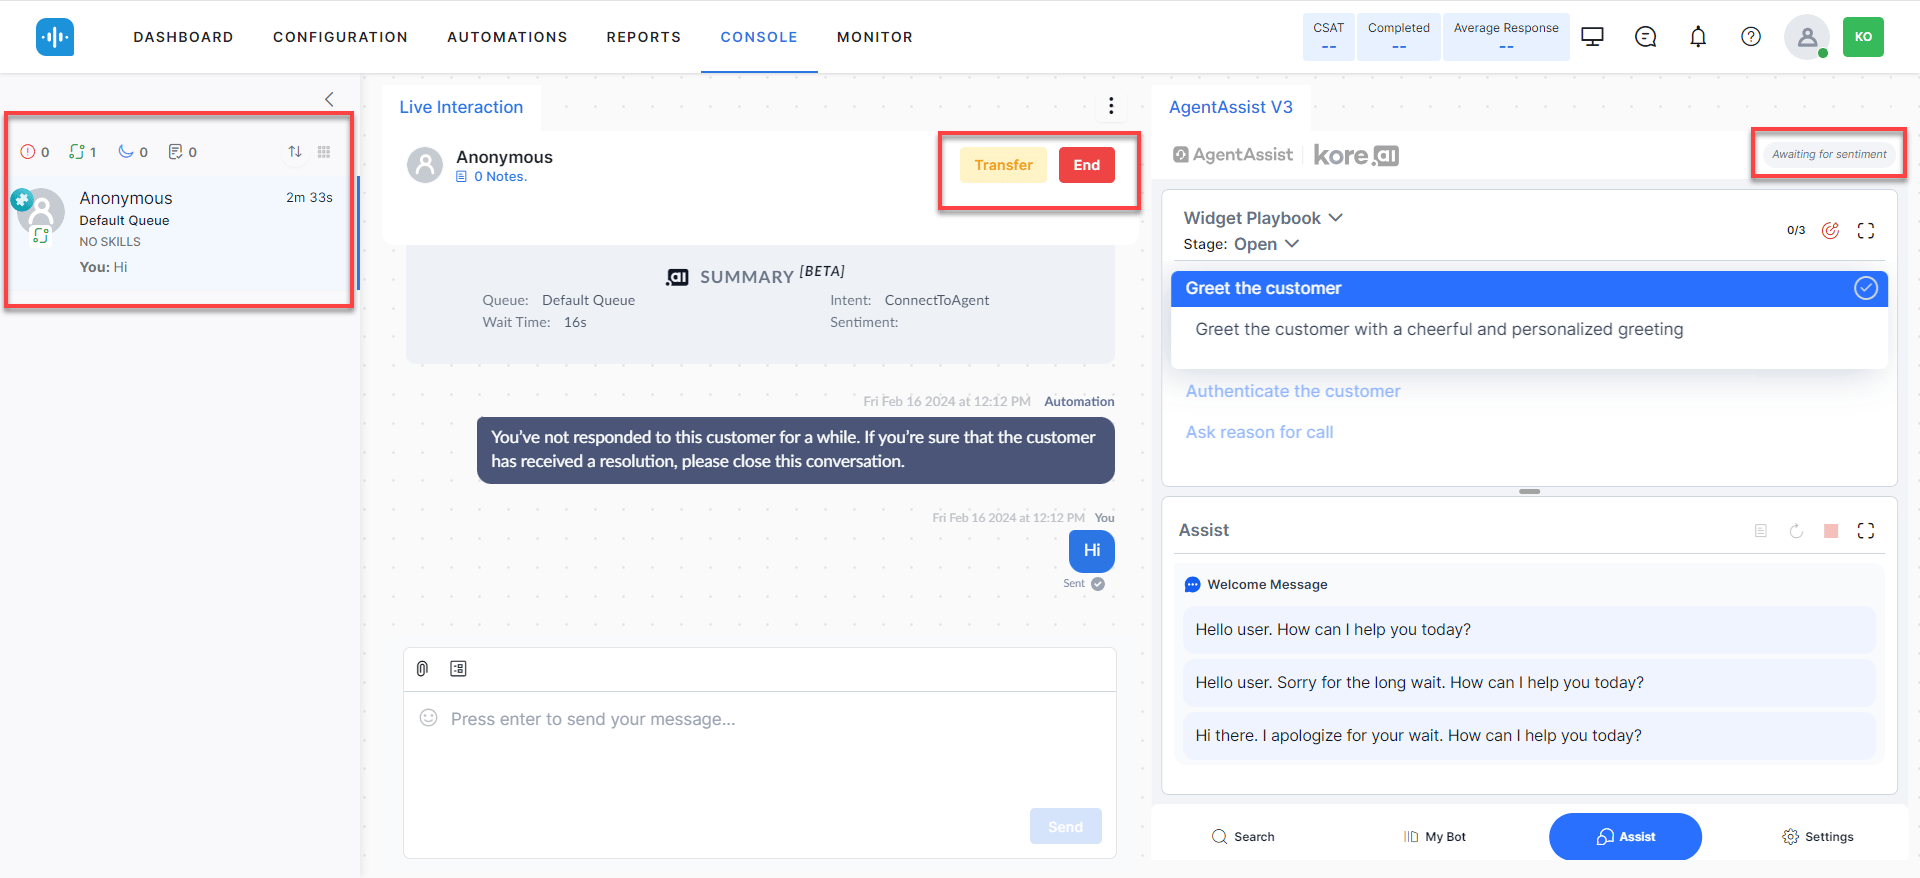
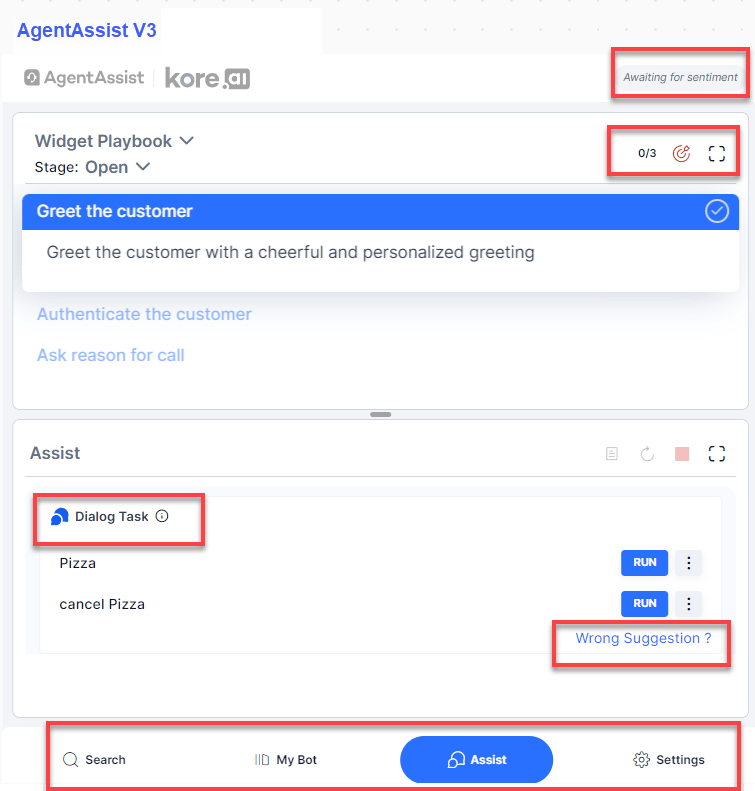
Assist Tab
The primary agent workspace. Monitors the conversation automatically and surfaces Dialog Tasks, FAQs, Knowledge AI results, Playbooks, Agentic Copilot messages, and coaching prompts.
Capabilities:
- Suggests the best response based on conversation context.
- Displays Agentic Copilot messages with a configurable delay (up to 10 seconds) before auto-sending.
- Retrieves knowledge base content based on customer intent.
- Shows historical automation runs and conversation history.
- Supports file and image attachments up to 25 MB.
- Allows on-demand summary generation (up to 2 times per conversation).
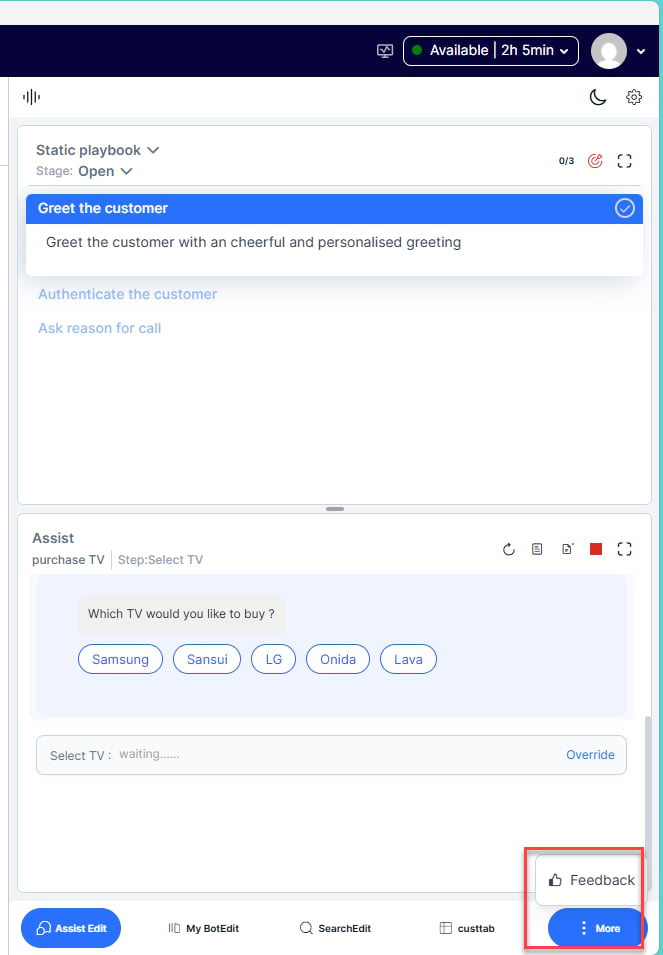
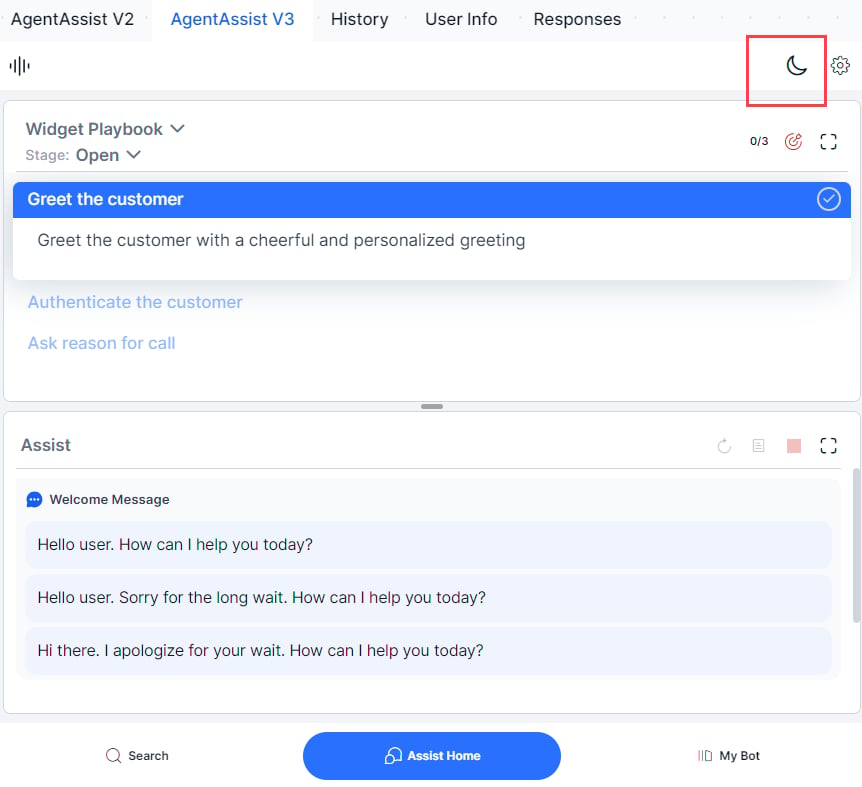
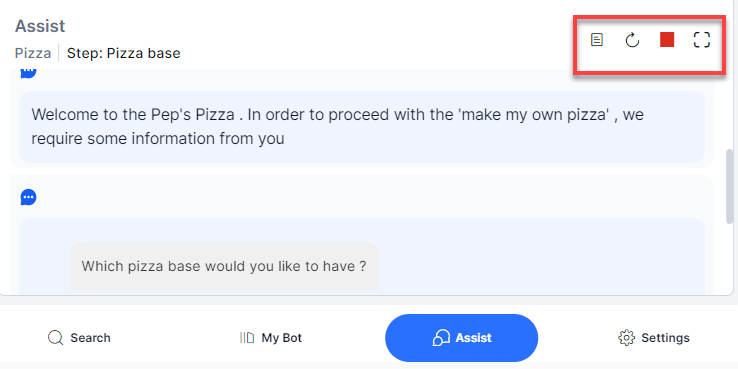
Assist Tab Controls
| Control | Description |
|---|
| Running Playbook stages | Shows total and adhered stages (for example, 1/3 means 1 of 3 stages completed). |
| Proceed to Close | Moves a running playbook from Open to Close status. |
| Send / Copy | Send the message as-is or copy it to customize before sending. |
| Up / Down arrows | Jump to the first or last message in the tab. |
| Resume | Resumes a paused playbook when switching between playbooks. |
| List View | Shows all entity entries captured in the conversation. |
| Generate Summary | Generates an on-demand conversation summary. |
| Restart | Restarts the Dialog Task from the beginning or with captured inputs. |
| Terminate | Stops the running Dialog Task. Options: Terminate, Cancel, or Continue with Override. |
| Maximize / Minimize | Expands or collapses the section. |
| Playbook adherence | Mark a step as complete manually if automatic detection doesn’t trigger. Hover over an adhered step to revisit its text without affecting the adherence metrics. |
Revisiting adhered playbook steps
You can revisit the content of an adhered playbook step without affecting the adherence metrics.
- Hover over an adhered Playbook step to expand and display its text body.
- Select an adhered Dynamic Playbook to reopen it and view its content.
This is useful during voice calls when a customer asks you to repeat information. Revisiting a step doesn’t reset or change its adherence metrics.
Agentic Copilot Messages
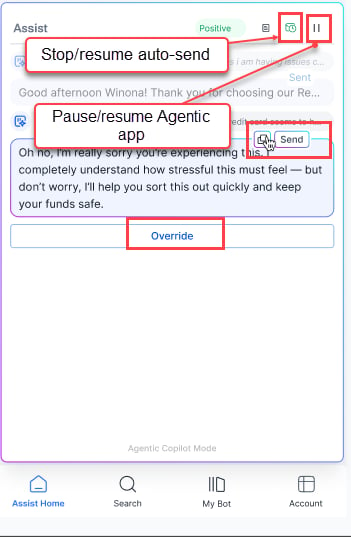
After Welcome Events execute, the widget displays: Agentic Copilot is actively listening to your conversation and ready to assist automatically.
 Each Agentic message includes a Sending button that delays auto-send for up to 10 seconds. During this window:
- Select x to cancel auto-send.
- Select Copy to move the message to the chat input field.
- Select Send to send immediately.
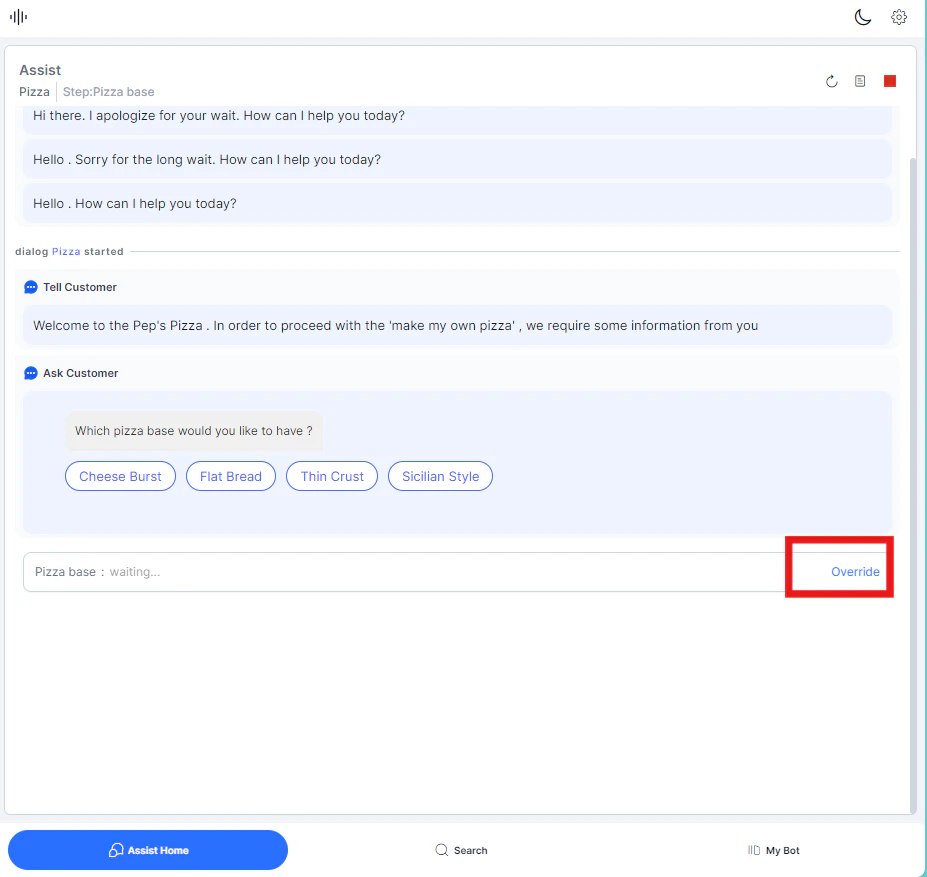
- Select Override to discard the Agentic response and type your own.
- Use the Stop/Resume icon (top-right) to pause or resume auto-send globally.
- Use the Pause/Resume icon (top-right) to pause or resume the Agentic app.
- Auto-send disables automatically if Agentic Copilot fails to respond.
- For messages outside the app’s scope, Agentic indicates it can’t respond.
- To regenerate a failed response, double-click the corresponding customer message.
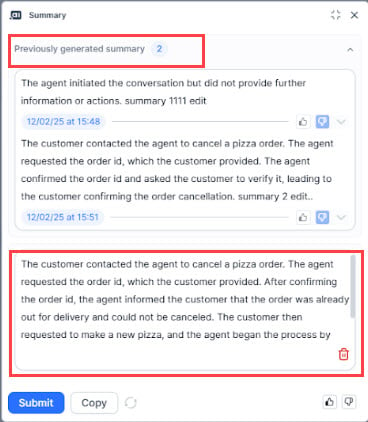
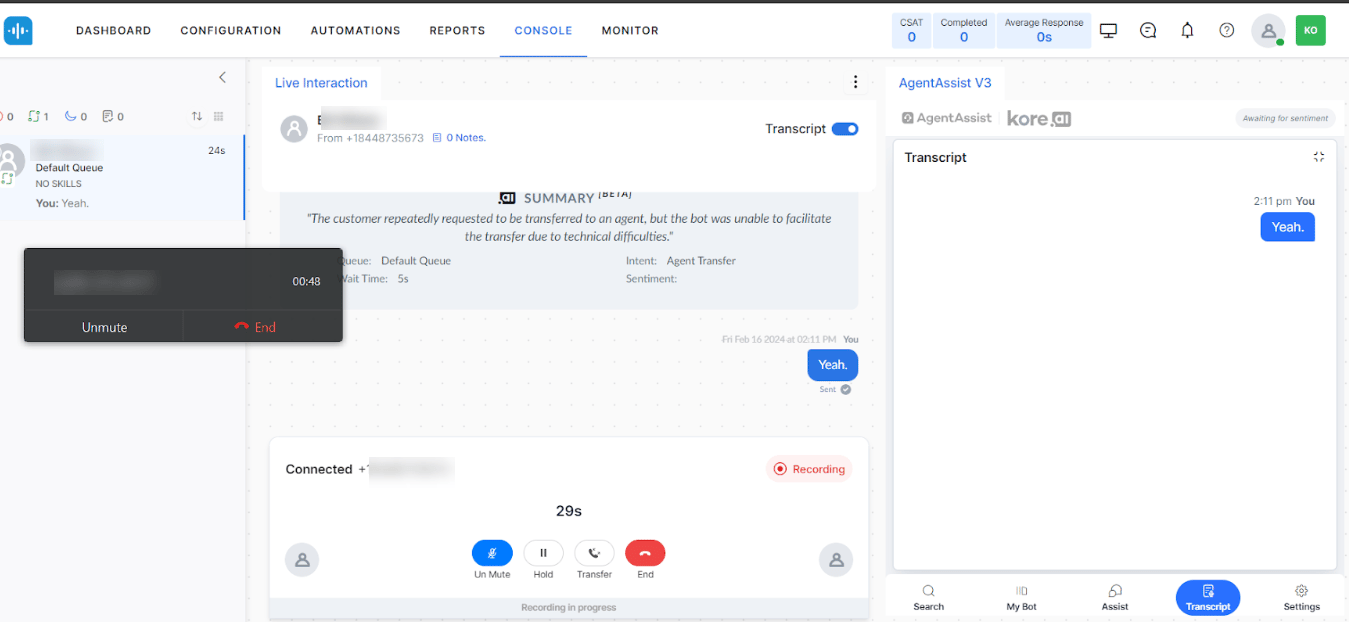
Generate Summary
Agents can generate on-demand summaries at any point during a conversation, up to two times. Previous summaries with timestamps remain visible during agent transfers.
Enable the Generate Summary toggle in Widget Theming > Layout Customization > Assist Action Menu Layout to activate this feature.
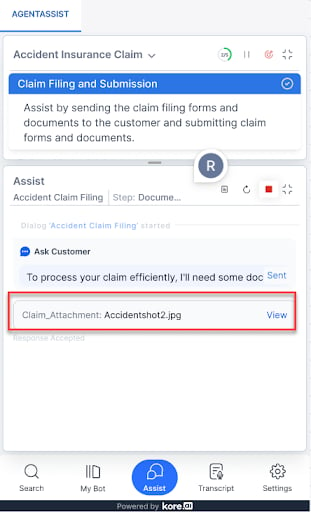
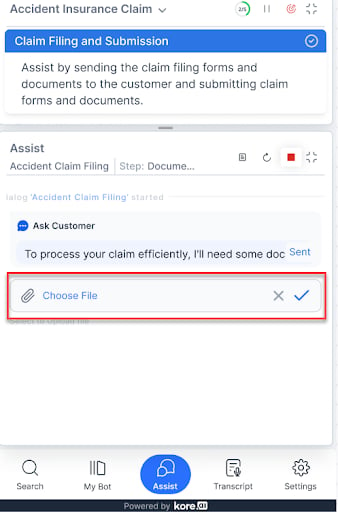
Attachment Support
You can attach one file at a time, up to 25 MB.
If the system detects the file automatically:
- A “waiting…” indicator appears.
- On success, the file name appears in the input field with a View button.
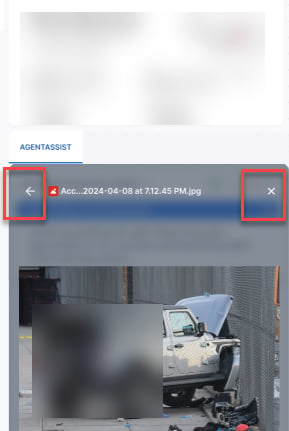
 Preview opens within the widget with Back and Close buttons.
 If the file isn’t detected:
Select Override, choose the file from your local directory, then confirm with the tick mark or reject with the close icon.
If the file isn’t detected:
Select Override, choose the file from your local directory, then confirm with the tick mark or reject with the close icon.
 Error messages:
| Error | Display |
|---|
| File exceeds 25 MB | 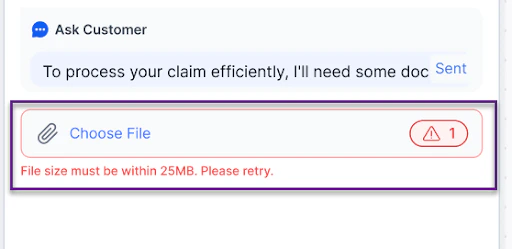 |
| Unsupported file type |  |
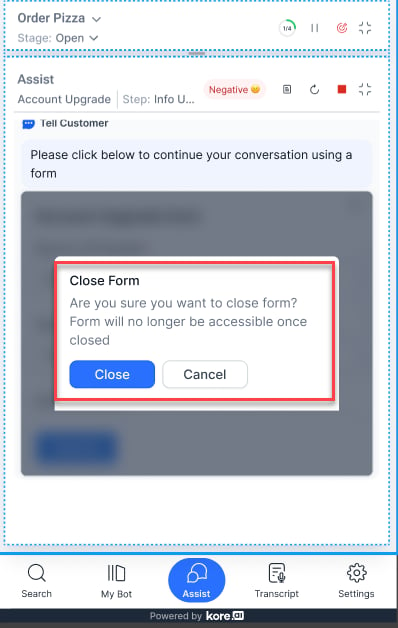
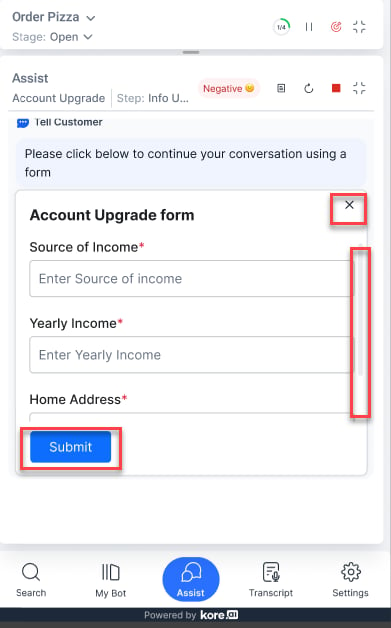
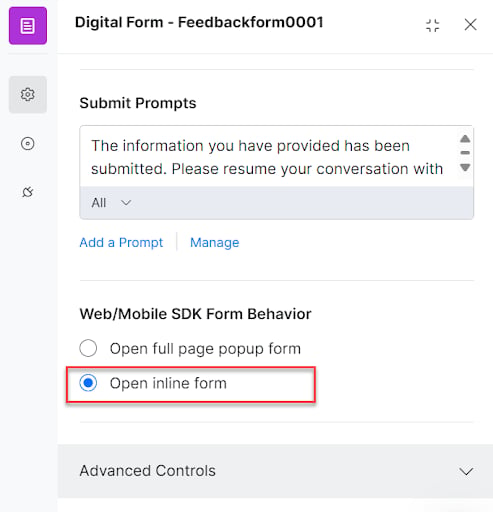 Form features:
-
Close icon — Exits the form. A confirmation dialog prompts before discarding.
-
Fixed frame height — 306 pixels with scroll support.
-
Submit button — Sticky at the bottom of the form.
Behavior by application type:
| Application | Behavior |
|---|
| Third-party contact center | Can’t send the form to the customer. Fill it out manually. |
| Smart Assist Suite | Can send the form to the customer multiple times, but access only once. Simultaneous access by agent and customer triggers an error. |

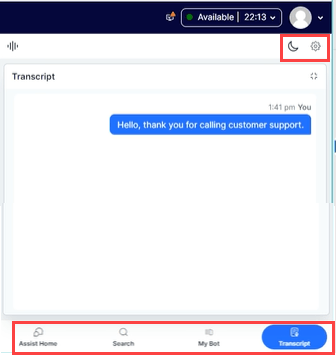
Transcript Tab
Available for voice calls only. Displays a real-time text transcription of the agent-customer conversation throughout the session.
 If you select Auto-scroll Widget Content in Settings, the tab scrolls to the latest utterance automatically. Agents can scroll manually as needed.
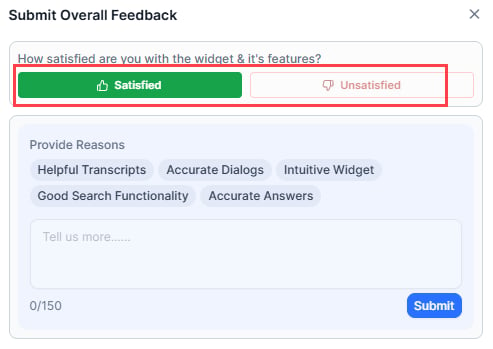
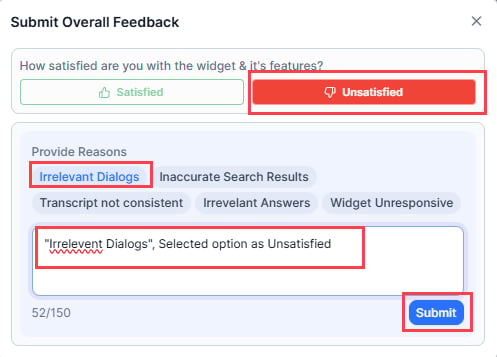
More Tab
Lets agents submit overall feedback on the widget. Agents can select up to five positive or negative options and optionally add comments.
If the conversation is transferred, feedback from both agents is saved in the logs.
-
Select More (…) > Feedback.
-
Select Satisfied (positive) or Unsatisfied (negative).
-
Select feedback options from the list and add comments if needed.
-
Select Submit.
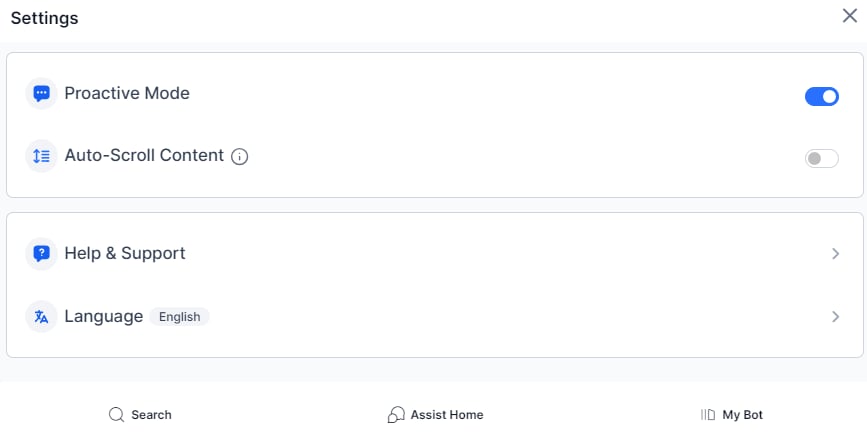
Settings
| Setting | Description |
|---|
| Proactive Mode | Toggles the widget’s listening mode on or off. Disable if the widget isn’t working as expected. |
| Auto-Scroll Content | Controls auto-scroll in the Assist, My AI Agent (Bot), and Transcript tabs. |
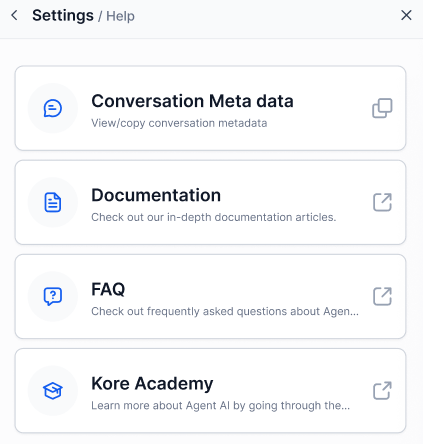
| Help & Support | Links to documentation, FAQs, and Academy Courses, and allows agents to copy the conversation metadata |
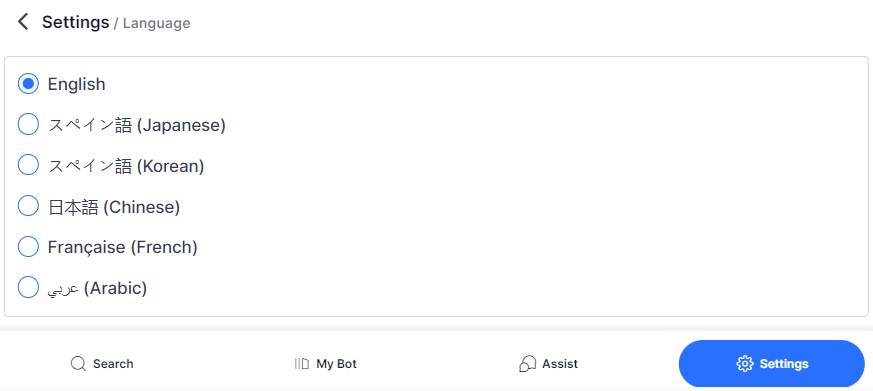
| Language | Select a display language for the widget. |
Theme Selection
Choose Dark or Light theme from the Settings tab.
Agentic Copilot
Agentic Copilot automates end-to-end customer conversations through the Agent AI widget while keeping agents in control. Agent AI proactively sends contextual, empathetic responses without requiring manual input. Agents can supervise every interaction, cancel or override automated replies, edit responses, run dialog tasks manually, and perform LLM-powered searches.
Key Benefits
| Benefit | Description |
|---|
| Scalable Efficiency | Automates routine interactions so agents can manage multiple conversations simultaneously. |
| Human Supervision | Agents can pause, cancel, override, or edit any automated message before it’s sent. |
| Proactive Engagement | Agent AI initiates and responds to conversations based on context, reducing wait times. |
| Contextual Intelligence | Uses real-time data and workflow logic to generate accurate replies. Prompts users for inputs, extracts entities, and adapts via external APIs (pricing, availability, customer status). |
| Empathetic Responses | Understands conversation context to respond in a natural, empathetic tone. |
| Robust Fail-Safes | If data delays or response failures occur, agents can intervene using pause-to-send controls. Auto-send disables automatically if a response fails. |
-
Sign in to AI for Service.
-
Go to Agent AI > Configurations > Linked Services > Agentic Configuration.
-
Select + Add Agentic Copilot App.

-
Fill in the App Information fields:
| Field | Description |
|---|
| App Name | A name for the app (up to 50 characters). For example, Travel Agent. |
| Domain URL | The Agentic platform’s host URL. For example, agent-platform.kore.ai. |
| Environment | The environment name as configured in the Agentic Platform’s Environment section. |
| App ID | The Agentic app ID in use. |
| API Key | The API key as configured in the Agentic Platform’s API Keys section. |
-
Select Test Connection & Save.

Delete an Agentic Copilot App
Deleting an app automatically disables it from the Agent AI widget.
- Select Delete on the app.
- Confirm by selecting Delete.
You can’t delete an app that’s in use. The Delete option is unavailable, and a badge indicates that the app is active.
-
Sign in to AI for Service.
-
Go to Agent AI > Configurations > Widget Settings.
-
Expand Agent AI Channel Specific Settings.
-
Select a channel from the Select channel list.
-
Enable the Agent AI Channel Specific Settings toggle if it’s off.
-
Configure the Agentic Copilot settings:
| Setting | Description |
|---|
| Language | Select the language for Agentic responses. |
| Enable/Disable toggle | Turn Agentic Copilot on or off for the selected channel. |
| Select Agentic App | Choose the configured app to use. |
| Allow auto send Message | When enabled, Agentic messages send automatically after the configured delay. Clearing this option cancels all unsent Agentic messages. |
| Set message delay before auto send | Set the delay (up to 60 seconds) before a message auto-sends. |

Agentic Copilot at Runtime
Agentic Copilot runs conversations autonomously while agents supervise. Agents can cancel, override, or edit messages at any time.
After Welcome Events execute, the Assist tab displays:
“Agentic Copilot is actively listening to your conversation and ready to assist automatically.”
 Each Agentic message includes a Sending button that delays auto-send based on the configured timer.

Agent Controls

| Control | Action |
|---|
| X beside the Sending button | Cancels auto-send for that message. |
| Copy icon | Copies the message to the Chat Response field for editing before sending. |
| Send button | Sends the message immediately without waiting for the timer. |
| Override | Discards the Agentic prompt so you can type your own response. |
| Stop/Resume icon (top-right) | Pauses or resumes auto-send globally for all Agentic messages. |
| Pause/Resume icon (top-right) | Pauses or resumes the Agentic app entirely. |
Behavior Notes
- When you select Allow Auto Send Message, each message’s timer starts only after the system sends the previous message.
- If the view doesn’t scroll to the latest message, an arrow appears at the lower-right showing the count of stacked messages. Select it to jump to the latest.
- To regenerate a failed Agentic response, double-click the corresponding customer message.
- If Agentic Copilot fails to send a response, auto-send disables automatically.
- For messages outside the app’s scope, Agentic indicates it’s not trained to respond.
Search Tab — Agentic Results
When Agentic Copilot is active, the Search tab also displays Agentic Results — search results generated by Agentic Copilot based on the conversation.

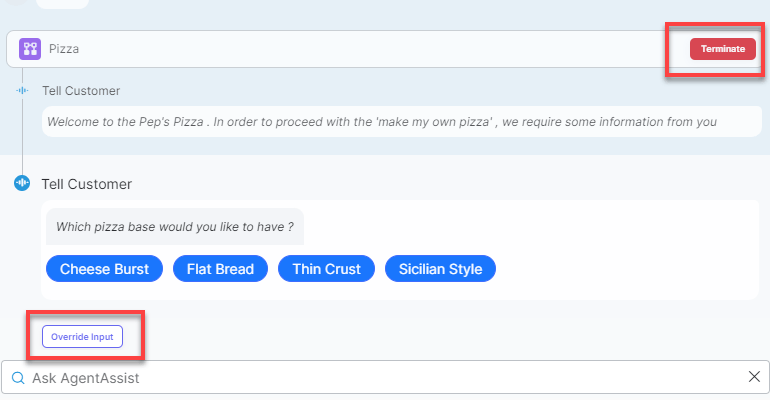
Automation Controls
During a customer interaction, the Agent AI app suggests automations based on customer intent. Agents can run these automations, override inputs, terminate tasks, and run automations independently.
When automation fails to understand a customer’s input, a “try again” error appears. If errors repeat, you can intervene and correct the input manually.
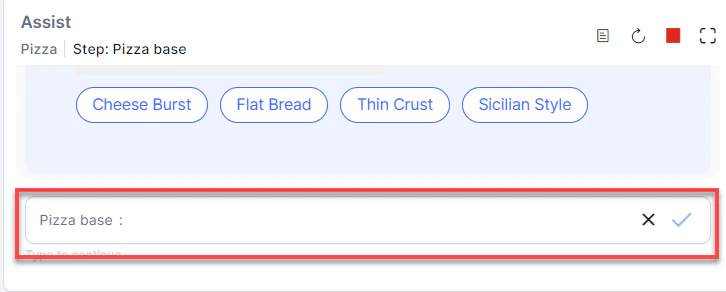
-
Select Override Input below the automation step.
-
The Type to continue box appears. Enter the correct value.

The automation resumes with the corrected input.
Terminate an Automation
Stop an automation at any point. Common reasons: accidental trigger, unexpected behavior, or change in customer intent.
-
On the Assist or My AI Agent (Bot) tab, select Terminate next to the automation step.
-
Select Yes, Terminate to confirm.

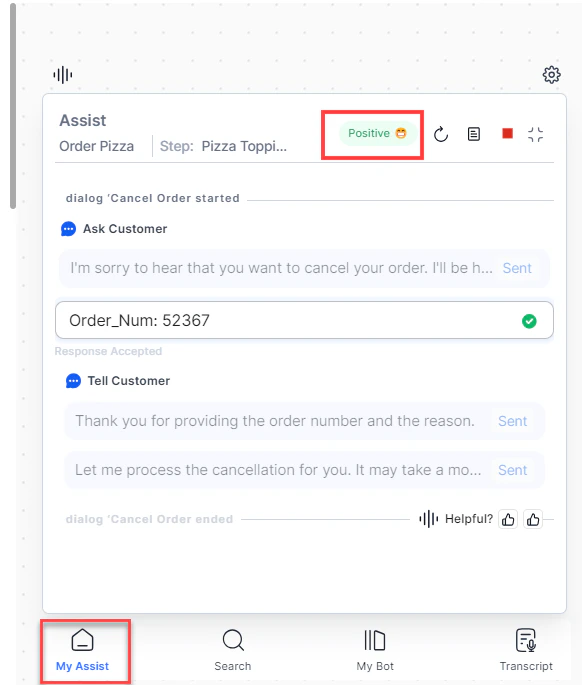
Sentiment Analysis
The widget continuously analyzes and displays the customer’s sentiment in real time based on their messages. This helps agents handling multiple conversations quickly assess customer emotion when switching between interactions.
The sentiment indicator appears at the top-right of the widget.
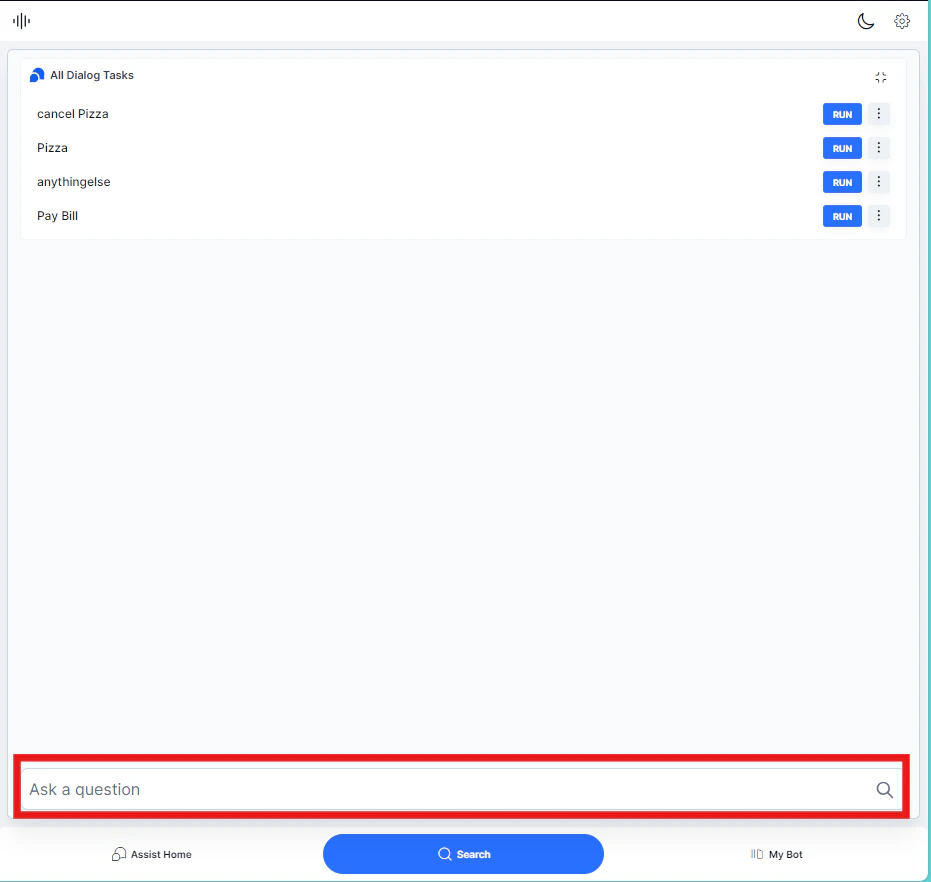
Search and Ask a Question
Use the search bar to look up FAQs and automations without leaving the conversation.
-
Type a question in the Ask a question search bar.
-
Press Enter. Agent AI shows matching results you can use to respond.
Run an automation using agent inputs to control the entire process independently — without prompting the customer for each value. Use this to retrieve information in parallel while the customer waits, or when you already have the required data.
- In the Search tab, select the ellipsis next to a Dialog Task.
- Select Run with agent’s input. The automation starts in the My AI Agent (Bot) tab as a parallel session.
The automation runs independently and doesn’t affect the customer-facing interaction.
You can also use the Run button to start a configured Dialog Task directly.
Access Custom Data
Custom data is additional information—such as agent name, ID, or other metadata—passed from third-party applications into the Agent AI widget. Use it to personalize interactions, streamline workflows, and provide more context-specific responses.
Custom data uses this format: {{context.session.UserContext.customData.<key>}}
The UserContext variable stores this value. You can access it wherever UserContext is available, including Welcome Events and Dialog Tasks.
Access Custom Data in Welcome Events
-
Sign in to AI for Service.
-
Select an app from the App list.
-
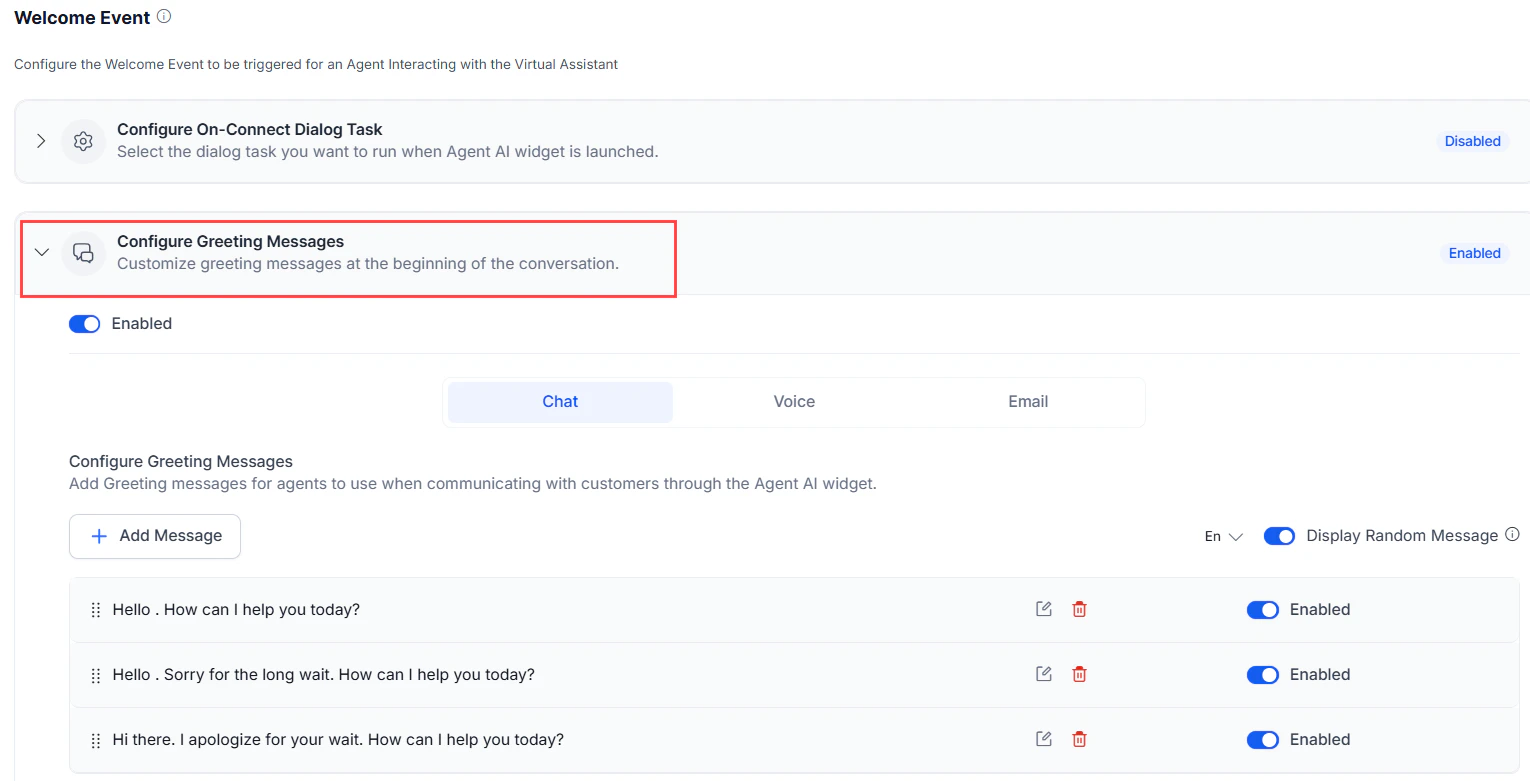
Select Agent AI > Configurations > Welcome Events.
-
Expand the Configure Greeting Messages section.
-
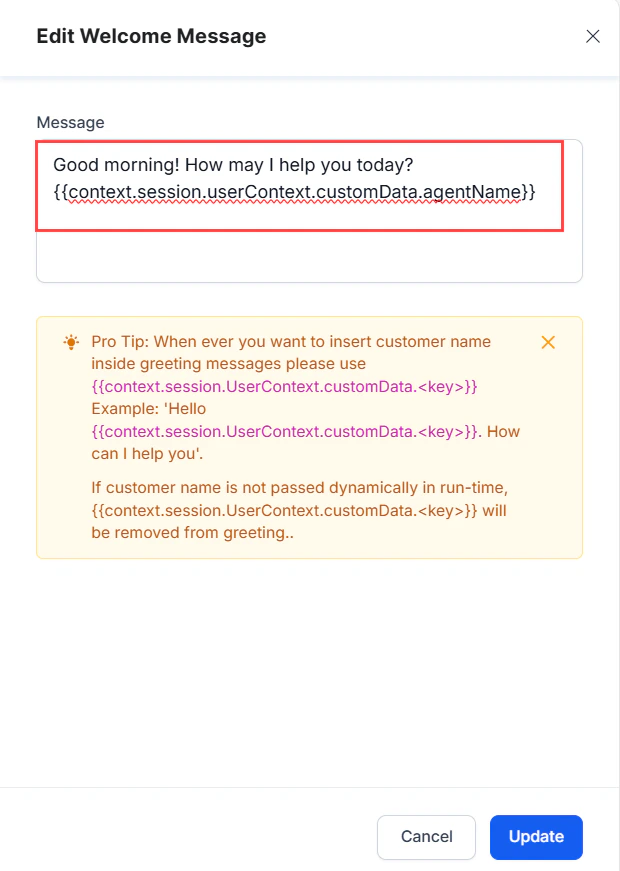
Select Edit on a greeting message where you want to use custom data.
If no greeting messages exist, create one first. Refer to
Welcome Events for help.
-
In the Message field, reference your custom data using the
{{context.session.UserContext.customData.<key>}} format.
Access Custom Data in Dialog Tasks
-
Sign in to AI for Service.
-
Select an app from the App list.
-
Select Automation AI > AI Agent.
-
Open an existing Dialog Task from the Dialogs page.
If no Dialog Tasks exist, create one first. Refer to
Dialog Builder for help.
-
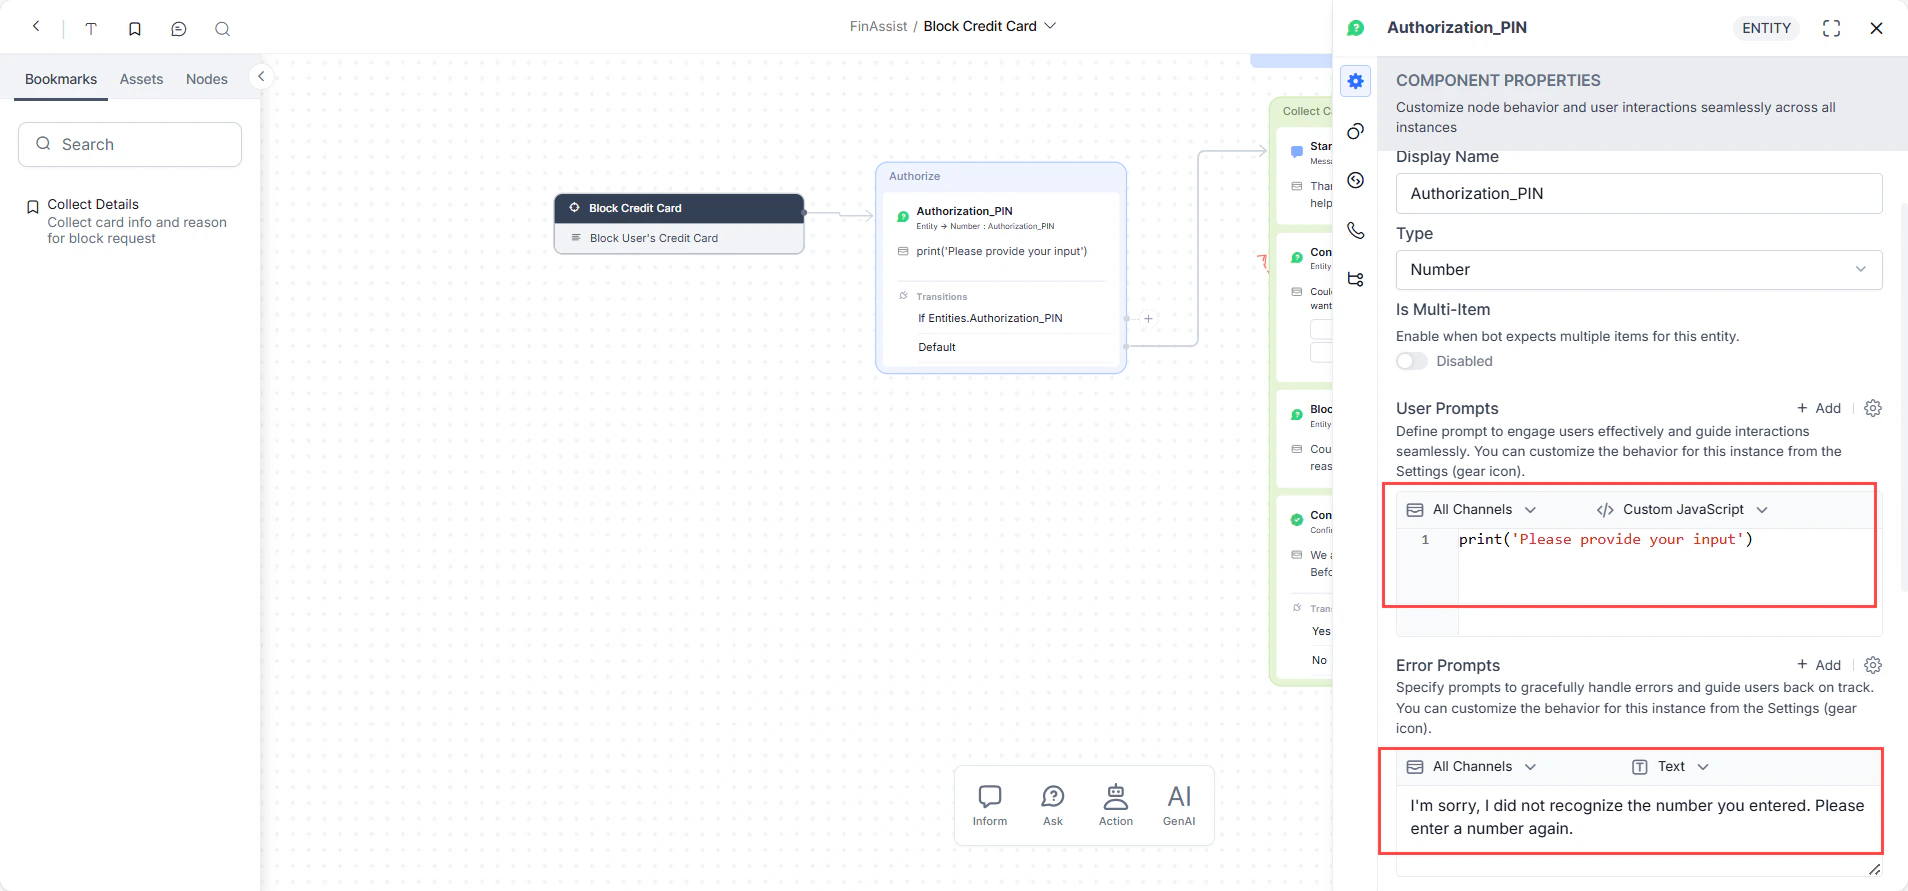
Open a Message node.
-
On the Component Properties page, go to the User Prompts or Error Prompts field, and select Text or Custom JavaScript to enter your custom data reference.
V2 vs V3 Differences
UI Changes
| Area | V2 | V3 |
|---|
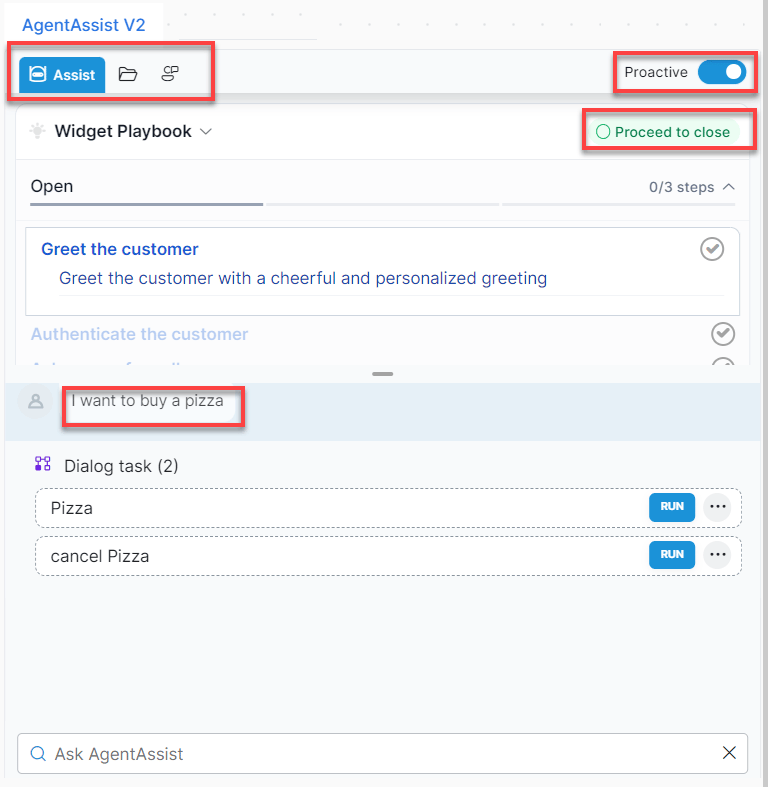
| Tabs | Assist, Library, My AI Agent (Bot) + search bar at bottom | Search, My AI Agent (Bot), Assist, Settings |
| Tab placement | Top | Bottom |
| Sentiment display | Visible only on customer utterance match | Always visible and includes badges, icons, and emojis per utterance |
| Proactive button | Top-right corner of the widget | Settings tab |
| Playbook closure | ”Proceed to Close” label | Symbol indicator |
| Playbook list | Primary playbooks only | Primary and Dynamic playbooks |
| Dialog Task utterance display | Shown at top of Dialog Task section | Tooltip via information icon hover |
 Agent AI V3
Feature-Level Changes
| Feature | V2 | V3 |
|---|
| Dialog Task controls | Terminate and Override Input buttons | List View, Restart, Terminate, and Maximize as icons |
| Override Input | Button below the Dialog Task | Input field directly under the running Dialog Task |
| Settings tab | Not available | Proactive mode, Auto-Scroll, Documentation/FAQ links, Language selection |
 Agent AI V3 — Dialog Tasks
 Agent AI V2 — Override Input
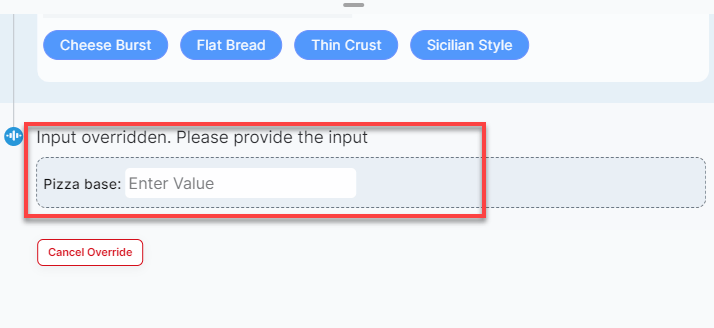 Agent AI V3 — Override Input