

- Agent AI Channel Specific Settings — channel-specific preferences for Chat, Voice, and Email.
- Agent AI General Settings — widget-wide behavior and display options.
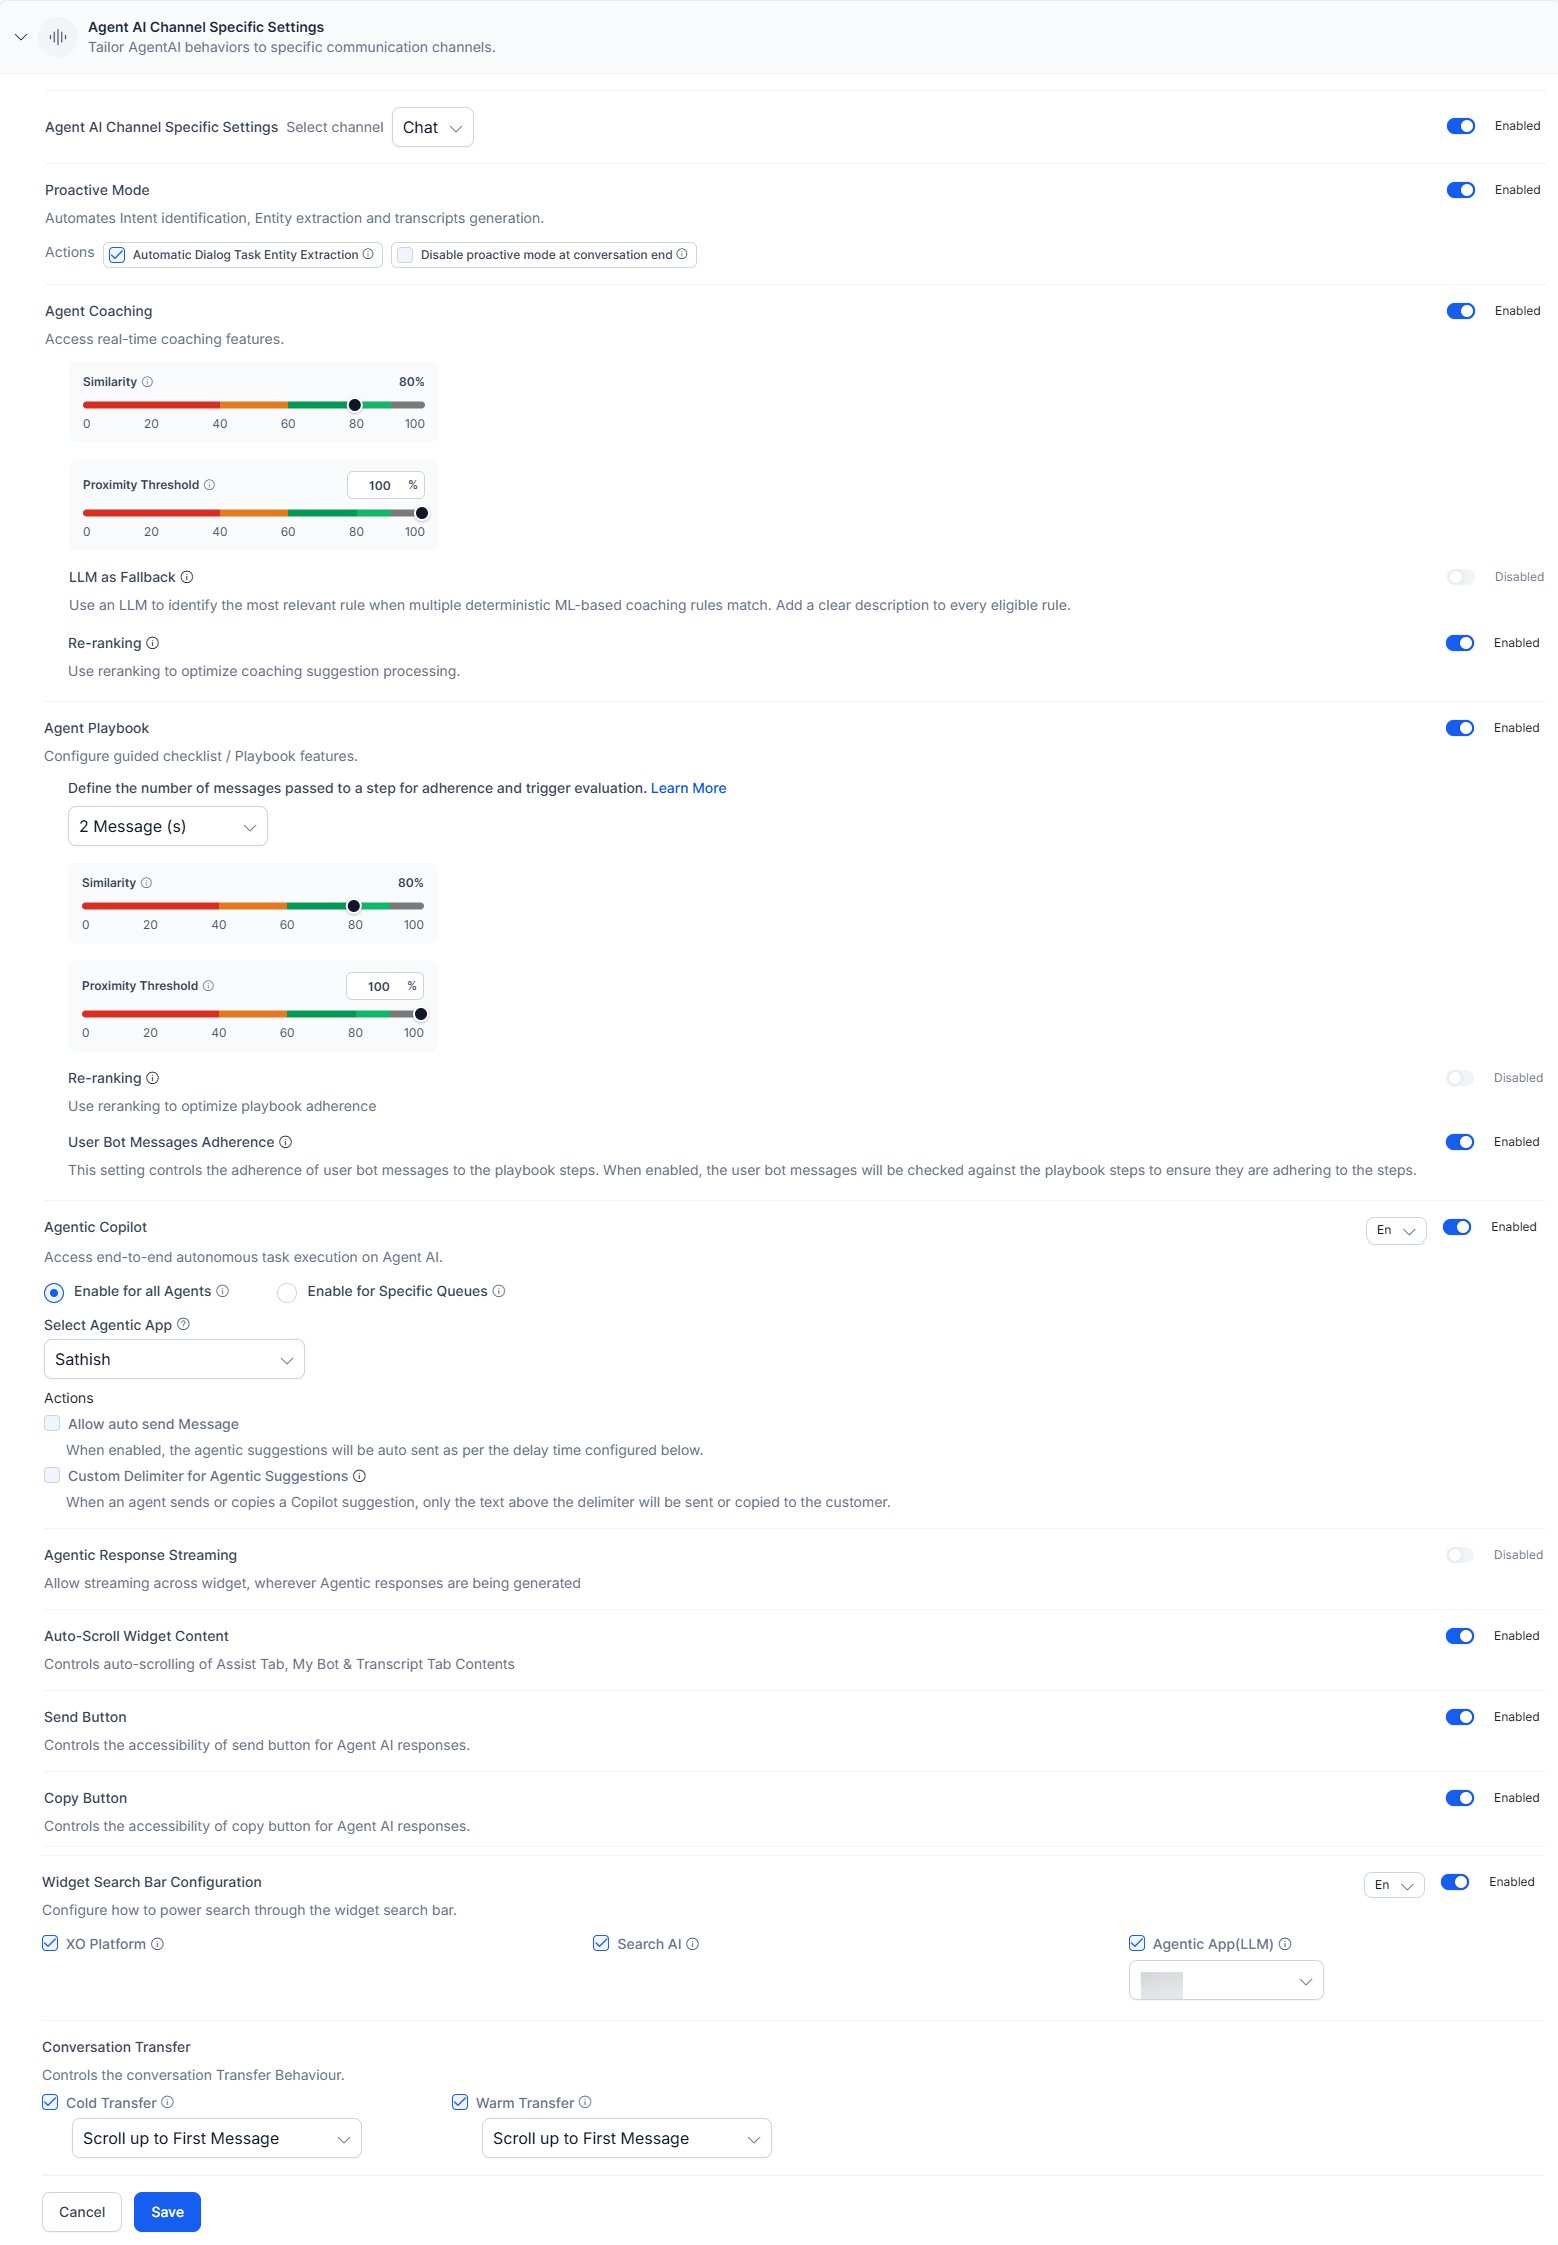
Agent AI Channel-Specific Settings
Configure widget features per channel. The following options are available:
Agent Coaching options:
Agent Playbook options:
When the Proactive Mode is off:
- The Assist tab Run button is off; only Run with agent’s input is available.
- Dynamic playbook identification and adherence are inactive; tick-off and step progression still work.
- Primary playbook automatic adherence or tick-off doesn’t occur.
- If the Playbook widget is also off, the default landing page is My AI Agent (Bot).
Both transfer types support:
- Scroll up to the First Message — opens chat history at the top.
- Continue from the Last Message — opens chat history at the bottom.
- Configure Dialog Task — runs a selected dialog task automatically when the conversation transfers.
Steps to set Channel-Specific Preferences
- Sign in to Platform.
- Go to Agent AI > Configuration > Widget Settings > Agent AI Settings > Agent AI Channel Specific Settings.
- Expand Agent AI Channel Specific Settings.
- Select a channel from the Select channel list.
- Turn on the Agent AI Channel Specific Settings toggle if it’s off.
-
Turn Proactive Mode on or off.
- Select or clear Automatic Dialog Task Entity Extraction.
- Select or clear Disable proactive mode at conversation end.
-
Turn the toggles on or off for Agent Coaching, Agent Playbook, Agentic Response Streaming, Auto-Scroll Widget Content, Send Button, and Copy Button.
-
For Agent Coaching, set the following options:
- Use the Similarity slider to set the minimum similarity.
- Use the Proximity Threshold slider, or enter a value, to set the minimum proximity threshold.
- Turn LLM as Fallback on or off.
- Turn Re-ranking on or off.
-
For Agent Playbook, select the number of messages to pass to a step for adherence and trigger evaluation. The following note displays if you select five messages:
For Agent Playbook, also set the following options:Increasing the number of messages might cause higher latency.- Use the Similarity slider to set the minimum similarity.
- Use the Proximity Threshold slider, or enter a value, to set the minimum proximity threshold.
- Turn Re-ranking on or off.
- Turn User Bot Messages Adherence on or off.
-
For Agent Coaching, set the following options:
-
For Agentic Copilot:
- Select a language.
- Turn on or off the Agentic Copilot toggle.
- Select an assignment option:
- Enable for all Agents — the selected app applies to all queues.
- Select an app from Select Agentic App.
- Select Allow auto send Message to turn on auto-send.
- Use the slider to set the delay (up to 60 seconds).
- Select Custom Delimiter for Agentic Suggestions to send or copy only the text above the delimiter to the customer.
- Enable for Specific Queues — assigns apps to specific queues via Agent AI Mapping.
- Select Open AI Feature Mapping to navigate to Agent AI Mapping.
- Select learn more for queue configuration details.
- Enable for all Agents — the selected app applies to all queues.
-
Turn on or off Control Transcript Visibility between Agents (Voice channel only) and select one of the following options:
-
Turn on Widget Search Bar Configuration.
- Select one or more options — Platform, Search AI, Agentic App(LLM).
- If you select Agentic App(LLM), choose an app from the dropdown list.
Search AI and Agentic App(LLM) fields are unavailable until you configure them, and a warning prompts you to configure them first. - Under Conversation Transfer, select Cold Transfer, Warm Transfer, or both. Select an option from the list for each transfer type.
-
Select Save.
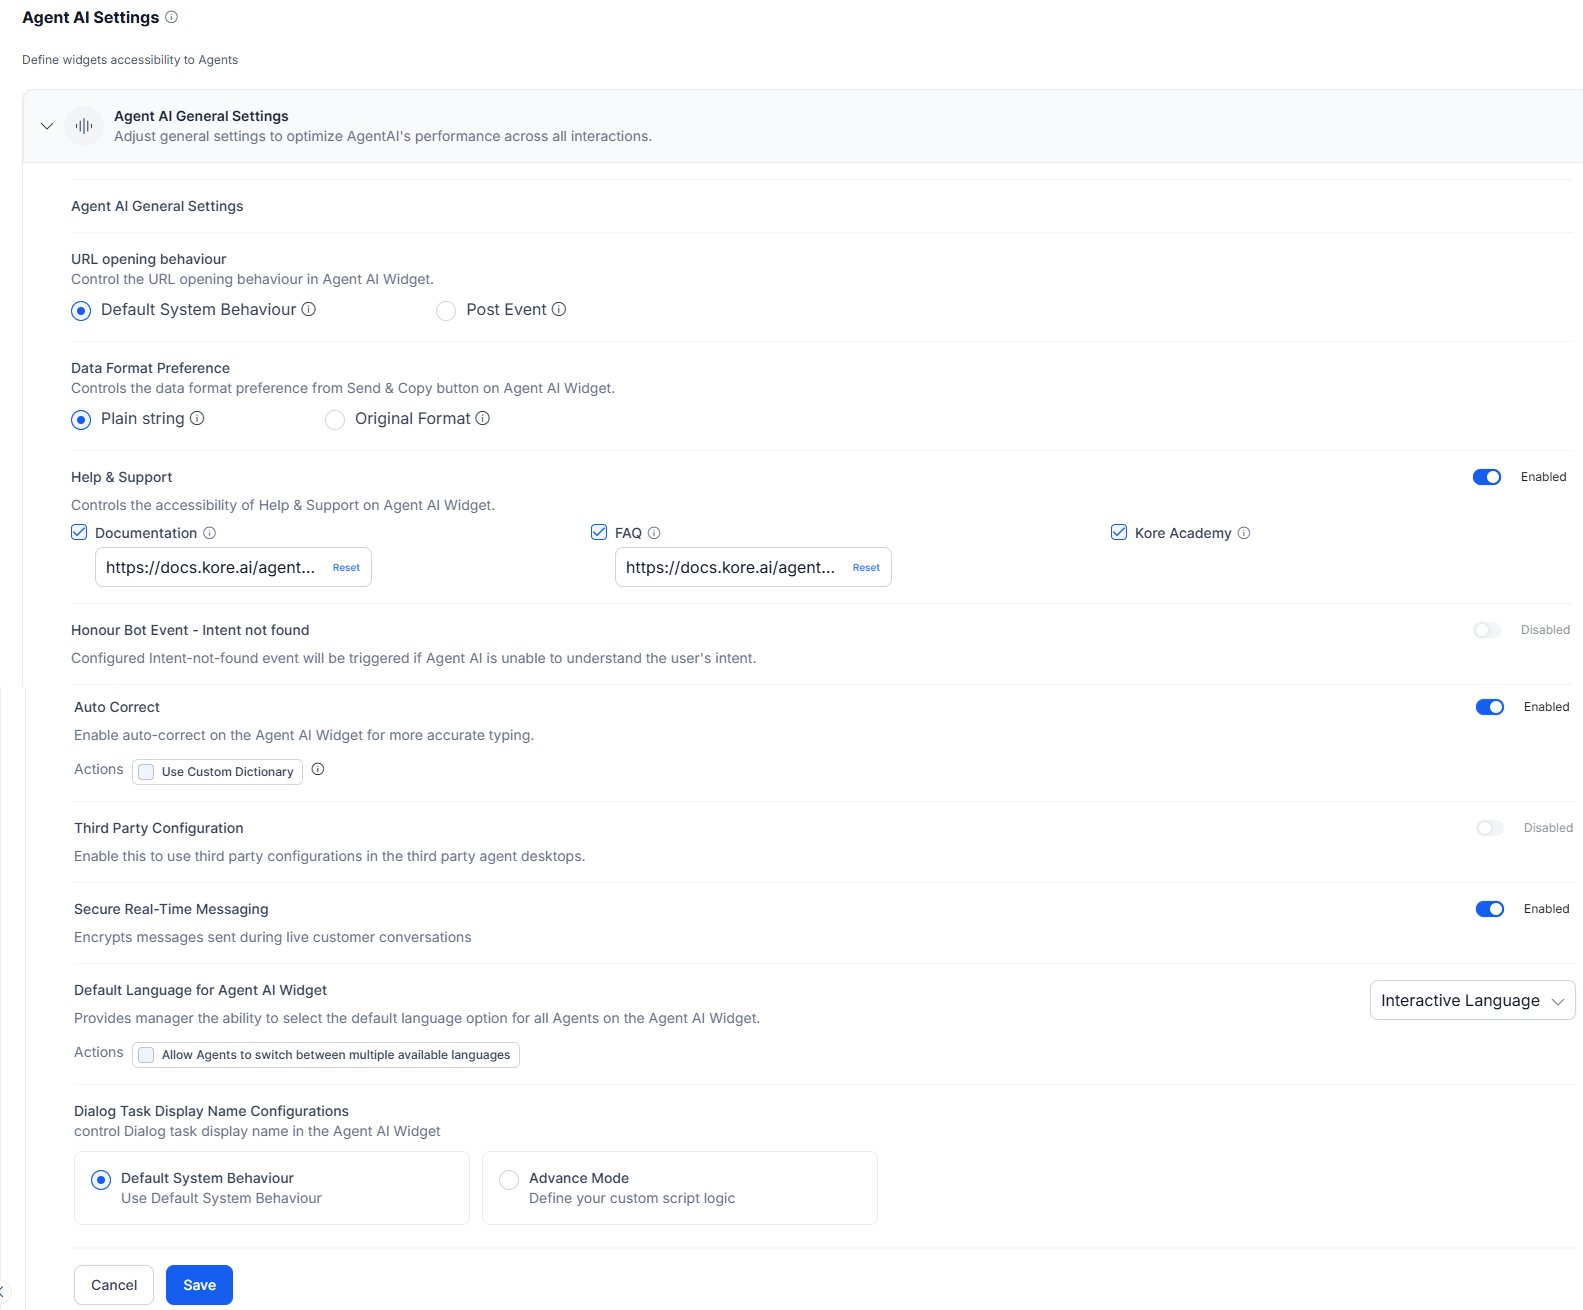
Agent AI General Settings
Configure global widget behavior including URL handling, data format, and language preferences.
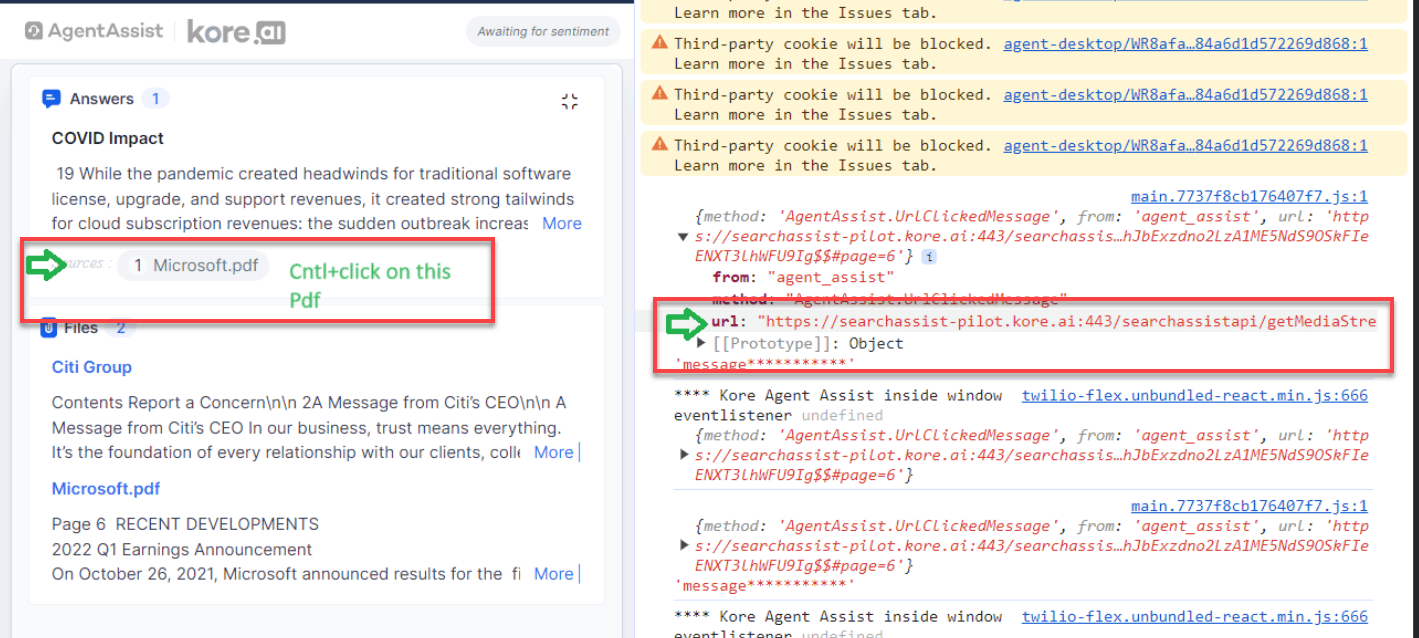
Post Event URL behavior:
When an agent selects a link in the widget, the
AgentAI.UrlClickedMessage event triggers and a log appears on the right showing the URL. Desktop applications use this URL to control how the link opens.
Steps to Set Agent AI General Settings
- Go to Agent AI > Configuration > Widget Settings > Agent AI Settings > Agent AI General Settings.
- Expand Agent AI General Settings.
- Select Default System Behavior or Post Event under URL opening behavior.
- Select Plain String or Original Format under Data Format Preference.
-
Turn on or off the Help & Support toggle.
Turning on this toggle makes Conversation Metadata available to copy by default.
- Select the components to display — Documentation, FAQ, Kore Academy.
- Customize the URLs for Documentation and FAQ as needed.
- Turn on or off the Honor Bot Event - Intent not found and Third Party Configuration toggles.
- Select a language from the Default Language for Agent AI Widget list, or select Interactive Language to use the app’s language. To allow agents to switch languages, select Allow agents to switch between multiple available languages.
-
Select Default System Behavior or Advanced Mode under Dialog Task Display Name Configurations. For Advanced Mode, enter a custom script in the pop-up and select Save.
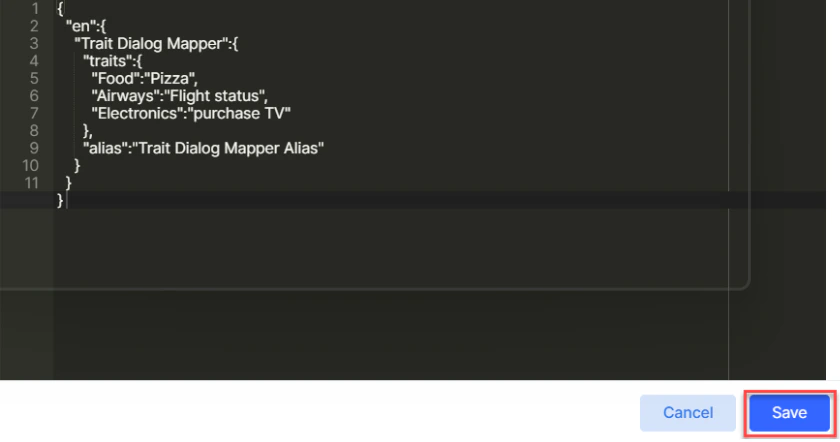
- Turn on the Secure Real-Time Messaging toggle to encrypt agent and customer messages during live conversations.
- Select Save.
Auto-Correct for the Search Tab
The Auto Correct feature highlights misspelled words in the Search tab and suggests corrections. Admins configure it in Widget Settings; agents can override the setting in the widget’s Settings tab. Admin steps:- Sign in to Agent AI.
- Go to Widget Settings > Agent AI General Settings.
- Turn the Auto Correct toggle on or off.
- Select or clear Use Custom Dictionary.
-
Upload a customized word list.
You can download the current word list if one has already been uploaded.
- Select Save.
- Sign in to the Agent AI widget.
- Go to the Settings tab.
- Turn on or off the Auto Correct toggle.