> ## Documentation Index
> Fetch the complete documentation index at: https://koreai.mintlify.site/llms.txt
> Use this file to discover all available pages before exploring further.
# Assistant Configurations
Assistant Configurations in the **Admin Hub** give administrators control over communication, security, pipeline behavior, and resource management across the AI deployment.
## Overview
| Configuration | Purpose |
| ------------------------------------------------- | ----------------------------------------------------------------- |
| [Orchestration Settings](#orchestration-settings) | Configure the AI query processing pipeline |
| [Prebuilt Tools](#prebuilt-tools) | Configure the AI query processing pipeline |
| [Announcements](#announcements) | Publish banner messages to users |
| [Email Templates](#email-templates) | Customize invitation emails for users and admins |
| [Guardrails](#guardrails) | Enforce PII detection and content restrictions |
| [MCP Server](#mcp-server) | Manage Model Context Protocol servers and agent tools |
| [Rate Limits](#rate-limits) | Control query point consumption per user category |
| [Scheduler Settings](#scheduler-settings) | Manage automated agent execution permissions |
| [Language Settings](#language-settings) | Set a default language for the platform and new users |
| [Attachment Settings](#attachment-settings) | Control file attachment uploads and processing |
| [Projects Settings](#projects-settings) | Configure project features, model selection, and RAG capabilities |
## Orchestration Settings
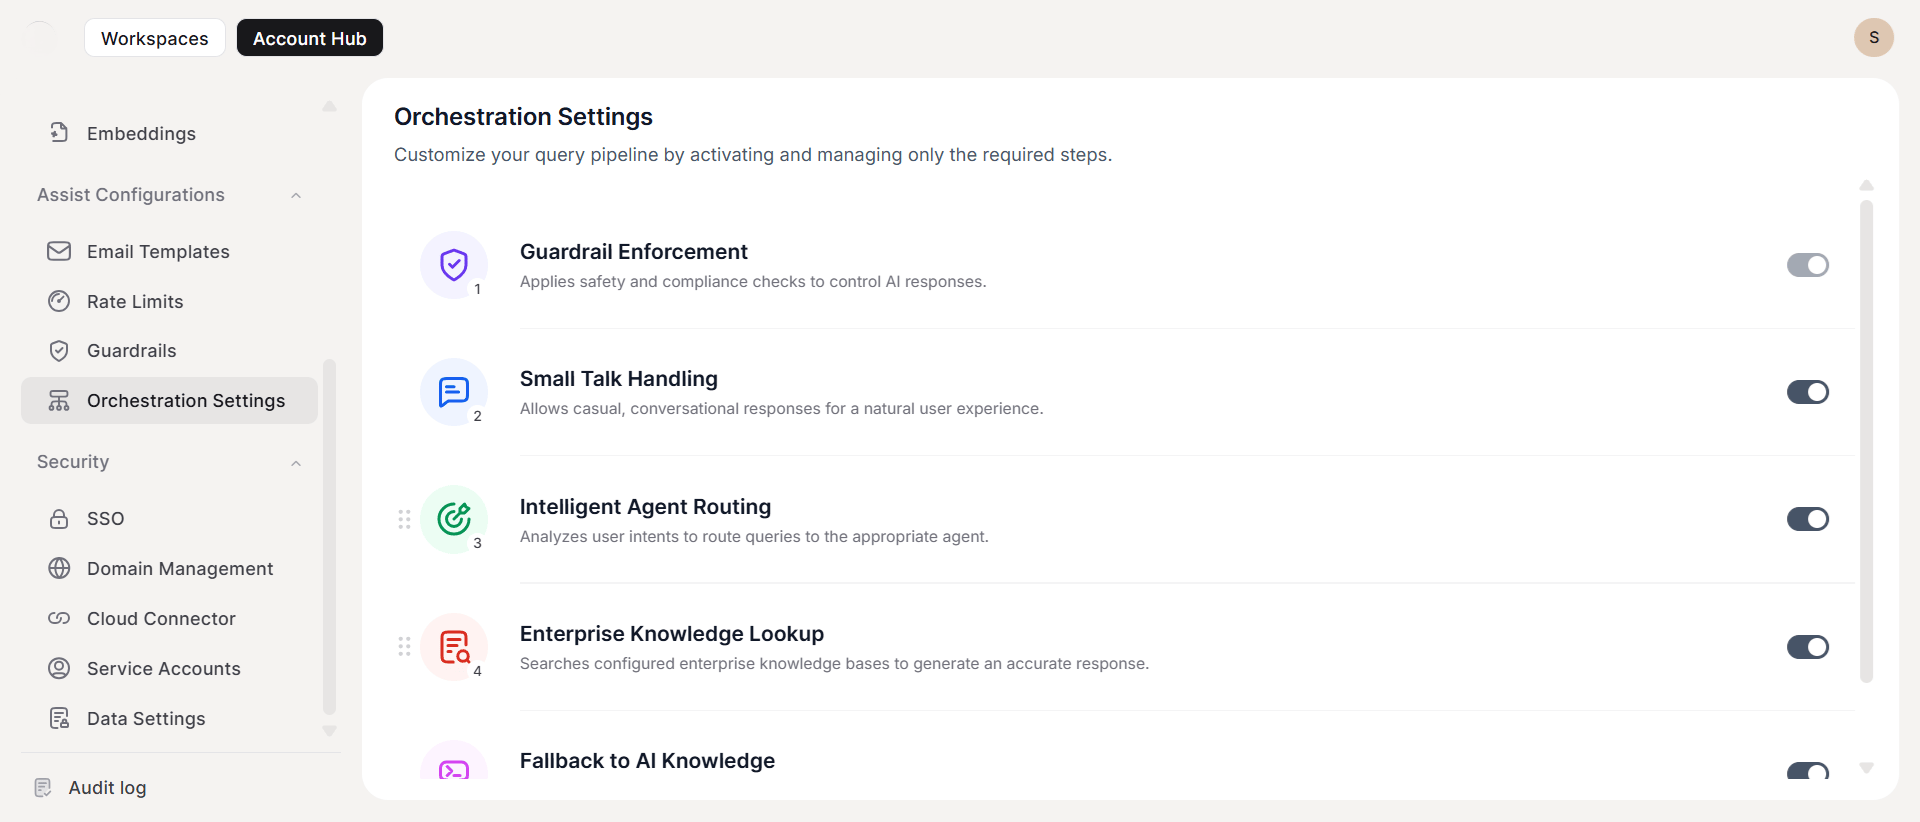
Orchestration Settings is a pipeline management framework that lets administrators activate, configure, and manage individual components of the AI query processing workflow.
**Navigation**: Account Hub → Assistant Configurations → Orchestration Settings
 ### Setup
1. Go to **Orchestration Settings** under Assist Configurations.
2. Review available pipeline components and their current status.
3. Configure components based on your organizational requirements.
4. Test the configuration with sample queries.
5. Monitor performance and adjust settings as needed.
### Pipeline Components
| Component | Function |
| ------------------------------- | ---------------------------------------------------------------------- |
| **Guardrail Enforcement** | Applies safety and compliance checks to AI responses |
| **Small Talk Handling** | Enables casual, conversational responses for a natural user experience |
| **Intelligent Agent Routing** | Routes queries to the most appropriate agent based on intent |
| **Enterprise Knowledge Lookup** | Searches configured internal knowledge bases for accurate responses |
| **Fallback to AI Knowledge** | Uses LLM-derived knowledge when primary sources are unavailable |
### Guardrail Enforcement
Automatically applies security policies from your [Guardrails](#guardrails) configuration across all AI interactions.
### Setup
1. Go to **Orchestration Settings** under Assist Configurations.
2. Review available pipeline components and their current status.
3. Configure components based on your organizational requirements.
4. Test the configuration with sample queries.
5. Monitor performance and adjust settings as needed.
### Pipeline Components
| Component | Function |
| ------------------------------- | ---------------------------------------------------------------------- |
| **Guardrail Enforcement** | Applies safety and compliance checks to AI responses |
| **Small Talk Handling** | Enables casual, conversational responses for a natural user experience |
| **Intelligent Agent Routing** | Routes queries to the most appropriate agent based on intent |
| **Enterprise Knowledge Lookup** | Searches configured internal knowledge bases for accurate responses |
| **Fallback to AI Knowledge** | Uses LLM-derived knowledge when primary sources are unavailable |
### Guardrail Enforcement
Automatically applies security policies from your [Guardrails](#guardrails) configuration across all AI interactions.
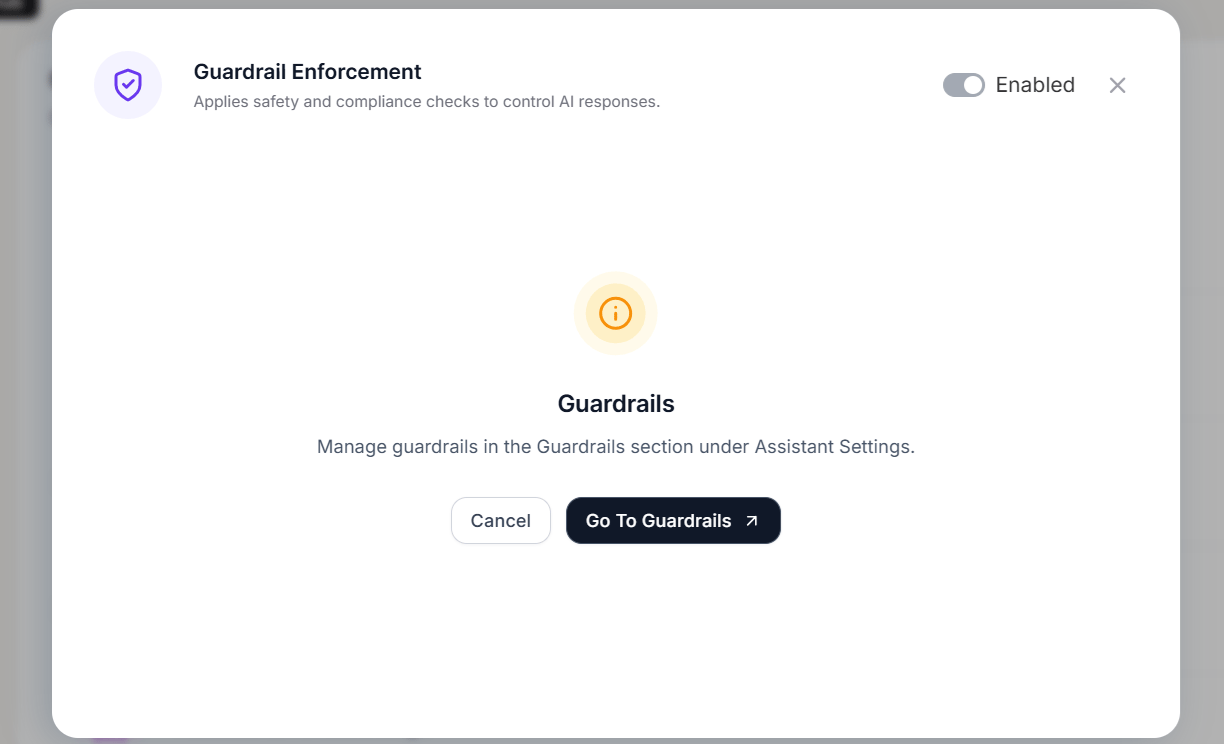 * **Enabled**: Security policies enforce across all pipeline queries.
* **Disabled**: Enforcement is removed from the pipeline.
* Cannot be toggled here — controlled exclusively through the [Guardrails](#guardrails) interface.
### Small Talk Handling
Enables casual, contextual conversation for an improved user experience.
* **Enabled**: Security policies enforce across all pipeline queries.
* **Disabled**: Enforcement is removed from the pipeline.
* Cannot be toggled here — controlled exclusively through the [Guardrails](#guardrails) interface.
### Small Talk Handling
Enables casual, contextual conversation for an improved user experience.
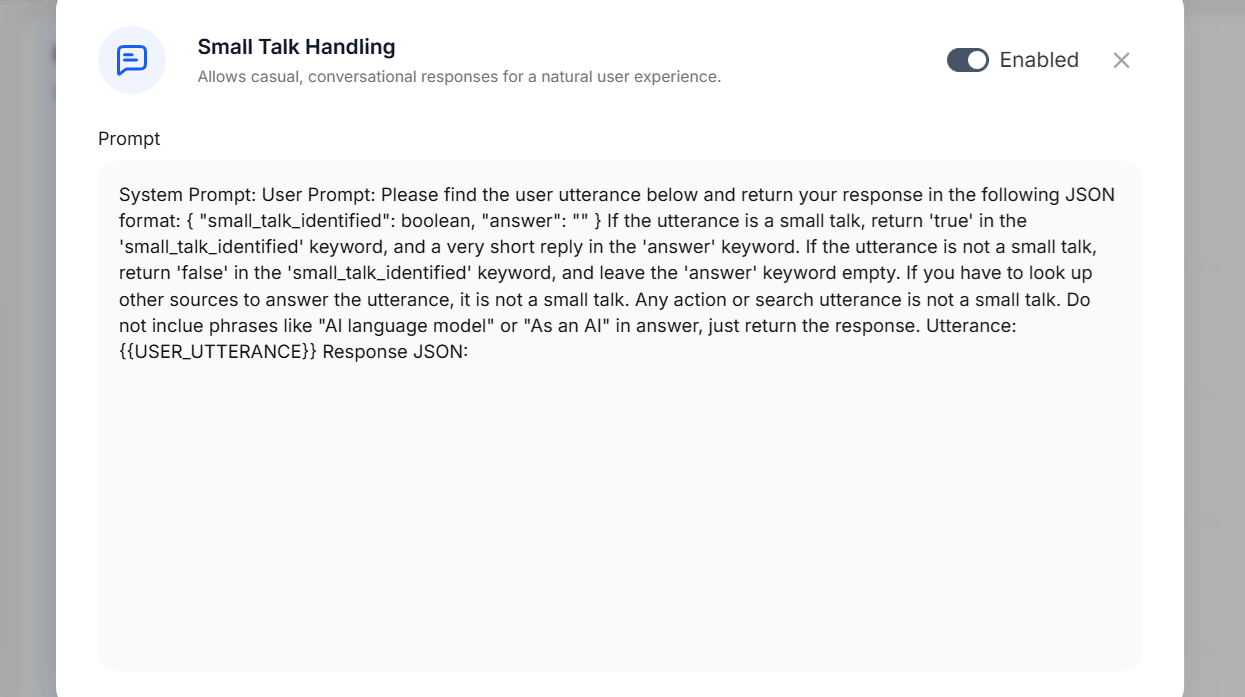 * Toggle on or off based on organizational preferences.
* Uses professionally crafted, pre-configured prompts (not editable) to ensure a consistent brand voice.
### Intelligent Agent Routing
Analyzes incoming queries and directs them to the most appropriate AI agent.
* Toggle on or off based on organizational preferences.
* Uses professionally crafted, pre-configured prompts (not editable) to ensure a consistent brand voice.
### Intelligent Agent Routing
Analyzes incoming queries and directs them to the most appropriate AI agent.
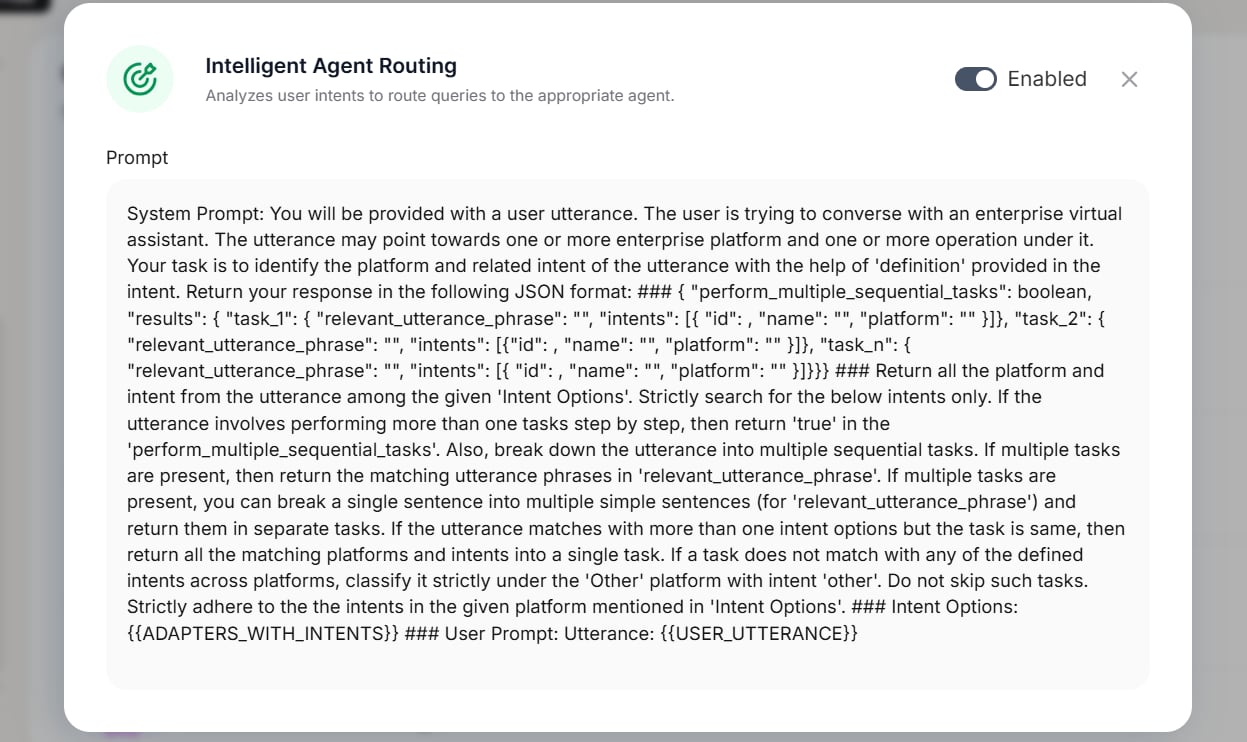 * Uses predefined routing algorithms optimized for accuracy and efficiency.
* Routing logic is locked to ensure consistent performance and scalability.
### Enterprise Knowledge Lookup
Integrates your organization's knowledge base into the AI query pipeline so responses draw from authoritative internal sources.
* Uses predefined routing algorithms optimized for accuracy and efficiency.
* Routing logic is locked to ensure consistent performance and scalability.
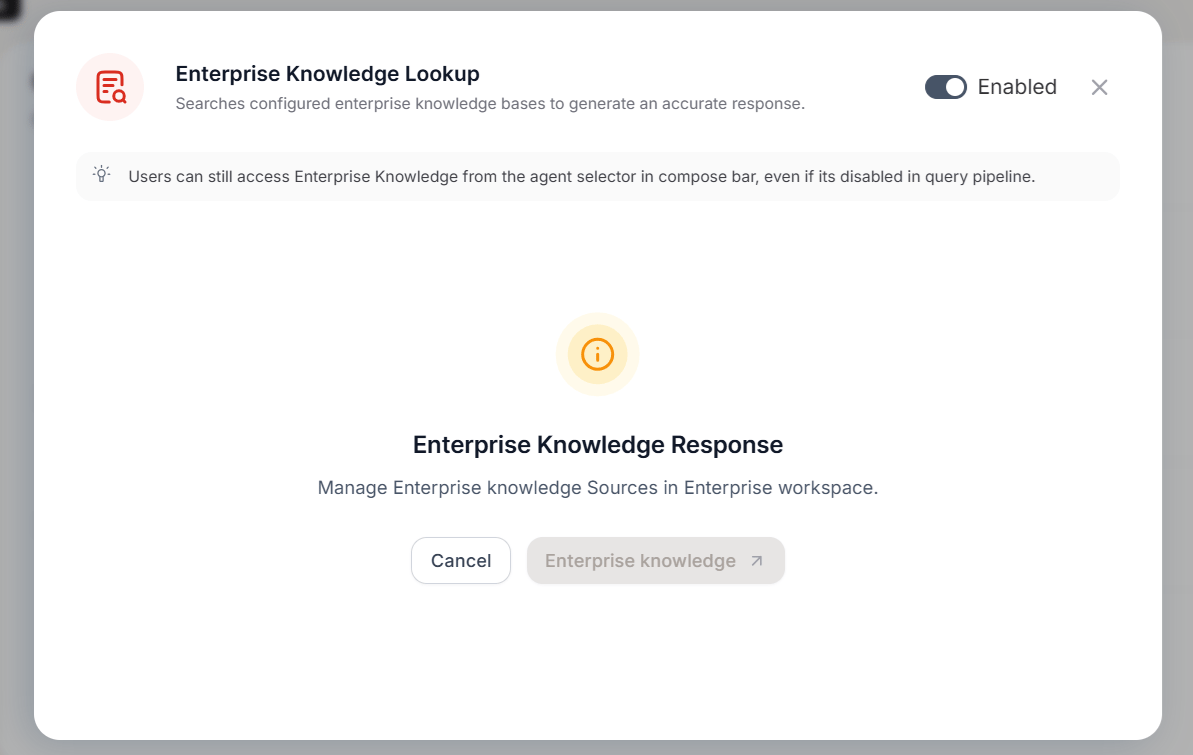
### Enterprise Knowledge Lookup
Integrates your organization's knowledge base into the AI query pipeline so responses draw from authoritative internal sources.
 | State | Behavior |
| --------------------------- | -------------------------------------------------------------------------- |
| **Configured and Enabled** | Knowledge base is queried automatically for all pipeline requests |
| **Configured but Disabled** | Knowledge base is accessible only through the compose bar's agent selector |
| **Not Configured** | Component remains inactive until Enterprise Knowledge is set up |
Enterprise Knowledge remains accessible through the compose bar's agent selector even when disabled in the query pipeline.
### Fallback to AI Knowledge
Provides responses from LLM knowledge when primary systems cannot respond adequately.
| State | Behavior |
| --------------------------- | -------------------------------------------------------------------------- |
| **Configured and Enabled** | Knowledge base is queried automatically for all pipeline requests |
| **Configured but Disabled** | Knowledge base is accessible only through the compose bar's agent selector |
| **Not Configured** | Component remains inactive until Enterprise Knowledge is set up |
Enterprise Knowledge remains accessible through the compose bar's agent selector even when disabled in the query pipeline.
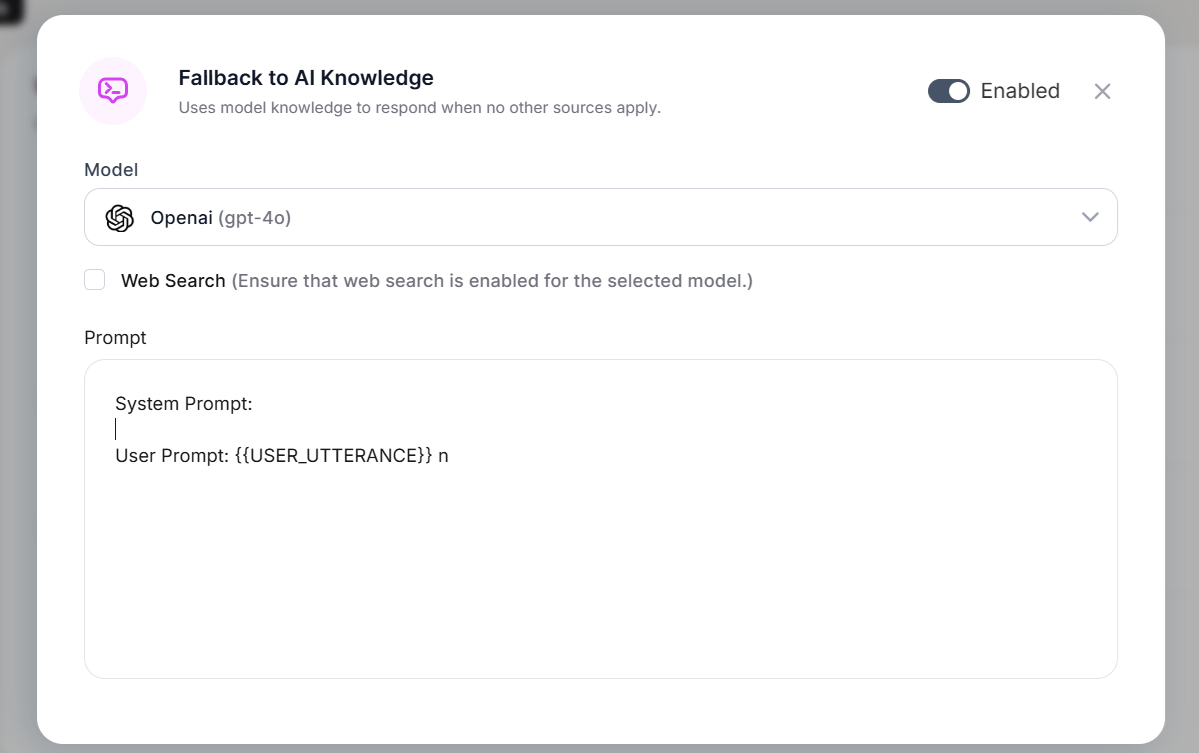
### Fallback to AI Knowledge
Provides responses from LLM knowledge when primary systems cannot respond adequately.
 | Option | Description |
| ----------------- | --------------------------------------------------------- |
| **Toggle** | Enable or disable based on operational requirements |
| **LLM Model** | Select from available language models |
| **Web Search** | Optional integration; available for supported models only |
| **Custom Prompt** | Editable prompt for tailored AI response behavior |
***
## Prebuilt Tools
The Prebuilt Tools page provides a centralized view of platform tools available across all workspaces in your account.
**Navigation**: Admin Console > Assistant Configurations > Prebuilt Tools
The following tools appear on the page:
| Tool | Description |
| --------------- | ------------------------------------------------------------------------------------------------------------- |
| **AI Model** | Uses the AI model's general knowledge to generate answers; does not rely on your organization's internal data |
| **Web Search** | Allows end users to search the web |
| **Attachments** | Allows end users to attach files when asking queries |
| **Create** | Allows end users to generate PPTs, spreadsheets, docs, PDFs, and charts directly from their queries |
### AI Models
Administrators can add AI models from configured LLM connections and make them available to end users as selectable models.
**Add a model**
1. Click **Add Model** on the AI Model card.
2. In the popup, select a model from the list of all models configured in LLM Connections.
3. Provide a **Name** that end users see when selecting the model.
4. Provide a **Short Description** that explains the model's purpose to end users.
5. Click **Save**.
**Define publishing scope**
Set the visibility of each model:
| Scope | Description |
| ------------------------ | -------------------------------------------------------------- |
| **Everyone** | All users in the account can select the model |
| **Selected Users** | Only the specified users can select the model |
| **Selected User Groups** | Only members of the specified user groups can select the model |
***
## Enterprise Search
Enterprise Search lets administrators enable a dedicated search experience for end users.
**Navigation**: Admin Console > Assistant Configurations > Enterprise Search
Turn on the **Enable** toggle to make the **Search** option available to end users in the application.
When Enterprise Search is enabled, select one enterprise knowledge source from the configured sources. The platform uses the selected source for all search results shown to end users. You can change the selected source at any time.
***
## Announcements
The Announcements feature lets administrators create, manage, and publish organizational messages as banners at the top of the user interface.
**Navigation**: Account Hub → Assistant Configurations → Announcements
| Option | Description |
| ----------------- | --------------------------------------------------------- |
| **Toggle** | Enable or disable based on operational requirements |
| **LLM Model** | Select from available language models |
| **Web Search** | Optional integration; available for supported models only |
| **Custom Prompt** | Editable prompt for tailored AI response behavior |
***
## Prebuilt Tools
The Prebuilt Tools page provides a centralized view of platform tools available across all workspaces in your account.
**Navigation**: Admin Console > Assistant Configurations > Prebuilt Tools
The following tools appear on the page:
| Tool | Description |
| --------------- | ------------------------------------------------------------------------------------------------------------- |
| **AI Model** | Uses the AI model's general knowledge to generate answers; does not rely on your organization's internal data |
| **Web Search** | Allows end users to search the web |
| **Attachments** | Allows end users to attach files when asking queries |
| **Create** | Allows end users to generate PPTs, spreadsheets, docs, PDFs, and charts directly from their queries |
### AI Models
Administrators can add AI models from configured LLM connections and make them available to end users as selectable models.
**Add a model**
1. Click **Add Model** on the AI Model card.
2. In the popup, select a model from the list of all models configured in LLM Connections.
3. Provide a **Name** that end users see when selecting the model.
4. Provide a **Short Description** that explains the model's purpose to end users.
5. Click **Save**.
**Define publishing scope**
Set the visibility of each model:
| Scope | Description |
| ------------------------ | -------------------------------------------------------------- |
| **Everyone** | All users in the account can select the model |
| **Selected Users** | Only the specified users can select the model |
| **Selected User Groups** | Only members of the specified user groups can select the model |
***
## Enterprise Search
Enterprise Search lets administrators enable a dedicated search experience for end users.
**Navigation**: Admin Console > Assistant Configurations > Enterprise Search
Turn on the **Enable** toggle to make the **Search** option available to end users in the application.
When Enterprise Search is enabled, select one enterprise knowledge source from the configured sources. The platform uses the selected source for all search results shown to end users. You can change the selected source at any time.
***
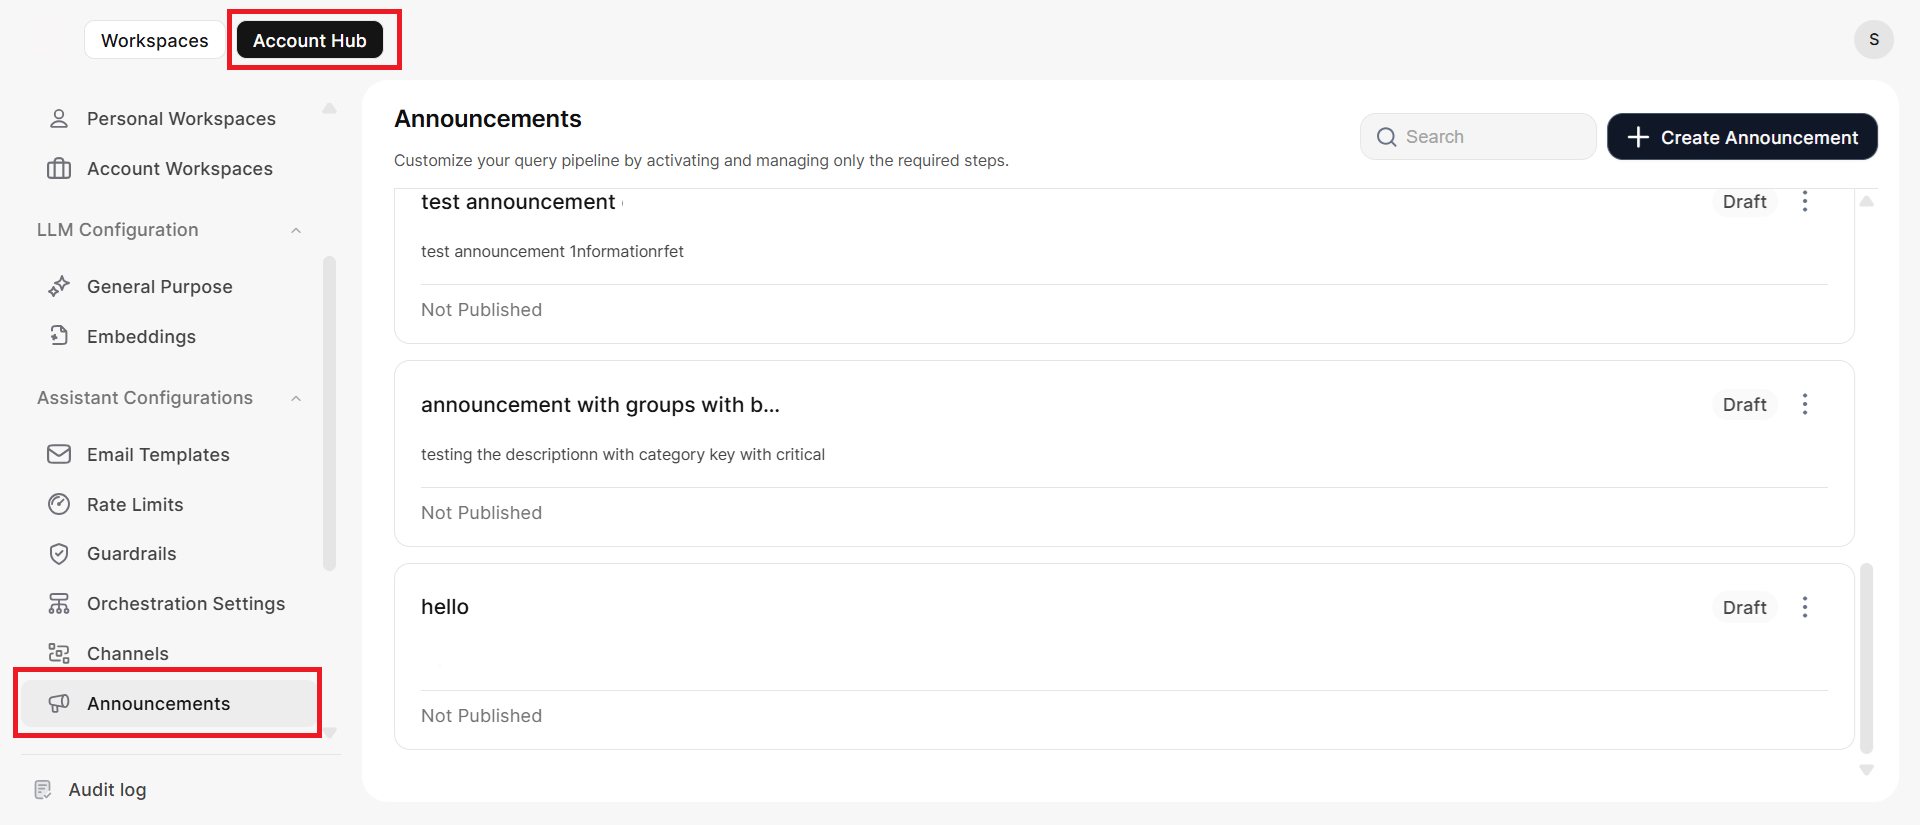
## Announcements
The Announcements feature lets administrators create, manage, and publish organizational messages as banners at the top of the user interface.
**Navigation**: Account Hub → Assistant Configurations → Announcements
 ### Create an Announcement
1. Click **Create Announcement**.
2. Complete the required fields:
| Field | Details |
| --------------------- | ------------------------------------------------------------------------------------------------------- |
| **Name** | Up to 80 characters |
| **Description** | Up to 800 characters; supports bold, italic, underline, hyperlinks, colors, bullets, and numbered lists |
| **Announcement Type** | Banner (currently the only option) |
| **Publish To** | Everyone in the account, or specific agents/users |
### Create an Announcement
1. Click **Create Announcement**.
2. Complete the required fields:
| Field | Details |
| --------------------- | ------------------------------------------------------------------------------------------------------- |
| **Name** | Up to 80 characters |
| **Description** | Up to 800 characters; supports bold, italic, underline, hyperlinks, colors, bullets, and numbered lists |
| **Announcement Type** | Banner (currently the only option) |
| **Publish To** | Everyone in the account, or specific agents/users |
 ### Actions
| Action | Description |
| ------------- | ------------------------------------------------------------- |
| **Preview** | View the banner before publishing |
| **Publish** | Make the announcement visible (requires Name and Description) |
| **Unpublish** | Remove a published announcement from view |
| **Delete** | Permanently remove any announcement, published or not |
### Manage Published Announcements
Editing a published announcement prompts you to either **Discard changes** or **Publish changes**.
You must publish again to push changes to users. The system prompts you to publish or discard modifications to keep updates intentional and controlled.
### Actions
| Action | Description |
| ------------- | ------------------------------------------------------------- |
| **Preview** | View the banner before publishing |
| **Publish** | Make the announcement visible (requires Name and Description) |
| **Unpublish** | Remove a published announcement from view |
| **Delete** | Permanently remove any announcement, published or not |
### Manage Published Announcements
Editing a published announcement prompts you to either **Discard changes** or **Publish changes**.
You must publish again to push changes to users. The system prompts you to publish or discard modifications to keep updates intentional and controlled.
 ### End-User Experience
* Announcements appear as banners at the top of the screen.
* Multiple announcements rotate every **10 seconds**.
* Each banner includes a **Dismiss** button:
* Dismissing hides the banner for the current session.
* The banner reappears after a page refresh or after one hour.
***
## Email Templates
Email Templates let you customize the invitation emails sent when users are added to the account, a workspace, or specific applications.
**Navigation**: Account Hub → Assistant Configurations → Email Templates
### Template Categories
#### Admin Templates
| Template | Sent When |
| --------------------------- | ----------------------------------------- |
| **Admin Invitation** | A user is added as an Admin |
| **Custom Admin Invitation** | A user is assigned a custom admin role |
| **Workspace Invitation** | A user is invited to a specific workspace |
#### Application Templates
Each provisioned application has a **Member Invitation** template sent when a user is added as a member. Each application maintains its own separate template.
### Customize a Template
1. Use the toggle to **enable or disable** the template.
2. Click the template to open the editor.
3. Edit the **subject line** and **email body**.
4. **Preview** the email to verify appearance.
5. Add links to relevant resources (such as the Admin Console) for easy access.
### Template Management
* Templates are organized by application; all provisioned applications appear in the list.
* Default subject and body text are provided and can be modified.
* Changes apply to all future invitations of that type.
* Admins and Custom Admins can review and adjust templates before the system sends invitations.
***
## Guardrails
Guardrails is a multi-layered security and compliance framework that automatically scans AI inputs and outputs to protect sensitive data and enforce content policies.
**Navigation**: Account Hub → Assistant Configurations → Guardrails
### End-User Experience
* Announcements appear as banners at the top of the screen.
* Multiple announcements rotate every **10 seconds**.
* Each banner includes a **Dismiss** button:
* Dismissing hides the banner for the current session.
* The banner reappears after a page refresh or after one hour.
***
## Email Templates
Email Templates let you customize the invitation emails sent when users are added to the account, a workspace, or specific applications.
**Navigation**: Account Hub → Assistant Configurations → Email Templates
### Template Categories
#### Admin Templates
| Template | Sent When |
| --------------------------- | ----------------------------------------- |
| **Admin Invitation** | A user is added as an Admin |
| **Custom Admin Invitation** | A user is assigned a custom admin role |
| **Workspace Invitation** | A user is invited to a specific workspace |
#### Application Templates
Each provisioned application has a **Member Invitation** template sent when a user is added as a member. Each application maintains its own separate template.
### Customize a Template
1. Use the toggle to **enable or disable** the template.
2. Click the template to open the editor.
3. Edit the **subject line** and **email body**.
4. **Preview** the email to verify appearance.
5. Add links to relevant resources (such as the Admin Console) for easy access.
### Template Management
* Templates are organized by application; all provisioned applications appear in the list.
* Default subject and body text are provided and can be modified.
* Changes apply to all future invitations of that type.
* Admins and Custom Admins can review and adjust templates before the system sends invitations.
***
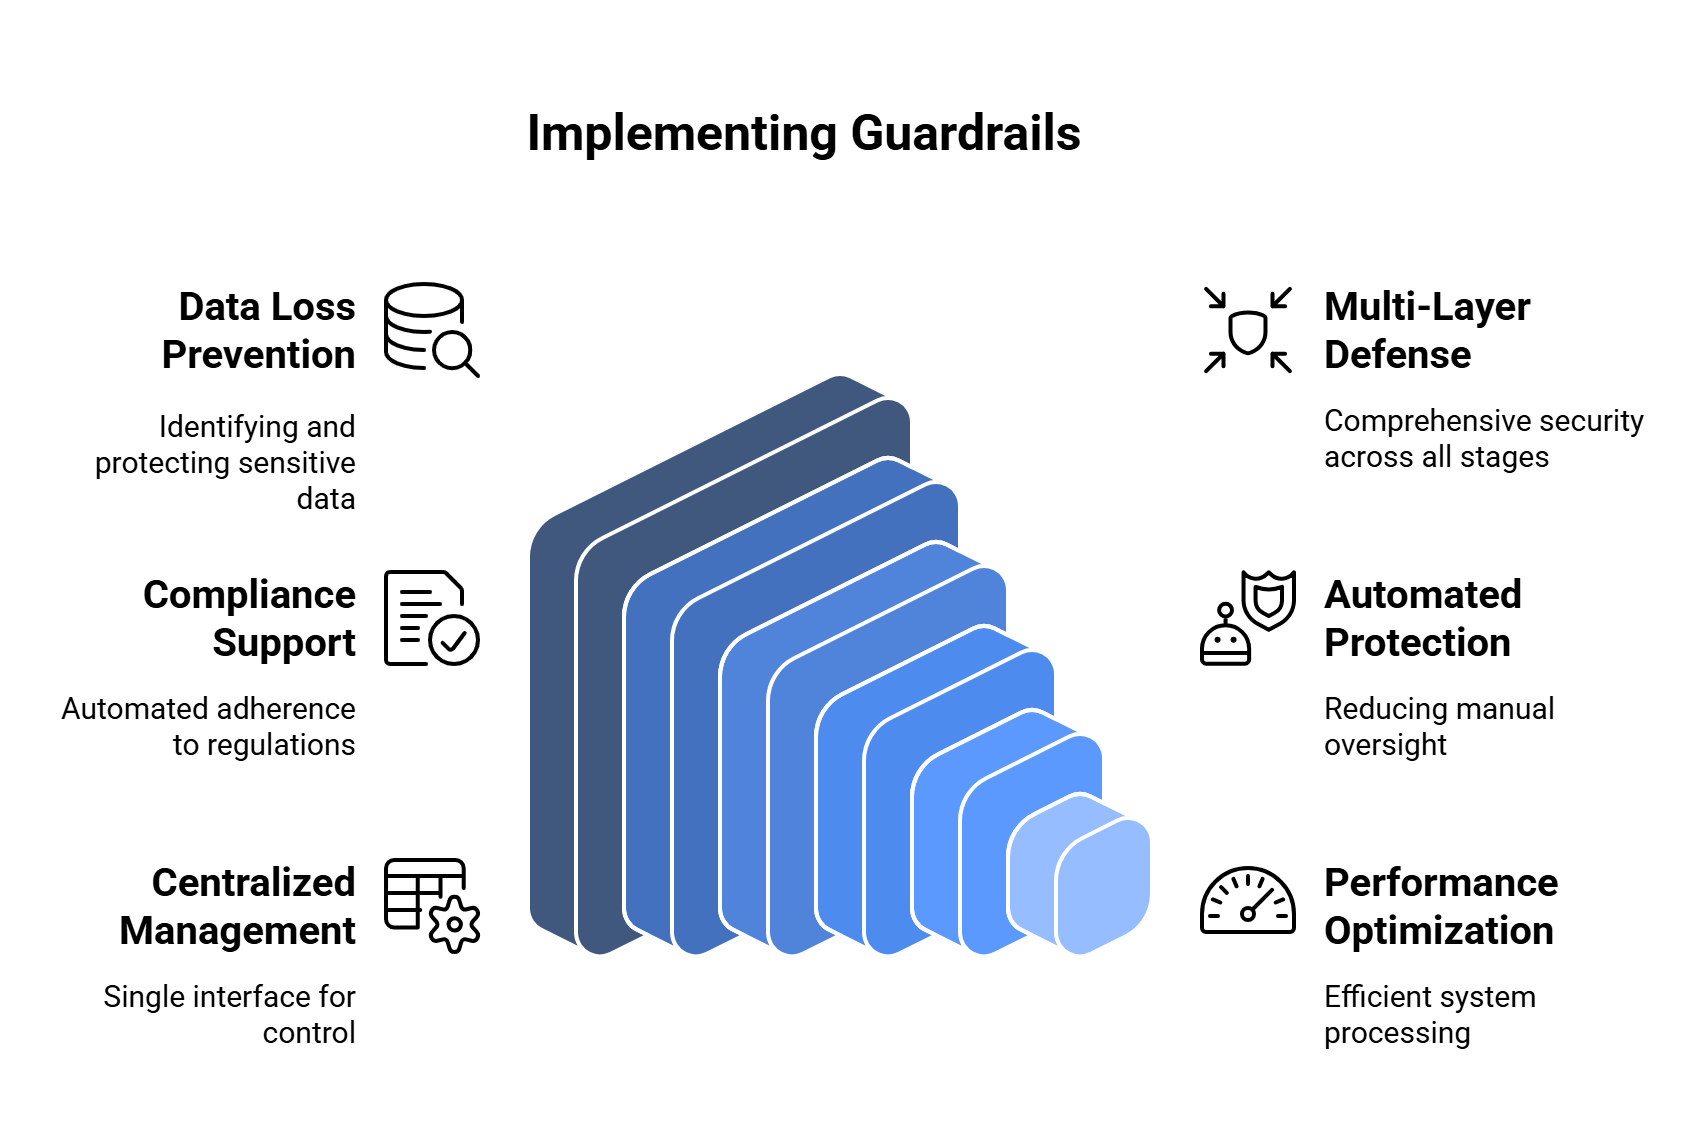
## Guardrails
Guardrails is a multi-layered security and compliance framework that automatically scans AI inputs and outputs to protect sensitive data and enforce content policies.
**Navigation**: Account Hub → Assistant Configurations → Guardrails
 ### Setup
1. Go to **Guardrails** in Account Hub.
### Setup
1. Go to **Guardrails** in Account Hub.
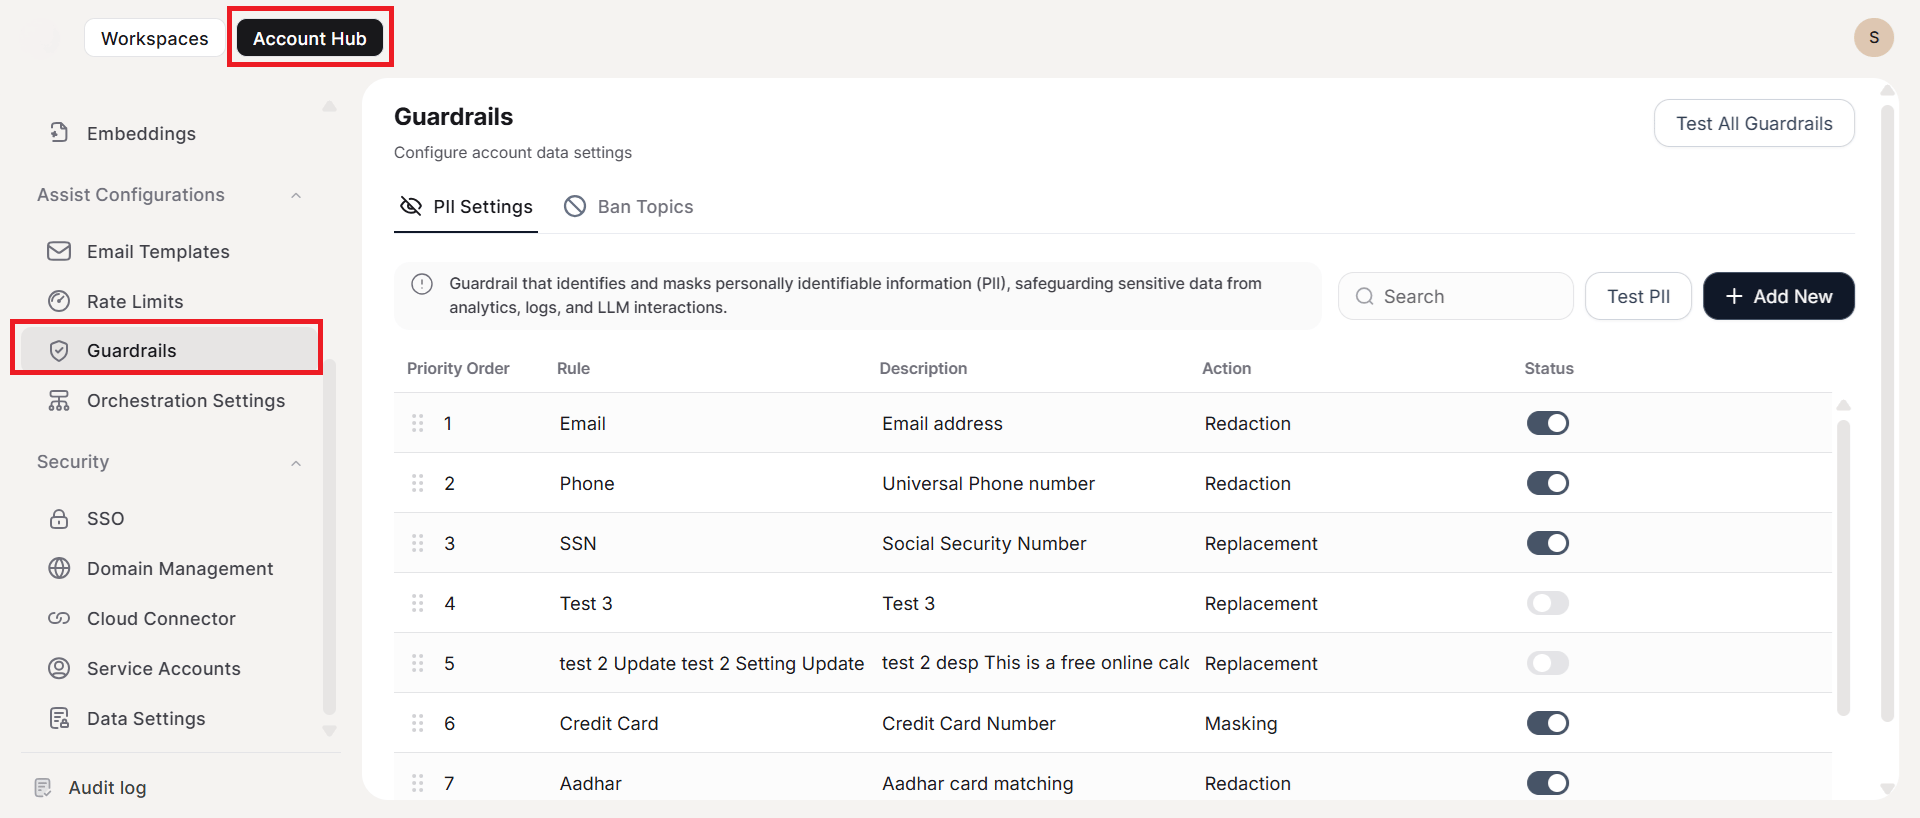 2. Review pre-configured PII detection rules.
3. Set up content restrictions for your organization.
4. Validate configurations using the integrated testing suite.
### Interface Layout
The Guardrails interface has three sections: **PII Settings**, **Ban Topics**, and **Testing Suite**.
### PII Settings
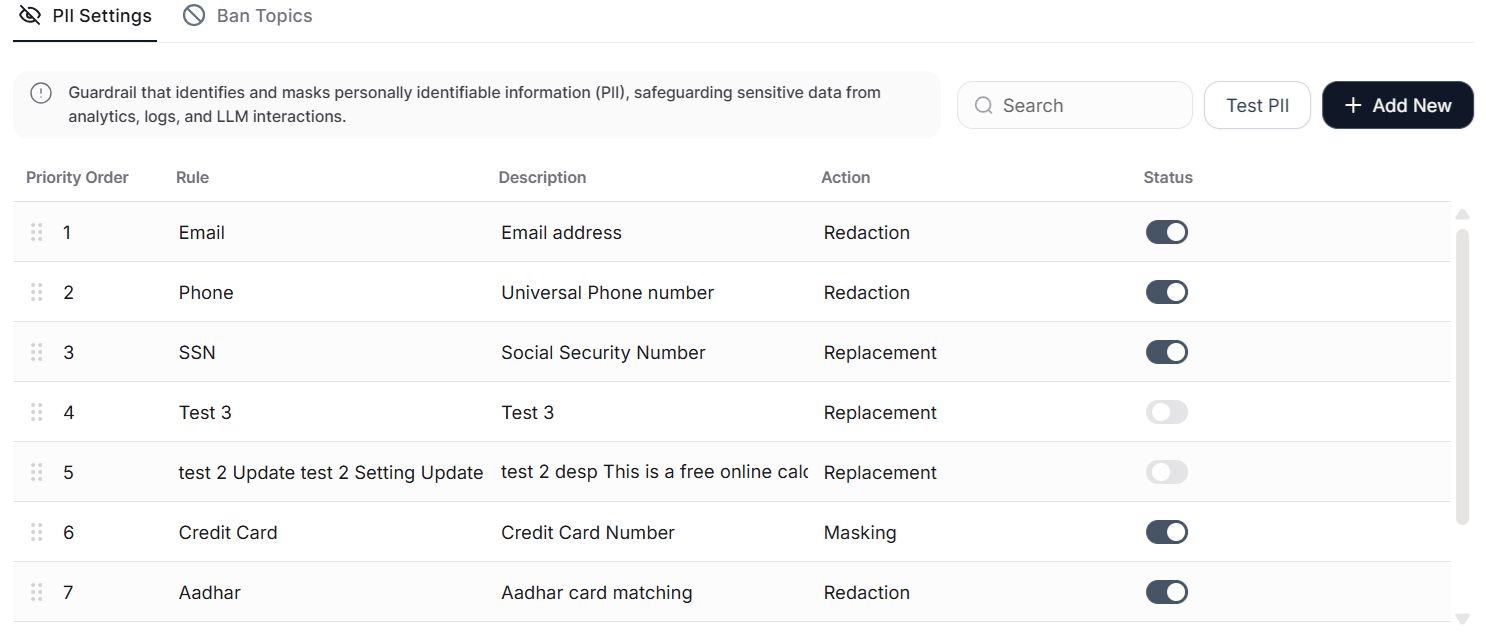
Pre-configured rules detect common PII types:
| Rule | Detects |
| --------------------------- | ---------------------------------------- |
| **Email Address** | Email patterns across various formats |
| **Universal Phone Numbers** | Domestic and international phone formats |
| **Social Security Numbers** | SSN patterns with format validation |
| **Credit Card Numbers** | Major credit card number formats |
2. Review pre-configured PII detection rules.
3. Set up content restrictions for your organization.
4. Validate configurations using the integrated testing suite.
### Interface Layout
The Guardrails interface has three sections: **PII Settings**, **Ban Topics**, and **Testing Suite**.
### PII Settings
Pre-configured rules detect common PII types:
| Rule | Detects |
| --------------------------- | ---------------------------------------- |
| **Email Address** | Email patterns across various formats |
| **Universal Phone Numbers** | Domestic and international phone formats |
| **Social Security Numbers** | SSN patterns with format validation |
| **Credit Card Numbers** | Major credit card number formats |
 #### Add or Update a Rule
Create custom detection patterns using regular expressions:
| Field | Description |
| --------------- | ------------------------------------------------- |
| **Name** | Unique identifier for the rule |
| **Description** | What the rule detects |
| **Regex** | Pattern used to match sensitive data |
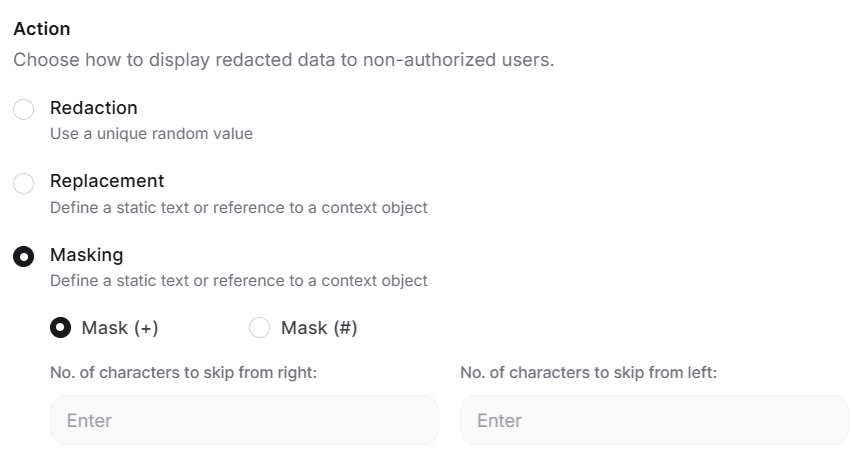
| **Action** | How redacted data appears to non-authorized users |
**Action types:**
| Action | Behavior |
| ---------------------- | ------------------------------------------------------------ |
| **Redaction** | Removes sensitive data from text |
| **Static Replacement** | Substitutes with predefined safe text |
| **Masking** | Replaces with placeholder characters (e.g., `****` or `XXX`) |
#### Add or Update a Rule
Create custom detection patterns using regular expressions:
| Field | Description |
| --------------- | ------------------------------------------------- |
| **Name** | Unique identifier for the rule |
| **Description** | What the rule detects |
| **Regex** | Pattern used to match sensitive data |
| **Action** | How redacted data appears to non-authorized users |
**Action types:**
| Action | Behavior |
| ---------------------- | ------------------------------------------------------------ |
| **Redaction** | Removes sensitive data from text |
| **Static Replacement** | Substitutes with predefined safe text |
| **Masking** | Replaces with placeholder characters (e.g., `****` or `XXX`) |
 ### Ban Topics
Ban Topics prevents AI models from engaging with prohibited subjects by dynamically modifying input prompts in real time, ensuring consistent compliance across all AI interactions.
| Feature | Description |
| ------------------- | --------------------------------------------------------------- |
| **Template System** | Pre-defined restriction sets based on common industry standards |
| **Custom Prompts** | Create detailed, context-specific content restrictions |
| **Enable/Disable** | Toggle built-in or custom restrictions individually as needed |
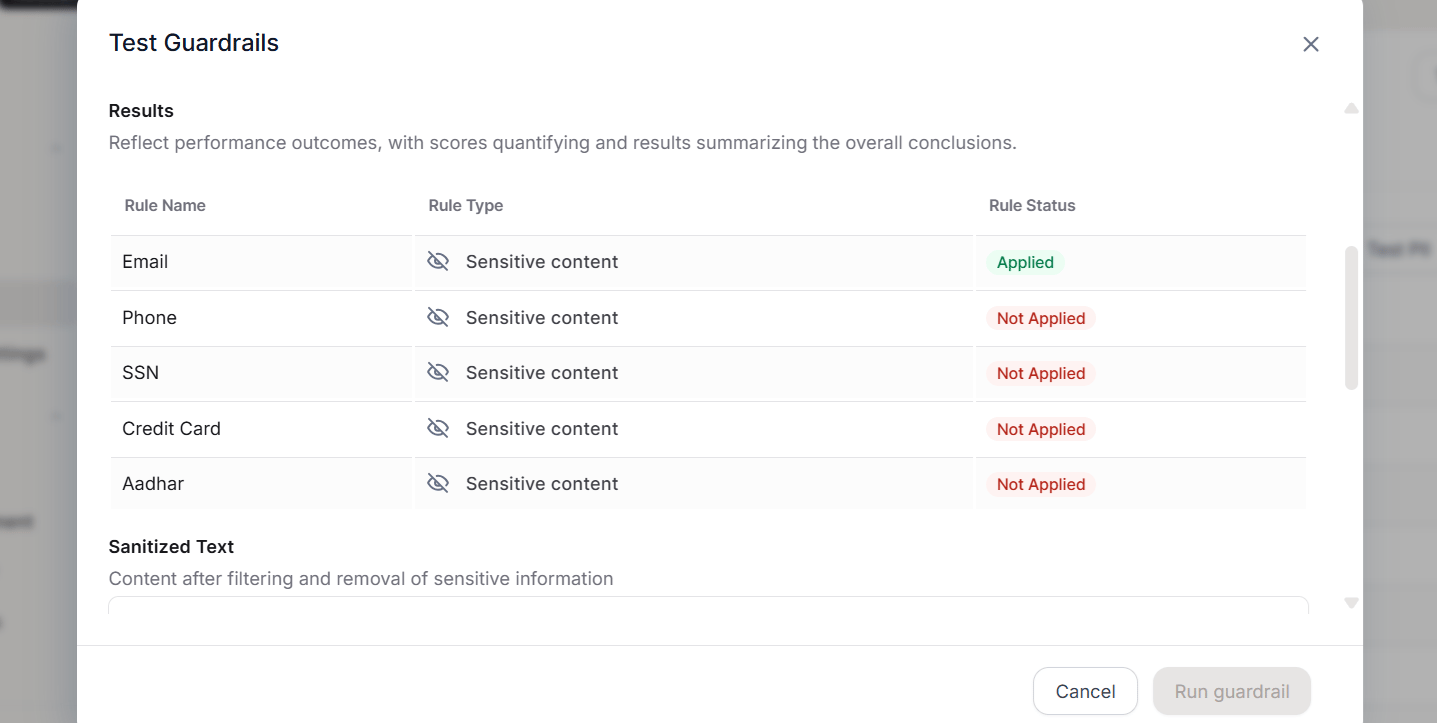
### Testing Suite
Validate guardrail configurations in an isolated environment before deploying them:
* Run full or targeted validation of PII rules and banned topics.
* Use manual, AI-driven, or batch test inputs, including boundary condition testing.
* Analyze results by rule, impact status, processing duration, and output.
* Preview data sanitization visually.
### Ban Topics
Ban Topics prevents AI models from engaging with prohibited subjects by dynamically modifying input prompts in real time, ensuring consistent compliance across all AI interactions.
| Feature | Description |
| ------------------- | --------------------------------------------------------------- |
| **Template System** | Pre-defined restriction sets based on common industry standards |
| **Custom Prompts** | Create detailed, context-specific content restrictions |
| **Enable/Disable** | Toggle built-in or custom restrictions individually as needed |
### Testing Suite
Validate guardrail configurations in an isolated environment before deploying them:
* Run full or targeted validation of PII rules and banned topics.
* Use manual, AI-driven, or batch test inputs, including boundary condition testing.
* Analyze results by rule, impact status, processing duration, and output.
* Preview data sanitization visually.
 ***
## MCP Server
The MCP Server feature lets administrators create and manage Model Context Protocol (MCP) servers that expose agents, prebuilt tools, and enterprise knowledge sources as tools. Administrators control which tools each server provides, how clients authenticate, and which users can access the server. MCP-compatible clients connect to a server through its unique URL to run tasks and orchestrate workflows.
**Navigation**: Admin Console > Assistant Configurations > MCP Server
***
## MCP Server
The MCP Server feature lets administrators create and manage Model Context Protocol (MCP) servers that expose agents, prebuilt tools, and enterprise knowledge sources as tools. Administrators control which tools each server provides, how clients authenticate, and which users can access the server. MCP-compatible clients connect to a server through its unique URL to run tasks and orchestrate workflows.
**Navigation**: Admin Console > Assistant Configurations > MCP Server
 ### Server List
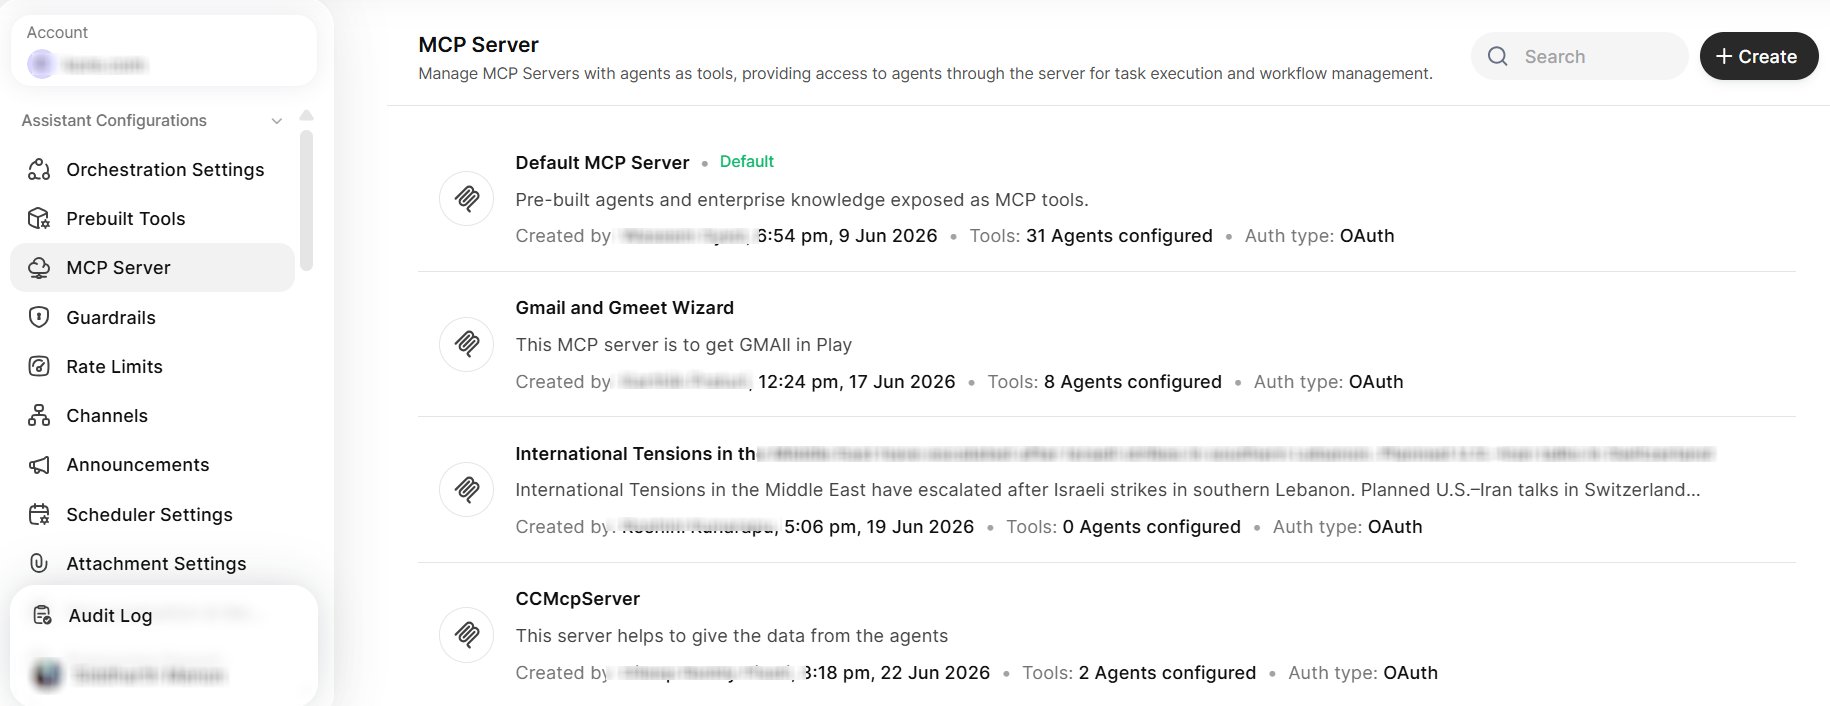
The MCP Server page lists every server in the account. Each server entry displays the creator, the creation date, the number of configured tools, and the authentication type. Use the **Search** box to find a server by name. Select **Create** to start the server creation wizard.
The page includes a pre-provisioned **Default MCP Server** that the platform marks with a **Default** label.
### Default MCP Server
Every account includes a **Default MCP Server** that requires no setup and is ready on first access. The Default MCP Server exposes the account's prebuilt agents and enterprise knowledge sources as MCP tools.
### Create a Server
Select **Create** to open the server creation wizard. The wizard guides you through four steps: **Details**, **Tools**, **Auth settings**, and **Access limits**.
#### Details
Enter a **Server Name** and a **Description**. Select **Continue** to create the server and generate its unique **Remote MCP URL**. The wizard displays this URL on the remaining steps, where you can copy it.
#### Tools
Configure the tools that the server exposes. The Tools step has two sections: **Prebuilt tools** and **Custom tools**.
**Prebuilt tools**
The **Prebuilt tools** section lists every available prebuilt agent, such as `M365 Email`, `Jira`, `Zendesk`, and `Slack`. Each entry shows the number of tools the agent provides. Select an agent to expand it and view the individual tools, each with a description. Select or clear individual tools to control what the server exposes. Use the **Search** box to find a specific prebuilt tool.
**Custom tools**
The **Custom tools** section lists the custom agents that you add to the server. **Work Orchestrator** and **Enterprise Knowledge Sources** appear in this section by default when configured in the account, and remain unselected until you select them.
To add a custom tool:
1. Select **+ Tool** to open the **Add agents** panel. The panel lists agents across all workspaces in the account, along with the total agent count.
2. Use the **Search agent** box to find an agent.
3. Select one or more agents.
4. Select **Add**.
The platform pre-populates each custom tool with the agent's purpose as its tool description.
To edit a tool description, hover over a custom tool and select **Edit description**. Edit the description inline. The platform applies edited descriptions to all items in the custom tools list, including **Enterprise Knowledge Sources** and **Work Orchestrator**, and preserves them within this server's configuration.
To remove a custom tool, hover over the tool and select the remove option. To add a removed tool again, select **+ Tool** and select it from the **Add agents** panel.
**Auth settings**
Select the authentication method that clients use to connect to the server:
| Method | Description |
| --------------- | --------------------------------------------------------- |
| **OAuth** | Clients authenticate through an OAuth-based flow. |
| **Auth Tokens** | Clients authenticate with an authentication or API token. |
**Access limits**
Set which users in the account can access the server:
| Option | Access |
| ----------------- | --------------------------------------------------------------------------------------------------------------------------------- |
| **Everyone** | All users in the account can access the server. This is the default. |
| **Limited users** | Only the selected users or user groups can access the server. Use the directory picker to search for and select users and groups. |
| **None** | No users can access the server, which makes the server inaccessible. |
***
## Rate Limits
Rate Limits control how many query points users consume over a configurable time window, helping manage system resources and usage.
**Navigation**: Account Hub → Assistant Configurations → Rate Limits
### Server List
The MCP Server page lists every server in the account. Each server entry displays the creator, the creation date, the number of configured tools, and the authentication type. Use the **Search** box to find a server by name. Select **Create** to start the server creation wizard.
The page includes a pre-provisioned **Default MCP Server** that the platform marks with a **Default** label.
### Default MCP Server
Every account includes a **Default MCP Server** that requires no setup and is ready on first access. The Default MCP Server exposes the account's prebuilt agents and enterprise knowledge sources as MCP tools.
### Create a Server
Select **Create** to open the server creation wizard. The wizard guides you through four steps: **Details**, **Tools**, **Auth settings**, and **Access limits**.
#### Details
Enter a **Server Name** and a **Description**. Select **Continue** to create the server and generate its unique **Remote MCP URL**. The wizard displays this URL on the remaining steps, where you can copy it.
#### Tools
Configure the tools that the server exposes. The Tools step has two sections: **Prebuilt tools** and **Custom tools**.
**Prebuilt tools**
The **Prebuilt tools** section lists every available prebuilt agent, such as `M365 Email`, `Jira`, `Zendesk`, and `Slack`. Each entry shows the number of tools the agent provides. Select an agent to expand it and view the individual tools, each with a description. Select or clear individual tools to control what the server exposes. Use the **Search** box to find a specific prebuilt tool.
**Custom tools**
The **Custom tools** section lists the custom agents that you add to the server. **Work Orchestrator** and **Enterprise Knowledge Sources** appear in this section by default when configured in the account, and remain unselected until you select them.
To add a custom tool:
1. Select **+ Tool** to open the **Add agents** panel. The panel lists agents across all workspaces in the account, along with the total agent count.
2. Use the **Search agent** box to find an agent.
3. Select one or more agents.
4. Select **Add**.
The platform pre-populates each custom tool with the agent's purpose as its tool description.
To edit a tool description, hover over a custom tool and select **Edit description**. Edit the description inline. The platform applies edited descriptions to all items in the custom tools list, including **Enterprise Knowledge Sources** and **Work Orchestrator**, and preserves them within this server's configuration.
To remove a custom tool, hover over the tool and select the remove option. To add a removed tool again, select **+ Tool** and select it from the **Add agents** panel.
**Auth settings**
Select the authentication method that clients use to connect to the server:
| Method | Description |
| --------------- | --------------------------------------------------------- |
| **OAuth** | Clients authenticate through an OAuth-based flow. |
| **Auth Tokens** | Clients authenticate with an authentication or API token. |
**Access limits**
Set which users in the account can access the server:
| Option | Access |
| ----------------- | --------------------------------------------------------------------------------------------------------------------------------- |
| **Everyone** | All users in the account can access the server. This is the default. |
| **Limited users** | Only the selected users or user groups can access the server. Use the directory picker to search for and select users and groups. |
| **None** | No users can access the server, which makes the server inaccessible. |
***
## Rate Limits
Rate Limits control how many query points users consume over a configurable time window, helping manage system resources and usage.
**Navigation**: Account Hub → Assistant Configurations → Rate Limits
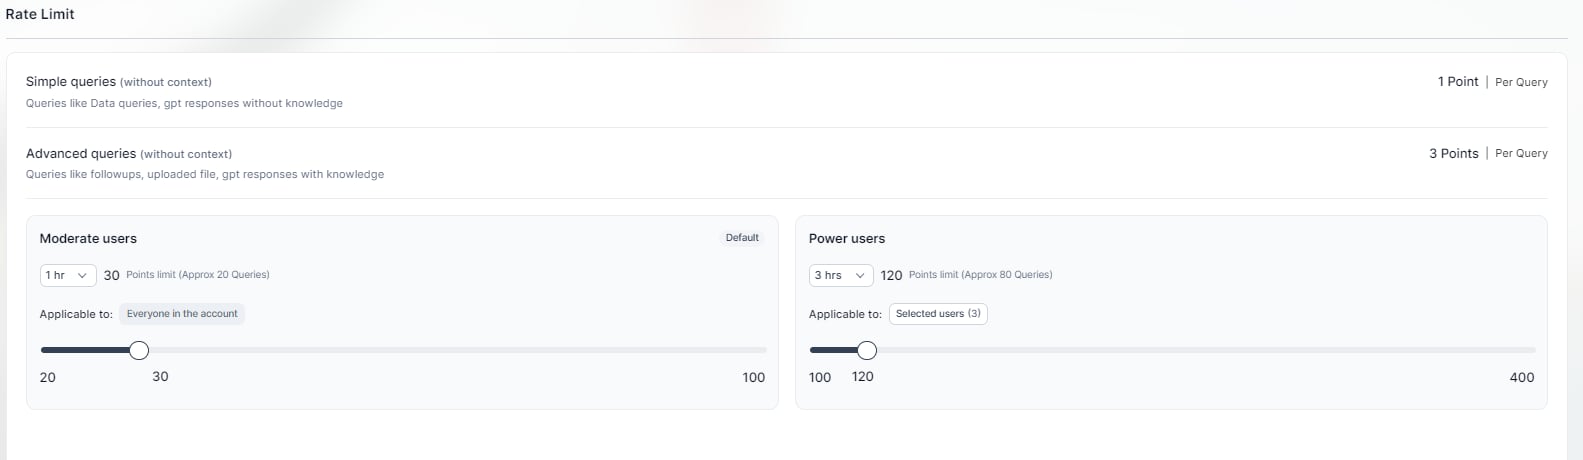 ### Point Consumption
| Query Type | Points | Examples |
| ------------ | -------- | ----------------------------------------------------------------- |
| **Simple** | 1 point | Small talk, context-free queries, GPT responses without knowledge |
| **Advanced** | 3 points | GPT with knowledge, context-aware queries, follow-up queries |
### User Categories
| Category | Description |
| ------------------ | ---------------------------------------------------------- |
| **Moderate Users** | Default for all account users |
| **Power Users** | Added to a separate list; subject to different rate limits |
Admins can add users to, remove users from, or clear the entire Power User list.
### Time Windows
Select the duration over which points are tracked:
* 1 hour
* 3 hours
* 6 hours
* 12 hours
View point consumption per query in the **Logs** tab of the dashboard.
All queries — including small talk and interrupted queries — consume points. Points are not counted if an error occurs while answering a query.
***
## Scheduler Settings
Scheduler Settings lets administrators configure account-wide controls for automated agent execution, including availability, usage limits, and workspace permissions.
**Navigation**: Account Hub → Assistant Configurations → Scheduler Settings
### Enable Scheduler
Control whether users can access scheduling functionality for agents.
| State | Effect |
| ------- | ------------------------------------------------------- |
| **On** | Users can create and manage schedulers for their agents |
| **Off** | Scheduling is disabled for all users |
### Scheduling Limit per User
Set the maximum number of active schedulers each user can create simultaneously:
* No Limit
* 5 schedulers
* 10 schedulers
* 20 schedulers
* 30 schedulers
Select the limit that aligns with your organization's automation needs and resource capacity.
### Workspace Owner Permissions
When enabled, workspace owners can:
* Add schedulers during the agent creation workflow.
* Publish agents with pre-configured schedules.
* Set schedulers to run automatically for all end users.
End users receive agents with active schedulers but retain control to disable any scheduler they don't need.
For agent-level scheduler configuration, see [Schedule Trigger](/ai-for-work/custom-agents/agent-management#schedule-trigger).
***
## Language Settings
The following languages are supported:
| Language | Code |
| ------------ | ---- |
| English (US) | `en` |
| Arabic | `ar` |
| German | `de` |
| Spanish | `es` |
| French | `fr` |
| Japanese | `ja` |
| Thai | `th` |
Administrators can set a default language for the account. Users can override this selection from **Settings** > **Language** in the end-user application.
***
## Attachment Settings
Attachment Settings let administrators control whether end users can upload file attachments in the compose bar and configure how the platform processes those attachments.
**Navigation**: Account Hub → Assistant Configurations → Attachment Settings
### Enable Uploading Attachments in Compose Bar
Use the **Enable Uploading Attachments in Compose Bar** toggle to control whether end users can upload files when asking queries.
| State | Effect |
| ------- | --------------------------------------------------------------------------------------------------- |
| **On** | End users see the attachment option in the compose bar and can upload files alongside their queries |
| **Off** | The platform hides the attachment option from the compose bar for all end users |
You can enable attachment uploads only if at least one LLM model is configured in the platform. If no LLM model is available, the toggle remains disabled and the platform displays a banner prompting you to configure an LLM model first.
### LLM Model Selection
When you enable attachment uploads, the platform displays an **LLM model selection** dropdown below the toggle.
* The platform selects the **default LLM model** automatically.
* You can change the LLM model used for processing attachments at any time.
* Changes to the LLM model take effect immediately for all subsequent queries.
### Allow Attachments Larger Than Model Context
A separate toggle controls whether end users can upload files that exceed the selected model's context size.
| State | Behavior |
| ------- | ----------------------------------------------------------------------------------------------------------------------------- |
| **Off** | The platform restricts uploaded files to the selected model's context size limit |
| **On** | The platform accepts files larger than the model's context size and processes them using RAG (Retrieval-Augmented Generation) |
When enabled, select one of the following RAG processing options:
| Option | Description |
| ------------------------- | ------------------------------------------------------------------------------------------------------------------------------------------------------------------------------------------------------------------------------------------------------ |
| **Platform Built-in RAG** | Uses the platform's built-in RAG capability to process and retrieve content from large attachments. Displays a **Select Embedding Model** dropdown; the Kore embedding model is selected by default. Only embedding-capable models appear in the list. |
| **LLM-Provided RAG** | Uses the selected LLM's native RAG or file-handling capabilities. Available only if the chosen LLM model supports the required APIs. |
Switching between RAG options or changing the embedding model removes all currently uploaded files across the account. The platform prompts you to confirm before applying the change.
***
## Personalisation and Memory
Personalisation and Memory lets administrators configure the assistant's ability to generate user memory and deliver personalized responses.
**Navigation**: Admin Console > Assistant Configurations > Personalisation and Memory
### Point Consumption
| Query Type | Points | Examples |
| ------------ | -------- | ----------------------------------------------------------------- |
| **Simple** | 1 point | Small talk, context-free queries, GPT responses without knowledge |
| **Advanced** | 3 points | GPT with knowledge, context-aware queries, follow-up queries |
### User Categories
| Category | Description |
| ------------------ | ---------------------------------------------------------- |
| **Moderate Users** | Default for all account users |
| **Power Users** | Added to a separate list; subject to different rate limits |
Admins can add users to, remove users from, or clear the entire Power User list.
### Time Windows
Select the duration over which points are tracked:
* 1 hour
* 3 hours
* 6 hours
* 12 hours
View point consumption per query in the **Logs** tab of the dashboard.
All queries — including small talk and interrupted queries — consume points. Points are not counted if an error occurs while answering a query.
***
## Scheduler Settings
Scheduler Settings lets administrators configure account-wide controls for automated agent execution, including availability, usage limits, and workspace permissions.
**Navigation**: Account Hub → Assistant Configurations → Scheduler Settings
### Enable Scheduler
Control whether users can access scheduling functionality for agents.
| State | Effect |
| ------- | ------------------------------------------------------- |
| **On** | Users can create and manage schedulers for their agents |
| **Off** | Scheduling is disabled for all users |
### Scheduling Limit per User
Set the maximum number of active schedulers each user can create simultaneously:
* No Limit
* 5 schedulers
* 10 schedulers
* 20 schedulers
* 30 schedulers
Select the limit that aligns with your organization's automation needs and resource capacity.
### Workspace Owner Permissions
When enabled, workspace owners can:
* Add schedulers during the agent creation workflow.
* Publish agents with pre-configured schedules.
* Set schedulers to run automatically for all end users.
End users receive agents with active schedulers but retain control to disable any scheduler they don't need.
For agent-level scheduler configuration, see [Schedule Trigger](/ai-for-work/custom-agents/agent-management#schedule-trigger).
***
## Language Settings
The following languages are supported:
| Language | Code |
| ------------ | ---- |
| English (US) | `en` |
| Arabic | `ar` |
| German | `de` |
| Spanish | `es` |
| French | `fr` |
| Japanese | `ja` |
| Thai | `th` |
Administrators can set a default language for the account. Users can override this selection from **Settings** > **Language** in the end-user application.
***
## Attachment Settings
Attachment Settings let administrators control whether end users can upload file attachments in the compose bar and configure how the platform processes those attachments.
**Navigation**: Account Hub → Assistant Configurations → Attachment Settings
### Enable Uploading Attachments in Compose Bar
Use the **Enable Uploading Attachments in Compose Bar** toggle to control whether end users can upload files when asking queries.
| State | Effect |
| ------- | --------------------------------------------------------------------------------------------------- |
| **On** | End users see the attachment option in the compose bar and can upload files alongside their queries |
| **Off** | The platform hides the attachment option from the compose bar for all end users |
You can enable attachment uploads only if at least one LLM model is configured in the platform. If no LLM model is available, the toggle remains disabled and the platform displays a banner prompting you to configure an LLM model first.
### LLM Model Selection
When you enable attachment uploads, the platform displays an **LLM model selection** dropdown below the toggle.
* The platform selects the **default LLM model** automatically.
* You can change the LLM model used for processing attachments at any time.
* Changes to the LLM model take effect immediately for all subsequent queries.
### Allow Attachments Larger Than Model Context
A separate toggle controls whether end users can upload files that exceed the selected model's context size.
| State | Behavior |
| ------- | ----------------------------------------------------------------------------------------------------------------------------- |
| **Off** | The platform restricts uploaded files to the selected model's context size limit |
| **On** | The platform accepts files larger than the model's context size and processes them using RAG (Retrieval-Augmented Generation) |
When enabled, select one of the following RAG processing options:
| Option | Description |
| ------------------------- | ------------------------------------------------------------------------------------------------------------------------------------------------------------------------------------------------------------------------------------------------------ |
| **Platform Built-in RAG** | Uses the platform's built-in RAG capability to process and retrieve content from large attachments. Displays a **Select Embedding Model** dropdown; the Kore embedding model is selected by default. Only embedding-capable models appear in the list. |
| **LLM-Provided RAG** | Uses the selected LLM's native RAG or file-handling capabilities. Available only if the chosen LLM model supports the required APIs. |
Switching between RAG options or changing the embedding model removes all currently uploaded files across the account. The platform prompts you to confirm before applying the change.
***
## Personalisation and Memory
Personalisation and Memory lets administrators configure the assistant's ability to generate user memory and deliver personalized responses.
**Navigation**: Admin Console > Assistant Configurations > Personalisation and Memory
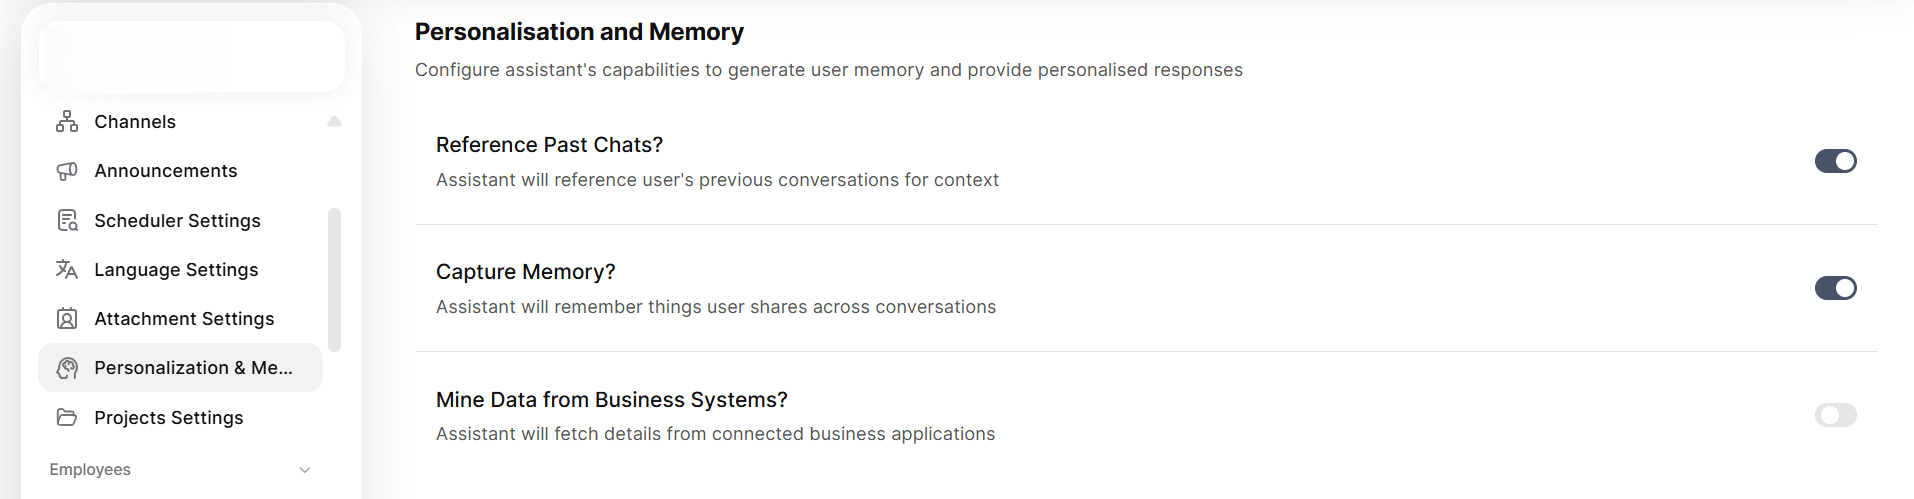 The page provides three account-wide toggles:
| Setting | Description |
| ------------------------------------ | ------------------------------------------------------------------------ |
| **Reference Past Chats?** | The assistant references the user's previous conversations for context |
| **Capture Memory?** | The assistant remembers information the user shares across conversations |
| **Mine Data from Business Systems?** | The assistant fetches details from connected business applications |
When an administrator turns on **Capture Memory**, all existing end users see a one-time pop-up notification in the AI for Work app confirming that memory is active. Any new user who receives access while memory is enabled also sees this notification on first login.
Turning off Capture Memory stops new memory generation but does not delete existing memories. Users can manage their stored memories from the Personalisation and Memory widget on their profile page.
***
## Projects Settings
Projects Settings lets administrators configure project features, model selection, and RAG capabilities for project-based queries and file processing.
**Navigation**: Account Hub → Assistant Configurations → Projects Settings
### Enable Projects
Use the **Enable Projects** toggle to control whether users can create and manage projects.
| State | Effect |
| ------- | ---------------------------------------------------------------------------------------- |
| **On** | Users can create projects, upload files, and use project content as a source for queries |
| **Off** | The Projects feature is hidden from all users |
### Model Selection
When Projects is enabled, the platform displays a **Model Selection** dropdown.
* The platform selects the default configured LLM model automatically.
* You can change the model used for processing project-based queries at any time.
* Models that support RAG display a **Supports RAG** label next to the model name.
### RAG Configuration
RAG (Retrieval-Augmented Generation) allows the platform to query large attachments that exceed context limits and to execute queries on project content.
Select one of the following RAG processing options:
| Option | Description |
| ------------------------- | ------------------------------------------------------------------------------------------------------------------------------------------------------------ |
| **Platform Built-in RAG** | Uses the platform's built-in RAG capability to process and retrieve content from large attachments within projects |
| **LLM-Provided RAG** | Uses the selected LLM's native RAG or file-handling capabilities to process large attachments. Available only if the chosen model supports the required APIs |
Switching between RAG options affects file processing across all projects in the account. The platform prompts you to confirm before applying the change.
***
The page provides three account-wide toggles:
| Setting | Description |
| ------------------------------------ | ------------------------------------------------------------------------ |
| **Reference Past Chats?** | The assistant references the user's previous conversations for context |
| **Capture Memory?** | The assistant remembers information the user shares across conversations |
| **Mine Data from Business Systems?** | The assistant fetches details from connected business applications |
When an administrator turns on **Capture Memory**, all existing end users see a one-time pop-up notification in the AI for Work app confirming that memory is active. Any new user who receives access while memory is enabled also sees this notification on first login.
Turning off Capture Memory stops new memory generation but does not delete existing memories. Users can manage their stored memories from the Personalisation and Memory widget on their profile page.
***
## Projects Settings
Projects Settings lets administrators configure project features, model selection, and RAG capabilities for project-based queries and file processing.
**Navigation**: Account Hub → Assistant Configurations → Projects Settings
### Enable Projects
Use the **Enable Projects** toggle to control whether users can create and manage projects.
| State | Effect |
| ------- | ---------------------------------------------------------------------------------------- |
| **On** | Users can create projects, upload files, and use project content as a source for queries |
| **Off** | The Projects feature is hidden from all users |
### Model Selection
When Projects is enabled, the platform displays a **Model Selection** dropdown.
* The platform selects the default configured LLM model automatically.
* You can change the model used for processing project-based queries at any time.
* Models that support RAG display a **Supports RAG** label next to the model name.
### RAG Configuration
RAG (Retrieval-Augmented Generation) allows the platform to query large attachments that exceed context limits and to execute queries on project content.
Select one of the following RAG processing options:
| Option | Description |
| ------------------------- | ------------------------------------------------------------------------------------------------------------------------------------------------------------ |
| **Platform Built-in RAG** | Uses the platform's built-in RAG capability to process and retrieve content from large attachments within projects |
| **LLM-Provided RAG** | Uses the selected LLM's native RAG or file-handling capabilities to process large attachments. Available only if the chosen model supports the required APIs |
Switching between RAG options affects file processing across all projects in the account. The platform prompts you to confirm before applying the change.
***