> ## Documentation Index
> Fetch the complete documentation index at: https://koreai.mintlify.site/llms.txt
> Use this file to discover all available pages before exploring further.
# Amazon Connect Integration with Kore using Amazon External Voice Connector (Voice Automation)
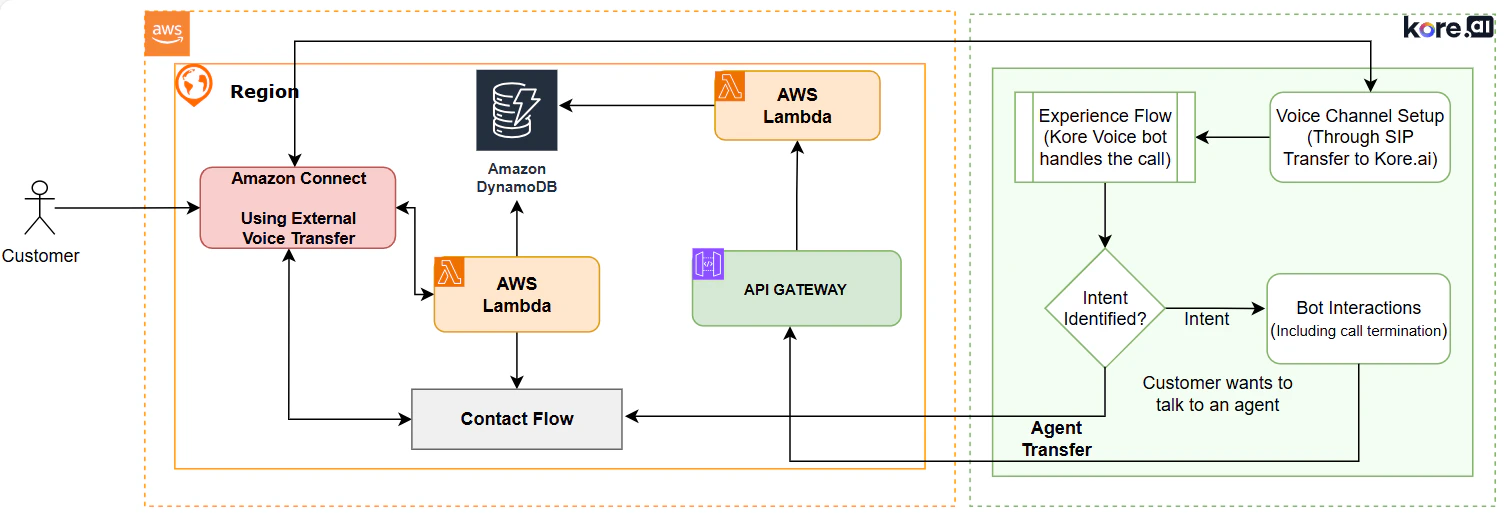
This document explains how to integrate Voice Automation with Amazon Connect using Amazon's external voice transfer capabilities. The integration enables voice transfers from Amazon Connect to a Voice Gateway and back through the Amazon Connect desktop.
## Architecture Diagram
 ## Prerequisites
* External voice transfer connectors per account with an AWS Connect instance turned on.
* A Kore voice AI agent trained with few use cases.
Amazon Connect external voice pricing is subject to change. For more details, refer to [Amazon Connect External Voice Pricing Changes](https://educronix.com/amazon-connect-external-voice-pricing-changes/) document.
## Set up Instructions
### 1. Enabling External Voice Transfer in Amazon Connect
Before setting up the integration, you must turn on the **External voice systems** option in your Amazon Connect instance. For more details, refer to [Set up Amazon Connect external voice transfer to an on-premise voice system](https://docs.aws.amazon.com/connect/latest/adminguide/external-voice-transfer.html).
* **Service Quota Increase**: Submit a **Service Quota Increase** request to Amazon Connect. Amazon Connect turns on this feature only after it approves your request.
* **Accessing the Option**: After approval, the **External voice systems** option appears in your Amazon Connect console.
## Prerequisites
* External voice transfer connectors per account with an AWS Connect instance turned on.
* A Kore voice AI agent trained with few use cases.
Amazon Connect external voice pricing is subject to change. For more details, refer to [Amazon Connect External Voice Pricing Changes](https://educronix.com/amazon-connect-external-voice-pricing-changes/) document.
## Set up Instructions
### 1. Enabling External Voice Transfer in Amazon Connect
Before setting up the integration, you must turn on the **External voice systems** option in your Amazon Connect instance. For more details, refer to [Set up Amazon Connect external voice transfer to an on-premise voice system](https://docs.aws.amazon.com/connect/latest/adminguide/external-voice-transfer.html).
* **Service Quota Increase**: Submit a **Service Quota Increase** request to Amazon Connect. Amazon Connect turns on this feature only after it approves your request.
* **Accessing the Option**: After approval, the **External voice systems** option appears in your Amazon Connect console.
 ### 2. Creating an External Voice Transfer Connector
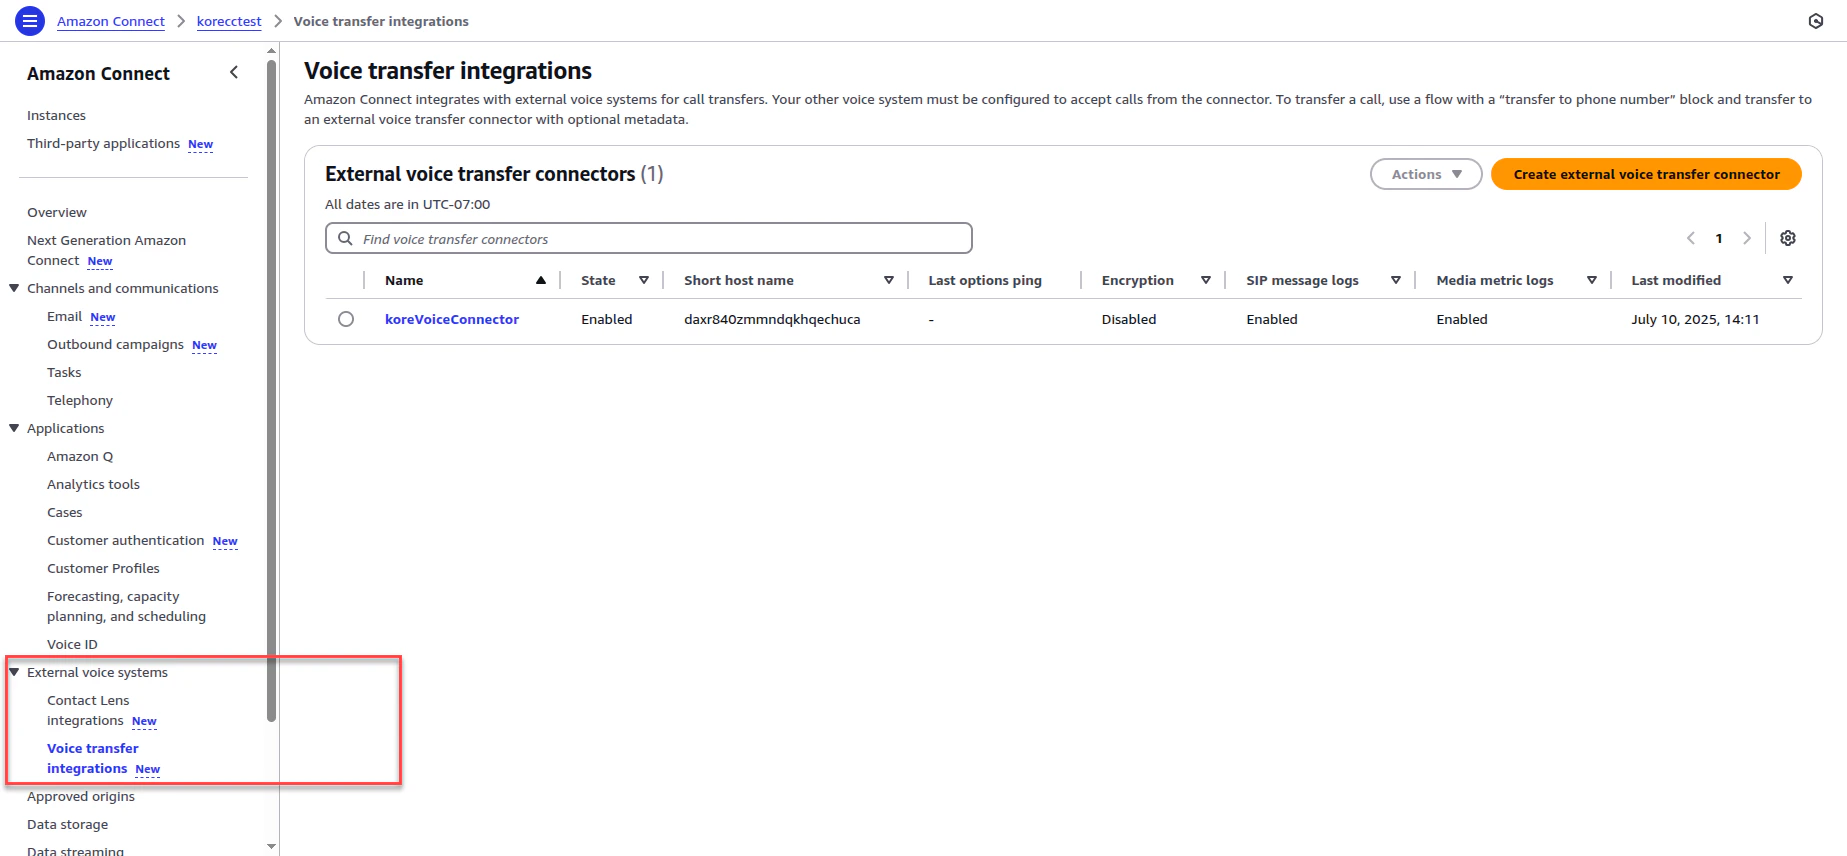
After turning on the feature, create a connector under **Voice transfer integrations** to link Amazon Connect with your Voice Gateway.
* **Navigate to Connector Creation**: Select the **External voice systems** option to open the connector creation screen.
### 2. Creating an External Voice Transfer Connector
After turning on the feature, create a connector under **Voice transfer integrations** to link Amazon Connect with your Voice Gateway.
* **Navigate to Connector Creation**: Select the **External voice systems** option to open the connector creation screen.
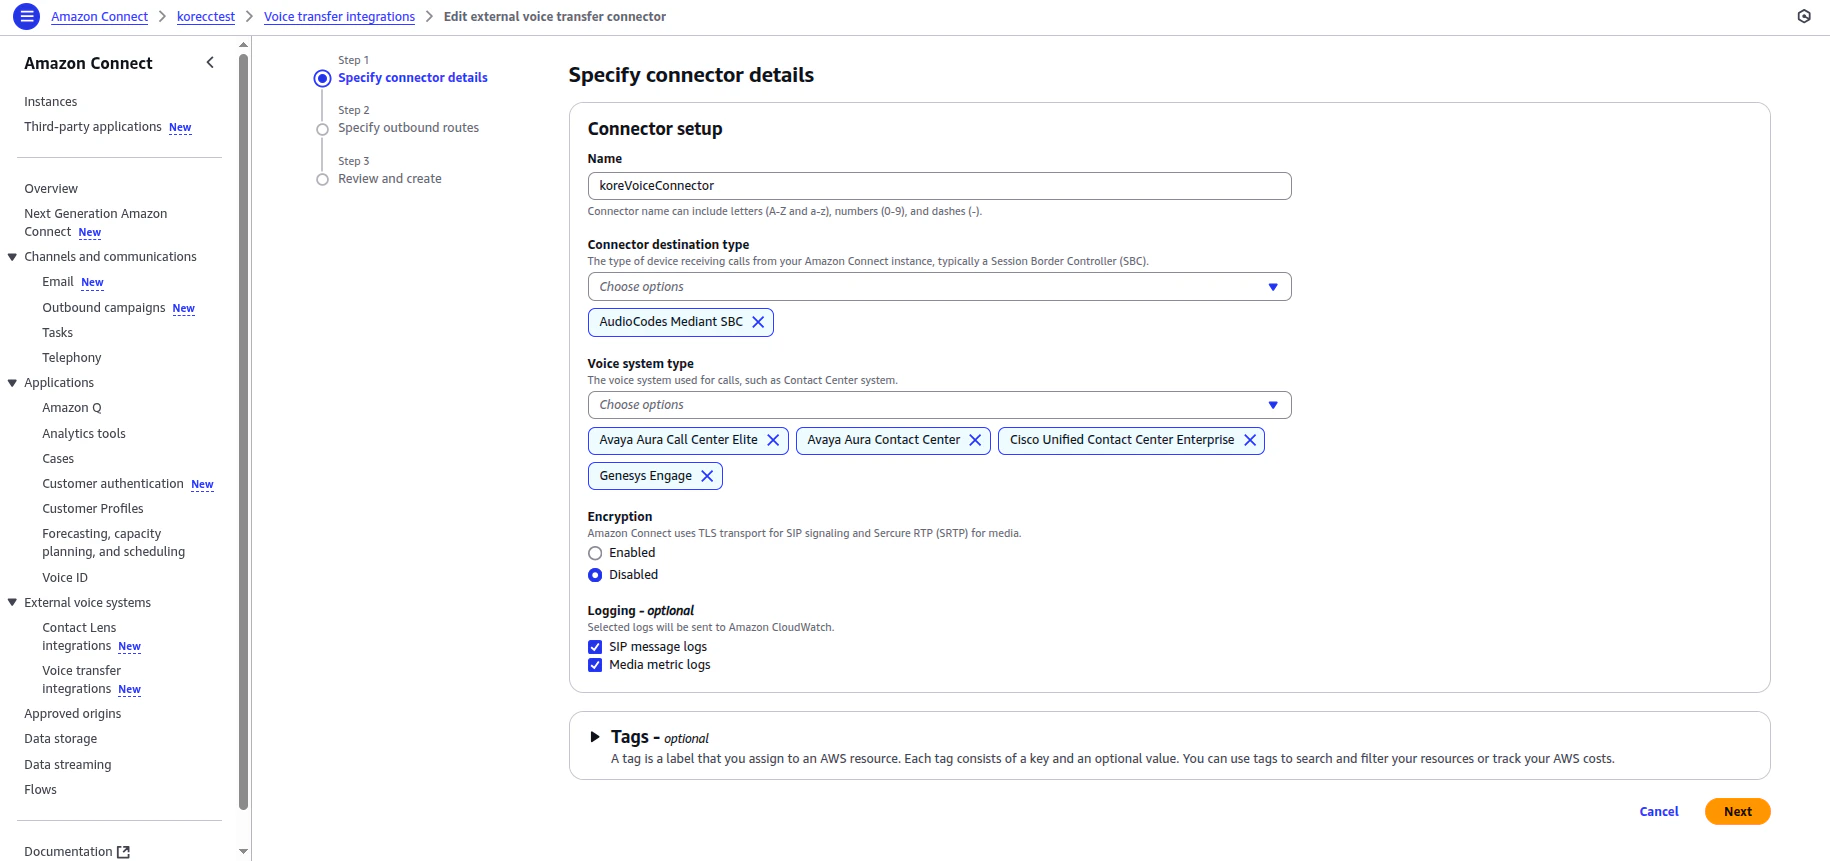 * **Connector Configuration**:
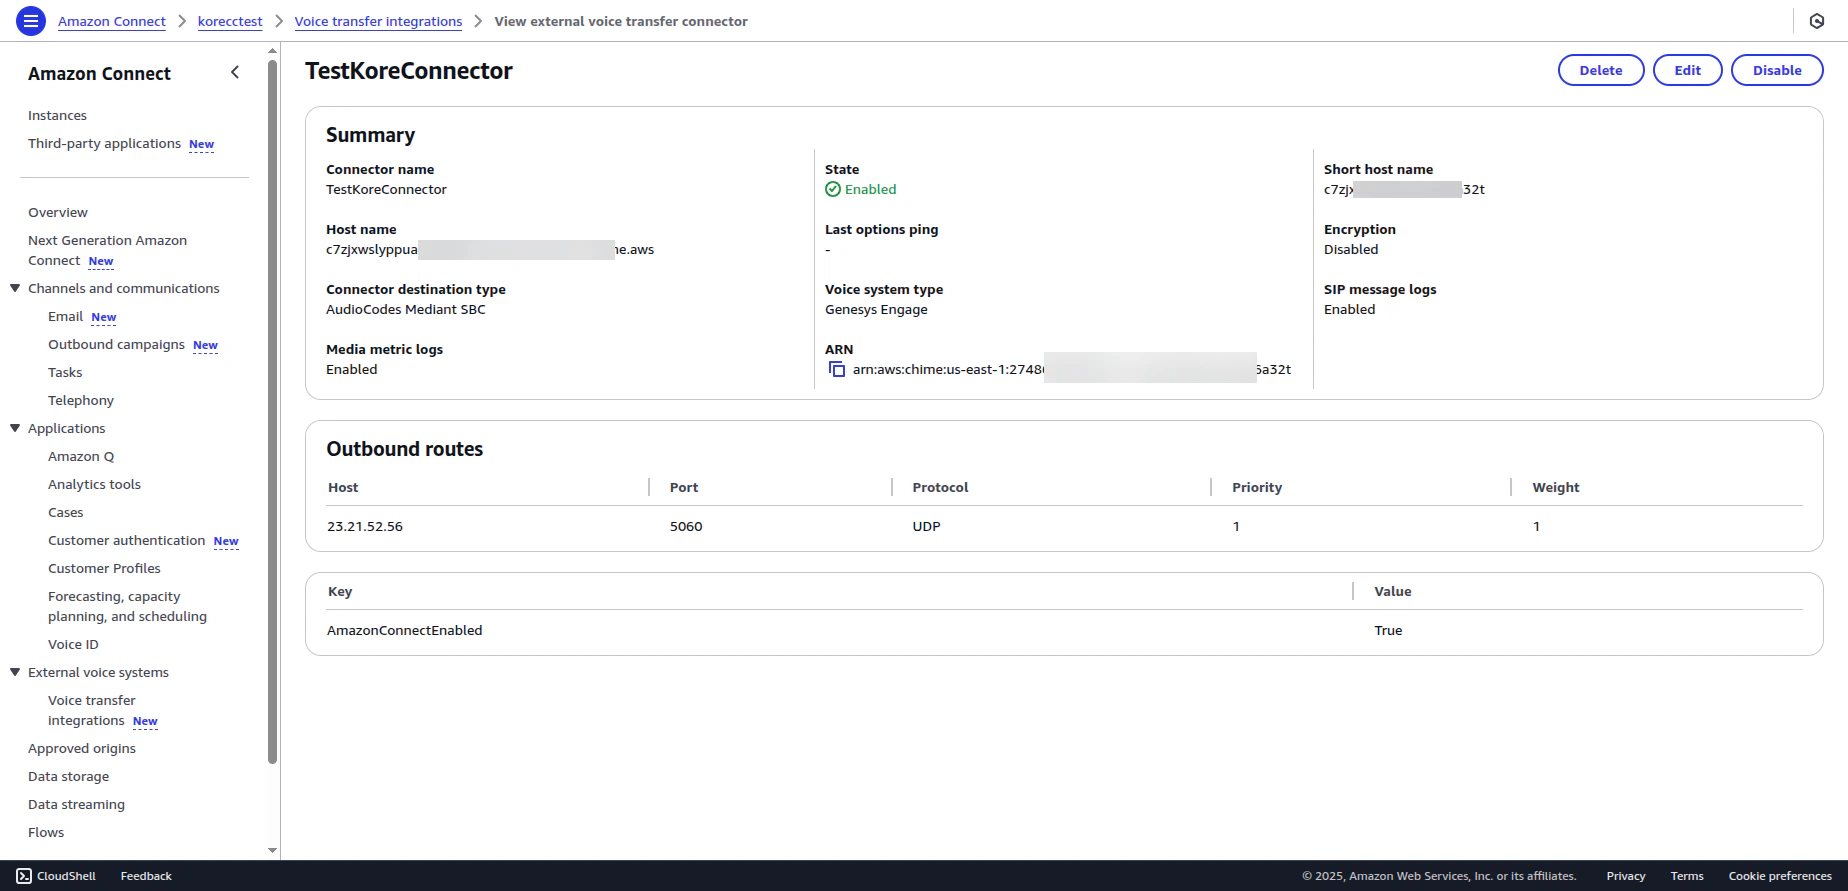
* **Name**: Enter a name for the connector.
* **Connector destination type**: Select **AudioCodes** from the dropdown list.
* **Voice system type**: Select one or more options. This selection doesn't affect functionality.
* **Encryption**: Select **Disabled**.
* **Logging**: Select both options to view the corresponding logs in Connector Logs.
* **Host and Port Details**: After creation, the connector configuration displays the IP address of the host, the protocol, and the port. This port corresponds to your Voice Gateway environment.
* The final configuration appears as shown in the following screenshot:
* **Connector Configuration**:
* **Name**: Enter a name for the connector.
* **Connector destination type**: Select **AudioCodes** from the dropdown list.
* **Voice system type**: Select one or more options. This selection doesn't affect functionality.
* **Encryption**: Select **Disabled**.
* **Logging**: Select both options to view the corresponding logs in Connector Logs.
* **Host and Port Details**: After creation, the connector configuration displays the IP address of the host, the protocol, and the port. This port corresponds to your Voice Gateway environment.
* The final configuration appears as shown in the following screenshot:
 ### 3. Configuring the Amazon Connect Flow
The next step involves modifying your Amazon Connect flow to use the external voice connector you created.
* Add `Transfer to Phone Number` node: In your Amazon Connect flow, add a **Transfer to phone number** node.
### 3. Configuring the Amazon Connect Flow
The next step involves modifying your Amazon Connect flow to use the external voice connector you created.
* Add `Transfer to Phone Number` node: In your Amazon Connect flow, add a **Transfer to phone number** node.
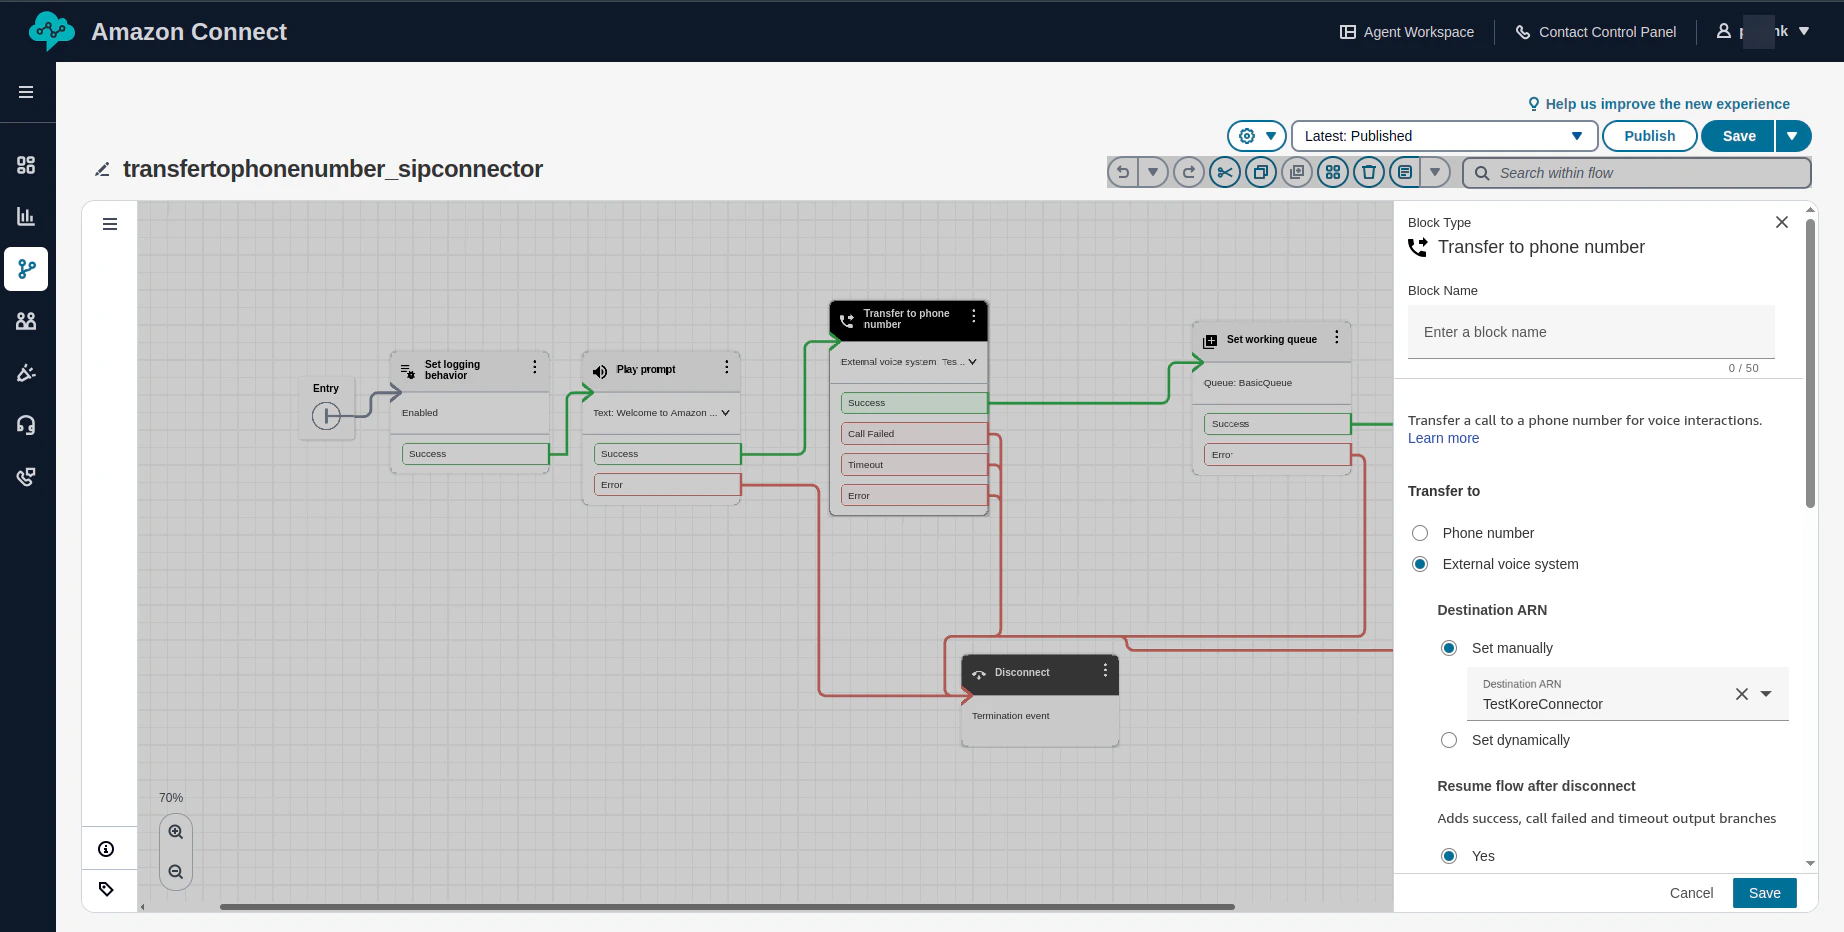 * Select **External Voice System** instead of entering a phone number.
* Attach the connector you created in the previous step.
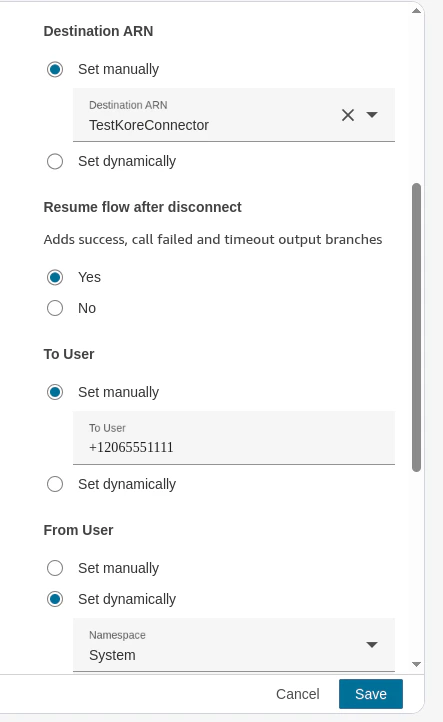
* Set the **Resume flow after disconnect** option to **Yes**. This ensures that after the call ends with the third-party system (Voice Gateway), the call transfers back to Amazon Connect (facilitating a continuous flow and correlation between Amazon Connect and the Kore system).
* Select **External Voice System** instead of entering a phone number.
* Attach the connector you created in the previous step.
* Set the **Resume flow after disconnect** option to **Yes**. This ensures that after the call ends with the third-party system (Voice Gateway), the call transfers back to Amazon Connect (facilitating a continuous flow and correlation between Amazon Connect and the Kore system).
 ### 4. Configuring Contact Center AI (Kore Side Configuration)
On the Kore side, you must configure Contact Center AI (CCAI) to receive and manage calls Amazon Connect transfers.
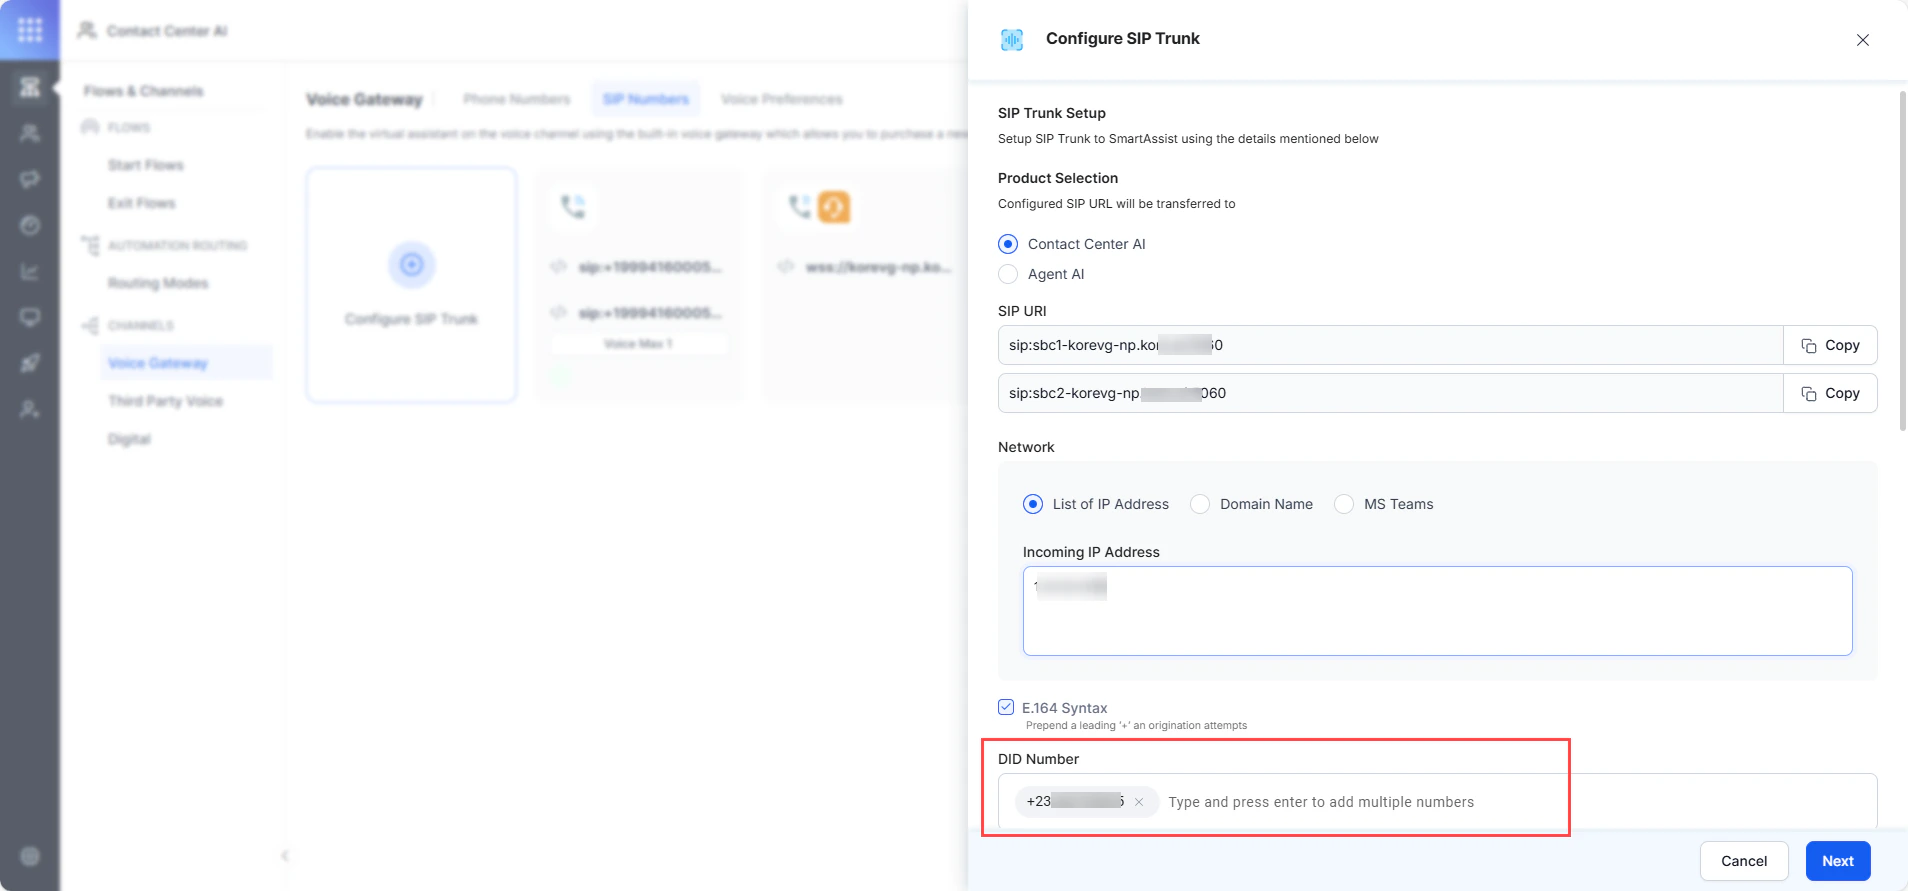
* **Create New Configuration**: In CCAI, create a new configuration (or use an existing one).
* **Allowlist IP Address**: Add the IP address that Amazon Connect provides to the allowlist. This IP address is essential for allowing communication from Amazon Connect to Kore. Check with Amazon Connect documentation or Support for the details on this IP address.
* **DID Number**: Enter the Direct Inward Dialing (DID) number you specified in the **Transfer to phone number** node in the previous step).
### 4. Configuring Contact Center AI (Kore Side Configuration)
On the Kore side, you must configure Contact Center AI (CCAI) to receive and manage calls Amazon Connect transfers.
* **Create New Configuration**: In CCAI, create a new configuration (or use an existing one).
* **Allowlist IP Address**: Add the IP address that Amazon Connect provides to the allowlist. This IP address is essential for allowing communication from Amazon Connect to Kore. Check with Amazon Connect documentation or Support for the details on this IP address.
* **DID Number**: Enter the Direct Inward Dialing (DID) number you specified in the **Transfer to phone number** node in the previous step).
 * **Attach to Start Flow**: Once the configuration is complete, attach this number to the relevant Experience Flow within Kore.
### End-to-End Call Flow
The following steps describe the call flow after this integration:
1. A customer calls the Amazon Connect number.
* **Attach to Start Flow**: Once the configuration is complete, attach this number to the relevant Experience Flow within Kore.
### End-to-End Call Flow
The following steps describe the call flow after this integration:
1. A customer calls the Amazon Connect number.
 2. The Amazon Connect flow transfers the call to Voice Gateway via the external voice connector.
3. CCAI handles the call. To view the call details, go to the CCAI **Dashboard** > **Interactions** section.
4. After the interaction, the system transfers the call back to Amazon Connect.
## Metadata Passing from Kore to Amazon Connect (Additional Feature)
Amazon Connect doesn't support SIP header extraction. To pass metadata from Kore to Amazon Connect, use the following alternative AWS components:
* API Gateway
* Lambda function
* DynamoDB Table
* CloudWatch (for debugging)
### Architecture
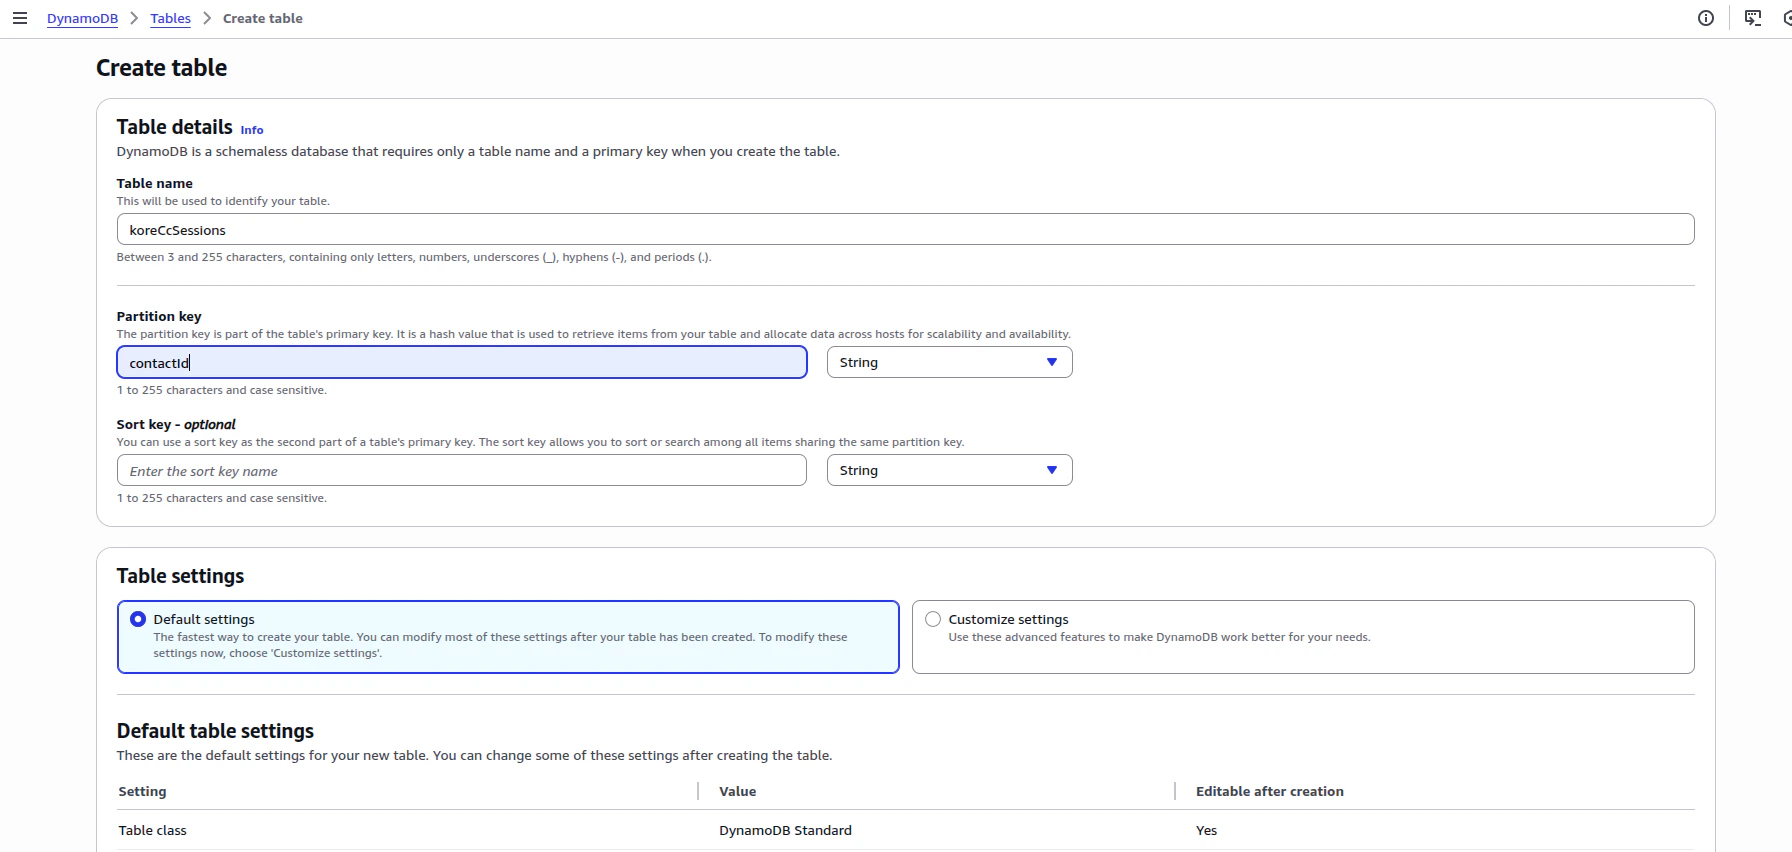
1. Create a **DynamoDB** table with **contactId** (Amazon Connect Contact Id) as a partition key.
2. Create an API Gateway and call it from outside AWS via **Dialog Task** > **Service Node** in CCAI, before agent transfer, to store data in the DynamoDB table.
3. To call this API, the system must pass the Amazon Connect contact ID as one of the query parameters. The system retrieves this ID from the SIP headers data that Amazon Connect sends to Kore.
4. Create two Lambda functions — one for the API Gateway business logic and the other for its authentication.
5. In the Amazon Connect flow, invoke another Lambda function to extract these metadata saved in DynamoDB in the last step.
6. These metadata values are then set as contact attributes within the flow.
You need a three Lambda functions for this use case.
### AWS Side Configuration
#### Create a DynamoDB Table
**Name**: koreCcSessions
**Partition Key**: contactId
2. The Amazon Connect flow transfers the call to Voice Gateway via the external voice connector.
3. CCAI handles the call. To view the call details, go to the CCAI **Dashboard** > **Interactions** section.
4. After the interaction, the system transfers the call back to Amazon Connect.
## Metadata Passing from Kore to Amazon Connect (Additional Feature)
Amazon Connect doesn't support SIP header extraction. To pass metadata from Kore to Amazon Connect, use the following alternative AWS components:
* API Gateway
* Lambda function
* DynamoDB Table
* CloudWatch (for debugging)
### Architecture
1. Create a **DynamoDB** table with **contactId** (Amazon Connect Contact Id) as a partition key.
2. Create an API Gateway and call it from outside AWS via **Dialog Task** > **Service Node** in CCAI, before agent transfer, to store data in the DynamoDB table.
3. To call this API, the system must pass the Amazon Connect contact ID as one of the query parameters. The system retrieves this ID from the SIP headers data that Amazon Connect sends to Kore.
4. Create two Lambda functions — one for the API Gateway business logic and the other for its authentication.
5. In the Amazon Connect flow, invoke another Lambda function to extract these metadata saved in DynamoDB in the last step.
6. These metadata values are then set as contact attributes within the flow.
You need a three Lambda functions for this use case.
### AWS Side Configuration
#### Create a DynamoDB Table
**Name**: koreCcSessions
**Partition Key**: contactId
 #### Create Three Lambda Functions
You must create three Lambda functions for three different purposes. Set the runtime to **Python** for all three.
The following section lists the recommended Lambda function names and their code.
After you paste the Lambda code, deploy the latest version of the code. Ensure your first and third Lambda functions have **DynamoDB** full access. (You can **add permissions** inside the IAM role of the Lambda function.)
1. **koreStoreSessionMetadata**: Use this Lambda function to expose an API Gateway (Trigger) to get the metadata from platform and store it in the DynamoDB table. Copy and deploy the code from [this link](https://raw.githubusercontent.com/Koredotcom/korecc-twilio/master/AmazonConnect/Metadata%20passing%20via%20External%20voice%20connector/lambdas/koreStoreSessionMetadata.py).
2. **AuthenticateBeforeStoringInDynamoDB**: Use this Lambda function to add an authentication layer (Authorizer) to the API Gateway in the previous Lambda function (koreStoreSessionMetadata). Copy and deploy the code from [this link](https://raw.githubusercontent.com/Koredotcom/korecc-twilio/master/AmazonConnect/Metadata%20passing%20via%20External%20voice%20connector/lambdas/AuthenticateBeforeStoringInDynamoDB.py).
3. **koreRetrieveSessionMetadata**: Amazon Connect Contact Flow invokes this Lambda function after the call disconnects from Kore and returns to Amazon Connect. This Lambda function returns all the metadata stored in the DynamoDB table using the first Lambda. Copy and deploy the code from [this link](https://raw.githubusercontent.com/Koredotcom/korecc-twilio/master/AmazonConnect/Metadata%20passing%20via%20External%20voice%20connector/lambdas/%20koreRetrieveSessionMetadata.py).
#### Create an API Gateway
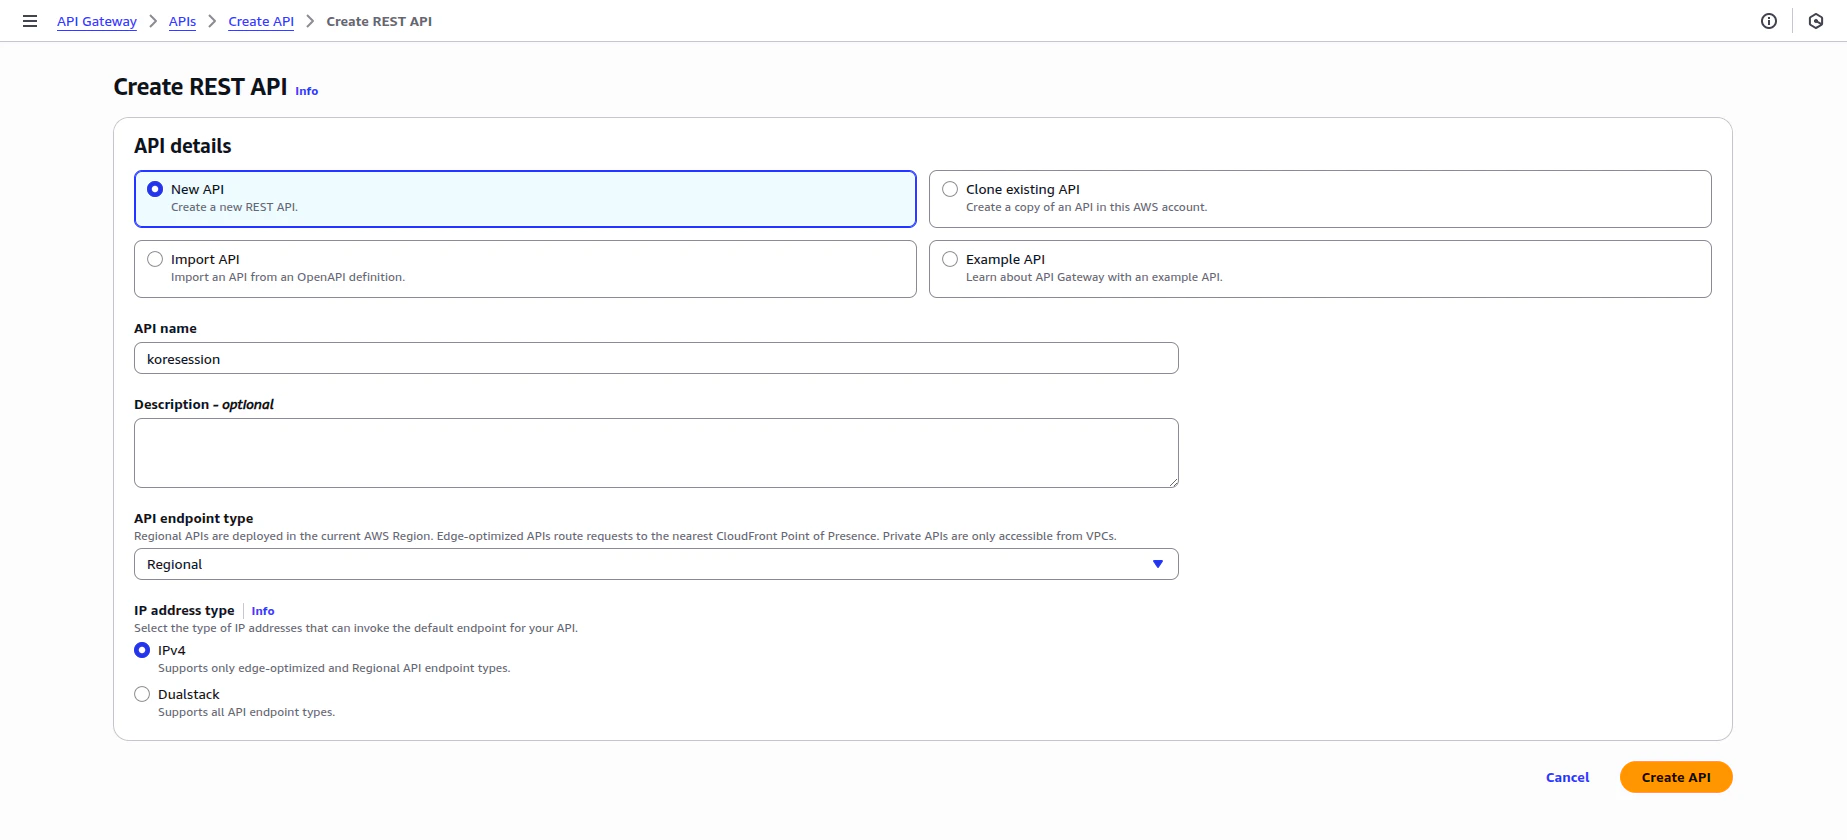
1. Create a REST API Gateway with the default configuration:
#### Create Three Lambda Functions
You must create three Lambda functions for three different purposes. Set the runtime to **Python** for all three.
The following section lists the recommended Lambda function names and their code.
After you paste the Lambda code, deploy the latest version of the code. Ensure your first and third Lambda functions have **DynamoDB** full access. (You can **add permissions** inside the IAM role of the Lambda function.)
1. **koreStoreSessionMetadata**: Use this Lambda function to expose an API Gateway (Trigger) to get the metadata from platform and store it in the DynamoDB table. Copy and deploy the code from [this link](https://raw.githubusercontent.com/Koredotcom/korecc-twilio/master/AmazonConnect/Metadata%20passing%20via%20External%20voice%20connector/lambdas/koreStoreSessionMetadata.py).
2. **AuthenticateBeforeStoringInDynamoDB**: Use this Lambda function to add an authentication layer (Authorizer) to the API Gateway in the previous Lambda function (koreStoreSessionMetadata). Copy and deploy the code from [this link](https://raw.githubusercontent.com/Koredotcom/korecc-twilio/master/AmazonConnect/Metadata%20passing%20via%20External%20voice%20connector/lambdas/AuthenticateBeforeStoringInDynamoDB.py).
3. **koreRetrieveSessionMetadata**: Amazon Connect Contact Flow invokes this Lambda function after the call disconnects from Kore and returns to Amazon Connect. This Lambda function returns all the metadata stored in the DynamoDB table using the first Lambda. Copy and deploy the code from [this link](https://raw.githubusercontent.com/Koredotcom/korecc-twilio/master/AmazonConnect/Metadata%20passing%20via%20External%20voice%20connector/lambdas/%20koreRetrieveSessionMetadata.py).
#### Create an API Gateway
1. Create a REST API Gateway with the default configuration:
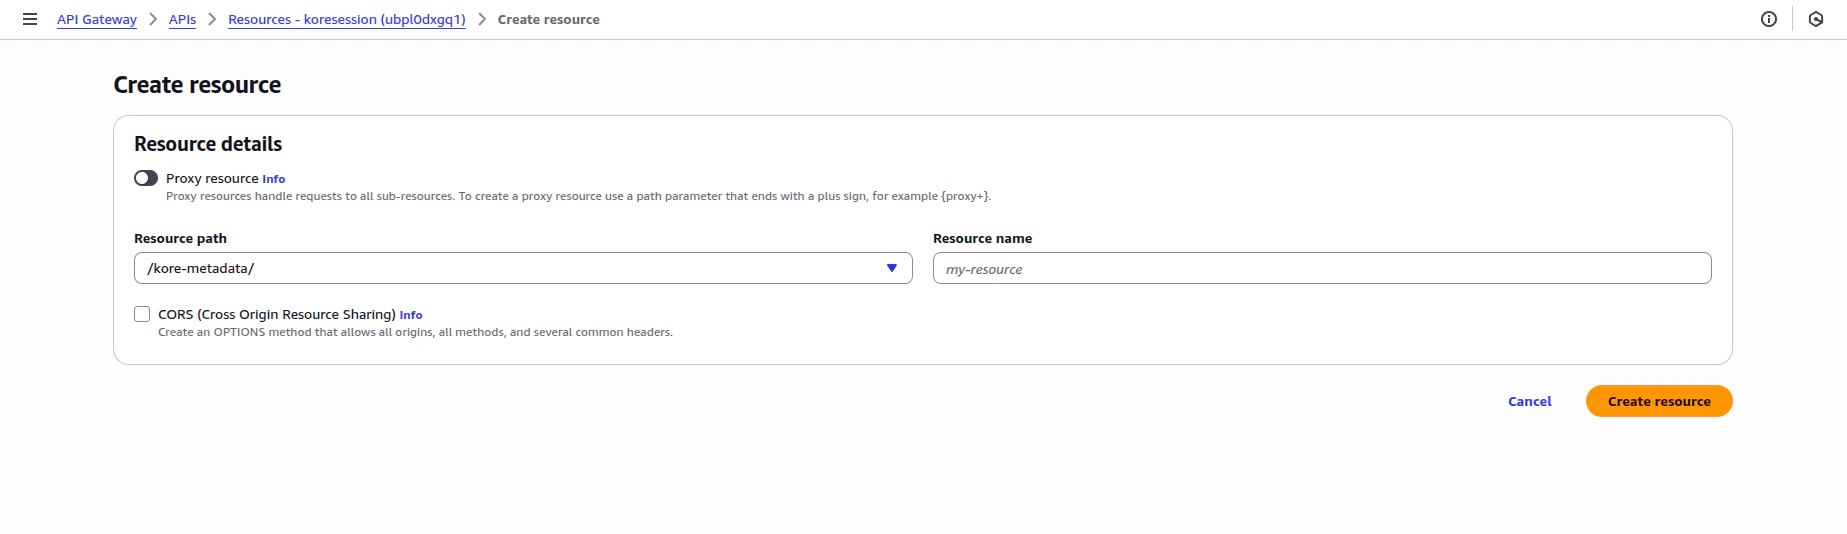
 2. Create an API resource with the **Resource path** as `/kore-metadata`, and then select **Create resource**:
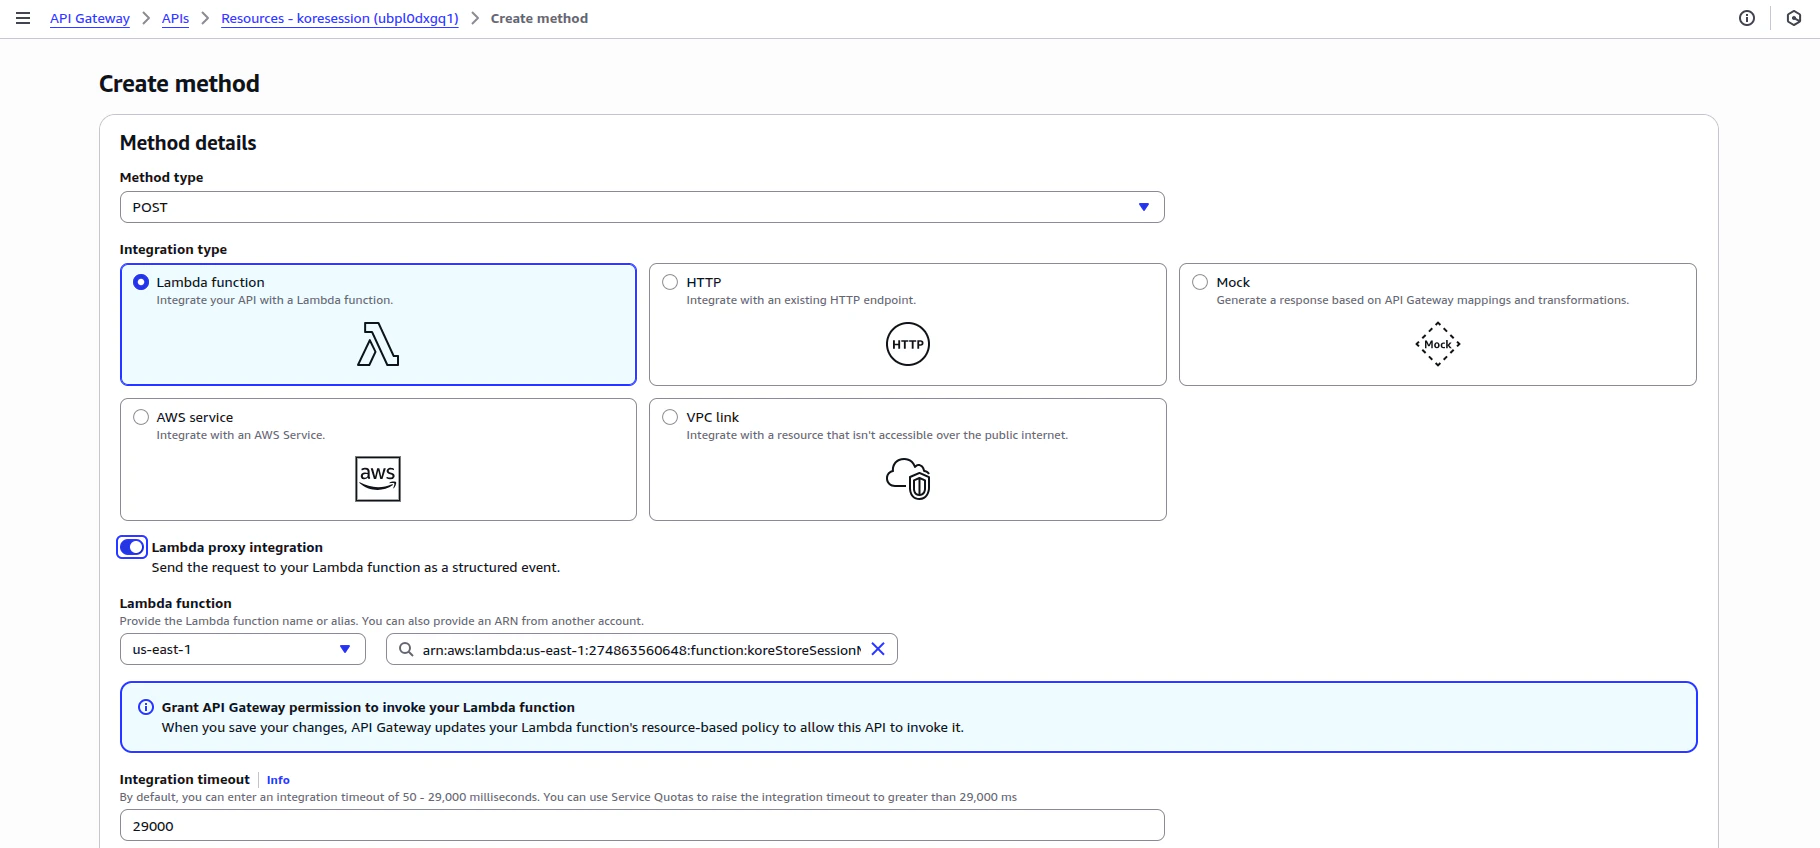
 3. Create an **API Method** with the following details:
* **Method type**: POST
* **Integration type**: Lambda function (koreStoreSessionMetadata)
* Turn on the **Lambda proxy integration** toggle.
* Select the Lambda function (**koreStoreSessionMetadata**).
* Select **Create Method**.
3. Create an **API Method** with the following details:
* **Method type**: POST
* **Integration type**: Lambda function (koreStoreSessionMetadata)
* Turn on the **Lambda proxy integration** toggle.
* Select the Lambda function (**koreStoreSessionMetadata**).
* Select **Create Method**.
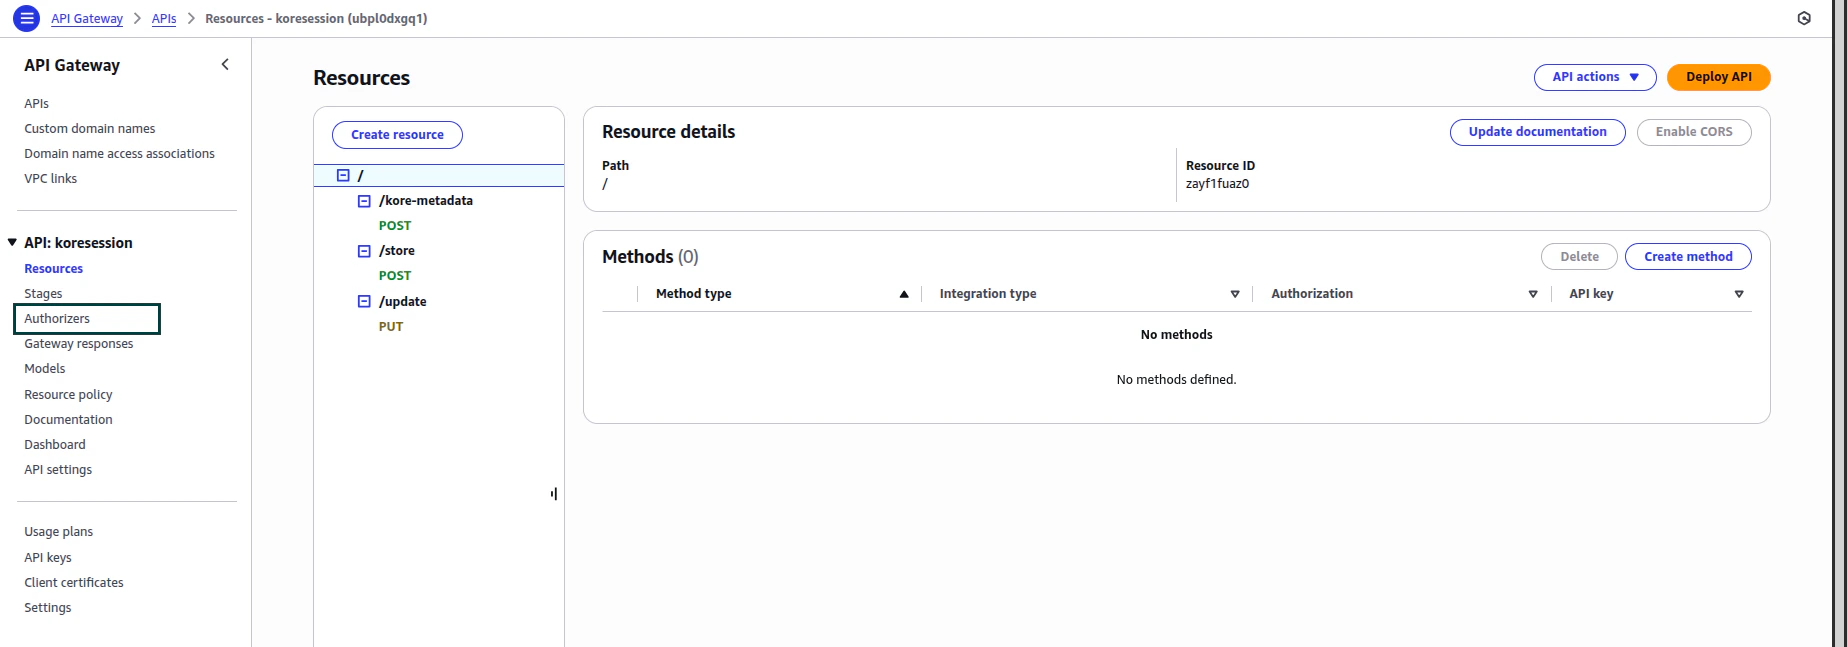
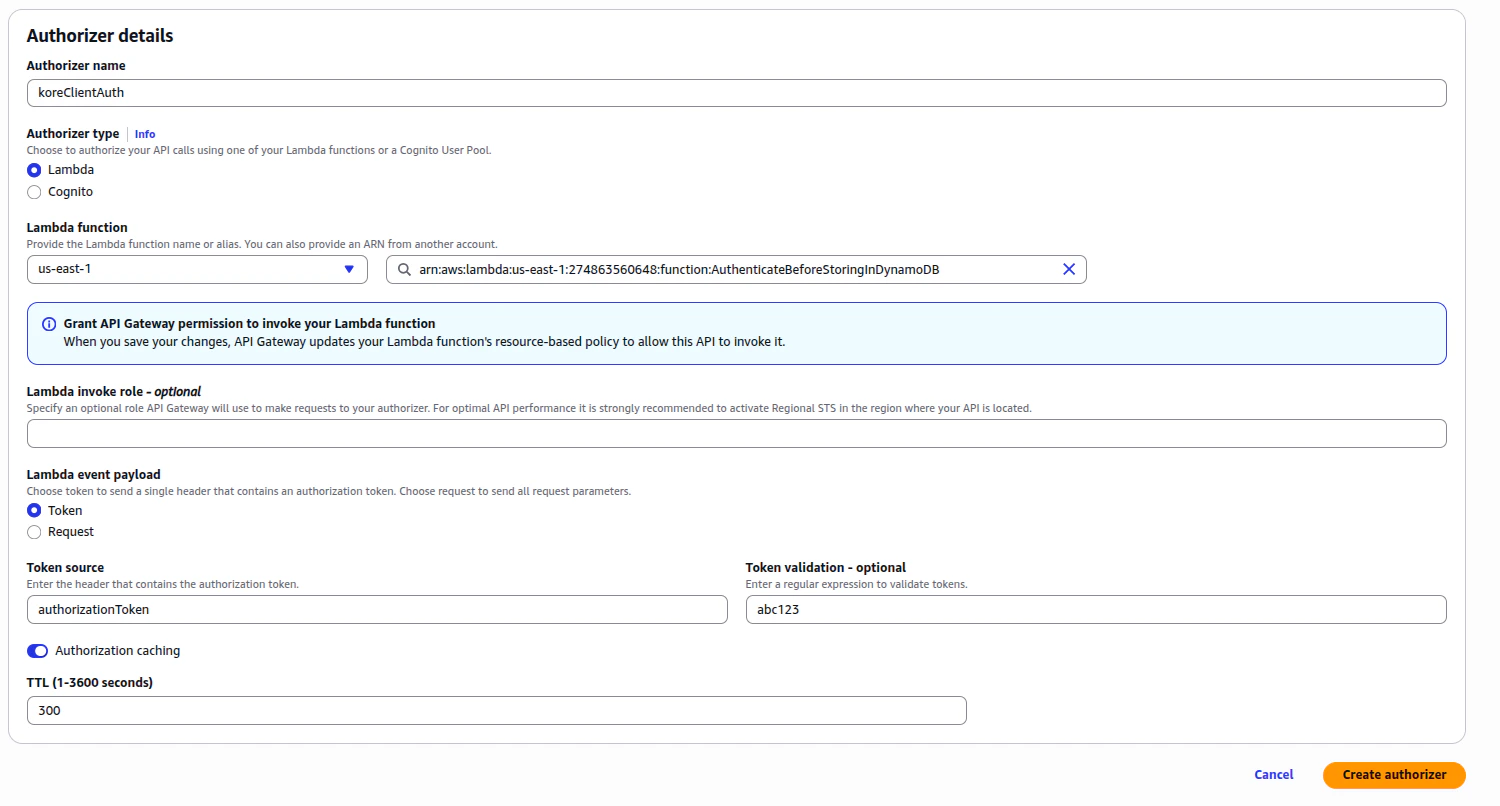
 4. To authenticate this API Gateway, you need **Authorizers**. Create a new Authorizer with the following details:
* **Authorizer name**: koreClientAuth
* **Authorizer type**: Lambda
* **Lambda function**: AuthenticateBeforeStoringInDynamoDB
* **Lambda event payload**: Select **Token**
* **Token source**: authorizationToken
* **Token validation - optional**: Enter the value you want to use as Token for the API authentication. You need the same value to store in the Env Variable of **AuthenticateBeforeStoringInDynamoDB** Lambda function with the key as **AUTH\_TOKEN**.
* Select **Create authorizer**.
4. To authenticate this API Gateway, you need **Authorizers**. Create a new Authorizer with the following details:
* **Authorizer name**: koreClientAuth
* **Authorizer type**: Lambda
* **Lambda function**: AuthenticateBeforeStoringInDynamoDB
* **Lambda event payload**: Select **Token**
* **Token source**: authorizationToken
* **Token validation - optional**: Enter the value you want to use as Token for the API authentication. You need the same value to store in the Env Variable of **AuthenticateBeforeStoringInDynamoDB** Lambda function with the key as **AUTH\_TOKEN**.
* Select **Create authorizer**.
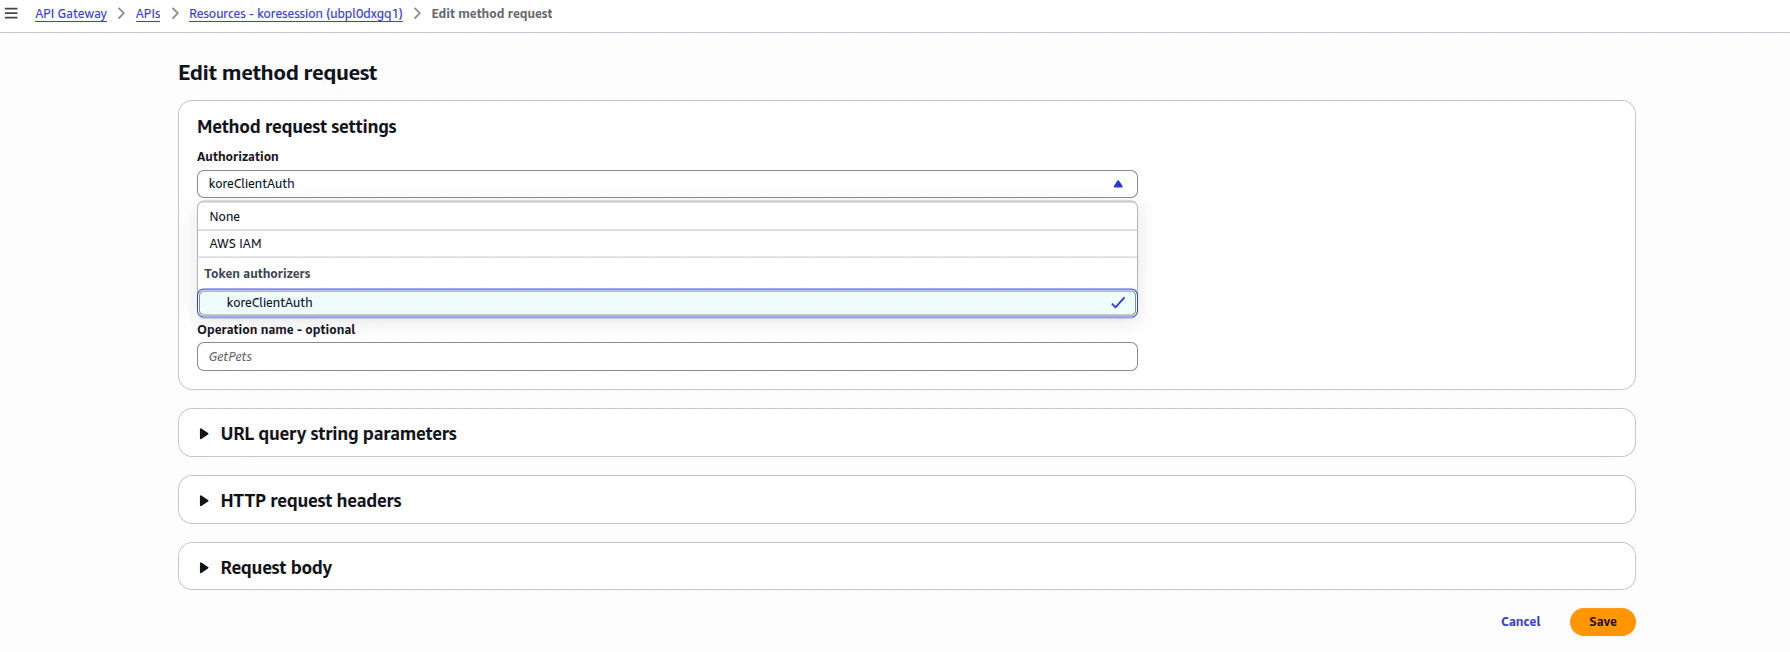
 5. After creating the **koreClientAuth** authorizer, add this as part of authentication for the API resource and method.
* Select **Edit method request**.
* Select **Token authorizers** > **koreClientAuth** under **Authorization**.
* Select **Save**.
5. After creating the **koreClientAuth** authorizer, add this as part of authentication for the API resource and method.
* Select **Edit method request**.
* Select **Token authorizers** > **koreClientAuth** under **Authorization**.
* Select **Save**.
 6. Select **Deploy API**.
#### Modify the Contact Flow
Open the Amazon Connect instance and add the last Lambda function (koreRetrieveSessionMetadata) inside the flow.
6. Select **Deploy API**.
#### Modify the Contact Flow
Open the Amazon Connect instance and add the last Lambda function (koreRetrieveSessionMetadata) inside the flow.
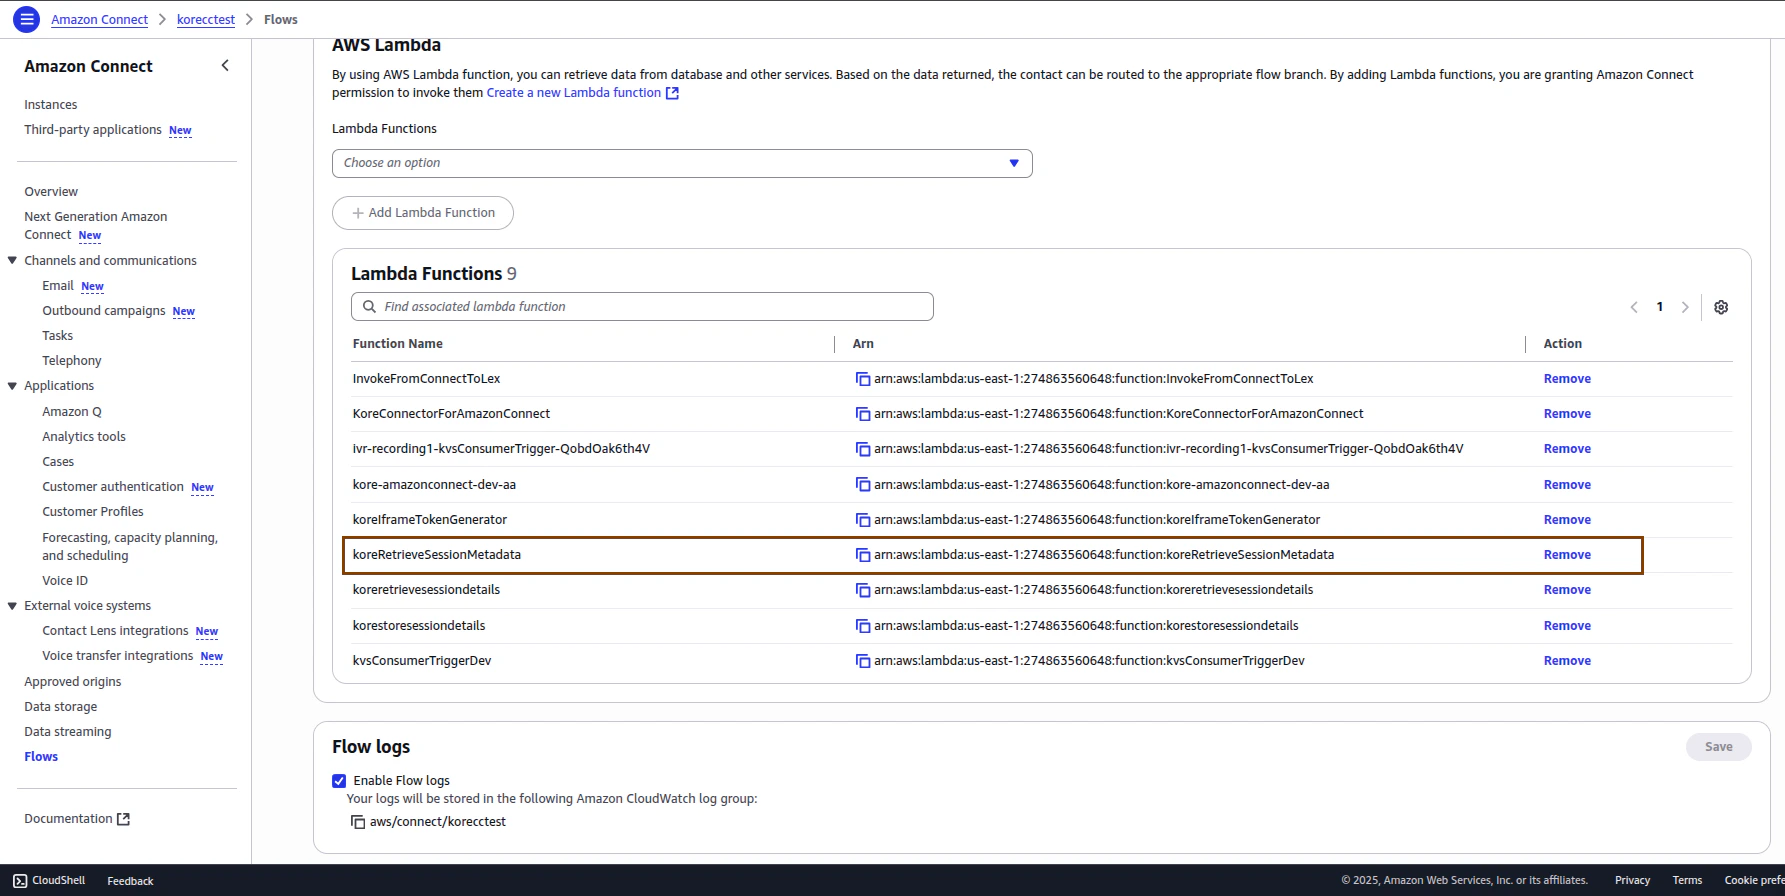 **Modify the Amazon Connect flow**:
1. Name this flow as **TransfertoKore\&MetadataPassing**. (This name appears during the Agent AI integration step.)
2. Add an **AWS Lambda function** node after the **Transfer to phone number** node.
3. In the **AWS Lambda function**:
* Select the **Invoke Lambda** function (koreRetrieveSessionMetadata), added in the last step.
* **Add a parameter**:
* Destination Key: contactId (enter this name)
* Value: set dynamically
* Namespace: System
* Key: Contact id
* **Response Validation**: JSON
* **Save** the configuration.
4. Add one **Set contact attribute** node. In this node:
* Set attributes on: Current Contact
* Add another attribute
* Namespace: User defined
* Key: `customData`
* Value to be **Set dynamically**
* Namespace: External
* Key: body
* **Save** the configuration.
5. Connect all the nodes. You can add a **Play prompt** node to check if there is any error in the flow.
6. **Save** and **Publish** the flow.
The modified Amazon Connect flow appears as shown in the following screenshot:
**Modify the Amazon Connect flow**:
1. Name this flow as **TransfertoKore\&MetadataPassing**. (This name appears during the Agent AI integration step.)
2. Add an **AWS Lambda function** node after the **Transfer to phone number** node.
3. In the **AWS Lambda function**:
* Select the **Invoke Lambda** function (koreRetrieveSessionMetadata), added in the last step.
* **Add a parameter**:
* Destination Key: contactId (enter this name)
* Value: set dynamically
* Namespace: System
* Key: Contact id
* **Response Validation**: JSON
* **Save** the configuration.
4. Add one **Set contact attribute** node. In this node:
* Set attributes on: Current Contact
* Add another attribute
* Namespace: User defined
* Key: `customData`
* Value to be **Set dynamically**
* Namespace: External
* Key: body
* **Save** the configuration.
5. Connect all the nodes. You can add a **Play prompt** node to check if there is any error in the flow.
6. **Save** and **Publish** the flow.
The modified Amazon Connect flow appears as shown in the following screenshot:
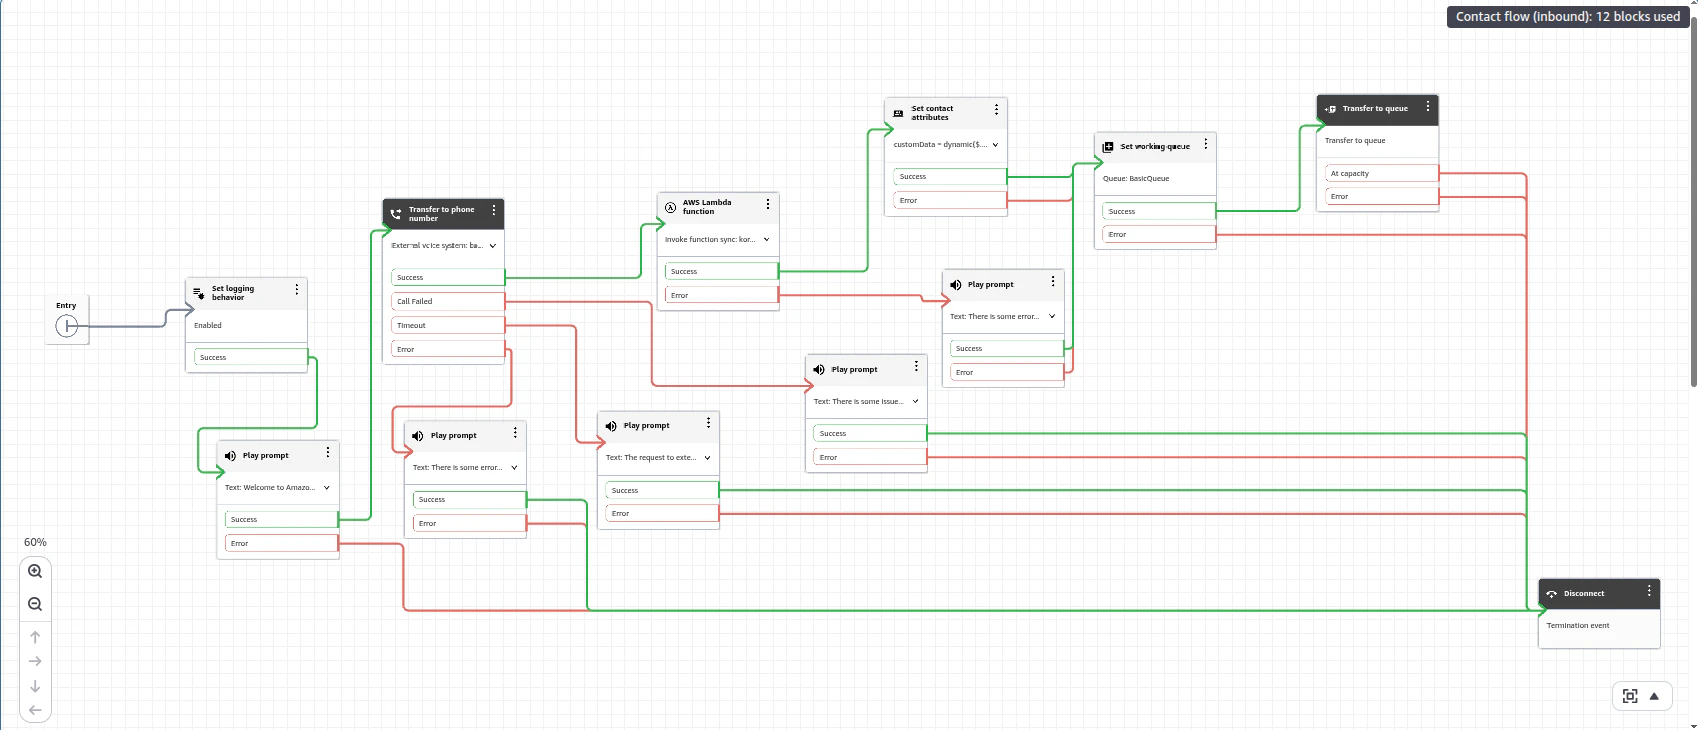 You can also import the contact flow (.JSON file) from this [link](https://raw.githubusercontent.com/Koredotcom/korecc-twilio/refs/heads/master/AmazonConnect/Metadata%20passing%20via%20External%20voice%20connector/contact%20flows/transfertokore_sipconnector_metadata_passing.json). Right-click and save it as **.JSON**).
### Kore Side Configuration
#### In CCAI
1. **Start Flows**
1. Open **Conditional Flow**.
2. Add the following code snippet in a **Script node** immediately after the **Start node**:
```
setCallFlowVariable('sipHeaders',
context.BotUserSession.channels[0].handle.sipHeaders); var
headers = getCallFlowVariable('sipHeaders');
userSessionUtils.put('sipHeaders', headers);
```
3. Select **Test** to test the flow.
4. Identify the **Automation bot** in Conditional Flow. Use it in the next step when configuring the Botbuilder.
2. **Agent Transfer**
1. Go to **Settings** > **Integrations** > **Agent Transfer** > **Voice**.
2. Select **SIP Transfer**.
3. Select **SIP BYE** from the **SIP Transfer Method** list.
4. Select **Save** to save the configuration.
#### In Botbuilder
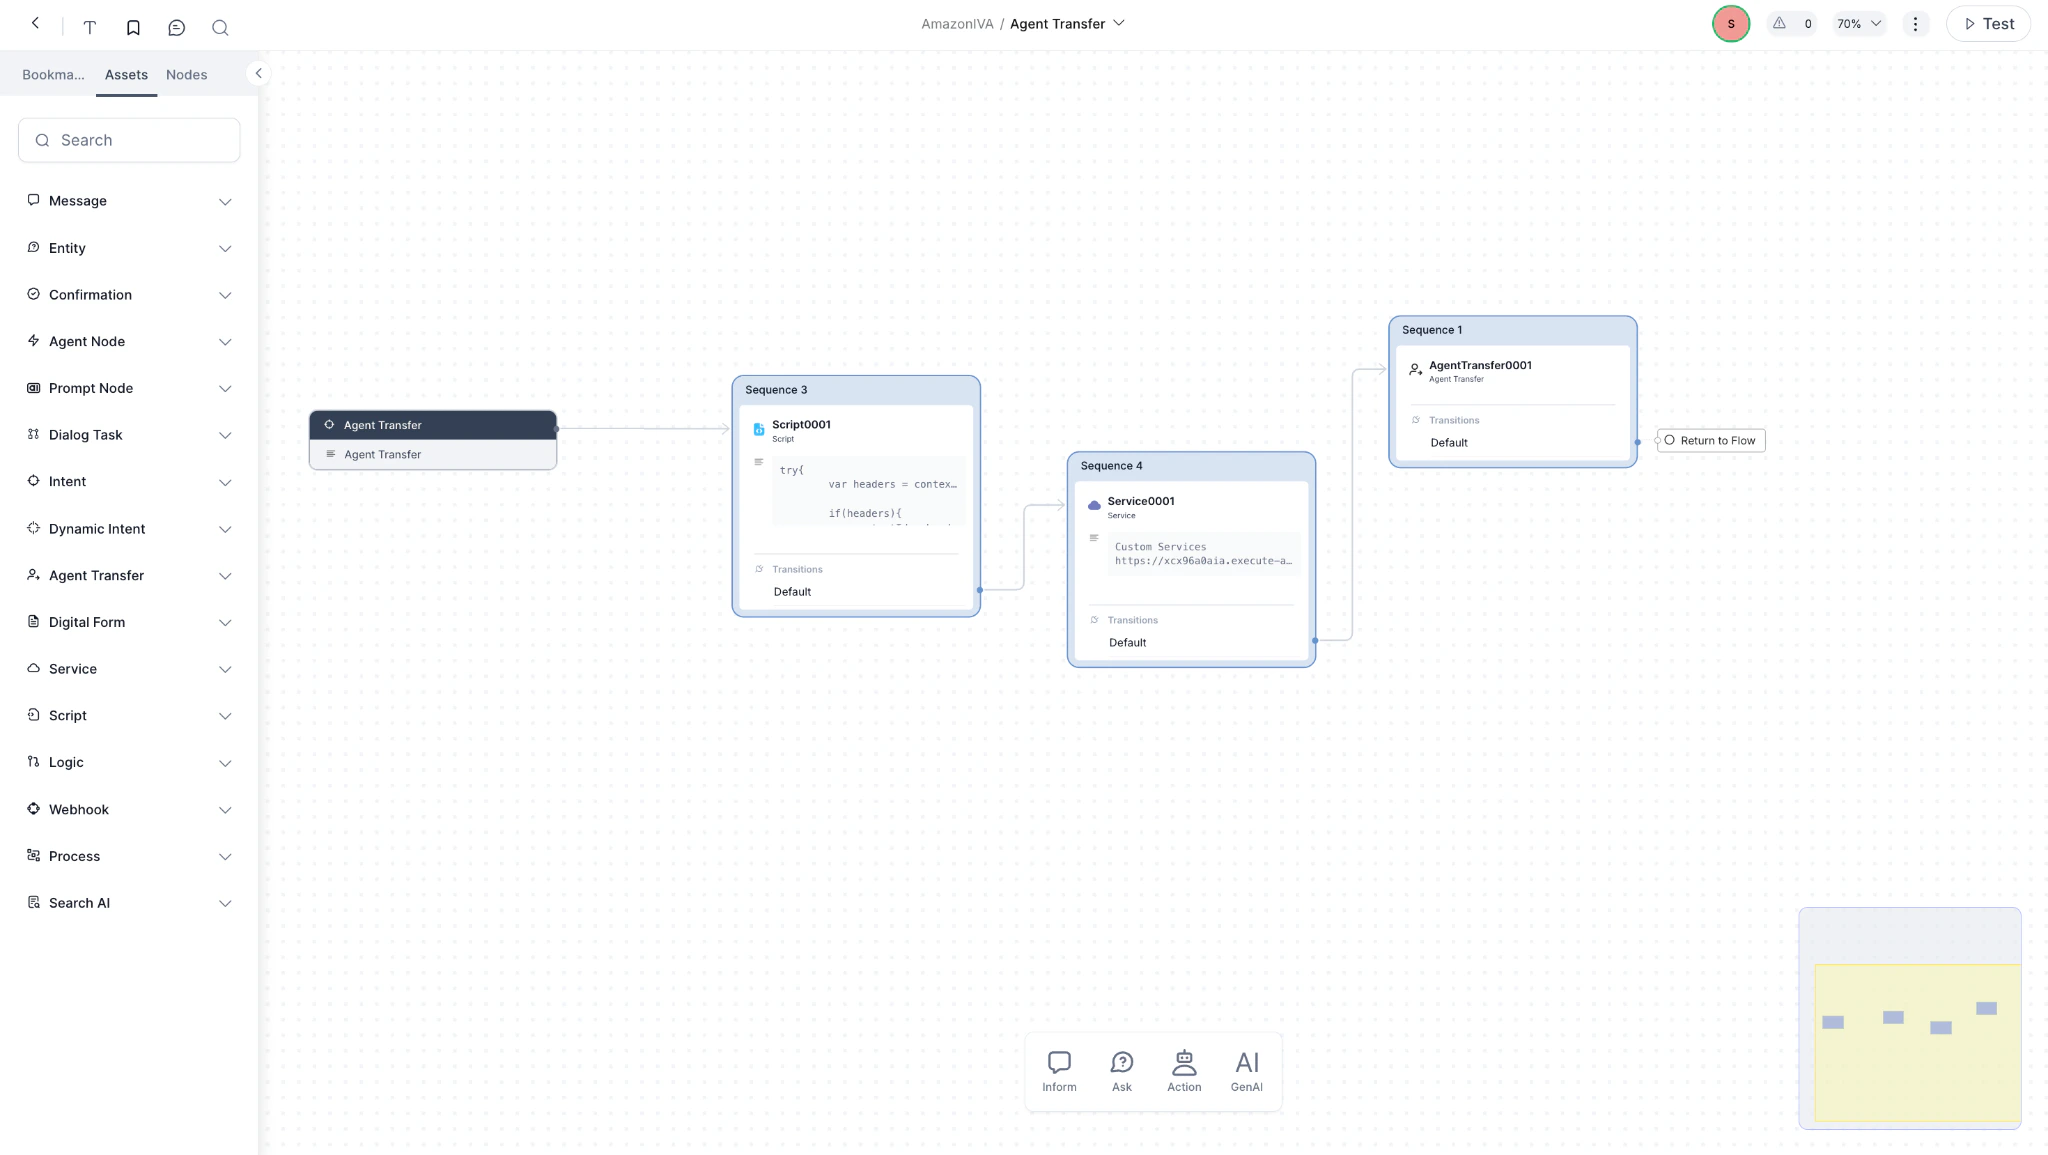
Verify that the Automation bot in the CCAI Conditional Flow includes an Agent Transfer dialog task.
1. Open the **Agent Transfer** dialog task.
2. Add a **Script node** and paste the following code to extract **contactId** (Amazon Connect contact Id) from the SIP headers:
```
try{
var headers = context.session.UserSession.sipHeaders;
if(headers){
var contactId = headers.find(o => o.name ===
'X-Amzn-ConnectContactId');
if(contactId){
BotUserSession.put("ContactId", contactId.value);
}
}
}catch(err){
koreDebugger.log("Error is:"+err);
}
```
3. Add a **Service node** immediately after the **Script node** to make a REST API request to the API Gateway you configured in AWS in the earlier steps.
You can also import the contact flow (.JSON file) from this [link](https://raw.githubusercontent.com/Koredotcom/korecc-twilio/refs/heads/master/AmazonConnect/Metadata%20passing%20via%20External%20voice%20connector/contact%20flows/transfertokore_sipconnector_metadata_passing.json). Right-click and save it as **.JSON**).
### Kore Side Configuration
#### In CCAI
1. **Start Flows**
1. Open **Conditional Flow**.
2. Add the following code snippet in a **Script node** immediately after the **Start node**:
```
setCallFlowVariable('sipHeaders',
context.BotUserSession.channels[0].handle.sipHeaders); var
headers = getCallFlowVariable('sipHeaders');
userSessionUtils.put('sipHeaders', headers);
```
3. Select **Test** to test the flow.
4. Identify the **Automation bot** in Conditional Flow. Use it in the next step when configuring the Botbuilder.
2. **Agent Transfer**
1. Go to **Settings** > **Integrations** > **Agent Transfer** > **Voice**.
2. Select **SIP Transfer**.
3. Select **SIP BYE** from the **SIP Transfer Method** list.
4. Select **Save** to save the configuration.
#### In Botbuilder
Verify that the Automation bot in the CCAI Conditional Flow includes an Agent Transfer dialog task.
1. Open the **Agent Transfer** dialog task.
2. Add a **Script node** and paste the following code to extract **contactId** (Amazon Connect contact Id) from the SIP headers:
```
try{
var headers = context.session.UserSession.sipHeaders;
if(headers){
var contactId = headers.find(o => o.name ===
'X-Amzn-ConnectContactId');
if(contactId){
BotUserSession.put("ContactId", contactId.value);
}
}
}catch(err){
koreDebugger.log("Error is:"+err);
}
```
3. Add a **Service node** immediately after the **Script node** to make a REST API request to the API Gateway you configured in AWS in the earlier steps.
 4. Select **Define Request** in the **Service node**.
5. **Add the Request URL**: Add the **API Gateway URL** with **contactId** as query parameter. Get this by accessing your first Lambda function ("koreStoreSessionMetadata\_S") > **Configuration** > **Triggers**.
4. Select **Define Request** in the **Service node**.
5. **Add the Request URL**: Add the **API Gateway URL** with **contactId** as query parameter. Get this by accessing your first Lambda function ("koreStoreSessionMetadata\_S") > **Configuration** > **Triggers**.
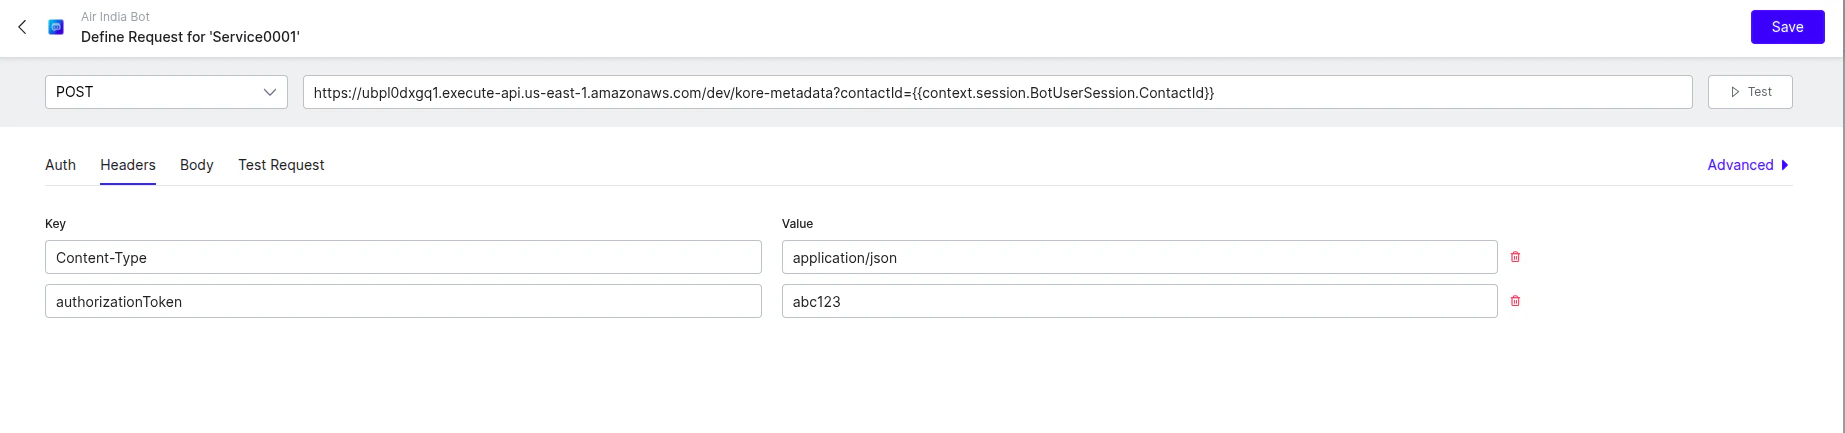
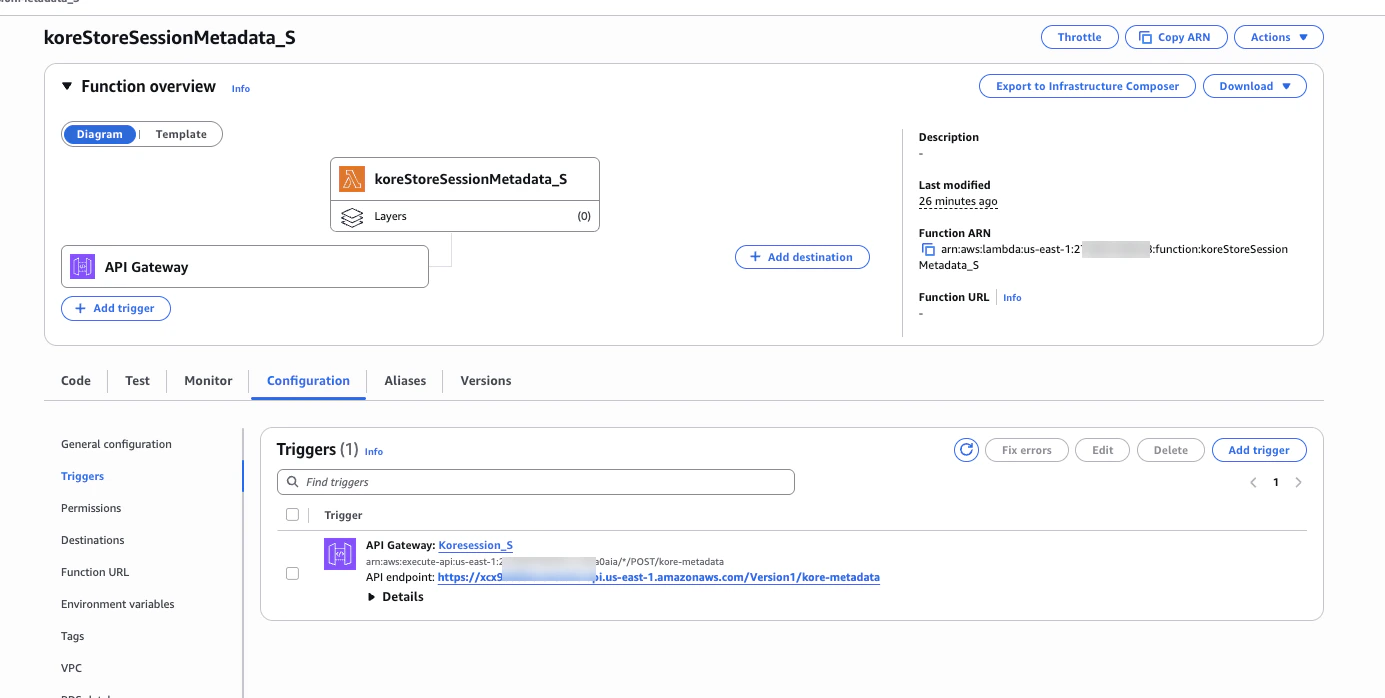 **Example**: `https://ubpl0dxgq1.execute-api.us-east-1.amazonaws.com/dev/kore-metadata?contactId={{context.session.BotUserSession.ContactId}}`
* **Method**: POST
* **Headers**:
* **Content-Type**: application/json
* **authorizationToken**: "abc123" (Add your token)
**Example**: `https://ubpl0dxgq1.execute-api.us-east-1.amazonaws.com/dev/kore-metadata?contactId={{context.session.BotUserSession.ContactId}}`
* **Method**: POST
* **Headers**:
* **Content-Type**: application/json
* **authorizationToken**: "abc123" (Add your token)
 * **Body**:
* Add your **metadata**
**Example**:
```json theme={null}
{"x_metadata":"Hello from Kore", "kore-instanceSessionId":"{{context.session.BotUserSession.lastMessage.messagePayload.instanceSessionId}}"}
```
* **Body**:
* Add your **metadata**
**Example**:
```json theme={null}
{"x_metadata":"Hello from Kore", "kore-instanceSessionId":"{{context.session.BotUserSession.lastMessage.messagePayload.instanceSessionId}}"}
```
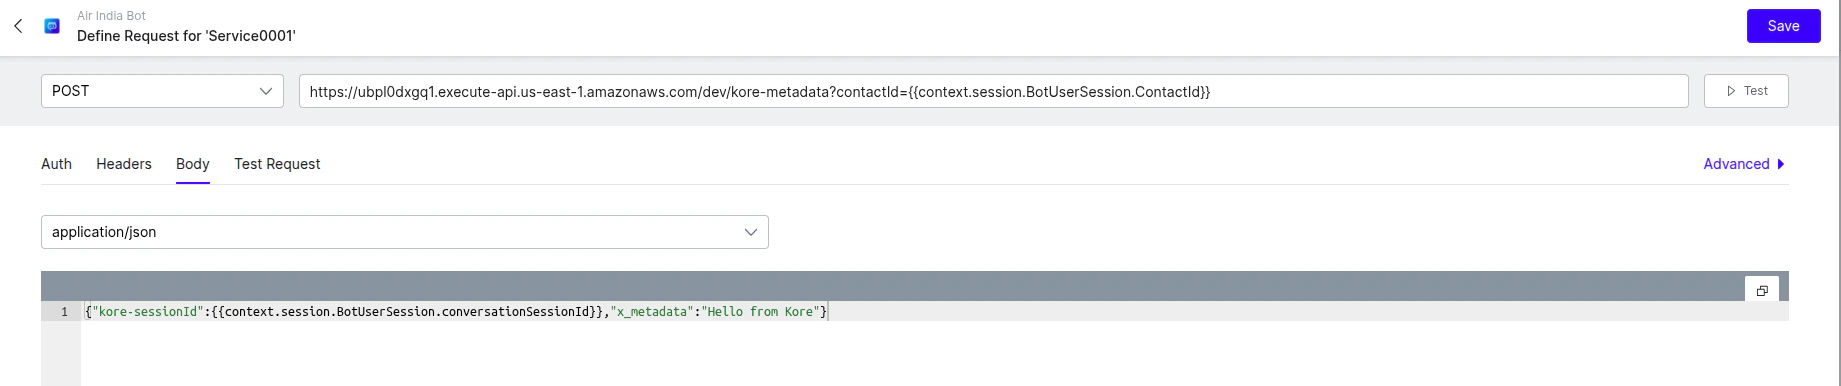
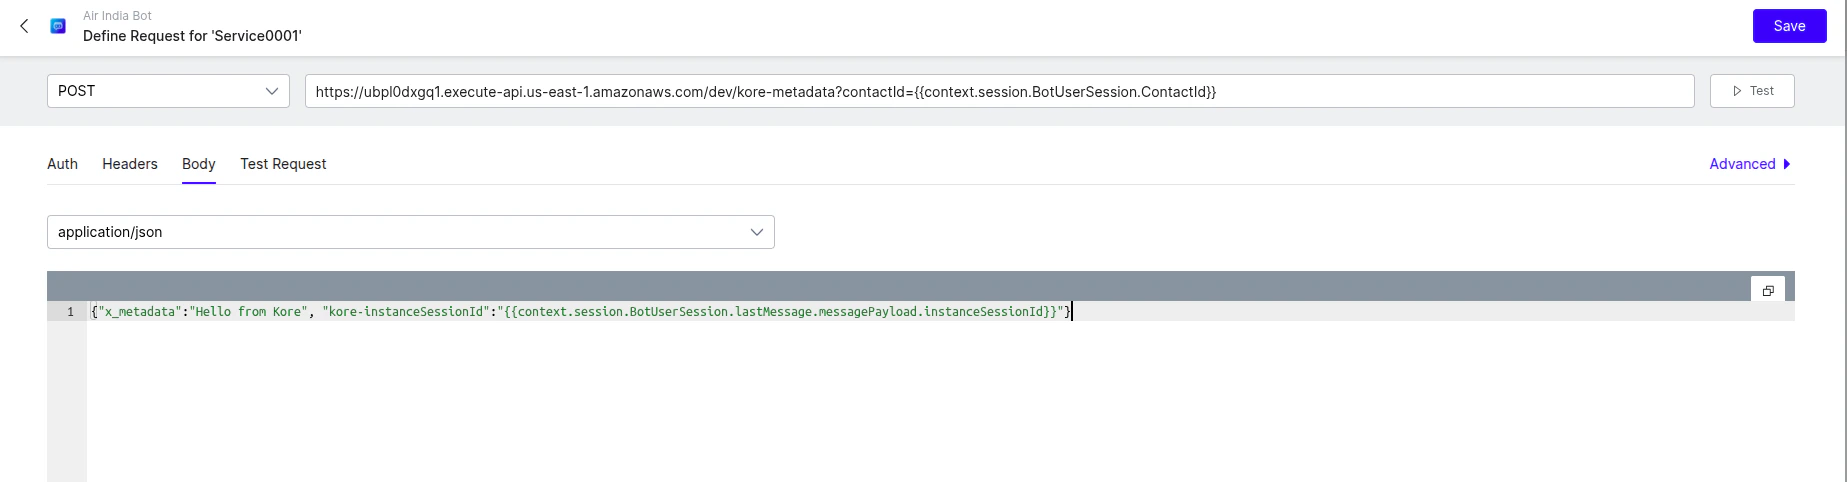 Pass the `kore-instanceSessionId` key and its value in the format as in the example above. The Agent AI widget requires this to retrieve the user's bot history. You can also include additional data as needed.
 * **Save** the configuration.
* **Publish** the bot.
### Validate Your Metadata
When you call the Amazon Connect number, the call routes to Kore Automation and, after agent transfer, returns to the Amazon Connect desktop.
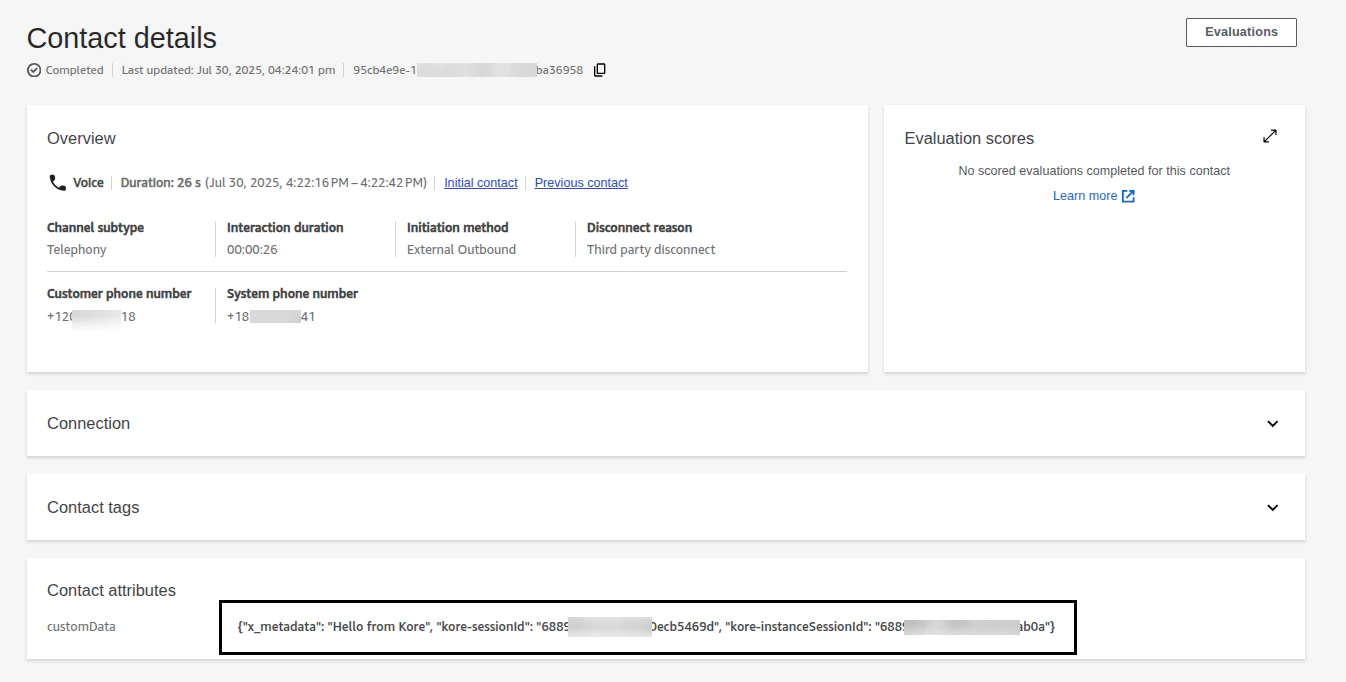
To view the metadata, check the **Flow CloudWatch** logs or use **Contact Search**:
1. Sign in to **Amazon Connect**.
2. Select **Analytics and optimization** > **Contact search**.
3. Filter the results by contact ID.
* **Save** the configuration.
* **Publish** the bot.
### Validate Your Metadata
When you call the Amazon Connect number, the call routes to Kore Automation and, after agent transfer, returns to the Amazon Connect desktop.
To view the metadata, check the **Flow CloudWatch** logs or use **Contact Search**:
1. Sign in to **Amazon Connect**.
2. Select **Analytics and optimization** > **Contact search**.
3. Filter the results by contact ID.
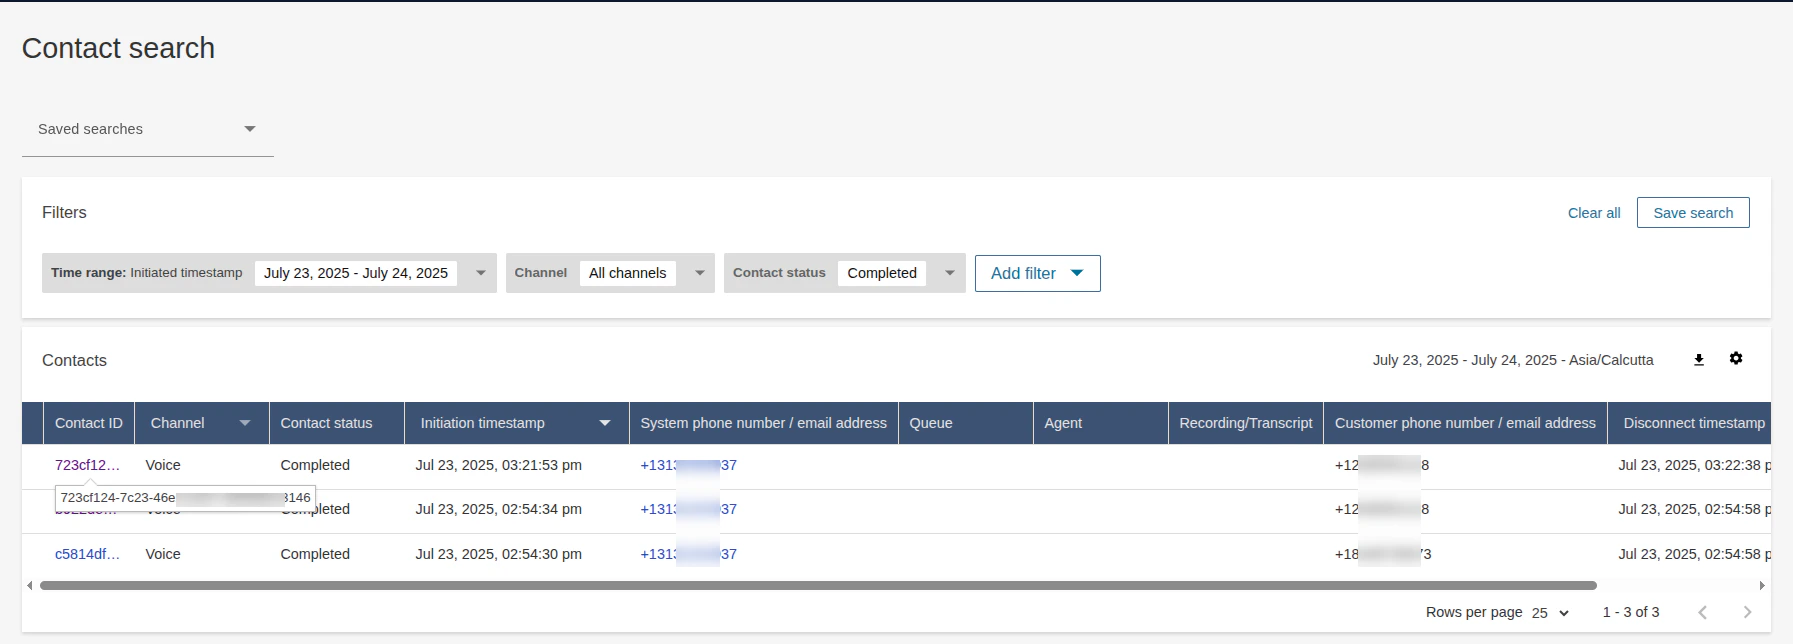 4. When you open a contact's details, the metadata appears as contact attributes.
 ## Passing Metadata as Custom Data to Agent AI
To integrate Agent AI as a third-party application (TPA) into the Amazon Connect workspace, follow [this](/ai-for-service/agentai/integration/amazon-connect-voice/amazon-connect-with-agentai-voice-via-aws-third-party-applications) document.
### Modify the Amazon Connect flow
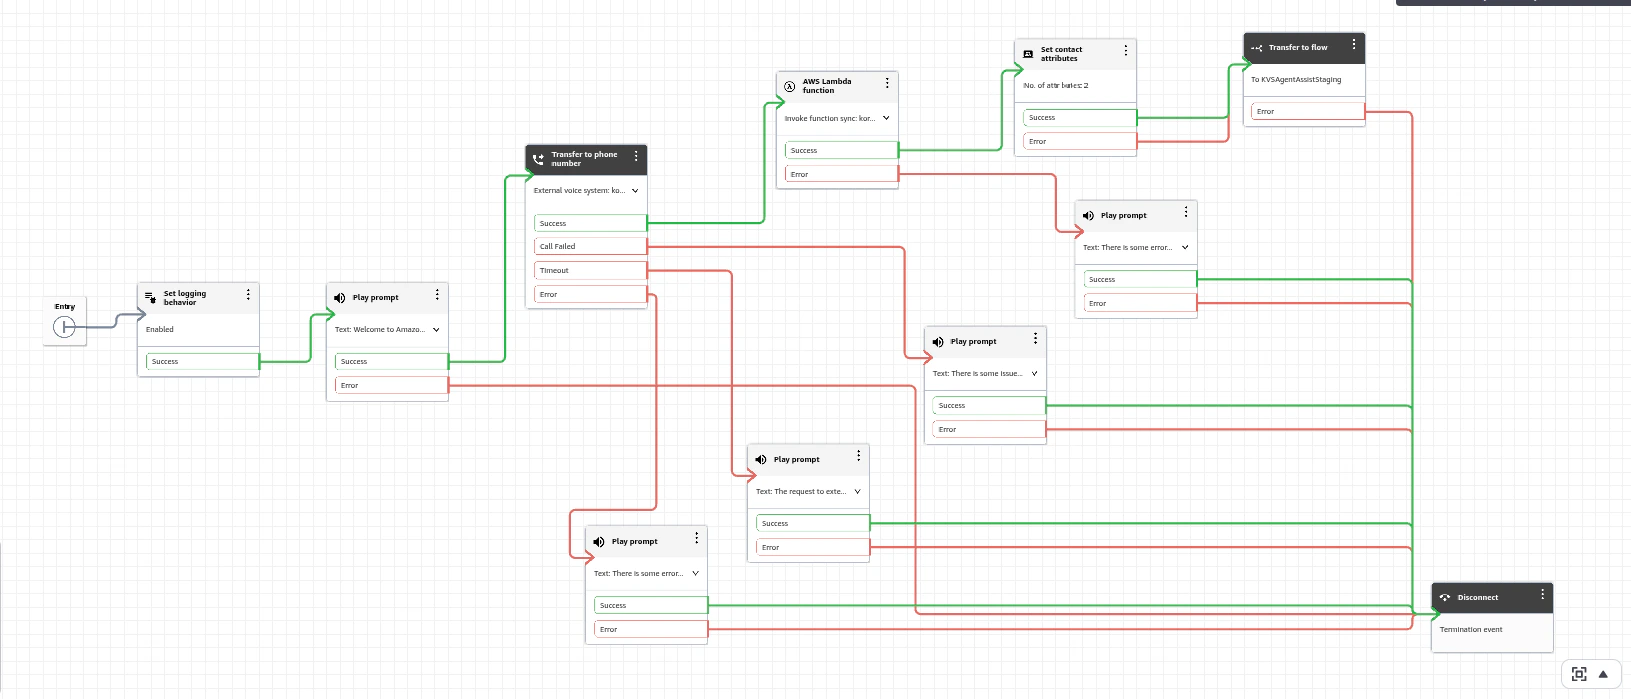
After integrating Agent AI as a TPA in Amazon Connect, create another contact flow (for example, *KVSAgentAssist*). Add this to the flow you created or imported (*TransfertoKore\&MetadataPassing*).
The following screenshot shows the completed contact flow:
## Passing Metadata as Custom Data to Agent AI
To integrate Agent AI as a third-party application (TPA) into the Amazon Connect workspace, follow [this](/ai-for-service/agentai/integration/amazon-connect-voice/amazon-connect-with-agentai-voice-via-aws-third-party-applications) document.
### Modify the Amazon Connect flow
After integrating Agent AI as a TPA in Amazon Connect, create another contact flow (for example, *KVSAgentAssist*). Add this to the flow you created or imported (*TransfertoKore\&MetadataPassing*).
The following screenshot shows the completed contact flow:
 Any metadata that the previous steps pass from Kore to Amazon Connect becomes available in the Agent AI widget after it loads.
The Agent AI widget collects the `customData` contact attribute from Amazon Connect at runtime and passes it to the widget during its creation.
You can access this custom data in the Agent AI widget under the path: `context.session.UserContext.customData`.
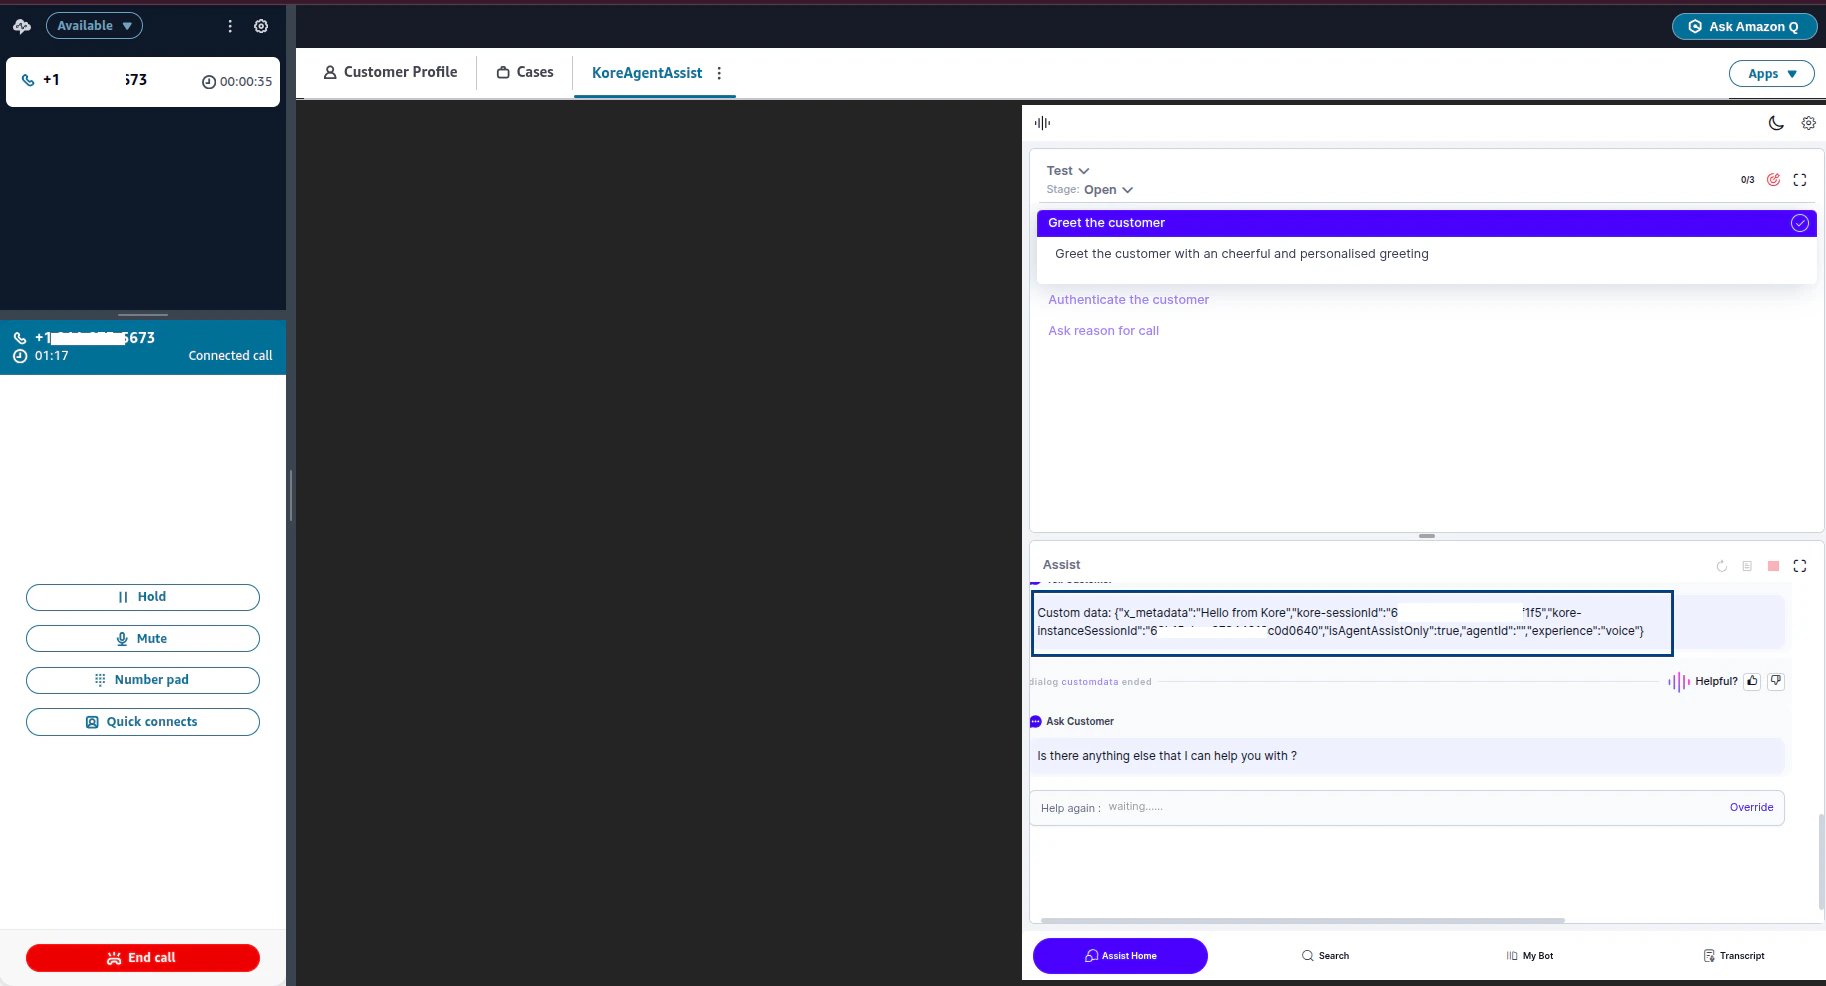
After accepting the call and loading the Agent AI widget, you can print the custom data.
Any metadata that the previous steps pass from Kore to Amazon Connect becomes available in the Agent AI widget after it loads.
The Agent AI widget collects the `customData` contact attribute from Amazon Connect at runtime and passes it to the widget during its creation.
You can access this custom data in the Agent AI widget under the path: `context.session.UserContext.customData`.
After accepting the call and loading the Agent AI widget, you can print the custom data.