> ## Documentation Index
> Fetch the complete documentation index at: https://koreai.mintlify.site/llms.txt
> Use this file to discover all available pages before exploring further.
# Adding the Slack Channel
[Back to Available Channels](/ai-for-service/channels/adding-channels-to-your-bot#available-channels)
To set up the Slack channel on the Platform and interact with an AI Agent using a Slack account, you must associate the AI Agent with a Slack app.
The Slack channel integration supports Direct Messaging (DM) and Channel (group) conversations via the Platform. When an AI Agent is added to a channel (group) within the Slack organization space, any member can start a group conversation using @mentions to talk to a specific AI Agent.
The Platform offers native support for threaded conversations in the Slack channel. Users can initiate a new thread from any message within a Slack channel or direct message group and continue a conversation with the AI Agent. The Platform leverages Slack’s threads to enable one-on-one conversations without losing the conversation context.
The Platform lets developers to configure how the Slack channel integration should handle DM and group conversations. It creates a new thread whenever users select @mentions the AI Agent in a Slack channel to provide flexibility to developers for the Threads feature.
To use Slack **Threads** for your AI Agent deployed on the Slack Channel, add the Bot token Scope `chat:write.public` to the existing Slack app under **OAuth & Permissions** > **Scopes** > **Bot Token Scopes**. [Learn more](#step-2-set-redirect-url-and-scopes)
**Prerequisites**
* Slack account
* Must be a member of a Slack organization space
**Channel Setup Summary**
To set up Slack as a channel, the developer must associate the AI Agent with a Slack app, set up an app user, and enable interactive components for this app. The steps include:
1. [Create an App on Slack](#step-1-create-an-app-on-slack).
2. [Set Redirect URL and Scopes](#step-2-set-redirect-url-and-scopes).
3. [Install the App](#step-3-install-the-app).
4. [Enable Interactivity](#step-4-enable-interactivity).
5. [Enable Events](#step-5-enable-events).
6. [Enable Interactions from the Message Tab](#step-6-enable-interactions-from-the-messages-tab).
7. [Configure App Credentials](#step-7-configure-app-credentials).
8. [Manage Distribution](#step-8-manage-distribution).
9. [Enable the Channel on the Platform](#step-9-enable-the-channel).
## Step 1: Create an App on Slack
1. In the Platform, select the assistant to which you want to add the Slack Channel.
2. Navigate to **Deploy** > **Channels** > **Slack** > **Configuration**.
3. In a new browser tab, [login](https://api.slack.com/) to the Slack developer portal and navigate to the **Your Apps** section [here](https://api.slack.com/apps). If this is your first app, click **Create an App**. If you already have some apps, then click **Your Apps**.
 4. Select **From Scratch**. This option lets you configure your app’s scopes and settings.
5. On the **Create a Slack App** window, enter the **App Name** and select a **team** from the Development Slack Team drop-down list. Use your assistant’s name as the App Name.
4. Select **From Scratch**. This option lets you configure your app’s scopes and settings.
5. On the **Create a Slack App** window, enter the **App Name** and select a **team** from the Development Slack Team drop-down list. Use your assistant’s name as the App Name.
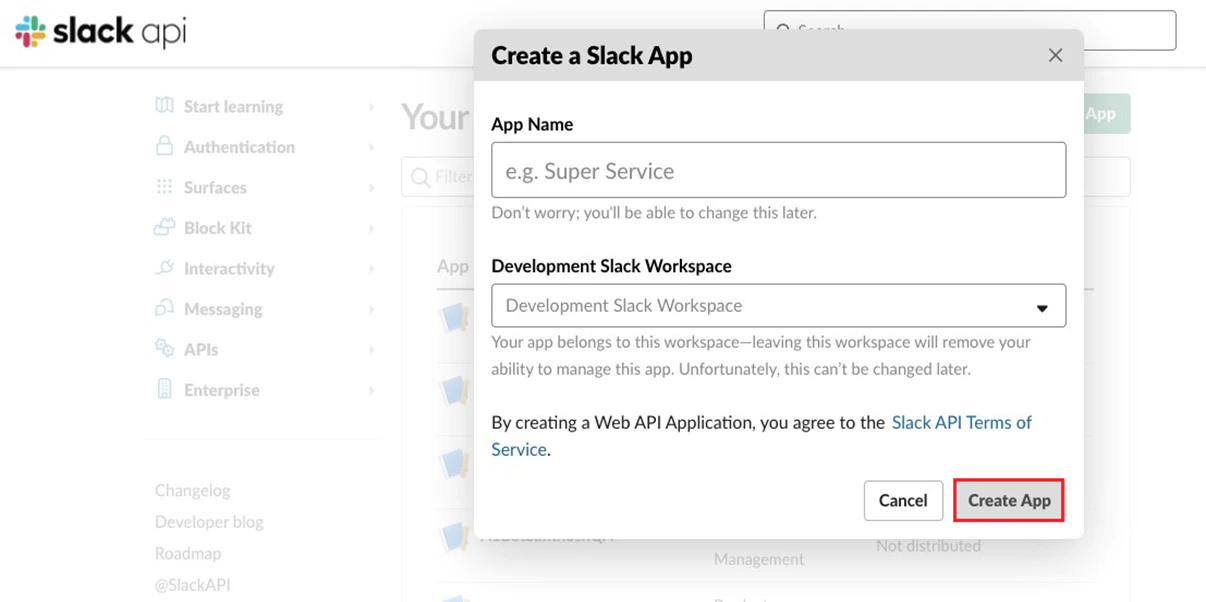 6. Click **Create App**. This creates a new app and redirect you to the basic information section of the new app.
## Step 2: Set Redirect URL and Scopes
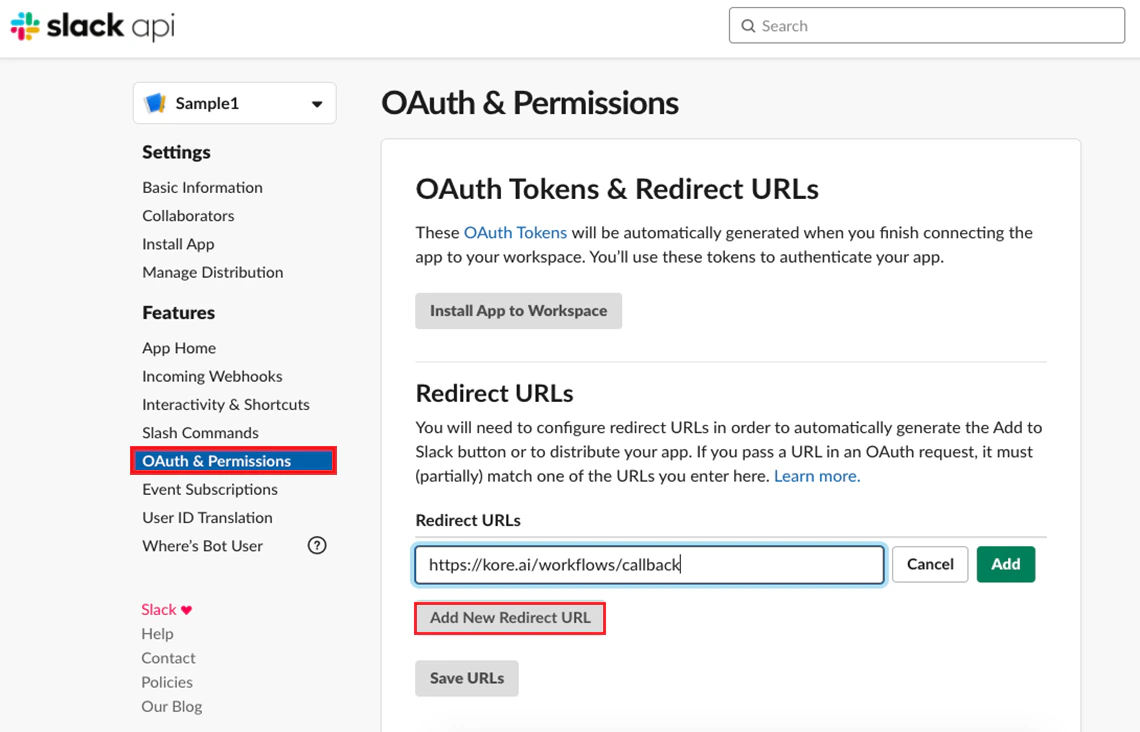
1. Click **OAuth & Permissions** on the left menu and click **Add New Redirect URL** on the resulting page.
2. On the Platform, copy the Redirect URL from the **Configurations** section and paste it in the **Redirect URLs** field of the **OAuth Tokens & Redirect URLs** page.
3. Click **Add** and **Save URLs**.
6. Click **Create App**. This creates a new app and redirect you to the basic information section of the new app.
## Step 2: Set Redirect URL and Scopes
1. Click **OAuth & Permissions** on the left menu and click **Add New Redirect URL** on the resulting page.
2. On the Platform, copy the Redirect URL from the **Configurations** section and paste it in the **Redirect URLs** field of the **OAuth Tokens & Redirect URLs** page.
3. Click **Add** and **Save URLs**.
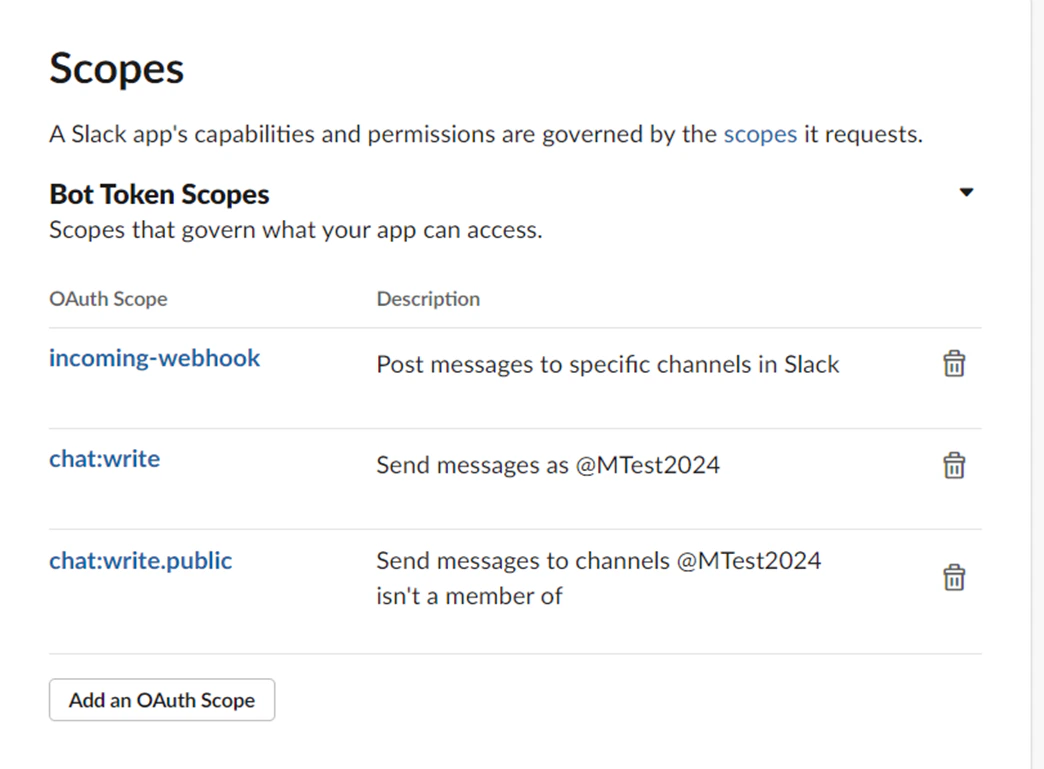
 4. Navigates to **Scopes** > **Bot Token Scopes** section and add `incoming-webhook`, `chat:write`, and `chat:write.public` scopes. For users to send attachments to your app, select the `files:write` scope.
To send Proactive Notifications to users on Slack, select the `users:read`, `users:read.email`, and `team:read` scopes.
4. Navigates to **Scopes** > **Bot Token Scopes** section and add `incoming-webhook`, `chat:write`, and `chat:write.public` scopes. For users to send attachments to your app, select the `files:write` scope.
To send Proactive Notifications to users on Slack, select the `users:read`, `users:read.email`, and `team:read` scopes.
 ## Step 3: Install the App
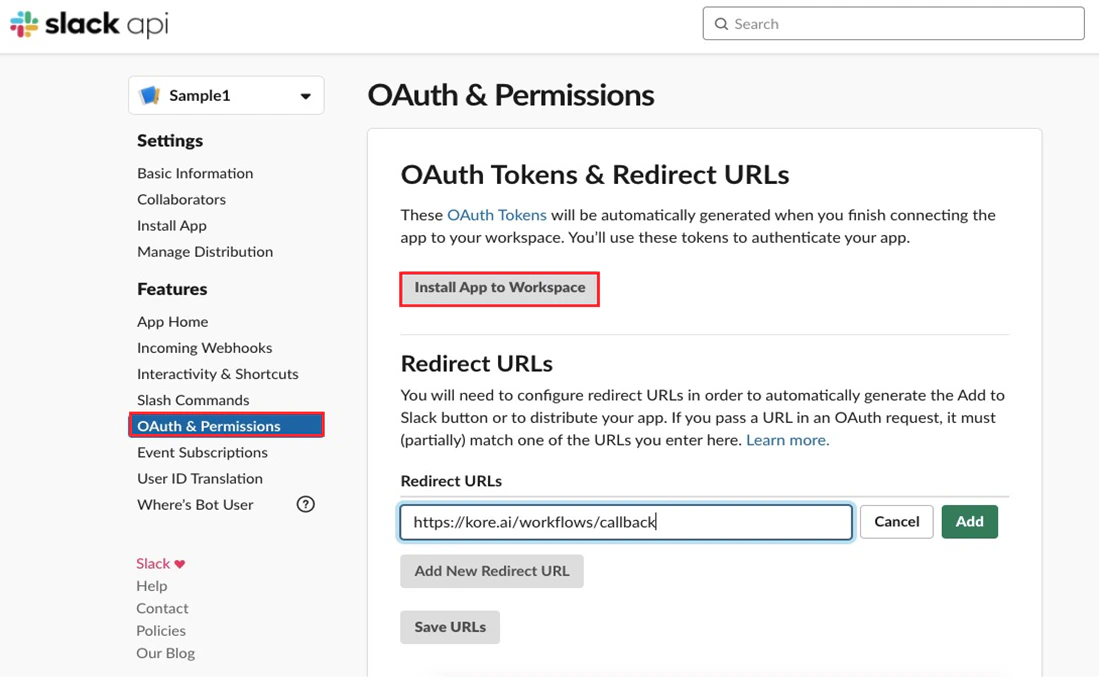
1. Navigate to **OAuth & Permissions** > **OAuth Tokens & Redirect URLs** > **Install App to Workspace** and choose the required Workspace and complete the process.
## Step 3: Install the App
1. Navigate to **OAuth & Permissions** > **OAuth Tokens & Redirect URLs** > **Install App to Workspace** and choose the required Workspace and complete the process.
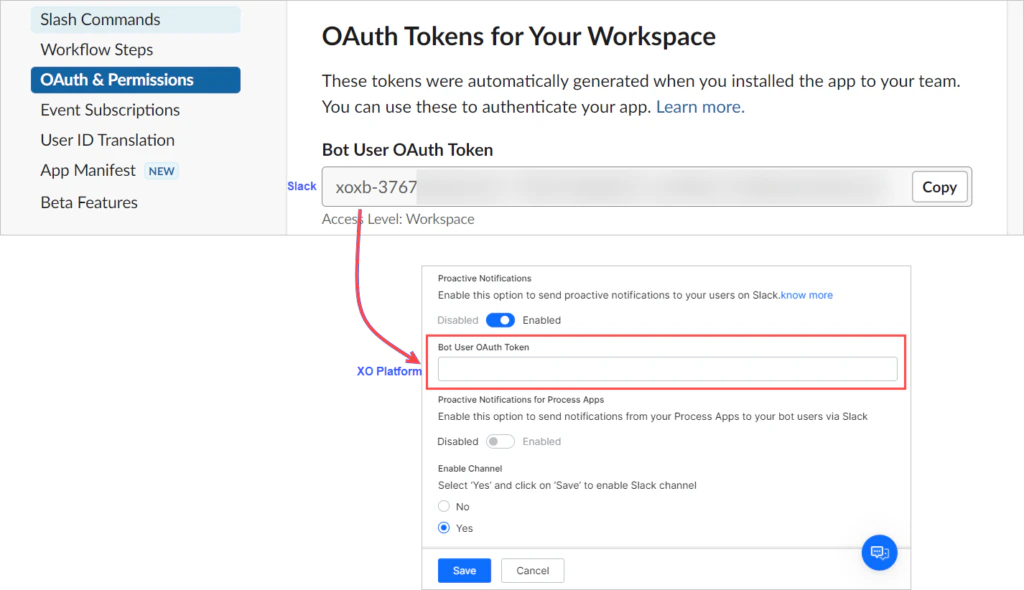
 2. (Optional) To send Proactive Notifications to your users on the Slack, copy the **Bot User OAuth Token** from the **OAuth Tokens for Your Team** section and enter it in the Slack Channel **Configurations** section on the Platform.
 ## Step 4: Enable Interactivity
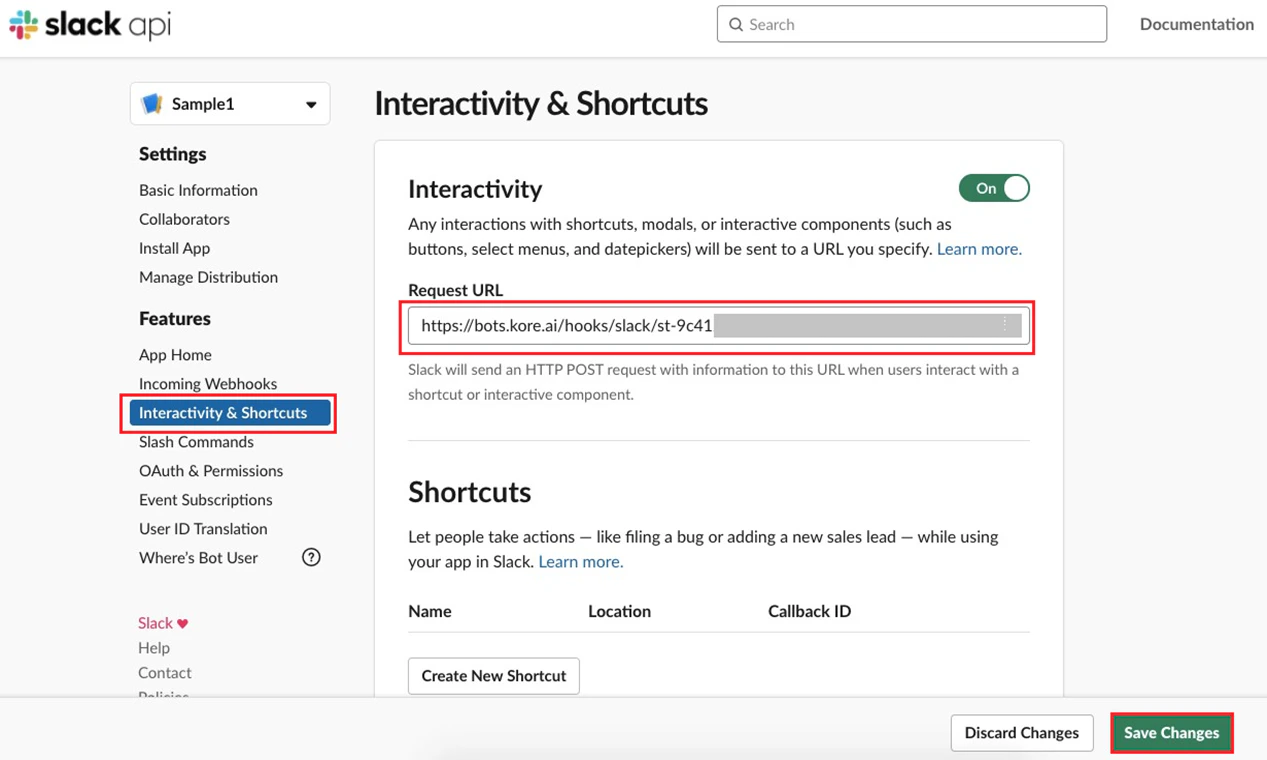
1. Navigate to **Interactivity & Shortcuts** and enable **Interactivity**.
2. On the Platform, copy the **Webhook URL** from the Slack channel’s **Configurations** tab and enter it in the **Request URL** field on Slack. Click **Save Changes**.
The Webhook URL includes the `streamid` in the API request to identify the AI Agent. When an incoming request qualifies with the identifier, it helps with traceability, troubleshooting, and remediation at the network level during anomalies such as malicious calls or unusual app activity.
## Step 4: Enable Interactivity
1. Navigate to **Interactivity & Shortcuts** and enable **Interactivity**.
2. On the Platform, copy the **Webhook URL** from the Slack channel’s **Configurations** tab and enter it in the **Request URL** field on Slack. Click **Save Changes**.
The Webhook URL includes the `streamid` in the API request to identify the AI Agent. When an incoming request qualifies with the identifier, it helps with traceability, troubleshooting, and remediation at the network level during anomalies such as malicious calls or unusual app activity.
 ## Step 5: Enable Events
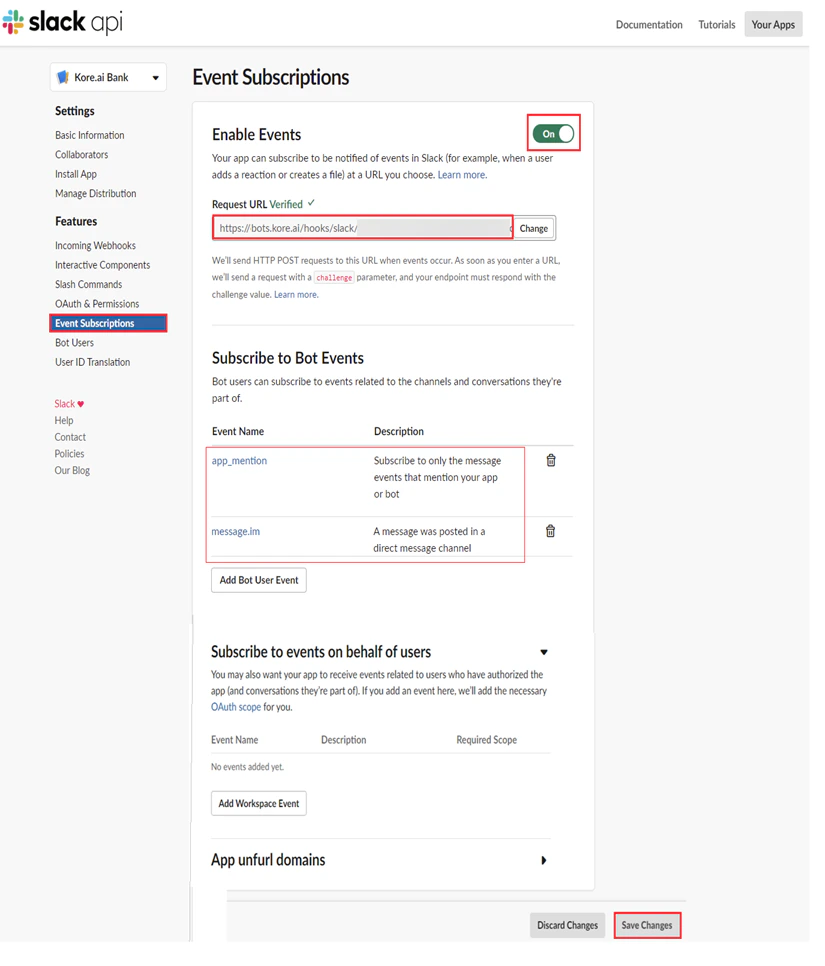
1. Navigate to **Event Subscriptions** and activate the **Enable Events** option.
2. On the Platform, copy the Webhook URL from the Slack channel’s Configurations section and paste it in the **Request URL** field in the **Enable Subscriptions** section.
3. In the **Subscribe to Bot Events** section, add the following events and Click **Save Changes**.
* `app_mention`
* `message.im`
* `App_installed`
* `App_home_opened`
## Step 5: Enable Events
1. Navigate to **Event Subscriptions** and activate the **Enable Events** option.
2. On the Platform, copy the Webhook URL from the Slack channel’s Configurations section and paste it in the **Request URL** field in the **Enable Subscriptions** section.
3. In the **Subscribe to Bot Events** section, add the following events and Click **Save Changes**.
* `app_mention`
* `message.im`
* `App_installed`
* `App_home_opened`
 ## Step 6: Enable Interactions from the Messages tab
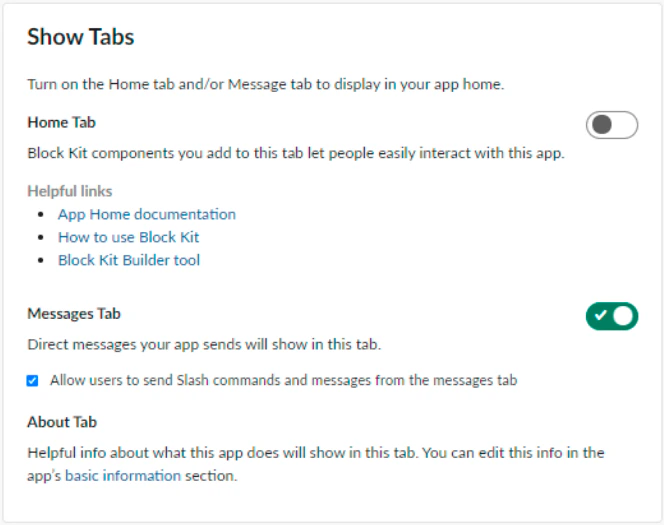
1. Navigate to **App Home** > **Show tabs** and enable the **Messages Tab**.
2. Check the **Allow users to send Slash commands and messages from the messages tab**. This lets users to directly interact with the app from the **Messages** section.
## Step 6: Enable Interactions from the Messages tab
1. Navigate to **App Home** > **Show tabs** and enable the **Messages Tab**.
2. Check the **Allow users to send Slash commands and messages from the messages tab**. This lets users to directly interact with the app from the **Messages** section.
 The Slack channel supports an optional welcome experience that introduces users to the AI Agent after installation and during their first interaction on app home. When enabled, the Platform sends a welcome message to the installer and displays onboarding content in the Slack app home, including setup guidance, bot capabilities, and help information.
## Step 7: Configure App Credentials
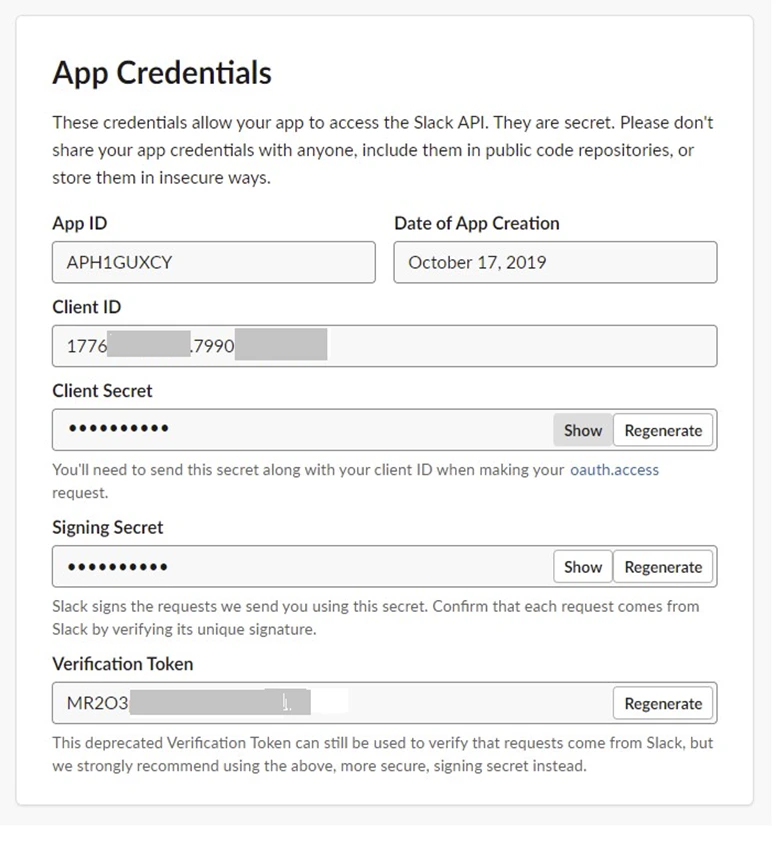
1. Navigate to **Basic Information** and scroll down to the **App Credentials** section.
2. Copy the values for **Client ID**, **Client Secret**, and **Verification Token** fields and paste them in the **Configurations** section of the Slack Channel on the Platform.
The Slack channel supports an optional welcome experience that introduces users to the AI Agent after installation and during their first interaction on app home. When enabled, the Platform sends a welcome message to the installer and displays onboarding content in the Slack app home, including setup guidance, bot capabilities, and help information.
## Step 7: Configure App Credentials
1. Navigate to **Basic Information** and scroll down to the **App Credentials** section.
2. Copy the values for **Client ID**, **Client Secret**, and **Verification Token** fields and paste them in the **Configurations** section of the Slack Channel on the Platform.
 ## Step 8: Manage Distribution
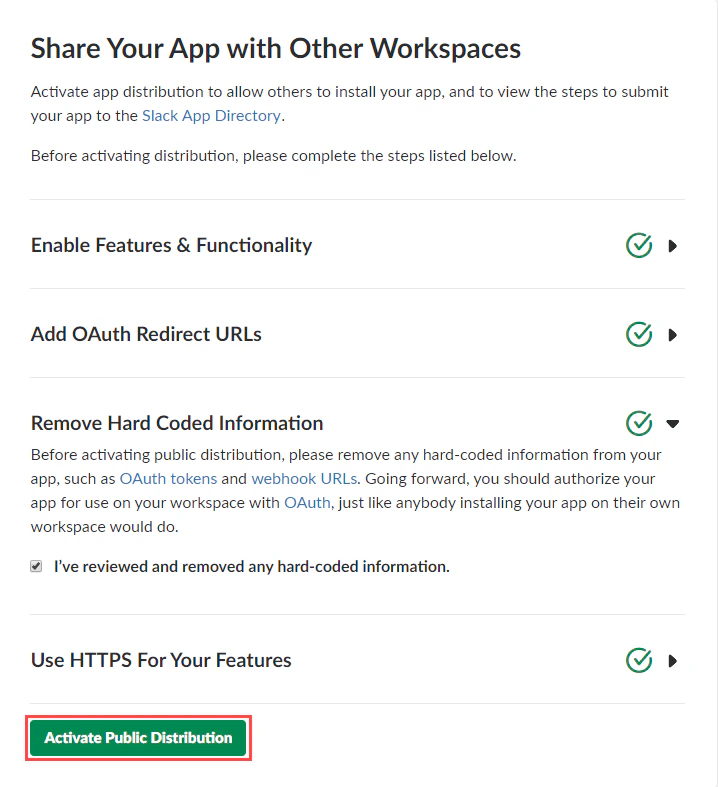
1. Navigate to **Manage Distribution** and click **Remove Hard Coded Information**.
2. Select **I’ve reviewed and removed any hard-coded information** and click **Activate Public Distribution**.
## Step 8: Manage Distribution
1. Navigate to **Manage Distribution** and click **Remove Hard Coded Information**.
2. Select **I’ve reviewed and removed any hard-coded information** and click **Activate Public Distribution**.
 ## Step 9: Enable the Channel
1. Navigate to **Channels** > **Slack** > **Configurations**.
2. Copy the following information and use it to define the app properties on Slack:
* `App Name`
* `Redirect URL`
* `Webhook URL`
3. Copy and paste the following information from the Slack app and Click **Authorize**.
* `Client ID`
* `Client Secret`
* `Verification Token`
4. In the **Customize Slack Channel’s Conversations** section, select one of the following options to define the conversation behavior of the AI Agent.
* **Continue the conversation with the AI Agent in the channel** (This is the default selection. It maintains the current behavior for DM and group messages. However, if a user intentionally starts a thread with the AI Agent, the conversation will continue within that thread).
* **Create a new thread for every user message(@mentioned to the AI Agent) in the channel** (For every user message in the channel such as DM and Channel conversations)
* Creates a new thread and replies to the user message in the thread.
* Treats each conversation thread as a separate session whenever it's created in the channel, maintaining context isolation.
* Treats each conversation thread as a new user conversation whenever it's created for Slack DM.
All the consecutive interactions between the user and the AI Agent happen in the same thread irrespective of the option you select. The existing apps default to the first option, ensuring zero disruptions to current deployments.
5. Enable the **Proactive Notifications** toggle button. This step is optional. This option lets you to send proactive notifications from your process apps to your AI Agent users via Slack. Please refer to Step 3. when enabled, select the required process apps from the list for your AI Agent, and click **Authorize**.
6. For a welcome experience, enable this option to automatically send a welcome message. This option is disabled by default to maintain backward compatibility with existing deployments.
7. Under **Enable Channel**, select **Yes** and click **Save** to enable the Slack channel.
When the Slack channel is added successfully, it's optional to submit your app to the Slack app directory. When the channel is enabled and all configurations are verified, you can optionally publish the app to make it available for end-users, with the new channel. [Publishing your App](/ai-for-service/deployment/publishing-app).
## Step 9: Enable the Channel
1. Navigate to **Channels** > **Slack** > **Configurations**.
2. Copy the following information and use it to define the app properties on Slack:
* `App Name`
* `Redirect URL`
* `Webhook URL`
3. Copy and paste the following information from the Slack app and Click **Authorize**.
* `Client ID`
* `Client Secret`
* `Verification Token`
4. In the **Customize Slack Channel’s Conversations** section, select one of the following options to define the conversation behavior of the AI Agent.
* **Continue the conversation with the AI Agent in the channel** (This is the default selection. It maintains the current behavior for DM and group messages. However, if a user intentionally starts a thread with the AI Agent, the conversation will continue within that thread).
* **Create a new thread for every user message(@mentioned to the AI Agent) in the channel** (For every user message in the channel such as DM and Channel conversations)
* Creates a new thread and replies to the user message in the thread.
* Treats each conversation thread as a separate session whenever it's created in the channel, maintaining context isolation.
* Treats each conversation thread as a new user conversation whenever it's created for Slack DM.
All the consecutive interactions between the user and the AI Agent happen in the same thread irrespective of the option you select. The existing apps default to the first option, ensuring zero disruptions to current deployments.
5. Enable the **Proactive Notifications** toggle button. This step is optional. This option lets you to send proactive notifications from your process apps to your AI Agent users via Slack. Please refer to Step 3. when enabled, select the required process apps from the list for your AI Agent, and click **Authorize**.
6. For a welcome experience, enable this option to automatically send a welcome message. This option is disabled by default to maintain backward compatibility with existing deployments.
7. Under **Enable Channel**, select **Yes** and click **Save** to enable the Slack channel.
When the Slack channel is added successfully, it's optional to submit your app to the Slack app directory. When the channel is enabled and all configurations are verified, you can optionally publish the app to make it available for end-users, with the new channel. [Publishing your App](/ai-for-service/deployment/publishing-app).