> ## Documentation Index
> Fetch the complete documentation index at: https://koreai.mintlify.site/llms.txt
> Use this file to discover all available pages before exploring further.
# Configure Digital Forms
In this how-to, we'll walk through a Banking App scenario where a user creates an additional account, using Digital Forms to gather the required information.
For details on what Digital Forms are and how they're implemented in the Platform, see [Digital Forms](/ai-for-service/automation/digital-skills/digital-forms).
## Illustration with an Example
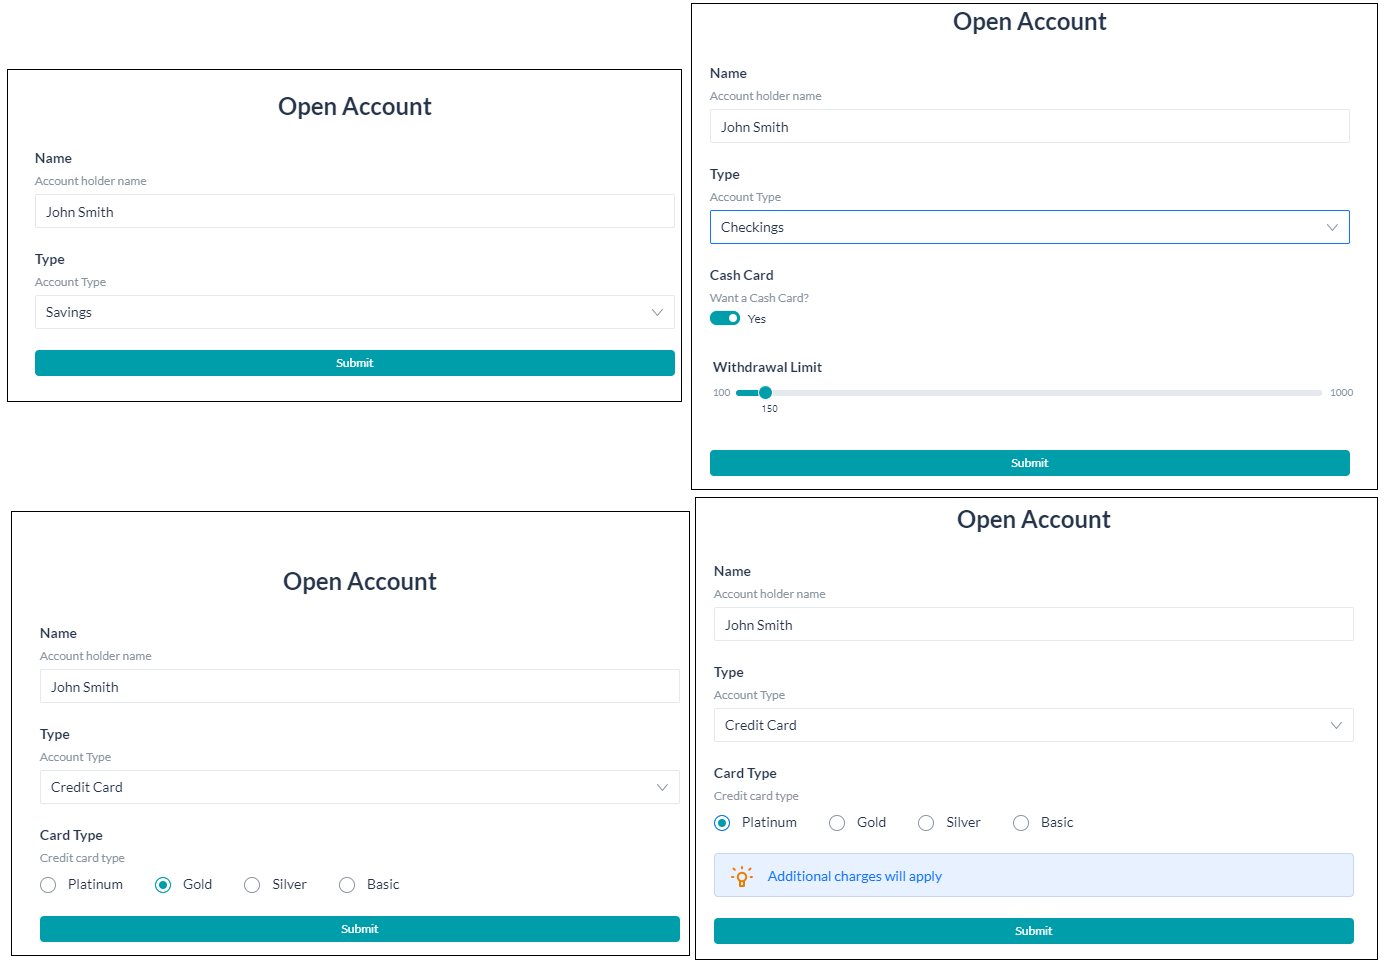
Consider a Banking App trying to address the following scenarios:
1. An already registered user wants to open an additional account.
2. There are three types of accounts that are available, each with further options:
* Savings Account.
* Checking Account with an option to opt for a Cash Card and set the minimum balance.
* Credit Card with an option to choose the type of card to be Platinum, Gold, Silver or Basic.
 ### Prerequisites
* App building knowledge.
* A configured Banking App.
## Configurations
Let's consider each of the following scenarios:
1. Digital Form to gather input from the user;
2. Dialog Task to:
* Trigger the above Digital Form.
* Capture the user-entered account information.
### Digital Form Configuration
Create a form to gather the following information:
* **Account Name** – pre-populated with the user’s name with an option to change it;
* **Type of Account** that the user wants to create, default selection to Savings Account;
* Based on the type of account selected above the following details to be gathered:
* **Savings** – No further information required.
* **Checkings** – Whether Cash Card is required, if yes then the maximum withdrawal limit (range between $100 to $1000) to be enforced on that card;
* **Credit Card** – The type of card required
* Platinum card (levies additional charge).
* Gold
* Silver
* Basic
* **Trading** - Identity proof required.
### Form Creation
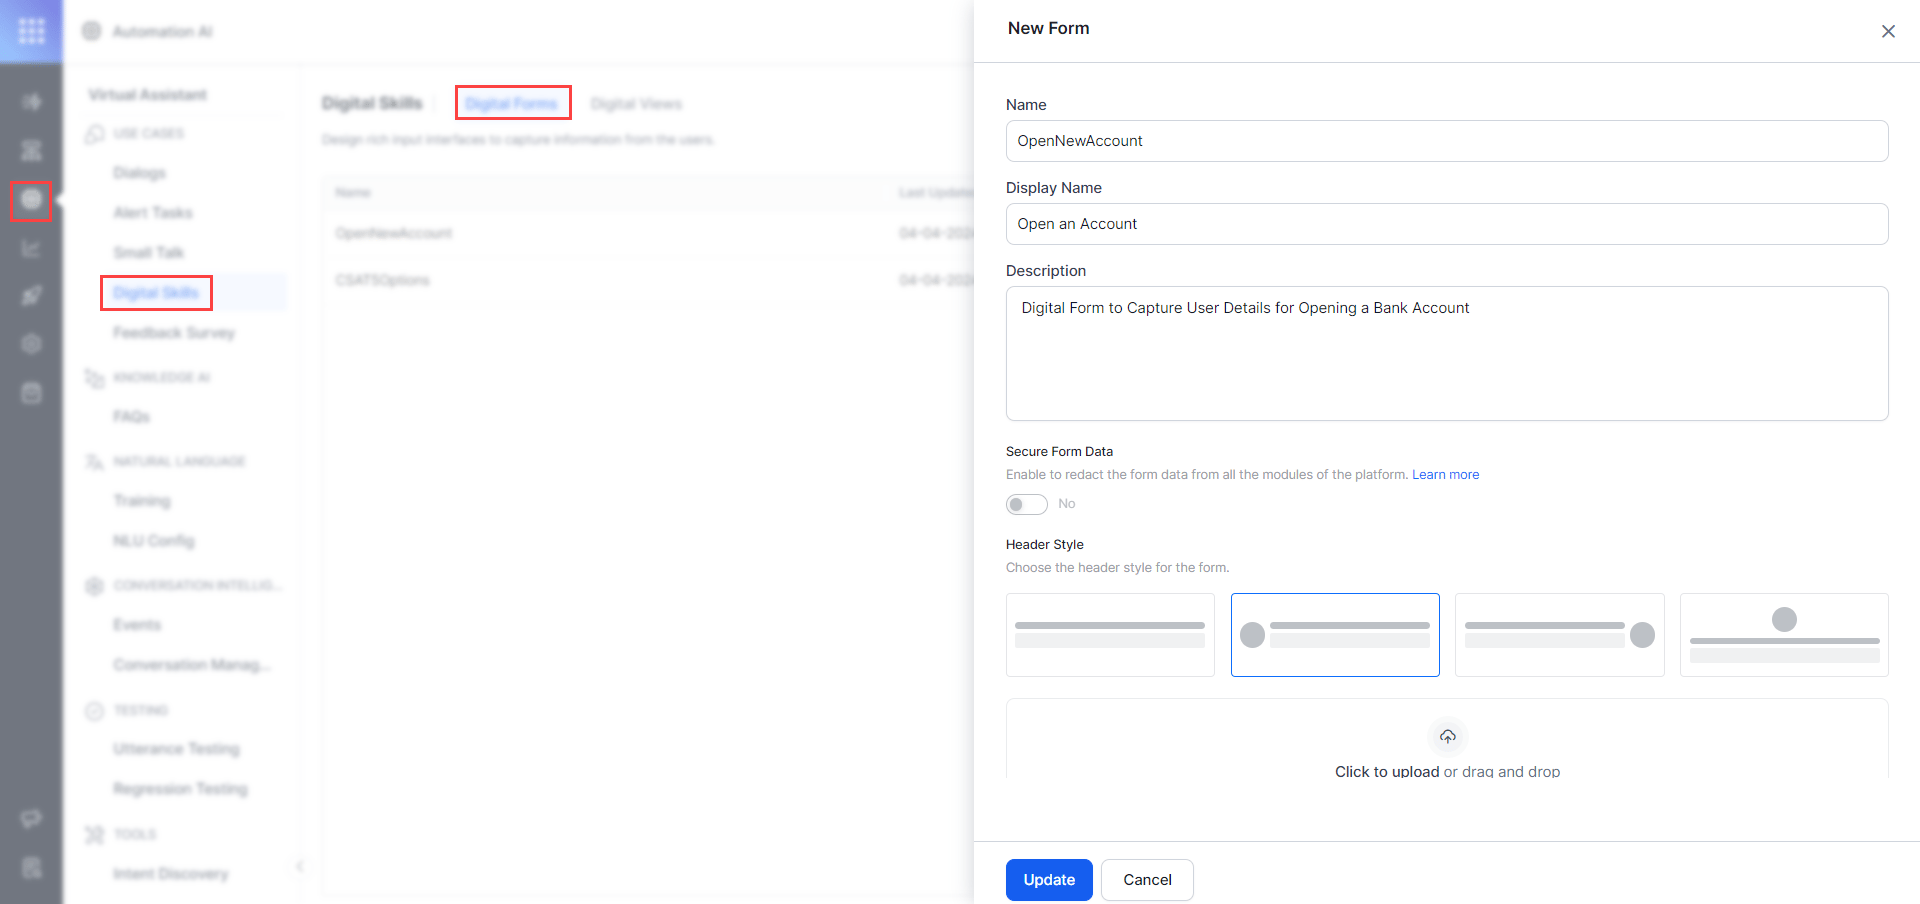
1. Navigate to **Automation AI > Use Cases > Digital Skills > Digital Forms** to access the Digital Forms page.
2. Click **New Form** and enter the following:
* **Name** – name of the form that will be used by the engine, let's set as *OpenNewAccount*
* **Display Name** for the form, let's set as *Open an Account*
* **Description** of the form.
**Select form’s Header Style**: You can choose a specific header style from the listed illustrations – the circle indicates the position of logo/icon with respect to the title of the form in the header.
Click the card to select the style. If it has a logo, you can upload an image file (png or jpg) for the logo.
During the Export of the App, the logo isn't exported along with Digital Forms. So, while importing this App, you need to separately copy the logo image file and then manually reupload the logo.
3. **Description**: Turn on the toggle to show a description of the form in the header.
4. **Save & Proceed** to the next step.
### Prerequisites
* App building knowledge.
* A configured Banking App.
## Configurations
Let's consider each of the following scenarios:
1. Digital Form to gather input from the user;
2. Dialog Task to:
* Trigger the above Digital Form.
* Capture the user-entered account information.
### Digital Form Configuration
Create a form to gather the following information:
* **Account Name** – pre-populated with the user’s name with an option to change it;
* **Type of Account** that the user wants to create, default selection to Savings Account;
* Based on the type of account selected above the following details to be gathered:
* **Savings** – No further information required.
* **Checkings** – Whether Cash Card is required, if yes then the maximum withdrawal limit (range between $100 to $1000) to be enforced on that card;
* **Credit Card** – The type of card required
* Platinum card (levies additional charge).
* Gold
* Silver
* Basic
* **Trading** - Identity proof required.
### Form Creation
1. Navigate to **Automation AI > Use Cases > Digital Skills > Digital Forms** to access the Digital Forms page.
2. Click **New Form** and enter the following:
* **Name** – name of the form that will be used by the engine, let's set as *OpenNewAccount*
* **Display Name** for the form, let's set as *Open an Account*
* **Description** of the form.
**Select form’s Header Style**: You can choose a specific header style from the listed illustrations – the circle indicates the position of logo/icon with respect to the title of the form in the header.
Click the card to select the style. If it has a logo, you can upload an image file (png or jpg) for the logo.
During the Export of the App, the logo isn't exported along with Digital Forms. So, while importing this App, you need to separately copy the logo image file and then manually reupload the logo.
3. **Description**: Turn on the toggle to show a description of the form in the header.
4. **Save & Proceed** to the next step.
 ### Form Editor
1. Form Editor opens with components on the left, and a blank form. You can drag and drop components to the form as per your requirement.
2. By default, a **Submit button** is added to the form. This would trigger the submit event which would capture the user input and save in context object.
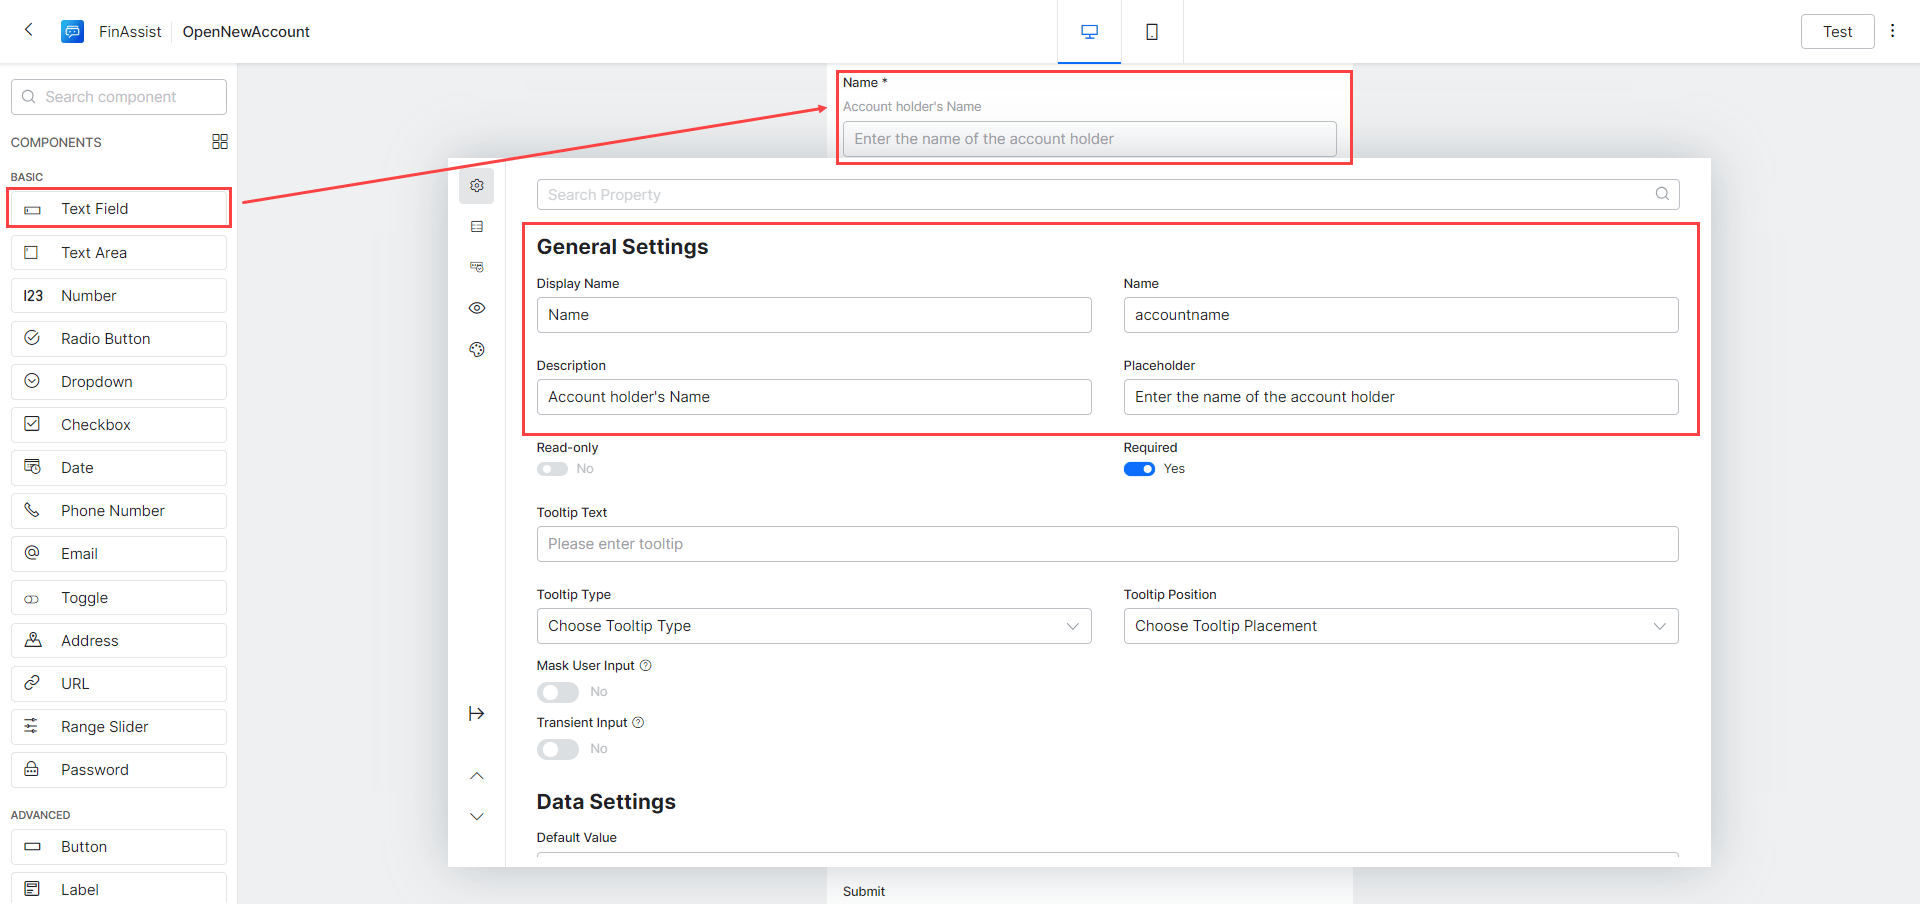
3. Drag and drop a **Text Field** component onto the form.
4. As soon as you drag and drop a component, its property settings panel will be displayed.
5. In that panel configure the following settings:
* **Display Name** set as *Name.*
* **Name** used for internal reference, set as *accountname.*
* **Description** of the field.
* **Placeholder** value to be displayed in the field when blank, set as, *Enter the name of the account holder*.
### Form Editor
1. Form Editor opens with components on the left, and a blank form. You can drag and drop components to the form as per your requirement.
2. By default, a **Submit button** is added to the form. This would trigger the submit event which would capture the user input and save in context object.
3. Drag and drop a **Text Field** component onto the form.
4. As soon as you drag and drop a component, its property settings panel will be displayed.
5. In that panel configure the following settings:
* **Display Name** set as *Name.*
* **Name** used for internal reference, set as *accountname.*
* **Description** of the field.
* **Placeholder** value to be displayed in the field when blank, set as, *Enter the name of the account holder*.
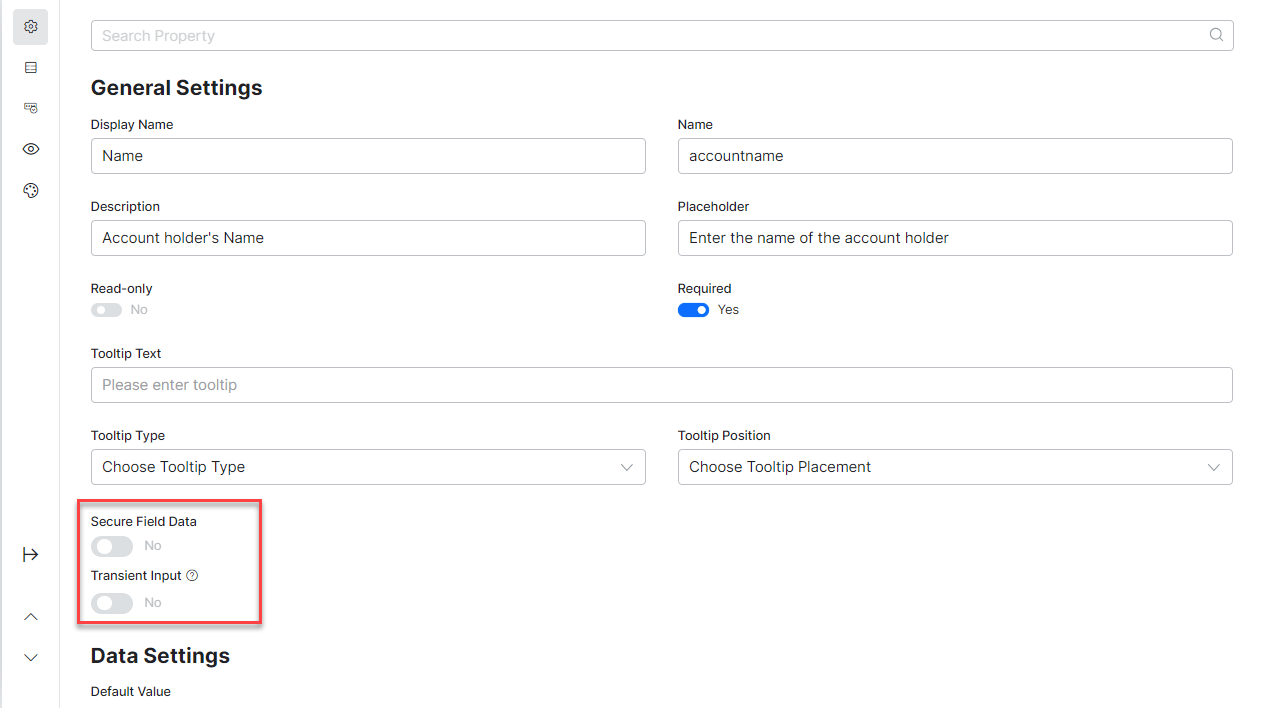
 * **Mask User Input/Secure Field Data** is a toggle under **Data Settings** that enables securing of the input data. The label of this toggle varies as below:
* If **Secure Form Data** is enabled, the caption of this toggle is **Mask User Input**. At runtime, the input data is masked.
* If **Secure Form Data** is disabled, the caption of this toggle is **Secure Field Data**. At runtime, the data of this field will be redacted. This would be a component level setting for data redaction.
* **Transient Input** is a toggle under **Data Settings** which, if enabled, ensures that the data provided in this field isn't stored anywhere after the session ends. This would mean that the data won't be available in the database or logs as well.
* **Mask User Input/Secure Field Data** is a toggle under **Data Settings** that enables securing of the input data. The label of this toggle varies as below:
* If **Secure Form Data** is enabled, the caption of this toggle is **Mask User Input**. At runtime, the input data is masked.
* If **Secure Form Data** is disabled, the caption of this toggle is **Secure Field Data**. At runtime, the data of this field will be redacted. This would be a component level setting for data redaction.
* **Transient Input** is a toggle under **Data Settings** which, if enabled, ensures that the data provided in this field isn't stored anywhere after the session ends. This would mean that the data won't be available in the database or logs as well.
 **Mask User Input/Secure Field Data** and **Transient Input** toggles are available for all the components, and need to be set on component level. Settings of one component will have no impact on others.
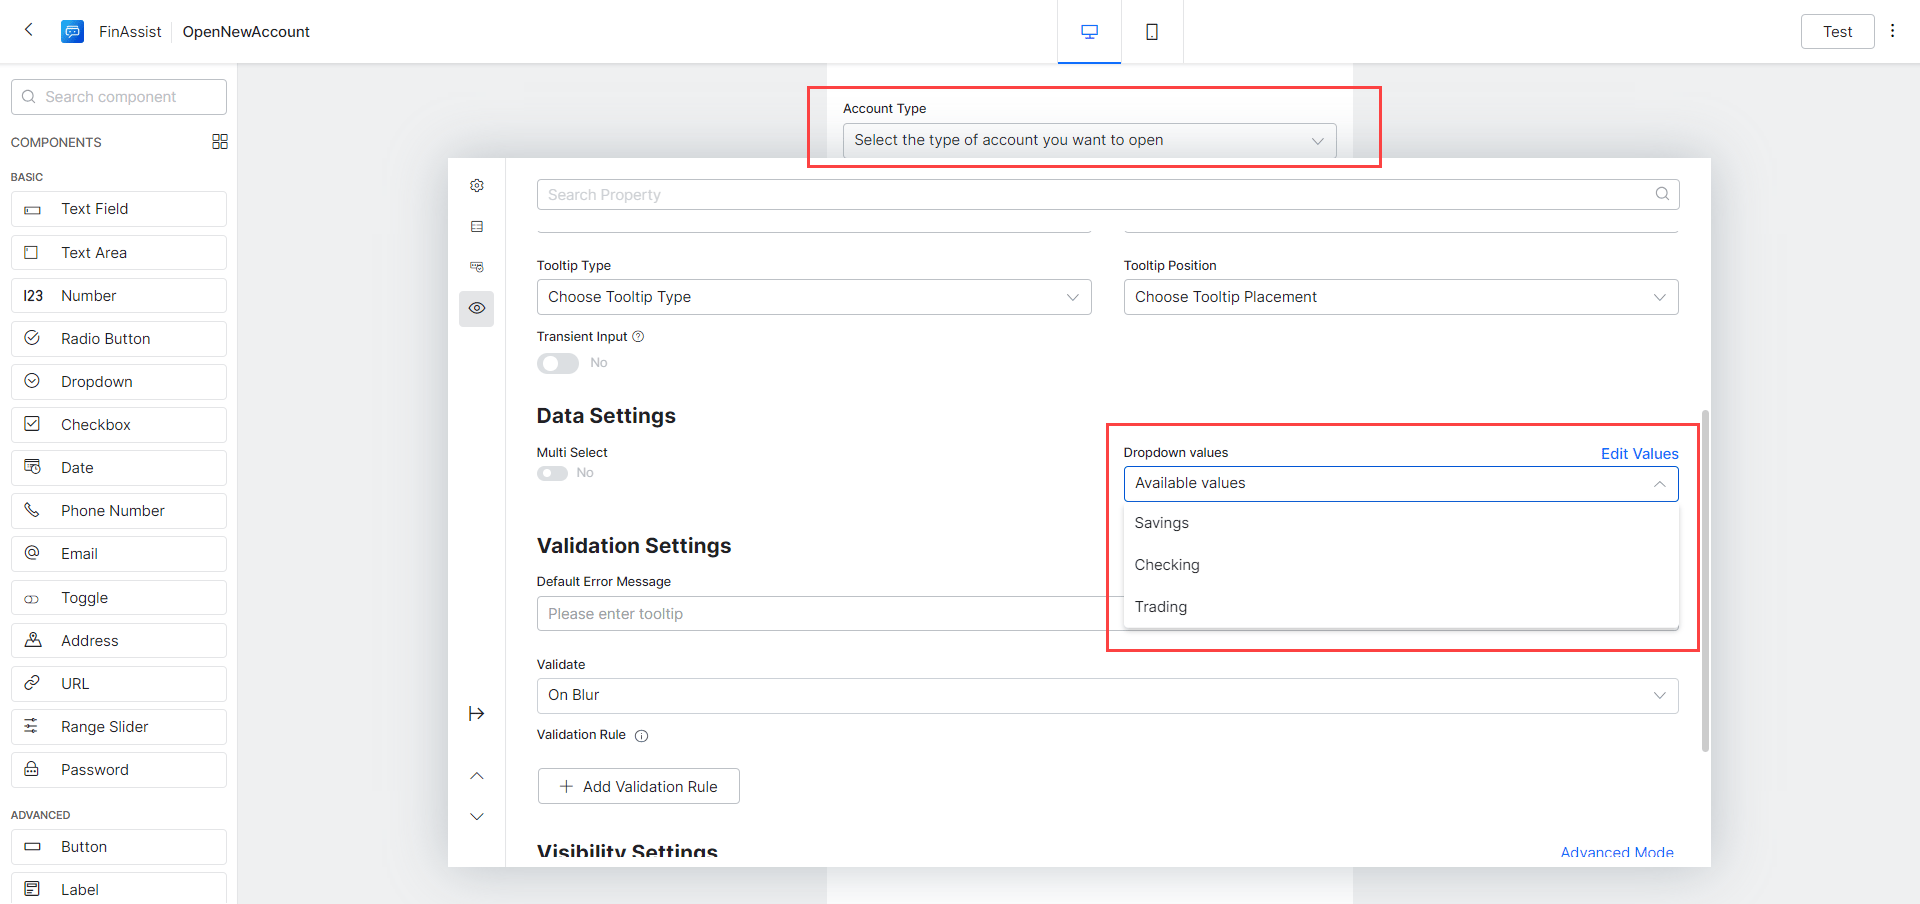
6. Next, a selection box for the type of account to be opened. Drag and drop a **Dropdown** component onto the form and set the following values:
* **Display Name** set as *Account Type.*
* **Name** used for internal reference, set as *accounttype.*
* **Description** of the field.
* **Placeholder** value to be displayed in the field when blank, set as, *Select the type of account you want to open*.
7. Scroll and locate **Data Settings**, and deselect **Multi Select** option.
8. Against **Dropdown values** click **Add Values** to enter the values – *Checking, Savings, Credit Card, Trading.* You can mark one value, *Savings*, as default. This would be selected by default at the time of execution.
**Mask User Input/Secure Field Data** and **Transient Input** toggles are available for all the components, and need to be set on component level. Settings of one component will have no impact on others.
6. Next, a selection box for the type of account to be opened. Drag and drop a **Dropdown** component onto the form and set the following values:
* **Display Name** set as *Account Type.*
* **Name** used for internal reference, set as *accounttype.*
* **Description** of the field.
* **Placeholder** value to be displayed in the field when blank, set as, *Select the type of account you want to open*.
7. Scroll and locate **Data Settings**, and deselect **Multi Select** option.
8. Against **Dropdown values** click **Add Values** to enter the values – *Checking, Savings, Credit Card, Trading.* You can mark one value, *Savings*, as default. This would be selected by default at the time of execution.
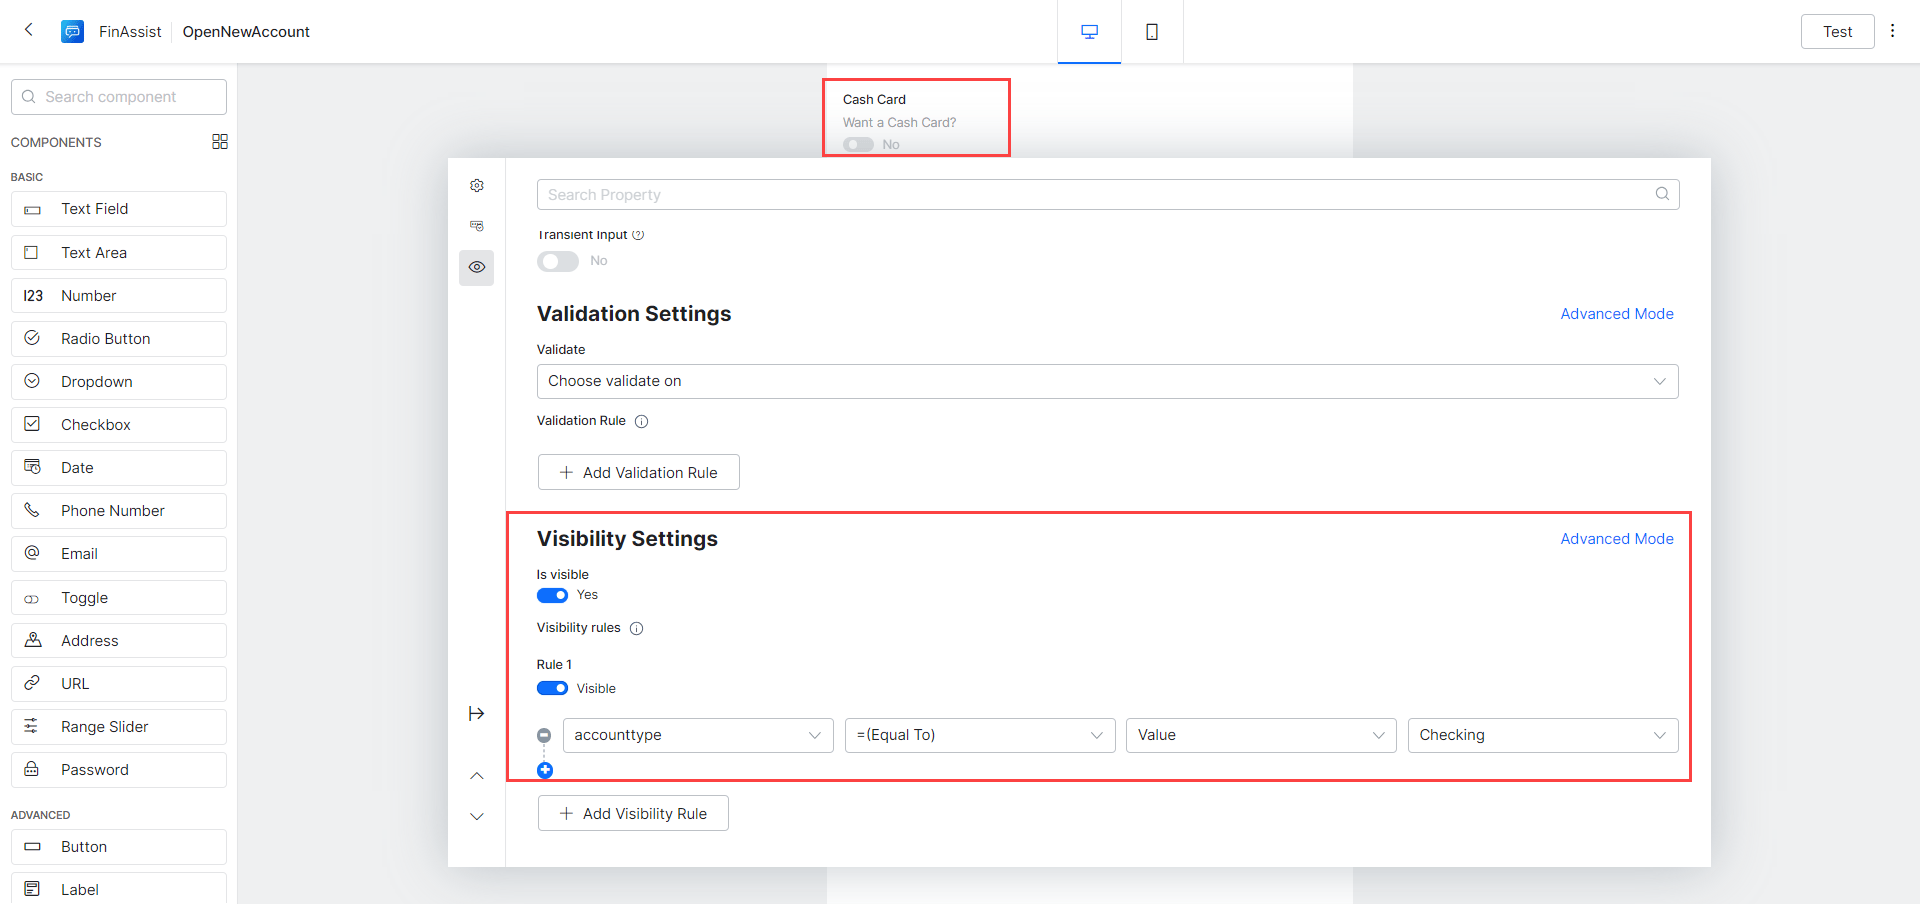
 9. Next, for the Cash Card option when the account type is selected to be a Checkings account. Drag and drop a **Toggle** component onto the form and set the following values:
* **Display Name** set as *Cash Card.*
* **Name** used for internal reference, set as *cashcard*.
* **Description** of the field. In this case, the question, *Want a cash card?*
* **Value** as *Yes* when selected and *No* when deselected.
10. Scroll and locate **Visibility Settings.** This component should be visible only when the account type is set to Checkings.
11. Add **Visibility Rules – Rule 1** for the field to be **Visible**, select **accounttype** field, *=(Equal To)* operator, *Value* comparison with, *Checkings* value.
9. Next, for the Cash Card option when the account type is selected to be a Checkings account. Drag and drop a **Toggle** component onto the form and set the following values:
* **Display Name** set as *Cash Card.*
* **Name** used for internal reference, set as *cashcard*.
* **Description** of the field. In this case, the question, *Want a cash card?*
* **Value** as *Yes* when selected and *No* when deselected.
10. Scroll and locate **Visibility Settings.** This component should be visible only when the account type is set to Checkings.
11. Add **Visibility Rules – Rule 1** for the field to be **Visible**, select **accounttype** field, *=(Equal To)* operator, *Value* comparison with, *Checkings* value.
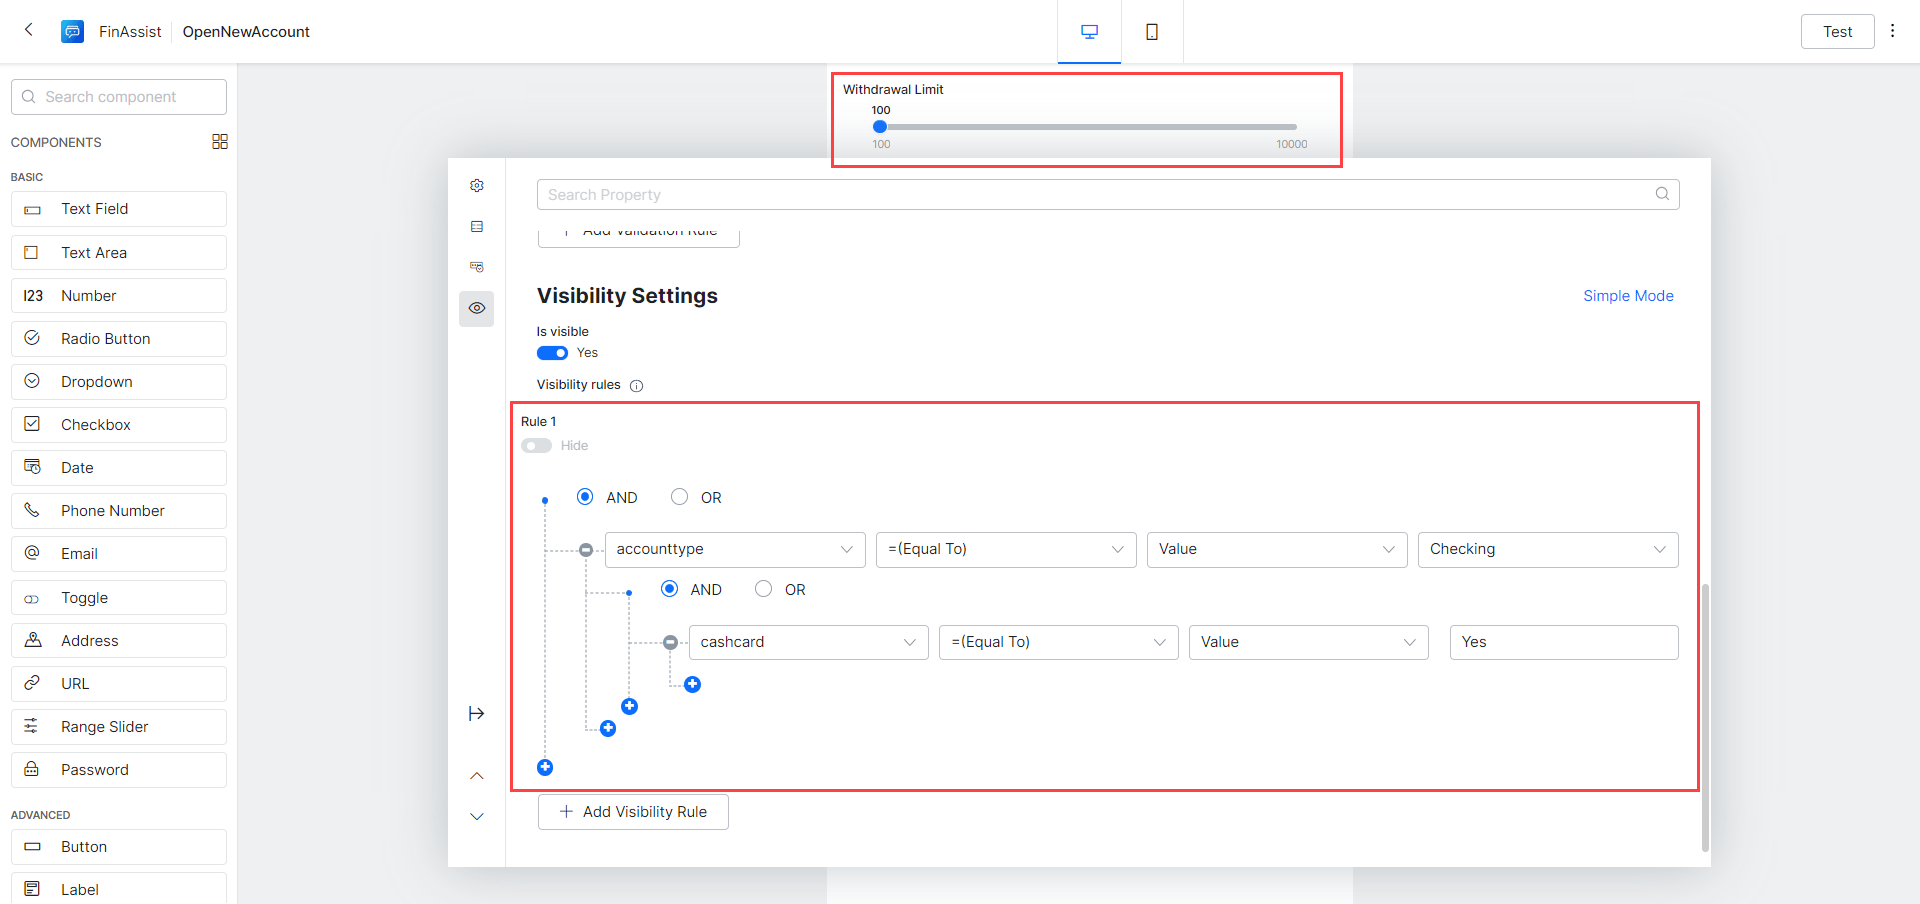
 12. If the user opts for cash card, then the withdrawal limit needs to be set on the same. Drag and drop a **Range Slider** component onto the form and set the following values:
* **Display Name** set as *Withdrawal Limit.*
* **Name** used for internal reference, set as *withdrawallimit.*
* **Description** of the field.
* **Placeholder** value to be displayed in the field when blank, set as, *Set the withdrawal limit*.
13. Deselect **Is Percentage**
14. Select **Value** as *100* for Min and *10000* for Max.
15. Under **Data Settings** you can set the **Default Value** to be 150, this would be pre-selected.
16. **Visibility Rules** would be a compound rule – account type is checkings and cash card is selected.
17. Scroll and locate **Visibility Settings.** This component should be visible only when the account type is set to Checkings and the Cash Card is opted.
18. Add **Visibility Rules – Rule 1** field to be visible when, select, **accounttype** field, *=(Equal To)* operator, *Value* comparison with *Checkings* value AND selecting *cashcard* field, *=(Equal To)* operator, *Value* comparison with *Yes* value.
19. Switch to **Advanced Mode** to enter the visibility rules.
12. If the user opts for cash card, then the withdrawal limit needs to be set on the same. Drag and drop a **Range Slider** component onto the form and set the following values:
* **Display Name** set as *Withdrawal Limit.*
* **Name** used for internal reference, set as *withdrawallimit.*
* **Description** of the field.
* **Placeholder** value to be displayed in the field when blank, set as, *Set the withdrawal limit*.
13. Deselect **Is Percentage**
14. Select **Value** as *100* for Min and *10000* for Max.
15. Under **Data Settings** you can set the **Default Value** to be 150, this would be pre-selected.
16. **Visibility Rules** would be a compound rule – account type is checkings and cash card is selected.
17. Scroll and locate **Visibility Settings.** This component should be visible only when the account type is set to Checkings and the Cash Card is opted.
18. Add **Visibility Rules – Rule 1** field to be visible when, select, **accounttype** field, *=(Equal To)* operator, *Value* comparison with *Checkings* value AND selecting *cashcard* field, *=(Equal To)* operator, *Value* comparison with *Yes* value.
19. Switch to **Advanced Mode** to enter the visibility rules.
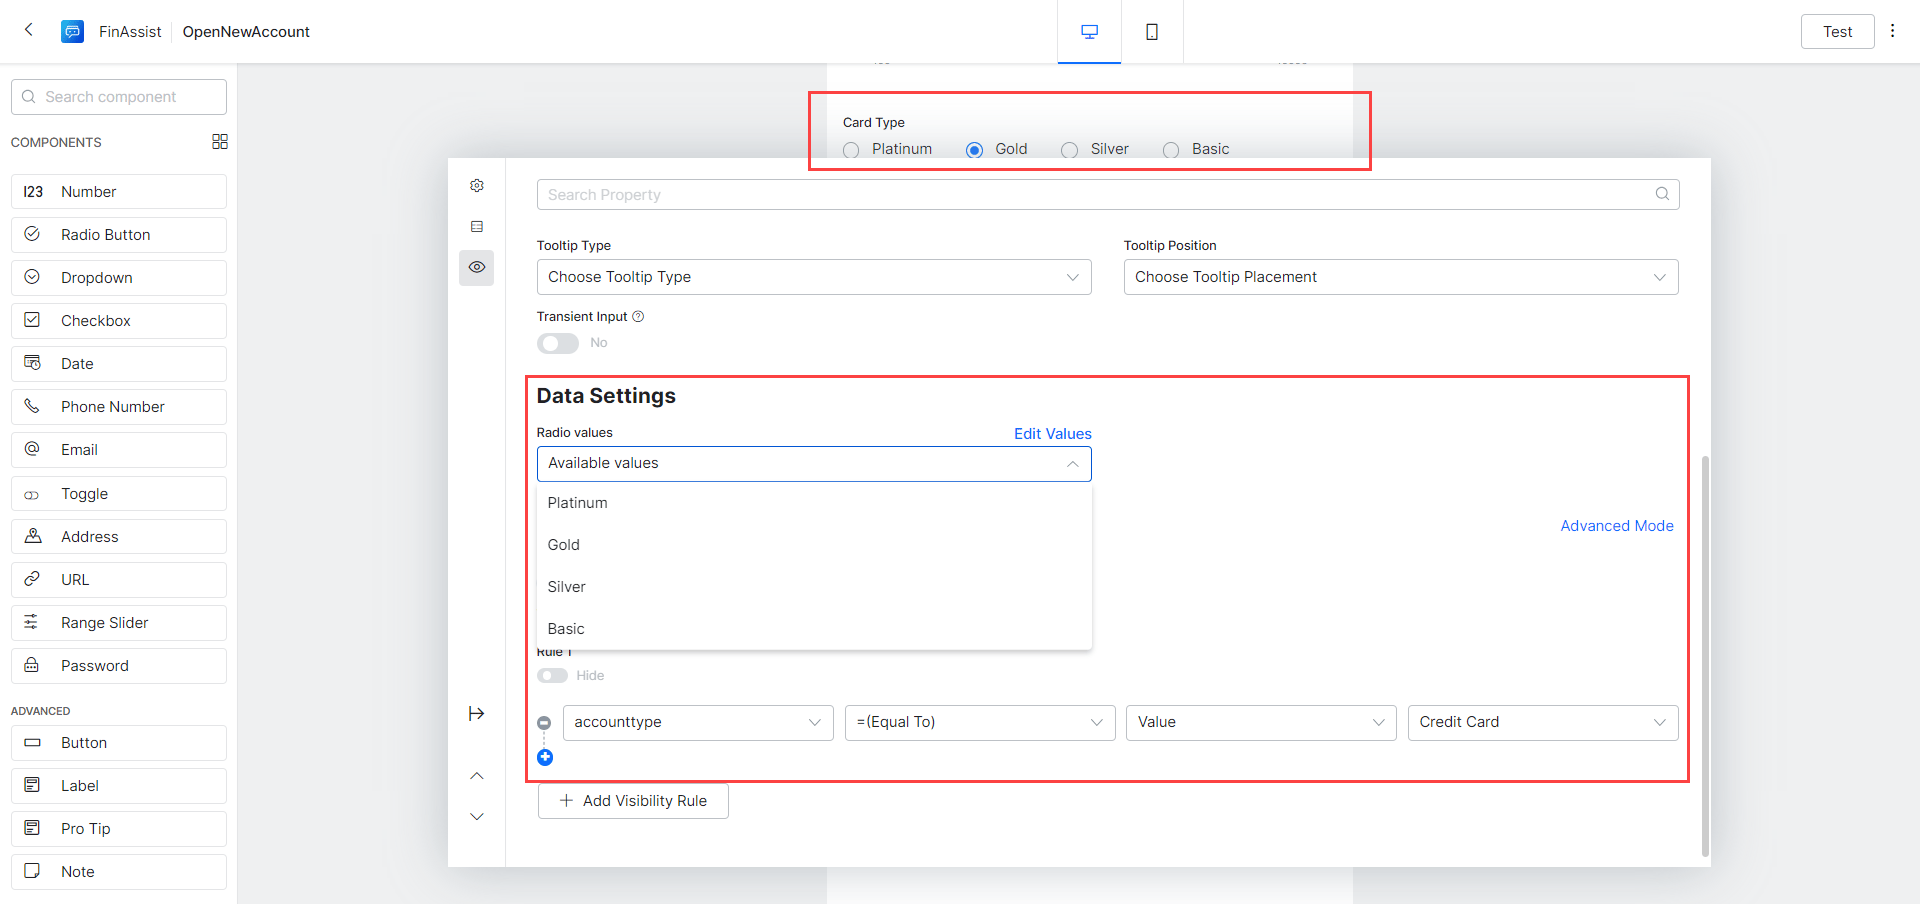
 20. For the Credit Card option,you need to further select the type of card. Drag and drop a **Radio Button** component onto the form and set the following values:
* **Display Name** set as *Card Type.*
* **Name** used for internal reference, set as *cardtype*.
* **Description** of the field.
* **Placeholder** value to be displayed in the field when blank, set as, *Choose the type of credit card*.
21. Under **Data Settings**, set the **Radio values** to be \_Platinum, Gold, Silver, and *Basic*.
22. Scroll and locate **Visibility Settings.** This component should be visible only when the account type is set to Credit Card.
* Set **Is visible** flag to *Yes*.
* Add **Visibility Rules – Rule 1** for the filed to be **Visible**, select **accounttype** \_field, *=(Equal To)* operator, *Value* comparison with, *Credit Card* value.
20. For the Credit Card option,you need to further select the type of card. Drag and drop a **Radio Button** component onto the form and set the following values:
* **Display Name** set as *Card Type.*
* **Name** used for internal reference, set as *cardtype*.
* **Description** of the field.
* **Placeholder** value to be displayed in the field when blank, set as, *Choose the type of credit card*.
21. Under **Data Settings**, set the **Radio values** to be \_Platinum, Gold, Silver, and *Basic*.
22. Scroll and locate **Visibility Settings.** This component should be visible only when the account type is set to Credit Card.
* Set **Is visible** flag to *Yes*.
* Add **Visibility Rules – Rule 1** for the filed to be **Visible**, select **accounttype** \_field, *=(Equal To)* operator, *Value* comparison with, *Credit Card* value.
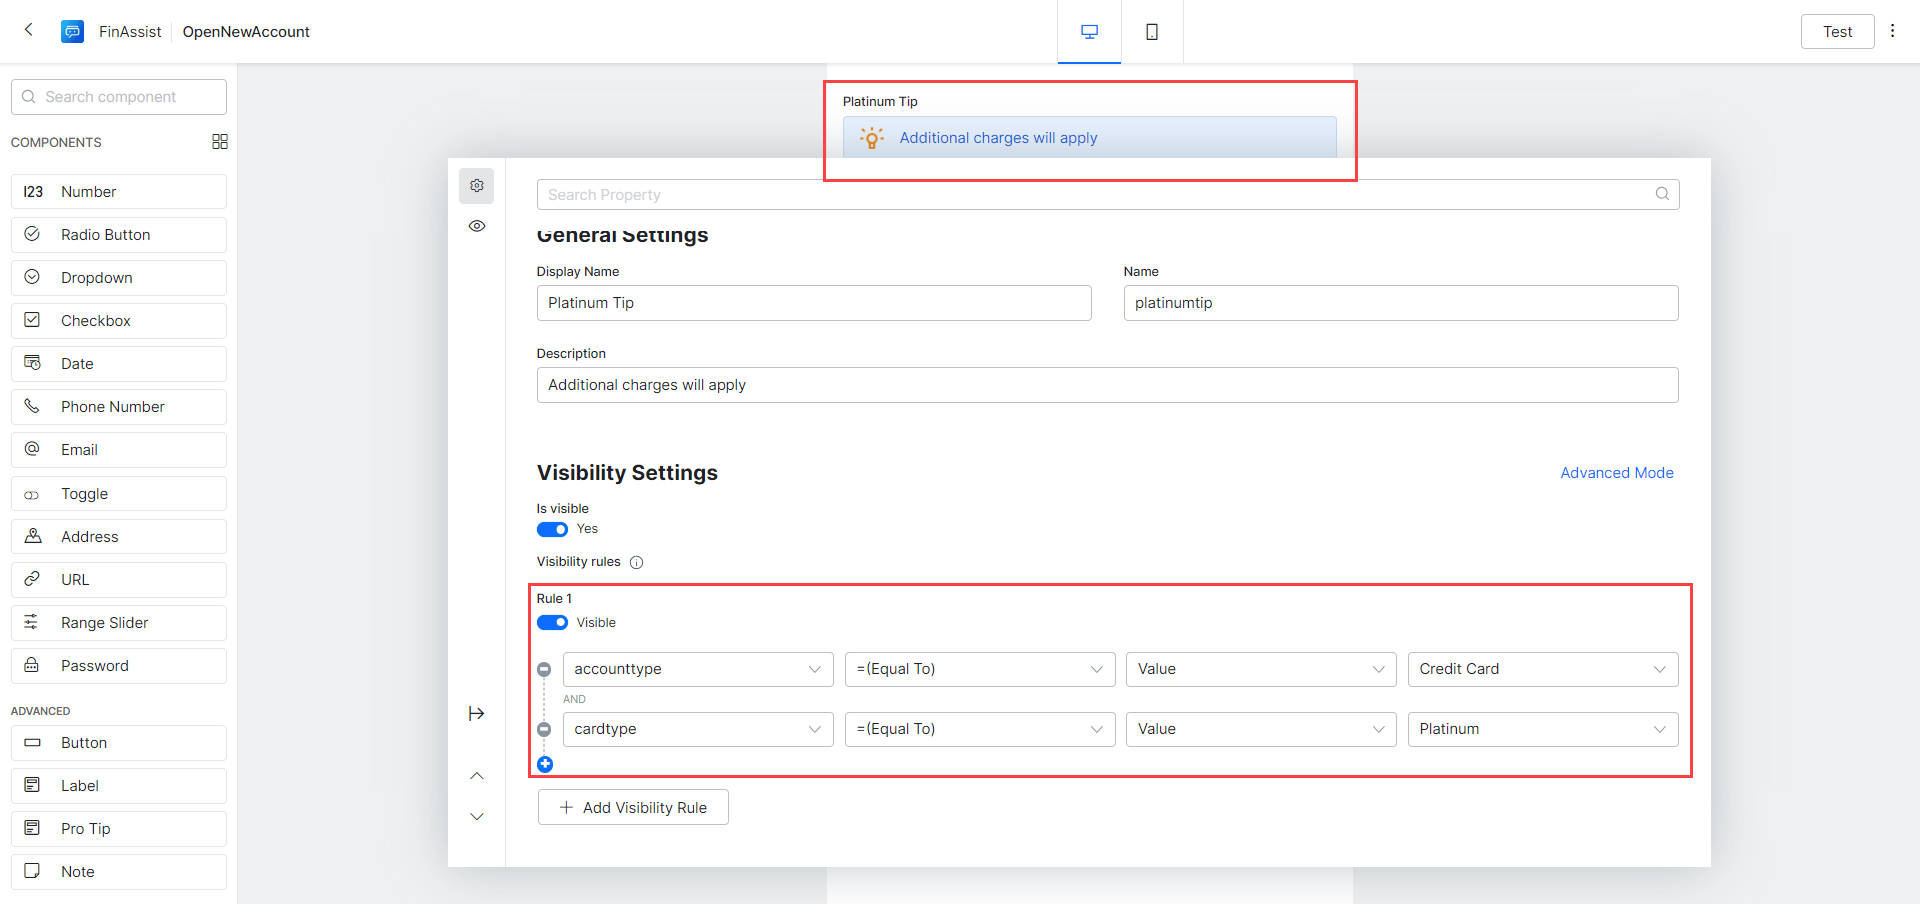
 23. Finally, the Pro-Tip, when user selects a Platinum card. Drag and drop a **Pro Tip** component onto the form and set the following values:
* Set **Display Name** as *Platinum Tip.*
* **Name** used for internal reference, mention *platinumtip.*
* **Description** would be the tip you want to display, eg. *Additional charges will apply*.
24. Scroll and locate **Visibility Settings.** This component should be visible only when the account type is set to Credit Card.
* Set **Is visible** flag to *Yes*
* Add **Visibility Rules – Rule 1** for the field to be **Visible** select **accounttype** field, *=(Equal To)* operator, *Value* comparison with, *Credit Card* value AND selecting **cardtype** field, *=(Equal To)* operator, *Value* comparison with, *Platinum* value.
23. Finally, the Pro-Tip, when user selects a Platinum card. Drag and drop a **Pro Tip** component onto the form and set the following values:
* Set **Display Name** as *Platinum Tip.*
* **Name** used for internal reference, mention *platinumtip.*
* **Description** would be the tip you want to display, eg. *Additional charges will apply*.
24. Scroll and locate **Visibility Settings.** This component should be visible only when the account type is set to Credit Card.
* Set **Is visible** flag to *Yes*
* Add **Visibility Rules – Rule 1** for the field to be **Visible** select **accounttype** field, *=(Equal To)* operator, *Value* comparison with, *Credit Card* value AND selecting **cardtype** field, *=(Equal To)* operator, *Value* comparison with, *Platinum* value.
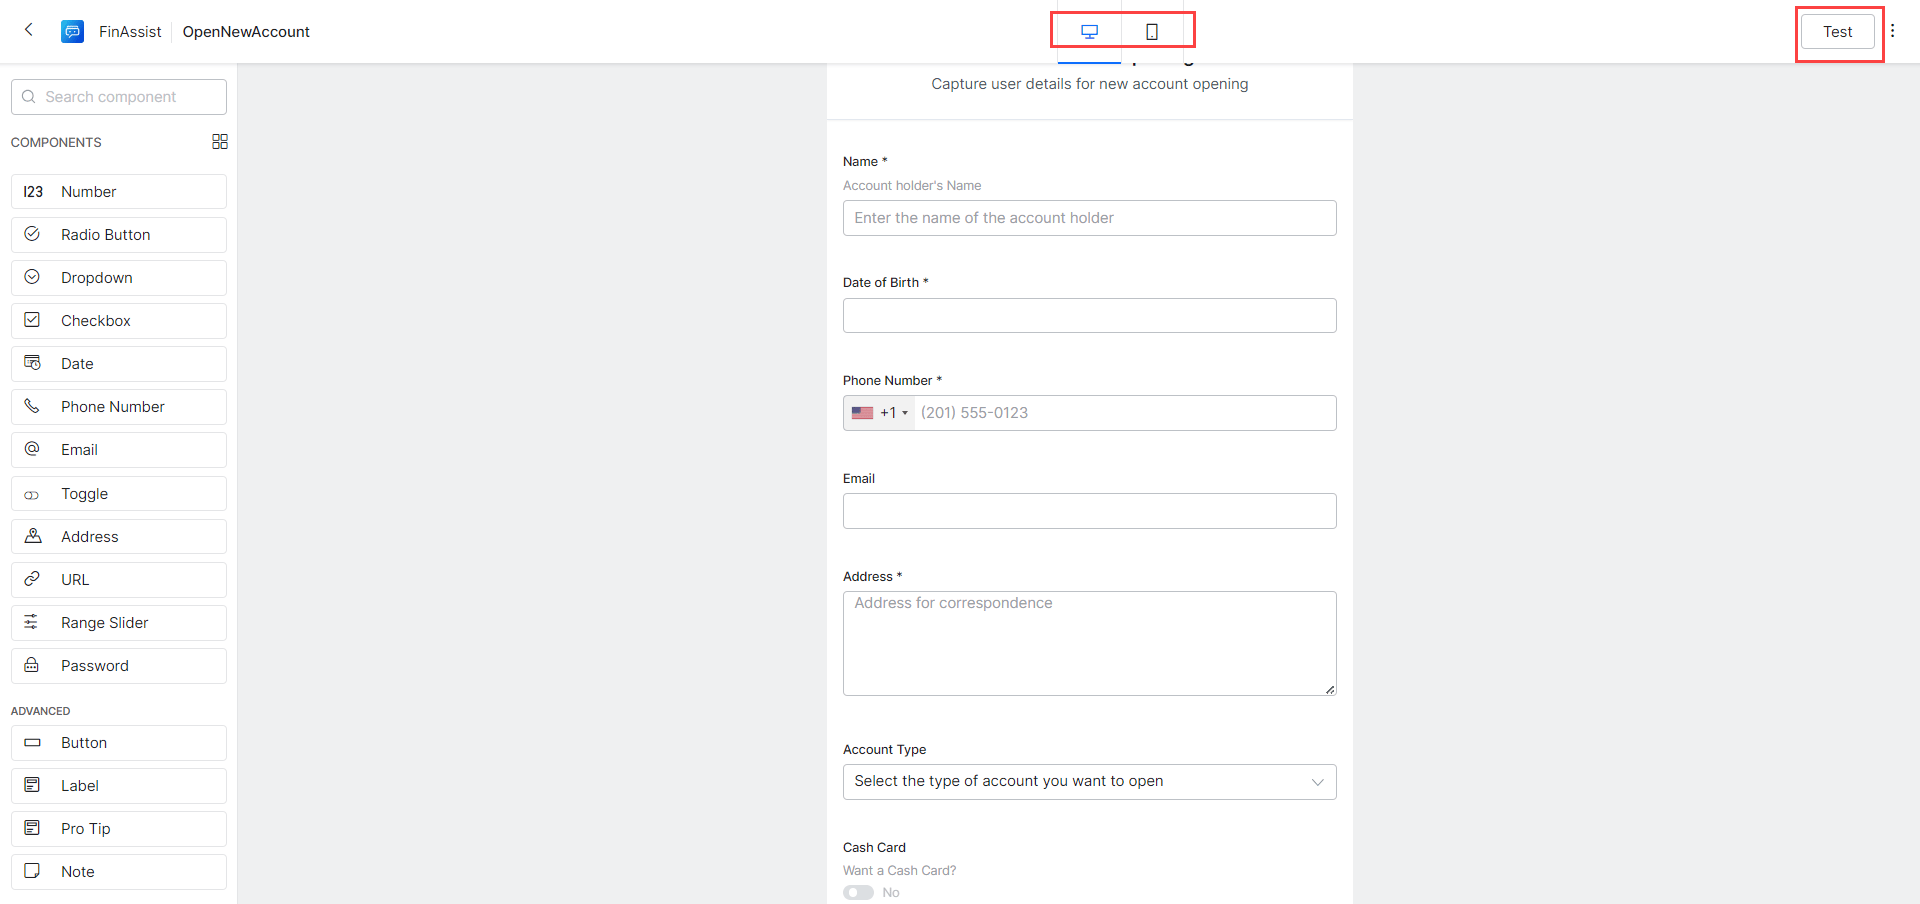
 Your form is ready. You can toggle between Desktop View and Mobile View to see how it looks in those devices.
 25. You can select how the AI Agent handles the conversation when the user cancels the form. You can choose from two options:
* **Discard the task and trigger End of Task Event**: This is the default option.
25. You can select how the AI Agent handles the conversation when the user cancels the form. You can choose from two options:
* **Discard the task and trigger End of Task Event**: This is the default option.
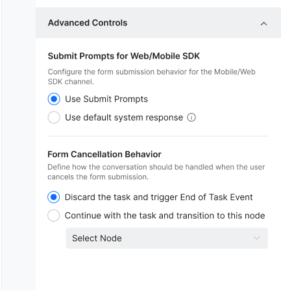 * **Continue with this task and transition to this node**: In the **Select Node** drop-down list, you can select any node present in the current dialog task.
 You can jump only to nodes within the current dialog, so the target node list shows only local nodes. If the target node is unavailable at runtime, the platform cannot continue the conversation and discards the task.
26. Use the **Test** button to see a preview.
### Dialog Task Configuration
We'll be creating a dialog task and adding a form node to trigger the Digital Form created in the above step and use a service node to make a service call to add the new account from the form data.
### Create Dialog Task
1. Navigate to **Automation AI > Use Cases > Dialogs.**
2. Click the **Create Dialog** button to create a new Task.
3. Select the **Start from Scratch** option.
4. Provide below details:
* Enter **IntentName**, set as, *Open Bank Account*
* Click **Proceed** to open the dialog builder page.
5. Retain the Root Intent Node's default settings.
6. Click the **+** next to the Root intent node and select the form (*OpenNewAccount*) that we created earlier from the list. Note that the form name will contain numeric suffix in the form of 001, 002 and so on depending on the number of its instances already added to the AI Agent.
You can jump only to nodes within the current dialog, so the target node list shows only local nodes. If the target node is unavailable at runtime, the platform cannot continue the conversation and discards the task.
26. Use the **Test** button to see a preview.
### Dialog Task Configuration
We'll be creating a dialog task and adding a form node to trigger the Digital Form created in the above step and use a service node to make a service call to add the new account from the form data.
### Create Dialog Task
1. Navigate to **Automation AI > Use Cases > Dialogs.**
2. Click the **Create Dialog** button to create a new Task.
3. Select the **Start from Scratch** option.
4. Provide below details:
* Enter **IntentName**, set as, *Open Bank Account*
* Click **Proceed** to open the dialog builder page.
5. Retain the Root Intent Node's default settings.
6. Click the **+** next to the Root intent node and select the form (*OpenNewAccount*) that we created earlier from the list. Note that the form name will contain numeric suffix in the form of 001, 002 and so on depending on the number of its instances already added to the AI Agent.
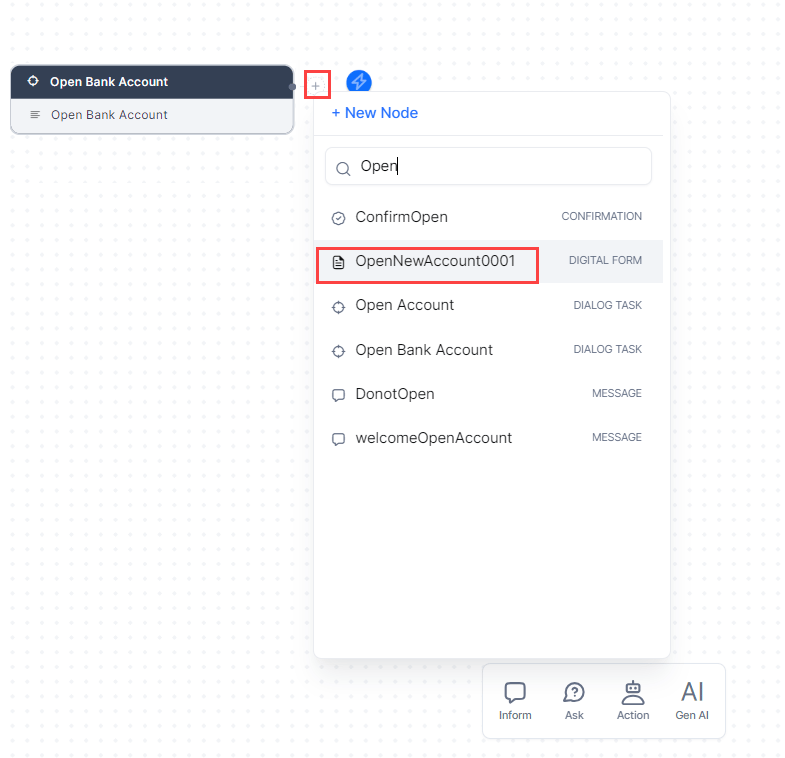 7. You'll be prompted to select the **Form Experience**. ThePlatform allows you to gather user input both from the form and through conversation based on the channel.
8. For this use case, select *Only Form UI* experience.
9. A New sequence containing the Form Node would be added, you can customize the form name, etc.
10. We're changing the **Name** to *OpenAccountForm* and **Display Name** to *Form to open account*.
### Capture Form Node Values
Next, to capture the values returned by the Form Node using a Script node and displaying the same, follow the steps below:
1. Add a **Message Node** in the sequence under the form node.
2. Set the **Name** to *FormDataMessage* and **Display Name** to *Form Data Message*.
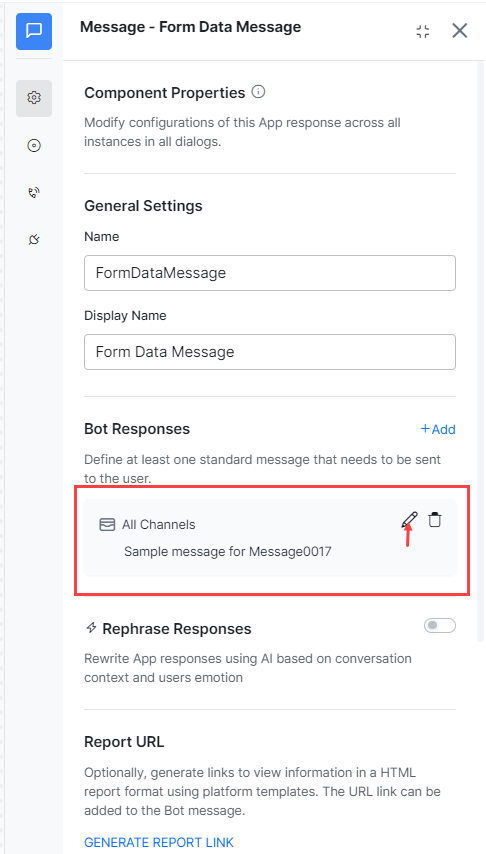
3. Hover on the **Sample Bot Response for All Channels** and **Edit** icon to open the message editor.
7. You'll be prompted to select the **Form Experience**. ThePlatform allows you to gather user input both from the form and through conversation based on the channel.
8. For this use case, select *Only Form UI* experience.
9. A New sequence containing the Form Node would be added, you can customize the form name, etc.
10. We're changing the **Name** to *OpenAccountForm* and **Display Name** to *Form to open account*.
### Capture Form Node Values
Next, to capture the values returned by the Form Node using a Script node and displaying the same, follow the steps below:
1. Add a **Message Node** in the sequence under the form node.
2. Set the **Name** to *FormDataMessage* and **Display Name** to *Form Data Message*.
3. Hover on the **Sample Bot Response for All Channels** and **Edit** icon to open the message editor.
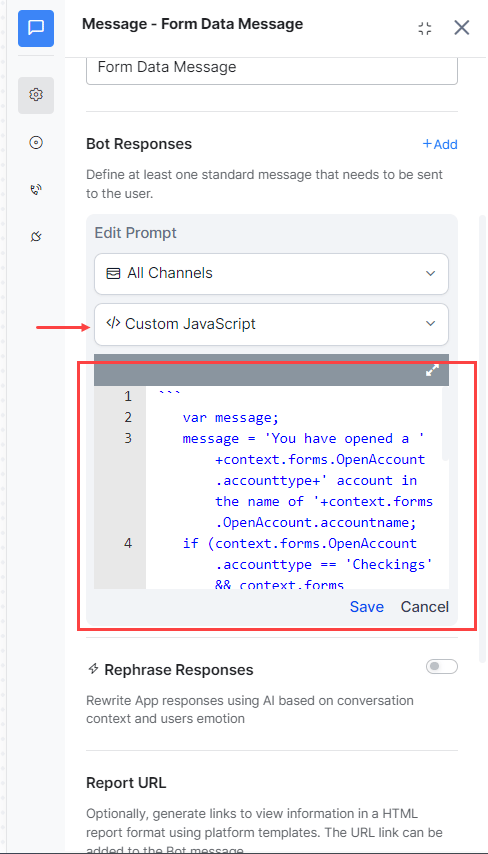
 4. Select the **Custom JavaScript** option and enter the following code. This code would capture from the context object, the data submitted by the user in the Form and display it accordingly.
```
var message;
message = 'You have opened a '+context.forms.OpenAccount.accounttype+' account in the name of '+context.forms.OpenAccount.accountname;
if (context.forms.OpenAccount.accounttype == 'Checkings' && context.forms.OpenAccount.cashcard == 'Yes')
message = message + ' and opted for cash card with withdrawal limit set to '+ context.forms.OpenAccount.withdrawallimit;
if (context.forms.OpenAccount.accounttype == 'Credit Card')
message = message + ' and opted for a '+ context.forms.OpenAccount.cardtype+' card';
print(message);
```
4. Select the **Custom JavaScript** option and enter the following code. This code would capture from the context object, the data submitted by the user in the Form and display it accordingly.
```
var message;
message = 'You have opened a '+context.forms.OpenAccount.accounttype+' account in the name of '+context.forms.OpenAccount.accountname;
if (context.forms.OpenAccount.accounttype == 'Checkings' && context.forms.OpenAccount.cashcard == 'Yes')
message = message + ' and opted for cash card with withdrawal limit set to '+ context.forms.OpenAccount.withdrawallimit;
if (context.forms.OpenAccount.accounttype == 'Credit Card')
message = message + ' and opted for a '+ context.forms.OpenAccount.cardtype+' card';
print(message);
```
 Your dialog with form is ready! **Test** and trigger the above dialog. The form will be displayed, enter the values and click Submit, the message would be displayed.
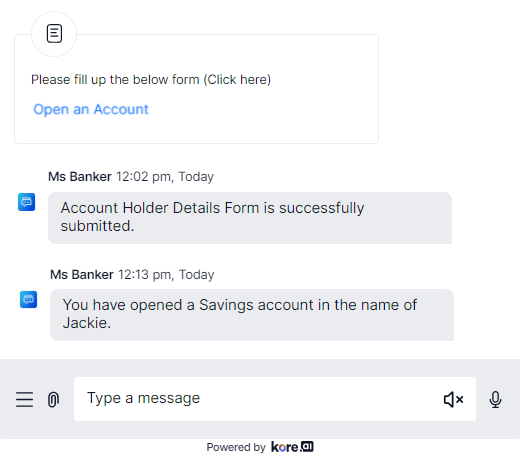 You can use the context object as shown above it a **Script** or **Service** nodes for further processing.