> ## Documentation Index
> Fetch the complete documentation index at: https://koreai.mintlify.site/llms.txt
> Use this file to discover all available pages before exploring further.
# Single Sign-On
[Back to Admin Console](/ai-for-service/administration/overview)
Use the Single Sign-On (SSO) page in the **Security & Control** module to configure SSO, 2FA, and enterprise security keys in the Admin Console.
## Configure Single Sign-On (SSO)
Use this section to configure Single Sign-On for your domain users. When you enable SSO, users authenticate through your identity provider instead of using AI for Service credentials. This streamlines access and improves security.
If you don't enable SSO, users authenticate through the AI for Service sign-in process, which requires them to set a AI for Service password. You can configure the password policy in the **Security Settings** module.
Select **Configure** to set up your SSO method.
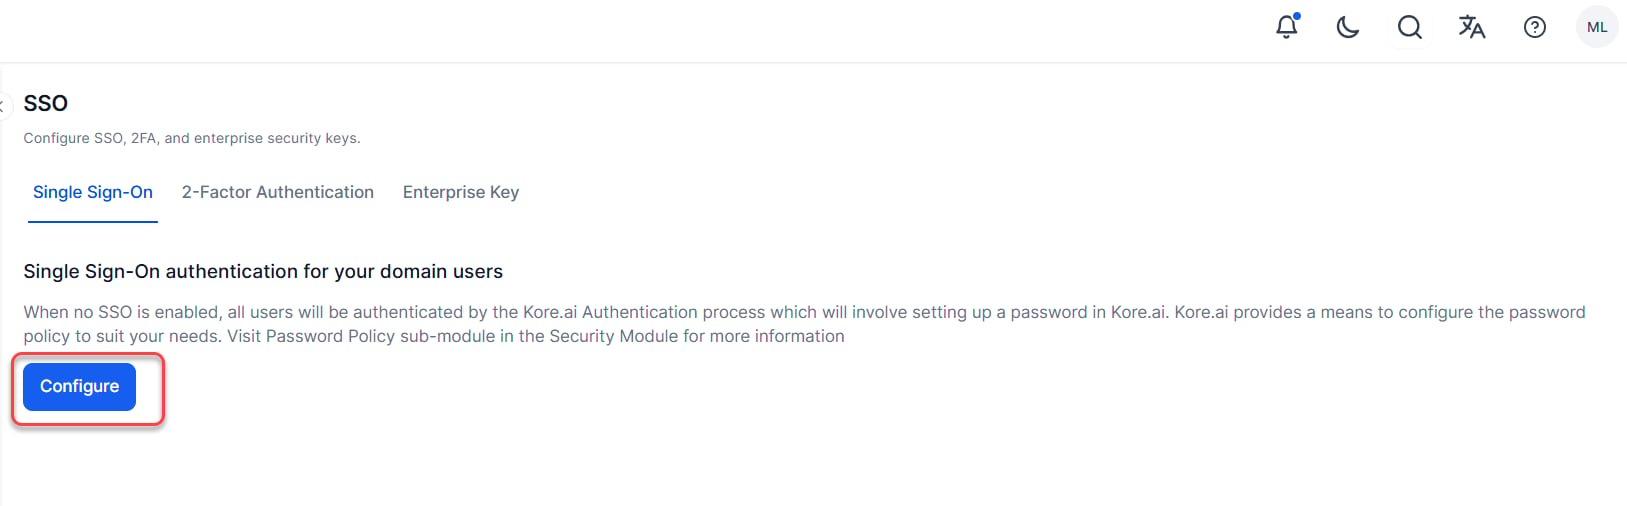 You can configure Single Sign-On (SSO) authentication for your AI for Service-managed users using the following:
* OpenID Connect (OIDC)
* Security Assertion Markup Language (SAML)
* WS-Federation sign-on protocol
SSO enables easy access to the application using your existing identity provider. With SSO, your users can log on once, for example, to your company account, and when accessing their application, the same login credentials can be used automatically by the system.
For example, using the *WS-Federation* sign-on protocol, you can enable a user to sign on to the AI for Service application using Microsoft® Active Directory® server credentials.
You can configure Single Sign-On (SSO) authentication for your AI for Service-managed users using the following:
* OpenID Connect (OIDC)
* Security Assertion Markup Language (SAML)
* WS-Federation sign-on protocol
SSO enables easy access to the application using your existing identity provider. With SSO, your users can log on once, for example, to your company account, and when accessing their application, the same login credentials can be used automatically by the system.
For example, using the *WS-Federation* sign-on protocol, you can enable a user to sign on to the AI for Service application using Microsoft® Active Directory® server credentials.
 ## Enable or Disable SSO
Depending on the security required for your company, you can enable or disable Single Sign-On (SSO) for users accessing the application.
When you disable SSO or when the SSO authentication validity period expires, users must create and log on using their credentials. If no account-specific password policies have been defined, then default password policies are automatically enabled for the users.
## OIDC
Complete the steps in the following procedure to configure SSO using OIDC in the **Security & Control** module of the Admin Console.
1. On the **Single Sign On** page, select **Configure**, then **Enable SSO**.
2. In the **Select suitable Sign-On Protocol** section, select **OpenID Connect**.
3. In the **Configure SSO for OpenID Connect** section, select an identity provider, for example, **Sign in with Google**.
4. Select **Create**.
## WS-Federation
Complete the steps in the following procedure to configure Single Sign-On (SSO) using the WS-Federation protocol in the **Security & Control** module of the Admin Console.
1. On the **Single Sign On** page, select **Configure**, then **Enable SSO**.
2. In the **Select suitable Sign-On Protocol** section, select **WS-Federation**.
3. In the **Configure SSO for WS-Federation** section, select an identity provider, and then define the settings for:
1. **Windows Azure®**
* **Azure AD Sign-On End Point URL**: The URL that AI for Services ends sign-on and sign-off requests using *Azure*. The response for the authentication is sent to the **Reply URL** defined in your *Azure* Active Directory configuration settings.
* **Azure AD Federation Metadata Document**: The URL for the federation metadata document used for authentication with *Azure* Active Directory.
2. **Other**: Generic WS-Federation identity provider configuration, other than Azure
* **AD Sign-On End Point URL**: The URL that the platform sends sign on and sign off requests using your WS-Federation identity provider.
* **Identity provider issuer**: The entity that provides the user identities, including the ability to authenticate a user.
4. In the administrative console for your Single Sign-On provider, you will also need to define the URLs that are used to exchange data between the application and your SSO provider. While the URL names may vary by SSO provider, you will need to define these URLs:
1. **SAML 2.0**
* **LDAP Attribute:** nameId
* **Claim Attribute:** uri
2. **SAML 1.1**
* **LDAP Attribute:** nameId
* **Claim Attribute:** emailAddress
3. **Assertion Consumer Service (ACS) URL** or **Callback URL** as `https://idp.kore.com/authorize/callback`.
5. In addition to authentication values, you must pass the email address of the user as an LDAP attribute from Active Directory when using ADFS. For more information, [see Attributes for ADFS](#attributes-for-adfs).
6. Select **Create**.
## SAML
Security Assertion Markup Language (SAML) is a standard protocol for web browser Single Sign-On (SSO) using secure tokens. SAML eliminates all passwords and instead uses standard cryptography and digital signatures to pass a secure sign-in token from an identity provider to a SaaS application.
SAML provides a solution to allow your identity provider and service providers to exist separately from each other. When a user logs into a SAML-enabled application, the service provider requests authorization from the appropriate identity provider. The identity provider authenticates the user's credentials and then returns the authorization for the user to the service provider, and the user is now able to use the application.
### How SAML works
SAML SSO works by transferring the user's identity from one place (the identity provider) to another (the service provider). This is done through an exchange of digitally signed XML documents.
Consider the following scenario: A user is logged into a system that acts as an identity provider. The user wants to log in to a remote application, such as a support or accounting application (the service provider). The following happens:
1. The user accesses the remote application using a link on an intranet, a bookmark, or similar and the application loads.
2. The application identifies the user's origin (by application subdomain, user IP address, or similar) and redirects the user back to the identity provider, asking for authentication. This is the authentication request.
3. The user either has an existing active browser session with the identity provider or establishes one by logging into the identity provider.
4. The identity provider builds the authentication response in the form of an XML-document containing the user's username or email address, signs it using an X.509 certificate, and posts this information to the service provider.
5. The service provider, which already knows the identity provider and has a certificate fingerprint, retrieves the authentication response and validates it using the certificate fingerprint.
6. The identity of the user is established, and the user is provided with app access.
### Implementation
There are two ways SAML can be used within Platform:
* For developer authentication to access the App Builder,
* For user authentication to access the App.
#### Use case 1: App builder authentication.
Enterprises can set up access to the App builder tool using the enterprise SSO. App developers and admins can log into app builder using SSO done by the enterprise identity provider.
**SSO flow from Platform**: The following is the flow within the Platform once SSO is configured using SAML:
1. The client makes a call to the AI for Service app server (using the login URL) with user details to get identity provider info (SAML).
2. The AI for Service app server initiates a handshake request with the AI for Service idproxy server.
3. The AI for Service ID Proxy server initiates a request to the identity provider (SAML) with user details.
4. On successful authentication, the identity provider (SAML) returns an assertion response to the AI for Service ID Proxy server.
5. Upon verifying the response from the identity provider, AI for Service idproxy server initiates a request to the AI for Service app server.
6. On successful authentication of the token from AI for Service idproxy server, AI for Service app server grants access to the user.
Refer below [to configure SSO using SAML](#configuring-sso-using-saml)
#### Use case 2: End-user authentication
In this scenario, the chat interface is embedded on the customer portal or Mobile app that requires user authentication via SSO.\
The App access is automatically limited to authenticated users. If the task requires API invocation that requires SSO-based authentication, the developer can follow the below steps
* On the client, developer needs to retrieve SSO token of the logged in user and pass it to the app using the ***secureCustomPayload*** parameter in the Bot SDK API.
* In the dialog task, the App developer can write custom logic to read this token and add it as API headers for secure API calls made using service node or webhook node.
The token information on the client varies depending upon the SSO provider and the payload, accordingly the developer would need to write custom logic.
### Configuring SSO using SAML
Complete the following steps to configure Single Sign-On (SSO) using Security Assertion Markup Language (SAML) protocol in the Admin Console. AI for Servicealso supports WS-Federation and OpenID Connect (OIDC) protocols.
### OKTA Configuration
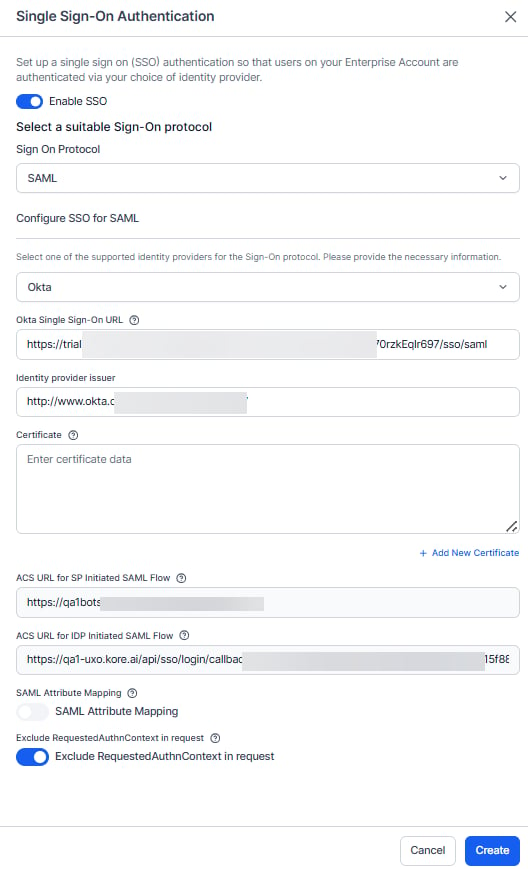
1. On the **Single Sign On** page, select **Configure**, then **Enable SSO**.In the **Security & Control** module on the **Single Sign On** page in the Admin Console, click **Enable SSO**.
2. In the **Select a suitable Sign-On Protocol** section, select **SAML**.
3. In the **Configure SSO for SAML** section, select an identity provider, and then define the settings for one of:
1. **Okta Single Sign-On URL**: The SSO URL for *Okta* this is to enable Service Provider-initiated SAML flow.
2. **Identity Provider Issuer**: The entity that provides the user identities, including the ability to authenticate a user.
3. **Certificate**: The public certificate stored by the service provider from the identity provider used to validate a user's signature. You can add multiple (max of 2) certificates, delete already added invalid certificates, the platform will use the latest certificate for authorization, in case it's invalid, then the older certificate is used.
4. **ACS URL for SP Initiated SAML Flow**: This is the redirect URL for Service Provider-initiated SAML flow.
5. **ACS URL for IDP Initiated SAML Flow**: This is the account-specific URL for Identity Provider-initiated SAML flow.
6. **Skip 2FA Authentication** – This setting lets administrators determine whether users must complete two-factor authentication (2FA) during their first login. The 2FA step can be skipped at the Service Provider (SP) level, the Identity Provider (IdP) level, or at both levels, based on the configuration.
* Select the **IdP (Identity Provider)** checkbox to skip 2FA enforcement at the identity provider during first-time authentication.
* Select the **SP** checkbox to skip 2FA enforcement at the service provider during first-time authentication.
7. **SAML Attribute Mapping**: Enable this option to map SAML Attributes with AI for ServiceGroup Names or Admin Roles Names. Once enabled, you can:
* Define how the SAML attributes should be mapped with AI for Serviceattributes:
1. Full Sync: Every time the user signs in, the platform will update the user's Group and Role assignments based on the SAML Attributes present in the response. All existing assignments will be removed. Only the new group or role assignments as available in the SAML response will be assigned
2. Inclusion Only: Every time the user signs in, the platform will only assign the new group or roles available in the SAML response. All existing assignments will be retained. New assignments will be added as available in the SAML responses
* define one or more mapping pairs. Each pair includes
1. SAML Attribute Name: Name of the SAML attribute as available in the SAML response
2. SAML Attribute Value: Value associated with the SAML attribute
3. Attribute Type: Refers to the type of mapping to be associated that's Group Name or Role Name
* Group Name: Refers to any of the user groups defined in the AI for Serviceaccount
* Role Name: Refers to the following
* Admin Roles defined in the AI for Serviceaccount
* App Builder Access
* New App Creation
* Manage Data Tables and Views
4. AI for ServiceAttribute: Refers to either Group Name or Role Name. The list should include the following:
* List of all Admin Roles
* App Builder Access
* New App Creation
* Manage Data Tables and Views
8. **Restrict Auto - Onboarding** - Enable this option to restrict automatic user onboarding during IdP-initiated login for users who don't exist in the Kore platform.
9. **Exclude RequestedAuthnContext in request** - Enable this option to remove RequestedAuthnContext from SAML authentication requests.
4. Click **Save**.
#### Okta for AI for Service SSO
To configure Single Sign-On in *Okta* for AI for Service, you must first add the AI for Service app to your *Okta* account, and then copy URLs and the security certificate from *Okta* into your AI for Service account. This topic describes how to add the AI for Service app to your *Okta* account and then access the URLs and certificate needed for the AI for Service configuration for SSO using *Okta*.
To complete this procedure, you must have already selected *Okta* as a SAML provider on the **Single Sign On** page in the Admin Console.
**To add the AI for Service app to Okta**
1. Log on to **Okta**.
2. On the **Home** page, select **Admin**. The **Dashboard** page is displayed.
3. On the top navigation bar, select **Applications**. The **Applications** page is displayed.
4. Select **Add Application**. The **Add Application** page is displayed.
5. Select **Create application**
6. In the **General settings**, provide an *App name* and select **Next**.
7. In **Configure SAML**, provide the *Single Sign-On URL.* To obtain this:
1. Login to Admin Console
2. Navigate to **Security & Control** > **Single Sign on page**
3. Enable **SAML** and select **Okta** as the identity provider.
4. Locate the **ACS URL for SP Initiated SAML Flow field**.
This field contains the required Single Sign-On URL.
5. For on-prem accounts, the ACS URL for SP Initiated SAML Flow is displayed as `https://idproxy-dev.kore.com/authorize/callback`. This needs to be updated as "single sign on URL" in Okta platform and `https://idproxy-dev.kore.com` needs to be updated as the "Audience URL"
6. You can provide the **Attribute statements** like emailId, firstName as per your requirement.
8. To configure the **ACS URL for IDP-Initiated SAML Flow**, copy and paste the complete URL that you get from your admin. In case you are using internal redirection URLs, please reach out to your internal admin/network teams. To get the **ACS URL for IDP Initiated SAML Flow**, check "Use this Recipient URL and Destination URL". Enter the **Audience URI** field as ACS URL for SP Initiated SAML Flow `https://idp.kore.com/authorize/callback`.
This URL is a temporary URL. Once you add the AI for Service app in Okta, this URL changes as per your organisation's domain requirements. You must copy the final ACS URL again and paste it in the field. For more information, read [How to configure Okta SSO in AI for Service Platform](https://community.kore.ai/t/sso-how-to-configure-okta-sso-in-kore-ai-xo-platform/2618) community post.
9. Select **Finish**.
10. On the **Sign On** tab, in the **Settings** section, select **View Setup Instructions**.
11. Copy the URLs in the:
1. **Identity Provider Single Sign-On URL** field to the **Okta Single Sign-On URL** field in AI for Service.
2. **Identity Provider Issuer** field to the AI for Service **Identity Provider Issuer** field
12. In the Okta **X.509 Certificate** field, copy the certificate data, and then paste the data into the AI for Service **Certificate** text box.
Only data after the **BEGIN CERTIFICATE** header and before the **END CERTIFICATE** footer should be copied and pasted into AI for Service.
13. In AI for Service, select **Create**. This will complete the integration of the Okta login.
To test the configuration, log off the Admin Console and log on again. The Okta portal should be displayed.
### OneLogin Configuration
**OneLogin** – For more information, refer below, or in the *OneLogin* documentation, see [Configuring SSO for AI for Service](https://www.onelogin.com/connector/kore).
* **SAML 2.0 Endpoint**: The HTTP SSO endpoint for OneLogin to enable Service Provider-initiated SAML flow, for example, `https://app.onelogin.com/trust/saml2/http-post/sso/358111`.
* **Issuer URL**: The URL for the *OneLogin* issuer, for example, `https://app.onelogin.com/saml/metadata/358111`.
* **X.509 Certificate**: The public certificate stored by the service provider from the identity provider used to validate a user signature. You can add multiple (max of 2) certificates, delete already added invalid certificates, the platform will use the latest certificate for authorisation, in case it's invalid, then the older certificate will be used.
* **ACS URL for SP Initiated SAML Flow**: This is the redirect URL for Service Provider-initiated SAML flow.
* **ACS URL for IDP Initiated SAML Flow**: This is the account-specific URL for Identity Provider-initiated SAML flow.
* **Skip 2FA Authentication**: This setting lets administrators determine whether users must complete two-factor authentication (2FA) during their first login. The 2FA step can be skipped at the Service Provider (SP) level, the Identity Provider (IdP) level, or at both levels, based on the configuration.
* Select the **IdP (Identity Provider)** checkbox to skip 2FA enforcement at the identity provider during first-time authentication.
* Select the **SP** checkbox to skip 2FA enforcement at the service provider during first-time authentication.
* **SAML Attribute Mapping**: Enable this option to map SAML Attributes with AI for Service Group Names or Admin Roles Names. Once enabled, you can:
* Define how the SAML attributes should be mapped with AI for Service attributes:
* Full Sync: Every time the user signs in, the platform will update the user's Group and Role assignments based on the SAML Attributes present in the response. All existing assignments will be removed. Only the new group or role assignments available in the SAML response will be assigned
* Inclusion Only: Every time the user signs in, the platform will only assign the new group or roles available in the SAML response. All existing assignments will be retained. New assignments will be added as available in the SAML responses
* define one or more mapping pairs. Each pair includes
* SAML Attribute Name: Name of the SAML attribute as available in the SAML response
* SAML Attribute Value: Value associated with the SAML attribute
* Attribute Type: Refers to the type of mapping to be associated, that's Group Name or Role Name
* Group Name: Refers to any of the user groups defined in the AI for Service account
* Role Name: Refers to the following
* Admin Roles defined in the AI for Service account
* App Builder Access
* New App Creation
* Manage Data Tables and Views
* AI for Service Attribute: Refers to either Group Name or Role Name. The list should include the following:
* List of all Admin Roles
* App Builder Access
* New App Creation
* Manage Data Tables and Views
* **Restrict Auto - Onboarding** - Enable this option to restrict automatic user onboarding during IdP-initiated login for users who don't exist in the Kore platform.
* **Exclude RequestedAuthnContext in request** - Enable this option to remove RequestedAuthnContext from SAML authentication requests.
#### OneLogin for AI for Service SSO
To configure Single Sign-On in AI for Service using *OneLogin*, you must first add the AI for Service app to your *OneLogin* account and then copy URLs and the security certificate from *OneLogin* into your AI for Service account. This topic describes how to add the AI for Service app to your *OneLogin* account and then access the URLs and certificate needed for the AI for Service configuration for SSO using *OneLogin*.
To complete this procedure, you must have already selected *OneLogin* as a SAML provider on the **Single Sign On** page in the Admin Console.
**To add the AI for Service app to OneLogin**
1. Log on to *OneLogin*.
2. On the **APPS** menu, click **Add Apps**. The **Find Applications** page is displayed.
3. In the **Search** field, enter AI for Service, and then press **Enter**. The AI for Service app for *OneLogin* is displayed.
4. Click the AI for Service app. The **Add AI for Service** page is displayed.
5. Optionally, change the display name or the icons displayed to your users in the *OneLogin* portal, and then click **SAVE**. The AI for Service app is added to your Company apps for *OneLogin,* and the AI for Service app page is displayed.
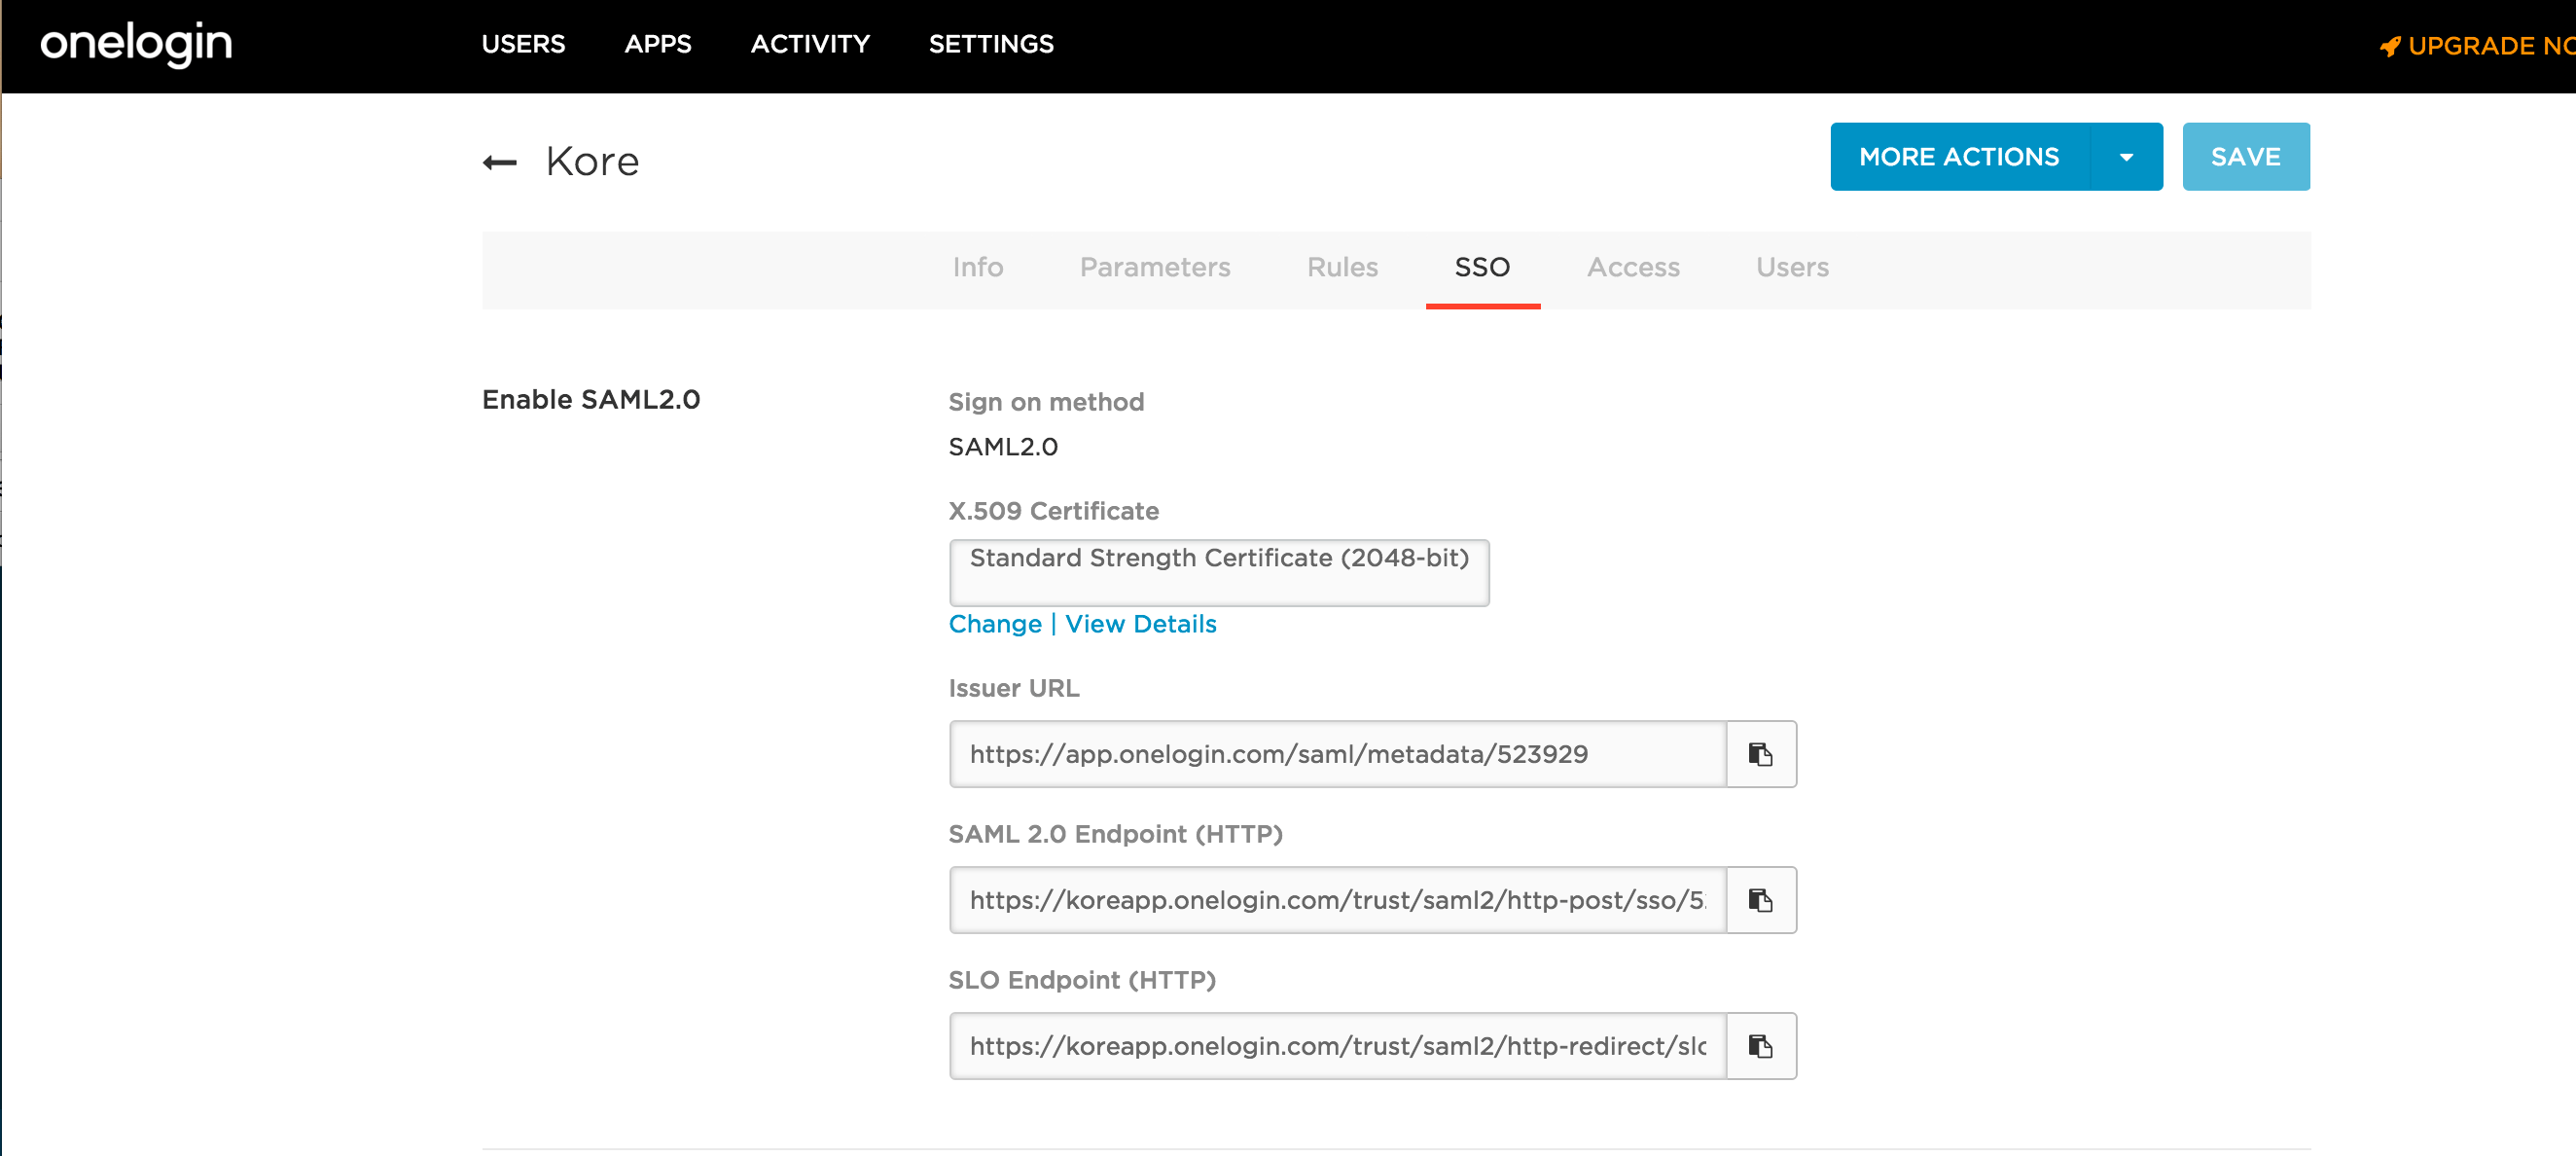
6. On the **SSO** tab, in the **Enable SAML2.0** section, copy the URLs in the:
* **OneLogin SAML 2.0 Endpoint (HTTP)** field to the AI for Service **SAML 2.0 Endpoint** field
* **OneLogin Issuer URL** field to the AI for Service **Issuer URL** field
7. In the **OneLogin X.509 Certificate** field, click View Details. The **Standard Strength Certificate (2048-bit)** page is displayed.
8. In the **X.509 Certificate** section, copy the certificate data, and then paste the data into the AI for Service **X.509 Certificate** text box.
Copy and paste only the data after the `BEGIN CERTIFICATE` header and before the `END CERTIFICATE` footer in AI for Service.
9. In AI for Service, select **Create**.
To test the configuration, log off the Admin Console and log on again. The **OneLogin** portal should be displayed.
## Enable or Disable SSO
Depending on the security required for your company, you can enable or disable Single Sign-On (SSO) for users accessing the application.
When you disable SSO or when the SSO authentication validity period expires, users must create and log on using their credentials. If no account-specific password policies have been defined, then default password policies are automatically enabled for the users.
## OIDC
Complete the steps in the following procedure to configure SSO using OIDC in the **Security & Control** module of the Admin Console.
1. On the **Single Sign On** page, select **Configure**, then **Enable SSO**.
2. In the **Select suitable Sign-On Protocol** section, select **OpenID Connect**.
3. In the **Configure SSO for OpenID Connect** section, select an identity provider, for example, **Sign in with Google**.
4. Select **Create**.
## WS-Federation
Complete the steps in the following procedure to configure Single Sign-On (SSO) using the WS-Federation protocol in the **Security & Control** module of the Admin Console.
1. On the **Single Sign On** page, select **Configure**, then **Enable SSO**.
2. In the **Select suitable Sign-On Protocol** section, select **WS-Federation**.
3. In the **Configure SSO for WS-Federation** section, select an identity provider, and then define the settings for:
1. **Windows Azure®**
* **Azure AD Sign-On End Point URL**: The URL that AI for Services ends sign-on and sign-off requests using *Azure*. The response for the authentication is sent to the **Reply URL** defined in your *Azure* Active Directory configuration settings.
* **Azure AD Federation Metadata Document**: The URL for the federation metadata document used for authentication with *Azure* Active Directory.
2. **Other**: Generic WS-Federation identity provider configuration, other than Azure
* **AD Sign-On End Point URL**: The URL that the platform sends sign on and sign off requests using your WS-Federation identity provider.
* **Identity provider issuer**: The entity that provides the user identities, including the ability to authenticate a user.
4. In the administrative console for your Single Sign-On provider, you will also need to define the URLs that are used to exchange data between the application and your SSO provider. While the URL names may vary by SSO provider, you will need to define these URLs:
1. **SAML 2.0**
* **LDAP Attribute:** nameId
* **Claim Attribute:** uri
2. **SAML 1.1**
* **LDAP Attribute:** nameId
* **Claim Attribute:** emailAddress
3. **Assertion Consumer Service (ACS) URL** or **Callback URL** as `https://idp.kore.com/authorize/callback`.
5. In addition to authentication values, you must pass the email address of the user as an LDAP attribute from Active Directory when using ADFS. For more information, [see Attributes for ADFS](#attributes-for-adfs).
6. Select **Create**.
## SAML
Security Assertion Markup Language (SAML) is a standard protocol for web browser Single Sign-On (SSO) using secure tokens. SAML eliminates all passwords and instead uses standard cryptography and digital signatures to pass a secure sign-in token from an identity provider to a SaaS application.
SAML provides a solution to allow your identity provider and service providers to exist separately from each other. When a user logs into a SAML-enabled application, the service provider requests authorization from the appropriate identity provider. The identity provider authenticates the user's credentials and then returns the authorization for the user to the service provider, and the user is now able to use the application.
### How SAML works
SAML SSO works by transferring the user's identity from one place (the identity provider) to another (the service provider). This is done through an exchange of digitally signed XML documents.
Consider the following scenario: A user is logged into a system that acts as an identity provider. The user wants to log in to a remote application, such as a support or accounting application (the service provider). The following happens:
1. The user accesses the remote application using a link on an intranet, a bookmark, or similar and the application loads.
2. The application identifies the user's origin (by application subdomain, user IP address, or similar) and redirects the user back to the identity provider, asking for authentication. This is the authentication request.
3. The user either has an existing active browser session with the identity provider or establishes one by logging into the identity provider.
4. The identity provider builds the authentication response in the form of an XML-document containing the user's username or email address, signs it using an X.509 certificate, and posts this information to the service provider.
5. The service provider, which already knows the identity provider and has a certificate fingerprint, retrieves the authentication response and validates it using the certificate fingerprint.
6. The identity of the user is established, and the user is provided with app access.
### Implementation
There are two ways SAML can be used within Platform:
* For developer authentication to access the App Builder,
* For user authentication to access the App.
#### Use case 1: App builder authentication.
Enterprises can set up access to the App builder tool using the enterprise SSO. App developers and admins can log into app builder using SSO done by the enterprise identity provider.
**SSO flow from Platform**: The following is the flow within the Platform once SSO is configured using SAML:
1. The client makes a call to the AI for Service app server (using the login URL) with user details to get identity provider info (SAML).
2. The AI for Service app server initiates a handshake request with the AI for Service idproxy server.
3. The AI for Service ID Proxy server initiates a request to the identity provider (SAML) with user details.
4. On successful authentication, the identity provider (SAML) returns an assertion response to the AI for Service ID Proxy server.
5. Upon verifying the response from the identity provider, AI for Service idproxy server initiates a request to the AI for Service app server.
6. On successful authentication of the token from AI for Service idproxy server, AI for Service app server grants access to the user.
Refer below [to configure SSO using SAML](#configuring-sso-using-saml)
#### Use case 2: End-user authentication
In this scenario, the chat interface is embedded on the customer portal or Mobile app that requires user authentication via SSO.\
The App access is automatically limited to authenticated users. If the task requires API invocation that requires SSO-based authentication, the developer can follow the below steps
* On the client, developer needs to retrieve SSO token of the logged in user and pass it to the app using the ***secureCustomPayload*** parameter in the Bot SDK API.
* In the dialog task, the App developer can write custom logic to read this token and add it as API headers for secure API calls made using service node or webhook node.
The token information on the client varies depending upon the SSO provider and the payload, accordingly the developer would need to write custom logic.
### Configuring SSO using SAML
Complete the following steps to configure Single Sign-On (SSO) using Security Assertion Markup Language (SAML) protocol in the Admin Console. AI for Servicealso supports WS-Federation and OpenID Connect (OIDC) protocols.
### OKTA Configuration
1. On the **Single Sign On** page, select **Configure**, then **Enable SSO**.In the **Security & Control** module on the **Single Sign On** page in the Admin Console, click **Enable SSO**.
2. In the **Select a suitable Sign-On Protocol** section, select **SAML**.
3. In the **Configure SSO for SAML** section, select an identity provider, and then define the settings for one of:
1. **Okta Single Sign-On URL**: The SSO URL for *Okta* this is to enable Service Provider-initiated SAML flow.
2. **Identity Provider Issuer**: The entity that provides the user identities, including the ability to authenticate a user.
3. **Certificate**: The public certificate stored by the service provider from the identity provider used to validate a user's signature. You can add multiple (max of 2) certificates, delete already added invalid certificates, the platform will use the latest certificate for authorization, in case it's invalid, then the older certificate is used.
4. **ACS URL for SP Initiated SAML Flow**: This is the redirect URL for Service Provider-initiated SAML flow.
5. **ACS URL for IDP Initiated SAML Flow**: This is the account-specific URL for Identity Provider-initiated SAML flow.
6. **Skip 2FA Authentication** – This setting lets administrators determine whether users must complete two-factor authentication (2FA) during their first login. The 2FA step can be skipped at the Service Provider (SP) level, the Identity Provider (IdP) level, or at both levels, based on the configuration.
* Select the **IdP (Identity Provider)** checkbox to skip 2FA enforcement at the identity provider during first-time authentication.
* Select the **SP** checkbox to skip 2FA enforcement at the service provider during first-time authentication.
7. **SAML Attribute Mapping**: Enable this option to map SAML Attributes with AI for ServiceGroup Names or Admin Roles Names. Once enabled, you can:
* Define how the SAML attributes should be mapped with AI for Serviceattributes:
1. Full Sync: Every time the user signs in, the platform will update the user's Group and Role assignments based on the SAML Attributes present in the response. All existing assignments will be removed. Only the new group or role assignments as available in the SAML response will be assigned
2. Inclusion Only: Every time the user signs in, the platform will only assign the new group or roles available in the SAML response. All existing assignments will be retained. New assignments will be added as available in the SAML responses
* define one or more mapping pairs. Each pair includes
1. SAML Attribute Name: Name of the SAML attribute as available in the SAML response
2. SAML Attribute Value: Value associated with the SAML attribute
3. Attribute Type: Refers to the type of mapping to be associated that's Group Name or Role Name
* Group Name: Refers to any of the user groups defined in the AI for Serviceaccount
* Role Name: Refers to the following
* Admin Roles defined in the AI for Serviceaccount
* App Builder Access
* New App Creation
* Manage Data Tables and Views
4. AI for ServiceAttribute: Refers to either Group Name or Role Name. The list should include the following:
* List of all Admin Roles
* App Builder Access
* New App Creation
* Manage Data Tables and Views
8. **Restrict Auto - Onboarding** - Enable this option to restrict automatic user onboarding during IdP-initiated login for users who don't exist in the Kore platform.
9. **Exclude RequestedAuthnContext in request** - Enable this option to remove RequestedAuthnContext from SAML authentication requests.
4. Click **Save**.
#### Okta for AI for Service SSO
To configure Single Sign-On in *Okta* for AI for Service, you must first add the AI for Service app to your *Okta* account, and then copy URLs and the security certificate from *Okta* into your AI for Service account. This topic describes how to add the AI for Service app to your *Okta* account and then access the URLs and certificate needed for the AI for Service configuration for SSO using *Okta*.
To complete this procedure, you must have already selected *Okta* as a SAML provider on the **Single Sign On** page in the Admin Console.
**To add the AI for Service app to Okta**
1. Log on to **Okta**.
2. On the **Home** page, select **Admin**. The **Dashboard** page is displayed.
3. On the top navigation bar, select **Applications**. The **Applications** page is displayed.
4. Select **Add Application**. The **Add Application** page is displayed.
5. Select **Create application**
6. In the **General settings**, provide an *App name* and select **Next**.
7. In **Configure SAML**, provide the *Single Sign-On URL.* To obtain this:
1. Login to Admin Console
2. Navigate to **Security & Control** > **Single Sign on page**
3. Enable **SAML** and select **Okta** as the identity provider.
4. Locate the **ACS URL for SP Initiated SAML Flow field**.
This field contains the required Single Sign-On URL.
5. For on-prem accounts, the ACS URL for SP Initiated SAML Flow is displayed as `https://idproxy-dev.kore.com/authorize/callback`. This needs to be updated as "single sign on URL" in Okta platform and `https://idproxy-dev.kore.com` needs to be updated as the "Audience URL"
6. You can provide the **Attribute statements** like emailId, firstName as per your requirement.
8. To configure the **ACS URL for IDP-Initiated SAML Flow**, copy and paste the complete URL that you get from your admin. In case you are using internal redirection URLs, please reach out to your internal admin/network teams. To get the **ACS URL for IDP Initiated SAML Flow**, check "Use this Recipient URL and Destination URL". Enter the **Audience URI** field as ACS URL for SP Initiated SAML Flow `https://idp.kore.com/authorize/callback`.
This URL is a temporary URL. Once you add the AI for Service app in Okta, this URL changes as per your organisation's domain requirements. You must copy the final ACS URL again and paste it in the field. For more information, read [How to configure Okta SSO in AI for Service Platform](https://community.kore.ai/t/sso-how-to-configure-okta-sso-in-kore-ai-xo-platform/2618) community post.
9. Select **Finish**.
10. On the **Sign On** tab, in the **Settings** section, select **View Setup Instructions**.
11. Copy the URLs in the:
1. **Identity Provider Single Sign-On URL** field to the **Okta Single Sign-On URL** field in AI for Service.
2. **Identity Provider Issuer** field to the AI for Service **Identity Provider Issuer** field
12. In the Okta **X.509 Certificate** field, copy the certificate data, and then paste the data into the AI for Service **Certificate** text box.
Only data after the **BEGIN CERTIFICATE** header and before the **END CERTIFICATE** footer should be copied and pasted into AI for Service.
13. In AI for Service, select **Create**. This will complete the integration of the Okta login.
To test the configuration, log off the Admin Console and log on again. The Okta portal should be displayed.
### OneLogin Configuration
**OneLogin** – For more information, refer below, or in the *OneLogin* documentation, see [Configuring SSO for AI for Service](https://www.onelogin.com/connector/kore).
* **SAML 2.0 Endpoint**: The HTTP SSO endpoint for OneLogin to enable Service Provider-initiated SAML flow, for example, `https://app.onelogin.com/trust/saml2/http-post/sso/358111`.
* **Issuer URL**: The URL for the *OneLogin* issuer, for example, `https://app.onelogin.com/saml/metadata/358111`.
* **X.509 Certificate**: The public certificate stored by the service provider from the identity provider used to validate a user signature. You can add multiple (max of 2) certificates, delete already added invalid certificates, the platform will use the latest certificate for authorisation, in case it's invalid, then the older certificate will be used.
* **ACS URL for SP Initiated SAML Flow**: This is the redirect URL for Service Provider-initiated SAML flow.
* **ACS URL for IDP Initiated SAML Flow**: This is the account-specific URL for Identity Provider-initiated SAML flow.
* **Skip 2FA Authentication**: This setting lets administrators determine whether users must complete two-factor authentication (2FA) during their first login. The 2FA step can be skipped at the Service Provider (SP) level, the Identity Provider (IdP) level, or at both levels, based on the configuration.
* Select the **IdP (Identity Provider)** checkbox to skip 2FA enforcement at the identity provider during first-time authentication.
* Select the **SP** checkbox to skip 2FA enforcement at the service provider during first-time authentication.
* **SAML Attribute Mapping**: Enable this option to map SAML Attributes with AI for Service Group Names or Admin Roles Names. Once enabled, you can:
* Define how the SAML attributes should be mapped with AI for Service attributes:
* Full Sync: Every time the user signs in, the platform will update the user's Group and Role assignments based on the SAML Attributes present in the response. All existing assignments will be removed. Only the new group or role assignments available in the SAML response will be assigned
* Inclusion Only: Every time the user signs in, the platform will only assign the new group or roles available in the SAML response. All existing assignments will be retained. New assignments will be added as available in the SAML responses
* define one or more mapping pairs. Each pair includes
* SAML Attribute Name: Name of the SAML attribute as available in the SAML response
* SAML Attribute Value: Value associated with the SAML attribute
* Attribute Type: Refers to the type of mapping to be associated, that's Group Name or Role Name
* Group Name: Refers to any of the user groups defined in the AI for Service account
* Role Name: Refers to the following
* Admin Roles defined in the AI for Service account
* App Builder Access
* New App Creation
* Manage Data Tables and Views
* AI for Service Attribute: Refers to either Group Name or Role Name. The list should include the following:
* List of all Admin Roles
* App Builder Access
* New App Creation
* Manage Data Tables and Views
* **Restrict Auto - Onboarding** - Enable this option to restrict automatic user onboarding during IdP-initiated login for users who don't exist in the Kore platform.
* **Exclude RequestedAuthnContext in request** - Enable this option to remove RequestedAuthnContext from SAML authentication requests.
#### OneLogin for AI for Service SSO
To configure Single Sign-On in AI for Service using *OneLogin*, you must first add the AI for Service app to your *OneLogin* account and then copy URLs and the security certificate from *OneLogin* into your AI for Service account. This topic describes how to add the AI for Service app to your *OneLogin* account and then access the URLs and certificate needed for the AI for Service configuration for SSO using *OneLogin*.
To complete this procedure, you must have already selected *OneLogin* as a SAML provider on the **Single Sign On** page in the Admin Console.
**To add the AI for Service app to OneLogin**
1. Log on to *OneLogin*.
2. On the **APPS** menu, click **Add Apps**. The **Find Applications** page is displayed.
3. In the **Search** field, enter AI for Service, and then press **Enter**. The AI for Service app for *OneLogin* is displayed.
4. Click the AI for Service app. The **Add AI for Service** page is displayed.
5. Optionally, change the display name or the icons displayed to your users in the *OneLogin* portal, and then click **SAVE**. The AI for Service app is added to your Company apps for *OneLogin,* and the AI for Service app page is displayed.
6. On the **SSO** tab, in the **Enable SAML2.0** section, copy the URLs in the:
* **OneLogin SAML 2.0 Endpoint (HTTP)** field to the AI for Service **SAML 2.0 Endpoint** field
* **OneLogin Issuer URL** field to the AI for Service **Issuer URL** field
7. In the **OneLogin X.509 Certificate** field, click View Details. The **Standard Strength Certificate (2048-bit)** page is displayed.
8. In the **X.509 Certificate** section, copy the certificate data, and then paste the data into the AI for Service **X.509 Certificate** text box.
Copy and paste only the data after the `BEGIN CERTIFICATE` header and before the `END CERTIFICATE` footer in AI for Service.
9. In AI for Service, select **Create**.
To test the configuration, log off the Admin Console and log on again. The **OneLogin** portal should be displayed.
 ### Bitium Configuration
* **Single Sign-On URL**: The HTTP SSO endpoint for *Bitium* to enable Service Provider-initiated SAML flow, for example, `https://www.bitium.com/7655`.
* **Issuer URL**: The URL for the *OneLogin* issuer, for example, `https://bitium.com/7655/saml/82456/metadata.xml`.
* **Certificate**: The public certificate stored by the service provider from the identity provider used to validate a user signature. You can add multiple (max of 2) certificates, delete already added invalid certificates, platform will use the latest certificate for authorization, in case it's invalid then the older certificate would be used.
* **ACS URL for SP Initiated SAML Flow**: This is the redirect URL for Service Provided initiated SAML flow.
* **ACS URL for IDP Initiated SAML Flow**: This is the account-specific URL for Identity Provided initiated SAML flow.
* **Skip 2FA Authentication**: This setting lets administrators determine whether users must complete two-factor authentication (2FA) during their first login. The 2FA step can be skipped at the Service Provider (SP) level, the Identity Provider (IdP) level, or at both levels, based on the configuration.
* Select the **IdP (Identity Provider)** checkbox to skip 2FA enforcement at the identity provider during first-time authentication.
* Select the **SP** checkbox to skip 2FA enforcement at the service provider during first-time authentication.
* **SAML Attribute Mapping**: Enable this option to map SAML Attributes with AI for Service Group Names or Admin Roles Names. Once enabled, you can:
* define how the SAML attributes should be mapped with AI for Service attributes:
* Full Sync: Every time the user signs in, the platform will update the user's Group and Role assignments based on the SAML Attributes present in the response. All existing assignments will be removed. Only the new group or role assignments as available in the SAML response will be assigned
* Inclusion Only: Every time the user signs in, the platform will only assign the new group or roles available in the SAML response. All existing assignments will be retained. New assignments will be added as available in the SAML responses
* define one or more mapping pairs. Each pair includes
* SAML Attribute Name: Name of the SAML attribute as available in the SAML response
* SAML Attribute Value: Value associated with the SAML attribute
* Attribute Type: Refers to the type of mapping to be associated, that's Group Name or Role Name
* Group Name: Refers to any of the user groups defined in the AI for Service account
* Role Name: Refers to the following
* Admin Roles defined in the AI for Service account
* App Builder Access
* New App Creation
* Manage Data Tables and Views
* AI for Service Attribute: Refers to either Group Name or Role Name. The list should include the following:
* List of all Admin Roles
* App Builder Access
* New App Creation
* Manage Data Tables and Views
* **Restrict Auto - Onboarding** - Enable this option to restrict automatic user onboarding during IdP-initiated login for users who don't exist in the Kore platform.
* **Exclude RequestedAuthnContext in request** - Enable this option to remove RequestedAuthnContext from SAML authentication requests.
#### AI for Service SSO for Bitium
To configure Single Sign-On in *Bitium* for AI for Service, you must first add the AI for Service app to your *Bitium* account and then copy URLs and the security certificate from *Bitium* into your AI for Service account. This topic describes how to add the AI for Service app to your *Bitium* account and then access the URLs and certificate needed for the AI for Service configuration for SSO using *Bitium*.
To complete this procedure, you must have already selected *Bitium* as a SAML provider on the **Single Sign On** page in the Admin Console.
**To add the AI for Service app to Bitium**
1. Log on to **Bitium**.
2. On the **Manage Company Name** menu, select **Manage Apps**, then select **Add an App**. The **Add Apps** dialog is displayed.
3. In the **Search** field, enter AI for Service, and then press **Enter**. The **Install AI for Service app for *Bitium*** dialog is displayed.
4. On the **Manage Organization** menu, select **Manage Apps**, and then select **AI for Service**.
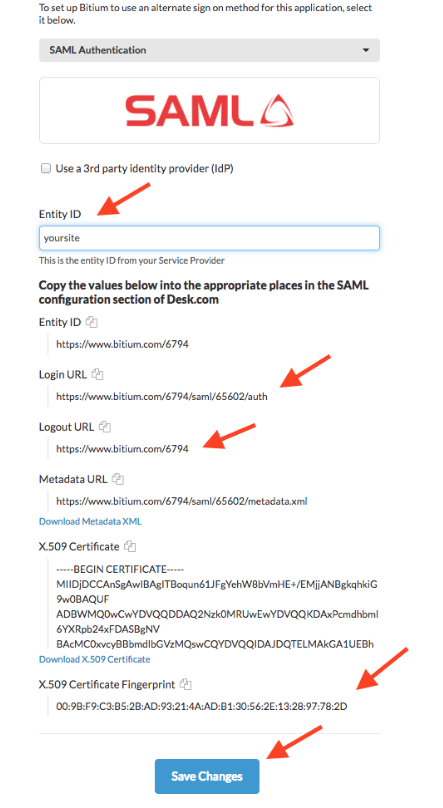
5. On the **Single Sign-On** tab, in the **Select a Single Sign-On Provider** section, select **SAML Authentication**.
6. Copy the following URLs from *Bitium* into the Admin Console *Bitium* configuration section:
* **Bitium Login URL** field to the AI for Service **Single Sign-On** field
* **Bitium Logout URL** field to the AI for Service **Issuer URL** field
7. In the Bitium **X.509 Certificate** field, copy the certificate data, and then paste the data into the Admin Console **Certificate** text box.
Only data after the \*\*BEGIN CERTIFICATE header and before the **ENCERTIFICATE** footer should be copied and pasted into AI for Service.
8. In AI for Service, select **Create**.
To test the configuration, log off the Admin Console and log on again. The Bitium portal should be displayed.
### Bitium Configuration
* **Single Sign-On URL**: The HTTP SSO endpoint for *Bitium* to enable Service Provider-initiated SAML flow, for example, `https://www.bitium.com/7655`.
* **Issuer URL**: The URL for the *OneLogin* issuer, for example, `https://bitium.com/7655/saml/82456/metadata.xml`.
* **Certificate**: The public certificate stored by the service provider from the identity provider used to validate a user signature. You can add multiple (max of 2) certificates, delete already added invalid certificates, platform will use the latest certificate for authorization, in case it's invalid then the older certificate would be used.
* **ACS URL for SP Initiated SAML Flow**: This is the redirect URL for Service Provided initiated SAML flow.
* **ACS URL for IDP Initiated SAML Flow**: This is the account-specific URL for Identity Provided initiated SAML flow.
* **Skip 2FA Authentication**: This setting lets administrators determine whether users must complete two-factor authentication (2FA) during their first login. The 2FA step can be skipped at the Service Provider (SP) level, the Identity Provider (IdP) level, or at both levels, based on the configuration.
* Select the **IdP (Identity Provider)** checkbox to skip 2FA enforcement at the identity provider during first-time authentication.
* Select the **SP** checkbox to skip 2FA enforcement at the service provider during first-time authentication.
* **SAML Attribute Mapping**: Enable this option to map SAML Attributes with AI for Service Group Names or Admin Roles Names. Once enabled, you can:
* define how the SAML attributes should be mapped with AI for Service attributes:
* Full Sync: Every time the user signs in, the platform will update the user's Group and Role assignments based on the SAML Attributes present in the response. All existing assignments will be removed. Only the new group or role assignments as available in the SAML response will be assigned
* Inclusion Only: Every time the user signs in, the platform will only assign the new group or roles available in the SAML response. All existing assignments will be retained. New assignments will be added as available in the SAML responses
* define one or more mapping pairs. Each pair includes
* SAML Attribute Name: Name of the SAML attribute as available in the SAML response
* SAML Attribute Value: Value associated with the SAML attribute
* Attribute Type: Refers to the type of mapping to be associated, that's Group Name or Role Name
* Group Name: Refers to any of the user groups defined in the AI for Service account
* Role Name: Refers to the following
* Admin Roles defined in the AI for Service account
* App Builder Access
* New App Creation
* Manage Data Tables and Views
* AI for Service Attribute: Refers to either Group Name or Role Name. The list should include the following:
* List of all Admin Roles
* App Builder Access
* New App Creation
* Manage Data Tables and Views
* **Restrict Auto - Onboarding** - Enable this option to restrict automatic user onboarding during IdP-initiated login for users who don't exist in the Kore platform.
* **Exclude RequestedAuthnContext in request** - Enable this option to remove RequestedAuthnContext from SAML authentication requests.
#### AI for Service SSO for Bitium
To configure Single Sign-On in *Bitium* for AI for Service, you must first add the AI for Service app to your *Bitium* account and then copy URLs and the security certificate from *Bitium* into your AI for Service account. This topic describes how to add the AI for Service app to your *Bitium* account and then access the URLs and certificate needed for the AI for Service configuration for SSO using *Bitium*.
To complete this procedure, you must have already selected *Bitium* as a SAML provider on the **Single Sign On** page in the Admin Console.
**To add the AI for Service app to Bitium**
1. Log on to **Bitium**.
2. On the **Manage Company Name** menu, select **Manage Apps**, then select **Add an App**. The **Add Apps** dialog is displayed.
3. In the **Search** field, enter AI for Service, and then press **Enter**. The **Install AI for Service app for *Bitium*** dialog is displayed.
4. On the **Manage Organization** menu, select **Manage Apps**, and then select **AI for Service**.
5. On the **Single Sign-On** tab, in the **Select a Single Sign-On Provider** section, select **SAML Authentication**.
6. Copy the following URLs from *Bitium* into the Admin Console *Bitium* configuration section:
* **Bitium Login URL** field to the AI for Service **Single Sign-On** field
* **Bitium Logout URL** field to the AI for Service **Issuer URL** field
7. In the Bitium **X.509 Certificate** field, copy the certificate data, and then paste the data into the Admin Console **Certificate** text box.
Only data after the \*\*BEGIN CERTIFICATE header and before the **ENCERTIFICATE** footer should be copied and pasted into AI for Service.
8. In AI for Service, select **Create**.
To test the configuration, log off the Admin Console and log on again. The Bitium portal should be displayed.
 **Other**: Generic SAML identity provider configuration. Select this option if you aren't using a AI for Service built-in configuration.
* **Single Sign-On URL**: The URL that AI for Service sends sign on and sign off requests using your WS-Federation identity provider. This is to enable Service Provider initiated SAML flow.
* **Issuer URL**: The URL for the WS-Federation metadata document used for authentication with Active Directory.
* **Certificate**: The public certificate stored by the service provider from the identity provider used to validate a user signature. You can add multiple (max of 2) certificates, delete already added invalid certificates, platform will use the latest certificate for authorization, in case it's invalid then the older certificate would be used.
* **ACS URL for SP Initiated SAML Flow**: This is the redirect URL for Service Provided initiated SAML flow.
* **ACS URL for IDP Initiated SAML Flow**: This is the account-specific URL for Identity Provided initiated SAML flow.
* **Skip 2FA Authentication** – This setting lets administrators determine whether users must complete two-factor authentication (2FA) during their first login. The 2FA step can be skipped at the Service Provider (SP) level, the Identity Provider (IdP) level, or at both levels, based on the configuration.
* Select the **IdP (Identity Provider)** checkbox to skip 2FA enforcement at the identity provider during first-time authentication.
* Select the **SP** checkbox to skip 2FA enforcement at the service provider during first-time authentication.
* **SAML Attribute Mapping**: Enable this option to map SAML Attributes with AI for Service Group Names or Admin Roles Names. Once enabled, you can:
* define how the SAML attributes should be mapped with AI for Service attributes:
* Full Sync: Every time the user signs in, the platform will update the user's Group and Role assignments based on the SAML Attributes present in the response. All existing assignments will be removed. Only the new group or role assignments as available in the SAML response will be assigned
* Inclusion Only: Every time the user signs in, the platform will only assign the new group or roles available in the SAML response. All existing assignments will be retained. New assignments will be added as available in the SAML responses
* define one or more mapping pairs. Each pair includes
* SAML Attribute Name: Name of the SAML attribute as available in the SAML response
* SAML Attribute Value: Value associated with the SAML attribute
* Attribute Type: Refers to the type of mapping to be associated that's Group Name or Role Name
* Group Name: Refers to any of the user groups defined in the AI for Service account
* Role Name: Refers to the following
* Admin Roles defined in the AI for Service account
* App Builder Access
* New App Creation
* Manage Data Tables and Views
* AI for Service Attribute: Refers to either Group Name or Role Name. The list should include the following:
* List of all Admin Roles
* App Builder Access
* NewApp Creation
* Manage Data Tables and Views
* In the administrative console for your Single Sign-On provider, you will also need to define the URLs that are used to exchange data between AI for Service and your SSO provider. While the URL names may vary by SSO provider, you will need to define these URLs:
* **Assertion Consumer Service (ACS) URL** or **Callback URL** as `https://idp.kore.com/authorize/callback`.
* In addition to authentication values, you must pass the email address of the user as an LDAP attribute from Active Directory when using ADFS. For more information, see [Attributes for ADFS](#attributes-for-adfs).
* **Identity URL** or **Sign On URL** as `https://idp.kore.com`
* **Restrict Auto - Onboarding** - Enable this option to restrict automatic user onboarding during IdP-initiated login for users who don't exist in the Kore platform.
* **Exclude RequestedAuthnContext in request** - Enable this option to remove RequestedAuthnContext from SAML authentication requests.
9. Select **Create**.
#### Attributes for ADFS
When you configure Single Sign-On using LDAP for ADFS, in addition to authentication attributes, your third-party SSO provider can send additional attributes to AI for Service through the **Assertion Consumer Service (ACS) URL** or **Callback URL**.
If you are using a built-in AI for Service app for SSO, such as *Windows Azure* for WS-Federation protocol, or *OneLogin* for SAML protocol, required attributes are already configured for AI for Service when you add the AI for Service app to your SSO provider admin console.
The following data is an example of attribute data passed to AI for Service in the callback URL.
```xml theme={null}
Michael
Doe
John Doe
john.doe@example.com
```
These attributes are optional except for the `EmailAddress`, which is required. The `Email Address` attribute uses the following `nameId` format:
```
SAML 2.0:
NameID Format="urn:oasis:names:tc:SAML:2.0:attrname-format:uri"
SAML 1.1:
NameID Format="urn:oasis:names:tc:SAML:1.1:nameid:format:emailAddress
```
#### Mapping Attributes in ADFS
ADFS is a service provided by Microsoft as a standard role for Windows Server that provides a web login using existing Active Directory credentials. When using SAML or WS-Federation protocols to log on with ADFS, you can pass other values in addition to the authentication values.
The attribute values are defined as **Claim Rules** in the **Relying Party Trust** dialog in the SQL Server admin console. To edit the **Claim Rules**, select the **Relying Party Trusts** folder in **ADFS Management**, and then select **Edit Claim Rules** from the **Actions** sidebar. To add a new rule, select **Add Rule**, and then select the **Send LDAP Attributes** template. Enter the following mapping values:
* **SAML 2.0**
* **LDAP Attribute:** nameId
* **Claim Attribute:** uri
* **SAML 1.1**
* **LDAP Attribute:** nameId
* **Claim Attribute:** emailAddress
## Exclude Users from SSO
When SSO is enabled for an account, administrators can exclude specific users from mandatory SSO authentication. Excluded users sign in with platform credentials, while all other users continue to authenticate through the configured identity provider (IdP). This is useful when organizations enforce SSO for employees while enabling external collaborators, such as partners and contractors, to sign in using platform credentials without being provisioned in the organization's IdP.
To exclude users, search for their email address and add them to the SSO exclusion list. Removing a user from the exclusion list restores mandatory SSO authentication. Changes take effect on the user's next sign-in.
**Other**: Generic SAML identity provider configuration. Select this option if you aren't using a AI for Service built-in configuration.
* **Single Sign-On URL**: The URL that AI for Service sends sign on and sign off requests using your WS-Federation identity provider. This is to enable Service Provider initiated SAML flow.
* **Issuer URL**: The URL for the WS-Federation metadata document used for authentication with Active Directory.
* **Certificate**: The public certificate stored by the service provider from the identity provider used to validate a user signature. You can add multiple (max of 2) certificates, delete already added invalid certificates, platform will use the latest certificate for authorization, in case it's invalid then the older certificate would be used.
* **ACS URL for SP Initiated SAML Flow**: This is the redirect URL for Service Provided initiated SAML flow.
* **ACS URL for IDP Initiated SAML Flow**: This is the account-specific URL for Identity Provided initiated SAML flow.
* **Skip 2FA Authentication** – This setting lets administrators determine whether users must complete two-factor authentication (2FA) during their first login. The 2FA step can be skipped at the Service Provider (SP) level, the Identity Provider (IdP) level, or at both levels, based on the configuration.
* Select the **IdP (Identity Provider)** checkbox to skip 2FA enforcement at the identity provider during first-time authentication.
* Select the **SP** checkbox to skip 2FA enforcement at the service provider during first-time authentication.
* **SAML Attribute Mapping**: Enable this option to map SAML Attributes with AI for Service Group Names or Admin Roles Names. Once enabled, you can:
* define how the SAML attributes should be mapped with AI for Service attributes:
* Full Sync: Every time the user signs in, the platform will update the user's Group and Role assignments based on the SAML Attributes present in the response. All existing assignments will be removed. Only the new group or role assignments as available in the SAML response will be assigned
* Inclusion Only: Every time the user signs in, the platform will only assign the new group or roles available in the SAML response. All existing assignments will be retained. New assignments will be added as available in the SAML responses
* define one or more mapping pairs. Each pair includes
* SAML Attribute Name: Name of the SAML attribute as available in the SAML response
* SAML Attribute Value: Value associated with the SAML attribute
* Attribute Type: Refers to the type of mapping to be associated that's Group Name or Role Name
* Group Name: Refers to any of the user groups defined in the AI for Service account
* Role Name: Refers to the following
* Admin Roles defined in the AI for Service account
* App Builder Access
* New App Creation
* Manage Data Tables and Views
* AI for Service Attribute: Refers to either Group Name or Role Name. The list should include the following:
* List of all Admin Roles
* App Builder Access
* NewApp Creation
* Manage Data Tables and Views
* In the administrative console for your Single Sign-On provider, you will also need to define the URLs that are used to exchange data between AI for Service and your SSO provider. While the URL names may vary by SSO provider, you will need to define these URLs:
* **Assertion Consumer Service (ACS) URL** or **Callback URL** as `https://idp.kore.com/authorize/callback`.
* In addition to authentication values, you must pass the email address of the user as an LDAP attribute from Active Directory when using ADFS. For more information, see [Attributes for ADFS](#attributes-for-adfs).
* **Identity URL** or **Sign On URL** as `https://idp.kore.com`
* **Restrict Auto - Onboarding** - Enable this option to restrict automatic user onboarding during IdP-initiated login for users who don't exist in the Kore platform.
* **Exclude RequestedAuthnContext in request** - Enable this option to remove RequestedAuthnContext from SAML authentication requests.
9. Select **Create**.
#### Attributes for ADFS
When you configure Single Sign-On using LDAP for ADFS, in addition to authentication attributes, your third-party SSO provider can send additional attributes to AI for Service through the **Assertion Consumer Service (ACS) URL** or **Callback URL**.
If you are using a built-in AI for Service app for SSO, such as *Windows Azure* for WS-Federation protocol, or *OneLogin* for SAML protocol, required attributes are already configured for AI for Service when you add the AI for Service app to your SSO provider admin console.
The following data is an example of attribute data passed to AI for Service in the callback URL.
```xml theme={null}
Michael
Doe
John Doe
john.doe@example.com
```
These attributes are optional except for the `EmailAddress`, which is required. The `Email Address` attribute uses the following `nameId` format:
```
SAML 2.0:
NameID Format="urn:oasis:names:tc:SAML:2.0:attrname-format:uri"
SAML 1.1:
NameID Format="urn:oasis:names:tc:SAML:1.1:nameid:format:emailAddress
```
#### Mapping Attributes in ADFS
ADFS is a service provided by Microsoft as a standard role for Windows Server that provides a web login using existing Active Directory credentials. When using SAML or WS-Federation protocols to log on with ADFS, you can pass other values in addition to the authentication values.
The attribute values are defined as **Claim Rules** in the **Relying Party Trust** dialog in the SQL Server admin console. To edit the **Claim Rules**, select the **Relying Party Trusts** folder in **ADFS Management**, and then select **Edit Claim Rules** from the **Actions** sidebar. To add a new rule, select **Add Rule**, and then select the **Send LDAP Attributes** template. Enter the following mapping values:
* **SAML 2.0**
* **LDAP Attribute:** nameId
* **Claim Attribute:** uri
* **SAML 1.1**
* **LDAP Attribute:** nameId
* **Claim Attribute:** emailAddress
## Exclude Users from SSO
When SSO is enabled for an account, administrators can exclude specific users from mandatory SSO authentication. Excluded users sign in with platform credentials, while all other users continue to authenticate through the configured identity provider (IdP). This is useful when organizations enforce SSO for employees while enabling external collaborators, such as partners and contractors, to sign in using platform credentials without being provisioned in the organization's IdP.
To exclude users, search for their email address and add them to the SSO exclusion list. Removing a user from the exclusion list restores mandatory SSO authentication. Changes take effect on the user's next sign-in.