> ## Documentation Index
> Fetch the complete documentation index at: https://koreai.mintlify.site/llms.txt
> Use this file to discover all available pages before exploring further.
# BYOK Integration Guide for Amazon Web Services
[Back to Admin Console](/ai-for-service/administration/overview)
Bring Your Own Key (BYOK) encryption in Kore's public cloud SaaS enables enterprises to retain complete control over their encryption keys while protecting sensitive data. With BYOK, organizations use their own Customer Master Keys (CMKs) to encrypt app data, ensuring stronger security and compliance.
Kore's BYOK solution integrates with external key management systems such as AWS Key Management Service (KMS). Customers retain ownership of their encryption keys while leveraging Kore's secure, scalable cloud platform with HSM-backed keys.
## Prerequisites
* Active Kore.ai subscription (platform.kore.ai) with BYOK enabled.
* AWS account with administrative access to IAM and KMS.
* Permissions to create IAM roles and policies.
* Permissions to create and manage KMS keys.
## Information Exchange
The BYOK integration requires coordination between you (the customer) and the Kore.ai support team. Key information exchanged between Kore.ai and you is summarized in the table.
| Information | Description and Purpose | Provided By |
| -------------------- | --------------------------------------------------------------------------------------------------------------------------------------------------------------------------------------------------------------------------------------------------------------------------------------------------------------------------------------------------------------------------------------------------------------------- | ----------- |
| **Service Role ARN** | The Amazon Resource Name (ARN) of the IAM role in Kore.ai's AWS account. You add this to your IAM role's trust policy to allow Kore.ai's service to assume your role.
• **Service Role ARN for `platform.kore.ai`:**
• `arn:aws:iam::358587034707:role/SegBots-Servers-Role`
**Note:** Contact [Support](https://support.kore.ai/) if your SaaS instance URL is different from `platform.kore.ai`. | Kore.ai |
| **External ID** | A unique identifier (similar to a password) that we use when assuming your IAM role to prevent unauthorized access.
• External ID is auto-populated within the AI for Service Admin Console. See [Configuration Steps](#configuration-steps). | Kore.ai |
| **Role ARN** | The ARN of the IAM role created in your AWS account. The Platform assumes this role to access your KMS key.
• **Example:** `arn:aws:iam:::role/BYOK_Role`.
• Share this with Kore.ai after completing the steps in the [Integration Process](#integration-process) section. | Customer |
| **CMK ARN** | The ARN of your Customer Managed Key (CMK) in AWS KMS. This key is used by Kore.ai to encrypt and decrypt your data.
• **Example:** `arn:aws:kms:::key/`
• Follow the steps in the [Integration Process](#integration-process) section to create and share this value. | Customer |
## Integration Process
The BYOK integration involves six main steps:
1. [Create IAM Policy](#step-1-create-iam-policy): Define KMS permissions (encrypt, decrypt, generate keys, describe key).
2. [Create IAM Role](#step-2-create-iam-role): Establish a trust relationship with Kore.ai and attach the IAM policy.
3. [Create KMS Key](#step-3-create-kms-key): Set up a Customer Managed Key for encryption operations.
4. [Update KMS Key Policy](#step-4-update-kms-key-policy): Grant the IAM role explicit access to use the KMS key.
5. [Verify Configuration](#step-5-verify-configuration): Confirm all components are correctly configured.
6. [Share Information](#step-6-share-information-with-kore-ai): Provide your Role ARN and CMK ARN to Kore.ai support.
### Step 1: Create IAM Policy
This policy defines the KMS permissions for your BYOK role.
1. Go to **AWS Console → IAM → Policies**.
2. Click **Create policy**.
3. Select the **JSON** tab and paste this policy:
```
{ "Version": "2012-10-17",
"Statement": [
{
"Sid": "BYOKKMSPermissions",
"Effect": "Allow",
"Action": [
"kms:Encrypt",
"kms:Decrypt",
"kms:GenerateDataKey*",
"kms:DescribeKey"
],
"Resource": "arn:aws:kms:REGION:ACCOUNT_ID:key/KEY_ID"
}
]
}
```
4. Click **Next**.
5. **Name** the policy (e.g., BYOK\_KMS\_Policy).
6. Add an appropriate description, for example: "Policy granting KMS permissions for BYOK integration with AI for Service Kore.ai Platform".
7. Click **Create policy**.
Replace `REGION`, `ACCOUNT_ID`, and `KEY_ID` with your values. You can use `"Resource": "*"` initially and update it after creating your KMS key.
### Step 2: Create IAM Role
This role establishes trust with Kore.ai and uses the policy from Step 1.
1. Go to **AWS Console → IAM → Roles**.
2. Click **Create role**.
3. Select **AWS Account** as the trusted entity type.
4. Select **This account**.
5. Click **Next**.
6. Select the **BYOK\_KMS\_Policy** from Step 1.
7. Click **Next**.
8. **Name** the role (e.g., BYOK\_Role).
9. Add an appropriate description, for example: "Role for BYOK integration with AI for Service Kore.ai Platform."
10. Click **Create role**.
#### Update Trust Policy
Configure the role to trust Kore.ai's Service Role:
1. Go to the **BYOK\_Role** you just created.
2. Click the **Trust relationships** tab.
3. Click **Edit trust policy**.
4. Replace the policy with the following:
```
{ "Version": "2012-10-17",
"Statement": [
{
"Effect": "Allow",
"Principal": {
"AWS":"arn:aws:iam::358587034707:role/SegBots-Servers-Role"
},
"Action": "sts:AssumeRole",
"Condition": {
"StringEquals": {
"sts:ExternalId": ""
}
}
}
]
}
```
5. Click Update policy.
### Step 3: Create KMS Key
Create a Customer Managed Key for encryption.
1. Go to **AWS Console → KMS → Customer managed keys**.
2. Click **Create key**.
3. Select **Symmetric** as the **key type**.
4. Select **Encrypt and decrypt** as the **key usage**.
5. Click **Next**.
6. Enter key details:
1. An **Alias** (for example, `byok-kore-ai-key`).
2. An appropriate **Description**, for example: "Customer managed key for BYOK integration with AI for Service Kore.ai Platform".
7. Click **Next**.
8. Under **Key administrators**, add your administrator users or roles as those who should manage this key.
9. Click **Next**.
10. Add the **BYOK\_Role** as a **key user**.
11. Click **Next**.
12. Review the key configuration and click **Finish**.
### Step 4: Update KMS Key Policy
Add the BYOK\_Role to the key policy to grant explicit access.
1. Go to your **KMS key**.
2. Click the **Key policy** tab.
3. Click **Edit**.
4. Add the customer role statement to the existing **Statement** array (don't remove other statements).
```
{
"Sid": "Allow use of the key",
"Effect": "Allow",
"Principal": {
"AWS": "arn:aws:iam::ACCOUNT_ID:role/BYOK_Role"
},
"Action": [
"kms:Encrypt",
"kms:Decrypt",
"kms:GenerateDataKey*",
"kms:DescribeKey"
],
"Resource": "*"
}
```
Replace `ACCOUNT_ID` with your AWS account ID.
5. **Save** the policy.
### Step 5: Verify Configuration
Confirm all components are correctly configured:
| Item | Verification |
| ------------------ | --------------------------------------------------------------------------- |
| IAM Policy | Confirm BYOK\_KMS\_Policy exists with correct KMS actions. |
| Policy Attachment | Verify policy is attached to BYOK\_Role under the Permissions tab. |
| Trust Relationship | Confirm the Trust relationships tab shows Kore.ai Service Role ARN. |
| KMS Key Policy | Verify key policy includes both the root account and BYOK\_Role statements. |
| Key Users | Confirm BYOK\_Role appears under Key users in the KMS console. |
### Step 6: Share Information with Kore.ai
[Contact Kore.ai support](https://support.kore.ai/) and provide the following:
* CMK ARN: `arn:aws:kms:::key/`
* Role ARN: `arn:aws:iam:::role/BYOK_Role`
The Kore.ai support team will configure the integration (trust relationship between Kore and your AWS tenant) on their end and notify you when it's complete.
You can now configure and enable data encryption in AI for Service using your AWS KMS, as explained in the next section.
***
## Configure BYOK Encryption in AI for Service
You can enable BYOK encryption by configuring it within the AI for Service Admin Console. This process connects your AWS KMS key to AI for Service. During configuration, you can choose which applications will use it.
### Configuration Steps
1. In the Admin Console, go to **Enterprise Key**.
2. Click **Create Key** under the Bring Your Own Key section.\\
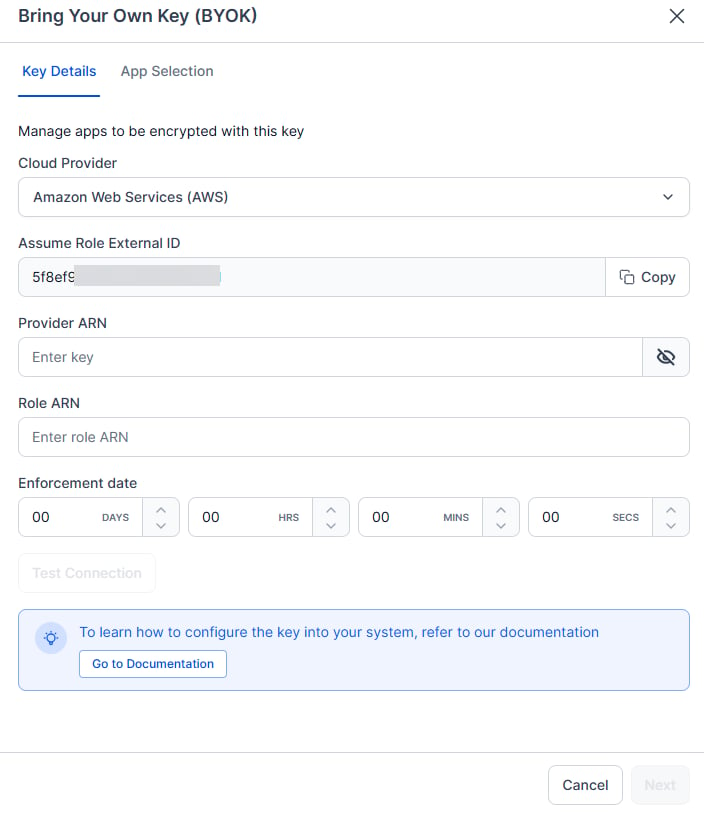 3. Enter AWS Details:
* **Cloud Provider**: Select Amazon Web Services (AWS).
* **Assume Role External ID**: Auto-populated.
* **Provider ARN**: Enter your CMK ARN.
* **Role ARN**: Enter your Role ARN.
4. Set **Enforcement Date**: Choose when encryption will begin. This is the date your CMK starts encrypting data.
You can modify the CMK and retest until the enforcement date. After this date, you can only rotate the key or update which apps are encrypted.
5. Test Configuration: Click **Test Configuration** to validate the connection.
The system will test the connection to your KMS, authentication, and encryption and decryption operations. Verify all tests pass before continuing.
6. Select Apps: Click **Next** to view all applications in your workspace.
* All apps are selected by default.
* Deselect any apps you want to keep on the default Kore.ai encryption.
7. Complete Setup: Click **Proceed** to complete the process. Your CMK is added to the enterprise keys list, and encryption begins on the enforcement date.
## Validation (Optional)
After the enforcement date, you can verify that encryption is working by using one of the following options:
### Option 1: View Analytics
Check analytics data for recent chat interactions to confirm that encrypted data is accessible.
### Option 2: Test Application Authorization
Open the application and run Authorization Profiles and Dialogs.
* Execute **BasicAuthValidationDialog**.
* When the app displays the authorization link, click the link and enter the credentials (**admin/password**).
**Example:**
3. Enter AWS Details:
* **Cloud Provider**: Select Amazon Web Services (AWS).
* **Assume Role External ID**: Auto-populated.
* **Provider ARN**: Enter your CMK ARN.
* **Role ARN**: Enter your Role ARN.
4. Set **Enforcement Date**: Choose when encryption will begin. This is the date your CMK starts encrypting data.
You can modify the CMK and retest until the enforcement date. After this date, you can only rotate the key or update which apps are encrypted.
5. Test Configuration: Click **Test Configuration** to validate the connection.
The system will test the connection to your KMS, authentication, and encryption and decryption operations. Verify all tests pass before continuing.
6. Select Apps: Click **Next** to view all applications in your workspace.
* All apps are selected by default.
* Deselect any apps you want to keep on the default Kore.ai encryption.
7. Complete Setup: Click **Proceed** to complete the process. Your CMK is added to the enterprise keys list, and encryption begins on the enforcement date.
## Validation (Optional)
After the enforcement date, you can verify that encryption is working by using one of the following options:
### Option 1: View Analytics
Check analytics data for recent chat interactions to confirm that encrypted data is accessible.
### Option 2: Test Application Authorization
Open the application and run Authorization Profiles and Dialogs.
* Execute **BasicAuthValidationDialog**.
* When the app displays the authorization link, click the link and enter the credentials (**admin/password**).
**Example:**
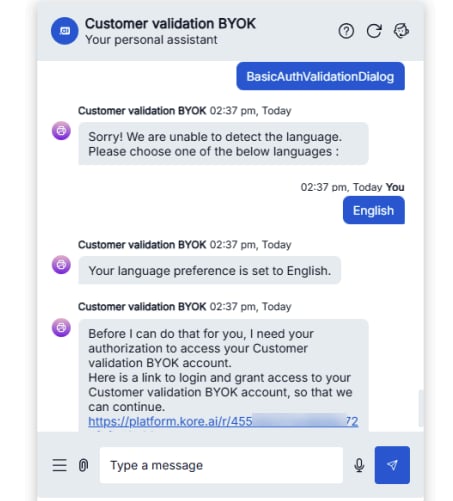
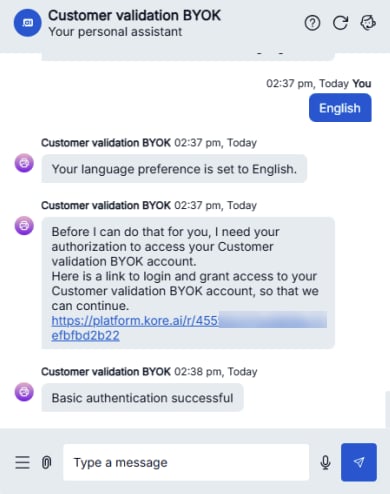 If successful, the system redirects you and displays "Basic authentication successful." This confirms your encrypted credentials are correctly stored and retrieved using your CMK.
***
**Related resources**
[AWS KMS Developer Guide](https://docs.aws.amazon.com/kms/)
If successful, the system redirects you and displays "Basic authentication successful." This confirms your encrypted credentials are correctly stored and retrieved using your CMK.
***
**Related resources**
[AWS KMS Developer Guide](https://docs.aws.amazon.com/kms/)