> ## Documentation Index
> Fetch the complete documentation index at: https://koreai.mintlify.site/llms.txt
> Use this file to discover all available pages before exploring further.
# Apps Management Module
[Back to Admin Console](/ai-for-service/administration/overview)
In the **Apps Management** module of the Admin Console, you can deploy the apps developed by your company developers from the App Builder tool. When the developer develops an app, it can be published for approval and deployment by the Admin from the Apps Management section. From this section, you can:
* Approve or reject apps sent for deployment approval,
* Deploy some or all of the tasks defined for an app,
* Assign the deployed apps to users, or groups of users in your company .
## Managing Apps
On the **Apps** page in the **App Management** module of the Admin Console, you can manage deployed Apps and App tasks that are approved by Admin on the **Deployment Requests** page. Only approved Apps are displayed on the **Apps** page.
 In this page, you can review and modify App settings such as channels and email settings, and manage approved tasks for the Apps.
### Apps Columns
The following list describes the columns displayed for each consumer app.
| Column | Description |
| ------------ | -------------------------------------------------------------------- |
| App Name | Displays the name of the App, created by the user. |
| Published By | Displays the emailId of the developer that created or owns this App. |
| App Type | Displays the type of app. |
| Channels | Displays the channels where app will be accessible for the Users. |
| Plan Type | The plan under which the App was published. |
### About the Action Bar
The Action bar provides commands to manage and navigate large lists efficiently.
You can use the Sort By option to organize apps by App Name in alphabetical order; by default, apps are sorted in descending order of creation date, and selecting None removes any applied sorting.
The Search field helps you quickly locate specific users, groups, spaces, or apps. Enter at least three characters for find-as-you-type results or press Enter to search. While you can include unlimited search terms, only the first 20 characters of each term are considered when generating results. To view all entries, clear the search field, and then press the **Enter** key.
### App Settings
As an Admin, you need to manage your deployed apps to your customers. In App Settings, you can view the deployment model type, add or remove channels that your customers can use to access your App, and if needed, send an email to the developer that published the App for approval, for example, to request a change to the App.
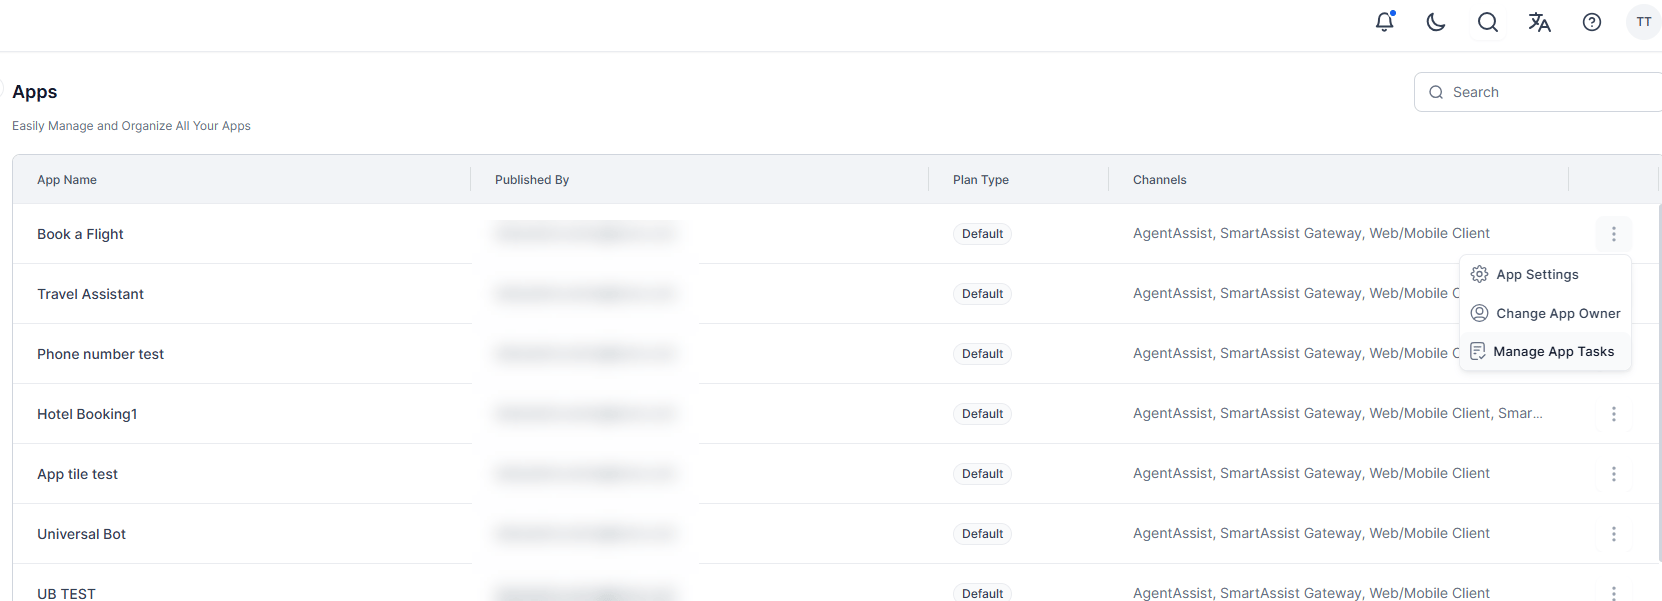
1. On the **Apps** page, select the **Ellipses** icon for the App, and then select **App settings**.
2. The **App settings** dialog is displayed as shown in the following illustration.\\
In this page, you can review and modify App settings such as channels and email settings, and manage approved tasks for the Apps.
### Apps Columns
The following list describes the columns displayed for each consumer app.
| Column | Description |
| ------------ | -------------------------------------------------------------------- |
| App Name | Displays the name of the App, created by the user. |
| Published By | Displays the emailId of the developer that created or owns this App. |
| App Type | Displays the type of app. |
| Channels | Displays the channels where app will be accessible for the Users. |
| Plan Type | The plan under which the App was published. |
### About the Action Bar
The Action bar provides commands to manage and navigate large lists efficiently.
You can use the Sort By option to organize apps by App Name in alphabetical order; by default, apps are sorted in descending order of creation date, and selecting None removes any applied sorting.
The Search field helps you quickly locate specific users, groups, spaces, or apps. Enter at least three characters for find-as-you-type results or press Enter to search. While you can include unlimited search terms, only the first 20 characters of each term are considered when generating results. To view all entries, clear the search field, and then press the **Enter** key.
### App Settings
As an Admin, you need to manage your deployed apps to your customers. In App Settings, you can view the deployment model type, add or remove channels that your customers can use to access your App, and if needed, send an email to the developer that published the App for approval, for example, to request a change to the App.
1. On the **Apps** page, select the **Ellipses** icon for the App, and then select **App settings**.
2. The **App settings** dialog is displayed as shown in the following illustration.\\
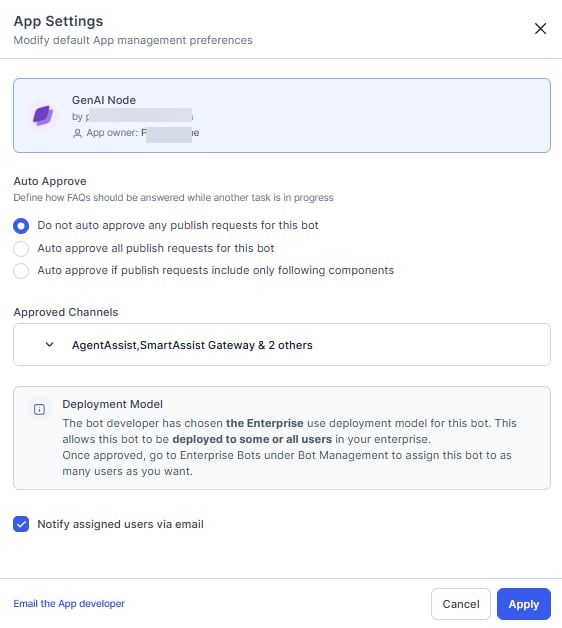 3. **Auto Approve** Settings- In the **Auto Approve** dialog, There are three settings to choose from:
1. Don't approve any publish requests for this App- all future publish from this App need approvals by the Admin.
2. Auto approve all publish requests for this App- any future publish from this App will be approved automatically.
3. Auto approve if publish requests include only following components for all other requests Admin needs to approve it:
* **New Channels** – Automatically approve the App for channels are added.
* **New Tasks** – Automatically approve the App when new tasks are published.
* **Channel Upgrades** – Automatically approve the App when existing approved channels are upgraded.
* **Task Upgrades** – Automatically approve the App when existing tasks are upgraded.
4. In the **Deployment model** field, you can view the read-only deployment type.
5. In the **Approved channels** field, you can view and modify the channels available or deployed. Select the **Expand** icon to display the **Approved channels** dialog. Select or clear one or more channels defined for this app to be available to the users, and then select **Done**. At least one channel must be enabled.
6. Select Email the App developer ( ***\< Developer Name >*** ) to open your default mail application to email a message to the App developer.
7. Select **Apply** to save the changes.
### Change App Owner
You can change the ownership of the App. For that you need to
1. assign a new role to the current owner and
2. select the new Owner from the list of developers.
### Manage App Tasks
After you approve and deploy your Apps published in your account by a developer, you may decide to suspend a task or redeploy a suspended task, or activate an inactive task published by the developer.
#### About Suspended Tasks
When you suspend a task in the Apps Admin console, end-user can't access that task of the app. The app won't send alerts nor respond to action requests, and an alert is sent to all users configured for the task that the task is temporarily suspended. When the task is set back to **Active**, then an alert is sent to all users as well. While a task is suspended, a developer can still access the task in App Builder and create and publish an upgrade, but the App task remains suspended until the Apps Admin explicitly changes the status back to **Active**. Complete the steps in the following procedure to deploy or suspend tasks for an approved App.
1. On the **Consumer Apps** page in the **Apps Management** module, select the **Ellipses** icon for the App that you want to modify deployed tasks for, and then select **Manage App tasks**. The **Manage App tasks** dialog is displayed as shown in the following illustration.
2. In the **App tasks** field, select the **Expand** to display the available and deployed tasks. The **App tasks** dialog is displayed as shown in the following example.
3. **Auto Approve** Settings- In the **Auto Approve** dialog, There are three settings to choose from:
1. Don't approve any publish requests for this App- all future publish from this App need approvals by the Admin.
2. Auto approve all publish requests for this App- any future publish from this App will be approved automatically.
3. Auto approve if publish requests include only following components for all other requests Admin needs to approve it:
* **New Channels** – Automatically approve the App for channels are added.
* **New Tasks** – Automatically approve the App when new tasks are published.
* **Channel Upgrades** – Automatically approve the App when existing approved channels are upgraded.
* **Task Upgrades** – Automatically approve the App when existing tasks are upgraded.
4. In the **Deployment model** field, you can view the read-only deployment type.
5. In the **Approved channels** field, you can view and modify the channels available or deployed. Select the **Expand** icon to display the **Approved channels** dialog. Select or clear one or more channels defined for this app to be available to the users, and then select **Done**. At least one channel must be enabled.
6. Select Email the App developer ( ***\< Developer Name >*** ) to open your default mail application to email a message to the App developer.
7. Select **Apply** to save the changes.
### Change App Owner
You can change the ownership of the App. For that you need to
1. assign a new role to the current owner and
2. select the new Owner from the list of developers.
### Manage App Tasks
After you approve and deploy your Apps published in your account by a developer, you may decide to suspend a task or redeploy a suspended task, or activate an inactive task published by the developer.
#### About Suspended Tasks
When you suspend a task in the Apps Admin console, end-user can't access that task of the app. The app won't send alerts nor respond to action requests, and an alert is sent to all users configured for the task that the task is temporarily suspended. When the task is set back to **Active**, then an alert is sent to all users as well. While a task is suspended, a developer can still access the task in App Builder and create and publish an upgrade, but the App task remains suspended until the Apps Admin explicitly changes the status back to **Active**. Complete the steps in the following procedure to deploy or suspend tasks for an approved App.
1. On the **Consumer Apps** page in the **Apps Management** module, select the **Ellipses** icon for the App that you want to modify deployed tasks for, and then select **Manage App tasks**. The **Manage App tasks** dialog is displayed as shown in the following illustration.
2. In the **App tasks** field, select the **Expand** to display the available and deployed tasks. The **App tasks** dialog is displayed as shown in the following example.
 3. Select or clear the checkbox for the task to suspend a task or deploy a task, and then select **Confirm**.
4. In the **Manage apps tasks** dialog, select **Confirm**.
The *App status changed successfully* message is displayed at the top of the page.
### App Plan
You can view and if needed change the subscribed plan. [See here for details](/ai-for-service/administration/billing).
### Restore
A published app with active dialog tasks can be restored within 30 days following the deletion date.
On the **Consumer Apps** page in the **Apps Management** module, select the **Ellipses** icon for the App that you want to restore, and then select **Restore**.
## Deploying Apps
As the Apps Admin, you can manage the apps permission and consumption. After a developer publishes a custom app from the Kore.ai App Builder tool to the Enterprise page at the Kore.ai App Store, the app is displayed on the **Deployment Requests** page. Apps are'nt available to any users in your company until you approve the app, and then assign that app to one or more users, or customers for your company, depending on the app deployment type defined as either for **Enterprise use** or **Consumer use**.
You can select the following options to approve the apps in the App Management module:
* If Apps are set to be auto-approved by the Apps Admin in the **Apps Management** module **Preferences** page, when published by the developer, these Apps are immediately approved and deployed and aren't displayed on the **Deployment Requests** page.
* If the apps are set to **Hold all deployment requests for manual admin approval. App can't be used outside the developer environment until approved**. In this case, the Apps Admin has to [approve the apps manually](#approve-app-manually) and assign users for apps.
### Deployment Page Controls
For each App displayed on the **Deployment Requests** page, the following information and controls are displayed:
* **App Icon** – The icon displayed to the end-user in the client to identify the app.
* **App Name** – The name of the app.
* **App Type** – The type of the app – standard, universal etc..
* **Tasks** – number of tasks within the App
* **Version** – The type of app for deployment. One of:
* **New** – A new app that has never been deployed.
* **Upgrade** – A previously deployed app that was upgraded and ready to be deployed.
* **Purpose** – The intended audience for the app. One of:
* **Consumer Use** – For enterprise customers and consumers.
* **Enterprise Use** – For specified managed users of your enterprise.
* **Requested by** – The name of the developer submitting the app for approval.
* **Requested on** – The date the developer submitted the app for approval.
* **Reject/Publish** icons which will be visible on the hover over the row.
#### To approve a app
1. On the **Deployment Requests** page in the **Apps Management** module, hover over the App you want to approve and select the approve.
2. Optionally, select **App** to review tasks pending for approval for this app, if any.
3. On selecting the App the **App Publish** page is displayed with the following additional information
1. **Dialog Task** details – names, language supported and version
2. **Natural Language** configuration
3. **Channels** enabled for publishing
4. **API Extensions** configured if any
5. **Settings** – the app settings.
6. **Publish Comments** entered by the developer
4. Review and select the **NEXT** button. For Apps awaiting approval for **Update**, you will see the **Publish** button instead of Next.
5. On successful payment, the **App Approval: Success** dialog is displayed.
6. Select **Continue**. The **Enterprise Apps** or the **Consumer Apps** page is displayed, depending on the **Deployment model** type specified for the approved App.
After a task is approved and deployed, the App is available to customers for Apps with deployment model set to **Consumer use**. However, the task is still not available to enterprise users until the Apps Admin assigns the task to users or groups on the **Enterprise Apps** page in the **App Management** module in the Apps Admin Console. For more information, see Managing Deployed Enterprise Apps or Managing Deployed Consumer Apps.
#### To reject a app
You may decide not to approve a App for use by employees or customers of the company. To return the App to the developer for an update, you can reject the App mentioning a reason. When you reject a app, it's removed from the **Deployments Request** page, and in the App Builder tool, the status of the task is changed from Published to Configured. The developer can then make changes and re-publish the App for your approval.
1. On the **Deployment Requests** page in the **Apps Management** module, hover over the App you want to reject to view the reject and publish icons.
2. Optionally, select **App Details** to view the App details and select the **Reject** button.
3. The **Reject app** dialog is displayed.
4. Select or clear the tasks that you want to reject, and then in the **Provide a reason** text field, enter the reason that you are rejecting the tasks.
5. Select **Reject**.
The App rejected successfully message is displayed at the top of the page, and the App is removed from the **Deployment Requests** page.
### Automate Deployment Requests
Steps to automate deployment requests:
1. In the **Deployment Requests** section, select **Automatically approve all new deployment requests**. When deployment requests are automatically approved, the **Enterprise App Assignments** section is available.
2. Select **Save**.
### Automate App Assignments
App assignments can't be configured unless deployment requests are set to automate.
Steps to automate app assignments:
1. In the **Enterprise Apps Assignments** section, select **Automatically assign all approved apps, their tasks, and channels**.
2. Select **Save**.
When deployment requests and App assignments are automatic, managed users are assigned new Apps and App Task immediately after the enterprise developer publishes the App or App task.
### Approve App Manually
Steps to approve apps manually:
1. In the **Enterprise Apps Assignments** section, select **Hold all deployment requests for manual admin approval. App can't be used outside the developer environment until approved**.
2. Select **Save**.
When deployment requests and App assignments are manual, the admin has to approve the app for users whenever the enterprise developer publishes the App or App task.
## Deleted Apps
The permanently deleted apps are displayed on this page.
The following list describes the columns displayed for each deleted app.
| Column | Description |
| --------------------- | -------------------------------------------------- |
| App Name | Displays the name of the app, created by the user. |
| Deletion requested by | Displays the name of the user who deleted the App. |
| Deletion Request | Displays the date when the user deleted the app. |
| App Creation Date | Displays the date when the user created the app. |
| Deletion Date | Displays the date of actual deletion. |
3. Select or clear the checkbox for the task to suspend a task or deploy a task, and then select **Confirm**.
4. In the **Manage apps tasks** dialog, select **Confirm**.
The *App status changed successfully* message is displayed at the top of the page.
### App Plan
You can view and if needed change the subscribed plan. [See here for details](/ai-for-service/administration/billing).
### Restore
A published app with active dialog tasks can be restored within 30 days following the deletion date.
On the **Consumer Apps** page in the **Apps Management** module, select the **Ellipses** icon for the App that you want to restore, and then select **Restore**.
## Deploying Apps
As the Apps Admin, you can manage the apps permission and consumption. After a developer publishes a custom app from the Kore.ai App Builder tool to the Enterprise page at the Kore.ai App Store, the app is displayed on the **Deployment Requests** page. Apps are'nt available to any users in your company until you approve the app, and then assign that app to one or more users, or customers for your company, depending on the app deployment type defined as either for **Enterprise use** or **Consumer use**.
You can select the following options to approve the apps in the App Management module:
* If Apps are set to be auto-approved by the Apps Admin in the **Apps Management** module **Preferences** page, when published by the developer, these Apps are immediately approved and deployed and aren't displayed on the **Deployment Requests** page.
* If the apps are set to **Hold all deployment requests for manual admin approval. App can't be used outside the developer environment until approved**. In this case, the Apps Admin has to [approve the apps manually](#approve-app-manually) and assign users for apps.
### Deployment Page Controls
For each App displayed on the **Deployment Requests** page, the following information and controls are displayed:
* **App Icon** – The icon displayed to the end-user in the client to identify the app.
* **App Name** – The name of the app.
* **App Type** – The type of the app – standard, universal etc..
* **Tasks** – number of tasks within the App
* **Version** – The type of app for deployment. One of:
* **New** – A new app that has never been deployed.
* **Upgrade** – A previously deployed app that was upgraded and ready to be deployed.
* **Purpose** – The intended audience for the app. One of:
* **Consumer Use** – For enterprise customers and consumers.
* **Enterprise Use** – For specified managed users of your enterprise.
* **Requested by** – The name of the developer submitting the app for approval.
* **Requested on** – The date the developer submitted the app for approval.
* **Reject/Publish** icons which will be visible on the hover over the row.
#### To approve a app
1. On the **Deployment Requests** page in the **Apps Management** module, hover over the App you want to approve and select the approve.
2. Optionally, select **App** to review tasks pending for approval for this app, if any.
3. On selecting the App the **App Publish** page is displayed with the following additional information
1. **Dialog Task** details – names, language supported and version
2. **Natural Language** configuration
3. **Channels** enabled for publishing
4. **API Extensions** configured if any
5. **Settings** – the app settings.
6. **Publish Comments** entered by the developer
4. Review and select the **NEXT** button. For Apps awaiting approval for **Update**, you will see the **Publish** button instead of Next.
5. On successful payment, the **App Approval: Success** dialog is displayed.
6. Select **Continue**. The **Enterprise Apps** or the **Consumer Apps** page is displayed, depending on the **Deployment model** type specified for the approved App.
After a task is approved and deployed, the App is available to customers for Apps with deployment model set to **Consumer use**. However, the task is still not available to enterprise users until the Apps Admin assigns the task to users or groups on the **Enterprise Apps** page in the **App Management** module in the Apps Admin Console. For more information, see Managing Deployed Enterprise Apps or Managing Deployed Consumer Apps.
#### To reject a app
You may decide not to approve a App for use by employees or customers of the company. To return the App to the developer for an update, you can reject the App mentioning a reason. When you reject a app, it's removed from the **Deployments Request** page, and in the App Builder tool, the status of the task is changed from Published to Configured. The developer can then make changes and re-publish the App for your approval.
1. On the **Deployment Requests** page in the **Apps Management** module, hover over the App you want to reject to view the reject and publish icons.
2. Optionally, select **App Details** to view the App details and select the **Reject** button.
3. The **Reject app** dialog is displayed.
4. Select or clear the tasks that you want to reject, and then in the **Provide a reason** text field, enter the reason that you are rejecting the tasks.
5. Select **Reject**.
The App rejected successfully message is displayed at the top of the page, and the App is removed from the **Deployment Requests** page.
### Automate Deployment Requests
Steps to automate deployment requests:
1. In the **Deployment Requests** section, select **Automatically approve all new deployment requests**. When deployment requests are automatically approved, the **Enterprise App Assignments** section is available.
2. Select **Save**.
### Automate App Assignments
App assignments can't be configured unless deployment requests are set to automate.
Steps to automate app assignments:
1. In the **Enterprise Apps Assignments** section, select **Automatically assign all approved apps, their tasks, and channels**.
2. Select **Save**.
When deployment requests and App assignments are automatic, managed users are assigned new Apps and App Task immediately after the enterprise developer publishes the App or App task.
### Approve App Manually
Steps to approve apps manually:
1. In the **Enterprise Apps Assignments** section, select **Hold all deployment requests for manual admin approval. App can't be used outside the developer environment until approved**.
2. Select **Save**.
When deployment requests and App assignments are manual, the admin has to approve the app for users whenever the enterprise developer publishes the App or App task.
## Deleted Apps
The permanently deleted apps are displayed on this page.
The following list describes the columns displayed for each deleted app.
| Column | Description |
| --------------------- | -------------------------------------------------- |
| App Name | Displays the name of the app, created by the user. |
| Deletion requested by | Displays the name of the user who deleted the App. |
| Deletion Request | Displays the date when the user deleted the app. |
| App Creation Date | Displays the date when the user created the app. |
| Deletion Date | Displays the date of actual deletion. |